
CH633B3 - Hob CANDY - Free user manual and instructions
Find the device manual for free CH633B3 CANDY in PDF.

| Product type | Ceramic glass hob |
| Brand | CANDY |
| Model | CH633B3 |
| Number of burners | 3 burners (including one 3-zone expandable burner) |
| Burner type | Hilight rapid heating burners |
| Power supply | 230 V single-phase or three-phase (220-240 V ~ / 380-415 V 2N~) |
| Maximum power | Variable according to burner (e.g., 1800 W for a standard burner) |
| Accelerator function (Sprinter) | Yes, up to 15% less cooking time |
| Programmable timer | Yes, from 0 to 99 minutes with automatic shut-off |
| Child lock | Yes (touch controls) |
| Residual heat indicator | Yes (display "H") |
| Surface material | Ceramic glass |
| Cleaning | Specific ceramic glass cleaner + scraper |
| Installation type | Built-in (cut-out in worktop) |
| Cut-out dimensions (approx.) | Approximately 560 x 490 mm (not specified, standard estimate) |
| Net weight (approx.) | 5.5 kg (not specified, standard estimate) |
| Safety | Automatic shut-off, lock, overheating protection |
| Technical support | Contact CANDY after-sales service |
| Warranty | According to the warranty card provided |
Frequently Asked Questions - CH633B3 CANDY
User questions about CH633B3 CANDY
0 question about this device. Answer the ones you know or ask your own.
Ask a new question about this device
Download the instructions for your Hob in PDF format for free! Find your manual CH633B3 - CANDY and take your electronic device back in hand. On this page are published all the documents necessary for the use of your device. CH633B3 by CANDY.
USER MANUAL CH633B3 CANDY
- General warnings 6
- Installation 6
- Built-in 6
- Electrical connection 6
- Presentation according to model 7
6.Hob cookware advice 7 - Instructions for use 8
- Maintenance and cleaning 9
- Problem solving 10
- Aftercare 10
- Protection of the environment 10
CONTENIDO ES
Identification Plate (located under the hob's bottom casing)
We recommend you keep the instructions for installation and use for later reference, and before installing the hob, note its serial number in case you need to get help from the after sales service.
- It is strongly recommended to keep children away from the cooking zones while they are in operation or when they are switched off, so long as the residual heat indicator is on, in order to prevent the risks of serious burns.
- When cooking with fats or oils, take care always to watch the cooking process as heated fats and oils can catch fire rapidly.
- Aluminium foil and plastic pans must not be placed on heating zones.
- After every use, some cleaning of the hob is necessary to prevent the build up of dirt and grease. If left, this is recooked when the hob is used and burns giving off smoke and unpleasant smells, not to mention the risks of fire propagation.
- It is advisable not to stare directly at the halogen elements.
- Do not touch the heat zones during operation or for a while after use.
- Never cook food directly on the glass ceramic hob. Always use the appropriate cookware.
- Always place the pan in the centre of the unit that you are cooking on.
- Do not use the surface as a cutting board.
- Do not slide cookware across the hob.
- Do not store heavy items above the hob. If they drop onto the hob, they may cause damage.
- Do not use the hob as a working surface.
- Do not use the hob for storage of any items.
- In the unlikely event of a surface crack appearing, do not use the hob.
Immediately disconnect the hob from the electrical power supply and call the After Sales Service - Never use a steam or high pressure spray to clean the appliance.
This appliance is not intended for use by persons (including children) with reduced physical, sensory or mental capabilities, or lack of experience and knowledge, unless they have been given supervision or instruction concerning use of the appliance by a person responsible for their safety. - Children should be supervised to ensure that they do not play with the appliance.
We are constantly striving to improve product quality and as such may modify appliances to incorporate the latest technical improvements.
CE Appliance complies with European Directives 73/23/EEC and 89/336/EEC, replaced by 2006/95/EC and 2004/108/EC, and subsequent amendments.
2. INSTALLATION
Installing a domestic appliance can be a complicated operation which if not carried out correctly, can seriously affect consumer safety. It is for this reason that the task should be undertaken by a professionally qualified person who will carry it out in accordance with the technical regulations in force. In the event that this advice is ignored and the installation is carried out by an unqualified person, the manufacturer declines all responsibility for any technical failure of the product whether or not it results in damage to goods or injury to individuals.
3. BUILT-IN
The furniture in which your hob will be installed and all adjacent furniture, should be made from materials that can withstand high temperatures. In addition, all decorative laminates should be fixed with heat-resistant glue.
- A watertight seal is supplied with the hob.
Before fitting:
- turn the hob upside down, with the glass surface facing downwards.
Make sure the glass is protected. - fit the seal round the hob.
- make sure that it is correctly fitted to avoid any leakage into the supporting cabinet.
- Leave a gap of at least 5cm between the appliance and the vertical sides of the adjacent furniture.
- If, when installing the hob, the lower hob face is adjacent to an area normally accessible when handling or cleaning, fit a partition 1cm below the base of the hob to avoid any risk of scorching or damage.
4. ELECTRICAL CONNECTION
"The installation must conform to the standard directives." The manufacturer declines all responsibility for any damage that may be caused by unsuitable or unreasonable use.
Warning: we cannot be held responsible for any incident or its consequences that may arise during the use of an appliance not linked to the earth, or linked to an earth whose continuity is defective.
- Always check before any electrical operation, the supply tension shown on the electricity meter, the adjustment of the circuit-breaker, the continuity of the connection to earth to the installation and that the fuse is suitable.
- The electrical connection to the installation should be made via a socket with a plug with earth, or via an omnipole cut-out switch.
If the appliance has a socket outlet, it must be installed so that the socket outlet is accessible.
- The yellow/green wire of the power supply cable must be connected to the earth of both power supply and appliance terminals.
- Any queries regarding the power supply cord should be referred to After Sales Service or a qualified technician.
ATTENTION:
should it be necessary to replace the supply cord, connect the wire in accordance with the following colours/codes:
BLUE
BROWN
YELLOW-GREEN
- NEUTRAL (N)
- LIVE (L)
-EARTH(
The hob is fitted with a power supply cord which allows it to be connected only to a power supply of 220-240 V between phases or between phase and neutral.
- Connect to a socket, to choose the correct fuse, you must refer on the table.
It is however possible to connect the hob to :
. Three phase 220-240 V3~
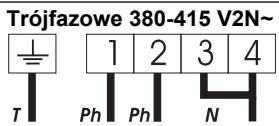
. Three phase 380-415 V2N~
To proceed to the new connection, you must adhere the following instructions.
- Before making the connection, make sure that the installation is protected by a suitable fuse, see table, and that it is fitted with wires of a large enough section to supply the appliance normally.
-
Turn over the hob, glass side against the work top, taking care to protect the glass.
-
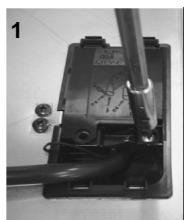
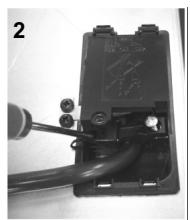
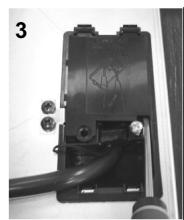
Open the cover in the following sequence:
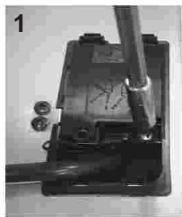
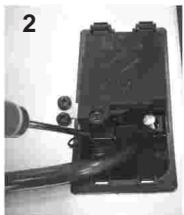
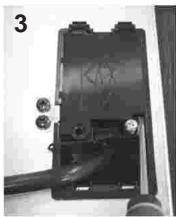
- unscrew the cable clamp "1".
- find the two tabs located on the sides,
- put the blade of a flat screw-driver in front of each tab "2" e "3", push in and press,
remove the cover.
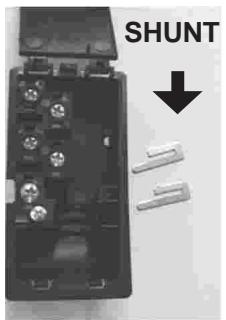
To release the power supplying cord.
- remove the screws retaining the terminal block which contains the shunt bars and the conductors of the supply cord,
-
Pull out the supply cord.
-
Operations to be carried out to make a new connection :
-
Choose the power supply cable in accordance with the recommendations in the table.
- Pass the power supply cable into the clamp.
- Strip the end of each conductor of the supply cord on a 10mm length, by taking in account the requested length of the cord for the connection to the terminal block.
- According to the installation and with the help of shunt bars which you should have recovered in the first operation, fix the conductor as shown on the chart.
Fix the cover. - Screw the cable clamp.
Note: make sure the terminal board screws are tight.
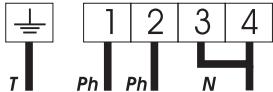
Connection to the terminals on the terminal block
| LAY OUT“5” | LAY OUT“2-3” | LAY OUT“4” | LAY OUT“1” | |
| MONOPHASE or TWO PHASES 220-240 V~ | ||||
| Fuse | 25 A | 25 A | 25 A | 20 A |
| Cable HO5V2V2F | 3x2,5 mm² | 3x2,5 mm² | 3x2,5 mm² | 3x2,5 mm² |
| THREE PHASES 220-240 V3~ | ||||
| Fuse | 25 A | 20 A | 25 A | 20 A |
| Cable HO5V2V2F | 4x2,5 mm² | 4x2,5 mm² | 4x2,5 mm² | 4x2,5 mm² |
| THREE PHASES 380-415 V2N~ | ||||
| Fuse | 16 A | 20 A | 20 A | 16 A |
| Cable HO5V2V2F | 4x1,5 mm² | 4x2,5 mm² | 4x2,5 mm² | 4x1,5 mm² |
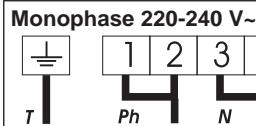
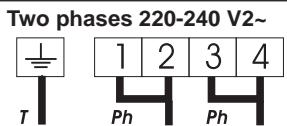
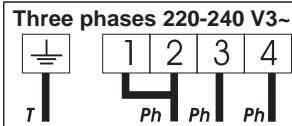
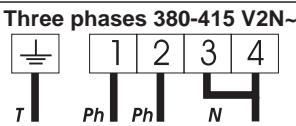
Ph = Phase
N = Neutral
T = Earth
5. PRESENTATION
- hilight zone :
a metallic conductor strip is spread uniformly over the whole surface unit. It is effective within 3 seconds and is suitable for steady, homogeneous and also sustained cooking.
The glass-ceramic hob benefits from greater heat output which is generated by the hilight cooking zones thereby accelerating the cooking process. Modifications to the design of the hob have not affected the capacity of the glass to withstand high temperatures, but they have improved controllability.
With the "Sprinter" facility, reduced cooking times of up to 15% can be achieved, depending upon the method of cooking and the type of saucepans being used.
6. HOB COOKWARE ADVICE
Using good quality cookware is critical for setting the best performance from your hob.

- Always use good quality cookware with perfectly flat and thick bases :
using this type of cookware will prevent hot spots that cause food to stick. Thick metal pots and pans will provide an even distribution of heat. - Ensure that the base of the pot or pan is dry : when filling pans with liquid or using one that has been stored in the refrigerator, ensure that the base of the pan is completely dry before placing it on the hob. This will help to avoid staining the hob.
- Use pans whose diameter is wide enough to completely cover the surface unit : the size of the pan should be no smaller than the heating area. If it is slightly wider the energy will be used at its maximum efficiency.
THE CHOICE OF COOKWARE - The following information will help you to choose cookware which will give good performance.
Stainless Steel : highly recommended. Especially good with a sandwich clad base. The sandwich base combines the benefits of stainless steel (appearance, durability and stability) with the advantages of aluminium or copper (heat conduction, even heat distribution).
Aluminium : heavy weight recommended. Good conductivity. Aluminium residues sometimes appear as scratches on the hob, but can be removed if cleaned immediately.
Because of its low melting point, thin aluminium should not be used.
Cast Iron : usable, but not recommended. Poor performance. May scratch the surface.
Copper Bottom / stoneware: heavy weight recommended. Good performance, but copper may leave residues which can appear as scratches. The residues can be removed, as long as the hob is cleaned immediately. However, do not let these pots boil dry. Overheated metal can bond to glass hobs. An overheated copper pot will leave a residue that will permanently stain the hob.
Porcelain/enamel : Good performance only with a thiny smooth, flat base.
Glass-ceramic : not recommended. Poor performance. May scratch the surface.
7. USE
- After powering up the hob, wait some seconds to activate the electronic controls.
- Press the button ①.
Electronic control of the hob is activated. In each display zone the heat level is displayed and the control LED blinks.
- After 20 seconds whithout use, the electronic control goes off and the starting operation has to be repeated.
- STARTING A COOKING ZONE
- Press the selection button of the required cooking zone. In the display zone, the control LED is on steady. It shows that the zone is live.
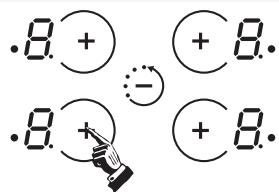
- Press the - or + button to select a heat level between 1 and 9. Hold down the + or - button and the heat level increases or decreases gradually.
The following examples are for information only. Personal experience should then let you adapt these settings to your taste and habits.
0 Off
1 )
2 ).... Melting heat
3 Keeping hot
4 Heating up
5 Thawing, stewing, full cooking, low temperature cooking
6 Cooking without lid
7 Frying, meat browning and roasting
8 High temperature cooking and roasting, seizing
9 Frying, boiling large quantities of water.....
- STOPPING A COOKING ZONE
- Press the selection button of the required cooking zone.
- Press the - button to display heat level . Now the zone goes off, the indicator goes off after 10 seconds.
- To stop rapidly, press the - and + buttons at the same time. The heat level automatically goes down to . The cooking zone goes off.
GENERAL STOP
The cooking zones and the timer can be stopped at any moment by pressing the On-Off button.

- RESIDUAL HEAT INDICATOR
The control panel tells the user when the surface temperature of the cooking zones exceeds about 60^ , by the following displaying: H. When the temperature goes back below 60^ , the H display goes off.
For ending the cooking, we advise switching off the cooking zone and using the residual heat of the zone to finish cooking gently. N.B. After a cut in the current, the residual heat indicator disappears completely, even if the surface temperature exceeds 60^ .
The cooking zone with two zones is fitted certain models. It can be either concentric or extendable.
It is active in totality when the cooking zone is in function, the control led of the additional cooking is displayed.
To desactivate the additional cooking zone :
- Press on the additional cooking zone button. The corresponding control led for the additional cooking zone goes off when it is deactivated.
To re-activate the additional cooking zone :
- Press on the additional cooking zone button. The corresponding control led for the additional cooking zone is active.
The additional cooking zone is fitted only one model. It is active in totality when the cooking zone is in function; the two control led of the additional cooking are displayed.
To desactivate the additional cooking zones :
- Press one time the additional cooking zone button . The corresponding control led for the external additional cooking zone goes off when it is deactivated.
- Press two times the additional cooking zone button () . The corresponding control led for the central additional cooking zone goes off when it is deactivated.
To re-activate the additional cooking zones :
- Press on the additional cooking zone button, one or two times on the additional cooking zone button, according to the need.
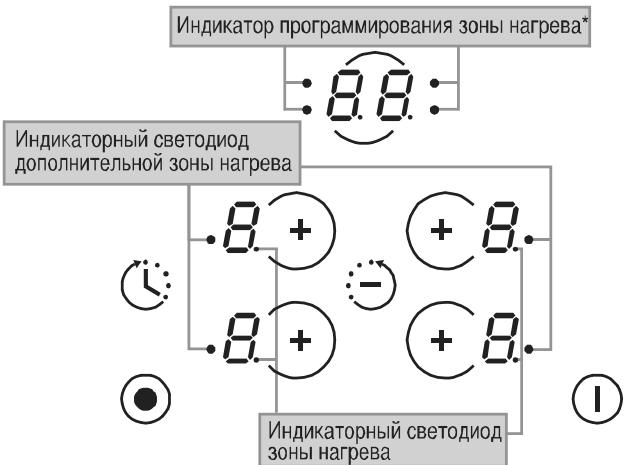
- PROGRAMMING A COOKING ZONE (according to the model)
Every cooking zone can be programmed for a maximum time of 99 minutes.
- Start the required zone by following the previous instructions. The control LED near the heat level must be displayed, it shows that the zone is live.
- Press the Timer button.
The zone mark around the timer display shows the controlled zone.
- Press again on the timer button to select a time in minutes between 0 and 99 minutes or press on the "-" button to decrease the time between 60 minutes and 0.
the programmed time can be modified at any moment reactivating the cooking zone and then the timer button.
When the time is run, the cooking zone goes off automatically and an audible beep sounds for 1 minute, press the timer button to stop it.
the time can be used alone as reminder, it will ring at the end of the programmed time.
The locking function prevents the children from starting the hob. It is also used for cleaning the control strip as the controls can be locked without the hob being on.
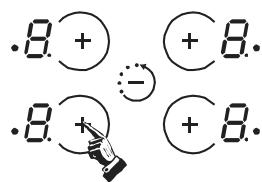
To lock the hob :
- Press the on/off button ①.
- Press simultaneously " - " button and " + " button of the front right zone (CH 633 front left zone), and then press again on the " + " button of this zone. The hob is locked, the locking indicator " L " is displayed on all zones for 20 seconds.
To unlock the hob :
- Press the on/off button ①. The locking indicator "L" is displayed on all zones.
- Press simultaneously the " - " button and the " + " button of the front right zone (CH 633 front left zone), and then press again on the " - " button of this zone.
The hob is unlocked.
Starting the fast heater
-
Press the on/off button (1).
-
Start the required zone, press the "+" button to obtain position "9", release the button briefly and press again the "+" button; the display alternates showing "A" "fast heater" and "9" heat level.
- If necessary reduce to the required heat position, the display alternates showing "A" "fast heater" and the new heat position.
| Cooking position | Power released (%) | Time of fast heater (minutes) | Maximum operating time before automatic cut off* |
| 0 | 0 % | 0 | 0 H |
| 1 | 3 % | 1 | 6 H |
| 2 | 6 % | 3 | 6 H |
| 3 | 11 % | 5 | 5 H |
| 4 | 16 % | 6,5 | 5 H |
| 5 | 19 % | 8,5 | 4 H |
| 6 | 32 % | 2,5 | 1,5 H |
| 7 | 45 % | 3,5 | 1,5 H |
| 8 | 65 % | 4,5 | 1,5 H |
| 9 | 100 % | 0 | 1,5 H |
E.g. 1800 W zone at position 6 = 32% of 1800 W power released When the "Fast heater" is on, the zone supplies 1800 W power for 2.5 minutes, and adjusts to 576 W after this time.
* For increased safety, the cooking zones cut off automatically if they are left on too long. The cut off depends on the heat level used.
To desactivate the fast heater
- Switch on the cooking zone, press the " - " button to come back to a normal heat level, decrease to the heat level required or to " 0 " to stop the cooking zone.
8. CLEANING AND MAINTENANCE
- Before carrying out any maintenance work on the hob, allow it to cool down.
- Only products, (creams and scrapers) specifically designed for glass ceramic surfaces should be used. They are obtainable from hardware stores.
- Avoid spillages, as anything which falls on to the hob surface will quickly burn and will make cleaning more difficult.
- It is advisable to keep away from the hob all substances which are liable to melt, such as plastic items, sugar, or sugar-based products.
MAINTENANCE:
- Place a few drops of the specialised cleaning product on the hob surface.
- Rub any stubborn stains with a soft cloth or with slightly damp kitchen paper.
- Wipe with a soft cloth or dry kitchen paper until the surface is clean.
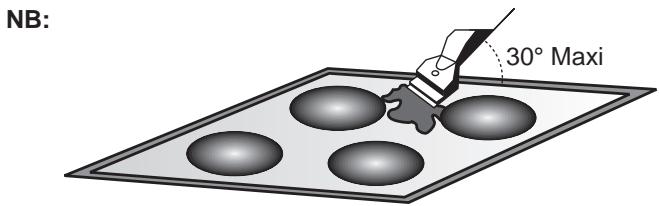
If there are still some stubborn stains:
- Place a few more drops of specialised cleaning fluid on the surface.
- Scrape with a scraper, holding it at an angle of 30^ to the hob, until the stains disappear.
- Wipe with a soft cloth or dry kitchen paper until the surface is clean.
- Repeat the operation if necessary.
A FEW HINTS:
Frequent cleaning leaves a protective layer which is essential to prevent scratches and wear. Make sure that the surface is clean before using the hob again. To remove marks left by water, use a few drops of white vinegar or lemon juice. Then wipe with absorbent paper and a few drops of specialised cleaning fluid. The control knobs can be removed for a complete cleaning. However, you must care not to let any liquid go into the open zones, and then to push the knobs fully on fitting back. The glass ceramic surface will withstand scraping from flat-bottomed cooking vessels, however, it is always better to lift them when moving them from one zone to another.
Do not use a sponge which is too wet.
Never use a knife or a screwdriver.
A scraper with a razor blade will not damage the surface, as long as it is kept at an angle of 30^ .
Never leave a scraper with a razor blade within the reach of children.
Never use abrasive products or scouring powders.
- The metal surround : to safely clean the metal surround wash with soap and water, rinse, then dry with a soft cloth.
9. PROBLEM SOLVING
The cooking zones do not simmer or only fry gently.
- Only use flat-bottomed pans. If light is visible between the pan and the hob, the zone is not transmitting heat correctly.
- The pan bottom should fully cover the diameter of the selected zone.
The cooking is too slow
- Unsuitable pans are being used. Only use flatbottomed utensils, that are heavy and have a diameter at least the same as the cooking zone.
Small scratches or abrasions on the hob's glass surface - Incorrect cleaning or rough-bottomed pans are used; particles like grains of sand or salt get between the hob and the bottom of the pan. Refer to the "CLEANING" section; make sure that pan bottoms are clean before use and only use smooth bottomed pans. Scratches can be lessened only the cleaning is done correctly.
Metal marks
- Do not slide aluminium pans on the hob. Refer to the cleaning recommendations.
- You use the correct materials, but the stains persist. Use a razor blade and follow the "CLEANING" section.
Dark stains
- Use a razor blade and follow the "CLEANING" section.
Light surfaces on the hob
- Marks from an aluminium or copper pan, but also mineral, water or food deposits; they can be removed using the cream cleaner.
Caramelisation or melted plastic on the hob.
Refer to the "CLEANING" section.
The hob does not operate or certain zones don't work
- The shunts are not positioned correctly on the terminal board. Have a check made that the connection is done in compliance with the recommendations.
- Hobs with sensitive controls: a big spill or object covers at least two buttons, for at least 10 seconds. Clean up the spill or remove the object.
- The control panel is locked. Unlock the hob.
The hob does not cut off.
- The control panel is locked. Unlock the hob.
The hob stops automatically
- A spill covers at least two buttons for more than 10 seconds; the hob switches to safety, and an audible beep sounds. Clean up the spill or remove the object.
- The cooking zones stop automatically if they are left on for too long. Refer to the section, "operating time".
Frequency of on/off operations for cooking zones
- The on-off cycles vary according to the required heat level:
- low level: short operating time,
- high level: long operating time.
"H" display, residual heat indicator, blinking.
- The electronic temperature is too high. A technician should verify the fitting in compliance with the recommendations.
10. AFTERCARE
Before calling out a Service Engineer please check the following:
that the plug is correctly inserted and fused;
If the fault cannot be identified switch off the appliance — do not tamper with it — call the Aftercare Service Centre. The appliance is supplied with a guarantee certificate that ensures that it will be repaired free of charge at the Service Centre.
11. PROTECTION OF THE ENVIRONMENT
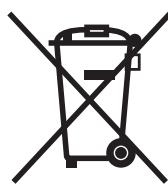
This appliance is marked according to the European directive 2002/96/EC on Waste Electrical and Electronic Equipment (WEEE). By ensuring this product is disposed of correctly, you will help prevent potential negative consequences for the environment and human health, which could otherwise be caused by inappropriate waste handling of this product. The symbol on the product indicates that this product may not be treated as household waste.

Instead it shall be handed over to the applicable collection point for the recycling of electrical and electronic equipment Disposal must be carried out in accordance with local environmental regulations for waste disposal.
For more detailed information about treatment, recovery and recycling of this product, please contact your local city office, your household waste disposal service or the shop where you purchased the product.
1. AVVERTENZE GENERALI
LEGGERE ATTENTAMENTE LE ISTRUZIONI INCLUDE IN QUESTO LIBRETTO.
Blu - neutrto/neutral (N)
Marrone - fase/ live (L)
Giallo-Verde - Terra/ earth (
Ph = Phase
N = Neutre
T = Terre
5. PRESENTATION
Ph = Phase N = Nulleiter T = Erdung
5. DARSTELLUNG
1. MEPbI PPEIOCTOPOXHOCTN
YTO6bl IO6bTbc8 HANJyUHIX PE3yJIbTATOB IPN 3KcIpyATAUIN BAPOUHOI NOBEPXHOCTN, BHIMATEJIbHO IPOUTNTE 3TU INHCTPYKUNIO
Pekomehnyetc coxpaHntb 3tu nHCTpykunno yctahOBKn n 3Kcnnyataunn noobpaatbcra K Hei no Mepe Heo6xoDmoctnn nepeD yctahOBkoB BapOCHNO NobepxHOCTN. B cnyae obpaueHnna pmoCbU B cepBncbI ceHTp ykaJNTe cepHNO HOpE BapOCHNO NobepxHOCTN, yka3aHHBI B ee naCnpTHO Ta6nUKe, KaNtOka3aHO Hnke.
-
Bo n36exkHne cepbe3hIX OXKOrOB He pa3pe7aIe Te DeTAM NOxOuNTb 6n3KO K 3oHaM HarpeBa, KOrda OH N BkNIOUeHbI, IIN KOrda OH N BkNIOUeHbI, HO pRr TOM rOpIT INdIKaTOP oCTaTOHOro HArpeBa.
-
Pn npiroTOBneHnPiuC nIcNoJIb3OBAHHeM JxnpOB uN MaCna Bcerda CneDInTe 3a IpoUeCCOM npiroTOBHeHn Piu, TaK KaK Xnpbl MACNO MOrTy BHe3aAnHO 3aRopeTbCra.
-
He klaaIte Ha 30hI hArpeBa aIOMHHeBvIO fOJIbry I He CTaBtE Ha HIX pIaCTMaCCoByIO Nocdy.
-
Pocne Kaqdo IcnoB3oBAHnI Tpe6yETc OOnuATb BapOHyIO NobepxHocTb, YTo6bl IpTeODBpaNTb Obpa3oBAHne npiropeBseI rpa3n IJupa. Ecn OctaBt 3arpy3HeHn Ha BapOHOIOBepxHocTN, TO pRcNcEduOeM NcNoB3oBAHm OH bdyT npiropAtp, n npr 3Tom 6ydt BlydelaTbC DaBIM HnepnraTHb 3anax. Kpome 3TO, 3TO MoKet npnbecTN Knojapy.
He pekomeHnyetc cMOTpeTb Ha ranoreHHbIe lambli.
He npikacaiTecb pykamn K3OHAM HArpeBa, KOrDa OHN BKJIIOHeHbI, NJIIN OKA OHN He OCTblJIn.
HnkOrda He roTOBbTe NnUy HnOcpeDCTBeHHo Ha CTekJIOkepAMuYeCKoB BApOHyo NOBepXHOCTN. Bcerda NoJIb3yIteCb dJa 3To0 nOxOJaSeK kXOHNo NocDoB. Bcerda CTAbTe KAcTPOJIIO uIN cKOBOpOky B ceHTp 3OnbI HarpeBa, Ha KOtopoB bbl rOTOBITE NnUy. HnkOrda He nOlb3yIbTECb BApOHyo NOBepXHOCTbIO B KaueCTBe DOckn DnPa pe3Kn. He npotaackBaIte KxOHHyIO nocdy no BapOHyo NOBepXHOCTN.
He xpaHnte naBapOCHno NOBepxHOCTbI TAgKeIbe IpeDMeTbI. EcnOn OHyT ha BapOHyIO NOBepxHOCTb, To OHmOrTy NOBpeDHTbe.
Hnkorga He noJIb3yIeScb BapouHOi NOBepxHOCTbIO BAueCTBe pa6OeRo cToJa.
He noIb3yIteCb BapOuHoi NOBepxHOCTbIO B KaUeCTBe MeCTa DnI XpaHEnHa KaKIN-JIn6o PpeDMToB.
EcnHa BapouHno NOBepxHOCTn IPOBHTcra TpeuHa, HemeJeHNO OTCoeDHNTE BapOHyIO NOBepxHOCTb OT 3JKeKTPocETn IO6paTntecb 3a nOMoUbIO Cnyk6by NocJIePnoDaJHOrO OBClyKmbAHnI.
Hikorda He nCOnb3yIe ropyu np uJIN BODY NOB BbICOKIM daBJIeHNEM dJa YnCTKn H3deJIa.
DaHHbI 3NeKtponp6op He npedHa3HaeH IJIy NcNoJb3OBAHnna DeTBMn INoDbMn C fN3uYeCKmN nIN PCNXUeCKm HEOCTaKaMn, a TaKke JIOdbMn, He oBlaadaOuzmN DoCTaTOhBIM ONbITOM n 3HaHnma, ecn 3TN JInca He nOJyUnn IHCTpykun OTHOCNTeNbHO 3KcnjLyaataunn 3NeKtponp6op, nIN He nCnoJb3yIOT 3NeKtponp6op nO npncMOrPom Lnua, OTBeauIoIero 3a nx 6e3OnacHocTb. He pa3pewaTe Detam mIrpaTb c 3NeKtponp6opom.
Ha7a KOMPnAHnI NOCTOARHHo CTpeMHTcI NOBbICITb KaueCTBO BByNCKaEMo EHO IPOyKzIM, I03TOMy B KOHCTpyKzIO BByNcKaEBIX HaMN 13JeIN MOrYT BHOCITbcra HOBeWShne TEXHNeCKeY YCOBepSeHCTBOBaHnI.
89/336/EEC, KOtopbie 6bln 3aMeHebl dapeKtBamn 2006/95/EC n 2004/108/EC n noCneDyUOUMn nonpaBkAmn KnHm.
2. YCTAHOBKA
UcTaHOBKa 6bIIOBOI TexHKn YBJIeTcra CLOJHO pa6OTo, HnPaBnIbHoe BbINOJHHeHne KOTOpO MoKeT OTruCaTeHbHO cKa3aTbcra Ha 6e3OnacHocTn PONb3OBaTeJI. Ioo 3ToI npUInhe yCTaHOBKa 6bIIOBOI TexHKn DoJXHa BblIOJNHTbcra BBICOKKBAJIINΦIcnipOBaHHbIMn CneuaJIncTAm, KOTOpBIE BbINOJHrT yCTaHOBKy C co6JIouHeHem Bcex DeiCTByUOxN npabII n HopM. B TOM clyuae, ecnn 3To npedocTepeXeHne 6yDet npOnrHopropoBaHo, u yCTaHOBKa 6yDet BblIOJHeHa liuOcm, He IMeIoUIm DocTaTOHoi KBaJIINΦIkaUIn, pOn3BOJnteJIb He 6yDet npInHMAtb Hkaknx IpTeH3n OTHOCHTeHbHO BbIXOda o6OpudobAHnna n3 CTPO n HaHeCEHHOro npn 3TOM uyep6a ImyueCTBy nII IN3doPObBIO JIOdeI.
3. BCTPANBAEMARБBITOBARTEXHINKA
Kyxonna Me6eB, B KOTopyu 6ydet BCTpanBaTbCBAwa BapouHnA NOBepxHOCTb, IN BcR pacnoJIOXKeHHa NIObn3OCTN OT Hee Me6eB bONJHa 6bITb N3rTOBJeHa n3 MaTePnaIob, KOTOpbie MOryt BbldepXnBaT BblcOKne TempepaTypbl. Kpome 3TORo BCE DeKopatNBhle PNeHKn DOJXHb 6bITb PrnkneeHb TENIOCTOnkIM KJeeM.
YcTaHOBka:
B KOMPJIeKTe C BapOuHoi NOBepXHOCTbIO NOCTaJIaETcRepeMTeN3IpyUo7A npoklaJaKa.
IpeydycTaHOBkoN:
-
Положи te Bapочну IO nobepxHocTb TaK, yTo6bl cTeKIOkepaMNUeCKa IOBepxHocTb 6blIa HnPaBJIeHa BHN3. IpoBepbte TTO cTeKIOkepaMNUeCKa IOBepxHocTb 3aUINuHeA. - YctahOBIne npOKNIAkky nO nepIMeTpBu apOCHoN IOBepxHocTn.
-
y6eHntecb B TOM, chTo npoknaKa npabnIbHO yCTaHOBJeHa dIpyTO, ChTo6bl n36kAteB npTeueK B uKaΦ, Ha KOTOpbI ONIPAETcB bApOuHЯ NOBepxHOCTb.
PacctoHne MeJdy BapOCHNoBepxHOCTbIO n BepTnKaJIbHbIMn CTeHKAMn pacpOJoxEHHoI pAOM C HeN KUxOHHO Me6eJIbIO dONXeH 6bITbHe MeHbSe 5cm. - Ecnn HnKnHcTcPOHa yCTaHOBHeHHo BapOCHo NOBepxHOCTn pacNoIaraetcB OblaactN, K KOTopoI OcyUeCTBnIeTc DaOCTyn BO BpeM BblONJIeHHa YbOPKn IIN dpyrnx Oenpaun, TO yCTaHOBtne HnKe BApOCHo NOBepXHOCTn neperopodky. Peneropodka DoJxHa 6bItb yCTaHOBJIeHa Ha paCctOraHHn 1 CM OT BapOCHo NOBepxHOCTn dIyTOrO, YTO6bl
n36ekatb oXoROB nIINOBpeHn.
4. NOДКЛЮЧЕНЕ KЭЛЕKTPOCETN
UcTaHOBKa DOnJXHa 6bITb BbIOnJIHeHa B COOTBETCTBnC DeIcTBYIOUIMN IpaBUNaMn IN HopMaMn 3JIeKTpOBe3OanChOCTn. Ipon3BOIDTeNb He npINHMAe HnKaKnx IpTeH3n OTHOCITeNbHO NOBpeXdEHH, YBJIaIOUxxCn CJeDCTBnEM HEnpaBUNbHOro npImMeHnI3DeJIy.
PpeDynpexJeHHe: PpOn3BODnteH He HecetOTBeTCTBeHHOCTb 3a HeCuaCThIe Cnyan, YBJIaHOuIeCe CneIcTBeM TORo, YTO 3NeKtpOpn6Op He 6bl3a3EmLeH, IIN npOn3oWeJ O6pbIB B JInHnn 3a3EmLeHn.
- Pepeş BbINOJIHHeHEm NODKIIChUeHnE 3JNeKTponpnbopa K 3JNeKTporcetN O63aTeIbHO npOBepbTe HaprrKeHne B 3JNeKTporcetN, peryIINPOBky ABTOMATNUeCKORO BbIKJIouCAten, OTCyTCTBnO6pbIBa B JINHm 3a3emJIeHnE JNeKTporpnbopa, n HOMHaI NJaBKO rnpdoxpaHnten.
-3NeKtpoPnp6op DOnJKeH NoDKnHouaTbC KAnEKeTpnueCKo pO3eTke C NOMOuB BuNk, CnAb6KeHHo WtBipbKOM 3aUHTHO 3aEmHeHn, INIyuepe3 DBYxNpOCHb pa3BeENHITeB.
Ecnn 3neKtponpnp6op cna6xhen wTeNceNbHO pO3eTKo,TO OH dOnJxH e 6bIb yCTaHOBnEH TAK, YTO6bIK WTeNceNbHO pO3eTKe OcyuectBnIcnyo6HbI DOCTyI. - JeIto-3eJIeHbI npOBODnK shHypa nHTaHn IdoJxeh NoDCoeDnHЯTbC K KOHTaKTy 3a3EmHeHn 3NeKtpUYeCKo pO3EtKn I 3JeKtpOpnp6opa.
- Пи ВОЗнКНовен КаКИX-ЛИБО BONPOCOB, CBЯЗнБИС ИСПОЛБОВАHЕМ SHHypa ПИТАнЯ, СLEДуET OБРаТьСВ B CNYK6Y NOСLEПЮДAJXHORO OБСЛУЖИВAHИ NII K KBALINФИЦРОВАHOMY 3ЛЕКТПИКУ.
BHIMAHHE:
EcIn BO3HNKHeT Heo6XoDnMoCTb BbIIOJHnTb 3aMeHy Shhpy nHTaHn, NOcOeDHHte npOBdHKn ShHpy aNTaHn B COOTBeTCTBn C yKa3aHHbIMn HnKe ZBeTObBMn KODaMn.
CINHIN-HEINTPAJB(N1
KOPNUHEBbl-ΦA3A(I.)
XEJITo-3EJIeHbI-3EMJIA ()
- MoDéJI N PYP
B KOMPJIeKT NocTbKIN BAPoYHoi NOBepXHOCTN BXOJNT UHyp IITaHn. 3TO N03BOJIaR TIOKJIIOuATb 3TOT 3JIeKTPoPn6Op TOJbKO K 3JIeKTPocETn C HApPjaKeHem 220-240 B MeJy DBymФa3amn INI MekJdy a30i N HeITpaJIbI.
- Пдклочи TeJleKtpponp60р K ЗлсКТчecко розтke, 3aшиценho nJaBKM npeOxpaHnteMe (HomHaI npedoxpaHnteJIy BbIbupaTeC nOMOuTbTO Ta6nUcbl).
OdHako maKke umeemc8o3MOxHocmb nodKnIouumb 6apouHyIOsePxAocmb K cneDyUoUM JluHuaM 3Jekmpocemu:
TpnФa3b220-240В3~
-TpuФаЗbl 380-415В31\1~
IЯ nepexoHa HOBOe NOKJIIOHHe BbINONHTe CneDyIOUne HNCTpyKc:
- Pered BbIIOJIHeHHeM NOdKIIoueHn IPOBepbTe, yTO 3JIeKTPoPnPbOp 3aIuIeH C NOMOJbI O IOXODJUero PnABKOro IpeOxpaHNTeIa (CM. Ta6Ntu), n YTO NIOUaIb CeueHn IIOBDOJIAux INPOBOHNKOB YBJIeTcI DOCTaTOUHO, yTO6bl ObecneuBaIocb HOpMaJIbHoE NITAHne 3JIeKTPoPnPbOpa.
- Плобжпеварочны по breast Ha noBepxHocTb Stota CTekKIOkepaMueeCKO CTOpOH BHN3. (CTekKIOkepaMueeCKaЯ NOBepxHocTbdoJnKa 6bIb 3aunuHa!.
- CHIMITE KpbIshky KJIeMMHoi KOIoJKN, BbINOJIHHB CneDyIOUHe onepaun:
3NEKTPNueCKNE COEINHEHNA
| LAY OUT "5" | LAY OUT "2-3" | LAY OUT "4" | LAY OUT "1", | ||||
| Одna phаза 220-240 B- Дve phазы 220-240 B 2- | |||||||
| ПЕДОХPAHINTEь | 25 A | 25 A | 25 A | 20 A | |||
| ШИР ПITАния HO5V2V2F | 3x2,5 mm² | 3x2,5 mm² | 3x2,5 mm² | 3x2,5 mm² | |||
| Три phазы -220-240 B 3- | |||||||
| ПЕДОХPAHINTEь | 25 A | 20 A | 25 A | 20 A | |||
| ШИР ПITАния HO5V2V2F | 4x2,5 mm² | 4x2,5 mm² | 4x2,5 mm² | 4x2,5 mm² | |||
| Три phазы -380-415 B 3N- | |||||||
| ПЕДОХPAHINTEь | 16 A | 20 A | 20 A | 16 A | |||
| ШИР ПITАния HO5V2V2F | 4x1,5 mm² | 4x2,5 mm² | 4x2,5 mm² | 4x1,5 mm² | |||
| Одna phаза 220-240 B~ | Дve phазы 220-240 B 2~ | ||||||
| 1 2 3 4 T Ph N | 1 2 3 4 T Ph N | ||||||
| Три phазы ~220-240 B 3~ | Три phаи -380-415 B 3N~ | ||||||
| 1 2 3 4 T Ph N | 1 2 3 4 T Ph N | ||||||
PhΦa3a
N:HeItpaJIb
T:3emn
5. ONICAHNE
30Ha Harpeba "xaIJaT": MetaIIHuecka TOKOpBODaJcA noNocKa paCnpedeHeA OndHopOHO NO Bcei BapOHyo NOBepXHOCTn. Oha pa3OrpeBaetc B TeHeHne 3 c n MoKet IcNoJIb3ObaTcBdI py PAbHOMepHoro, OndHopOHDoro I DoCTaTOUHO npOdoJnxTeNbHoro npOuceca npiroTOBNeHnPiu.
CTeknokepamuueckara Bapouhna nobepxnoctb 6bnaaet 60nbio TeNIOBO MoOIOHocTbI,TeHepnpyEmo3OH HarpBa "xaJnAIT",TO oBecepeuHaBc6bICTpoe pnproTOBNeHne Niun. I3MeHEnn,BHeceHHbe B KOHCTpyKmIO Bapouhno nobepxHOCTn,HE CN3UNC nC0OC6HoCTb CTeknokepaMnK bIeApkXNaBt BbcOKne Tempepatypb,HO NHONobbCnn Nn6KoKtB perylnpoBAnH narpeH. IcnPb3ObaHne yctpOCTBa"cnpuHTep" No3BOJAE TCHNtB BPEma nproTOBNeHn Niun Ha 15% B3abNCMOCTOn OT CNOcO6a npiroTOBNeHn Niun n NCNoJIb3yeMoK KxOHHO NOcyDbI
30ha Harpeba "xanonaiT": 3to KOMbHaaunra ranoreHOBO 3OHb HarpBa (1/3) n 30hBnHarpeba"XainaunT"(2/3). 3Ta 30Ha pa3orpeBaetc OeHb 6bICTpo. OHa npriGOnHa dIg Jaxpk Mca, 6blCTpO rKINJyEHHa BODi n INTeHCNBHOrnpirTOBNeHHa\Psiu, KOrda Tpe6yETc BbcOKa TemnepaTpaB TteHHeNkoPOTKORo pomexyTKa BpeMeHN.
30Ha HarpeBa "paHNT": 3Ta 3OHa HarpBeBa oBceNeuBaet bCTpoe nnMdJIeHHOE NOBbIeHHe TMepaTpybl, a TAKke BbICOKYIO Cta6MbHOCbTOdEprzAnHryKHOI TEMnepaTpybl. 3Ta 3OHa HarpeBa rBnIeTc OueHToOHn I oBecneHBAeOT OeHb XopoOee paccEHNHe TenIIa.
6. COBETbI OTHOCHTeJIbHO BblbOPA KUXOHHO IocuIbI dIa NcIPOJIb3OBAHnC BAPOUHOI NOBEPXHOCTbIO
Дяобсенья ВьICOKО зффкгнвбгСиВарочи NOBepxHOCrДОЛЖHA NCNoJb3OBaTbCЯ ВьICOKOKaYeCTBeHHa KUXOHHa Nocya.

Ponb3yntecb TOnbKO BbICOKOkaeeCTBENHO KxOHHO NOcyoD C COBpeHNO NIOCKIM NTOCTbIM OCHOBAHMEM: MCNOb3OBAHMe TAKO NOcybl PnepoTbPAaIaET Opa3OBAHMe RopJHX TOeK, B KOTOpBX 6ydet NIOrpoTa b Niua. KaTpOJIu N CKBOPoDa I C TOnCTbIM OCHOBAHMem 6ydt OBeCneUHbA bIpa.
- OchoBaHne KAcTpOHN IIN cKOBOPoDbI DOJXHO 6bITb cyxHM: nocTe TOrO, KaK B NocCyDy 6yEdT 3aNtA JxIDKOCTb, IIN npN IcNoJIb3OBAHn ICAcTpOHN, KOtOpA JDO 3TO TOn HAXOINaC b XJOLOINbNIke, NepeI Te KAK NOCTaBnTb KAcTpOHN Ha BapOHyIO NobepxHOCTb npOBepbTe, YTO OCHOBaHne KAcTpOHN YBIAETcO CBoPeHEnHO cyxHM. 3To npedeOTbPaTn OBpa3OBAHne Ha BapOHyON NobepxHOCTn PAnTeH.
-ПользунштсTOЛьКВБICOKOKaYeCTBeHHОKxOHHONNOCyDcCOBepseHNO NIOCKHM 和TOnCTbIM OCHOBAHHE:ДиamETP NOcydIbIdoJIKEN6bIbHe Me HeMbSe DnAmETpa 3ObIb HarpeBa.EcnI DnAmETp NocydIbIHeMHORO 60bIbWe DnAmETpa 3ObIb HarpeBa,To 3eHPrIg 6ydetMCONJb3OBAbTCsCMAKCImAJIbHOH3ФΦeKTIVBHOCTbIO
BbIbOP NODXOJAE KYXOHHO NOCybl - PpeIcTaBneHna HIXe INΦopMaζη NOMOKeT Bam BbIbPaT NocUd y dIa IpiroTOBJeHn IINZ C MaKcImaJIbHON 3ΦΦeKTHBHOCTbHO.
Nocya n3 HepKabeoche cTann: HacToaTeNbHO peKOMeHdyETcMnObl30BaTb. Oco6eHNO xopoIoo IPOXODHT KxOHNa Hocya c TpexCNoHOn cTpykTpoi OCHOBaHn. OChOBaHne C TpexCNoHOn cTpykTpoi o6beHNHe T cBe 1pePmUeCTBa HepKaeIOSe cTann (npINBLeKaTeNbH bHEsHn BND, DOJIROBEuHOCTb N pOCHoCTb) n PpeMUsECTBa AJHMNHIA JILMeDN (BbICOKa TeILOIpOBoDHOCTb, paBHomePHO paCnpedeJeHne TempepaTybl).
Anomnuebaryocya:peKOMeHdyTeCnOJIb30BaT TJKeenyIO nocyu. BbICoKa TENIOnpOBoDHOCTb. AIIOMnHEBAY nocya INOrda OCTaBnEaH aBapOHNoBepXHOCTn CLeDb, NOXOXHe Na cepaINHBi. Ho 3tN CneDb NERG YdAJaTOcR, ECNI NCTKa BapOHNoBepXHOCTn BbIOnIHReTcH MeMeDJIeHHO NOCJe O6pa3OBAHn4 3TNx CneDB.
I3-3a Hn3KoN Tempeatypbl PnabHeHnaJIOMHHa, TOHKa aJIOMHHeBaB NOcya He DoJnxHa NcNoNb30BaTbcra.
UryHna nocya: MoXHO hCnOJIb30BaTb, Ho He peKOMeHJyETcA. IIOxHe 3KcPJIyatauOnHHbIe xapaKTepeNCTnKn. MoXeT capanaTb NOBepxHOCtB.
Nocya c MeHbIM dHOM / KameHHa KepAMka: peKoMeHdyetcR NcNoIb3OBaTb TJeKyO nocyu. XopoWne 3KcPiyatauOnHbIe XapakTePrcNTkN, HO MeIb MoKeT OCTabnTb Ha NOBepXHOCTn CJeIbI, NOXOxHe Na cepAnHbI. 3TN CJeDy MOrT 6bITb YdaJIeHbI, ECIN YnCTKa BApouHoi NOBEPXHOCTn BblONHReTcH HeMeJdJIeHNO nocNe O6pa3OBaHNr 3TNX CJeIDOB. Ondako He CTaBbTe Ha BApOHU IOBepXHOCTb TaKyIO nocyu 6e3 HaNtO B Hee JKnIOCTn. IpeperpIb MtaJIIN MoKet npiroptb K cTEKnOkePAmuecko nobEPOXHOCTn. IpeperpTa a nocya c MeiNbIM dHOM MOKeT OCTaBnTb Ha cTEKnOkePAmuecko NOBepXHOCTn CJeIbI, KOToPbIE HeBO3MOXHO 6yDet ydaJIntb.
ΦapΦopOBa/əMaHnPobAHHa nocya: XopoWne 3KcPnyaTaUOnHHbIe XapaKTePncTnKn TOnbKO IJIra NocydbIC TOHKIM, TlaKnM, PIOCKIM OCHOBaHHeM.
CTeKIOKepaMnuecka nocya: He peKOMeHnyetcNcNoIb3ObaTb. IINOxHe 3cKnIyatauOnHHbIe xapaKTePncTnKn. MoXeT capanaTb CTeKIOKepaMnueckyo
7. CTEKJIOKEPAMUeCKA BAPOUHAR IOBEPXHOCTb C CEHCOPHBIM YIPABJIEHNEM
- OINCAHNE CEHCOPHO YIPTABJIEHNA
-
B 3aBUNMOCTN OT MOJEJI
-
Послve BKJIIOUeHnI\PaTAHnI BApOuHoi NOBepxHOCTn NODOXdTe HeCKoJIbKO cekyHd IJrTOrO, YTObI DaTb NpOgPeTBc3NeKTPOHOMY 6ILOKy ynpabLeHnI.
HaKMTe KONky ① BKnIOuayetcAneKTPOHbI 6nOK ynpaBHeH.N KaKdoN 3OHe nCnpeoTO6paKaetcYpOBeHb HArpeBa , MMRaET mHdNKaTOpHb CBeToIDNoD.
EcInB TceHHe 20 C He BblIOJIaTeTc HnKaKHX DeIeCTBm,3NeKTPOHHb6Kn YnpaBLeHn BblIOJIuaTeTc, HneOxOJIMO NOBToPntb OpepaUHO3AnyCKA.
BKJIIOUOHEME30HbI HAFPEBA
-HaKMTe KHOIky BbI6opa HyXHOBam 30hbl HaraPeBa.B COOTBeTCTByIOUe3OHe DnCnJIeB CBTODMOH NaHnae T Opeb POBbIM CBETOM,POKA3bBAIem TEM CaMbIM,YTO 30Ha HaraPeBa BKIOUeHa.
-Bb6epTe HxKbI yPoBeHb HapReBa B IaIana3OHe OT 1 Do 9 c NOMoIbHO KhoIKN " " IIN " +". PIn HaKaTNI KHOIKN " + " IIN " -" yPoBeHb HapReBa 6ydet NOCTeHNO YBeJIuNvBaTcR IIN YMeHbWAtbcr.
OncaHbIe HNKe npHMepbl npBBeHbT OJIbKO nAe CnpaBKn. C TeueHnEM BpeMeBb HBy NaHTecb PpaBmHbO BbIbApTaYCTAHOBKn HaPeBa B COOTBECTBN Co CBOMN NOTpe6HOCTAMN
OBJIEE BbIKJIIOUChEHN
30Ha HarpeBa N TaMep MoryT 6bITbBkIIOyeHb IJIIOoe Bpemc IOMOuBu HkaTnKHOKNBKn./BkiN.

- INHДNKATOP OCTATOCHOTO HAPPEBA
Korda Tempeata ypa 30hbl HarpeBa nobblaaetcno 60^ ,Ha nncnnee noBraetc H. Korda Tempeata npaaet Hnke 60^ ,3OT HnDkaTOp nce3aET.
B KOHue npiroTOBnEHHI NIIu peKoMeHdyeTcB bIKIOHTb 3OHy HArpeBa I 3aKOHHTb npiroTOBHeHne NIIu, INIOJIb3yOCTaTOHoe TEnIIO 30HbI HarpeBa. BaxHOe 3ameuHne. Iocne OTKJIOUeHHI NITaHnIHINiKATop OCTaTOHOro HArpeBa racheT, daxe ecNn TEMnpaTypa 30hbl HarpeBa npeBbIwaet 60^
- YIPABJIENHE PABOTOI DOIPOJHITbHOI 3OHbI HAPPEBA (ДBE 30Hbl)
B HeKOTOpbIX MoJEnX IMeHOTcR 30HbI HarpeBa, COCTOJIue M3 DByx O6nacte. 3TN 30HbI MOrY 6bITb KaK KOHcEHTPnuHbIMn, TAK N BblTAYtBMn. Ppi BkIIHOUeHH 30HbI HarpeBa BkIIHOuAHOCTc KaK OCHOBHa, TAK IN DonONHInTeNbHa 30Ha HarpeBa. 3TO perINcTpPyETcC NOMoUbIO 3aRopAnHn HNDiKAToPHOro CBetOnNoDa DoONHInTeNbHO 30HbI HarpeBa.
ДлЯ ВьIKLOUЧЕнЯ ДОЛНHTeJIbHоI 3OHbI HarpeBa:
-HaXKMnTe KHOJky DOnOHnHTeJIbHoi 30HbI HArpeBa .PpBbIKIOueHHN DOnOHnHTeJIbHoi 30HbI HarpeBa CBeToIOoD DonOHnHTeJIbHoi 30HbI HarpeBa raChET.
He noIb3yIteCb CInIaKOM BlaJXHO rY6KoI.
Hikorda He noIb3yIeTcB IJIYnCTKN NOBepxHOCTN HOXOM NIN OTBepTKoM. CKepe60K c ne3BnEM 6pntBbl He NOBpeDNT NOBepxHOCTb, ecJIn OH pacnonaraetcnoyrom 30^
Hikorda He octabnIte cKpe60k C Ie3BnEm 6pntbI B DoCTyINbIX dIa dete MeCTax.
HnKOrJa He nOJIb3yIteCb a6pa3NHBbIMu YIcTaeIaMm CpeDCTBaMn Ia6pa3NBbIMn NopoWKamn.
-MetaJIInuecka paMka: BbIMOnTe MetaJIInueckyHO paMKyMbIbHOBdoI, 3aTEM YHCTO BDOI, IN PpOTpuTE HAcYxO TKAHbIO.
9. NOCJIENPOJAXHOE OBCJYXNBAHNE
Ipeep Tem kak Bb3BaTb cneuaancta nTo texnueckomy 06cnyxnbHIO, BblonHInTe cJeDyIoUne npOBepKn:
PObepbTe, yTO BnIka shHypa nItaHn IpaBnIbHO BCTaBJIeHa B 3JIeKtpnueckyO pO3ETky, uTTo He nepeRopEn INaBKn IpeDoxpAHNTenb. EcNl Bbl He MoKeTe CaMOCToTeBnO npPeJeNtB npuNHy HneCnpABHocTl, BbIKJIOUHTe 3JIeKtpoPn6Op N He nbTaItec OTpMeONHtPOBaTb erO camOCToTeBnO. I03BOHnTE B U cHTp NocIePOnDaXHOrO 0cbNyXbAHn. 3JIeKtpoPn6Op IMeet rapaTHnO, N 6yEt OTpeMOHTnoPBah B cepBnCHOM 9HTpe 6ecnnlaTHo.
10. PELSEHNE IPOBJIEM
HeoctaTochHynHarpeB
Bapouhna NOBepxHocTb He pa6oTaet, INI Hpepa6OtaHT HeKOTOpble 30HbI HargpeBa BapouHoi NobepxHocTn
- HénpaBnHbO yCTaHOJIeHbI yHTbI (3aKOpaHbIaUcHne nepembIcH) Ha KJIeMMHOn KOJIOdKe. IpoBepbTe, YTO NODKJIIOUcHne BblONHeHO B COOTBeTCTBnC yKa3aHnA M
BapouhIbe NOBepxHocTn CceHCOPHBIM ynpaBneHMe: pOJIHTa Ha 6oJIbwoM yUactKe KIOKOCTb NIN 6oJIbWOI OBeKT, IOKpbIBAOUIne, IO KpaIHeMpe, IBe KHOKN B TeueHHe He MeHee 10 c. YdaIInTe pOJItuYoo KIOKOCTb NIN oBeKT.
-Панелыгравлия варочи поверхонтл заблкюраза.Ра36лкуTe ee.
Bapouhna nobepxhoctb He bblnoaetc
-3a6nokpoBaHa naneB ynpaBneHna. Pa36nokpyte ee.
Bapouhna nobepxHoctb caMonpon3BOJbHO BbIKIouaetcra
Muraet HndkaTop "H", HndkaTop octaToHoro HarpeBa
CImiKOM BbICOKa TEMepaTpya 6Ioka 3neKtpoHKn. CneuaJIncT no TexHnueCKomy 06cIyXKBaHNIOJOnKeH NpOBepNTb, YTO yCTaHOBka BblONHeHa B COOTBeTCTBm C peKOMEHDAUINM.
Даннь злектponрбор Имeel Маркировky COOTBECTBNA EBponecko Диpektne 2002/96/EC noутлизаци злектпческоги n 3лектpoHHOrO 06obypobанa (WEEE).
PpabnIbna yTnIIN3aunmaunHbI NOMOXET npedOTBpaNTb HeratUNBHOe BO3deNCTBne Ha OKpykaOuYIO Cpey Ni 3DOpOBbe IIOJe.
MapknpoBka Ha n3denn yka3bIbaeT Ha To, YTO daHHOe n3dene HeIb3a BbIbpaCbIbTa, KaK 06bUHhble 6bITOBble OTxoDb. MaunHa DoJnxHa 6bIt DoCTabJIeHa Ha MeTo C6opa Otpa6OtabWero CBOI cPOK 3NEkTpueckoro n
3JIeKtpoHHOrO 6ObOpYOBaHnI yBbIOJIHeHnE ee yTuJIN3aUIn. YTuJIN3aUIn MoAunHbI CNeDyET PON3BOuNTb B COOTBeTCTBn C MeCTbIMN IpaBUNAMN OTHOCHTJIbHO yTuJIN3aUIn OTXoDOB.
3a 60lee nIopboHoi HnΦoMaueNe OTHOCITnelHo yTINImaun MaunHbIn IOBTOPHOrIOIcIb3OBAHn HaxOJaXxCB He MaTePnaIbOB CneDyET ObaaTaBC B OprAhBi MeCTHORO ynpabJIeHn, B MeCTHYO Cnyk6y yTINImaUN 6bITOBbIX OTxOIOB UNB MaRa3IN, Ige Bbl PnIO6peNl daHHe N3dEIne.
1. UWAGI OGÓLNE
PROSZE DOKLADNIA ZAPOZNAC SIE Z NINIEJSZA INSTRUKCJA PRZED PRZYSTAPIENIEM DO INSTALACJI PLYTY.
Ph = Faza
N = Zero
T = Uziemienie
5. OPIS - WYBRANE MODELE
- Pola highlight:
WAARSCHUWINGICOON VOOR RESTHITTE
Installation (fig.B/D):
Ph = Fas N = Nollan T = Jord
5. PRESENTATION
Ph = Vaihe N = Nolla
T = Maa
5. ESITTELY
Installingering (fig.B/D):
- Platetoppen leveres med en vanntett pakning.
Før montering: - Snu toppen opp ned sik at glassplaten er rettet nedover.
Sorg for a beskyte glassplaten. - Sett på pakningen rundt platetoppen.
- Pass på at den monteres riktig slick at du unngår lekkasjer til kabinettet under.
- La det.vm minst 5 cm avstand mellom platetoppen og omkringliggende vertikale flater.
- Hvis den nedre delen av platetoppen under installering er nær et område som normalt erlett tilgengelig ved for eksempel rengjøring, lar du det vare en luftespalte på 1 cm under platetoppen for a unngå fare for skolding eller skader.
4. ELEKTRISK TILKOBLING
Starte hurtigoppvarming
Deaktivere hurtigoppvarming
The manufacturer will not be responsible for any inaccuracy resulting from printing or transcript errors contained in this brochure. We reserve the right to carry out modifications to products as required, including the interests of consumption, without prejudice to the characteristics relating to safety or function.
IT

- CONTENIDO ES
- INSTALLATION
- BUILT-IN
- Before fitting:
- ELECTRICAL CONNECTION
- ATTENTION:
- BLUE
- BROWN
- YELLOW-GREEN
- To release the power supplying cord.
- PRESENTATION
- - hilight zone :
- HOB COOKWARE ADVICE
- USE
- - STARTING A COOKING ZONE
- - STOPPING A COOKING ZONE
- GENERAL STOP
- - RESIDUAL HEAT INDICATOR
- To desactivate the additional cooking zone :
- To re-activate the additional cooking zone :
- To desactivate the additional cooking zones :
- To re-activate the additional cooking zones :
- - PROGRAMMING A COOKING ZONE (according to the model)
- Starting the fast heater
- To desactivate the fast heater
- CLEANING AND MAINTENANCE
- MAINTENANCE:
- A FEW HINTS:
- PROBLEM SOLVING
- The cooking is too slow
- Metal marks
- Dark stains
- Light surfaces on the hob
- Caramelisation or melted plastic on the hob.
- The hob does not cut off.
- The hob stops automatically
- Frequency of on/off operations for cooking zones
- AFTERCARE
- Before calling out a Service Engineer please check the following:
- PROTECTION OF THE ENVIRONMENT
- AVVERTENZE GENERALI
- DARSTELLUNG
- MEPbI PPEIOCTOPOXHOCTN
- YCTAHOBKA
- BCTPANBAEMARБBITOBARTEXHINKA
- YcTaHOBka:
- IpeydycTaHOBkoN:
- NOДКЛЮЧЕНЕ KЭЛЕKTPOCETN
- BHIMAHHE:
- CINHIN-HEINTPAJB(N1
- - MoDéJI N PYP
- IЯ nepexoHa HOBOe NOKJIIOHHe BbINONHTe CneDyIOUne HNCTpyKc:
- ONICAHNE
- COBETbI OTHOCHTeJIbHO BblbOPA KUXOHHO IocuIbI dIa NcIPOJIb3OBAHnC BAPOUHOI NOBEPXHOCTbIO
- CTEKJIOKEPAMUeCKA BAPOUHAR IOBEPXHOCTb C CEHCOPHBIM YIPABJIEHNEM
- BKJIIOUOHEME30HbI HAFPEBA
- OBJIEE BbIKJIIOUChEHN
- - INHДNKATOP OCTATOCHOTO HAPPEBA
- - YIPABJIENHE PABOTOI DOIPOJHITbHOI 3OHbI HAPPEBA (ДBE 30Hbl)
- ДлЯ ВьIKLOUЧЕнЯ ДОЛНHTeJIbHоI 3OHbI HarpeBa:
- NOCJIENPOJAXHOE OBCJYXNBAHNE
- PELSEHNE IPOBJIEM
- HeoctaTochHynHarpeB
- Bapouhna NOBepxHocTb He pa6oTaet, INI Hpepa6OtaHT HeKOTOpble 30HbI HargpeBa BapouHoi NobepxHocTn
- Bapouhna nobepxhoctb He bblnoaetc
- Bapouhna nobepxHoctb caMonpon3BOJbHO BbIKIouaetcra
- Muraet HndkaTop "H", HndkaTop octaToHoro HarpeBa
- UWAGI OGÓLNE
- OPIS - WYBRANE MODELE
- - Pola highlight:
- WAARSCHUWINGICOON VOOR RESTHITTE
- Installation (fig.B/D):
- ESITTELY
- Installingering (fig.B/D):
- ELEKTRISK TILKOBLING
- Starte hurtigoppvarming
- Deaktivere hurtigoppvarming
- IT
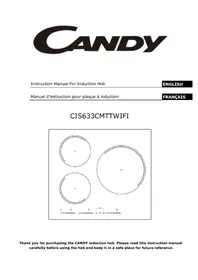
Brand : CANDY
Model : CH633B3
Category : Hob