
F230-104 - Bean to cup coffee maker MELITTA - Free user manual and instructions
Find the device manual for free F230-104 MELITTA in PDF.
| Product type | Automatic espresso grinder |
| Brand | Melitta |
| Model | F230-104 (Purista) |
| Dimensions (W x D x H) | 200 mm x 460 mm x 334 mm |
| Weight (empty) | 7.9 kg |
| Power supply | 220 V – 240 V, 50 Hz – 60 Hz |
| Power consumption | 1450 W |
| Pump pressure | 15 bar maximum |
| Bean hopper capacity | 125 g |
| Water tank capacity | 1.2 L |
| Main functions | Coffee bean preparation, adjustable intensity, adjustable quantity (25-220 ml), adjustable brewing temperature, favorite coffee programming, 2-cup preparation, adjustable auto-off |
| Basic settings | Water hardness, auto-off, rinsing at stop, brewing temperature, coffee intensity |
| Grinding | Continuous fineness adjustment via internal lever (6 positions) |
| Maintenance | General cleaning, cleaning of the brewing chamber, cleaning program, descaling program, use of Melitta® Pro Aqua filter cartridge |
| Safety | Electric shock protection, auto-off, child safety (supervision required) |
| Spare parts and repairability | Parts available via Melitta after-sales service; repair by authorized technician |
| General information | Domestic use only; ambient temperature 10 °C – 32 °C; relative humidity 30% – 80% |
Frequently Asked Questions - F230-104 MELITTA
User questions about F230-104 MELITTA
0 question about this device. Answer the ones you know or ask your own.
Ask a new question about this device
Download the instructions for your Bean to cup coffee maker in PDF format for free! Find your manual F230-104 - MELITTA and take your electronic device back in hand. On this page are published all the documents necessary for the use of your device. F230-104 by MELITTA.
USER MANUAL F230-104 MELITTA
1 Overview of the appliance. 31
1.1 Appliance at a glance 31
1.2 Overview of the control panel 32
2 For your safety. 33
2.1 Proper use 33
2.2 Danger from electric current 33
2.3 Risk of burns and scalds 34
2.4 Other dangers 34
3 First steps. 34
3.1 Unpacking the appliance 34
3.2 Installing the appliance.. 34
3.3 Connecting the appliance.. 35
3.4 Switching on the appliance for the first time 35
4 Basic operation 35
4.1 Switching the appliance on and off 35
4.2 Filling coffee beans into the bean container 36
4.3 Filling with water 37
4.4 Adjusting the outlet for coffee beverages 37
4.5 Emptying the drip tray and coffee grounds container 37
5 Preparing beverages 38
5.1 Setting the coffee strength 38
5.2 Setting the coffee quantity 38
5.3 Preparing the coffee beverage 39
5.4 Programming your favourite coffee 39
5.5 Stopping coffee preparation 39
5.6 Preparing two coffee beverages simultaneously 39
6 Changing basic settings 40
6.1 Service mode 1. 40
6.2 Setting Auto OFF 40
6.3 Setting the water hardness.. 41
6.4 Activating/deactivating switch-off rinsing 41
6.5 Setting the brewing temperature 42
6.6 Service mode 2. 42
6.7 Resetting the appliance to the factory settings 43
6.8 Setting the grinding fineness 43
7 Care and maintenance 44
7.1 General cleaning 44
7.2 Cleaning the brewing unit 44
7.3 Running the cleaning programme 45
7.4 Running the descending programme 46
7.5 Using a water filter 48
8 Transport, storage and disposal 49
8.1 Venting the appliance 49
8.2 Transporting the appliance 50
8.3 Disposing of the appliance 50
9 Technical data. 51
10 Troubleshooting 51
1 Overview of the appliance
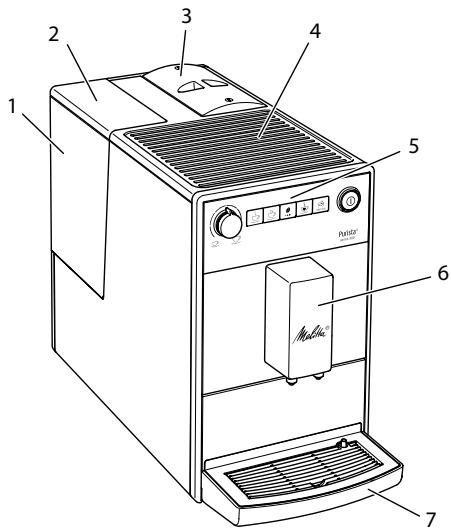
1.1 Appliance at a glance
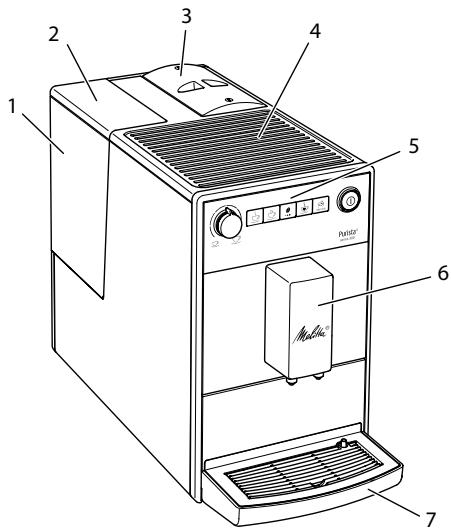
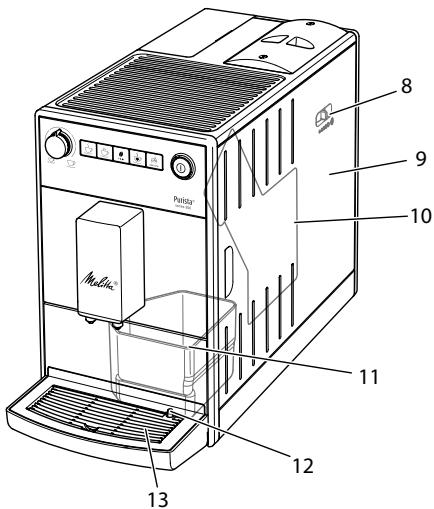
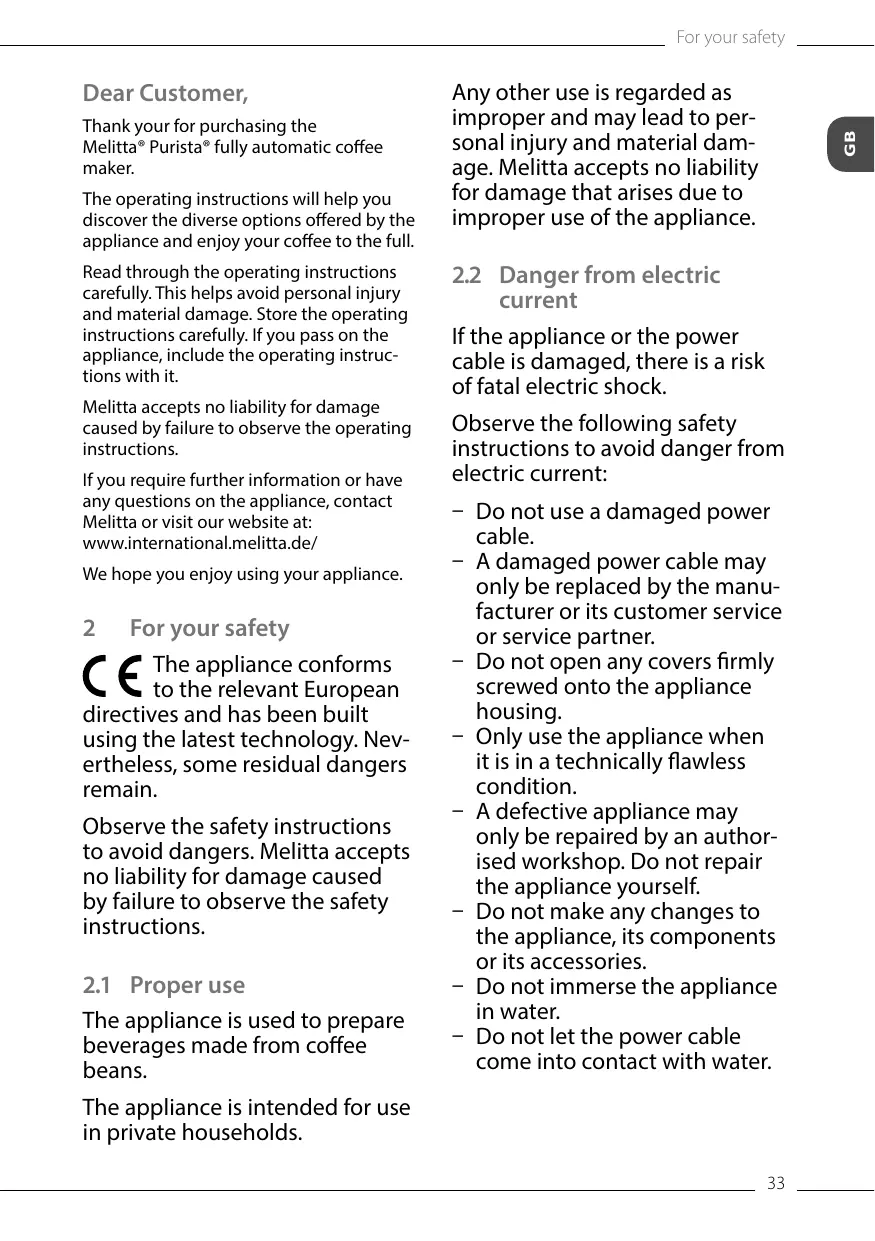
Fig. 1: Front left of the appliance
Fig.2: Front right of the appliance
1 Water tank
2 Water tank lid
3 Bean container with lid
4 Cup rest
5 Control panel
6 Outlet with 2 coffee nozzles for coffee beverages
7 Drip tray
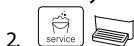
8 "Grinding fineness adjustment" lever (inner)
9 Cover
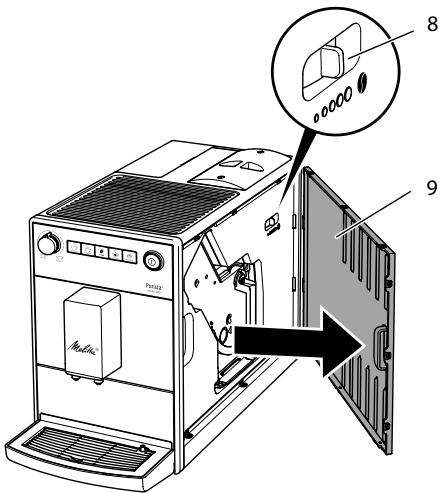
10 Brewing unit (inner)
11 Coffee grounds container (inner)
12 Float
13 Cup plate
1.2 Overview of the control panel
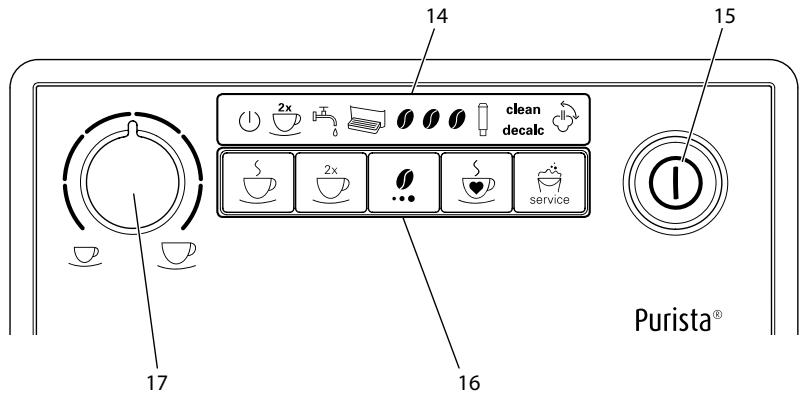
Fig.3: Control panel
14 Indications
15 ON/OFF button
16 Buttons
17 "Coffee quantity" rotary regulator
| Display | Designation |
| 1 | Ready display |
| 2x | 2 cups display |
| 3 | Water display |
| 4 | Drip tray display |
| 0 | Coffee beans display |
| Filter display | |
| clean | Clean display |
| decalc | Descending display |
| Venting display |
| Control | Designation |
| S | "Coffee" direct key |
| 2x | "2 cups" button |
| "Coffees strength" button | |
| S | "Favourite coffee" button |
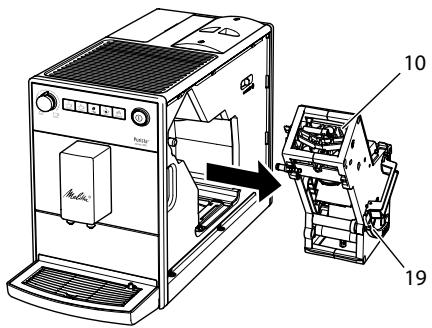
| "Service" button |
Dear Customer,
Thank your for purchasing the Melitta® Purista® fully automatic coffee maker.
The operating instructions will help you discover the diverse options offered by the appliance and enjoy your coffee to the full.
Read through the operating instructions carefully. This helps avoid personal injury and material damage. Store the operating instructions carefully. If you pass on the appliance, include the operating instructions with it.
Melitta accepts no liability for damage caused by failure to observe the operating instructions.
If you require further information or have any questions on the appliance, contact Melitta or visit our website at: www.international.melitta.de/
We hope you enjoy using your appliance.
2 For your safety
The appliance conforms to the relevant European directives and has been built using the latest technology. Nevertheless, some residual dangers remain.
Observe the safety instructions to avoid dangers. Melitta accepts no liability for damage caused by failure to observe the safety instructions.
2.1 Proper use
The appliance is used to prepare beverages made from coffee beans.
The appliance is intended for use in private households.
Any other use is regarded as improper and may lead to personal injury and material damage. Melitta accepts no liability for damage that arises due to improper use of the appliance.
2.2 Danger from electric current
If the appliance or the power cable is damaged, there is a risk of fatal electric shock.
Observe the following safety instructions to avoid danger from electric current:
- Do not use a damaged power cable.
- A damaged power cable may only be replaced by the manufacturer or its customer service or service partner.
- Do not open any covers firmly screwed onto the appliance housing.
- Only use the appliance when it is in a technically flawless condition.
- A defective appliance may only be repaired by an authorised workshop. Do not repair the appliance yourself.
- Do not make any changes to the appliance, its components or its accessories.
- Do not immerse the appliance in water.
- Do not let the power cable come into contact with water.
2.3 Risk of burns and scalds
Escaping fluids and steam may be very hot. Parts of the appliance can also become very hot.
Observe the following safety instructions to avoid scalds and burns:
- Avoid escaping fluids and steam coming into contact with the skin.
- Do not touch the nozzles on the outlet during and immediately after dispensing a beverage. Wait until the components have cooled down.
2.4 Other dangers
Observe the following safety instructions to avoid personal injury and material damage:
- Do not operate the appliance in a cabinet or similar.
- Do not reach into the interior of the appliance during operation.
- Keep the appliance and its power cable out of the reach of children under 8 years of age.
-
This appliance may be used by children over 8 years of age and by persons with reduced physical, sensory or mental capabilities or a lack of experience and knowledge if they are supervised or have been instructed in using the appliance safely and understand the resulting risks.
-
Children must not play with the appliance. Cleaning and maintenance must not be undertaken by children younger than 8 years of age. Children over 8 years of age must be supervised during cleaning and maintenance.
- Disconnect the appliance from the power supply when left unsupervised for a long time.
- The appliance must not be operated at altitudes over 2000m .
- Please observe the instructions in the corresponding section when cleaning the appliance and its components (Care and maintenance on page 44).
3 First steps
This chapter describes how to prepare your appliance for use.
3.1 Unpacking the appliance
- Unpack the appliance. Remove the packaging material, the adhesive strips and the protective films from the appliance.
- Keep the packaging material for transport and any return shipments.
Information
The appliance may contain traces of coffee and water. The appliance has been tested in the factory to ensure that it functions perfectly.
3.2 Installing the appliance
Observe the following instructions:
- Do not install the appliance in damp rooms.
Install the appliance on a stable, flat and dry surface.
- Do not install the appliance in the vicinity of sinks or the like.
- Do not install the appliance on hot surfaces.
Install the appliance at a sufficient distance (approx. 10cm ) from the wall and other objects. The space above the appliance should be at least 20cm .
- Route the power cable so it cannot be damaged by edges or hot surfaces.
3.3 Connecting the appliance
Observe the following instructions:
- Check that the supply voltage matches the operating voltage specified in the technical data (see table Technical data on page 51).
- Only connect the appliance to a properly installed earthing contact socket. If in doubt, consult a specialist electrician.
- The earthing contact socket must have a fuse of at least 10A .
3.4 Switching on the appliance for the first time
Once you switch on the appliance for the first time, the appliance performs automatic rinsing. Hot water flows out of the outlet. The appliance is vented.
Information
- We recommend pouring away the first two cups of coffee after initial start-up.
If you want to use a water filter, only insert this after starting up for the first time.
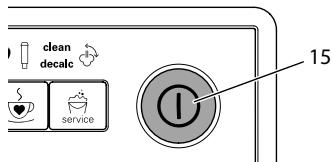
Fig.4: ON/OFF button
Requirement: The appliance has been installed and connected.
- Place a vessel beneath the outlet.
- Press the ON/OFF button (15).
The Ready display lights up briefly.
The Water display lights up and requests you to fill the water tank.
- Open the lid of the water tank and pull the water tank upwards out of the appliance by the handle.
- Rinse out the water tank with clean water. Fill the water tank with fresh water.
- Insert the water tank into the appliance from above and close the lid.
The Vent display lights up and requests you to vent the appliance.
-
Press the "Coffee strength" button.
Water flows into the drip tray.
The appliance heats up and hot water flows out of the outlet. -
Once no more water flows out of the outlet, the Coffee bean display lights up. The appliance is vented.
-
Fill coffee beans into the bean container (see section 4.3 Filling coffee beans into the bean container on page 11).
-
As required, you can now either a) set the water hardness (see section 6.3 Setting the water hardness on page 41) or
b) screw in a water filter (see section 7.5 Using a water filter on page 48).
4 Basic operation
4.1 Switching the appliance on and off
Before switching on after starting up the appliance for the first time, read section 3.4 Switching on the appliance for the first time on page 35.
Information
- When switched on and off, the appliance performs automatic rinsing.
During rinsing, rinsing water is also conducted into the drip tray.
Switching on the appliance
- Place a vessel beneath the outlet.
- Press the "ON/OFF" button (15).
The appliance heats up and performs automatic rinsing.
The appliance is ready for operation.
Information
If the appliance was only switched off briefly, there is no automatic rinsing after switching on.
Switching off the appliance
- Place a vessel beneath the outlet.
- Press the "ON/OFF" button (15).
The appliance performs automatic rinsing.
The appliance switches off.
Information
- The appliance switches off automatically when it is not operated for a long time. Automatic rinsing is also carried out in this case.
- You can set the off time in Service mode 1 (see section 6.2 Setting Auto OFF on page 40).
If no beverage has been prepared since switching on or if the water tank is empty, no rinsing takes place.
4.2 Filling coffee beans into the bean container
Roasted coffee beans lose their aroma.
Only fill the bean container with as many coffee beans as you will consume over the next 3 to 4 days.
ATTENTION
The use of unsuitable types of coffee can lead to clogging of the grinder.
- Do not use freeze-dried or caramelised coffee beans.
- Do not use any coffee powder or instant products.
Information
When changing the type of beans, remains of the old type of beans can still be in the grinder.
Even if the bean container runs empty and a new type of bean is filled in, there are still remains of the old type of bean in the grinder. For this reason, the first two coffees dispensed can contain remains of the old type of bean.
The flashing Coffee bean display requests you to refill coffee beans.
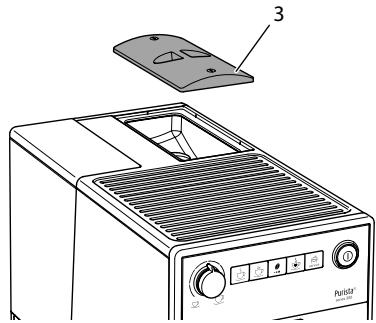
Fig. 5: Opening the lid of the bean container
- Open the lid of the bean container. (3).
- Fill coffee beans into the bean container.
- Close the lid of the bean container. The next time a coffee is dispensed, the display no longer flashes.
If the bean container runs empty during beverage preparation, output is interrupted and the Coffee bean display flashes. When you fill the bean container with coffee beans, the display will initially continue to flash. After pressing a direct key, coffee beans fall into the grinder. Coffee is
prepared and the display stops flashing. The Ready display and the Coffee beans display light up.
4.3 Filling with water
Only use fresh, cold water without carbon dioxide for optimum coffee enjoyment. Change the water daily.
Information
The quality of the water largely determines the flavour of the coffee. Therefore, use a water filter (see section 6.3 Setting the water hardness on page 41 and section 7.5 Using a water filter on page 48).
The Water display lights up and requests you to refill water.
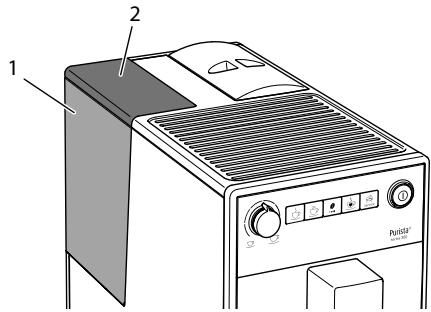
Fig.6: Removing the water tank
- Open the lid (2) of the water tank (1) and pull the water tank upwards out of the appliance by the handle.
- Fill the water tank with water.
- Insert the water tank into the appliance from above and close the lid.
4.4 Adjusting the outlet for coffee beverages
The outlet (6) is height-adjustable. Set the greatest possible distance between the outlet and the vessel. Depending on the vessel, push the outlet up or down.
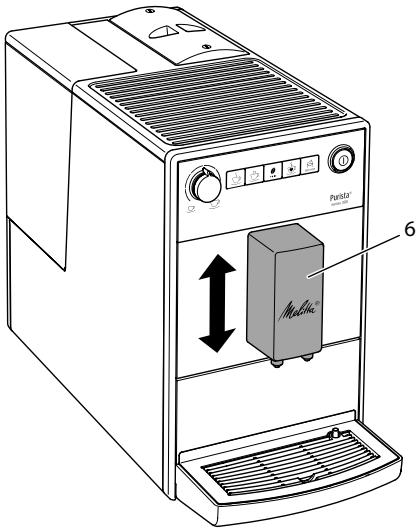
Fig. 7: Adjusting the outlet for coffee beverages
4.5 Emptying the drip tray and coffee grounds container
When the drip tray (7) and the coffee grounds container (11) are full, the Drip tray display lights up and requests you to empty the container. The display appears after preparing approx. 8 beverages.
The projecting float (12) also indicates that the drip tray is full.
Always empty both containers. When the drip tray is pulled out, the Drip tray display flashes.
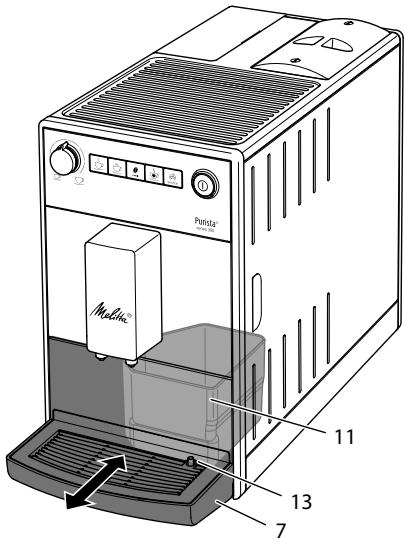
Fig.8: Emptying the drip tray and coffee grounds container
- Pull the drip tray (7) forwards out of the appliance.
- Remove the coffee grounds container (11) and empty it.
- Empty the drip tray.
- Insert the coffee grounds container.
- Push the drip tray into the appliance up to the stop.
Information
If you empty the drip tray and the coffee grounds container while the appliance is switched off, the appliance does not register this process. Therefore, it is possible that you are requested to empty the containers although the drip tray and the coffee grounds container are not yet full.
5 Preparing beverages
Please note:
- There should always be sufficient water in the water tank. If the filling level is too low, the appliance requests you to refill it.
- There should always also be sufficient coffee beans in the bean container. If
there are no longer any coffee beans present, the appliance stops the preparation of a coffee beverage.
- The vessels for the beverages should be sufficiently large.
The maximum coffee quantity is 220 ml.
5.1 Setting the coffee strength
As soon as the appliance is ready for operation, it displays the current setting of the coffee strength.
The following settings for the coffee strength are possible:
| Display | Coffee strength |
| 0 | Mild |
| 1 1 | Normal |
| 1 1 1 | Strong |
You can adjust the coffee strength by pressing the "Coffee strength" button one or more times.
You can adjust the coffee strength before the beverage is dispensed or during the grinding process.
Information
When switching off the appliance, the last set coffee strength is stored.
5.2 Setting the coffee quantity
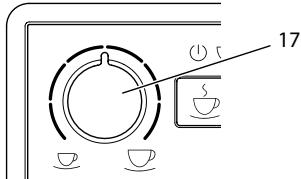
Fig.9: Setting the coffee quantity
You can set the coffee quantity with the "Coffee quantity" (17) rotary regulator.
You can adjust the coffee quantity before the beverage is dispensed or during the grinding process.
Coffee quantities are continuously adjustable between 25ml and 220~ml .
5.3 Preparing the coffee beverage
Requirement: The appliance is ready for operation.
- Place a vessel beneath the outlet.

Press one of the direct keys.
The grinding process and beverage dispensing start.
Beverage dispensing ends automatically.
- Remove the vessel.
5.4 Programming your favourite coffee
You can permanently store your preferred coffee strength and quantity using the "Favourite coffee" button.
The settings are made during the preparation of a coffee.
Requirement: The appliance is ready for operation.
- Press the "Favourite coffee" direct key for more than 2 seconds.
The Ready display and the Coffee beans display flash rapidly.
Press the "Coffee strength" button one or more times to set your preferred coffee strength. - Press the "Favourite coffee" direct key.
The grinding process starts. You can change the coffee strength again during the grinding process.Beverage dispensing starts.
- Press the "Favourite coffee" button during beverage dispensing when your
preferred coffee quantity has been reached.
Beverage dispensing stops.
The settings are stored.
If beverage preparation is stopped with the "Coffee" direct key, the coffee quantity and the coffee strength are not stored.

Press the "Favourite coffee" button to share a coffee with the stored coffee length and quantity.
5.5 Stopping coffee preparation
If you want to stop the preparation of a coffee beverage prematurely, press the direct key again.
5.6 Preparing two coffee beverages simultaneously
You can prepare two coffee drinks simultaneously with the "2 cups" button. For two-cup dispensing, the appliance carries out two grinding processes.
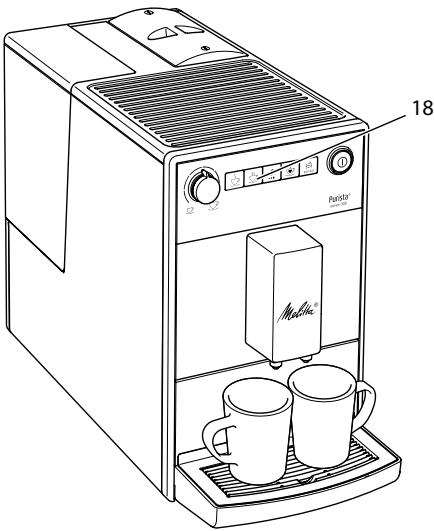
Fig. 10: Two-cup dispensing
- Place two vessels beneath the outlet.
- Press the"2 cups" button (18).
The 2 cups display lights up.
- Press a direct key.
The grinding process and beverage dispensing start.
Beverage dispensing ends automatically.
- Remove both vessels.
Information
- The setting only applies to the single beverage that is prepared.
If a coffee beverage is not prepared within 1 minute, the appliance switches to single-cup dispensing.
6 Changing basic settings
You can change the basic settings of the appliance with several functions. The functions are divided into two service modes.
6.1 Service mode 1
Each function is assigned a display.
Service mode 1
Display function

Auto OFF

Water hardness

Switch-off rinsing

Filter programme
clean
Cleaning programme
decalc
Dscaling programme

Brewing temperature
To call up Service mode 1, proceed as follows:
Requirement: The appliance is ready for operation.

Press the "Service" button for 10 seconds to call up Service 1.
The Ready display flashes rapidly and the 2 cups button lights up.
- Press the "Service" button one or more times to access the desired function.
» A display lights up according to the function selected, see Service mode 1 table.
The number of lit bean symbols indicates the current setting of the function.
Press the "Coffee" direct key to exit the service mode without saving the settings.
Information
If no further input is made within 1 minute, the appliance returns to Ready mode.
6.2 Setting Auto OFF
If you do not operate the machine for a long time, it initially switches to energy save mode. After a further preset time, the appliance switches off.
The following settings are possible:
| Display | Energy save mode after: | Switch off after: |
| 0 | 3 minutes | 30 minutes |
| 0 0 | 10 minutes | 1 hour |
| 0 0 0 | 20 minutes | 4 hours |
| 0 0 0 flash | 30 minutes | 8 hours |
Information
Press any button to exit Energy Save mode.
Requirement: The appliance is ready for operation.
-
Press the "Service" button for more than 2 seconds to call up Service mode 1.
-
Press the "Service" button repeatedly until the display for the Auto Off function appears.
- Press the "Coffee strength" button repeatedly until the desired time is set.
- You can call up the next function or exit Service mode:
a) Briefly press the "Service" button to navigate to the next function.
b) Press the "Service" button for more than 2 seconds to save the setting and exit the service mode.
6.3 Setting the water hardness
Setting the water hardness regulates how frequently you are requested to descale the appliance. The harder the water, the more frequently the appliance has to be descaled.
Information
Water hardness cannot be set while using a water filter (see section 7.5 Using a water filter on page 48).
Determine the water hardness with the enclosed test strip. Observe the instructions on the test strip packaging and in the table Water hardness range on page 51.
The following settings are possible:
| Display | Water hardness |
| 0 | soft, descale after 150 litres |
| 1 0 | medium, descale after 100 litres |
| 0 1 0 | hard, descale after 70 litres |
| 0 0 0 flash | very hard, descale after 30 litres |
| no coffee beans | A water filter is used. No adjust-ment is possible. |
Requirement: The appliance is ready for operation.
- Press the "Service" button for more than 2 seconds to call up Service mode 1.
- Press the "Service" button repeatedly until the display for the Water hardness function appears.
- Press the "Coffee strength" button repeatedly until the desired water hardness is set.
- You can call up the next function or exit Service mode:
a) Briefly press the "Service" button to navigate to the next function.
b) Press the "Service" button for more than 2 seconds to save the setting and exit the service mode.
6.4 Activating/deactivating switch-off rinsing
Rinsing is always carried out immediately after switching on the coffee system. Only switch-off rinsing can be activated/deactivated. If it is activated, the coffee system is rinsed after being switched off.
Information
We recommend that you do not permanently deactivate switch-off rinsing, because switch-off rinsing cleans the coffee system.
The following settings are possible:
| Display | Switch-off rinsing |
| 0 | activated |
| no coffee beans | deactivated |
Requirement: The appliance is ready for operation.
-
Press the "Service" button for more than 2 seconds to call up Service mode 1.
-
Press the "Service" button repeatedly until the display for the Switch-off rinsing function appears.
- Press the "Coffee strength" button repeatedly until switch-off rinsing is activated or deactivated.
- You can call up the next function or exit Service mode:
a) Briefly press the "Service" button to navigate to the next function.
b) Press the "Service" button for more than 2 seconds to save the setting and exit the service mode.
6.5 Setting the brewing temperature
The brewing temperature influences the flavour of the coffee beverage.
The following settings are possible:
| Display | Brewing temperature |
| 1 | Low |
| 1 1 | Medium |
| 1 1 1 | High |
Requirement: The appliance is ready for operation.
- Press the "Service" button for more than 2 seconds to call up Service mode 1.
- Press the "Service" button repeatedly until the display for the Brewing temperature function appears.
- Press the "Coffee strength" button repeatedly until the desired brewing temperature is set.
- You can call up the next function or exit Service mode:
a) Briefly press the "Service" button to navigate to the next function.
b) Press the "Service" button for more than 2 seconds to save the setting and exit the service mode.
6.6 Service mode 2
Each function is assigned a display.
| Service mode 2 | |
| Display | function |
| 2x | Factory settings |
| Venting | |
To call up Service mode 2, proceed as follows:
Requirement: The appliance is ready for operation.
- Press the "Service" button as well as the "Coffee" direct key for more than 2 seconds to enter Service mode 2.
2x The Ready display and the 2 cups display flash rapidly.
- Press the "Service" button one or more times to access the desired function.
A display lights up according to the function selected, see Service mode 2 table.
The number of lit bean symbols indicates the current setting of the function.
Press the "Coffee" direct key to exit the service mode without saving the settings.
Information
If no further input is made within 1 minute, the appliance returns to Ready mode.
6.7 Resetting the appliance to the factory settings
The appliance can be reset to the factory settings. When resetting, your settings in the functions will be lost. The coffee strength and quantity stored with the Favourite coffee function will also be lost.
Requirement: The appliance is ready for operation.
- Press the "Service" button as well as the "Coffee" direct key for more than 2 seconds to enter Service mode 2.
- Press the "Service" button repeatedly until the display for the Factory settings function appears.
- Press the "Coffee strength" button repeatedly until the display of one coffee bean appears.
- Press the "Service" button for more than 2 seconds to reset the appliance to the factory settings and exit the service mode.
6.8 Setting the grinding fineness
The grinding fineness of the coffee powder influences the flavour of the coffee.
If the grinding fineness is set finer, the coffee flavour is stronger.
ATTENTION
Very finely ground coffee powder can clog the brewing unit.
- The grinding fineness has been optimally set prior to delivery. Adjust grinding fineness at the earliest after about 100 coffees are dispensed (after approx. 1 month, depending on coffee consumption).
- Do not set the grinding fineness too fine. The grinding fineness is optimally set when the coffee flows evenly out of the outlet and a fine, dense crema appears.
Adjust the grinding fineness while the grinder is running.
Requirement: The appliance is ready for operation.
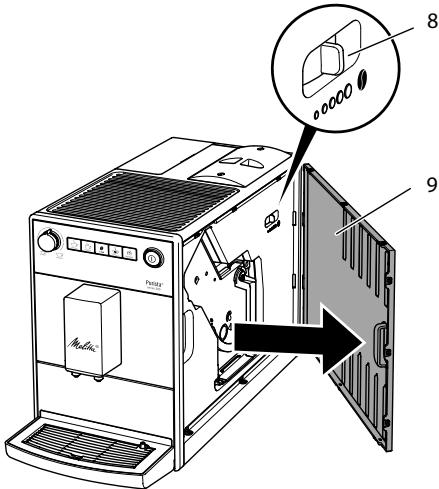
Fig. 11: Setting the grinding fineness
- Open the cover (9). To do this, reach into the recess on the right of the appliance and pull the cover off sideways.
- Prepare a coffee.
- Move the lever (8) to the left or right while the grinder is running. To the left = grinding fineness finer To the right = grinding fineness coarser
- Insert the cover (9) sideways until it engages.
7 Care and maintenance
Regular care and maintenance of the appliance ensure the consistent high quality of your beverages.
7.1 General cleaning
Clean the appliance regularly. Immediately remove external soiling caused by coffee.
ATTENTION
The use of unsuitable cleaning agents may lead to scratched surfaces.
- Do not use any abrasive cloths, sponges or cleaning agents.
Requirement: The appliance is switched off.
Clean the outside of the appliance with a soft, damp cloth and normal washing-up liquid.
- Rinse off the drip tray, the coffee container and the cup plate. Use a soft, damp cloth and normal washing up liquid for this.
The coffee container is dishwasher-safe.
Clean the bean container with a soft, dry cloth.
7.2 Cleaning the brewing unit
To avoid damage to the appliance, we recommend cleaning the brewing unit once a week.
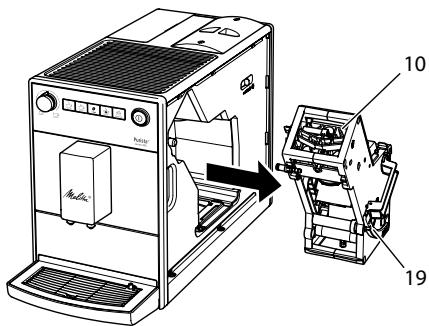
Fig.12: Removing the brewing unit
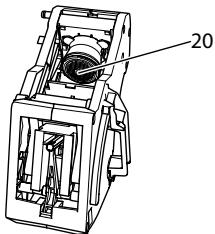
Fig. 13: Cleaning the brewing unit
Requirement: The appliance is switched off.
- Open the cover (9). To do this, reach into the recess on the right of the appliance and pull the cover off sideways.
- Press and hold the red lever (19) on the brewing unit handle (10) and turn the handle clockwise until it engages at the stop.
- Pull the brewing unit out of the appliance by the handle.
- Rinse the entire brewing unit thoroughly from all sides under running water. In particular, make sure that coffee residues are removed from the sieve (20).
- Allow the brewing unit to drip dry.
- Use a soft, dry cloth to remove coffee residues from the surfaces inside the appliance.
- Insert the brewing unit into the appliance. Press and hold the red lever on the handle of the brewing unit and turn the handle anticlockwise until it engages at the stop.
- To do this, insert the cover sideways until it engages.
When the appliance is switched on, an alternating flashing of the Ready display and the Clean display indicates a missing brewing unit. After the brewing unit has been inserted, the appliance switches to Ready mode.
7.3 Running the cleaning programme
This cleaning programme is used to remove residues and coffee oil residues with the aid of fully automatic coffee maker cleaning agents.
To avoid damage to the appliance, we recommend running the cleaning programme every 2 months or as requested by the appliance.
clean The Clean display light requests you to clean the unit.
CAUTION
Contact with fully automatic coffee maker cleaning agent may lead to eye and skin irritation.
- Observe the processing instructions on the packaging of the fully automatic coffee maker cleaning agent.
ATTENTION
The use of unsuitable fully automatic coffee maker cleaning agent can damage the appliance.
Only use Melitta® PERFECT CLEAN cleaning tablets for fully automatic coffee machines.
The cleaning programme takes approx. 15 minutes and should not be interrupted.
The cleaning programme runs in several stages. Progress is indicated by the number of coffee beans displayed.
The appliance performs several rinsing operations during the cleaning programme. The drip tray is also rinsed.
Requirement: The appliance is ready for operation.
- Press the "Service" button for more than 2 seconds to call up Service mode 1.
- clean Press the "Service" button repeatedly until the display for the cleaning programme appears.
- Press the "Service" button for more than 2 seconds to start the cleaning programme.
clean The Clean display flashes until the cleaning programme is finished.
The first stage of the cleaning programme starts. One coffee bean lights up.
The Drip tray display lights up and requests you to empty the drip tray and the coffee grounds container.
- Empty the drip tray and the coffee grounds container.
- Insert the drip tray without the coffee grounds container.
- Place the coffee grounds container beneath the outlet.
The appliance rinses twice.
clean The Clean display flashes rapidly and requests you to remove the brewing unit and insert a cleaning tablet.
- Remove the brewing unit. Do not switch off the appliance.
- Rinse the brewing unit under running water (see section 7.2 Cleaning the brewing unit on page 44).
- Place a cleaning tablet in the brewing unit. Insert the brewing unit into the appliance.
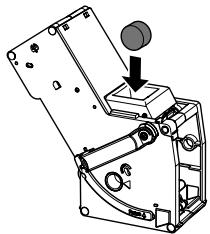
Fig. 14: Placing a cleaning tablet in the brewing unit.
The second stage of the cleaning programme starts. Two coffee beans light up.
The appliance performs several rinsing operations.
The Drip tray display lights up and requests you to empty the drip tray and the coffee grounds container.
The third stage of the cleaning programme starts. Three coffee beans light up.
- Empty the drip tray and the coffee grounds container.
11.Insert the drip tray without the coffee grounds container.
The fourth stage of the cleaning programme starts. The three coffee beans flash.
12. Place the coffee grounds container beneath the outlet.
The appliance performs several rinsing operations.
The Drip tray display lights up and requests you to empty the drip tray and the coffee grounds container.
- Empty the drip tray and the coffee grounds container.
- Insert the drip tray and the coffee grounds container.
The cleaning programme is finished.
The Clean display goes out.
The appliance is ready for operation.
Information
If the cleaning programme has been interrupted, e.g. because you unintentionally switched off the appliance, you must switch the appliance on again and follow the instructions from step 10. The appliance is then ready for operation, even if it has not been completely cleaned. For complete cleaning, you must run the cleaning programme from the beginning.
7.4 Running the descaling programme
The descending programme is used to remove limescale deposits in the interior of the appliance with fully automatic coffee maker descending agents.
To avoid damage to the appliance, we recommend running the descending programme every 3 months or as requested by the appliance, unless you regularly use a water filter.
decalc The Descalging display light requests you to descale the appliance.
CAUTION
Contact with descending agent may lead to eye and skin irritation.
- Observe the processing instructions on the packaging of the descaling agent.
ATTENTION
Use of unsuitable descending agents and failure to observe the processing instructions may damage the appliance.
Only use Melitta® ANTI CALC liquid descaling agent for fully automatic coffee machines.
- Observe the processing instructions on the packaging of the descaling agent.
ATTENTION
A water filter may be damaged if it is screwed in during the descending programme.
- Remove the water filter (see Fig. 15 on page 48).
- Place the water filter into a vessel filled with tap water during the descaling programme.
- The water filter can be reinserted and reused when the descending programme is complete.
The descending program lasts approx. 25 minutes and should not be interrupted.
The descending programme runs in several stages. Progress is indicated by the number of coffee beans displayed.
The appliance performs several rinsing operations during the descending programme. The drip tray is also rinsed.
Requirement: The appliance is ready for operation.

Press the "Service" button for more than 2 seconds to call up Service 1.

decalc Press the "Service" on repeatedly until the display for Descaling function appears.

Press the "Service" button for 2 seconds to start the scaling programme.
decalc The Descaling display flashes until the descending programme is finished.
The first stage of the descending programme starts. One coffee bean lights up.

The Drip tray display lights up requests you to empty the drip and the coffee groundsainer.
- Empty the drip tray and the coffee grounds container.
- Insert the drip tray.
The Water display lights up and requests you to fill the water tank with descending fluid.
- Remove the water tank.
- Fill 0.5 litres of descending fluid into the water tank. Observe the corresponding instructions for use of the fully automatic coffee maker descending agent.
- Insert the water tank again.
The second stage of the descending programme starts. Two coffee beans light up.
The descaler needs approx. 20 minutes to take effect, Several rinsing operations are carried out during this time.
The Drip tray display lights up and requests you to empty the drip tray and the coffee grounds container.
- Empty the drip tray and the coffee grounds container.
10.Insert the drip tray.
The Water display lights up and requests you to fill the water tank.
- Remove the water tank.
- Thoroughly rinse out the water tank and fill it with fresh water.
- Insert the water tank.
The third stage of the descending programme starts. Three coffee beans light up.
Hot water flows into the drip tray.
The Drip tray display lights up and requests you to empty the drip tray and the coffee grounds container.
- Empty the drip tray.
15.Insert the drip tray and the coffee grounds container.
The descending programme is finished.
The Descalging display goes out.
The appliance is ready for operation.
Information
If the descending programme has been interrupted, e.g. by unintentionally switching the appliance off, you must switch the appliance on again and follow the instructions from step 9. The appliance is then ready for operation, even if it has not been completely descaled. For complete descending, you must run the descending programme from the beginning.
7.5 Using a water filter
The use of a water filter extends the service life of the appliance and the appliance has to be descaled less frequently. The water filter filters calcium and other pollutants out of the water.
Only use Melitta® Pro Aqua filter cartridges for fully automatic coffee machines. Observe the processing instructions on the packaging of the water filter.
Information
When using and regularly replacing the Melitta® Pro Aqua filter cartridge, the appliance only needs to be descaled once a year.
This information is based on an average of 6 coffee beverages with 120ml per day and 6 filter changes per year.

Fig. 15: Screwing/Unscrewing the water filter
The water filter (21) is screwed into and unscrewed from the thread (22) on the base of the water tank (1).
Information
The water filter should not be left standing dry for a long period of time. When it is not used for a long time, we recommend storing the water filter in a vessel filled with tap water in the refrigerator.
Inserting the water filter
Requirement: The appliance is ready for operation.
- Press the "Service" button for more than 2 seconds to call up Service mode 1.
- Press the "Service" button repeatedly until the display for the Filter function appears.
- Press the "Coffee strength" button until one bean lights up.
- Follow the instructions from step 3 in section Changing the water filter.
Changing the water filter
In order to maintain a constant effect of the water filter, we recommend changing the water filter every 2 months – or when the device requests you to do so.
The Filter display light requests you to change the water filter.
Information
- The water hardness cannot be set if you use a water filter. The water hardness is automatically set to soft (see section 6.3 Setting the water hardness on page 41).
- Place the water filter into a vessel filled with fresh tap water for a few minutes before inserting it.
Requirement: The appliance is ready for operation.

Press the "Service" button for 10 seconds to call up Service 1.

Press the "Service" button atedly unit the display for the filter ramme appears.

One bean lights up.

Press the "Service" button for 2 seconds to start the filterframme.
The Filter display flashes until the filter programme is finished.
The Drip tray display lights up and requests you to empty the drip tray and the coffee grounds container.
- Empty the drip tray and the coffee grounds container.
- Insert the drip tray without the coffee grounds container.
- Place the coffee grounds container beneath the outlet.
The Water display lights up and requests you to remove the water tank and insert the water filter.
- Remove the water tank.
- Empty the water tank.
- Insert a new filter in the water tank (see Fig. 15).
- Fill the water tank.
- Insert the water tank again.
The filter is rinsed with water.
Water flows into the drip tray.
- Empty the drip tray and the coffee grounds container.
- Insert the drip tray and the coffee grounds container.
The filter programme is finished.
The Filter display goes out.
The appliance is ready for operation.
Permanently de-registering the water filter
If you have removed an inserted water filter and want to continue operating the appliance without a water filter, deactivate the water filter on the appliance:
- Remove the water tank.
- Empty the water tank.
- Remove the water filter (see Fig. 15).
- Fill the water tank.
- Insert the water tank again.

Press the "Service" button for 10 seconds to call up Service 1.

Press the "Service" button atedly until the display for the Filter tion appears.

Press the "Coffee strength" button atedly until no coffee beans are lit.

Press the "Service" button for 2 seconds to save the long and exit the service mode.
The water filter is de-registered.
The water hardness is reset to the water hardness that the appliance had stored prior to inserting a water filter.
- Adjust the water hardness if necessary (see section. 6.3 Setting the water hardness on page 41).
8 Transport, storage and disposal
8.1 Venting the appliance
We recommend venting the appliance when it is not used for a long period, prior to transport and when there is a risk of frost.
During venting, residual water is removed from the appliance.
If you put the appliance back into operation, automatic rinsing is carried out after switching on and the appliance vented
(see section 3.4 Switching on the appliance for the first time on page 35).
Requirement: The appliance is ready for operation.
- Press the "Service" button as well as the "Coffee" direct key for more than 2 seconds to enter Service mode 2.
- Press the "Service" button repeatedly until the display for the Venting function appears.
- Press the "Service" button for more than 2 seconds to start venting.
The Ready display flashes until venting is ready to start.
The Water display lights up and requests you to remove the water tank.
- Remove the water tank and empty it.
The appliance is vented and switches off automatically.
8.2 Transporting the appliance
ATTENTION
Freezing residual water can damage the appliance.
Prevent the appliance from being exposed to temperatures below 0^ C .
Transport the appliance in the original packaging. This avoids damage in transit.
Before transporting the appliance, carry out the following activities:
- Vent the appliance (see section 8.1 Venting the appliance on page 49).
- Empty the drip tray and the coffee grounds container.
- Empty the water tank.
- Empty the bean container.
- Clean the appliance (see section 7.1 General cleaning on page 44).
- Package the appliance.
Information
- When sending the appliance to Melitta's service centres, it is not necessary to send in the cup plate. This prevents scratches during transport.
- Do not use commercially available adhesive and packing tapes to attach loose parts. When detached, adhesive residues remain on the appliance which are difficult to remove.
8.3 Disposing of the appliance
Appliances marked with this symbol are subject to European Directive 2002/96/EC for WEEE (Waste Electrical and Electronic Equipment).
Electrical appliances do not belong in domestic waste.
Dispose of the appliance in an environmentally friendly manner via suitable collection systems.
9 Technical data
| Technical data | |
| Operating voltage | 220 V – 240 V, 50 Hz – 60 Hz |
| Power consumption | 1450 W |
| Pump pressure | max. 15 bar |
| Dimensions | |
| Width | 200 mm |
| Depth | 460 mm |
| Height | 334 mm |
| Capacity | |
| Bean container | 125 g |
| Water tank | 1.2 l |
| Weight (empty) | 7.9 kg |
| Ambient conditions | |
| Temperature | |
| Relative humidity | 10 °C – 32 °C 30 % – 80 % (non-condensing) |
| Water hardness range | °dH | °e | °fH |
| Soft | 0 to 10 | 0 to 13 | 0 to 18 |
| Medium | 10 to 15 | 13 to 19 | 18 to 27 |
| Hard | 15 to 20 | 19 to 25 | 27 to 36 |
| Very hard | >20 | >25 | >36 |
10 Troubleshooting
If the actions listed below fail to rectify the problems or other problems not listed here occur, contact our hotline (local rate).
You will find the hotline number in the lid of the water tank or in the Service section on our website.
| Problem | Cause | Action |
| Coffee only emerges from the outlet in drips. | Grinding fineness is too fine. | ■ Set a coarser grinding fineness (see section 6.8 on page 43). |
| Appliance is soiled. | ■ Clean the brewing unit (see section 7.2 on page 44).■ Run the cleaning programme (see section 7.3 on page 45). | |
| Appliance is covered inside with limescale. | ■ Run the descaling program (see section 7.4 on page 46). | |
| Coffee does not flow. | Water tank is not filled or is not correctly inserted. | ■ Fill the water tank and ensure it is positioned correctly (see section 4.3 on page 37). |
| Brewing unit is clogged. | ■ Clean the brewing unit (see section 7.2 on page 44). | |
| Although the bean container is full, the appliance indicates that coffee beans must be filled. | Coffee beans do not drop into the grinder. | ■ Press a direct key.■ Tap lightly on the bean container.■ Clean the bean container.■ Coffee beans are too oily. Use different coffee beans. |
| Loud grinder noise. | Foreign objects in the grinder. | ■ Contact the hotline. |
| Brewing unit cannot be inserted after removing. | Handle for the locking mechanism of the brewing unit is not in the correct position. | ■ Check that the handle for the locking mechanism is correctly engaged (see section 7.2 on page 44). |
| Drive is not in the correct position. | ■ Press the "Coffee" direct key and the "2 cups" button simultaneously for more than 2 seconds. The appliance initialises. | |
| Rapid alternate flashing of the displays: | Software problem. | ■ Switch the appliance off and on again (see section 4.1 on page 35).■ Contact the hotline. |
| Rapid alternate flashing of the displays: | Brewing unit is not inserted. | ■ Insert and lock the brewing unit. |
| The display lights up without having been activated: | Appliance is not fully vented. | ■ Vent the machine, fill the water tank if necessary and then press the "Coffee" and "Favourite coffee" direct keys simultaneously. Water flows into the drip tray when doing so. The appliance is ready for operation.■ Clean the brewing unit (see section 7.2 on page 44). |
Sommaire
Chere clientele, cher client,
(Waste Electrical and Electronic Equipment).
www.melitta.nl of www.melitta.be
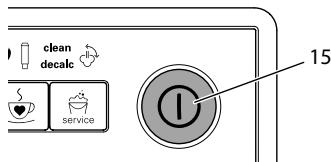
Fig.4: Tasto "ON/OFF"

Fig.3: Panel de control

Fig. 10: Brygning of to kopper
- Stil to kopper under udlbet.
- Tryk på betjeningsknappen "2 kopper" (18).
2kops-symbolet lyser.
8.2 Transport of maskinen
OBS
Frossent restvand kan medfore skader pa maskinen.
(Waste Electrical and Electronic Equipment).
Sette inn vannfilter
Forutsetning: Apparatet er driftsklart.

Trykk pa betjeningsknappen
"Service" longer enn 2 sekunder for Å apne Servicemodus 1.
Unngå a utsette apparater for temperaturer under 0^
Transporter apparatet i originaleballasjen. Dermed unngar du transportskader.
for WEEE (Waste Electrical and Electronic Equipment).
5 PnpiroToBJIeHne HapNTKOB 239
5.1 Hacrpoika kpeoctn Kooe 239
5.2 Hacrpoika koJIueCTBa Kofoe 240
5.3 PnpiroToBJIeHne HapNTka 240
5.4 PpOrpaMMnPoBaHne IIO6moro Kofoe 240
5.5Перьване пи��товлия коф.. 240
5.6 PnpiroToBVeHne DByx HaNITKOB OJHOBpeMeHHO 240
6 I3MeHeHne OCHOBbIX HAcTpoEK 241
6.1 Pexim o6cnykmbaHn 1. 241
6.2 HacpoiKa aBTOMaTnueCKOro BbIKIoueHnra 242
6.3 HacrpoKa JecTKoCTN BOJbl 242
6.4 BkIIOueHne/ByIKJIIOueHne npOMbIKn npN BbIKJIIOueHnn 243
6.5 Hacroka tempeatypbI npiroTOBlenia 243
6.6 Pekim M obcykubHn 2. 244
6.7 BocstaHOBJIeHne 3aBODCKnx yCTaHOBOK aannapaTa 244
6.8 Hacpoika ToHKoCTn NOMona 245
7 Yxod n Texnueckoe o6cnyuBaHne 245
7.1 067a yicstka 245
7.2 YIcTka 6Joka 3aBapuBaHnra 246
7.3 BbIopJIHeHne nporpaMMbl OChCTkn 247
7.4 BbInOpHeHne npOrpaMMbl IyIaJIeHnHaKINI 248
7.5 IcnoIb3OBAHne fInIbTpA dIa BODbl 250
8 TpaHcnpTnpOBka, xpaHeHne uytinnaaia. 252
8.1 BbIapnBaHne annapata 252
8.2 Tpansoptnipovka annapata 252
8.3 Ytulnizauia aannapata 253
9 TexHnueckne xapaKTepeNCTIKN 253
10 HenncpabHocTn 254
1 063op annapata
1.1 Osuchi Bua annapata

Puc.1: Bu annapama cnepedu cneba
Puc.2: Buə annapama cnepeodu cnpaea
1 KoHTeHepIaIbOdbI
2 KpbiIka KOHTeHepa Ira BObl
3 KOnTeHepДЯ KoΦeHbIX 3epeH c KpbIshKoI
4 NpOOrpeBaemn noCTabKa nlaaew
5 NaHeJb ynpaBneHn
6 BbIyckHoe OTBepCTne nI HaNITKOB c DByMHaCaJaKaMn
7 PoiDOn dIa c6opa KaIeIb
8 Pbyar «Perylnpobka ToHkoctn nOMOJa» (BHyTpN)
9 CbemHa nHaenb
10 BLOK 3aBapuBaHnA (BHyTpN)
11 EMKoCTbДЯ KOΦeHOrO XMbIXa (BHyTpN)
12 NonJaBOK
13 PndorpeBaemn noctabka dnyawek
1.2 06uBn BnD nAHeN ynpaBneHna

Puc.3: PanaheIynpaBneHua
14 INdkaTopbI
15 KhoNka «Bkn./BbIKn.»
16 KhoNkn
17 IobopOtHbI pyErJyIaTOp «KoJIueCTBO KoΦe»
Ybaxaemblnokynatelb,
Blaroapm Bac 3a noKynky KofoeHoro abTomata Melitta® Purista®.
Данhoe рукововсгво NO Экплуатци NOMOЖET Bam O3HaKOMUttcBc C pa3HOO-6pa3HbIMN BO3MOXHOCTaMn aannapata n nprirotobt Kofo,doctoHbI BOCxuieHNIA.
BhIMMaTeIbHO IpOuTnTe DaHHe o pyKOBoCTBO. 3To IOZBoJInr Bam NCKJIouHTb ONaCHOCTb IOnyueHn TpaBMbl n PpUChHeHnMaTePnaJIbHO rO uep6a.XpaHnTe DaHHepyKOBoCTBO B HAdIeKaIeM BnJe.DaHHOpyKOBoCTBO DOnJxHo 6bITb NepeHaHO HOBOMBy BlaJeBcY BMeCTe C aAnpaTOM.
KomnaHnMa Melitta He Hecet OTBeTCTBHeHocTn 3a NOBpeKdEHHa, OByCNoBLeHHbIe HecO6JIIODeHMe Tpe6OBaHn DaHHoro pyKOBOdCTBa.
Pn Heo6xOJIMoCTn POnJuYeHna 60lee
NoDpO6HOH nHΦopMauHn nn pRn HauN
HN BOpocOB oBaPaaIteB OΦuHaJIbHbIe npEcdTaBnteBCTBa KOMNaHn
Melitta nn noCeTne Haaw caHt:
www.melitta.ru
Kenaem Bam npnA rTO Horo BpemnIPOBOJKeHnC KOe, pnpIroTOBJIeHHbIM C NOMOuBo Hauero HOBOr annapaTa.
2ДЯВашев6e3oNaChOCTN
C E AnnapaT COOTBeTCTByeT DeiCTByUoIIM eBpOneiCKIM DInpeKtNUBaM I npOn3BeDeH B COOTBeTCTBUN C COBpeMeHHbIM yPoBHeM TexHnKn. Tem He MeHee, cyuecTByIOT OCTaToUHbIe pNcKn.
Bo n36eJHHe onaCHocTn Heo6xOdIMo CO6JIIOdaTb yKa3aH HnI NO TexHnke 6e30NaChOCTn. KomnaHnay Melitta He Hecet OTBeTCTBHeHHOCTH 3a NOBpeXdE Hnry, O6ycNoBJIeHNbIe Heco6JIIODeHnem YKa3aHnI No TexHnke 6e30NaChOCTn.
Heo6xoJnMoE yCNoBne: annapaT yCTa-HOBJIeH I NOKJIIOUeH.
1.Подстаьтеб EMKOCt b ПОД BblnyCKHoe OTBepCTne.
2. Haxmnte KhoNkY «BKn./BbIkn.» (15).
》 ①KpaTkoBpeMeHHO 3aRopaetcnaHdkaTop TomobHocmb K pa6ome.
五 3aropaeTcHnDnKaTOpBoda, cnHann3npyOHeo6XoJNMOCTn HANOHNb KOHTeHep DJIYBObl.
Kak toIbko aannapat roTOB, OH oTo6paKaet KeKyuHnacTpoNky KpeNoCTn KoΦe.
Bo3MoJHbI cIeNyUoUne HacTpoiKn KpeNoCTn KoΦe:
Heo6xoJnmoe ycNoBne: annapaT roTOB K pa6Ote.
- HaxmTe KhoNkpy npiroTOBneHnA «IIO6MbI KoΦe» uYpeKuBaIte ee HaxaToI 6oJIee 2 cekynd.
》 ①БьICTpo MmraIoNmDnKaTOpbI TomoBHoCmB K pa6Ome N KoFeuHoe 3epHo.
- OdINH nIIn HeckoJIbKO pa3 HaxMMTe KHNKUy «KpeNoCTb KoΦe», YTO6bl HaCTpOHTb npEДNoTtEnbHyO KpeNoCTb KoΦe.
- Haxmnte KhoNky npiroTOBneHnA «IIO6MbI KoOe>.
Hauheta pOcecc nomola. BoBpem npocecca nOMoMAoJHO eue pa3 u3MeHnTB KpeNoCTb Kofoe. HauHaetc npaay HauNTka.
- Bo Bpem noaun Hanntka nocne doCTnKHeHn PpeDnOHTeNbHOro KOJIuYeCTBa KoFe haxMnte KHOJKy npriToTOBLeHn «IIO6MbI KoFe»
》Полачahanntka npekpaataetc.
HactpoKn coXpaHAnOTcA.
Ecni npiroTOBHeHne HannTKa npepbIba- etcnaTneM KhoNkN npiroTOBHeHnnaKoFe), HacTroKn KOJIueCTBa N KpenoCTN KoFe He coXpaHraIOTc.
HaKMMte KhoNky npuROTOBLeHnra «IIO6bMbI KoOe》,UTo6bl npuROTOBtB KoOe C COOTBeTCTBUN C COxpaHeHHbIMN HAcTpoiKaMn erO KpeNoCTn U KOJIInueCTBa.
- HaxMMte KhoNky npiroTOBJIeHnIy.
Hauheta npoecc nomona n noaun HauNTka.
》IopdaHaHnITKa3aKOHHTcraABToMaTnueCKN.
UHΦopMaun
HactpoiKa DeIeCTByET TOnbKO dJa OdHOrO eDInHCTBeHHOro npnroTOBneHnHaNtKa.
EcnB TeueHne 1 MInHytI He BbINOJIHReTc nprirotOBJIeHne HAnITKa, annapat nepexoNT B pexKIM nprirotOBJIeHnOdHOu KaHAnITKa.
6 I3MeHeHne OCHOBbIX HacTpoEK
CyueCTByeT HeckoIbKO yHKnIy IaN 13MeHHeN OCHOBhIx HaCtPoEk aHaIa-
pata. 3Tu fHyKun pacnpedeJeHb Ha Dba pexima o6cnykmbaHna.
6.1 PexkIM o6cIyXuBaHnY 1
YKaKDoIΦyHKUINUMeETCBOYHdNkaZn.
6.4 BkIIOUeHne/BbIKJIIO-ueHne npOMbIBKn npn BbIKJIIOUeHn
Bcerda cpa3y je nocle BkIIOueHnna BbIIOJIHaeTc npOMbIBKa KofoeIHoH CnCTembl. BkIIOUHTb NnN BbIKIOUHTb MOXHO ToJbKO npOMbIBKy nOCLe BbIKIOueHnna annapaTa. Ecnn OHa BkIOUeHa, TOnocLe BbIKIOUeHnna annpaTa BbIIOJIHaeTc npOMbIBKa KofoeIHoH CnCTembl.
UHΦopMaunu
PekomEndyeTcH He BbIKIIOuTaB Ha CINU-KOM DOnIROE BpEma IpOMbIBKy NocJe BbIKIIOueHnA, TaK KaK npN ee NcNOJb3O-BaHN IIPOUN3BOIDTCs OUYCTKa KOeHON CNCTeMbI.
Bo3MOxHbI cIeNyUoIe HaCTpoIKn:
Heo6xoJumoe ycNoBne: annapaT roTOB K pa6ote.

HaKMMTe KhoNkY «O6cIyKuBaHn UyepKuBaIte ee 60onee KyHd, uTo6bl nepeiTu B pexmUyKuBaHn1.
HeckoIbko pa3 haxMnte 06cnykubHne》,noka He 3Nauchok yhKunn Ipombyka ooyHu.

HeckoIbKO pa3 HaKMIte KHONKy NOCTb KoOe》,NOKa He 6ydet OyeHa NII BbIKJIIOUeHa IpPOMbIBKa BbIKJIIOUeHN.

BbMOKeTepeeTNKcIeMyoSei KUIN NIN BbIITN N3 pexnMa yxKnBaHna:
a) KpaTKOBpeMeHHo HaxMnte KHOIpKy «O6cLyJxNtBaHne», YTO6bI IpeepTn K cIeNyUoSei fYHKuIN.
b) Haxmnte KhoNkY «O6cnyKuBaHne» n ydepKuBaIte ee 6olee 2 cekyHd, UTO6bl coxpaHt b HactpoiKy n BbItn n3 pexkMa o6cnyKuBaHn.
6.5 HactpoRka TempepaTypbI npuroTOBJeHnA
TempepaTypa npirotoBneHnBbnaeT ha Bkyc HauNTka.
Bo3MOxHbI cIeJyUOuNe hAcTpoKn:
Heo6xOumoe ycNoBne: annapaT roTOB K pa6ote.

HaKMMTe KHNOKy «O6cIyJxN- OIOJONHITeBHO KHNOKy yDePJKBaIte Ix 60Jee uTo6blpeEiB vpeKIM SaHn2.
2x 6bIcTpo MmraOT uHdkaTOpbl TomoBnocmb Kpa6ome n 2 yawku.

OdHnnHeckoBko pa3 Mnte KhoNkY «O6cIyXuBaHne», Bi IpeiTn K Tpe6yEmoI yHKun.
B COOTBECTBUN C Bbl6paHHoH ΦyHKcUN roPNT INHdNkaUN, CM. Ta6nUy PeXum 06cIyXuBaHua 2.
》KoJIuYeCTBO ropAunx KoFeiHbIX 3epeh CnIHaJIIN3npyET o6 aKTINBHOJ NaCTPOJKe yHKUIN.
Haxmnte KhONky npiroTOBHeNRA «KoFe》,T06bl BbIu n3 pexma 06cLyXuBaHn8e3 coxpaHeHHn HAcTpoek.
i INhfoopmaun
EcnB TeueHne 1 MNHyTbI He 6ydet HaKaTa HN OJHa KHONKa, aannapat nepexoNT B peKIM ROTOBHOCTN.
6.7 BocctaHOBJIeHne 3aBOdCKNX yCTaHOBOK aannapaTa
Moxho BocCTaHOBnTb 3aBOJCKne yCTaHOBKn aannapata. B cnyae BOCCTaHOBLeHnna 3aBOJCKNX yCTaHOBOK 6yDyT yTepeHbI HacTPOEHhBe BamN 3HaueHnE yHKcN. TaKxe 6yDyT yTepeHbI COxpaHeHHbI HaCTPOIN KpEnOCTn IN KOJIueCTBa KoFe, HacTPOEHhBe C NOMOUsbO yHKcNn «JIIObMbI KOe>.
Heo6xodmoe yclobne: annapaT roTOB K pa6ote.


HaKMMTe KHNkY «O6cIyJN- DOnOpONHnTeBHo KHNkY yDePKNBaIte Ix 6oJee uTo6bI npeiTn B pexm BaHn 2.


Heckolbko pa3 haxmnte «Obnykubahne», noka He 3aHouK fYHKuN 3aBodcKue 3ku.
- Heckolbko pa3 haxmnte KhoNky «O6cnyxnbHne», noka He NOBNTcra 3naQok fynkCn 3abodckue ycmaHOBUKU.

HeckoIbKO pa3 HaxMMTE KHOINKyoNocTB Kofoe》,NOKa He 3aROpNTcAo KofoeHoe 3epHo.

HaKmTe KHONky «O6cnyxNBa- n ydepxNBaIte ee 6oJee KyHd, BOCCTaHOBnTb 3aBOIDCKne HOBKn aannapata N BblTN n3 mMa O6cnyxNBaHn.
6.8 HactpoJaToHkoCTn NOMOJa
ToHKOCTb IOMOJa KoΦe BInIaTeHa Bkyc KoΦe.
Ecnn hactpontb 6oJee meKn nomOn,To Bkyc KoOe cTaHET KpeJe.
BHIMMAHVE
CIniHKOM TOHKn NOMOJI KOe MoKcET npuBecTI K 3acopeHIO 6Joka 3abapnBaHn.
Annapat noctabnaetcC onTnMaIb-HoH hAcTPOKoT OTHKOCTN NOMOA. DOnOJIHnTeBHyU hAcTPOKy TOHKOCTN NOMOA peKOMeHNyETc BblIOJIHrTa camoe pahee npIMepHO nOcne npiroToBHeHn 100 yauwek Kofoe (npimepHo uepe3 1 Mecau B 3aBNCmOcTN OT notpe6NeHn Kofoe).
He yctaHaBnBaIte CInuKOM 6oJIbUyIO TOHKOCTb NOMOA. PpI3Hak ONTMaJIbHO HAcTPOJKN TOHKOCTN NOMOA — paBHOMepHOe NOCTyPJIeHne KoFe n3 BblNyCKHOrO OTBepCTnI NOnJyuHene IerKOrO rYCTORO KpeMa.
ToHKoCTb NOMOJa CJIeNyEt HaCTpaINBaTb BO Bpemra60tbl KoΦeMOJKN.
Heo6xoJnmoe ycNoBne: annapaT rOtOB K pa6Ote.
Puc. 11: Hacmpouka monkocmu nomola
- OTKpoIte CbemHyIO nAHeJIb (9).ДЯ 3TOrO BO3bMntEcB 3a yrIy6NeHne C npaBoI CTOpOHbI aNpapaTa I NOTAHITe CbemHyIO nAHeJIb B CTOpOHy.
2.Пуг�овьтэндунчашky кфe.
3.Перемecntepbuvar(8)BbeBO nInn BnpaBo npn pa6oTaUoSei KoΦemOnKe. BneBO = 60Jee MeIknI NOMO1 BnpaBO = 60Jee KpynHbI NOMO1 - BctaBte cbeMHyo nAHeIb (9) c6Oky do ee fNKcaun.
7 yxodntexhnueeckoe 06cnykubHne
Perylaephoe BbIOpJIHeHne yXoJa n TexnHuCeCKOrO 6cbLyJxuBaHnI npI6opa n03BoJInT o6ecpeuTb HEn3MeHHO BbICOKoe KaueCTBO BaIUX HaIITKOB.
7.1 06za ynctka
Perylaepno npoBoOnTe uNcTky aannapata. Be3otlaraTeIbHO ydaIaIte BHeuHne 3arpa3HeHnB BVNe pTeH KoΦe.
BHUMAHVE
IcnoJIb3OBAHHe HEnoJXoJaIuNX ChnCTaIUX CpeDCTB MOxET CTaTB IpnUHHOI NOABLeHna UapAnHH Ha NOBepXHOCTAx.
He nCnoIb3yIte a6pa3nBhble TkaHn, r6kn uNCTaJIne cpeIcTba.
Heo6xoJumoe ycNoBne: annapaT BblKIO-ueH.
BbIOnHnYe HapxKyU qNCTky annapata npi NOMOuMЯrKoB, BlaJXHOt KaHn i CTaHApTbIX CpeDcTB dJaMbITbY NOCyDbI.
BbIMoIte POnDoN Dnla C6opa KapeIb, eMKoCTb Dnla KoOeHnHO JMbIXa N NOCTabKU POn YauKy. PpN EToM IcNoIb-3YInTe MraKyu, BnaJxHyIO caJIFeTKy IN CTaHJaPTHoe CpeIDCTBO Dnla MbITb IocyDbl. EMKOCTb Dnla KoOeHnHO JMbIXa MOxHO MbITb B NocyDomOeHuOH MaSInHe.
Дячstки кOTeHepaДЯЗернИСпОЛьзУтЕ МЯгКУЮ,СУXYUТKaHb.
7.2 Ynctka 6loka 3aBaPUBaHnIa
Bo n36eKaHne NOBpeKdEHHa annapaTa peKOMeHdyETcBAIIOJIHrTb YNCTKy 6noka 3aBaPUNBaHnO DN Hpa3 B HeJeIIO.
Puc.12:Демонмадблoka 3a8apu8aHua

Puc.13:Yucmka6noka3a8apu8aHua
Heo6xoHmOe ycNoBne: annapaT BbIKIO-ueH.
- OTKpoIte CbemHyIO nAHeJIb (9).ДЯ 3TOrO BO3bMNTeCb 3a yrIy6NeHne C npABoI CTOpOHbI aNNapaTaNOTAHITe CbemHyIO nAHeJIb B CTOpOHy.
- Haxmnte u yedejxnbaiTe hkaTbIm KpaChbI pyUar (19) ha pyuKe 6noka 3aBapnbAHna (10), noBepHnte pyko- Tky nO yacOBoi CTpeJIke Do ynpo a Co IeJyKOM.
- BbTaunTe 6NoK 3aBapuBaHn8 3a pyKy n3 annapaTa.
4.OchOBaTeIbHO npOMoIte 6IOK 3aBapINBaHnIeJIkOM IOI npOTouHoi BOIo co BCex CTOpOH. B nepByIO oupeIb CJIeIITe 3a TEM, UTO6bI B CNTe (20) He 6blIO OCTaTKOB Kofoe. - Пождпг, пoka с SFOKa 3abapubahnЯ CTeueT BOJa.
- C NOMOUI MOYKOH cyXoT KaHN ydaJIIne OCTaTKn KoΦe C NOBepxHocTei BHyTpni annapapa.
- BCTaBbTe 6IOK 3aBapuBaHnB aannapat. HaxMnte u ydepXuBaIte HaxaTbIM KpaChbI pyUar Ha puYke 6Ioka 3aBapuBaHnA, NOBepHnTe puKy npOTNb YacOBoi CTpeKN Do ynpoCo UeJIYKom.
- BctaBbTe cbeMHyIO paHeJIb c6Oky Do ee 0Kcaun.
PnB BKHIOUeHHOM annapaTe nonepemEHoe MIRAHne INHINKATOPOB FomOBHocmb Kpa6ome n OucmcKa yka3bIbaHT HaOTcyTCTBne 6Joka 3aBapuBaHn. IocNe YCTaHOBKn 6Joka 3aBapuBaHn aannapat NpeXoDNT B pexIM rTOBHOCTN.
7.3 BbInOpHeHne npoRpaMMbl OuNCTKl
PpOrpaMMA QnCTKn N03BOJareydaJIbTB PnTHa N OCTaTKn KOeHORo MaCna C NOMOuBcPcEaDCTBa DnA YnCTKn KoFeHbIX ABTomATOB.
Bo n36eKaHne noBpeKdEHHa aannapatapeKOMeHdyETcBAIINOLHAreTb npoRpaMMyOuNCTKN kaxDbte 2 Meca na nn npn pnoBJIeHN COOTBeTCTByUoSei HndNKaun Ha aannapate.
clean ToprauHnHnKaTOp Ouchmka cnHnHaJIIn3npyeTo HneO6xOAnMoCTn BbIOnHnTb OChCTky annapaata.
OCTOPOXHO
KoHTaKT CO cpeDCTBOM dIy UcTKn KOFeHbIX ABTOMaTOB MoXET CTAb npuHHO pa3dpaKeHnCJN3nCTbIX 06JOnueK rna3 n Koxn.
Co6IouaIte HCTpyKcIMn IOpimHeHnIO,yKa3aHHbIe Ha ynaKOBKe cpeCDtBaDJIy UCHTKN.
BHIMMAHVE
IcnoIb3ObaHne HnOIOxOIAuX CpeCDTBJL YNCTKN KOFeHbIX ABTOMaTOB MOKETCTaTb npuHoiN IOBpeXDeHn annapata.
IcnoJIb3yIteToJIbKOuNCTaIeTa6JIeTKnMelittaPERFECTCLEANJkoΦeHbIXABTOMaTOB.
BbIIOJIHeHHe IpOgPamMbI OChIcTKn 3aHIMaet OKoI O 15 MmHyT n erO HeIb3a IIpepbIbTaTb.
Tropaunn Hndnkatop Dunbmp CnHann3npyet O Heo6xOuMoCTn 3aMeHnTbΦnBtp DnIy BODbl.
UHΦopMaun
- Ecnu nCnoJb3yETcra 0nIbTp Ia BObl, To HeJIb3ra HAcTPONTb XeCTKOCTb BObl. XeCTKoCTb BObl aBTOMaTHueeCKn yCTaHOBHeHa «MraKa» (CM. rJaBy 6.3 Hacmpouka XecmKocMu BObl Ha cTp.242).
Ipeep npimmeHnem onyctnte fnilbtp Ha HeckoJbKO MInHT B EMKOCTb CO CBexKe Tpy6OpnoBODHO BDOI.
Heo6xoIumoe ycIOBne: annapaT rOTOB K pa6Ote.
- Haxmte KhoNky «06cnyKbA-Hne» uyepeXnBaIte ee 6oJee 2 cekyH, yTo6bl nepeiTu B pexm 06cnyKbAHn 1.
- Heckolbko pa3 haxmnte KhoNky «O6cnyxnbHne», noka He noBtca 3NaOOK npOrpaMMbl ΦnBtpa. >> TOpNT OndHO KofoeHoe 3epHO.
- Haxmte KhoNky «O6cnyKnaHne» uyepeKnaBaiTe ee 60Jee2 cekynd, yTo6bl 3aIyctntb nporpaMMy fInbTpa.
》 UNHДикаторФильmpMiraetdo 3aBepseHn nporpamMbIΦиьtpa.
3aropaeTcHnDnKaTOpIooDoH
d7 c6opaKanenb,cunHaNn3npyo
Heo6xOaUMocTnONopoXKnHTb
noDOHJ7c6opaKanenb
eMKoCTbJ7KoFeHOrOJXmbixA.
- CneTe JnDIOKoCTb n3 NOJDOHa dIra c6Opa KaIeJIb I eMKOCTb dIra KoΦeHHO rXMbIXa.
- UctaHOBtTe IOnDoH IJnC6Op KaIeNb 6e3 EMKoCTN IJn KOFeHOrO XMbIXa.
- Повстаьтей EMKоctь Дя КофeyHOrOЖмых по Вblnyckhoe OTBepCTne.
3aropaeTcNnDnKATOpBoda, cnHann3npyOHeo6xOJMoCTn CHaTb KOHTeHep DnIy BObl N BCTaBnTbΦnIbTp DnIy BObl.
- CHIMITE KOHTeHep DЯ BOdIbI.
- CneIte Bovody n3 KOHTeHepa IJn BObl.
-
BCTaBbTe HOBbI ΦnIbTp B KOHTeHep dIy BObl (cM.Puc.15).
-
HanonHInTe KOHTeHep DnB VOBbl.
-
YctaHOBNTe KOHTeHep DJIa BOdBi Ha MecTO.
》 ΦильТр помьВаETСВДОИ.
» Boda cInBaetcB POnDoH dIa c6opa Kaenb.
12.CneTe KnKoCTb n3 NOdoHa dIra c6opa KaPebN eMKOCTb dIra KoΦeHHO rKmbIXa.
13. UctaHOBITe IOnDoH IJIa c6opa KaIeIb I EMKoCTb IJIa KOFeiHOrO XMbIXa.
Heo6xOumoe ycNoBne: annapaT roTOB K pa6ote.
HaXMMTe KHOJNky «O6cIyKuBaHne» n DoJIOnHInTeIbHo KHOJNKy «KoΦe» n yIepKJBaIte Ix 60JIeE 2 cekYnD, uTo6bl nepeiTn B pexm O6cIyKuBaHn 2.
2. HeckoIbKO pa3 HaKMTe KHOJky «O6cLyKuBaHne», NOKa He NOBITc83NaUOK fYHKcNn BbInapua-Hue.
3. HaxMMTe KHONky «06cIyXnBa-Hne» I yIepXnBaIte ee 6oJIee 2 cekYnd, YTO6bI HaaytB BbIapuBaHne.
» ①ИнданkaTop Гомовсмь К paбOME мигает доTek пор,пoka annapaT He 6удт ROTOB K Bылари-Ваню.
3aRopaeTcNnDnKATOp Boda, CnHnAIn3npyo Heo6xOAnMoCTn CHaTb KOHTeHep DJIra BObl.
- Chmnte koHTeHep n cIeTe n3 Hero BODy.
》AnnapaT BbInapeH n aBTOMaTnueckn BbIKJIIOUaETcra.
8.2 TpaHcnpTnpoBka annapata
BHIMMAHVE
3aMep3aHHe OCTaTkoB BOdBi B aPnapeMoKTe npuBeCTN K NOBpeKdeHIO annapata.
He octablaIte aannapat npu tempe-type Hnke 0^
TpaHcnpOpTpyuTe annapaT B opunHaJIbHOI ypaKOBKe. 3TO nOMOKe TpeoTbPaTnTB NOBpeXJeHne annapaTa BO Bpemr TpaHCnpOpTnpOBKn.
Ipeep TeM KAK TpaHcnpOpTnpoBaTb aannapaT, BbINOHHTe CNeDyUOuNe DeiCTBnA:
- BbINOHNTE BbInapuBaHne BObln3 annapata (cm. rnaBy 8.1 BbInapueaHue annapama Ha cTp.252).
- CneTe KndKoCTb n3 NOdoHa dIa c6opakaneJIb n EMKoCTb dIa KofoH-HORO XMbIXa.
- CneiTe BOy u3 KOHTeHepa IJRA Bobl.
- OuNCTnTe KOHTeHep dJa KoOeHbIX 3epen.
- BbIOpHInTe OUncTKy aIInapaTa (cM. rnaBy 7.1 ObuaJ yucmKa Ha cTp. 246).
- YnakyuTe annapaT.
UHΦopMaun
- Пио OTnpaBke annapapaTа B cepBnchbI ueHrр kompaHm Melitta He Tpe6yEeTcra TaKke OTnpaBJIaTB NOdCTaBky NOd YauKy. 3TO N03BOJIn T36ExKaTb BO3MOxHbIX ZaapanHпрn TpaHCnOpTINpOBKe.
He nCnOJb3yIte cTaHdapTHyIO KJIeKJyIO yNaKOBouHyIO JeHTy dIraΦHKcauIN He3aKpePJIeHNbIX DeTale.IPi CNrTmN IeHTbI Ha aIInapaTe OCTaIOTc CJeDbI KJIe, KOtOpbie OChEh CLOXHO yJaIITb.
Division Household Products
Ringstr. 99
D-32427 Minden
Germany
www.melitta.de
Editorial department:
ZINDEL AG
www.zindel.de
- Overview of the appliance
- Appliance at a glance
- Overview of the control panel
- Dear Customer,
- For your safety
- Proper use
- Danger from electric current
- Risk of burns and scalds
- Other dangers
- First steps
- Unpacking the appliance
- Information
- Installing the appliance
- Connecting the appliance
- Switching on the appliance for the first time
- Basic operation
- Switching the appliance on and off
- Switching on the appliance
- Switching off the appliance
- Filling coffee beans into the bean container
- ATTENTION
- Filling with water
- Adjusting the outlet for coffee beverages
- Emptying the drip tray and coffee grounds container
- Preparing beverages
- Please note:
- Setting the coffee strength
- Setting the coffee quantity
- Preparing the coffee beverage
- Programming your favourite coffee
- Stopping coffee preparation
- Preparing two coffee beverages simultaneously
- Changing basic settings
- Service mode 1
- Setting Auto OFF
- Setting the water hardness
- Activating/deactivating switch-off rinsing
- Setting the brewing temperature
- Service mode 2
- Resetting the appliance to the factory settings
- Setting the grinding fineness
- Very finely ground coffee powder can clog the brewing unit.
- Care and maintenance
- General cleaning
- The use of unsuitable cleaning agents may lead to scratched surfaces.
- Cleaning the brewing unit
- Running the cleaning programme
- CAUTION
- Running the descaling programme
- A water filter may be damaged if it is screwed in during the descending programme.
- Using a water filter
- Inserting the water filter
- Changing the water filter
- Requirement: The appliance is ready for operation.
- Permanently de-registering the water filter
- Transport, storage and disposal
- Venting the appliance
- Transporting the appliance
- Disposing of the appliance
- Technical data
- Troubleshooting
- Sommaire
- Chere clientele, cher client,
- Transport of maskinen
- OBS
- Frossent restvand kan medfore skader pa maskinen.
- Sette inn vannfilter
- 063op annapata
- Osuchi Bua annapata
- 06uBn BnD nAHeN ynpaBneHna
- Ybaxaemblnokynatelb,
- 2ДЯВашев6e3oNaChOCTN
- UHΦopMaun
- I3MeHeHne OCHOBbIX HacTpoEK
- PexkIM o6cIyXuBaHnY 1
- BkIIOUeHne/BbIKJIIO-ueHne npOMbIBKn npn BbIKJIIOUeHn
- UHΦopMaunu
- HactpoRka TempepaTypbI npuroTOBJeHnA
- i INhfoopmaun
- BocctaHOBJIeHne 3aBOdCKNX yCTaHOBOK aannapaTa
- HactpoJaToHkoCTn NOMOJa
- BHIMMAHVE
- CIniHKOM TOHKn NOMOJI KOe MoKcET npuBecTI K 3acopeHIO 6Joka 3abapnBaHn.
- yxodntexhnueeckoe 06cnykubHne
- 06za ynctka
- BHUMAHVE
- Ynctka 6loka 3aBaPUBaHnIa
- BbInOpHeHne npoRpaMMbl OuNCTKl
- OCTOPOXHO
- TpaHcnpTnpoBka annapata
- 3aMep3aHHe OCTaTkoB BOdBi B aPnapeMoKTe npuBeCTN K NOBpeKdeHIO annapata.
Brand : MELITTA
Model : F230-104
Category : Bean to cup coffee maker