MINIPARTY ROCKER ONE - Speaker HISENSE - Free user manual and instructions
Find the device manual for free MINIPARTY ROCKER ONE HISENSE in PDF.
| Product type | Portable audio speaker |
| Brand | HISENSE |
| Model | MINIPARTY ROCKER ONE |
| Dimensions (W × H × D) | 295 × 550 × 258 mm |
| Weight | Not specified |
| Power supply | 100-240 V AC ~ 50/60 Hz or DC input 12 V, 2 A |
| Power consumption (AC) | 80 W |
| Maximum audio power | 300 W |
| Built-in battery | Li-ion 7.4 V, 5000 mAh |
| Battery life | Up to 15 hours (depending on usage) |
| Battery charging time | 3.5 hours |
| Bluetooth | Version 5.0, range up to 8 m |
| FM radio | Band 87.5-108 MHz, built-in wire antenna |
| USB port | USB 2.0, compatible up to 32 GB (WAV, WMA, MP3) |
| AUX input | 3.5 mm jack for external audio source |
| AUX output | 3.5 mm jack to connect external speaker |
| Microphone input | 6.35 mm jack for wired microphone |
| Guitar input | 6.35 mm jack for electric guitar |
| Wireless microphone | 2 microphones included (Plus model) or optional, AA 1.5V batteries |
| Wireless charging | Compatible with Qi smartphones (mains power only) |
| Water resistance | IPX4 (top panel, splash resistant) |
| LED lighting | Multiple modes, built-in strobe |
| Main functions | Bluetooth playback, FM radio, USB, AUX input, microphone, guitar, EQ (Rock, Jazz, Samba, Pop, Balance), DJ effect, TWS (wireless stereo connection between two identical speakers) |
| Package contents | User manual, quick start guide, warranty card, AC power cord, 4 AA batteries (Plus model), 2 wireless microphones (Plus model) |
| Maintenance and cleaning | Clean with a dry cloth. Do not use corrosive products. Do not expose to water (except IPX4 top panel). |
| Safety | Double insulation (Class II). Do not open. Avoid heat sources. Use only recommended accessories. |
| Repairability | Have any repairs done by qualified personnel. Spare parts not provided. |
Frequently Asked Questions - MINIPARTY ROCKER ONE HISENSE
User questions about MINIPARTY ROCKER ONE HISENSE
0 question about this device. Answer the ones you know or ask your own.
Ask a new question about this device
Download the instructions for your Speaker in PDF format for free! Find your manual MINIPARTY ROCKER ONE - HISENSE and take your electronic device back in hand. On this page are published all the documents necessary for the use of your device. MINIPARTY ROCKER ONE by HISENSE.
USER MANUAL MINIPARTY ROCKER ONE HISENSE
natural_image
Exterior view of a modern office building (no signage)USER MANUAL

Read all the safety instructions carefully before use and keep this instruction manual for future reference
Contents
Important Safety Instructions 2
Features 5
Package Contents 5
Product Diagram 6
Top View 6
Rear View 7
Connections 8
Connect Power 8
AUX IN/AUX OUT Socket 8
MIC Socket....9
GUITAR Socket....9
Wireless Microphone Connection (Only for Party Rocker One Plus) 10
Basic Operation 11
Standby/ON....11
DJ Effect....11
Select Modes....11
Adjust the Volume....11
Preset Equalizer 11
Bass settings 11
Adjust the LED light 11
AUX IN Operation 11
Wireless Charging 11
Bluetooth Operation 12
Pair Bluetooth-enabled Devices....12
Listen to Music from Bluetooth Device 12
TWS Connection....12
USB Operation 13
USB Operation....13
Charging from the USB Port 13
FM Radio Operation 14
Battery Charging For Party Speaker 14
Built-in Battery Charging....14
Troubleshooting 15
Specifications 16

CAUTION
RISK OF ELECTRIC SHOCK
DO NOT OPEN

CAUTION: TO REDUCE THE RISK OF ELECTRIC SHOCK, DO NOT REMOVE COVER (OR BACK). NO USER-SERVICEABLE PARTS INSIDE. REFER SERVICING TO QUALIFIED SERVICE PERSONNEL.

The lightning flash with arrowhead symbol, within an equilateral triangle, is intended to alert the user to the presence of uninsulated "dangerous voltage" within the product's enclosure that may be of sufficient magnitude to constitute a risk of electric shock to persons.

The exclamation point within an equilateral triangle is intended to alert the user to the presence of important operating and maintenance (servicing) instructions in the literature accompanying the appliance.
Safety
1 Read these instructions – All the safety and operating instructions should be read before this product is operated.
2 Keep these instructions – The safety and operating instructions should be retained for future reference.
3 Heed all warnings – All warnings on the appliance and in the operating instructions should be adhered to.
4 Follow all instructions – All operating and use instructions should be followed.
5 Do not use this apparatus near water – The appliance should not be used near water or moisture – for example, in a wet basement or near a swimming pool, and the like.
6 Clean only with dry cloth.
7 Do not block any ventilation openings. Install in accordance with the manufacture's instructions.
8 Do not install near any heat sources such as radiators, heat registers, stoves, or other apparatus (including amplifiers) that produce heat.
9 Danger of explosion if battery is incorrectly replaced. Replace only with the same or equivalent type.
10 Do not defeat the safety purpose of the polarized or grounding plug. A polarized
plug has two blades with one wider than the other. A grounding plug has two blades and a third grounding prong. The wide blade or the third prong is provided for your safety. If the provided plug does not fit into your outlet, consult an electrician for replacement of the obsolete outlet.
11 Protect the power cord from being walked on or pinched particularly at the plugs, convenience receptacles, and at the point where they exit from the apparatus.
12 Only use attachments/accessories specified by the manufacturer.
13 Use only with the cart, stand, tripod, bracket, or table specified by the manufacturer, or sold with the apparatus. When a cart or rack is used, use caution when moving the cart/apparatus combination to avoid injury from tip-over.
14 Unplug the apparatus during lightning storms or when unused for long periods of time.
15 Refer all servicing to qualified personnel. Servicing is required when the apparatus has been damaged in any way, such as power supply cord or plug is damaged, liquid has been spilled or objects have fallen into the apparatus has been exposed to rain or moisture, does not operate normally, or has been dropped.
16 ☐ This equipment is a Class II or double insulated electrical appliance. It has been designed in such a way that it does not require a safety connection to electrical earth.
17 To reduce the risk of fire or electric shock, do not expose this apparatus to rain or moisture. The apparatus must not be exposed to dripping or splashing and objects filled with liquids, such as vases, must not be placed on apparatus.
18 The mains plug is used as the disconnect device, the disconnect device shall remain readily operable.
Warning
- The battery (batteries or battery pack) shall not be exposed to excessive heat such as sunshine, fire or the like.
- These servicing instructions are for use by qualified service personnel only. To reduce the risk of electric shock, do not perform
Bluetooth®
any servicing other than that contained in the operating instructions unless you are qualified to do so.
- Avoid foreign bodies and liquids entering the device.
- Do not place open e.g. lit candles, on or directly adjacent to the device.
- Do not use any corrosive or abrasive cleaning agents. These could damage the surface of the device.
- Please refer the information on exterior bottom or rear enclosure for electrical and safety information before installing or operating the apparatus.
- Minimum distance around the apparatus for sufficient ventilation is 5cm;
- The ventilation should not be impeded by covering the ventilation openings with items such as newspaper, table-cloths, curtains etc.
- No naked flame sources such as lighted candles should be placed on the apparatus;
- Batteries should be recycled or disposed of as per state and local guidelines;
- The use of apparatus in moderate or tropical climates.
- The marking label is pasted on the bottom or back of the equipment.
WARNING
DO NOT INGEST BATTERY, CHEMICAL BURN HAZARD
If you think batteries might have been swallowed or placed inside any part of the body, seek immediate medical attention. Keep new and used batteries away from children. If the battery compartment does not close securely, stop using the product and keep it away from children. The remote control supplied with this product contains a coin/button cell battery. If the coin/button cell battery is swallowed, it can cause severe internal burns in just 2 hours and lead to death.

Correct Disposal of this product. This marking indicates that this product should not be disposed with other household wastes throughout the EU.
To prevent possible harm to the environment or human health from uncontrolled waste disposal, recycle it responsibly to promote the sustainable reuse of material resources. To return your used device, please use the return and collection systems or contact the retailer where the product was purchased. They can take this product for environmental safe recycling.
The Bluetooth ^® word mark and logos are registered trademarks owned by Bluetooth SIG, Inc. We are the licensee to use such marks. Other trademarks and trade names are those of their respective owners.
FCC INFORMATION (for US customers)
Warning:
Any Changes or modifications not expressly approved by the party responsible for compliance could void the user's authority to operate the equipment.
NOTE:
- This equipment has been tested and found to comply with the limits for a Class B digital device, pursuant to Part 15 of the FCC Rules. These limits are designed to provide reasonable protection against harmful interference in a residential installation. This equipment generates, uses and can radiate radio frequency energy and, if not installed and used in accordance with the instructions, may cause harmful interference to radio communications.
- However, there is no guarantee that interference will not occur in a particular installation. If this equipment does cause harmful interference to radio or television reception, which can be determined by turning the equipment off and on, the user is encouraged to try to correct the interference by one or more of the following measures:
- Reorient or relocate the receiving antenna.
- Increase the separation between the equipment and receiver.
- Connect the equipment into an outlet on a circuit different from that to which the receiver is connected.
- Consult the dealer or an experienced radio / TV technician for help.
- This device complies with Part 15 of the FCC Rules. Operation is subject to the following two conditions:
(1) this device may not cause harmful interference, and
(2) this device must accept any interference received, including interference that may cause undesired operation. - Shielded cables must be used with this unit to ensure compliance with the Class B FCC limits.
IC Caution
This device contains licence-exempt transmitter(s)/receiver(s) that comply with Innovation, Science and Economic Development Canada's licence-exempt RSS(s). Operation is subject to the following two conditions:
(1) This device may not cause interference.
(2) This device must accept any interference, including interference that may cause undesired operation of the device.
French:
RF warning for Portable device:
- The device has been evaluated to meet general RF exposure requirement. The device can be used in portable exposure condition without restriction.

WARNING: This product can expose you to chemicals including Pb which is known to the State of California to cause cancer. For more information go to www.P65Warnings.ca.gov
RF warning for Mobile device:
- This equipment complies with FCC radiation exposure limits set forth for an uncontrolled environment. This equipment should be installed and operated with minimum distance 20cm between the radiator & your body.
RED
- Hereby, Hisense International Co., Ltd. declares that the radio equipment type Party Rocker One/Party Rocker One Plus is in compliance with Directive 2014/53/EU. The full text of the EU declaration of conformity is available at the following internet address: https://hisense.fr https://hisense.de
UKCA
- Hereby, Hisense International Co., Ltd. declares that the radio equipment type Party Rocker One/Party Rocker One Plus is in compliance with Radio Equipment Regulations 2017. The full text of the EU declaration of conformity is available at the following internet address: https://hisense.co.uk
Operating ambient temperature:0 - 45°C, Storage and transportation ambient temperature: -10 - 60°C, altitude not higher than 5000m(air pressure not less than 45kPa),
WARNING:
- replacement of a battery with an incorrect type may defeat a safeguard;
- disposal of a battery into fire or a hot oven, or mechanically crushing or cutting of a battery, may result in an explosion;
- leaving a battery in an extremely high temperature surrounding environment, such as sunshine, fire, or hot surface may result in an explosion or the leakage of flammable liquid or gas;
- a battery subjected to extremely low air pressure may result in an explosion or the leakage of flammable liquid or gas.
CAUTION
Risk of fire or explosion if the battery is replaced by an incorrect type!
Features
Thanks for your purchase of our product. Please read through this manual before making connections and operating this product. Retain this manual for future reference.
● Bluetooth playback
● AUX IN
● FM tuner
- USB slot
● Microphone function
● Guitar function
● Multiple EQ sound effect mode
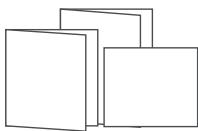
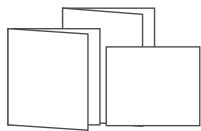
Package Contents
natural_image
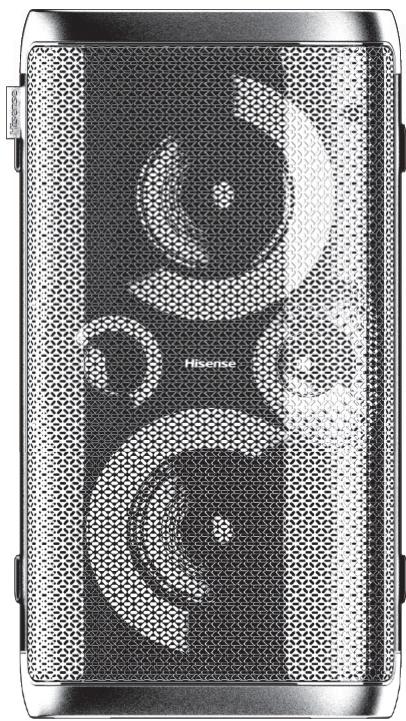
Close-up of a metallic electronic device with visible circuitry and components (no text or symbols)Main Unit
natural_image
Abstract geometric diagram of three overlapping squares with no text or symbolsUser Manual Quick Start Guide Warranty Card
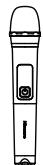
Wireless Microphone x2 (Only for Party Rocker One Plus)
* AC power cord

AA battery(1.5V) x 4
(Only for Party Rocker One Plus)
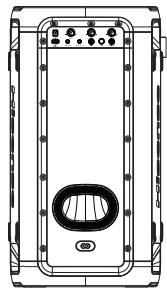
Product Diagram
Top View
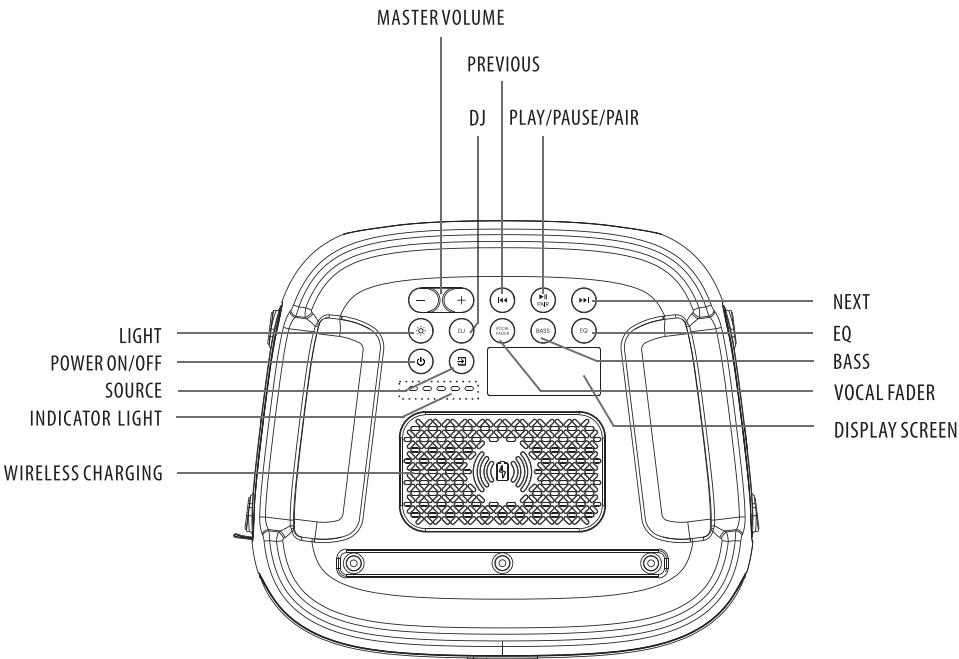
Party Rocker One Port
| LIGHT | Select the different lighting mode of LED indicator |
| POWER ON/OFF | Power on/off |
| SOURCE | Select a play function |
| INDICATOR LIGHT | Built-in battery charging indicator |
| WIRELESS CHARGING | Wireless charging |
| MASTER VOLUME | Increase/Decrease the volume level |
| DJ | DJ effect |
| PREVIOUS | Press to the previous track |
| PLAY/PAUSE/PAIR | Play/Pause/Pair playback |
| NEXT | Press to the next track |
| EQ | Equalizer manual mode |
| BASS | ON/OFF the BASS mode |
| VOCAL FADER | Switch between vocal fader on and vocal fader off |
| DISPLAY SCREEN | Display screen |
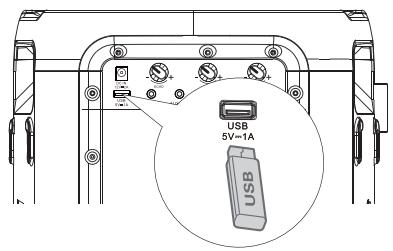
Rear View
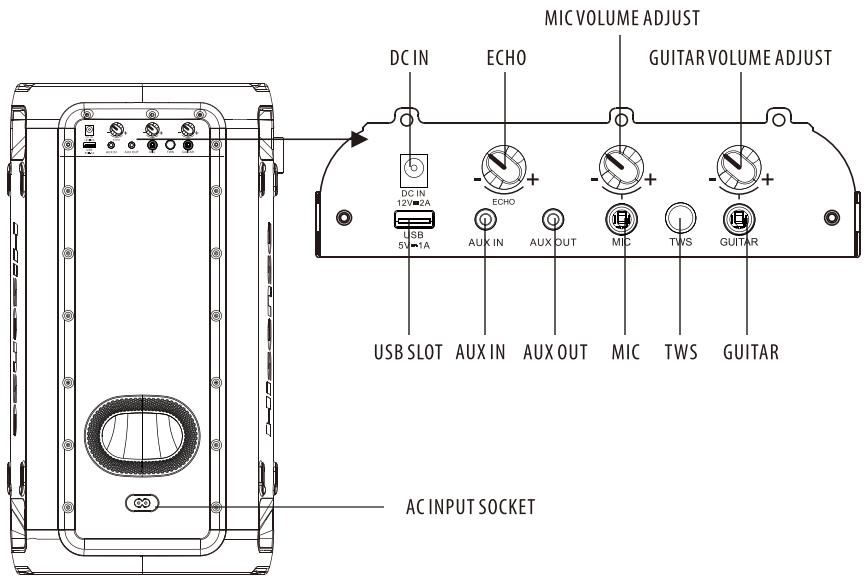
Party Rocker One Port
| DC IN | DC input socket(Only available for vehicle DC power adapter) |
| ECHO | Increase/decrease the mic echo volume level |
| MIC VOLUME ADJUST | Increase/decrease the mic volume level |
| GUITAR VOLUME ADJUST | Increase/decrease the guitar volume level |
| USB SLOT | USB slot |
| AUX IN | AUX input socket |
| AUX OUT | AUX output socket |
| MIC | MIC socket |
| TWS | Press to enter TWS pairing mode |
| GUITAR | Guitar socket |
| AC INPUT SOCKET | AC power socket |
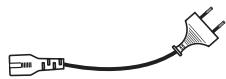
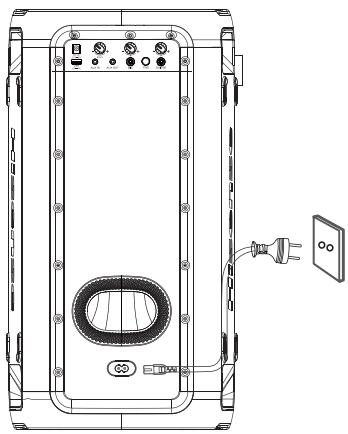
Connect Power
Rear panel of the main unit
natural_image
Technical line drawing of a device rear panel with electrical outlet and power plug (no text or symbols)Risk of product damage!
Ensure that the power supply voltage corresponds to the voltage printed on the back or the underside of the unit.
-Insert the AC power cord into a mains socket.
AUX IN Socket
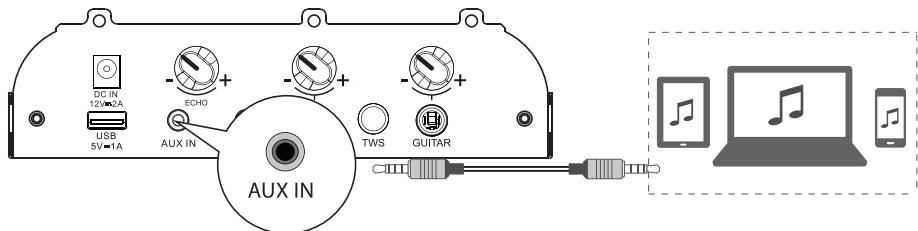
This unit has a audio input terminal. You can input the analogue stereo audio signals from extra devices such as VCD, CD, VCR, MP3 player, etc.
Use the audio cable with a 3.5mm(not supplied) connector to connect the input terminal AUX IN on the rear panel of the unit, press ➤ button to select AUX IN mode.
AUX OUT Socket
Rear View of the Main Unit
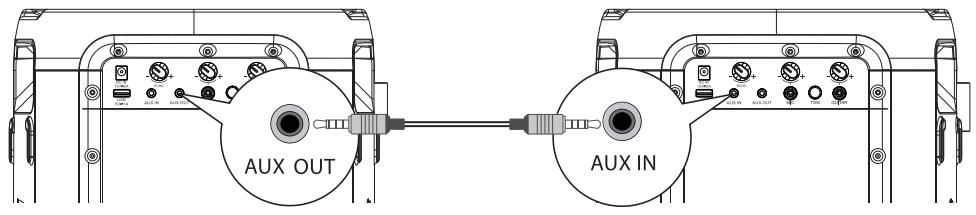
Rear View of another Main Unit (not included)
This unit has a AUX OUT jack. You can output the analog stereo audio signals to external devices such as an active speaker.
Connect an audio cable (not supplied) to the AUX OUT jack on the rear panel of the unit and the AUX IN jack of the external device, and the unit will output audio automatically to the external device.
MIC Socket
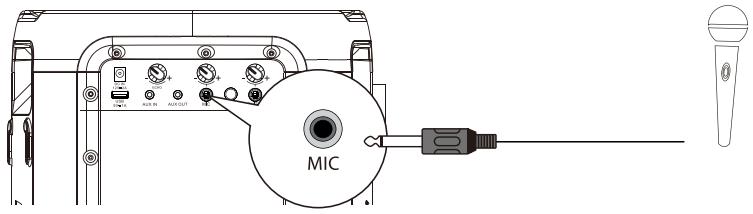
Insert the microphone into the microphone socket on the rear panel and adjust to a low level using the microphone volume knob on the rear panel.
Adjust the microphone volume level to your desired level using the microphone volume knob on the rear panel.
Now, enjoy the karaoke singing!
GUITAR Socket

Insert the guitar cable into the guitar socket on the rear panel.
Now, enjoy yourself!
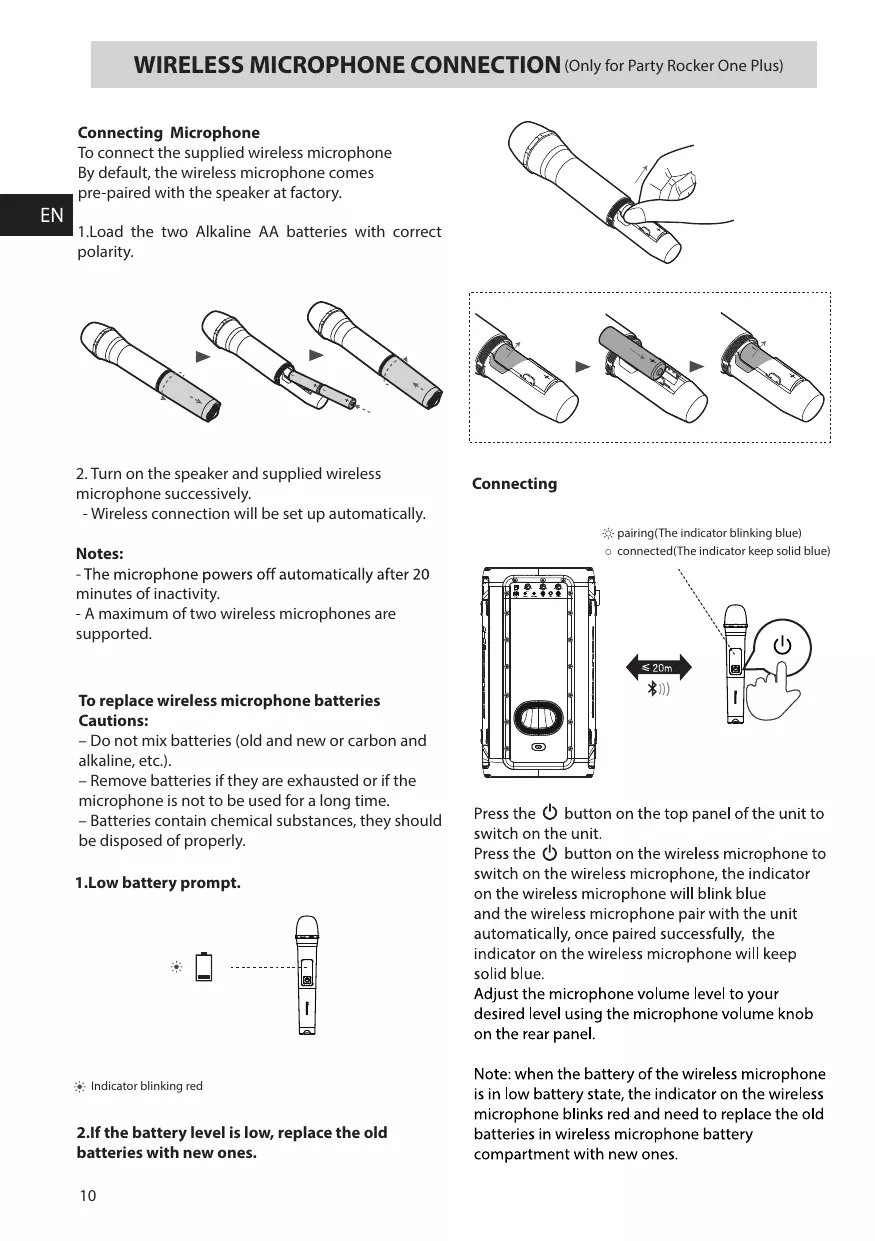
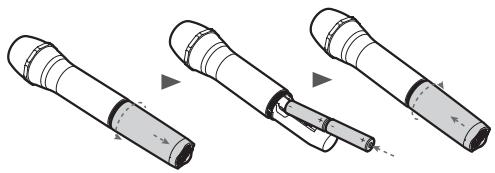
Connecting Microphone
To connect the supplied wireless microphone By default, the wireless microphone comes pre-paired with the speaker at factory.
- Load the two Alkaline AA batteries with correct polarity.
natural_image
Three-step illustration of a cylindrical device with a handle, showing progressive assembly and disassembly (no text or symbols)- Turn on the speaker and supplied wireless microphone successively.
- Wireless connection will be set up automatically.
Notes:
- The microphone powers off automatically after 20 minutes of inactivity.
- A maximum of two wireless microphones are supported.
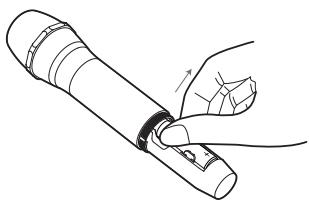
To replace wireless microphone batteries Cautions:
- Do not mix batteries (old and new or carbon and alkaline, etc.).
- Remove batteries if they are exhausted or if the microphone is not to be used for a long time.
– Batteries contain chemical substances, they should be disposed of properly.
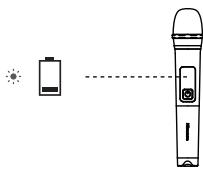
1. Low battery prompt.
Indicator blinking red
2. If the battery level is low, replace the old batteries with new ones.
natural_image
Line drawing of a hand holding a pen or stylus with a scroll wheel (no text or symbols)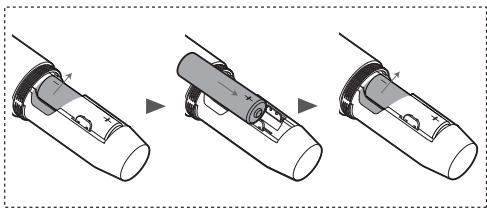
natural_image
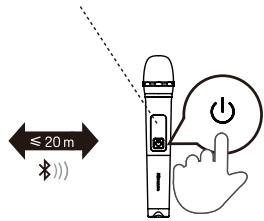
Three-step diagram showing a device being processed, with no visible text or symbolsConnecting
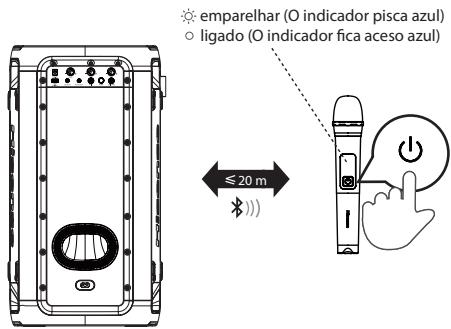
pairing(The indicator blinking blue)
○ connected(The indicator keep solid blue)
natural_image
Technical line drawing of a rectangular electronic device with mounting holes and a central vent (no text or symbols)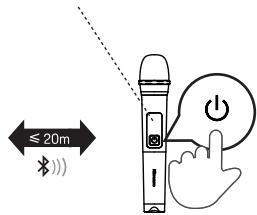
Press the ⏻ button on the top panel of the unit to switch on the unit.
Press the ⏻ button on the wireless microphone to switch on the wireless microphone, the indicator on the wireless microphone will blink blue and the wireless microphone pair with the unit automatically, once paired successfully, the indicator on the wireless microphone will keep solid blue.
Adjust the microphone volume level to your desired level using the microphone volume knob on the rear panel.
Note: when the battery of the wireless microphone is in low battery state, the indicator on the wireless microphone blinks red and need to replace the old batteries in wireless microphone battery compartment with new ones.
Basic Operation
Standby/ON
- Press the ⏻ button on the unit to switch the main unit ON, Press and hold for 2 seconds to OFF.
- Disconnect the main plug from the main socket if you want to switch the unit off completely.
- When there is no input signal from the unit more than 15 minutes, it will switch to Standby mode automatically.
DJ Effect
- Press the DJ button to the select different DJ effect.
- Press the DJ key once to play the current DJ. When you press the DJ continuously within 1 second, cycle to select different DJ sound effects. Press the DJ key for 1 second to start playing the current DJ sound effects after no operation;
- DJ sound effect types: DJ1 cheering sound, DJ2 drum sound, DJ3 alarm sound, DJ4 horn sound, DJ5 disc playing sound.
Select Modes
- Press the ➕ button on the unit to select the play function BT→USB→AUX IN→FM mode.
Adjust the Volume
- Press the VOL+/VOL- button on the unit to adjust the volume.
Preset Equalizer
- During play, press the EQ button repeatedly to select: ROCK-JAZZ-SAMBA-POP-BALANCE.
Bass settings
- Press BASS button to select BASS ON / BASS OFF.
Adjust the LED light
- Press the ⚙ button repeatedly to select the LED effect: LED OFF, LED1, LED2, LED3, LED4, LED5.
- Press and hold ⚙️ to switch ON/OFF the strobe light
AUX IN Operation
1 Ensure that the unit is connected to the TV or the other audio devices.
2 Press the ➕ button on the unit to select the AUX IN mode.
3 Operate your audio device directly for playback features.
4 Press the VOL+/VOL- button to adjust the volume to your desired level.
WIRELESS CHARGING
The party speaker can charge wireless charging compatible phones by placing your phone on top of the wireless charging logo of the party speaker.
Note:
1 The wireless charging can be used for charging compatible smart phone when the unit is in power on state or standby after 4 hours for AC mode.
2 In order to prolong the service life of the battery, direct wireless charging is not allowed in the battery mode.
Pair Bluetooth-enabled Devices
The first time you connect your Bluetooth device to this player, you need to pair your device to this player.
Note:
- The operational range between this player and a Bluetooth device is approximately 8 meters (without any object between the Bluetooth device and the unit).
- Before you connect a Bluetooth device to this unit, ensure you know the device's capabilities.
- Compatibility with all Bluetooth devices is not guaranteed.
- Any obstacle between this unit and a Bluetooth device can reduce the operational range.
- If the signal strength is weak, your Bluetooth receiver may disconnect, but it will re-enter pairing mode automatically.
1 Press the ➞ on the unit to select Bluetooth mode.
2 The word "PAIRING" will be shown on the display screen, the system has entered pairing mode.
3 Activate your Bluetooth device and select the search mode. "Hisense Party Rocker One" or "Hisense Party Rocker One Plus" will appear on your Bluetooth device.
4 Select "Hisense Party Rocker One" or "Hisense Party Rocker One Plus" in the pairing list, the system is successfully connected and the word "CONNECTED" will scroll show on the display screen.
5 Begin playing music from the connected Bluetooth device.
To disconnect the Bluetooth function, you can :
- Switch to another function on the unit.
- Disable the Bluetooth function on your device.
- Press and hold the "▶■" button on the unit.
Tips:
- Enter "0000" for the password if necessary.
- The player will also be disconnected when your device is moved beyond the operational range.
• If you want to reconnect your device to this player, place it within the operational range. - If the device is moved beyond the operational range, when it is brought back, please check if the device is still connected to the player.
- If the connection is lost, follow the instructions above to pair your device to the player again.
Listen to Music from Bluetooth Device
If your Bluetooth device supports A2DP, play music via your device.
• To pause/resume playback, press ▶ ■ ■ .
• To skip to a track, press ■◀◀ or ▶▶▶ ■ .
- Press the VOL+/- button to increase or decrease the volume.
TWS Connection
• This TWS(TRUE WIRELESS STEREO) bluetooth connection only use between the same two speakers.
- Power on both speakers, press ➤ button on the both speakers to switch to bluetooth mode, press TWS button on the one of both speakers, the display screen of the speaker scroll display TWS ON, and then scroll display TWS PAIRING, the both speakers enter the pairing state automatically, once paired successfully, one scrolls display MASTER on the display of the speaker is configured as the master, the other displays SLAVE on the display of the speaker is configured as the slave.
- Enable your bluetooth device and make sure it is in searching mode.
- Select "Hisense Party Rocker One" or "Hisense Party Rocker One Plus" from the list of discovered devices and connect to it.
- The master speaker will act as the left channel during TWS and will receive the bluetooth signal, the other speaker will act as the right channel to play music.
- Press and hold TWS button to disconnect the MASTER and the SLAVE speaker connection in TWS connection mode, the display screen of the both speakers scroll display TWS OFF.
USB Operation
1 Insert the USB device and press → button to select USB mode.
2 Play starts automatically. If play does not start automatically, press ▶■ button.
- To skip to the previous/next track, press the ◄◀◀/▶▶▶ buttons on the unit.
- To skip to the previous/next folder, press and hold ◀◀◀/▶▶▶ buttons on the unit.
3 In PLAY/PAUSE state, press and hold ▶■ button for 3 seconds to switch among in REPEAT 1/REPEAT ALL/RANDOM/NORMAL.
EN
Charging from the USB Port
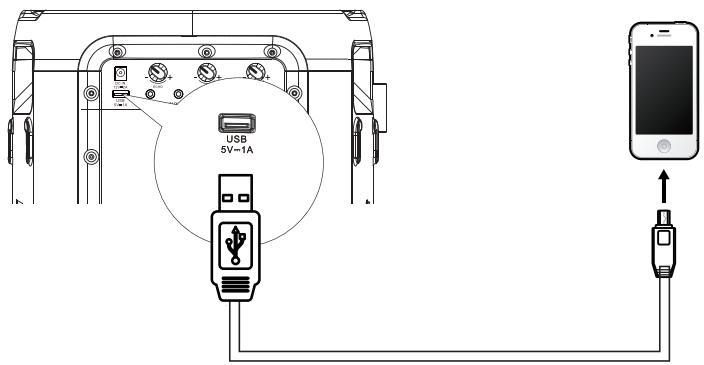
The Charging 5V 1A socket is designed for charging mobile devices(e.g. Mp3 player, mobile phone, etc). It supplies 5V DC at a charging current up to 1000mA(1A).
In power on mode, Use a USB cable (not included) to connect mobile device to Charging 5V 1A Socket of the unit and the mobile device will start charging.
FM Radio Operation
Press → button repeatedly to select the TUNER source. The display will show "TUNER".
TUNING in a Station
Auto Tuning
1 Press and hold ▶■ button to start auto tuning. Press ▶■ button again to stop the auto tuning.
2 The searched radio stations will be stored as preset stations.
Note: The search may not stop at a station with a very weak signal.
Manual Tuning
Press and hold ▪◀◀ or ▶▶▶ ▪ button to start the forward or reverse scanning. The display will show the frequency being searched. Once a station has been found, the scanning will stop automatically to change the frequency until you find the station you want.
Searching for a radio station manually
1 Briefly press the buttons ▪◀◀ or ▶▶▶ ▪ until the optimal reception frequency is reached.
2 Each time the buttons ■◀◀ or ▶▶▶ are pressed, the frequency decreases/increases by 0.05MHz.
Recalling a preset station
1 Press ▶■ button to switch between preset station and frequency.
2 Press ▪◀◀ / ▶▶▶ ▪ button to select your desired preset station.
Battery Charging For Party Speaker
Built-in Battery Charging
Use the AC power cord(included) to connect AC power input socket on the unit to AC power outlet. the current charging-indicator light on the unit will flash during charging, when five charging-indicator light on the unit keep solid light that the battery has been fully charged.
Alternatively, connect one terminal of the vehicle DC power adapter (not included) to the DC input socket on the unit and connect the other terminal of the vehicle DC power adapter to the power socket on the vehicle.
5 LED white light up=approx. 100% full
4 LED white light up=approx. 80% full
3 LED white light up=approx. 60% full
2 LED white light up=approx. 40% full
1 LED white light up=approx. 20% full
(indicating charging is needed)
Note: when the battery is low, the unit will emit a prompt beep.
When DC in is connected for charging, the unit can only be charged and cannot be played.
Troubleshooting
To keep the warranty valid, never try to repair the system yourself. If you encounter problems when using this unit, review the following before requesting service.
No power
- Ensure that the AC cord is properly connected.
- Ensure that there is power at the AC outlet.
- Press ⏻ button on the speaker.
I hear buzzing or humming
- Ensure all cables and wires are securely connected.
- Connect a different source device (Blu-ray player, etc) to see if the buzzing persists. If it does not, the problem may be with the original device.
- Connect your device to a different input on the speaker.
I can't find the Bluetooth name of this unit on my Bluetooth device
- Ensure the Bluetooth function is activated on your Bluetooth device.
• Re-pair the unit with your Bluetooth device.
SPECIFICATONS
| Model name | Party Rocker One |
| Model name | Party Rocker One Plus |
Power supply
| Voltage | AC 100-240 V ~ 50/60Hz; DC IN 12V 2A |
| Power consumption(AC) | 80 W |
| Dimensions(W x H x D) | 295x550x258mm |
Amplifier(Max Audio Power)
| Amplifier Maximun Audio Power Total | 300W |
Ambient conditions
| In operation | min. 0°C – max. +45°C / 60% relative humidity |
| Not in operation | min. -10°C – max. +60°C / 65% relative humidity |
| Built-in battery | Li-ion 5000mAh,7.4V |
| Battery charge time | 3.5 hours |
| Battery playtime | 15 hours* |
Radio
| FM band | FM 87.5 – 108 MHz. |
| FM antenna | Permanently installed wire aerial |
System
| Frequency range | 20Hz to 20KHz |
| Signal-to-noise | >80dB |
| USB port | USB 2.0 to 32GB WAV \WMA \ MP3 |
| USB output | Output: 5V 1A max. |
Bluetooth®
| Bluetooth Version | 5.0 |
| Bluetooth Transmitter Power | <10dBm |
| Frequency Range | 2.4GHz-2.4835GHz |
Proof-water
| Top-Panel | IPX4 |
Wireless microphone (Only for Party Rocker One Plus)
| Battery type | AA (1.5V x 2) |
| Transmission power | 9dBm |
| Distance between transmitter and receives | ≤20m |
*15 hrs battery playtime is only for reference and may vary depending on music content and battery aging after numerous charging and discharging cycles. It's achievable with a predefined music source, light show switch off, volume level at 7 and BT streaming source.
*If only powered by the battery, the Power would lowered automatically to protect the battery.
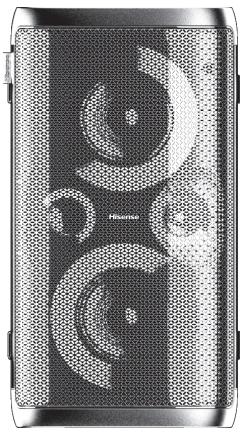
Hisense
Party Rocker One Party Rocker One Plus
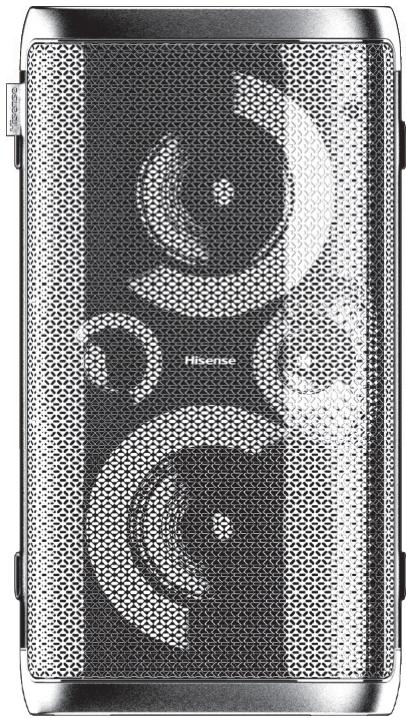
natural_image
Exterior view of a Hiense brand electronic device with geometric patterned panels (no readable text or symbols)MANUEL DE L'UTILISATEUR
Table des matières
RISQUE D'ELECTROCUTION NE PAS OUVRIR

ATTENTION : POUR RÉDUIRE LE RISQUE D'ÉLECTROCUTION, NE PAS ENLEVER LE COUVERCLE (OU FACE ARRIÈRE) IL N'Y A AUCUNE PIÈCE RÉPARABLE PAR L'UTILISATEUR À L'INTÉRIEUR. CONFIEZ LA RÉPARATION À UN TECHNICIEN QUALIFIÉ.

natural_image
Close-up of a metallic electronic device with circular and rectangular cutouts (no visible text or symbols)Unité principale
natural_image
Abstract geometric composition of three overlapping squares (no text or symbols)Port Party Rocker One
Port Party Rocker One
natural_image
Technical line drawing of a device casing with mounting holes and a power outlet (no text or symbols)natural_image
Three-step diagram showing a cylindrical device being processed into a segmented tool, with no visible text or symbols.natural_image
Line drawing of a hand holding a pen or stylus with a cable, no text or symbols present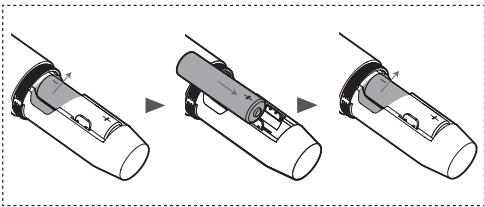
natural_image
Three-step diagram showing a device being processed, with no visible text or symbolsConnexion...
Party Rocker One Party Rocker One Plus
natural_image
Exterior view of a HiSense device with hexagonal patterned panels and circular cutouts (no readable text or symbols)MANUAL DE USUARIO

natural_image
Close-up of a metallic cylindrical device with three circular cutouts and textured surface (no visible text or symbols)Unidad principal
natural_image
Three overlapping squares with no text or symbolsnatural_image
Technical line drawing of a device casing with mounting holes and a power outlet (no text or symbols)natural_image
Three-step illustration of a pen-like tool with a handle, showing progressive folding and disassembly (no text or symbols)natural_image
Line drawing of a hand holding a pen or stylus with a handle, no text or symbols present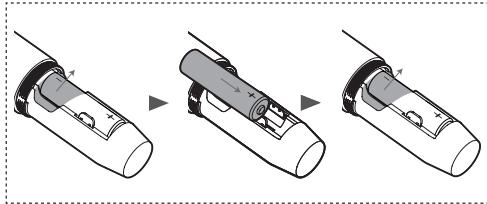
natural_image
Three-step diagram showing a device being processed, with no visible text or symbolsConectando
natural_image
Exterior view of a Hiense brand electronic device with hexagonal patterned panels and circular cutouts (no readable text or symbols)MANUAL DO UTILIZADOR
Conteúdo
natural_image
Close-up of a cylindrical electronic device with three circular components and a dotted pattern (no visible text or symbols)Aparelho principal
natural_image
Three overlapping squares with no text or symbolsnatural_image
Technical line drawing of a device casing with mounting holes and a power outlet (no text or symbols)natural_image
Three-step diagram showing a mechanical component being processed, with no visible text or symbols.natural_image
Line drawing of a hand holding a pen or stylus with a cable, no text or symbols present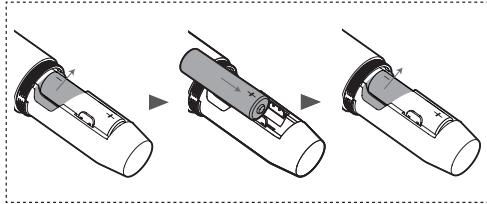
natural_image
Three-step diagram showing a device being processed, with no visible text or symbolsLigar
Party Rocker One Party Rocker One Plus
PARTY-LAUTSPRECHER
Modell: Party Rocker One
Party Rocker One Plus
natural_image
Exterior view of a modern office building (no signage)BENUTZERHANDBUCH
Inhalt
natural_image
Close-up of a textured, metallic object with circular patterns and no visible text or symbolsLautsprecher
natural_image
Abstract geometric composition of three overlapping squares (no text or symbols)natural_image
Three-step diagram showing a cylindrical device being processed into a segmented tool, with no visible text or symbols.Anzeige blinkt rot
natural_image
Line drawing of a hand holding a handheld device with a scroll wheel (no text or symbols)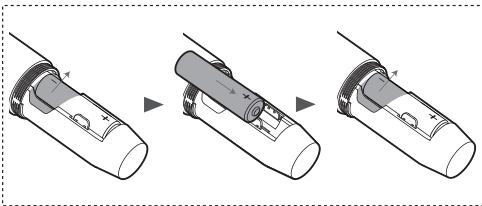
natural_image
Three-step diagram showing a mechanical assembly or assembly process (no text or symbols present)Verbinden
Party Rocker One Party Rocker One Plus
GŁOŚNIK IMPREZOWY
Model: Party Rocker One
Party Rocker One Plus
natural_image
Exterior view of a Hiense brand electronic device with hexagonal patterned panels and circular cutouts (no readable text or symbols)INSTRUKCJA OBSŁUGI

natural_image
Close-up of a metallic electronic device with three circular components and a textured surface (no visible text or symbols)Jednostka główna
natural_image
Abstract geometric composition of overlapping squares (no text or symbols)natural_image
Technical line drawing of a device rear panel with electrical connectors and a wall socket (no text or symbols)natural_image
Three-step diagram showing a cylindrical device being processed into a segmented cylindrical component, with no visible text or symbols.natural_image
Line drawing of a hand holding a pen or stylus with a scroll wheel (no text or symbols)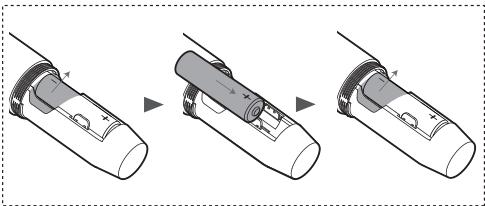
natural_image
Three-step diagram showing a cylindrical device being processed, with no visible text or symbols.natural_image
Technical line drawing of a mechanical component with mounting holes and a central oval feature (no text or symbols)