36DaRryONEARZ - CD Player DARTY - Free user manual and instructions
Find the device manual for free 36DaRryONEARZ DARTY in PDF.

User questions about 36DaRryONEARZ DARTY
0 question about this device. Answer the ones you know or ask your own.
Ask a new question about this device
Download the instructions for your CD Player in PDF format for free! Find your manual 36DaRryONEARZ - DARTY and take your electronic device back in hand. On this page are published all the documents necessary for the use of your device. 36DaRryONEARZ by DARTY.
USER MANUAL 36DaRryONEARZ DARTY
Pression longue: Allumer/Eteindre
RoHS Directive: 2011/65/EU, amendment 2015/863/EU
RoHS Directive: 2011/65/EU, amendment 2015/863/EU
David Peroo, Product Manager
on-earz
MP4 Player OEMP4_315 8GB
User's manual
1. Getting started
First thank you for buying this multimedia player. Please read this user's manual carefully before using the product to make a correct use of the functions and know well about the system connection and usage. Keep this manual in a safe place for future reference.
2.Box content
Please make sure that the following items are in the packaging when you open it for the first time.
- OEMP4_3158G player
- Micro USB charging cable
-User's Manual - Stereo earphones
3. Precautions
Read the following recommendations before using the multimedia player.
Keep it dry and don't take it to damp places to avoid the product's internal circuit being affected.
Keep the product away from direct sunlight or hot places. High temperatures will shorten the life of electronic devices, destroy the battery or distort certain plastic parts.
Don't expose the product to extremely cold area. It may damage the internal circuit board.
Don't try to disassemble the product as it may get damaged and the warranty will be cancelled.
Don't let it fall down onto the floor or other hard surfaces. The internal circuit might get damaged.
Don't use intensive chemical products or detergent to clean the product.
Don't scratch the surface with sharp objects.
Take care when charging the battery, excessive prolonged charging can damage battery lifetime. Charge the player to full capacity when using for the first time.
If you don't use this player for long time, please charge it at least once per month, in order to prevent the lithium battery from damaging because of excessive consumption.
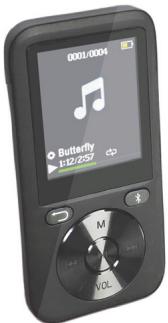
4. Product overview and keys description
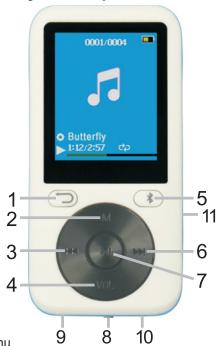
- Return: Return to previous menu
- MODE: Access to menu
- LAST: Previous Music / Rewind
- VOL: Volume
- BT: Go directly to the Bluetooth menu
- NEXT: Next Music / Fast-Forward
- PLAY: Short press: Enter/play/pause. Long press: turn on/off
- Main power ON/OFF switch
- USB port (micro 5Pin)
- Earphone jack
- Micro SD slot
5. Basic operations
- Turn on the device
When the main Power Switch is turned OFF, slide button to turn on device.
When the main Power Switch is turned ON, long press the PLAY button to turn on/off device.
After finishing using the player, make sure that the main Power Switch is turned OFF.
Volume
Press the VOL button to enter the volume control mode.
Then, press LAST/ NEXT button to decrease or increase the volume.
Press the Return button to exit the volume control mode.
- Charging the Battery
Connect one end of the micro USB cable supplied together with the product to one free USB port of the computer or to a USB wall charger (not included), and the other end to the micro USB port located on the product. It takes around 1,5 to 2 hours to charge completely the player.
When the battery is fully charged, the battery icon displays full. After some time of use, the battery indicator will be reduced.
When the battery is almost or completely out of power, the battery icon will be completely empty and the unit should be charged immediately.
Warning: If you are not using the player for few months, please recharge the battery to prevent damages on the battery.
6. Music
- Play music
- Enter the main menu, then press LAST/ NEXT button and scroll to "Music".

- Press PLAY button to select the music menu. Menu options include:
All songs: shows all songs from all storage (internal and external) of the player.
Artists: Shows the music alphabetically filtered by Artist's name.
Albums: Shows the music alphabetically filtered by Album's name.
Genres: Shows the music alphabetically filtered by Genres.
Playlists: includes "Playlists on the go [1], Playlists on the go [2], Playlists on the go [3]".
Create Playlist
- Select a song from the menu and press PLAY to start playing music:
Press LAST/NEXT: Select a Track
Long press LAST/NEXT: Fast forward / rewind
Press PLAY: Pause / Resume
Press MODE: Enter Music play submenu
Press Return: return previous directory
Long press MODE: Return to the main menu
Music Play Submenu
Play mode: Play music from... (All songs / this artist / this album / this genre), Repeat, Shuffle, Repeat settings (Repeat Mode, Replay Times, Replay Interval).
Sound settings: Equalizer, Variable Speed Playback.
Add to playlist
Remove from Playlist
Delete
Bookmarks
7. Video
This player only supports the AMV video files. If you have other video formats, you can convert it with a video conversion tool, and then can be played. There are some free conversion tools available on internet, you can find it easily with a simple search.

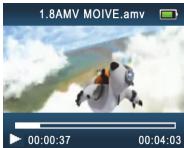
- Enter the main menu, press NEXT button and scroll to "Video". Press PLAY to enter.
- Select the file you want to play, then press PLAY to start playing.
- Press the MODE button to enter the menu.
You can now adjust these settings: Brightness, Repeat, Delete video, Create Playlist.
8. Voice Recording
- In the main menu press LAST/NEXT button and scroll to "Recordings". Then press PLAY button to enter menu interface.
- In the menu interface, select "Start voice recording", then press PLAY button to start recording.

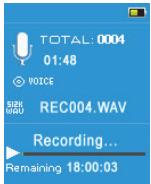
- Press PLAY: start / pause recording.
Long press MODE button to save the recorded file and return to the menu.
- Menu options include:
Start voice recording
Recordings library: Select and play the recorded files.
Record Format: select MP3 or WAV format.
Record Settings: set the recording bitrates.
9. Bluetooth

In the main menu press LAST/ NEXT button and scroll to "Bluetooth". Then press PLAY to enter the menu interface.
- BT Control: select to Enable or Disable Bluetooth.
- Search Device: press PLAY to open the searching interface. A list of the Bluetooth devices found will be displayed automatically. Press Return button to return to the previous menu.
Device's List: press PLAY to open it, and then press the LAST/ NEXT button to select a device. Then press PLAY to enter the device menu.
The current state of the device is available: you can proceed to "Connect" or "Unpair".
The current state of the device is "Connecting": you can proceed to "Disconnect".
Press Return return to the previous menu.
- All Music: Play music from a connected Bluetooth device.
BT Now Playing
10. Pedometer
Select "Pedometer" on main menu and press PLAY to enter the pedometer menu.
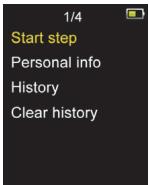
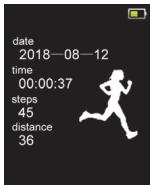
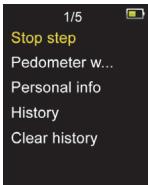
Select "Start step" and press PLAY to enter pedometer interface and start counting steps.
Press PLAY again to return to the pedometer menu. At this time, you can continue press Return to return to the main menu, Select and enter the Music, to achieve Using a pedometer while listening to music.
- Stop step: End this step and save the pedometer results in the history.
- Personal info: Select your step length.
History
Clear history
11. Settings
You can set the parameters of the player here.
In the main menu press the LAST/ NEXT button and scroll to "Setup". Press PLAY to enter the menu interface:
- Sleep timer: you can set here an automatic switch off schedule from 1min to 99min.
- Display settings: Select the brightness of the display between 0 an 11. The default is 5.
Backlight timer: 10 seconds, 20 seconds, 30 seconds or always ON.
Screensaver: None, Digital clock, Album art, Screen off.
- Date and time settings.
- Slideshow settings.
- Language selection.
- Information about the product.
- Format device: To format the main memory or TF Card memory. All data's will be lost!
- Factory settings: recover the initial values for all options of the player.
12. Pictures
- In the main menu press LAST/ NEXT button and scroll to "Pictures". Press PLAY to enter the menu interface.
- Select a picture and press PLAY to display it.
- Push LAST/NEXT button to browse the different pictures recorded in the memory.
- Press MODE button to enter the picture menu. The available options are:
Brightness, Backlight timer, Slideshow settings, Delete picture, Create Playlist.
13.eBook
- In the main menu press the LAST/NEXT button and scroll to "eBook". Press PLAY to enter the menu interface.
- Choose the desired txt file, then press the PLAY button to start reading.
- Press LAST/NEXT button: move to up and down page.
- Press MODE button to enter the eBook menu. The available options are:
Play setting, Delete eBook,Bookmark Select, Delete bookmark, Add bookmark, and Page select.
14. Other Settings
- Micro SD Card
The player support micro SD / micro SDHC (TF) Card as external memory, with a maximum capacity of 32Gb.
When the TF card is inserted in the player, a menu for Local folder and Card folder will appear for each function of the player. Select the desired menu and press PLAY to select it.
- Folder view
Display and edit all the directories and files contained in the memory of the player.
In the main menu press LAST/ NEXT button and scroll to "Folder view". Press the PLAY button enter menu interface. Select the desired option.
Press PLAY to Browse or Play.
Press MODE and select "Delete" to delete the selected file or directory.
- Tools
In the main menu press LAST/ NEXT button and scroll to "Tools". Press PLAY button to enter the menu interface. The available tools in this menu are:
Calendar
Stopwatch
Alarm: Alarm clock set
- Using the player as USB Disk
The player can also be used as a standard USB disk. It will be automatically recognized by Windows or Mac computers.
Use the micro USB cable to connect the player to the PC.
Select "Charge & Transfer" and press PLAY to enter the "USB disk" mode.
Choose "Charge & Play" if you want to use the player while its battery is charging.
15. Technical Specifications
| Dimension | 88*43*10mm | |
| Weight | 30 g | |
| Screen | 1.8 TFT display (128*160 pixels) | |
| Connecting to PC | High Speed USB2.0 (micro 5PIN) | |
| Music Formats | MP3, WMA, WAV, APE, FLAC | |
| MP3, WMA | Max. Output | (L) 10mW + (R)10mW (32Ohm) |
| MP3 Bit rate | 8K bps – 320K bps | |
| WMA Bit rate | 5K bps – 384K bps | |
| Signal to noise ratio | 45dB | |
| Photo format | JPG, BMP | |
| Operate Temperature | 5 to 40 degree celsius | |
| Supported Systems | Windows / Mac | |
| Operating frequency | 24MHz | |
| RF max output | +10dBm | |
Please note: The design and specifications of this product may change without prior notice.
16. About this manual
We strive to ensure that the information contained in this manual are as accurate as possible. Changes may be made to the manual or the product without prior notification. The latest updates will be available on our website www.onearz.com. Our company shall under no circumstances be held liable for injury or damage caused by errors or omissions in this manual.
© ON EARZ 2018. All brands and trademarks mentioned in this manual are the property of their respective owners. Bluetooth is a trademarks owned by Bluetooth SIG Inc, USA.
CE DECLARATION OF CONFORMITY
We, manufacturer / importer,
Company:A6 Europe s.a.
Address: 127-129 rue Colonel Bourg, 1140 Brussels, Belgium
Declare under our own responsibility that the following equipment :
Brand:ON.EARZ
Item code: OEMP4_3158G
Product description : Multimedia player
Complies to the essential provisions of the following EC Directive(s):
RED Directive: 2014/53/EU
LVD Directive: 2014/35/EU
EMC Directive: 2014/30/EU
RoHS Directive: 2011/65/EU, amendment 2015/863/EU
And complies with the essential provisions of the following harmonized European standards:
EMC:
Draft ETSI EN301489-1 V2.2.0: 2017-03
Draft ETSI EN301489-17 V3.2.0: 2017-03
EN55035:2017
EN55032:2015+AC:2016
Radio:
ETSI EN300328 V2.1.1: 2016-11
Safety: EN62368-1:2014+A11:2017
Health:EN62479:2010
Date: December 2019
David Peroo, Product Manager
#
Start voice recording