
EC 100 - Air conditioner PROLINE - Free user manual and instructions
Find the device manual for free EC 100 PROLINE in PDF.
| Product type | Evaporative air cooler (air conditioner) |
| Brand | PROLINE |
| Model | EC 100 |
| Dimensions (W x D x H) | 260 x 345 x 715 mm |
| Net weight | 7.8 kg |
| Power supply | AC 220-240 V ~ 50 Hz |
| Cooling power | 60 W |
| Max airflow | ≥20 m³/min |
| Water tank capacity | 8 L |
| Main functions | Cooling / Humidifier, Ionizer, Oscillation, Timer (1/2/4/8 h), 3 speeds, Ventilation modes (Normal, Nature, Night) |
| Cooling type | Evaporative with ice cube compartment and ice packs |
| Remote control | Yes, 2 AAA batteries, range 6 m |
| Air filter | Monthly cleaning: washable screen filter with soapy water, air filter with vacuum cleaner |
| Water tank cleaning | Monthly, drain via drain plug, clean with mild detergent |
| Safety | Low water level alarm, auto shut-off/standby, splash protection on control panel |
| Included accessories | 2 ice packs, remote control, user manual |
| Repairability | Consult a qualified technician; power cord replaced by manufacturer or authorized |
Frequently Asked Questions - EC 100 PROLINE
User questions about EC 100 PROLINE
0 question about this device. Answer the ones you know or ask your own.
Ask a new question about this device
Download the instructions for your Air conditioner in PDF format for free! Find your manual EC 100 - PROLINE and take your electronic device back in hand. On this page are published all the documents necessary for the use of your device. EC 100 by PROLINE.
USER MANUAL EC 100 PROLINE
For your safety please read the following information. The appliance must be connected to a 230 volts 50 cycle AC supply by means of a three pin socket and should be protected by a 13 amp fuse in the plug.
The appliance is supplied with a 13 amp 3-pin plug fitted with a 13-amp fuse. Should the fuse require replacement, it must be replaced with a fuse rated at 13 amp and approved to BS1362.
If the mains plug is unsuitable for the socket outlet in your home or is removed for any other reason, then the cut off plug should be disposed of safely to prevent the hazard of electric shock. Remove the fuse from the old plug before disposal.
There is a danger of electric shock if the cut off plug is inserted into any 13-amp socket outlet.
How to wire a 13 amp plug.
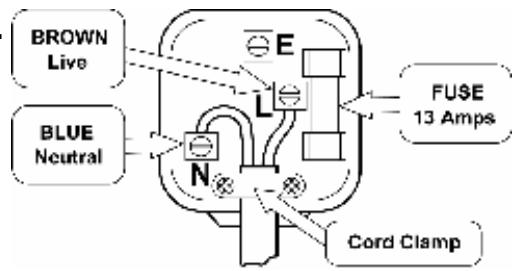
Important The wires in the mains lead on this appliance are coloured in accordance with the following code:
Blue – Neutral Brown – Live
As the colours may not correspond with the markings identifying the terminals in your plug proceed as follows.
The blue wire must be connected to the terminal marked N.
The brown wire must be connected to the terminal marked L.
No wire must be connected to the terminal in the plug which is marked with the letter E or with the earth symbol or coloured green and yellow.
Make sure the mains cord is secured firmly under the cord clamp.
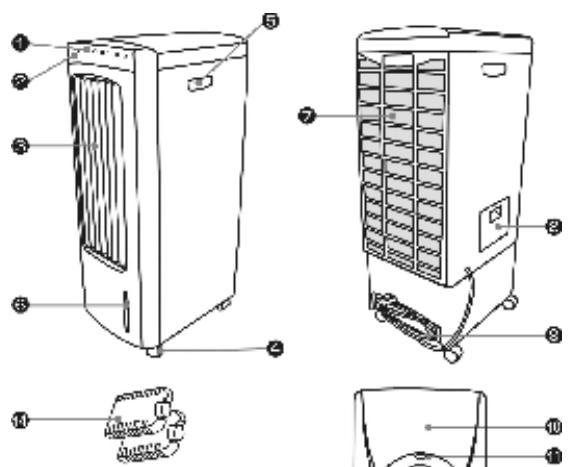
PARTS
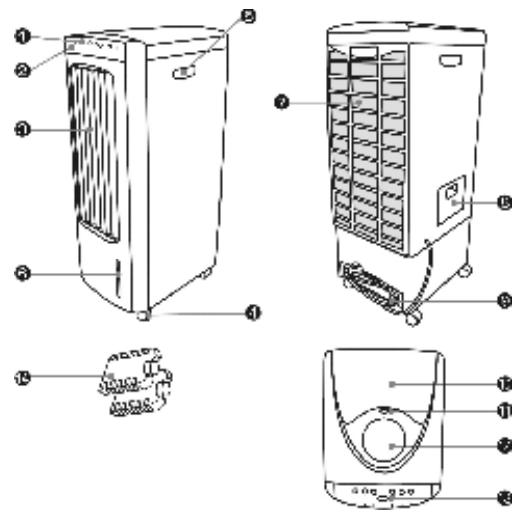
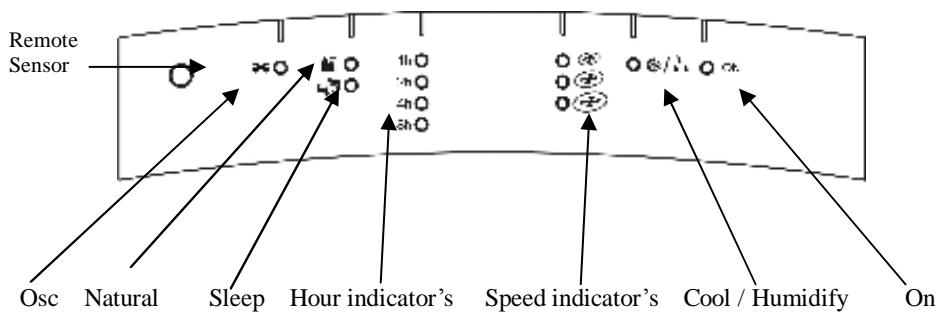
- Function Indicator
- Remote Control Receiving Window
- Air outlet
- Casters
- Handle (one on each side)
- Water Level Indicator
- Air-filter net
- Water compartment
- Power cord
- Ice compartment
- Ice adding door button
- Remote controller repository
- Control panel
- Ice packs
Remote Control
- Off/Standby 5.Mode
- On / Speed 6. Cool / Humidifier
- -Ion 7. Oscillation
- Timer
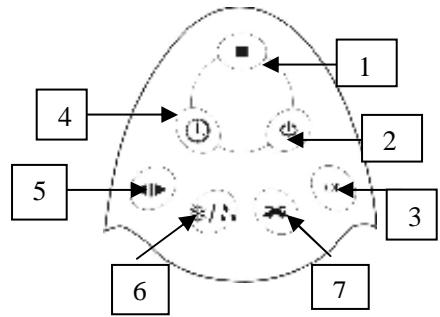
Control Panel
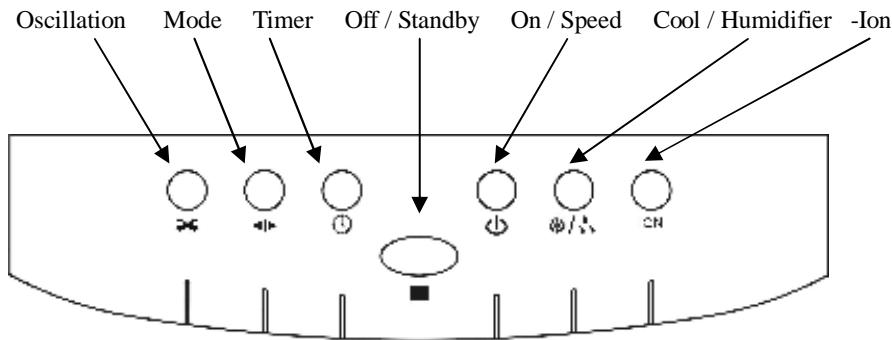
Indicator Panel
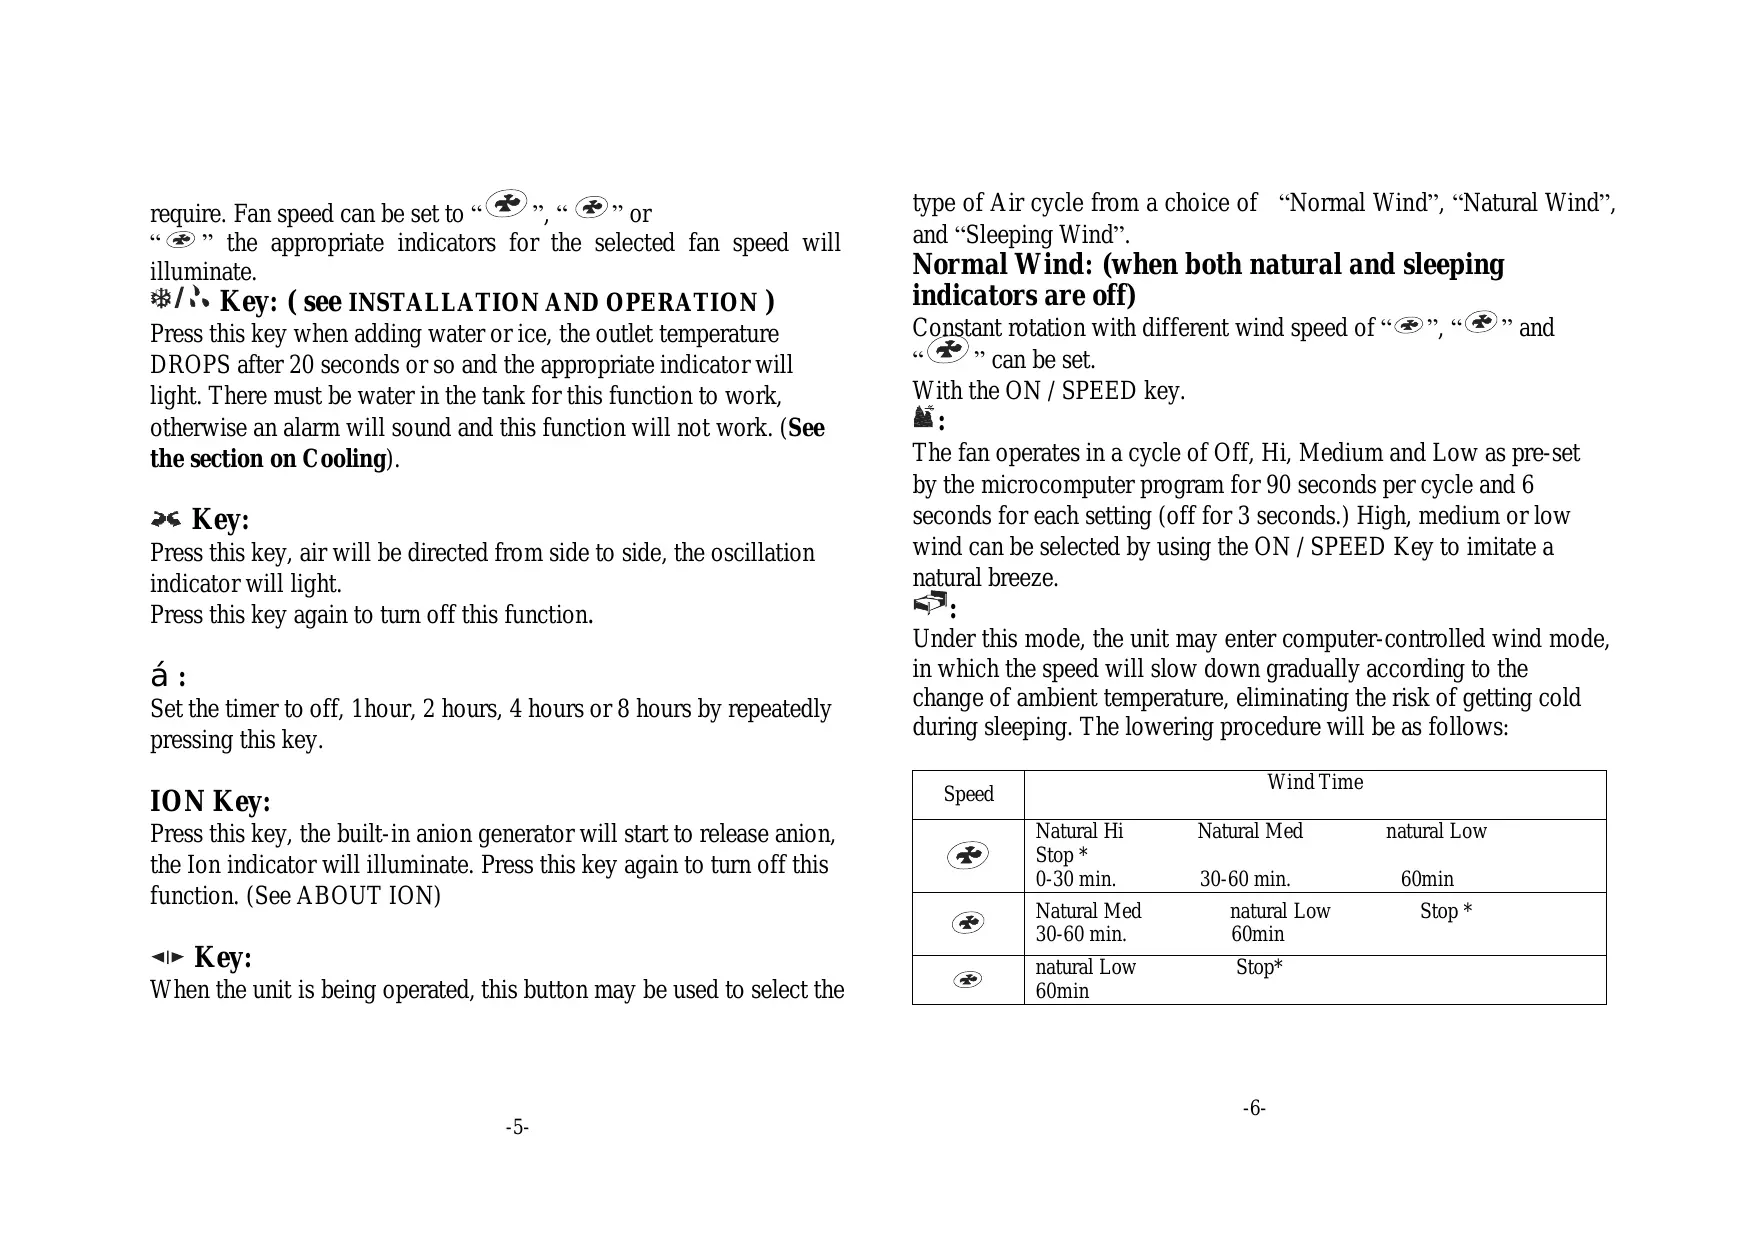
Manual Operation for Switches on Control Panel “ 山 ” Key:
The key is used for starting the unit and changing the fan speed. Fan speed is initially medium speed and changes to low speed after 3 seconds, then you can press the key to set the fan speed you
require. Fan speed can be set to " " , " ⑥ " or " ⑥ " the appropriate indicators for the selected fan speed will illuminate. 念 /念 Key: ( see INSTALLATION AND OPERATION ) Press this key when adding water or ice, the outlet temperature DROPS after 20 seconds or so and the appropriate indicator will light. There must be water in the tank for this function to work, otherwise an alarm will sound and this function will not work. (See the section on Cooling).
Key:
Press this key, air will be directed from side to side, the oscillation indicator will light.
Press this key again to turn off this function.
+:
Set the timer to off, 1 hour, 2 hours, 4 hours or 8 hours by repeatedly pressing this key.
ION Key:
Press this key, the built-in anion generator will start to release anion, the Ion indicator will illuminate. Press this key again to turn off this function. (See ABOUT ION)
Key:
When the unit is being operated, this button may be used to select the
type of Air cycle from a choice of "Normal Wind", "Natural Wind", and "Sleeping Wind".
Normal Wind: (when both natural and sleeping indicators are off)
Constant rotation with different wind speed of “ 心 ”, “ 心 ” and “ 心 ” can be set.
With the ON / SPEED key.
:
The fan operates in a cycle of Off, Hi, Medium and Low as pre-set by the microcomputer program for 90 seconds per cycle and 6 seconds for each setting (off for 3 seconds.) High, medium or low wind can be selected by using the ON / SPEED Key to imitate a natural breeze.
:
Under this mode, the unit may enter computer-controlled wind mode, in which the speed will slow down gradually according to the change of ambient temperature, eliminating the risk of getting cold during sleeping. The lowering procedure will be as follows:
| Speed | Wind Time | ||
| Natural Hi Stop * 0-30 min. | Natural Med 30-60 min. | natural Low 60min | |
| Natural Med 30-60 min. | natural Low 60min | Stop * | |
| natural Low 60min | Stop* | ||
Key:
When the unit is running, press the Key, the unit will enter "STAND-BY" mode.
Cooling
Extra cooling can be achieved by putting ice cubes in the ice compartment (10) or one of the 2 supplied ice packs into the water compartment (8) after freezing them in your freezer, press the key to increase the cooling effect.
Freeze one pack whilst using the other to maintain extra cooling.
WARNING:
Remember that the water level will rise as the ice melts. When using ice, keep checking the water level to avoid water overflow.
About Ion:
The High Efficiency Air Anion Generator can generate anion through discharging carbon fibre, during which the electrons and oxygen in the air can combine to make negative ion (anion). This has the effect of the oxygen molecules absorbing the anion, which makes oxygen-carrying anion. As the oxygen-carrying anion has strong magnetism, it is also known as "magnetic oxygen".
About Anion
Research proves that the presence of anion in the air is important to air quality. People in forests near waterfalls and at the seashore
enjoy much better air quality and freshness because of anion contents in these places, 1000 times more than when near office buildings and urban residential areas. The oxygen combined with anion is very active and much easier to be absorbed by human organs, which is beneficial for promoting human body growth, helps prevent disease and revives the spirit.
Therefore it constitutes an indispensable improvement to domestic life.
In the table: Ion stands for negative ion, S for number of ion, and CC for millilitre.
| Space | Forest, waterfall region | Mountain, seashore | Suburb, field |
| Content | 100,000-500,000 Ion S/CC | 50,000-100,000 Ion S/CC | 5,000-50,000 Ion S/CC |
| Relation with human health | Spontaneous recovery | Sterilising and reducing spreading of disease | Enhancing human immunity |
| Space | In urban park | Green belt of street |
| Content | 1,000-2,000 Ion S/CC | 100—200 Ion S/CC |
| Relation with human health | Maintain the basic demand for health | Threshold of inducing physiological disorder |
| Space | Enclosed urban residential area | Air-conditioned room | Air-conditioned room with Anion Generator |
| Content | 40–50 Ion S/CC | 0–25 Ion S/CC | 100,000–500,000 Ion S/CC |
| Relation with human health | Inducing physiological disorder, headache, insomnia and etc. | Inducing “Air-con” symptom | Spontaneous recovery |
Prevention of "Air-con" Symptoms
Long stays in an enclosed air-conditioned room may result in exposure to excessive dust, hazardous gas and positive ion, which induce "Air-con" Symptoms, light-headedness, insomnia, nausea and amnesia which can become extremely dangerous to your health. It is verified through tests that a room equipped with the Anion Air-con Fan can have the anions increased from 50 to 10,000 within half an hour of operation. The density of anion can be as much as 1 million, equivalent to the oxygen anion content in forest or waterfall
areas after 3 hours. Long term presence in this environment may benefit from improving myocardium function, pulmonary function and better sleeping, promoting metabolism and strengthening resistance against disease.
Effect of Anion in Dust-proof and Sterilisation
With a negative electric charge, the anion in the air can be blown throughout the room by the fan to neutralise the positive charge in the particles of smoke and dust that float in the air, the neutral particles losing activity may deposit automatically. The combination of anion and bacteria cause structural modification of bacterial virus or energy transfer, which lead to death of bacterial viruses.
Therefore anion is effective in dust resistance, sterilisation, medical care and keeping fit. That is way utilisation of air-conditioners with anion generating technology is in line with good health care.
Installation and Operation Guide
Open the package and take the unit out. To connect power for use after abandoning foam cover.
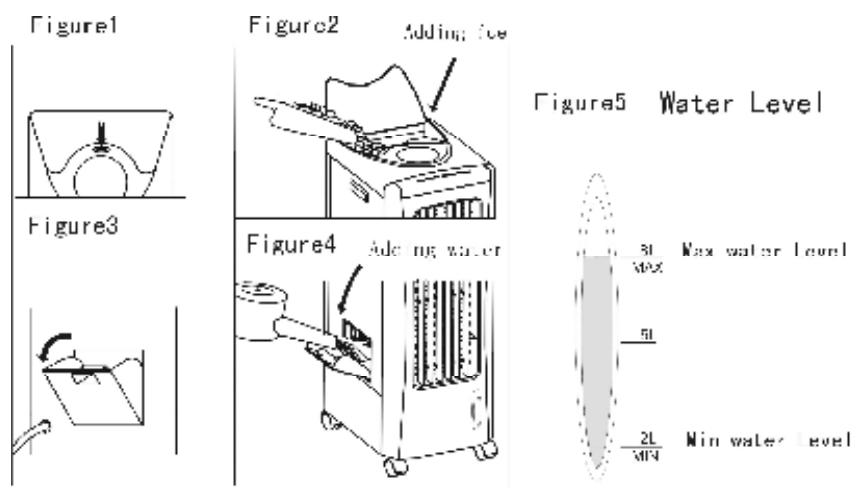
Adding Water:
Open the Water compartment door on the left of the unit and fill the water tank (figure3, figure4). Do not exceed the maximum water level, marked on the water level window on the front bottom of the unit (figure 5).
NOTE:
If there is little or no water in the tank the unit will sound an alarm and this function will stop working.
Pay attention to the following:
1) When adding water, pay attention to the water level indicator on the front of the unit (figure5).
2) Do not exceed the maximum level line (figure5).
3) Close the cover after adding water, otherwise the unit will not work.
4) If you want to reduce more temperature, you can put ice on the top of the unit (figure1, figure2).
5) Turn on the unit with the key, Press repeatedly to select high, medium or low wind.
6) Timing hours (1hour, 2hours, 4hours or 8hours) can be selected. If timing indicator is not on, the timing function is not in operation.
7) When choosing the wind oscillation function, press the key. If oscillation indicator is on, air direction is from left to right; if you move horizontal air leaf at the right side of the air outlet, air can be blown up or down.
8) When you want to stop the machine, press the “■ Key”, the unit goes into “■” mode.
Remote Control
1) The machine can also be operated with the remote control. Open the batteries cover on the back of the remote control and install two type AAA batteries observing the polarity markings inside the battery compartment.
2) There are 7 keys on the remote controller, the functions are the same as the corresponding buttons on the control panel of the main unit.
When using remote control, it should be aimed at the receiver window on the front of the unit at the top left, the maximum distance is 6 meters.
1. Instruction of "ICE BOX"
The unit comes with two "ice boxes", for its ability to cool the Air, it can absorb the energy of water little by little, keeping the
temperature of the water around 8^0 C lower than that of the ambient temperature, making the wind cooler.
Operation Method
1) Put the ICEBOXES into the refrigerator and keep them inside till they are completely frozen.
2) Put them into the water tank from the Adding water cover on the left of the unit. And then close the door. The temperature of the water will be 8^0 C lower than that of the ambient temperature and keeps for 4 hours, cooling the wind.
3) Using the two ICEBOXES alternately allows continuous cooling.
Points for Attention
When adding water, do not exceed the "MAXIMUM" level.
Choose normal wind when environmental humidity is too high as cooling function is accompanied with humidifying.
After adding water, do not tilt the unit or crash into objects when moving the unit, this keeps water from overflowing from the water tank.
I Do not put any objects on the unit.
Disconnect power and pull out the plug before cleaning.
Clean the cabinet of the unit with a damp cloth and mild detergent. Do not use aggressive detergents or solvents to clean the cabinet. Do not pour water on the control panel.
If the machine has fallen down with water in it, the plug should be pulled out of the outlet immediately. The machine can be switched on after 24 hours. You might damage the machine if you do not follow this instruction.
1 Do not place the Air outlet or Air inlet of the unit close to a wall or curtain, otherwise air can be blocked which will effect performance.
You will hear some uneven wind noise after using for a long period of time. This is because the air filter is dusty and blocks the airflow. Clean the filters (see the section on cleaning the filters).
When not using the appliance, pull the plug out of the wall outlet.
The appliance must be taken to a qualified service agent for repair.
If the supply cord is damaged, it must be replaced by the manufacturer, its service agent or similarly qualified persons in order to avoid an electrical hazard.
NOTE:
Do not let water come into contact with the control Panel as high voltage is present inside the unit, unplug the unit when cleaning or filling / draining water.
Cleaning
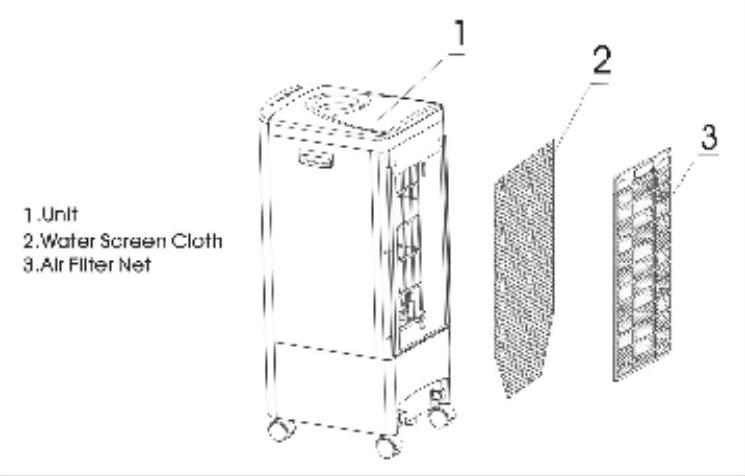
Removing the Filters
Pull the plug out of the wall outlet then hold the handle of the Air Filter (3) and pull upwards, to remove it. Then pull the water net (2) off the Velcro strips.
Cleaning the Filters
You must Clean both filters once every one or two months. Remove the air filter and pull the water net from its Velcro mount and wash it in soapy water. Clean the Air filter with a vacuum and a soft brush, make sure the black Positive ion pad in the centre of the Air filter does not come into contact with water.
Regenerate the Positive ion pad once a year by leaving the filter in direct sunlight for 4 hours or more.
Water Tank
You must clean the water tank once every one or two months.
Cleaning the Water Tank
Disconnect the plug from the outlet, then open the water cover and drain the water from the water tank by un-screwing the drainage stopper at the bottom of the unit, let the water drain off, then clean the sediments in the water tank with mild detergent.
Screw down the water stopper.
Cleaning the cabinet
Clean the cabinet with mild soap and a dampened soft cloth. Do not let any parts of the control panel come into contact with water.
As there is high pressure in the machine, the plug must be disconnected from the supply when cleaning.
Specifications
| Model No. | EC100 |
| Power Voltage | AC220-240V~50Hz |
| Cooling Power | 60W |
| Maximum Wind | ≥20m³/min |
| Maximum injecting water | 8L |
| Net weight of unit | 7.8KGS |
| Unit Size | 260x345x715mm |
We apologise for any inconvenience caused by minor inconsistencies in these instructions, which may occur as a result of product improvement and development.
Kesa U.K HU1 3AU 05/12/2006
PIÉCES
Waste electrical and electronic products must not be disposed of with household waste. Please refer to the retailer from whom you purchased this item for disposal instructions.
Packaging materials should be recycled using local facilities.
French
- PARTS
- Control Panel
- Manual Operation for Switches on Control Panel “ 山 ” Key:
- Key:
- +:
- ION Key:
- Normal Wind: (when both natural and sleeping indicators are off)
- :
- Cooling
- WARNING:
- About Ion:
- About Anion
- Prevention of "Air-con" Symptoms
- Effect of Anion in Dust-proof and Sterilisation
- Installation and Operation Guide
- Adding Water:
- NOTE:
- Pay attention to the following:
- Remote Control
- Instruction of "ICE BOX"
- Operation Method
- Points for Attention
- Cleaning
- Removing the Filters
- Cleaning the Filters
- Water Tank
- Cleaning the Water Tank
- PIÉCES
- French
Brand : PROLINE
Model : EC 100
Category : Air conditioner