USER MANUAL VP-D21 SAMSUNG
Charge Coupled Device
LCD
Liquid Crystal Display
Mode d'emploi
REC MODE (Opname) 50
AUDIO MODE 51
WIND CUT (Windfilter) 52
Specifications techniques 88
INDEX 89
USB-interface (alleen VP-D21/D21i) 80
Digitale fot's overbrengen via USB-aansluiting 80
Systeemeisen 80
Copyright (alleen VP-D20i/D21i)
1. Charging indicator
-
Battery Release
-
Lithium battery cover
4. Hook for shoulder strap
5. TAPE OPEN/EJECT
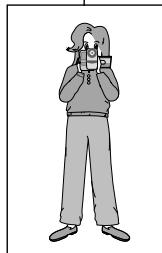
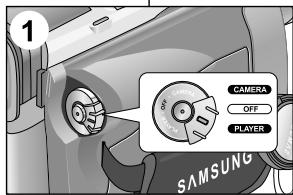
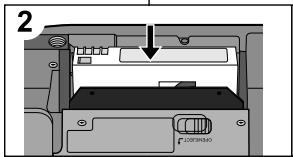
Making your First Recording
-
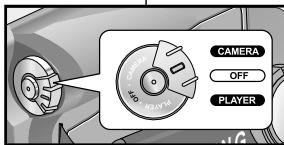
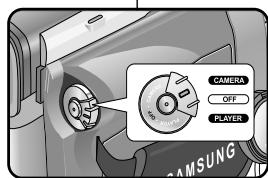
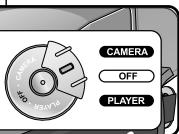
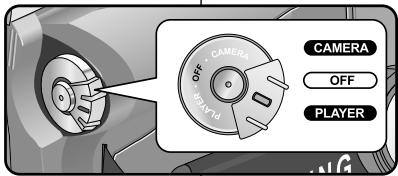
Set the power switch to the CAMERA position.
-
Connect a Power source to the camcorder. (see page 23) (A battery pack or a AC power adapter)
Insert a cassette. (see page 27)
- Remove the LENS CAP and hook it onto the hand strap.
Open the LCD monitor.
Make sure that STBY is displayed.
If the protection tab of the cassette is open, STOP and PROTECTION! will be displayed.
Make sure the image you want to record appears in the LCD monitor or viewfinder.
Make sure the battery level indicates that there is enough remaining power for your expected recording time.
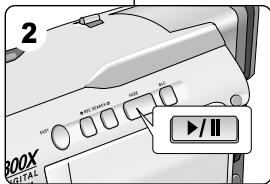
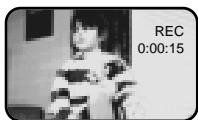
- To start recording, press the START/STOP button.
REC is displayed in the LCD.
To stop recording, press the START/STOP button again.
STBY is displayed in the LCD.
Ohre erste Aufnahme
When a cassette is loaded and the camcorder is left in the STBY mode for more than 5 minutes without being used, it will switch off automatically.
To use it again, push the START/STOP button or set the Power switch to OFF and then back to CAMERA.
This Auto Power off feature is designed to save battery power.
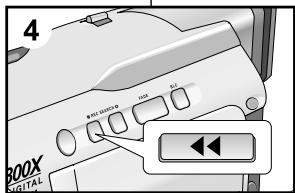
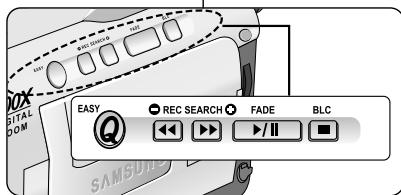
You can view a recording using the REC SEARCH ^+ - function in STBY mode. REC SEARCH - enables you to play the recording backwards and REC SEARC enables you to play it forwards, for as I as you keep each button pressed down
If you press the REC SEARCH - button in STBY mode, your camcorder will play in reverse for 3 seconds and return to the original position automatically.
Mosaic shaped distortion may appear on the screen while in Record Search mode.
Hinweis
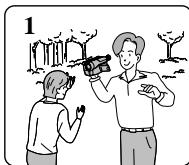
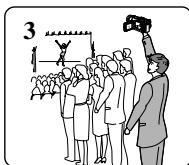
Hints for Stable Image Recording
While recording, it is very important to hold the camcorder correctly.
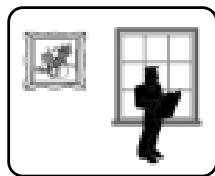
Fix the LENS cap firmly by clipping it to the hand strap. (refer to the figure)
Recording with the LCD monitor
- Hold the camcorder firmly using the hand strap.
- Place your right elbow against your side.
- Place your left hand under or beside the LCD to support and adjust it. Do not touch the built-in microphone.
- Choose a comfortable, stable position for the shots that you are taking. You can lean against a wall or on a table for greater stability. Do not forget to breathe gently.
- Use the LCD frame as a guide to determine the horizontal plane.
- Whenever possible, use a tripod.
Recording with the Viewfinder
- Hold the camcorder firmly using the hand strap.
- Place your right elbow against your side.
- Place your left hand under the camcorder to support it. Be sure not to touch the built-in microphone.
- Choose a comfortable, stable position for the shots that you are taking.
You can lean against a wall or on a table for greater stability.
Do not forget to breathe gently.
- To view an object through the viewfinder, pull it out until you hear the 'click' sound. Excessive force may cause damage to the viewfinder.
- Place your eye firmly against the viewfinder eyecup.
- Use the viewfinder frame as a guide to determine the horizontal plane.
- Whenever possible, use a tripod.
33 Your camcorder is equipped with a 2.5 inch colour Liquid Crystal Display(LCD) screen, which enables you to view what you are recording or playing back directly.
Depending on the conditions under which you are using the camcorder (indoors or outdoors for example), you can adjust;
BRIGHT SELECT
BRIGHTADJUST
COLOUR ADJUST
- Set the POWER switch to CAMERA position.
In the PLAYER mode, you may only setup the LCD while the tape is playing.
- Open the LCD screen, and the LCD switches on.
- Press the MENU button.
- Turn the MENU DIAL so that VIEWER is highlighted and then press the ENTER button.
- Turn the MENU DIAL so that LCD ADJUST is highlighted.
- Press the ENTER button to enter the sub-menu.
- Turn the MENU DIAL so that it highlights the menu item you want to adjust (BRIGHT SELECT, BRIGHT ADJUST, COLOUR ADJUST).
-
Press the ENTER button again.
-
You may select NORMAL or SUPER in the BRIGHT SELECT feature and press the ENTER button to save the setting.
Use the MENU DIAL to adjust the value of BRIGHT ADJUST and COLOUR ADJUST.
-
You can set values for BRIGHT ADJUST between 00 ~ 35 and COLOUR ADJUST between 00 ~ 35.
-
Press the MENU button to finish the setting.
Using the VIEWFINDER
The VIEWFINDER will not work when the LCD is open.
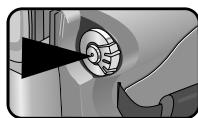
Adjusting the Focus
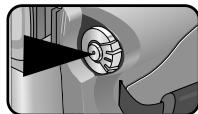
Use the focus adjustment knob of the VIEWFINDER to focus the picture. (refer to figure)
Playing back a tape you have recorded on the LCD
You can monitor the playback picture on the LCD monitor.
Make sure that the battery pack is in place.
- Hold down the power switch tab and turn it to the PLAYER position.
- Insert the tape you wish to view. (see page 27)
- Open the LCD screen. Adjust the angle of the LCD screen and set the brightness or colour if necessary.
- Press the (REW) button to rewind the tape to the starting point.
To stop rewinding, press the (STOP) button.
The camcorder stops automatically after rewinding is complete.
- Press the / / (PLAY/STILL) button to start playback.
You can view the picture you recorded on the LCD.
To stop the PLAY operation, press the (STOP) button.
Reference
- You can also view the picture on a TV screen, after connecting the camcorder to a TV or VCR. (see page 70)
Various functions are available in playback mode. (see page 72)
Adjusting the LCD during PLAY
You can adjust the LCD during playback.
The adjustment method is the same procedure as used in CAMERA mode. (see page 31)
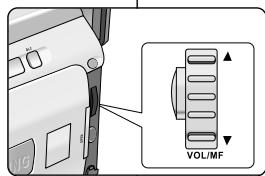
Controlling Sound from the Speaker
The Speaker works in PLAYER mode only.
-
When you use the LCD screen for playback, you can hear the recorded sound from the built-in Speaker.
-
Follow the instructions below to decrease or mute speaker volume in the PLAYER mode.
Take the following steps to lower the volume or mute the sound while playing a tape on the camcorder.
-
Set the power switch to PLAYER mode.
- Press /II (PLAY/STILL) to play the tape.
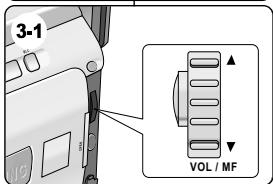
- When you hear sounds once the tape is in play, use the MENU DIAL to adjust the volume.
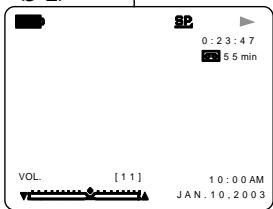
A volume level display will appear on the LCD. Levels may be adjusted from anywhere between 00 to 19 and you will not hear any sound when the volume is set on 00.
If you close the LCD while playing, you will not hear sound from the speaker.
Reference
- When the cable is connected to the A/V jack, you cannot hear sound from the speaker and cannot adjust the volume.
- But, even if cable is connected to the A/V jack, you can hear sound from the speaker when AV IN/OUT MODE on MENU is set to AV IN MODE. (VP-D20i/D21i only)
- You can hear sound from speaker by removing the connected cable from the A/V jack
<3-2>
Use of various Functions
| MENU | SUB MENU | Available mode |
| CAMERA | PLAYER |
| INITIAL | CLOCK SET | ✓ | ✓ |
| WL.REMOTE | ✓ | ✓ |
| DEMO | ✓ | |
| CAMERA | PROGRAM AE | ✓ | |
| WHT.BALANCE | ✓ | |
| D.ZOOM | ✓ | |
| DIS | ✓ | |
| DSE SELECT | ✓ | |
| A/V | REC MODE | ✓ | ✓ |
| PHOTO SEARCH | | ✓ |
| AUDIO MODE | ✓ | ✓ |
| AUDIO SELECT | | ✓ |
| WIND CUT | ✓ | ✓ |
| PB DSE | | ✓ |
| AV IN/OUT(VP-D20i/D21i only) | | ✓ |
| VIEWER | LCD ADJUST | ✓ | ✓ |
| DATE/TIME | ✓ | ✓ |
| TV DISPLAY | ✓ | ✓ |
- Set the camcorder to CAMERA or PLAYER mode
- Press the MENU button.
The MENU OSD is displayed. The cursor (HIGHLIGHT) indicates the feature you are currently adjusting.
- Use the MENU DIAL and press the ENTER button on the left side panel to select and activate the item.
- You can exit the menu mode by pressing the MENU button.
- Availability of functions in each mode
| Mode\Requested Operating Mode | Digital functions | Digital special effects | NIGHT CAPTURE |
| DIS | D.ZOOM | PHOTO (TAPE) | SLOW SHUTTER |
| DIS | | O | O | \( \bigtriangleup \) | O | O |
| D.ZOOM | O | | O | \( ^{*}\bigtriangleup \) | O | O |
| PHOTO | X | X | | X | X | O |
| SLOW SHUTTER | \( \bigtriangleup \) | X | O | | O | O |
| Digital Special Effects | O | O | O | O | | \( \bigtriangleup \) |
| NIGHT CAPTURE | O | O | O | O | X | |
O : The requested mode will work in this operating mode.
X : You can not change the requested mode.
: The operating mode will be released and the requested mode will work.
* : The operating mode will be released and the requested mode will work. (the data during the operating mode will be backed up)
Reference
| Gewünsche Aktive Funktion | Digitale Funktionen | Digitale Spezial-effekte | NIGHT CAPTURE |
| DIS | D.ZOOM | PHOTO (TAPE) | SLOW SHUTTER |
| DIS | | O | O | Δ | O | O |
| D.ZOOM | O | | O | *Δ | O | O |
| PHOTO | X | X | | X | X | O |
| SLOW SHUTTER | Δ | X | O | | O | O |
| Digitale Spezialeffekte | O | O | O | O | | Δ |
| NIGHT CAPTURE | O | O | O | O | X | |
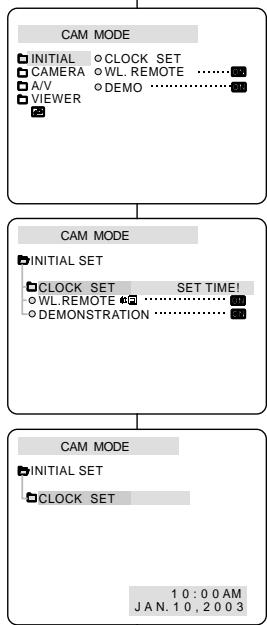
CLOCK setup works in CAMERA, PLAYER modes.
The DATE/TIME is automatically recorded onto a tape. Before recording, please set the DATE/TIME.
- Press the MENU button.
The menu list will appear.
- Turn the MENU DIAL to highlight INITIAL and press the ENTER button.
- Use the MENU DIAL to select CLOCK SET from the submenu.
- Press the ENTER button to enter SETTING mode.
A blinking item indicates the item to be changed. The year will blink first.
- Using the MENU DIAL, change the year setting.
- Press the ENTER button.
The month will blink.
- Using the MENU DIAL, change the month setting.
- Press the ENTER button.
The day will blink.
- You can set the day, hour and minute following the same procedure for setting the year and month.
- Press the ENTER button after setting the minutes.
The word COMPLETE! will appear, and a few seconds later, the menu screen will automatically return to the sub menu.
- To exit, press the MENU button.
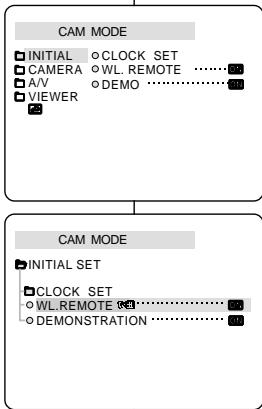
The REMOCON function works in CAMERA, PLAYER modes.
The REMOCON option allows you to enable or disable the remote control for use with the camcorder.
The setting switches between ON/OFF each time you press the ENTER button.
- To exit, press the MENU button.
If you set the remote to OFF in the menu and try to use it, the remote icon will the remote control icon will blink for 3 seconds and disappear on the LCD.
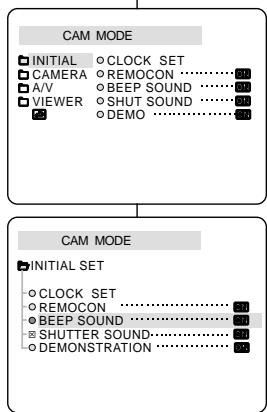
The BEEP SOUND function works in CAMERA, PLAYER modes.
Use the MENU to setup the BEEP SOUND function. Select whether or not you want to hear a beep sound whenever you change a setup value.
The setting switches between ON/OFF each time you press the ENTER button.
- You will hear a Beep Sound when you select the ON setup.
-
When you press the START/STOP button to start recording, the BEEP SOUND is automatically set to OFF so you can't hear it any longer.
-
To exit, press the MENU button.
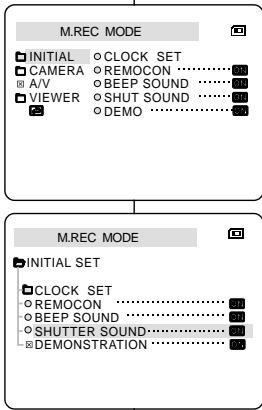
You can hear SHUTTER SOUND only when the PHOTO function is working.
The menu list will appear.
- Turn the MENU DIAL to highlight INITIAL and press the ENTER button.
- Use the MENU DIAL to select SHUTTER SOUND from the submenu.
- Press ENTER to switch between ON and OFF.
- To exit, press the MENU button.
3 Demonstration automatically shows you the major functions that are included with your camcorder so that you may use them more easily.
The DEMONSTRATION function may only be used in the CAMERA mode without a tape inserted in the camcorder.
The demonstration operates repeatedly until the DEMONSTRATION mode switched OFF.
The menu list will appear.
- Turn the MENU DIAL to highlight INITIAL.
- Select DEMONSTRATION from the submenu and press the ENTER button.
- To activate the DEMONSTRATION, set DEMONSTRATION ON.
Press the menu button to quit the menu.
The demonstration will begin.
- To end the DEMONSTRATION, set the DEMONSTRATION to OFF.
CAM MODE
INITIAL CLOCK
CAMERA OWL. REMOTE
A/V 0 DEMO
VIEWER

CAM MODE
INITIAL SET
CLOCK SET
OWL.REMOT
DEMONSTI
The DEMONSTRATION function only works without a TAPE installed.
The DEMONSTRATION mode is automatically activated when the camcorder is left idle for more than 10 minutes after switching to the CAMERA mode (no tape is inserted in the camcorder).
If you press other buttons (FADE, BLC, PHOTO, EASY) during the DEMONSTRATION mode, the DEMONSTRATION stops temporarily and resumes 10 minutes later if you do not operate any other functions.
Hinweise
The PROGRAM AE function works in CAMERA mode only.
The PROGRAM AE mode allows you to adjust shutter speeds and apertures to suit different recording conditions.
They give you creative control over the depth of field.
AUTO mode
- Auto balance between the subject and the background.
- To be used in normal conditions.
- The shutter speed automatically varies from 1/50 to 1/250 per second, depending on the scene.
SPORTS mode (空)
- For recording people or objects moving quickly.
PORTRAIT mode (
- For focusing on the background of the subject, when the background is out of focus.
- The PORTrait mode is most effective when used outdoors.
- The shutter speed automatically varies from 1/50 to 1/1000 per second.
SPOTLIGHT mode (
- For recording correctly when there is only light on the subject and not the rest of the picture.
SAND/SNOW mode(奎)
- For recording when people or objects are darker than the background because of reflected light from sand or snow.
High S. SPEED(High Shutter Speed) mode (3)
- For recording fast-moving subjects such as players in golf or tennis games.
PROGRAM AE (Belichtungsprogramme)
The WHITE BALANCE function works in CAMERA mode only.
The WHITE BALANCE is a recording function that preserves the unique colour of the object in any recording condition.
You may select the appropriate WHITE BALANCE mode to obtain good quality colour of the image.
AUTO (A) : This mode is generally used to control the WHITE BALANCE automatically.
HOLD () :This fixes the current WHITE BALANCE value.
INDOOR () : This controls the WHITE BALANCE according to the indoor ambience.
OUTDOOR (丰) : This controls the WHITE BALANCE according to the outdoor ambience.
- Set the camcorder to CAMERA mode.
- Press the MENU button.
The menu list will appear.
- Turn the MENU DIAL to highlight CAMERA and press the ENTER button.
- Select WHT.BALANCE from the submenu.
- Press the ENTER button to enter the sub-menu.
- Using the MENU DIAL, select the WHITE BALANCE mode.
Press the ENTER button to confirm the WHITE BALANCE mode.
- To exit, press the MENU button.
Reference
While setting the NIGHT CAPTURE to ON, the WHT.BALANCE function does not work.
The WHT.BALANCE function will not operate in EASY mode.
Turn the digital zoom off (if necessary) to set a more accurate white balance.
If you have set the white balance and lighting conditions changes, reset the white balance.
During normal outdoor recording, setting to AUTO may provide better results.
CAM MODE
CAMERA
A/V
VIEWER
DIS
DSE SELECT
CAM MODE
CAMERA SET
PROGR
OWHT.BA
D.ZOOM
DIS
DSE SE
MAE·
ANCE
··
··
ECT·
CAM MODE
CAMERA SET
WHT.BALANCE
AUTO
HOLD
INDOC
OUTDC
OR
Zooming In and Out with DIGITAL ZOOM
Zoom works in CAMERA mode only.
Zooming In and Out
Zooming is a recording technique that lets you change the size of the subject in a scene. For more professional looking recordings, do not use the zoom function too often.
You can zoom using variable zoom speeds.
Use these features for different shots. Please note that overuse of the zoom feature can lead to unprofessional looking results and a reduction of battery usage time.
- Move the zoom lever slightly for a gradual zoom, move it further for a high-speed zoom. Your zooming is monitored on the OSD.
- T(Telephoto) side: Subject appears closer.
- W(Wide angle) side: Subject appears farther away.
You can record a subject that is a minimum of 1 m (about 2.65 feet) away from the lens surface in the TELE position, or about 10 mm (about 0.5 inch) away in the WIDE position.
Hinweis
Zooming more than 10x is achieved digitally.
The picture quality may deteriorate depending on how much you zoom in on the subject.
We recommend that you use the DIS feature with DIGITAL ZOOM for picture stability. (see page 47)
Digitaler Zoom
The menu list will appear.
3. Turn the MENU DIAL to CAMERA and press the ENTER button.
4. Select D.ZOOM from the submenu.
5. Press the ENTER button to setup the 100x, 200x, 400x, 800x digital zoom function or to turn the feature OFF.
6. To exit, press the MENU button.
CAM MODE
0 INITIAL
CAMERA
A/V
VVIEWER
图
PROGRAM AE
OWHT.BALANCE
0D.ZC
0DIS
0DS6
CAM MODE
CAMERA SET
□PROGRAMAE:
EWHTBALANCE
D.ZOOM
ODIS
DSE SELECT
CAM MODE
CAMERA SET
D.ZOOM
OFF
100x
200x
400x
800x
The DIS function works in CAMERA mode only.
DIS (Digital Image Stabilizer) is a function that compensates for any shaking or hand movement while holding the camcorder (within reasonable limits).
It provides more stable pictures when:
Recording with the zoom
Recording a small object close-up
Recording and walking at the same time
Recording through the window of a vehicle
- Set the camcorder to CAMERA mode.
- Press the MENU button.
The menu list will appear.
- Turn the MENU DIAL highlight to CAMERA and press the ENTER button.
The sub menu list will appear.
- Turn the MENU DIAL to activate the DIS function, press the ENTER button.
The DIS menu is changed to ON.
If you do not want to use the DIS function, set the DIS menu to OFF.
- To exit, press the MENU button.
Reference
It is recommended that you deactivate the shake compensation function when using a tripod.
If you use the DIS function, the picture quality may deteriorate
The DSE function works in CAMERA mode only.
The digital effects enable you to give a creative look to your recording by adding various special effects.
Select the appropriate digital effect for the type of picture that you wish to record and the effect you wish to create.
There are 9 DSE modes.
a. ART mode
This mode gives the images a coarse effect.
b. MOSAIC mode
This mode gives the images a mosaic effect.
c. SEPIA mode
This mode gives the images a reddish-brown pigment.
d. NEGA mode
This mode reverses the colours of the images, creating a negative image.
e. MIRROR mode
This mode cuts the picture in half, using a mirror effect.
f. BLK & WHT mode
This mode changes the images to black and white.
g.EMBOSSmode
This mode creates a 3D effect (embossing).
h. CINEMA mode
This mode covers the upper/ lower portions of the screen to give a cinematic effect.
i. MAKE - UP mode
This mode allows the images to be selected in red, green, blue or yellow colours.


The menu list will appear.
- Turn the MENU DIAL to highlight CAMERA and press the ENTER button.
- Select DSE SELECT from the submenu.
- Press the ENTER button to enter the sub-menu.
- Using MENU DIAL, select the DSE mode.
Press the ENTER button to confirm the DSE mode.
7. To exit, press the MENU button.
Reference
While setting the NIGHT CAPTURE to ON, the DSE function does not work.
The DSE function will not operate in EASY mode.
The REC MODE function works in both CAMERA and PLAYER (VP-D20i/D21i only) modes.
This camcorder records and plays back in SP (standard play) mode and in LP (long play) mode.
SP (standard play): This mode permits 60 minutes of recording time with a DVM60 tape.
LP (long play): This mode permits 90 minutes of recording time with a DVM60 tape.
- Set the camcorder to CAMERA or PLAYER (VP-D20i/D21i only) mode.
- Press the MENU button.
The menu list will appear.
- Turn the MENU DIAL to highlight A/V and press the ENTER button.
- Select REC MODE from the submenu and press the ENTER button.
The REC MODE toggles between SP and LP with each press.
- To exit, press the MENU button.
Reference
We recommend that you use this camcorder to play back any tapes recorded on this camcorder. Playing back a tape recorded in other equipment may produce mosaic shaped distortion.
- When you record a tape in SP and LP modes, or LP mode only, the playback picture may be distorted or the time code may not be written properly between scenes.
Record using SP mode for best picture and sound quality.
The AUDIO MODE function works in CAMERA and PLAYER (VP-D20i/D21i only) modes.
This camcorder records sound in two ways. (12bit, 16bit)
12bit: You can record two 12bit stereo sound tracks. The original stereo sound can be recorded onto the MAIN (SOUND1) track. Additional stereo sound can be dubbed onto the SUB (SOUND2) track.
16bit : You can record one high quality stereo sound using the 16bit recording mode. Audio dubbing is not possible when using this mode
- Set the camcorder to CAMERA mode.
- Press the MENU button.
The menu list will appear.
- Turn the MENU DIAL to highlight A/V and press the ENTER button.
- Select the AUDIO MODE from the menu and press the ENTER button.
The AUDIO MODE toggles between 12bit-16bit with each push.
5. To exit, press the MENU button.
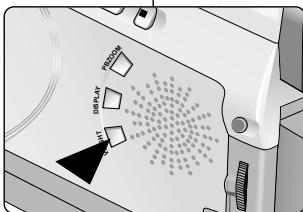
The WIND CUT function works in CAMERA and PLAYER (VP-D20i/D21i only) modes.
The WIND CUT function minimizes wind noise or other noise while recording.
- When the wind cut is on, some low sounds are eliminated along with the sound of the wind.
Make sure WIND CUT is set to off when you want the microphone to be as sensitive as possible.
Use the WIND CUT when recording in windy places such as the beach or near buildings.
CAM MODE

INITIAL
CAMERA
A/V
□V1
REC MODE
AUDIO MODE 12 bit
AUDIO SELECT
WIND CUT
OPBDSE
AVIN/OUT OUT
CAM MODE
DA/V SET
RECMODE
PHOTO SEARCH
AUDIO MODE
AUDIO SELECT
WIND CUT
PR DSE
PDBL027
Hinweise
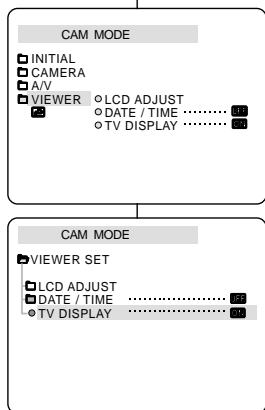
The DATE/TIME function works in CAMERA, PLAYER modes.
The date and time are automatically recorded on a special data area of the tape.
- Press the MENU button.
The menu list will appear.
- Turn the MENU DIAL to highlight VIEWER and press the ENTER button.
- Turn the MENU DIAL to highlight DATE/TIME.
- Press the ENTER button to select the sub-menu.
- Using the MENU DIAL, select the DATE/TIME mode.
You can choose to display - the OFF, DATE, TIME, DATE/TIME
OFFonly
- DATE only
TIME only
DATE & TIME
To return to the previous menu, highlight the DATE/TIME in the middle of the and press the ENTER button.
- To exit, press the MENU button.
Reference
The DATE/TIME is not affected by the OSD ON/OFF (DISPLAY) button.
The DATE/TIME will read "---" in the following conditions.
During playback of a blank section of a tape.
- If the tape was recorded before setting the DATE/TIME in the Camera's memory.
- When the lithium battery becomes weak or dead.
Before you can use the DATE/TIME function, you must set the Clock. See CLOCK SET on page 37.
The TV DISPLAY function works in CAMERA, PLAYER modes.
You can select the output path of the OSD (On Screen Display).
OFF: The OSD appears in the LCD screen only.
ON: The OSD appears in the LCD screen, EVF and TV.
Use the DISPLAY button located at the left side of the camcorder to turn ON/OFF all of the OSD displayed on the LCD/EVF/TV.
The menu list will appear.
- Turn the MENU DIAL to highlight VIEWER and press the ENTER button.
- Select the TV DISPLAY mode in list, press the ENTER button.
The DISPLAY mode switches between ON/OFF with each push.
5. To exit, press the MENU button.
Quick menu is available only in CAMERA mode.
Quick menu is used to adjust camera functions by simply using the MENU SELECTOR button.
This feature is useful for when you want to make simple adjustments without having to access the menus and submenus.
DATE/TIME
Each time you select DATE/TIME and press the ENTER button, it will be displayed in the order of DATE - TIME - DATE/TIME - OFF. (see page 53)
■ WL.REMOTE(
Each time you select WL.REMOTE and press the ENTER button, the WL.REMOTE is switched to either enabled (or disabled).
DIS
Each time you select DIS and press the ENTER button, the DIS icon is displayed or set to OFF.
DSE(Digital Special Effect) (see page 48)
Each time you select DSE and press the ENTER button, the DSE preset values are applied or set to OFF. DSE values will not switch between On and Off if they have not been preset in the menu.
PROGRAM AE (see page 42)
Each time you select PROGRAM AE and press the ENTER button, you can choose between the preset PROGRAM AE values and AUTO. You can't choose between Auto and the PROGRAM AE values if the values have not been preset in the regular menu.
Each time you select WHT. BALANCE and press the ENTER button, you can choose between preset WHT.BALANCE values and AUTO. As in PROGRAM AE, you can't choose between Auto and WHT.BALANCE values it they have not been preset.
FOCUS (Manual Focus/Auto Focus) (see page 60)
Each time you select FOCUS and press the ENTER button, the FOCUS is switched to either Manual Focus (MF) or Auto Focus (A).
SHUTTER SPEED & EXPOSURE
- You can set values for SHUTTER SPEED and EXPOSURE by selecting (D) icon and pressing the MENU DIAL. For more information, see the next chapter.
- Set the camcorder to CAMERA mode.
- Turn the MENU DIAL to select a function you want and then press the ENTER button to change the values.
Reference
Quick menu function will not operate in EASY mode.
If you are using the M.FOCUS(MF) function, you cannot use the Quick menu. If you want to use the Quick menu function, release the M.FOCUS(MF) mode.
32 You can set SHUTTERTPEED and EXPOSURE only in CAMERA mode.
33 SHUTTERTPEEDand EXPOSUREvalues can only be set in theQuickMenu.
2 SHUTTERTPEED and EXPOSURE are automatically switched and/or deactivated.
-
Set the power switch to CAMERA mode.
-
Turn the MENU DIAL until you see icon() on, and then press the ENTER button.
-
You see a screen on which you can select SHUTTERTPEED and EXPOSURE.
- Turn the MENU DIAL to select the item you want and then press the ENTER button.
-
SHUTTERTPEED can be set to 1/50, 1/120, 1/250, 1/500, 1/1000, 1/2000, 1/4000 or 1/10000.
EXPOSURE can be set between 00 and 29.
-
To exit from the setting screen, select the icon( ) and press the ENTER button.
Reference
If you want to use the selected shutter speed and exposure value, you should begin the recording with the shutter speed and the exposure adjustment screens displayed on the LCD.
If you manually change the shutter speed and the exposure value when Auto-exposure option is selected, manual changes are applied first.
SLOW SHUTTER (Low Shutter Speed)
The SLOW SHUTTER function works in CAMERA mode only.
The shutter speed can be controlled, allowing you to record slow moving objects.
- Set the power switch to CAMERA mode.
- Press the SLOW SHUTTER button.
- Each time you press the SLOW SHUTTER button, SHUTTER SPEED is changed to 1/25, 1/13, 1/6, off.
- To exit, press the SLOW SHUTTER button.
Reference
- When using "SLOW SHUTTER" the image takes on a slow motion like effect.
The SLOW SHUTTER function will not operate with DIS.
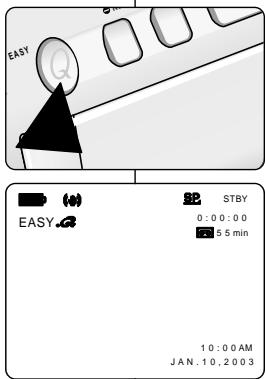
EASY Mode (for Beginners)
The EASY mode allows a beginner to easily make good recordings.
The EASY mode only operates in CAMERA mode.
- Set the power switch to CAMERA mode.
- By pressing the EASY button, all functions on the camera will be set to off and the recording settings will be set to the following basic modes:
Battery level, recording mode, counter, DATE/TIME, and DIS ( ) will be displayed.
The word "EASY.Q" will appear on the LCD at the same time.
However, the DATE/TIME will only be seen if it has been previously set. (see page 53)
- Press START/STOP to start recording.
-
Recording will begin using the basic automatic settings.
-
Pressing the EASY button again in the STBY mode and then turns the EASY mode off.
The EASY function will not turn off when you have recording.
The camera will return to the settings that were set prior to activating EASY mode.
Reference
In EASY mode, certain functions are not available, such as MENU, BLC, MF/AF.
- If you want to use these functions, you must first switch the EASY mode off.
The EASY mode settings are deleted when the battery pack is uninstalled from the camcorder and therefore, they must be reset when a battery pack has been replaced.
MF/AF (Manual Focus/Auto Focus)
The MF/AF function works in CAMERA mode only.
In most situations, it is better to use the automatic focus feature, as it enables you to concentrate on the creative side of your recording.
Manual focusing may be necessary under certain conditions that make automatic focusing difficult and/or unreliable.
Auto Focusing
If you are inexperienced in the use of camcorders, we recommend that you make use of Auto Focus.
Manual Focusing
In the following cases you may obtain better results by adjusting the focus manually.
a. A picture containing several objects, some close to the camcorder, others further away.
b. A person enveloped in fog or surrounded by snow.
c. Very shiny or glossy surfaces like a car.
d. People or objects moving constantly or quickly like an athlete or a crowd.
- Set the power switch to CAMERA mode.
- Turn the MENU DIAL and select the FOCUS menu.
3 Press the ENTER button.
- Turn the MENU DIAL up or down until the object is in focus.
Zoom out a little if focusing is difficult.
- To return to AF(Auto Focus: A), press the ENTER button again.


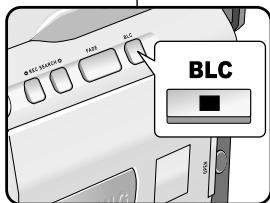
BLC (Back Light Compensation)
BLC works in CAMERA mode.
Back lighting exists when the subject is darker than the background:
The subject is in front of a window.
The person to be recorded is wearing white or shiny clothes and is placed against a bright background; the person's face is too dark to distinguish his/her features.
The subject is outdoors and the background is overcast.
The light sources are too bright.
The subject is against a snowy background.
* BLC off
- Set the power switch to CAMERA mode.
- Press the BLC button.
Normal - BLC - Normal
BLC enhances the subject.
Reference
While setting the NIGHT CAPTURE to ON, the BLC function does not work.
The BLC function will not operate in EASY mode.
The FADE function works in CAMERA mode only.
- You can give your recordings a professional look by using special effects such as fading in at the beginning of a sequence or fading out at the end of a sequence.
To Start Recording
- Before recording, hold down the FADE button.
The picture and sound gradually disappear (fade out).
- Press the START/STOP button and at the same time release the FADE button. Recording starts and the picture and sound gradually appear (fade in).
To Stop Recording (use FADE IN / FADE OUT)
- When you wish to stop recording, hold down the FADE button. The picture and sound gradually disappear (fade out).
- When the picture has disappeared, press the START/STOP button to stop recording. Press t
a. FADE OUT (Approx. 4 seconds)
b. FADE IN (Approx. 4 seconds)
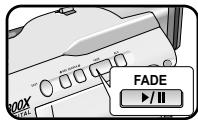
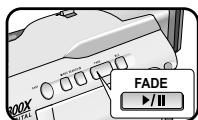

Press the FADE button
Gradual appearance

a. FADE OUT
b. FADE IN


Gradual disappearance

Release the FADE button
The AUDIO DUBBING function only works in PLAYER Mode.
You can add sound to the original sound on a pre-recorded tape, recorded in SP mode with 12bit sound.
Use the internal and external microphones or other audio equipment.
The original sound will not be erased.
Dubbing sound
- Set the camcorder to PLAYER mode.
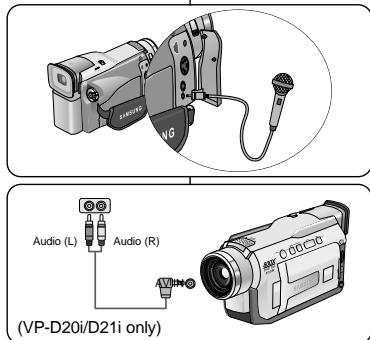
If you want to use an external microphone, connect the microphone to the external MIC input jack on the camcorder.
- When you wish to dub using the External A/V input, connect the AUDIO/VIDEO cable to the camcorder by inserting the cable jack into the A/V in/out terminal at the left side of the camcorder. (VP-D20i/D21i only)
A.DUB will be displayed on the LCD.
The camcorder is in a ready-to-dub state for dubbing.
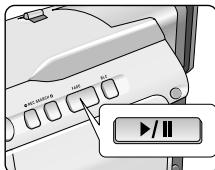
- Press the / (PLAY/STILL) button to start dubbing.
Press the (STOP) button to stop the dubbing.
Reference (VP-D20i/D21i only)
- You can not use the audio dubbing function while playing a write protected video tape.
- When you wish to dub using the External A/V input, you must connect the AUDIO/VIDEO cable to the audio system from which you wish to record.
Dubbed audio Playback
- Insert the dubbed tape and press MENU button.
- Turn the MENU DIAL to highlight A/V.
- Press the ENTER button to enter the sub-menu.
- Use the MENU DIAL to select AUDIO SELECT from the submenu.
- Press the ENTER button to enter the sub-menu.
- Using the MENU DIAL, select the AUDIO playback channel.
Press the ENTER button to confirm the audio playback channel.
Reference
When you playback added sound (SOUND2 or MIX mode), you may experience loss of sound quality.
PLAYER MODE
A/V SET
REC MODE 12
PHOTO SEARCH
AUDIO MODE 12bit
AUDIO SELECT SOUND1
WIND CUT
PB DSE
AV IN/OUT
PLAYER MODE
DA/V SET
AUDIO SELECT
OSOUND[1]
SOUND[2]
MIX[1+2]
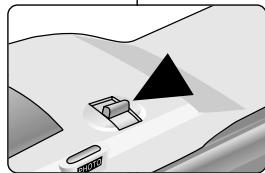
PHOTO Image Recording
- Press the PHOTO button and hold it.
The still picture appears on the LCD monitor.
If you do not wish to record, release the button.
- Release the PHOTO button and press the PHOTO button again in 2 seconds.
The still picture is recorded for about 6-7 seconds.
- After the PHOTO has been recorded, the camcorder returns to STBY mode.
Searching for a PHOTO picture
The PHOTO SEARCH works in PLAYER mode only.
-
Press the MENU button. (or press the PHOTO SEARCH button on the remote control.)
The MENU list will appear.
-
Turn the MENU DIAL to highlight A/V.
- Press the ENTER button to enter the sub-menu.
- Select PHOTO SEARCH from the sub-menu and press the ENTER button.
- Search the PHOTO using the (FF) and (REW) buttons.
The PHOTO search process appears on the LCD while you are searching.
After completing the search, the camcorder displays the still image.
- To exit, press the STOP button.
Fotos aufnehmen
(NIGHT CAPTURE indicator) appears on the LCD monitor.
The infrared (invisible rays) light is turned on automatically.
- To cancel the NIGHT CAPTURE function, slide the NIGHT CAPTURE switch to OFF.
Reference
The maximum recording distance using the infrared light is about 3m (about 10 feet).
If you use the NIGHT CAPTURE function in normal recording situations (ex. outdoors by day), the recorded picture may be tinted green.
In the NIGHT CAPTURE mode, certain functions are not available, such as White Balance, Program AE, DSE, BLC.
33 The POWER NIGHT CAPTURE function works in CAMERA mode.
The POWER NIGHT CAPTURE function can record a subject more brightly in darkness than the NIGHT CAPTURE function.
A POWER NIGHT CAPTURE is displayed for three seconds by LCD if you press a SLOW SHUTTER button in state that a NIGHT CAPTURE switch is turned on.
When you work in POWER NIGHT CAPTURE mode, POWER NIGHT CAPTURE icon appears on the LCD continuously.
- Set the camcorder to CAMERA mode.
- Turn on the NIGHT CAPTURE switch, and then press the SLOW SHUTTER button.
- Press the SLOW SHUTTER button to set shutter speed. The SLOW SHUTTER function enables you to record a subject more brightly.
- When using POWER NIGHT CAPTURE the image takes on a slow motion like effect.
- To cancel the POWER NIGHT CAPTURE function, press the SLOW SHUTTER button to set to "off" and then turn off the NIGHT CAPTURE switch.
Reference
The maximum recording distance using the infrared light is about 3m (about 10 feet).
If you use the POWER NIGHT CAPTURE function in normal recording situations (ex. outdoors by day), the recorded picture may contain unnatural colours.
In the POWER NIGHT CAPTURE mode, certain functions are not available, such as White Balance, Program AE, DSE, BLC.
- When the subject is too bright, you would better press the SLOW SHUTTER button (1/6 1/25) and then you can record in the good quality.
VIDEO LIGHT works in CAMERA mode only.
To brighten the scene when natural lighting is too dim.
VIDEO LIGHT works in SP mode only.
- If you turn on the LIGHT in LP mode, the LIGHT indicator and "LP" will be blinking on the LCD.
DANGER
The VIDEO LIGHT can become extremely hot. Do not touch it either while in operation or soon after turning it off, otherwise serious injury may result.
- Do not place the camcorder into the carrying case immediately after using the VIDEO LIGHT, since it can remain extremely hot for some time.
- Do not use near flammable or explosive materials.
It is recommended that you consult your nearest SAMSUNG dealer for bulb replacement.
The VIDEO LIGHT indicator appears on the LCD and the light is turned on.
- If you want to turn off the VIDEO LIGHT, press the V.LIGHT button again.
Reference
The light is turned off automatically during ejecting or inserting.
Even if the battery indicator does not blink when the battery packs charge is low, the camcorder may turn off automatically when you turn on the light, or when you start recording with light turned on.
The built-in light is used as a subsidiary light, it may not be enough for outdoor lighting.
The picture quality may deteriorate if you use the VIDEO LIGHT continuously for more than 20 minutes.
If you turn on the light in 1/6, 1/13, 1/25 SHUTTER mode, the manual SHUTTER mode will be switched off.
Various Recording Techniques
In some situations different recording techniques may be required for more dramatic results.
Reference
Please rotate the LCD screen carefully as excessive rotation may cause damage to the inside of the hinge that connects the LCD screen to the Camcorder.
- General recording.
- Downward recording.
Making a recording with a top view of the LCD screen.
- Upward recording.
Making a recording viewing the LCD screen from below.
- Self recording.
Making a recording viewing the LCD screen from the front.
- Recording with the Viewfinder.
In circumstances where it is difficult to use the LCD monitor, the viewfinder can be used as a convenient alternative.

The playback function works in PLAYER mode only.
Playback on the LCD
It is practical to view a tape using the LCD when in a car or outdoors.
Playback on a TV monitor
To play back a tape, the television must have a compatible colour system.
3 We recommend that you use the AC Power Adapter as the power source for the camcorder.
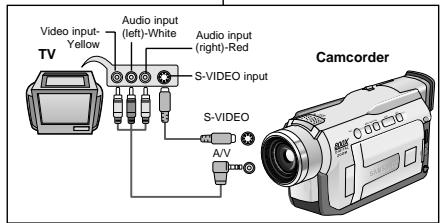
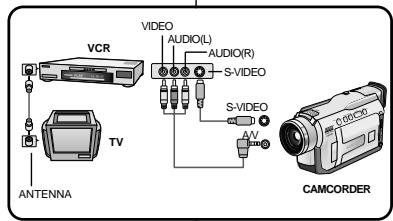
- Connect the camcorder and TV with the Audio/Video cable.
The yellow plug: Video
The white plug: Audio(L)
The red plug: Audio(R) - STEREO only
-
If you connect to a monaural TV or VCR, connect the yellow plug (Video) to the video input of the TV or VCR and the white plug (Audio L) to the audio input
-
Set the power switch on the camcorder to PLAYER mode.
- Turn on the TV and set the TV/VIDEO selector on the TV to VIDEO.
Refer to the TV or VCR user's manual.
- Play the tape back.
Reference
- You may use the S-VIDEO cable to obtain better quality pictures if you have a S-VIDEO connector on your TV.
Even if you use a S-VIDEO cable, you need to connect an audio cable.
If you connect the cable to the A/V Jack, you will not hear sound from the speakers.
Bandwiedergabe
You can connect your camcorder to a TV through a VCR.
- Connect the camcorder and VCR with the Audio/Video cable.
The yellow plug: Video
The white plug: Audio(L)
The red plug: Audio(R) - STEREO only
- Connect a TV to the VCR.
- Set the power switch on the camcorder to PLAYER mode.
- Turn on both the TV and VCR.
Set the input selector on the VCR to LINE.
- Select the channel reserved for your VCR on the TV set.
- Play the tape back.
Playback
3 You can play the recorded tape in PLAYER mode.
- Connect a power source and set the power switch to PLAYER mode.
- Insert the tape you wish to play back.
- Using the (FF) and (REW) buttons, find the first position you wish to play back.
- Press the / / (PLAY/STILL) button.
The images you recorded will appear on the TV after a few seconds.
If a tape reaches its end while being played back, the tape will rewind automatically.
Reference
The playback mode (SP/LP) is selected automatically.
Wiedergabe
Various Functions while in PLAYER mode
The PLAY/STILL, STOP, FF, REW buttons are located on the camcorder and the Remote Control.
The F.ADV(Frame advance), X2, SLOW buttons are located on the Remote Control only.
To prevent tape and head-drum wear, your camcorder will automatically stop if it is left in STILL or SLOW modes for more than 5 minutes.
Picture search (Forward/Reverse)
Press the (FF) or (REW) buttons once during Playback or Still mode. To resume normal playback, press the (PLAY/STILL) button.
3 Keep pressing (FF) or (REW) buttons during Playback or Still mode. To resume normal playback, release the button.
Slow playback (Forward/Reverse)
Forward SlowPlayback
Press the SLOW button on the remote control during Playback.
To resume normal playback, press the / (PLAY/STILL) button.
Reverse SlowPlayback
Press the button during Forward Slow Play back.
To resume forward slow playback, press the button.
To resume normal playback, press the / / (PLAY/STILL) button.
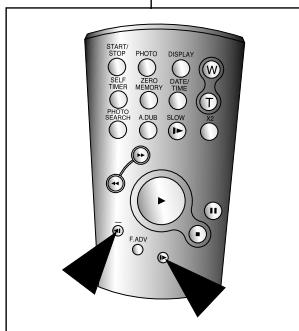
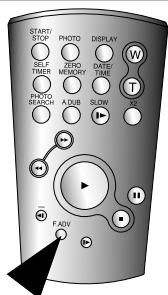
Frame advance (To play back frame by frame)
- Press the F.ADV button on the Remote Control while in Still mode. The F.ADV function works in still mode only.
To resume normal playback, press the / / (PLAY/STILL) button.
Forward frame advance
Press the F.ADV button on the remote control in Still mode.
Reverse frame advance
Press the button on the remote control to change the direction in F.ADV mode.
Press the F.ADV button on the remote control.
X2Playback(Forward/Reverse)
Forward X2 Playback
Press the X2 button on the Remote Control during Playback.
To resume normal playback, press the / (PLAY/STILL) button.
Reverse X2 Playback
Press (-) the button during during Forward X2 Playback.
To resume normal playback, press the (PLAY/STILL) button.
Reference
Mosaic shaped distortion may appear on the screen while in some of the various playback modes.
- Mosaic shaped distortion or noise may be experienced when you play back tapes recorded in LP which contain various playback functions.
Sound will only be heard during normal SP or LP playback.
F.ADV
The MEMORY function works in both CAMERA and PLAYER modes.
3 You can mark a point on a tape that you want to return to following playback.
- Press the ZERO MEMORY button on the remote control during playback or recording at the point you wish to return to.
The time code is changed to a tape counter that is set to zero memory with the M 0:00:00(Zero memory indicator)
If you want to cancel the zero memory function, press the ZERO MEMORY button again.
-
Finding the zero position.
-
When you have finished playback, fast forward or rewind the tape.
-
The tape stops automatically when it reaches the zero position.
- When you have finished recording, press the power switch on the PLAYER and press the (REW) button.
-
The tape stops automatically when it reaches the zero position.
-
The tape counter with the [M] (Zero memory indicator) disappears from the display and the tape counter is changed to the time code.
Reference
In the following situations, ZERO MEMORY mode may be canceled automatically:
- At the end of the section marked with the ZERO MEMORY function.
- When the tape is ejected.
- When you remove the battery pack or power supply.
The zero memory may not function correctly where there is a break between recordings on the tape.
- You cannot apply the PB DSE function to the pictures which are being input from the external.
Once you modify an image using the PB DSE function, it cannot be imported to your PC from the camcorder's DV jack.
- Press the PB ZOOM button in playback mode or in playback still mode
- The image is magnified starting from the center of image and the four arrows which allows you to move the image in the four directions appear.
- You can zoom in from 1.2x to 8.0x moving the zoom lever.
- You can move the image in the arrow directions using the MENU DIAL.
- You can change the arrow direction (vertical, horizontal) to move the image by pressing the ENTER button.
- To cancel the PB ZOOM function, press the PB ZOOM or STOP button.
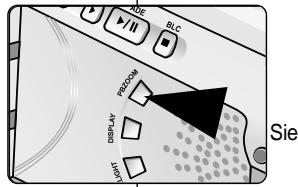
- You cannot apply the PB ZOOM function to the pictures which are being input from an external video source.
The PB ZOOM images cannot be imported to your PC from the camcorder's DV jack.
Hinweise
Recording in PLAYER mode (VP-D20i/D21i only)
You can use this camcorder as a recorder.
You can record a tape from VCR or TV.
- Connect the camcorder and VCR or TV with the Audio/Video cable.
- Set the power switch of the camcorder to PLAYER mode.
- Turn on the VCR or TV.
- Insert the blank tape with protection tab closed into the camcorder.
If you want to record from the connected VCR, insert a recorded VHS tape into the VCR.
- Press the MENU button, turn the MENU DIAL to highlight A/V and press the ENTER button.
- Turn the MENU DIAL to highlight AV IN/OUT and press the ENTER button to select AV IN.
- Press the START/STOP button to set the camcorder to REC PAUSE mode.
"PAUSE" and picture appear on the LCD monitor.
- Select the TV program or playback the VHS tape.
- Press START/STOP button to start recording.
If you want to pause recording for a while, press the START/STOP button again.
- To stop recording, press the (STOP) button.
Reference
- When you record the images being played back on analog VCR, if they are not being played back in normal speed, (for example, more than double speed or slow playback), only gray image appears on the camcorder.
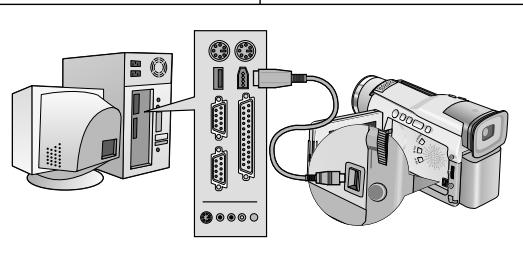
Connecting to a DV device
念 Connecting with other DV standard products.
A standard DV connection is quite simple. If a product has a DV port, you can transfer data by connecting to the DV port using the correct cable.
!!! Please be careful since there are two types of DV ports, (4pin, 6pin). This camcorder has a 4pin terminal.
With a digital connection, video and audio signals are transmitted in digital format, allowing high quality images to be transferred.
Connecting to a PC
If you want to transmit data to a PC, you must install a IEEE 1394 add-on card onto the PC. (not supplied)
The frame rate recorded for video capturing is dependent on the capacity of the PC.
Reference
- When you transmit data from the camcorder to another DV device, some functions may not work. If this occurs, please reconnect the DV cable or turn the power OFF and ON again.
- When you transmit data from the camcorder to PC, PC function button is not available in M.PLAY mode.
- System requirements
CPU: faster Intel Pentium III™ 450Mhz compatible.
Operating system: Windows® 98SE, ME, XP, Mac OS (9.1~10.2)
Main memory : more than 64 MB RAM
IEEE1394 add-on card or built in IEEE1394 card
Recording with a DV connection cable (VP-D20i/D21i only)
- Set the power switch to PLAYER mode.
- Connect the DV cable (not supplied) from the DV IN/OUT port of the camcorder to the DV IN/OUT port of the other DV device.
Make sure that DV IN appears on the screen.
-
Press the START/STOP button to begin REC PAUSE mode.
-
PAUSE is displayed on the OSD.
-
Start playback on the other DV device while you monitor the picture.
- Press the START/STOP button to start recording.
If you want to pause recording momentarily, press the START/STOP button again.
- To stop recording, press the (STOP) button.
Reference
When using this camcorder as a recorder, the pictures that appear on a monitor may seem uneven, however recorded pictures will not be affected.
USB interface (VP-D21/D21i only)
- Transferring a Digital Image through a USB Connection
You can easily transfer a still image from a camera, tape to a PC without additional add-on cards via a USB connection.
You can transfer an image to a PC via a USB connection.
If you transfer data to a PC, you need to install the software (Driver, Editing software) supplied with the camcorder.
System Requirements
CPU: Intel® Pentium II™ 400 processor compatible or better
Operating system: Windows® 98SE/ME/2000/XP
RAM:64MB or more
CD-ROM: 4x CD-ROM drive
VIDEO:65,000-colour or better video display card
Available USB port
Hard Disc: 4GB (8GB recommended)
Reference
Intel Pentium II™ is a trademark of the Intel Corporation.
Windows® is a registered trademark of the Microsoft Corporation.
All other brands and names are property of their respective owners.
USB interface (VP-D21/D21i only)
Do not connect the camcorder to PC before installing the program.
If another camera or scanner is connected, please disconnect it in advance.
This explanation is based on Windows® 98SE OS.
Program installation
- Insert the software CD into CD-ROM drive.
Installation selection screen appears in the monitor.
- If the installation selection screen does not appear after inserting the CD click "Run" on the Windows "Start" menu and execute SETUP.EXE file to begin installation.
-
When CD-ROM drive is set to "D:drive", type "D:\setup.exe" and press Enter.
-
Click one of the icons listed below to install the selected software.
DVC Driver
■ Editing Software
Install the DVC Driver
- When you see the Start window, click "DVC Driver" to continue installation.
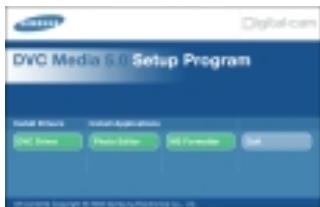
1.
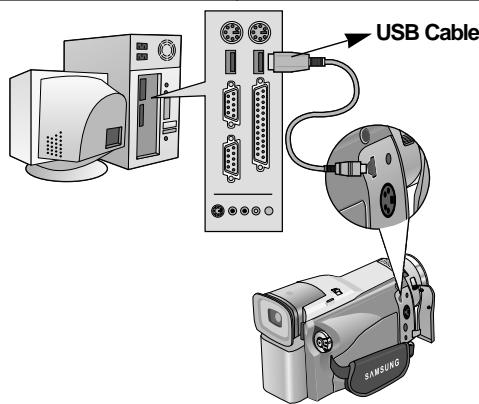
USB interface (VP-D21/D21i only)
- Connect a USB cable to the USB port on the PC.
- Connect the other end of the USB cable into the proper terminal on the camcorder. (USB jack)
Disconnecting the USB cable
After completing the data transmission, you must disconnect the cable in the following way:
- Select the removable disc icon and click the right mouse button to select [Eject].
- Select [Confirm] and disconnect the USB cable when the Windows Splash screen appears.
If you disconnect the USB cable from the PC or the camcorder while transferring, the data transmission will stop and the data may be damaged.
If you connect the USB cable to a PC via a USB HUB or simultaneously connect the USB cable along with other USB devices, the camcorder may not work properly.
If this occurs, remove all USB devices from the PC and reconnect the camcorder.
Hinweise
After finishing a recording
At the end of a recording you must remove the power source.
When recording with a Lithium Ion Battery Pack, leaving the pack on the camcorder can reduce the life span of the battery. Hence, it should be removed from the camcorder.
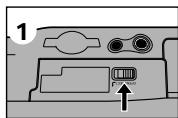
-
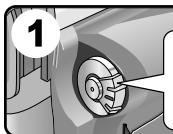
Slide the TAPE OPEN/EJECT switch in the direction of the arrow.
-
Opening the cassette door ejects the tape automatically.
Please wait while the tape is completely ejected.
-
After removing the tape, close the door and store the camcorder in a dust free environment.
Dust and other foreign materials can cause square-shaped noise or jerky images.
3. Set the power switch to the OFF mode.
4. Disconnect the power source or remove the Lithium Ion Battery Pack.
Hold down the BATTERY RELEASE button and slide the battery pack in the direction of the arrow.
Cleaning and Maintaining the Camcorder
Cleaning the Video Heads
To ensure normal recording and clear pictures, clean the video heads when the playback pictures display square block-shaped noise or distortion or a blue screen appears.
Camcorder reinigen
Videokopfe reinigen
- Set the power switch to PLAYER mode.
- Insert the cleaning tape.
- Press the / (PLAY/STILL) button.
- Press the (STOP) button after 10 seconds.

Using Your Camcorder Abroad
Each country or region has its own electric and colour systems.
Before using your camcorder abroad, check the following items.
Power sources
You can use your camcorder in any country or area with the supplied AC Power Adapter within 100V to 240V, 50/60 Hz.
Use a commercially available AC plug Adapter, if necessary, depending on the design of the local wall outlet.
Colour system
- You can view your recording in the viewfinder. However, to view it on a television or copy it to a videocassette recorder, the television or VCR must be PAL-compatible and have the appropriate audio/video jacks. Otherwise, you may need to use a transcoder.
PAL-compatible Countries/Regions
Australia, Austria, Belgium, Bulgaria, China, CIS, Czech Republic, Denmark, Egypt, Finland, France, Germany, Greece, Great Britain, Holland, Hong Kong, Hungary, India, Iran, Iraq, Kuwait, Libya, Malaysia, Mauritius, Norway, Romania, Saudi Arabia, Singapore, Slovak Republic, Spain, Sweden, Switzerland, Syria, Thailand, Tunisia, etc.
- NTSC-compatible Countries/Regions
Bahamas, Canada, Central America, Japan, Mexico, Philippines, Korea, Taiwan, United States of America, etc.
Reference
You can make recordings with your camcorder and view pictures on the LCD from anywhere in the world.
Before contacting a Samsung authorized service centre, perform the following simple checks.
They may save you the time and expense of an unnecessary call.
Self Diagnosis Display
| Display | Blinking | Informs that... | Action |
| □ | slow | the battery pack is almost discharged. | Change to a charged one. |
| TAPE END! | slow | When the remaining time on the tape is about 2 minutes | Prepare a new one. |
| TAPE END! | no | the tape reached its end. | Change to a new one. |
| TAPE! | slow | there is no tape in camcorder. | Insert a tape. |
| PROTECTION! | slow | the tape is record protected. | If you want to record, release the protection. |
| ▲···D
L
C
R | slow | the camcorder has some mechanical fault. | 1. Eject the tape.
2. Set to OFF.
3. Detach the battery.
4. Reattach the battery.
* If unresolved contact your local service representative. |
| slow | moisture condensation has formed in the camcorder. | see below. |
Moisture Condensation
If the camcorder is brought directly from a cold place to a warm place, moisture may condense inside the camcorder, on the surface of the tape, or on the lens.
In this condition, the tape may stick to the head drum and be damaged or the unit may not operate correctly.
To prevent possible damage under these circumstances, the camcorder is fitted with a moisture sensor.
If there is moisture inside the camcorder, (DEW) is displayed. If this happens, none of the functions except cassette ejection will work.
Open the cassette compartment and remove the battery.
Leave the camcorder for at least two hours in a dry warm room.
Bei Problemen
Bei Problemen
If these instructions do not solve your problem, contact your nearest Samsung authorized service centre.
| Symptom | Explanation/Solution |
| You cannot switch the camcorder on. | Check the battery pack or the AC Power Adapter. |
| START/STOP button does not operate while recording. | Check the POWER switch is set to CAMERA. You have reached the end of the cassette. Check the record protection tab on the cassette. |
| The camcorder goes off automatically. | You have left the camcorder set to STBY for more than 5 minutes without using it. The battery pack is fully exhausted. |
| The battery pack is quickly exhausted. | The atmospheric temperature is too low. The battery pack has not been charged fully. The battery pack is completely dead, and cannot be recharged, Use another battery pack. |
| When you see a blue screen during playback. | The video heads may be dirty. Clean the head with a cleaning tape. |
| A vertical strip appears on the screen when recording a dark background. | The contrast between the subject and the background is too great for the camcorder to operate normally. Make the background bright to reduce the contrast or use the BLC function while you are recording brighter. |
| The image in the viewfinder is blurred. | The Viewfinder lens has not been adjusted. Adjust the viewfinder control lever until the indicators displayed on the viewfinder come into sharp focus. |
| Auto focus does not work. | Check the M.FOCUS menu. Auto focus does not work in the Manual Focus mode. |
| Play, FF or REW button does not work. | Check the POWER switch. Set the power switch to PLAYER. You have reached the beginning or end of the cassette. |
| When you see a broken block image during the RECORD SEARCH. | This is normal operation and it is not a failure or defect. |
Bei Problemen
Model name: VP-D20/D21/D20i/D21i
| System |
| Video signal | PAL |
| Video recording system | 2 rotary heads, Helical scanning system |
| Audio recording system | Rotary heads, PCM system |
| Useable cassette | Digital video tape (6.35mm width): Mini DV cassette |
| Tape speed | SP: approx. 18.83mm/s LP: approx. 12.57mm/s |
| Tape recording time | SP: 60 minutes (when using DVM 60), LP: 90 minutes (when using DVM 60) |
| FF/REW time | Approx. 180 sec. (using DVM60 tape) |
| Image device | CCD (Charge Coupled Device) |
| Lens | F1.4 10x(Optical), 800x(Digital) Electronic zoom lens |
| Filter diameter | Ø37 |
| LCD monitor/Viewfinder |
| Size/dot number | 2.5inches (112,000) |
| LCD monitor Method | TFT LCD |
| Viewfinder | 0.24" B/W LCD |
| Connectors |
| Video output | 1Vp-p (75Ω terminated) |
| S-video output | Y: 1Vp-p, 75Ω, C: 0.286Vp-p, 75Ω |
| Audio output | -7.5dBs (600Ω terminated) |
| DV input/output | VP-DXXi: 4pin special in/out connector, VP-DXX: out only |
| USB output | Mini-B type connector (VP-D21/D21i only) |
| External mic | Ø3.5 stereo |
| General |
| Power source | DC 8.4V, Lithium Ion Battery Pack 7.4V |
| Power source type | Lithium Ion Battery Pack,
Power supply (100V~240V) 50/60Hz |
| Power consumption
(Recording) | 5.0W(LCD), 3.9W(EVF) |
| Operating temperature | 0°C~40°C (32°F~104°F) |
| Storage temperature | -20°C ~ 60°C (-4°F ~ 140°F) |
| External dimension | Length 7 inches(156mm), Height 3.54inches(90mm),
Width 2.48inches(58mm) |
| Weight | 1.21lbs(500g)
(Except for Lithium Ion Battery Pack and tape) |
| Built-in MIC | Omni-directional stereo condenser microphone |
| Remote control | Indoors: greater than 49ft(15m) (straight line),
Outdoors: greater than 16.4ft(5m) (straight line) |
- These technical specifications and design may be changed without notice.
Technische Daten
Camcorder-Modelle VP-D20/D21/D20i/D21i
Remote control 17, 20
-S
SHUTTER SPEED 56
Sound 34
Speaker 34
-T-
TV DISPLAY 54
-U-
USB (VP-D21/D21i only) 80
-V-
Viewfinder 30, 32
-W-
WHT.BALANCE 44
WIND CUT 52
-2-
ZERO MEMORY 74
Zoom 45, 46
INDEX
-A-
Akku 24
Anschluss. 71
Signalton (BEEP SOUND) 39
USB (nur VP-D21/D21i)............80
-W-

