
BD8712NWW - Washing machine BRANDT - Free user manual and instructions
Find the device manual for free BD8712NWW BRANDT in PDF.
| Product type | Front-load washing machine |
| Brand | BRANDT |
| Model | BD8712NWW |
| Washing capacity | 8 kg |
| Maximum spin speed | 1200 rpm |
| Energy class | A+++ |
| Power supply | 220-240 V ~ 50 Hz |
| Dimensions (H x W x D) | 85 x 60 x 55 cm |
| Net weight | 65 kg |
| Washing programs | Cotton, Synthetics, Delicates, Wool, Quick 15 min, etc. |
| Main functions | Delayed start, Cold wash, Steam option, Child lock |
| Noise level (wash/spin) | 52 dB / 74 dB |
| Maintenance and cleaning | Clean the filter monthly, self-cleaning drum |
| Safety | Child lock, automatic shut-off in case of overheating |
| Spare parts and repairability | Certified parts available on brandt.com, repairability index 8.5/10 |
| General information | 2-year warranty, telephone and online assistance |
Frequently Asked Questions - BD8712NWW BRANDT
User questions about BD8712NWW BRANDT
0 question about this device. Answer the ones you know or ask your own.
Ask a new question about this device
Download the instructions for your Washing machine in PDF format for free! Find your manual BD8712NWW - BRANDT and take your electronic device back in hand. On this page are published all the documents necessary for the use of your device. BD8712NWW by BRANDT.
USER MANUAL BD8712NWW BRANDT
MANUEL D'INSTRUCTION FR
INSTRUCTION MANUAL EN
Chere Cients, Cher Client
You have just purchased a BRANDT product and we thank you for your trust.
We designed and manufactured this product with you, your lifestyle and your needs in mind, in order to best meet your expectations. We have put into it our expertise, our spirit of innovation and all the passion which has driven us for over 60 years.
We make every effort to ensure our products better meet your requirements, and our Customer Relations Department is at your disposal and will be happy to hear any questions or suggestions you may have.
You may also visit our website www.brandt.com where you will find our latest innovations, as well as useful and complementary information.
BRANDT is happy to assist you in your daily life and hopes you will fully enjoy your purchase.
Important: Before switching on your appliance, please read this user guide carefully in order to familiarise yourself more quickly with its operation.
The following instructions must be respected:
INSTALLATION:
-
This appliance is designed to be used for domestic and similar applications such as:
-
kitchen areas for staff in shops, offices and other professional premises;
-farms; - use by hotel, motel and other residential clients;
- B&B-type environments.
- catering and other similar applications, excluding retail outlets..
- Once your appliance has been installed, the plug must remain accessible.
- Make sure the power cable is not squashed or damaged when you position your appliance.
- Do not position power strips or mobile power sockets at the back of the appliance.
- Do not use an extension, adapter, multi SOCKET or a timer plug.
- The electrical installation must be able to withstand the maximum power indicated on the rating plate and the plug must be properly grounded.
- Wait for at least four hours before plugging in the appliance in order for the refrigerant to stabilise itself in the compressor.
- If the power cord is damaged, have it changed by the After Sales Service or a qualified professional to avoid any risks.
- All operations to dismantle the appliance or part of the appliance, in particular to reverse the door direction, must be carried out by a professional to guarantee the appliance's conformity. All damaged parts must be replaced by original parts.
- This appliance must be plugged into a single-phase socket using 220 240 ~V / 50 ~Hz or 60 ~Hz alternative current such as mentioned on the appliance's data plate.
Danger;risk of fire/flammable materials
Warning:
- Keep clear all the ventilation openings in the appliance enclosure or in the built-in structure.
- Do not use any mechanical devices or other means to speed up the defrosting process other than those recommended by the manufacturer.
- Do not damage the refrigerating circuit.
INSTALLATION (continued):
- Do not store any explosive substances in this appliance, such as aerosols containing inflammable propellant gases.
- Do not use any electric appliances inside the food compartment, unless they are of a type recommended by the manufacturer.
USE:
-
This appliance may be used by children of 8 years or older and by persons with limited physical, sensorial or mental capacities or without experience or knowledge of it, provided that they are correctly supervised or if they are given instructions on the use of the appliance in complete safety if the risks incurred are understood. Children should be supervised to ensure that they do not play with the appliance and prevent children of less than 3 years old from playing with it, unless they are constantly supervised.
-
The device should not be cleaned or maintained by unsupervised children.
ENVIRONMENT

This appliance has been designed to respect the environment.
PROTECTING THE ENVIRONMENT
You can only keep your food in good condition and optimise your energy consumption by following the instructions in this installation and user guide.
Failure to install the drawers, bins and shelves properly can result in increased power consumption.
In accordance with the most recent legislative provisions applying to the protection and respect of the environment, your appliance does not contain any CFCs, but a refrigerant gas called R600a. The exact type of refrigerant gas used in your appliance is clearly shown on the data plate located at the back of your appliance. R600a is a non-polluting gas that does not harm the ozone layer and hardly contributes to the greenhouse effect at all.
This appliance's packaging material is recyclable.
Help protect the environment by placing the packaging into the municipal containers provided for this
purpose. Your appliance also contains many recyclable materials, it features this logo to remind you that used appliances must not be mixed with other waste.
The appliance must therefore be recycled in compliance with the European directive on used electrical and electronic equipment.
Contact your town hall or your retailer for the used appliance collection points closest to your home.
ENERGY SAVING
In order to reduce your appliance's power consumption:
Install it in a suitable location (see "Installing your appliance").
Leave the doors open for the shortest time possible.
Never put hot food in the fridge or freezer, and in particular soups and other preparations that release a lot of steam.
Check that your appliance is working correctly by not letting too much ice accumulate in the freezer (defrost when the ice is more than 5-6 mm thick).
Regularly check the door seals and make sure that the doors still close properly. If this is not the case, contact your after-sales department. Do not leave the temperature set too low.
1.1 - UNPACKING
Take the appliance out of its packaging and check its condition. If damaged, do not install the appliance and contact the shop from where you purchased it.
Remove the internal tape and protections that maintain the shelves and door racks.
If your appliance was transported horizontally, position it vertically and wait for 4 hours before switching it on.
Before plugging your appliance in and using it for the first time, clean it as recommended in paragraph 4 "Routine maintenance".
1.2 - CHOOSING THE INSTALLATION LOCATION
-
Install the appliance in a dry and well-ventilated area. Make sure it is not directly exposed to sunlight or installed near a source of heat (e.g.: a radiator).
-
Make sure sufficient clear space is available around the appliance when installing it. If there is not enough clear space for the fridge, the internal cooling system may not work correctly (Diagram. 1.2.1).
-
The height of the appliance may vary according to the model.
-
To guarantee your appliance works properly, make sure the ambient temperatures are suitable for its climate class, such as indicated on the data plate. Outside of these temperature ranges, the performance of your appliance maysuffer (food defrosting risk).
| Class | Ambient temperature |
| SN | from + 10°C to + 32°C |
| N | from + 16°C to + 32°C |
| ST | from + 16°C to + 38°C |
| T | from + 16°C to + 43°C |
| SN-T | from + 10°C to + 43°C |
1.3 - LEVELING THE APPLIANCE
Adjust the adjustable front feet to create enough space at the back of the lower part of the appliance to enable air to circulate correctly. You can either adjust these manually or with a suitable tool.
In order for the doors to close, tilt the appliance 10 mm backwards.
1.4 - REVERSING THE DOOR
It is recommended to contact a professional to ensure that the operation to reverse the door is compliant.
Any part damaged during the dismantling operation must be replaced by an original Brandt part.
1.5 - INSTALLING THE DOOR HANDLES (DEPENDING ON MODEL)
-
To facilitate transport, the door handles are provided separately in a plastic bag; to install these, please follow the instructions below:
-
Adapt the door handle on the side you want your door to open, while making sure the screw holes are lined up with those of the handle, such as illustrated on the diagram.
Fix the handle using the screws provided in the plastic bag, then place the screw covers on the handles (Diagram. 1.5.1).
2 - DESCRIPTION OF THE APPLIANCE
Certain functionalities and accessories may vary according to the model.
Please note: due to unceasing modification of our products, your refrigerator may be slightly different from this Instruction Manual, however, its functions and use remain the same.
In order to have more space in your freezer, you may remove the central rack as well as the integrated ice tray/flexible ice tray.
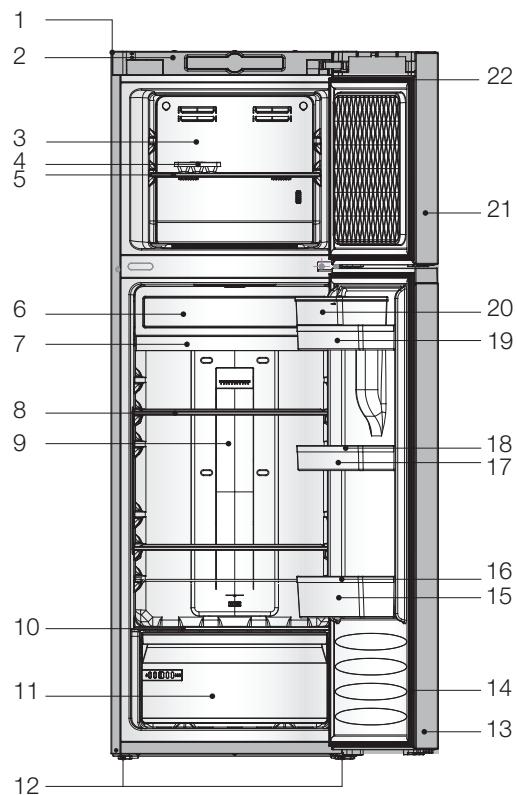
1-Cabinet
2 - Display cover
3 - Freezer wind channel cover
4- Ice tray
5 - Freezer shelf
6 - Fresh compartment cover
7 - Fresh or chiller compartment
8-Fridge shelf
9 - Fridge wind channel
10 - Vegetable crisper cover
11 - Vegetable crisper
12-Adjustable feet
13-Fridge door
14 - Fridge door seal
15 - Bottle rack
16 - Bottle guide
17 - Central rack
18-Egg tray
19 - Top rack
20 - Tank for water distribution
21 - Freezer door
22 - Freezer door seal
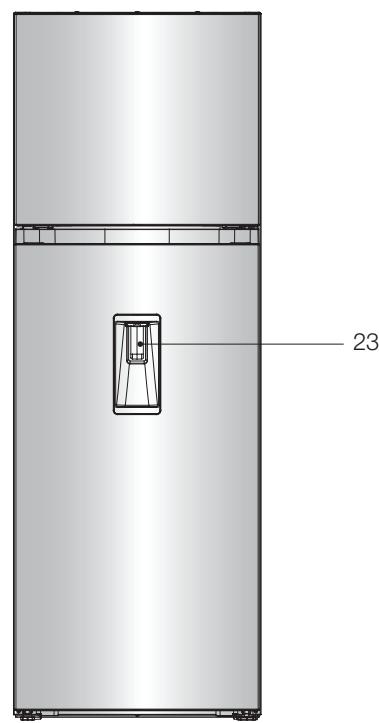
23 - Water distribution
3.1 - USING THE FRIDGE COMPARTMENT
- Do not place hot food or liquids in non-sealed containers in the fridge.
- NEVER introduce volatile, flammable or explosive liquids such as thinners, alcohols, acetone or petrol. There would be a risk of explosion.
- Meat and fish products should be wrapped up to avoid any smells.
- Leave enough space between food products so air can circulate between them correctly. Similarly, when stocking the fridge, avoid having items touch each other.
- Do not let any food touch the cold back wall of the fridge. The racks include a stop to avoid this.
- The door must not be left open for longer than necessary.
Food safety (depending on model)

Indication of the coldest area.

The symbol opposite indicates the location of the coldest area of your fridge, the temperature of which is at ≤ +4^
Store in this area any meat, poultry, fish, cold meats, ready-cooked dishes, mixed salads, egg- or cream-based preparations and pastries, fresh pasta, pie dough, pizza/quiches, fresh products, raw milk cheeses, prepared vegetables sold in plastic bags and more generally, any fresh product with a use-by date associated with a storage temperature of ≤ +4^ .
Temperature indicator:

Adjust your thermostat

Correct temperature
The temperature indicator enables you to check your fridge is working properly.
The indicator displays "OK" when the coldest area reaches an average temperature of +4^ (4h after switching on). If the temperature is above +4^ , the indicator remains white. The user must then reduce the temperature of the fridge by adjusting the thermostat.
3.2 - USING THE FREEZER COMPARTMENT

This compartment enables you to preserve deep frozen food, freeze fresh products and make ice cubes.
Do not freeze large quantities of items at a time, as the quicker food becomes frozen, the better its nutritive qualities will be preserved. Similarly, make sure your food products are well wrapped before freezing, in order to preserve their taste and avoid spoiling other products.
The shelf life of frozen or deep-frozen foods depends on the type of food. Please refer to the instructions on the packaging. Do not place any bottles or cans in the freezer compartment as they may burst when their content freezes. Carbonated beverages may even explode! NEVER store any lemonade, fruit juice, beer, wine, champagne, etc. in the freezer compartment.
Do not consume any iced products immediately after removal from the freezer as they may cause frost burns to the skin or lips.
In the case of a power cut, avoid opening the door in order to slow down food defrosting.
3.3 - USING THE CHILLER COMPARTMENT
(DEPENDING ON MODEL)
This compartment, whose temperature is between -2^ and +3^ , is used to store highly perishable food such as meat and fish.
This compartment is not suitable for storing fruit, vegetables and sensitive food.
3.4 - SWITCHING ON THE APPLIANCE AND SETTINGS
Press and hold the "power/off" button for a few seconds.
Two temperatures display on the screen. Your appliance is initially configured to operate at average temperatures of 4^ for the fridge compartment and -18^ for the freezer compartment.
In order to limit power consumption, the display switches off after a few seconds. It will light up again when opening the appliance or by pressing any key.
3.5 - SETTING THE FUNCTIONS
-
To activate a function, press the corresponding button, a beep confirms the selection and the button stays lit.
-
To deactivate a function, press the corresponding button, a beep confirms the deactivation and the button switches off.
3.6 - FRIDGE SETTINGS AND FUNCTIONS
Setting the Fridge Temperature
Select the fridge compartment using the "ZONE" key, the temperature flashes.
You can then set the temperature to the closest degree from 1^ to 8^ , using the + and - keys. You may press "ZONE" again to confirm your selection, or the latter is automatically taken into account after a few seconds.
"Holiday" function

Enables you to leave your appliance on during your absence by maintaining a temperature of around 12^ in your fridge. This enables you to preserve the food stored in the freezer as well as avoid any unpleasant smells from occurring and limit your electricity consumption. However, remember to remove perishable goods from the fridge compartment.
The « ^ » symbol lights up and "Ho" displays instead of the temperature when the function is activated.
When you deactivate the function, the « ^新 » symbol flashes until the actual temperature of the fridge reaches the set temperature.
"Booster" function
This function temporarily lowers the fridge temperature to regain the optimal storage temperature quicker (door open for a prolonged period, or when stocking products, etc.). Ideally, use this function to anticipate the arrival of your shopping. Remember to activate this function approximatively 3 hours ahead.
The «bo» symbol appears instead of the fridge temperature when the function is activated.
Automatically stops after 6h or manually by deactivating the function.
3.7 - FREEZER SETTINGS AND FUNCTIONS
Setting the temperature
Select the freezer compartment using the "ZONE" key, the temperature flashes.
You can then set the temperature to the closest degree from -15^ to -24^ , using the + and - keys. You may press "ZONE" again to confirm your selection, or the latter is automatically taken into account after a few seconds.
3.7 - FREEZER SETTINGS AND FUNCTIONS CONTINUED)
"Eco" function
This function enables you to save energy by reducing your appliance's consumption.
The «» symbol lights up and "Ec" displays instead of the temperature when the function is activated.
The freezer temperature initially set is no longer taken into account and your freezer switches to a 2-star freezer compartment. The Eco function is temporarily deactivated when using the "Booster" and "Flash" functions.
To deactivate this function, press the « button again, the previously selected freezer temperature will be regained.
When you deactivate the function, the « 空 ” symbol will continue to flash until the actual temperature of the freezer reaches the set temperature.
"Booster" function
This function temporarily lowers the freezer temperature to help you freeze efficiently a large quantity of fresh and varied products. It can also also be used to anticipate the arrival of your shopping.
Remember to activate this function the previous day.
The bo symbol displays instead of the freezer temperature when the function is activated.
Automatically stops after 52h or manually by deactivating the function.
This function needs to be activated to obtain the freezing power such as indicated on your appliance's data plate (kg/24h).
3.8 - OTHER FUNCTIONS AND ALARMS
"Child Lock" function (Depending on model) This function avoids any set parameters to be modified inadvertently.
To activate the function, press and hold the « button for a least 3s. The symbol lights up.
To deactivate the function, press and hold the « 回 » button again for a least 3s. The symbol switches off.
"Alarm Stop" function
If a door is left open for too long, the appliance's alarm sounds and the blue half-circle on the freezer or fridge compartment flashes to indicate which door is open. Close the door, the audible alarm and flashing stops.
"Cook food" alarm (Depending on model)
Indicates a malfunction (following a possible power cut) and the food stored in your freezer needs to be cooked quickly.
You can deactivate the alarm by pressing the "Alarm Stop" key.
"Dispose of food" alarm (Depending on model) Indicates a malfunction (following a possible power cut) and the food stored in your freezer needs to be thrown away.
You can deactivate the alarm by pressing the "Alarm Stop" key.
3.9 - WATER DISTRIBUTION
The tank located in the fridge door, enables you to store water in order to have cool water easily, without needing to open the fridge.
Use suitable glasses to collect the water under the distributor by pressing the tab (Diagram. 3.9.1).
Before using the tank for the first time, remove it from the door, remove the nozzle from the tank and wash both the nozzle and inside of the tank with water (the lid can also be removed).
Fill the tank up before replacing it in the door then fill several glasses to complete the cleaning process.
Warning: Fill the tank up to the maximum level (quantity suggested on the tank) and do not exceed the recommended level. Otherwise the tank may overspill once closed.
If you do not want to use the water tank, you can remove it and fit the door hole cover 1 instead (available in the plastic bag) (Diagram. 3.9.2).
Warning: Do not touch any other part of the appliance when filling the tank as water could leak.
3.10 - ICE MAKER (DEPENDING ON MODEL) (Diagram. 3.10.1)
The ice maker enables you to make and store ice cubes.
To use it:
- remove it from its support
- fill it with drinking water (do not exceed the maximum level).
- place it back on its support.
Wait for approx. three hours. Once the ice cubes formed, activate the distributor by turning the button (or pressing the knob) in order to drop the ice cubes into the drawer.
Please note: Do not use the ice drawer to make a bloc of ice.
4 - REGULAR CARE

For hygienic reasons the appliance (including exterior and interior accessories) should be cleaned regularly at least every two months.

Always unplug the appliance before cleaning. Electrocution risk!
Before cleaning, switch the appliance off and unplug it from the mains socket.
Exterior cleaning
To maintain your appliance in good condition, you should clean it regularly.
Wipe the digital panel and display panel with a clean, soft cloth.
Spray water onto the cleaning cloth and not directly onto the appliance. This will avoid any mould from appearing on its surface.
Clean the doors, handles and cabinet surfaces with a mild detergent and wipe dry with a soft cloth.

Do not use sharp objects to avoid scratching the surface of the appliance. Do not use any
thiners, car detergents, Clorox, ethereal oils, abrasive cleansers or organic solvents such as benzene for cleaning. They may damage the surface of the appliance and may cause fire.
Interior cleaning
You should clean the appliance interior regularly. Wipe the inside of the fridge-freezer with a weak solution of water and bicarbonate of soda, then rinse with warm water using a wrung-out sponge or cloth. Wipe completely dry before replacing the shelves and racks.
Thoroughly dry all surfaces and removable parts.
Although this appliance automatically defrosts, a layer of frost may occur on the freezer compartment's interior walls if the freezer door is opened frequently or kept open too long.
1- Remove all food and accessories from the compartment, unplug the appliance from the mains power and leave the doors open. Ventilate the room thoroughly to accelerate the thawing process.
2- Once defrosted, clean the freezer as described above.

Do not use any sharp objects to remove frost from the freezer compartment. Once the ice or dried, plug the appliance back in and switch off on.
Door seals cleaning
Make sure to regularly clean door seals.
These can indeed remain stuck by food or beverage residue and tear off when opening the door. Clean the seal with a mild detergent and warm water. Rinse and dry thoroughly after cleaning.

Once the door seals are completely dry, switch the appliance back on.
Replacing the LED light:
The LED light must not be replaced by the user! If the LED light is damaged, contact the after sales department.
Here are a few points to check:
| Problems: | Causes / Remedies: |
| The appliance is not working correctly | - Check whether the appliance is plugged into the mains socket. - Check the fuse or circuit of your mains power supply, and replace if necessary. - The ambient temperature is too low. Try setting the chamber temperature to a colder level to solve this problem. - It is normal if the freezer is not working during the automatic defrost cycle, or for a short time after the appliance is switched on to protect the compressor. |
| Odours from the compartments | - Clean the inside of the appliance. - Some food products, containers or packaging may cause odours. |
| Unusual noise from the appliance | The sounds listed below are quite normal: - Compressor running noises. - Air movement noise from the small fan motor in the freezer compartment or other compartments. - Gurgling sound similar to water boiling. - Popping noise during automatic defrosting. - Clicking noise before the compressor starts. Other noises, abnormal this time, may be head due to the rea-sons listed below: Also check the following points: - The cabinet is not level. - The back of appliance touches the wall. - Bottles or containers fallen or rolling. |
| The motor runs continuously | It is normal to regularly hear the motor running. The following circumstances may be at the origin of a regular operation: - The selected temperature is too low. - Large quantity of warm food has recently been stored in the appliance. - High temperature outside the appliance. - Doors are kept open too long or too often. - After switching on your appliance for the first time or if it has been switched off for a long time. |
| A layer of frost occurs in the compartments | Check that the air outlets are not blocked by food and ensure food is placed within the appliance to allow air to circulate freely. Ensure that door is fully closed. To remove the frost, please refer to the chapter "Cleaning and Care" |
| The temperature inside the appliance is too warm | The doors of the appliance are often open or left open, or obs-tacles prevent them from closing properly. Ensure proper ventilation around and above your appliance by creating enough space. |
| The temperature inside the appliance is too cold | Increase the temperature by following the chapter "Control panel" |
| Doors cannot be closed easily | Make sure the appliance is tilted backwards by 10 - 15 mm to enable the doors to close automatically. Internal elements pre-vent the doors from closing. |
Here are a few points to check:
| Problems: | Causes / Remedies: |
| Water drips onto the floor | The water pan (located at the rear bottom of the cabinet) may not be properly levelled, or the draining spout (located under the compressor) may not be properly positioned to direct water into the pan. The water draining spout may be blocked. Check the pan and gutter at the back of the appliance. |
| The light is not working | - The LED light may be damaged. Refer to the chapter "Cleaning and Care" to replace the LED light. - The control system switches the light off if the door remains open too long. Close the door and open again to switch the light back on. |
| "Alarm stop" function activated and flashing blue semi-circle | The temperature inside is too high. - Check that the door opens correctly - Set the temperature. If the fault persists, call after-sales service. |
If your screen displays a code starting with the letter "E", call your After-Sales Department.
INTERVENTIONS / EXPORT CONSUMER RELATIONS

Any repairs to your appliance must be made by a qualified professional accredited to work on the brand. In order to facilitate the processing of your request, please have available your appliance's commercial reference when you call; you may find this reference on the label located near the crispers.
Original parts:
When work is required, request exclusively original certified spare parts.

For information:
www.brandt.com
or contact your seller directly.
3.5 -AJUSTEDASFUNCOES
When you deactivate the function, the « ” symbol will continue to flash until the actual temperature of the freezer reaches the set temperature.