
B800GBK - Blender GORENJE - Free user manual and instructions
Find the device manual for free B800GBK GORENJE in PDF.
| Product type | Blender |
| Brand | Gorenje |
| Model | B800GBK |
| Bowl capacity | 1.5 litres |
| Bowl material | Transparent tempered glass |
| Body material | ABS plastic |
| Blades | Stainless steel, removable |
| Power | 600 W max |
| Voltage / Frequency | 220-240 V ~ 50 Hz |
| Speeds | 2 speeds + Pulse function |
| Maximum continuous operating time | 1 minute (30 seconds for coffee grinder) |
| Noise level | 82 dB(A) |
| Safety system | Safety lock (blocks if incorrectly assembled) |
| Cleaning | Hand wash only (not dishwasher safe) |
| Body maintenance | Wipe with a damp sponge |
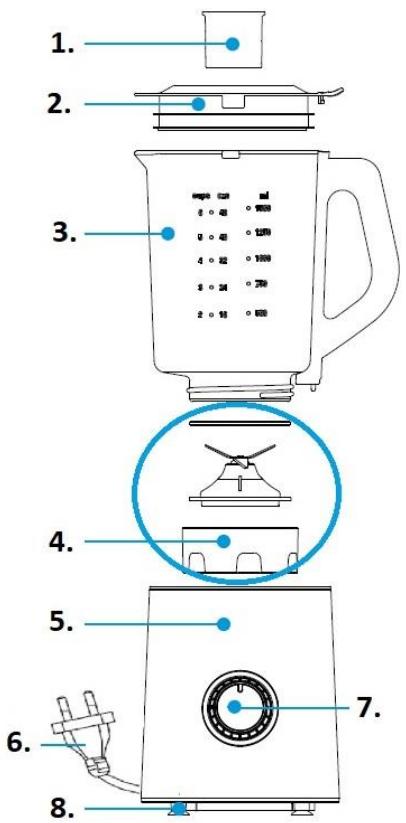
| Included accessories | Lid with measuring cup, bowl, blade, power cable |
| Approximate weight | 1.5 kg |
| Dimensions (L x W x H) | 20 x 18 x 40 cm (estimated) |
| Cable length | Approximately 1 meter |
| Use | For domestic use only |
Frequently Asked Questions - B800GBK GORENJE
User questions about B800GBK GORENJE
0 question about this device. Answer the ones you know or ask your own.
Ask a new question about this device
Download the instructions for your Blender in PDF format for free! Find your manual B800GBK - GORENJE and take your electronic device back in hand. On this page are published all the documents necessary for the use of your device. B800GBK by GORENJE.
USER MANUAL B800GBK GORENJE
natural_image
Black blender with clear glass interior and black handle, no visible text or symbolsB800GBK
| Nastavni mešalnik | Navodila za uporabo | SI |
| Mikser | Upute za uporabu | BIH HR |
| Mikser | Uputstvo za upotrebu | BIH SRB MNE |
| Миксер | Упатства за употреба | MK |
| Blender | Instruction manual | GB |
| Standmixer | Gebrauchsanweisung | D |
| Миксер | Инструкции за употреба | BG |
| Mixér | Návod na použití | CZ |
| Mixér | Návod na obsluhu | SK |
| Mixer | Használati utasítás | H |
| Mixer | Instrukcja obsługi | PL |
| Mixer | Manual de utilizare | RO |
| Змішувач | Інцтрукція з експлуатації | UA |
| Мешалка | Инструкция по эксплуатации | RUS |
| Frullatore | Istruzioni d'uso | I |
text_image
Diagram showing the step-by-step fabrication of a blender into a lighter, with Chinese labels indicating process flow.Slika.1
Slika.2
natural_image
Line drawing of a blender with a lid and handle, showing top and side views (no text or symbols)Slika.1
natural_image
Line drawing of a blender with a blue arrow indicating downward motion (no text or symbols)Slika.2
- Skinite poklopac ili mericu sa vrča seckalice te stavite sastojke u vrč.
-
Poklopac s nameštenom mericom ponovno stavite na vrč seckalice i vrč obrnite u suprotnom smeru od kazaljki na satu, da se uglavi. Više informacija naći ćete u poglavlju Bezbednosni sistem zaključavanja. Vodite računa da sadržaj vrča ne sme da prevaziđe označeni nivo, to jest najviše 1,5 litra.
-
Dugmetom za upravljanje izaberite brzinu seckanja: 1, 2, ili momentalno delovanje.
- U funkciji momentalnog delovanja (pulsiranje) seckalica će raditi sve dok držite pritisnuto dugme za momentalno delovanje. Takav način omogućuje više nadzora u seckanju npr. oraščića ili čokolade, ili za usitnjavanje leda.
- Kad dugme za upravljanje obrnete na poziciju 1, ili 2 aparat će raditi neprekidno, sve dok isto dugme ne obrnete natrag u položaj 0.
- Sastojke možete dodavati u vrč i tokom seckanja. To ćete uraditi tako da izvadite mericu iz otvora za dodavanje sastojaka.
- Nakon završenog seckanja, dugme za upravljanje uvek obrnite natrag na poziciju 0.
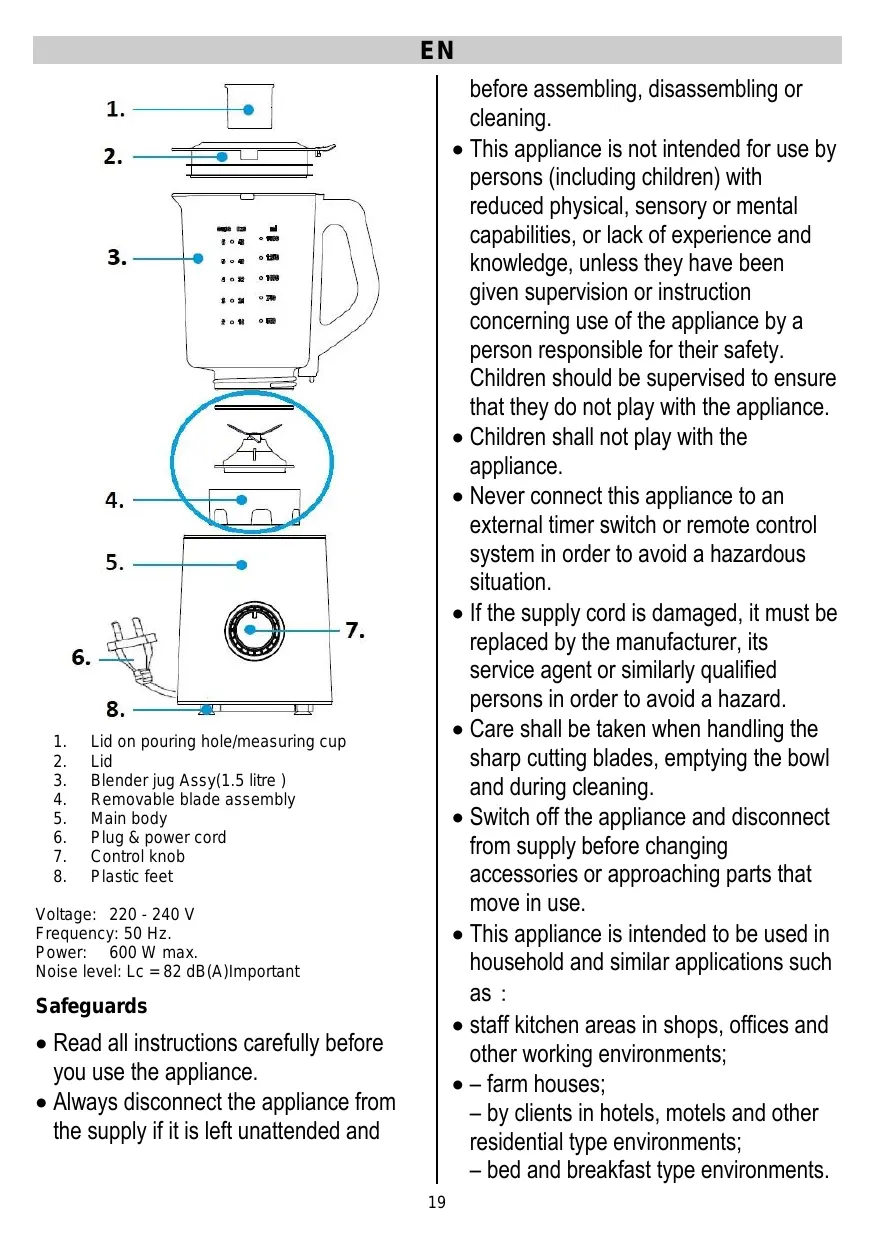
- Read all instructions carefully before you use the appliance.
- Always disconnect the appliance from the supply if it is left unattended and
before assembling, disassembling or cleaning.
- This appliance is not intended for use by persons (including children) with reduced physical, sensory or mental capabilities, or lack of experience and knowledge, unless they have been given supervision or instruction concerning use of the appliance by a person responsible for their safety. Children should be supervised to ensure that they do not play with the appliance.
- Children shall not play with the appliance.
- Never connect this appliance to an external timer switch or remote control system in order to avoid a hazardous situation.
- If the supply cord is damaged, it must be replaced by the manufacturer, its service agent or similarly qualified persons in order to avoid a hazard.
- Care shall be taken when handling the sharp cutting blades, emptying the bowl and during cleaning.
- Switch off the appliance and disconnect from supply before changing accessories or approaching parts that move in use.
- This appliance is intended to be used in household and similar applications such as :
- staff kitchen areas in shops, offices and other working environments;
- farm houses; - by clients in hotels, motels and other residential type environments; - bed and breakfast type environments.
- Ensure fingers are kept well away from the blades when in use.
- Do not blend hot ingredients.
• Always operate on a flat surface. - Ensure the control dial is in the off '0' position before plugging into the power outlet.
- Do not operate for more than 1 minutes at a time.
- Do not operate for more than 30 seconds for coffee mill at a time. After you have used the Coffee mill three times without interruption, a pause of around 60 minutes is necessary.
- Read carefully and save all the instructions provided with an appliance.
- Always turn the power off at the power outlet before you insert or remove a plug. Remove by grasping the Plug, do not pull on the cord.
- Do not use your appliance with an extension cord unless this cord has been checked and tested by a qualified technician or service person.
- Always use your appliance from a power outlet of the voltage (A.C. only) marked on the appliance.
- Do not use an appliance for any purpose other than its intended use.
- Do not place an appliance on or near a hot gas flame, electric element or on a heated oven. Do not place on top of any other appliance.
- Do not let the power cord of an appliance hang over the edge of a table or bench top or touch any hot surface.
- Do not operate any electrical appliance with a damaged cord or after the
appliance has been dropped or damaged in any manner.
- Do not immerse the appliance in water or any other liquid unless recommended.
- Never touch the blades while the machine is plugged in.
- Take special care when emptying and cleaning the blender jug, as the blades are extremely sharp.
This appliance is marked according to the European directive 2002/96/EC on Waste Electrical and Electronic Equipment (WEEE). This guideline is the frame of a European-wide validity of return and recycling on Waste Electrical and Electronic Equipment.
How to Use
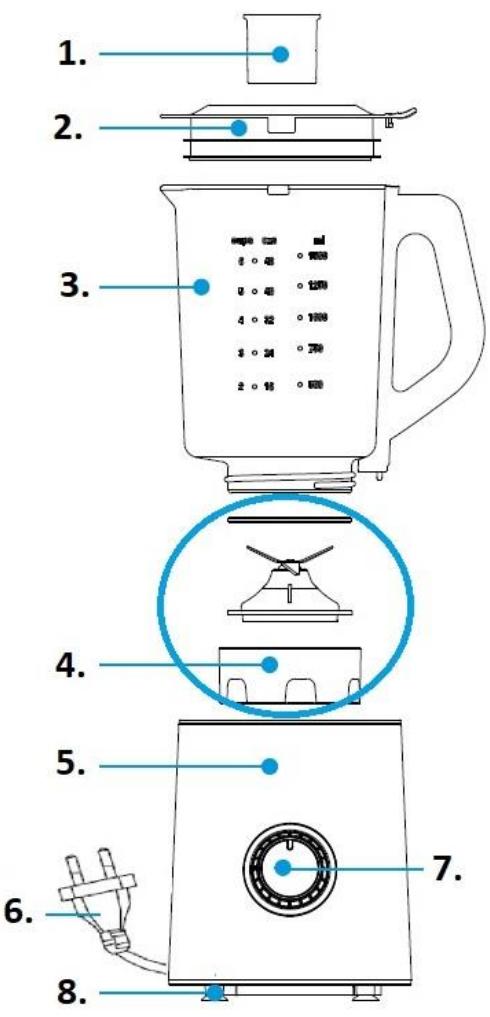
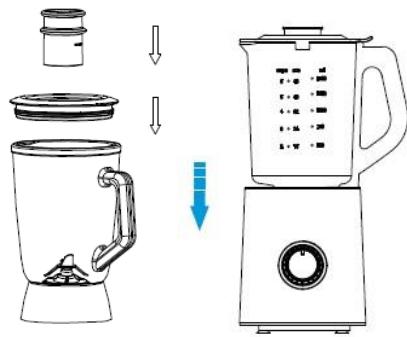
- Mount the Measuring Cup (1) onto the Lid (2). Secure the Lid onto blender jug and press down (FIG 1)
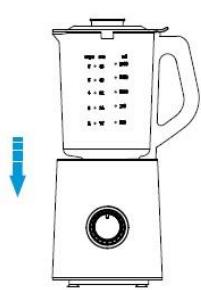
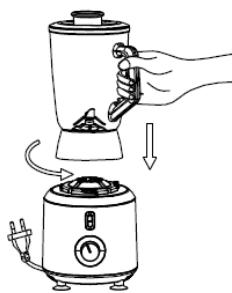
- Place the blender jug on the Main body and rotate anticlockwise (figure 2). See also chapter 'Safety locking system'.
text_image
Diagram showing the step-by-step fabrication of a blender with labeled parts and a blue arrow indicating the process.FIG.1
- Remove the lid or the measuring cup from the blender jug and place ingredients into the jug.
- Place the lid with the measuring cap back onto the blender jug and rotate the blender anticlockwise to lock. See also chapter ‘Safety locking system’. Do not exceed the maximum indicated level-1.5 litres.
- Using the selector control knob, select the desired blending speed1, 2 or PULSE.
-
The PULSE function remains on as long as the PULSE button is pressed down, for greater control when blending, e.g. when chopping nuts or chocolates, or crushing ice.
-
Setting 1 and 2 will provide continuous blending until the control knob is turned to the '0' position.
- You can add further ingredients while blending. For this, remove the measuring cup from the pouring hole.
- After you have completed blending, turn the control knob to the '0' position.
Safety locking system
With safety in mind, this blender and coffee mill are designed with a safety locking system. Unless the lid and blending jug or coffee mill are positioned correctly and locked in place, the blender or coffee mill will not operate.
For correctly assembling the blender, operate as follows:
- Place the main body on the table, with the front
facing toward you.
- Place the blending jug onto the main body with the handle to the right. The jug is placed correctly when the arrow on the jug is positioned right above the open lock on the motor base.
- Turn the blending jug to the right until you hear a slight click. The arrows on the motor base and blending jug should now be aligned with each other. If this is the case, the blending jug is locked correctly.
- Position the lid onto the blender so that the long holding lip is facing toward you.
- Turn this holding lip to the right, so that is it positioned right on top of the jug handle. Now the blender is ready for use.
A Guide to Your Blender
| Processing Task | Food | Suggested Setting | Suggested Processing Procedure |
| Aerating | Milkshakes, smoothies | 1, 2 | Use chilled milk. Blend it until desired consistency is achieved. |
| Chopping | Nuts, chocolate, garlic or herbs | PULSE | Process 1/2 cup at a time, to ensure evenly sized pieces. |
| Creaming | Butter or sugar | 1, 2 | Blend butter and sugar until creamed. It is advisable to top half way through and scrape the mixture down from the sides of the blender jug. DO NOT OVERPROCESS. |
| Crumbing | Bread crumbs, biscuit crumbs | 1, 2 | Break into pieces and process until crumbed. |
| Crushing Ice | Ice | 1, 2,PULSE | Add 1/4 cup of water. Use any setting or the PULSE button 3-4 times in succession for crushed iced |
| Emulsifying | Salad dressing | 1, 2 | Blend until well combined. Oil may be added to the mixture during processing through the pouring hole in the lid. |
| Making icing sugar | Crystal sugar | 1, 2 | Process for approximately 20 seconds for caster sugar and then a further 10 seconds for icing sugar. |
| Mixing | Batters, cades | 1, 2 | Process ingredients until just combined.DO NOT OVERPROCESS. |
| pureeing | Soups, vegetables, fruits | 1, 2 | Blend until smooth. |
ATTENTION! Times for processing will vary with the quantity in the blender jug, these times are only a guide
Handy Blending Hints
- A brief whirl in the blender will rescue a lumpy gravy, or an eggs-based sauce that has separated.
- Food items for blending should be cut into cubes (approximately 2-3cm), this will assist in achieving an even result.
- Never fill the blender jug above the maximum level indicated.
- To ensure efficient mixing when blending dry mixtures, it may be necessary to stop the blender and push ingredients down the sides of the jug with a spatula.
- When pureeing fruit or vegetable, cooked or raw, cut into small pieces to facilitate blending.
- When blending a variety of ingredients together, blend the liquids, first, then add dry ingredients.
- Always ensure stones are removed from fruit and bones from meat as these can harm the blades.
- Do not process hot liquids in your blender. Allows to cool before processing.
Always ventilate the blender jug when pureeing warm ingredients. This is achieved by lifting the ingredient cup out of the lid, after starting the blender.
Care and Cleaning
Quick cleaning method
- Half fill the blender with warm and a small amount of detergent.
- Press the 'Pulse' function and hold for 1-2 seconds and release. Repeat 3-4 times.
- Then remove the jug and rinse it under running water.
For thorough cleaning
- Unscrew the blade assembly from the blender jug by turning the bottom of the blade assembly in an anti-clockwise direction.
- Remove the rubber seal from the blade assembly.
- Wash the blender lid, ingredient cup, rubber seal, blade assembly and blender jug in warm soapy water.
Caution: Take care when cleaning the blades as they are extremely sharp.
Note: Do not clean any part of the blender in the dishwasher.
To clean the motor base
Use a damp, soft sponge with detergent and wipe over the motor base.
Note: Never immerse the motor base in water.
Environment
Do not throw away the appliance with the normal household waste at the end of its life, but hand it in at an official collection point for recycling. By doing this, you help to preserve the environment.
Guarantee & service
If you need information or if you have a problem, please contact the Gorenje Customer Care Centre in your country (you find its phone number in the worldwide guarantee leaflet). If there is no Customer Care Centre in your country, go to your local Gorenje dealer or contact the Service department of Gorenje domestic appliances.
For personal use only!
GORENJE WISHES YOU A LOT OF PLEASURE WHEN USING YOUR APPLIANCE
We reserve the right to any modifications!
text_image
1. 2. 3. 4. 5. 6. 7. 8.text_image
Diagram showing the step-by-step transformation of a blender into a blender, with Chinese labels indicating process flow.Abb.1
Abb.2
text_image
OBR.1 OBR.2natural_image
Diagram of a blender with liquid level sensor and side view showing internal components (no text or labels)ábra.1
natural_image
Illustration of a hand using a blender to press or adjust the product, showing the blade and fan (no text or symbols)ábra.2
text_image
Diagram showing the step-by-step fabrication of a blender with labeled parts and directional arrows indicating process flow.Рис.1
Рис.2
text_image
Diagram showing the step-by-step transformation of a blender into a cooler, with Chinese labels indicating process flow.Figura.1
Figura.2