
HB804QR - Blender GORENJE - Free user manual and instructions
Find the device manual for free HB804QR GORENJE in PDF.


| Product Type | Hand Blender (immersion blender) |
| Brand | Gorenje |
| Model | HB804QR |
| Attachments Included | Stainless steel blending attachment, universal chopper with bowl, whisk, beaker with lid |
| Motor Body Material | Plastic with soft-touch grip |
| Blending Shaft Material | Stainless steel |
| Speed Control | Variable speed with turbo button |
| Noise Level | < 72 dB(A) |
| Dishwasher Safe Parts | Beaker, whisk, chopping bowl, chopping blade |
| Cleaning of Motor Unit | Wipe with damp cloth; do not immerse in water |
| Max Continuous Operating Time | 30 seconds, then let cool to room temperature |
| Max Temperature for Ingredients | 80°C |
| Not Suitable For | Mashed potatoes, coffee beans, horseradish |
| Safety Features | Sharp blade warning, do not operate with damaged cord or plug |
| Usage | Household only, not for commercial use |
| Guarantee | As per Gorenje worldwide guarantee leaflet |
Frequently Asked Questions - HB804QR GORENJE
User questions about HB804QR GORENJE
0 question about this device. Answer the ones you know or ask your own.
Ask a new question about this device
Download the instructions for your Blender in PDF format for free! Find your manual HB804QR - GORENJE and take your electronic device back in hand. On this page are published all the documents necessary for the use of your device. HB804QR by GORENJE.
USER MANUAL HB804QR GORENJE
Instructions for use GB
- Fully unwind the connection cable.
- Connect the mixing attachment (5) to the appliance (1).
- Place food in the supplied bowl or another suitable bowl.
- Hold the mixer and the bowl. To prevent food from splattering, first immerse the mixer in the food, then press the on button (2 or 3).
- When using the normal speed button, you can adjust the speed with the speed selector. The higher the speed, the less time is needed for processing. To select a different speed setting, turn the speed selector (4) to the desired setting before pressing the normal speed button or while pressing it (2). When using the turbo speed button (3), the appliance operates at maximum speed. In that case, the speed cannot be adjusted using the speed selector.
- Place the chopper (8) on a smooth, clean work surface and press down.
- Insert the blade (7). • Place food in the bowl.
- Place the attachment on the universal chopper (6) and turn it clockwise until it stops.
- Connect the appliance to the attachment (6) and press down firmly while cutting.
- Hold the appliance and the chopper and press the on button (2, 3). You can use the speed adjustment button (2) or the turbo button (3).
- Insert the whisk (11) into the mixing unit and turn it clockwise until it stops. • Place food in the bowl.
- Hold the appliance and the bowl, and press the on button (2). You can use the speed
adjustment button (4), or the turbo button (3).
- Fully unwind the connection cable.
- Attach the mixing attachment (5) to the appliance (1).
- Place food in the provided bowl or another suitable container.
- Hold the blender and the bowl. To prevent splashing, first immerse the blender in the food, then press the start button (2,3).
- Press and hold the normal speed button (2) or the turbo speed button (3) to turn on the appliance. When using the normal speed button, you can adjust the speed with the speed selector (4). The higher the speed, the shorter the processing time. To select a different speed setting, turn the selector to the desired setting before or simultaneously with pressing the normal speed button. When using the turbo speed button, the appliance operates at maximum speed. In this case, you cannot adjust the speed with the speed selector.
Note: When finished, first turn off the blender, and only then remove it from the food.
- Place the chopper (8) on a smooth, clean work surface and press down.
- Insert the blade (7). • Place food in the bowl.
- Place the attachment (6) on the universal chopper and turn it clockwise until it stops.
- Attach the appliance (1) to the attachment (6) and press down firmly during cutting.
- Hold the appliance and the chopper and press the start button (2,3). You can use the speed control button (4) or the turbo button (3).
Note: If ingredients stick to the wall of the bowl, release the button to turn off the appliance and scrape them off with a spatula or add a little liquid.
- Insert the whisk (11) into the mixing unit and turn it clockwise until it stops. • Place ingredients in the bowl.
- Hold the appliance and the bowl, and press the start button (2,3). You can use the speed control button (4) or the turbo button (3).
- For mixing, use a glass or another suitable container.
This hand blender is a household appliance and is not intended for commercial use. Use it for processing food in the usual quantities for domestic use.
Store these instructions in a safe place and pass them on if the appliance changes hands. Before first use, wipe the handle of the blender with a damp cloth. Assemble the appliance properly before you put the plug in the wall socket. Cut large ingredients into pieces of approximately 2 cm before you process them. Let hot ingredients cool down before you chop them or pour them into the beaker (max. temperature 80°C).
Important safeguards
When using electrical appliances, in order to reduce the risk of fire, electric shock, and/or injury to persons, basic safety precautions should always be followed, including the following:
- Read all instructions carefully, even if you are familiar with the appliance.
This appliance is marked according to the European directive 2002/96/EC on Waste Electrical and Electronic Equipment (WEEE). This guideline is the frame of a European-wide validity of return and recycling on Waste Electrical and Electronic Equipment.
- To protect against the risk of electric shock, DO NOT IMMERSE the appliance, cordset, or plug in water or other liquid. To clean, wipe exterior with a damp cloth.
- Never leave an appliance unattended when in use.
- Switch off and remove the plug from the power outlet when not in use, before assembling or disassembling parts, and before cleaning. To
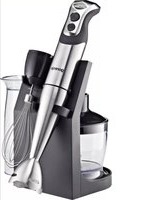
1 - Motor Body Unit 2 - Soft Touch On / Off Button 3 - Soft Touch Turbo button 4 - Speed Control Knob 5 - Stainless Steel Blending Attachment 6 – Chopping Body Unit 7 – Chopping Blade 8 – Chopping Bowl 9 - Bowl Rubber Ring 10 - Beater Body 11 – Whisk 12 - Beaker 13 - Beaker lid
unplug, grasp plug and pull from power outlet. Never pull cord.
- Do not operate any appliance with a damaged cord
- Do not operate any appliance with a damaged plug, or after the appliance malfunctions or is dropped or damaged in any manner. Return the complete appliance to your nearest authorized service facility for examination, electrical repair, mechanical repair, or adjustment.
- The use of attachments or accessories not recommended or sold by this appliance manufacturer may result in fire, electric shock, or personal injury.
- Do not overfill.
- Do not let the cord hang over the edge of a table or counter, or touch hot surfaces.
- Avoid touching hot surfaces; use handles and knobs.
- Do not operate or place any part of this appliance on or near any hot surface (such as a gas or electric burner, or in a heated oven).
- Do not abuse the cord. Never carry the appliance by the cord or yank it to disconnect it from the outlet; instead, grasp the plug and pull to disconnect.
- When using an extension cord with your appliance, make sure the extension cord is correctly wired and rated for its use.
- This product is intended for household use only.
- Do not attempt to repair the appliance yourself; instead, take it to your nearest Service Centre or Authorised Service Agent for repair.
- This appliance is not intended for use by persons (including children) with reduced physical, sensory or mental capabilities, or lack of experience and knowledge, unless they have been given supervision or instruction concerning use of the appliance by a person responsible for their safety. Children should be supervised to ensure that they do not play with the appliance.
- Handle the sharp blades carefully, especially when removing and emptying the container and during cleaning.
- Do not touch the blades of the blender bar, especially when the appliance is plugged in. The blades are very sharp.
- If the blades get stuck, unplug the appliance before removing the ingredients that block the blades.
- Be very careful when handling or cleaning the blade unit or the combination disc. Their cutting edges are very sharp. Be especially careful when cleaning them and when emptying the bowl.
- The bowl is not suitable for use in microwave ovens.
- Noise level: Lc < 72 dB(A)
Handling the appliance
The appliance is used for mixing mayonnaise, gravy, shakes, baby food, and for chopping onions, ice, cooked fruit and vegetables.
Caution! Hand blender is not suitable for the preparation of mashed potatoes.

- Attach the blending device (5) to the appliance (1).
- Insert food into the beaker or any other suitable bowl.
- Grip both the blender and the bowl. To prevent splashing first dip the blender blade into the food and then press the ON button (2, 3).
- Press and hold the normal (2) or turbo speed (3) button to switch on the appliance. When you use the normal speed button, you can adjust the speed with the speed selector (4). The higher the speed, the shorter the processing time required. To select a different speed setting, turn the speed selector to the preferred setting before or while you press the normal speed button. When you use the turbo speed button, the appliance operates at maximum speed. In this case, you cannot adjust the speed with the speed selector.
Caution! When finished first switch the blender off and then lift it from the bowl.
Warning: Do not process more than 30 seconds without interruption. Let the appliance cool down to room temperature before you continue processing.
Universal chopper
It is used for chopping herbs, onions, fruit, vegetables, ice, hard cheese and meat.
Caution! Before chopping meat remove tendon, gristle and bone tissue. Universal chopper is not suitable for chopping coffee beans or horse radish.

- Place the chopper bowl (8) on flat, solid worktop and press the body unit (1) downwards.
- Insert the chopping blade (7).
- Put food in the chopping bowl (8).
- Place the chopping bowl unit (6) on the chopper bowl (8).
- Turn the motor unit (1) on the chopper bowl unit (6) until it locks into place.
- Hold the appliance and the chopper bowl and push the start button (2,3). Use speed control knob (4) to select a speed or press the turbo button (3).
Note: If the ingredients stick to the wall of the bowl, release the button to switch off the appliance and loosen the ingredients with a spatula or add some liquid.
Warning: Do not process more than 30 seconds without interruption. Let the appliance cool down to room temperature before you continue processing.
Using the beater
Before connecting the beater onto the motor unit, make sure the blender is disconnected from the electrical outlet.

- Insert the whisk (11) by grasping it into the beater body (10). Screw the beating attachment to the main unit by turning counterclockwise.
- Place the ingredients to be mixed in the bowl/beaker.
- Hold the appliance and the bowl and push the start button (2,3). Use speed control knob (4) to select a speed or press the turbo button (3).
Warning: Do not process more than 30 seconds without interruption. Let the appliance cool down to room temperature before you continue processing.
Cleaning and Maintenance
Caution! Do not immerse the appliance in water and do not wash it in the dishwasher.
- Wipe the appliance first with a damp and then with a dry cloth.
- The beaker (12), whisk (11), chopping bowl (8), and chopping blade (7) can be used in the dishwasher.
- Chopping Body Unit (6), Blending Attachment (5), Beater Body (10) wipe first with damp and then with dry cloth.
Remark: During the processing of vegetables with aggressive coloring, e.g. red cabbage, plastic parts may be subject to discoloration. This may be removed by rubbing such surfaces with a few drops of cooking oil.
Environment
Do not throw away the appliance with the normal household waste at the end of its life, but hand it in at an official collection point for recycling. By doing this, you help to preserve the environment.
Guarantee & service
If you need information or if you have a problem, please contact the Gorenje Customer Care Centre in your country (you find its phone number in the worldwide guarantee leaflet). If there is no Customer Care Centre in your country, go to your local Gorenje dealer or contact the Service department of Gorenje domestic appliances.
For personal use only!
GORENJE WISHES YOU A LOT OF PLEASURE WHILE USING YOUR APPLIANCE
We reserve the right to any modifications!

- Place the appliance (8) on a flat, stable work surface and press it downwards. • Insert the blade (7). • Put the food into the beaker (8).
- Place the attachment over the chopper and turn it clockwise until it clicks into place.
- Connect the appliance to the attachment and hold it firmly down during operation.
- Plug the power cord into the socket.
- Hold the appliance and the chopper and press the start button (2,3). Use the speed control to select the speed, or press the turbo button.
- Unwind the cable completely.
- Insert the metal strainer (5).


Brand : GORENJE
Model : HB804QR
Category : Blender