
NRS9182CBBK - Combined refrigerator GORENJE - Free user manual and instructions
Find the device manual for free NRS9182CBBK GORENJE in PDF.



| Product Type | Combined Refrigerator |
| Brand | Gorenje |
| Model | NRS9182CBBK |
| Dimensions (H x W x D) | 1704 x 906 x 600 mm (approx.) |
| Weight | Approximately 90 kg |
| Power Supply | 220-240 V, 50 Hz, grounded plug |
| Climate Class | SN-ST (10 °C to 38 °C) |
| Refrigerant | R600a (isobutane) |
| Control Panel | Touch digital panel with lock |
| Special Functions | Super Freeze, Super Cool, Stop mode, Display off, Door alarm, Temperature alarm |
| Water and Ice Dispenser | Yes, with automatic ice maker |
| Freezer Capacity | Approximately 100 L (estimate) |
| Refrigerator Capacity | Approximately 250 L (estimate) |
| Number of Shelves | Multiple glass shelves, door bins, vegetable drawer |
| Water Filter | Replacement recommended every 6 months |
| Maintenance | Clean with a soft cloth and mild detergent; vacuum the rear grille once a year |
| Safety | Child lock, door alarm, electrical insulation, flammable refrigerant R600a |
| Supplied Accessories | Egg tray, filter housing, water supply kit |
| Repairability | Servicing by a qualified technician; spare parts available (filter, hinges, etc.) |
Frequently Asked Questions - NRS9182CBBK GORENJE
User questions about NRS9182CBBK GORENJE
0 question about this device. Answer the ones you know or ask your own.
Ask a new question about this device
Download the instructions for your Combined refrigerator in PDF format for free! Find your manual NRS9182CBBK - GORENJE and take your electronic device back in hand. On this page are published all the documents necessary for the use of your device. NRS9182CBBK by GORENJE.
USER MANUAL NRS9182CBBK GORENJE
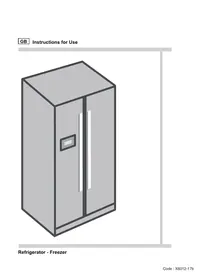
Refrigerator - Freezer
Disposal of Used Electrical & Electronic Equipment
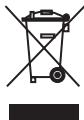
The meaning of the symbol on the product, its accessory or packaging indicates that this product shall not be treated as household waste. Please, dispose of this equipment at your applicable collection point for the recycling of electrical & electronic equipment waste.
In the European Union and other European countries there are separate collection systems for used electrical and electronic products. By ensuring the correct disposal of this product, you will help prevent potential hazards to the environment and to human health, which could otherwise be caused by unsuitable waste handling of this product. The recycling of materials will help conserve natural resources.
Please do not therefore dispose of your old electrical and electronic equipment with your household waste.
For more detailed information about recycling of this product, please contact your local city office, your household waste disposal service or the shop where you purchased the product.
SAFETY WARNING

This appliance contains a certain amount of isobutane refrigerant (R600a), a natural gas with high environmental compatibility that is, however, also combustible.
When transporting and installing the appliance, care should be taken to ensure that no parts of the refrigerating circuit are damaged.
Refrigerant squirting out of the pipes could ignite or cause eye injury. If a leak is detected, avoid any naked flames or potential sources of ignition and air the room in which the appliance is standing for several minutes.
- In order to avoid the creation of a flammable gas-air mixture if a leak in the refrigerating circuit occurs, the size of the room in which the appliance may be sited depends on the amount of refrigerant used.
The room must be 1 m³ in size for every 8g of R600a refrigerant inside the appliance. The amount of refrigerant is shown on the identification plate inside the appliance.
- Never start up an appliance showing any signs of damage. If in doubt, consult your dealer.
RoHS (Directive 2011/65/EU) Compliant

This product is environmentally sound and sustainable, free from Pb, Cd, Cr+6, Hg, PBBs and PBDEs restricted in accordance with the Directive.
OBSERVE AMBIENT TEMPERATURE
This refrigerator is designed to operate in ambient temperature specified by its category, which is marked on the rating plate.
| Climatic category | Ambient temperature from...to |
| SN | +10°C to +32°C |
| N | +16°C to +32°C |
| ST | +16°C to +38°C |
| T | +16°C to +43°C |
NOTE
Internal temperature may be affected by such factors as the location of the refrigerator, ambient temperature and frequency of the door opening.
Contents
Before You Call for Service... 10
Something strange?
Don't worry. Here is the answer . . . . . . . . . . 11
Installation Preparation 12
If the refrigerator cannot pass through a door during installation, follow these steps . . . . . . . . . 13
Refrigerator Leveling &
Door Adjustment (if needed) 14
How to install Water Line 15
Be sure to keep for safety!
Read these safety instructions thoroughly and carefully before using. Please keep this user guide on hand for future reference.

Indicates the possibility of danger of death or serious injury.

Indicates the possibility of risk of personal injury or material damage.
Other Signs

DO NOT remove or disassemble!

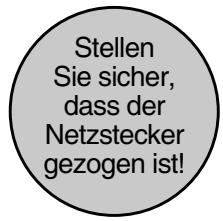
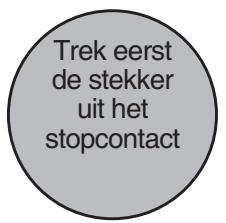
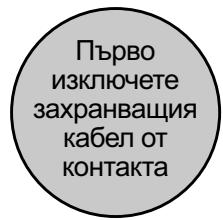
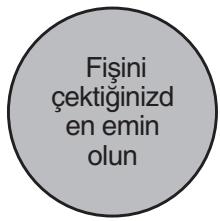
Be sure to unplug from outlet/mains!

NO. DO NOT...

Be sure to keep and follow!

Caution
- If the supply cord becomes damaged, it must be replaced by a qualified person in order to avoid a hazard.
- This appliance is not intended for use by persons (including children) with reduced physical, sensory or mental capabilities, or lack of experience and knowledge, unless they have been given supervision or instruction concerning use of the appliance by a person responsible for their safety.
WARNING

Never let the power cord be crushed by the refrigerator itself or other (heavy) objects. Never bend power cord excessively.
- If the cord is damaged or peeled, it can be a cause of fire and electric shock.

Do not plug several appliances into the same wall outlet.
- It can be a cause of overheating and/or fire. Use an exclusive grounding receptacle for the refrigerator.

Never hold the power cord or plug with wet hands.
There is a risk of electric shock.

Never use a damaged power cord or plug, or a loose main socket.
There is a risk of fire, electric shock, or serious injury.

Be sure to ground. Check if your wall outlet is grounded (earthed).
There is a risk of electric shock hazards.

Never unplug by pulling only the power cord wire. Always grip the plug firmly.

Let the cord from the plug outlet be directed downwards.
If it is directed up, the cord near the plug is bent and can be damaged, which can cause an electric shock or fire.

Do not install the refrigerator on a wet floor or in a place with excessive humidity and moisture.
Electric insulation gets weakened, resulting in a risk of electric shock hazards.

Never let the power cord touch or pass over heating appliances.
Power cord can be damaged, resulting in a risk of electric shock hazards.

Check if plug is loose from the wall outlet.
Electric insulation gets weakened, resulting in a risk of electric shock hazards.

Never pour or spray water into the refrigerator (both interior and exterior).
Electric insulation gets weakened, resulting in a risk of electric shock hazards.

Do not place containers with water or liquid on top of the refrigerator.
Water can spill into the refrigerator and can cause electric shock hazards or damage.

Do not let children hang on the refrigerator doors.
The refrigerator can fall and harm them.

Do not move or remove compartment shelves/pockets while foods and containers are on them.
Hard containers (of glass, metal, etc.) can fall to hurt you and can break glass shelves and interior parts.

Never repair, disassemble, or modify the refrigerator on your own.
There is a risk of personal injury or damage to the refrigerator. It is recommended that any service be carried out by a qualified person.

Never store any flammable gas or liquid in the refrigerator.

Never use flammable gas, benzene, thinners, gasoline, spray, etc. near the refrigerator.
There is a risk of fire, explosion, and personal injury or damage.

If a gas leak is found near the refrigerator or in the kitchen, ventilate it immediately without touching the power plug or refrigerator.

Do not store medicine or academic research samples which require strict temperature control in the refrigerator.

Never insert fingers or hands into the bottom of the refrigerator, especially into the bottom at the back.
You can be hurt by sharp metal edges or can receive an electric shock.

Do not change fuse or LED lamp on your own. Call the service agent to change them.

When you find the power cord damaged or cut, call the service agent immediately.

When you get rid of your old refrigerator, be sure to remove the doors first.
Children can be entrapped and suffocated in an abandoned refrigerator.

Keep ventilation openings, in the appliance enclosure or in the built-in structure, clear of obstruction.

Do not use mechanical devices or other means to accelerate the defrosting process.

Do not use electrical appliances inside the food storage compartments of the appliance.

The ice-maker in the freezer can be only replaced by the manufacturer or the service agent.

When the freezer door is open, do not press the dispenser lever.

Connect to drinkable water supply only.
CAUTION

Be sure to unplug the refrigerator when it is not going to be used for a long time.

Never touch foods and containers especially of metal with wet hands in the freezer compartment.
●You can be hurt by chilblains or cold burns.

Never eat any decayed or deteriorated food at all.
●Foods stored too long in the refrigerator can deteriorate and become decayed.

Never place bottles and containers of glass in the freezer compartment.
●Glass containers and bottles can break and can hurt you.

When moving the refrigerator (horizontally or tilted), more than 2 people are required to hold it. (One to hold top back handles, the other to hold the bottom holder.) If other parts are held instead, it is very dangerous and likely to slip.

Be sure to turn up the wheel first before moving the refrigerator.
- The wheels can damage or scratch the floor. If you are moving it for a long distance, never forget to fasten the interior parts tightly with tapes. - Otherwise, the parts can collide and break each other.
Installation Guide
* Read these safety instructions carefully before use and follow precautions for your safety.

Precautions in installation and power connection
■ To prevent fire, electric shock or leakage.
①Never install the refrigerator on a wet, watery floor or where water can gather easily. ② Check the following before power connection.
- Connect power plug only to a grounded wall socket (an earthed mains).
- Do not plug refrigerator power together with other appliances to the same socket.
③Do not use an adapter plug or an extension cord. ④Do not let the power cord be crushed by other (heavy) objects.
※If you hear a strange noise, strong chemical odour or find smoke etc. from the refrigerator after the power is plugged in, pull out the plug immediately and call a service agent. ※Wait about 5 minutes before you plug-in again in order to prevent any damage to the compressor and electrical devices of the refrigerator. ※Wait 2~3 hours until the inside gets cold enough after the first power plug-in, then store foods inside.
(There can be some smell of plastic parts on initial operation of the refrigerator after plugging in.
The smell fades away as the refrigerator works and doors are opened and closed.)

Precautions in use
■ To prevent personal injury, fire, electric shock etc. read this user guide carefully before use and keep it at hand for reference.
■ Accessories
Egg case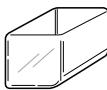
Filter Box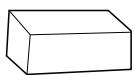
Water supply Kit
User guide Dispenser models only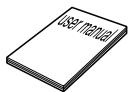
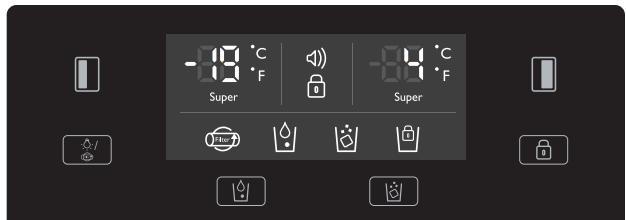
Control Panel
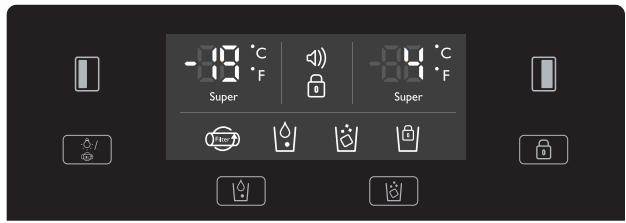
1. FRZ.SET button
Temperature selection button for freezer compartment.
2. LIGHT/FILTER button
1) Button for dispenser light on. 2) Button for filter exchange or reset. After exchanging or to reset, press the button for 3 seconds.
3. Alarm display
Customers can be informed of temperature status when temperature abnormally rises due to accidents (for example, blackout)
1) Alarm icon blinks, displaying the highest inner temperature. 2) Alarm stops when ☑ button is pressed, and display shows temperature control value.
4. Displays the button 'Lock'.
5. Filter exchange display
After 6 months of first power input, the icon will flicker.
6. Button for water dispensing. Water symbol (☐) lights up when selected.
7. Selection button for ice dispensing and lock for ice maker.
● Interior lights of the refrigerator turn off when the doors are open for more than 10 minutes. - In case either the freezer or refrigerator door is left open for more than a minute, door alarm rings for 5 minutes with 1 minute intervals. ● Display off function - All the light in the display will turn off after 20 seconds to save energy when doors closed. - The light will turn on when the door is opened or button is pressed. - Normal display mode resumes when customers operate buttons or doors. ● System off function (power off function) - You can stop operating the appliance without unplugging, especially on holidays. - Pressing FRZ.SET and REF.SET button at the same time for 5 seconds will turn the appliance off. - Under the 'off' mode, freezer and refrigerator temperature displays "-- --". - Other LED lights go out and all the operation of your appliance halts. - Conversely, pressing FRZ.SET and REF.SET button together for 5 seconds will switch it back on.
8.

REF.SET button Temperature selection button for refrigerator compartment.
9.

Lock button for control panel Press button for more than 3 seconds to activate and prevent settings from being unintentionally changed.
To unlock, press for more than 3 seconds. The display goes out.
Temperature Control
* When this refrigerator is first plugged in, the temperature mode is set to [Middle].
Freezer Compartment
Push the FRZ.SET button and the setting temperature changes as the figure shows.
Sequential Temperature Change <<<

Super
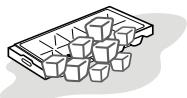
Faster Freezing...
When you want faster freezing, push the FRZ.SET button until 'Super' LED turns on. Just push the button again to release.
Refrigerator Compartment
Push the REF.SET button and the setting temperature changes as the figure shows.
Sequential Temperature Change <<<
Super
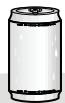
Faster Cooling or Refrigeration
When you want faster cooling or refrigeration, push the REF.SET button until 'Super' LED turns on. Just push the button again to release.
Temperature indicator convert function (Fahrenheit ↔ Celsius)
Press the lock button to enter locked mode. In locked mode, press the light and water buttons simultaneously for 10 seconds to switch the temperature scale (default is Celsius).

Caution
Foods in the refrigerator can freeze if the ambient temperature is below 5°C.
How to use the interior parts
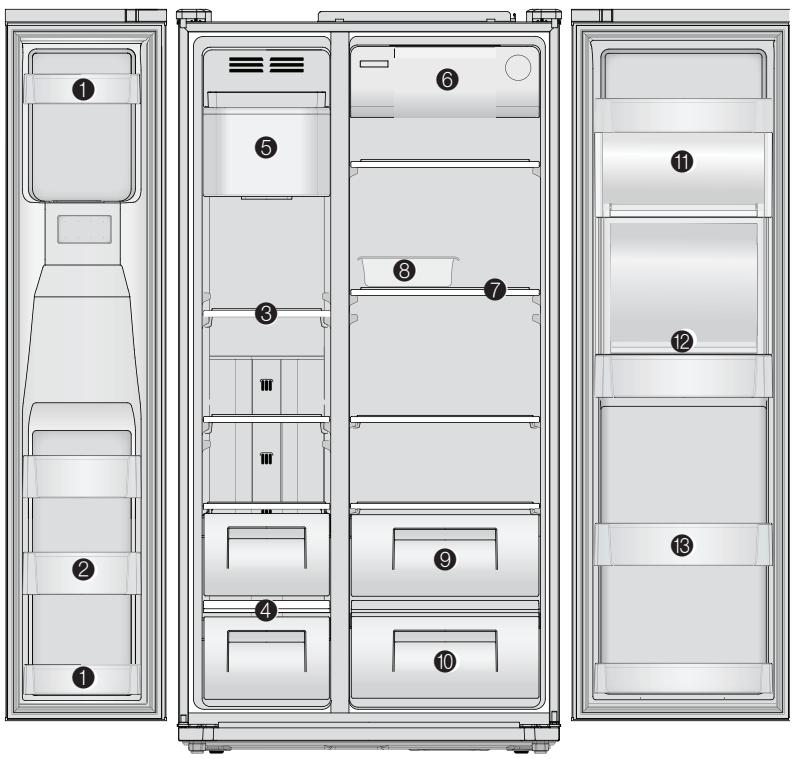
※ This instruction manual covers several models. Actual features depend on the model.
- Door storage compartment for short-term storage of food and ice cream.
- Door storage compartment for storing frozen food.
- Freezer shelf for storing frozen foods such as meat, fish, and ice cream.
- Freezer case for storing dried foods, fish, or meat for long periods.
- Ice maker & storage
- Xpress Can Chiller for storing beverages (quick cooling compartment).
- Refrigerator shelf for storing common foods.
- Egg case (do not use for storing ice cubes or place in the freezer compartment).
- Vegetable case
- Fruit case
- Multi Plus Zone for storing general products.
- Refreshment compartment (Option) for frequently used cans, drink water, beverages.
- Refreshment pocket for storing refrigerating foods, milk, juice, beer bottle etc.

Caution
- Do not touch or hold foods or food containers in the freezer compartment with wet hands.
- There is a risk of chilblains (cold burns). Do not store medicine, academic research samples etc. in the refrigerator.
Food Storage Tips
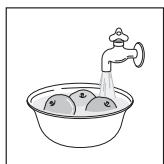
Wash foods before storing.
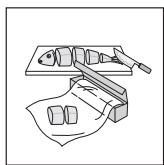
Divide and separate foods into smaller pieces.
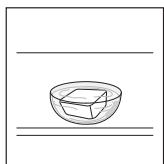
Place watery foods or foods with a lot of moisture in front shelves (close to door side). If they are placed close to the cold air spout, they can be frozen.
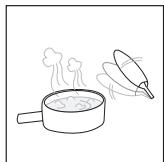
Warm or hot foods should be cooled down enough before storing to reduce power consumption and to enhance refrigeration performance.
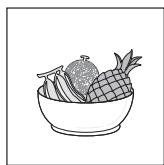
Be careful when storing tropical fruits such as bananas, pineapples, and tomatoes, as they can easily deteriorate at lower temperatures.
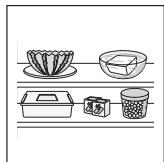
Keep enough space between foods. If they are too tight or too close, cold air circulation is hindered, resulting in poor refrigeration.
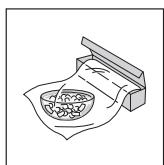
Never forget to cover or wrap foods to prevent odors.
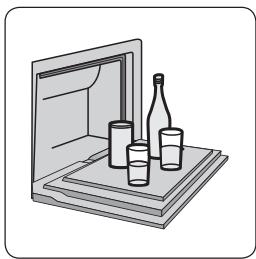
Refreshment compartment (Option)
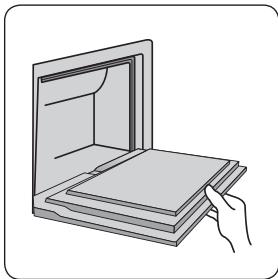
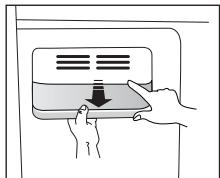
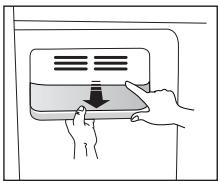
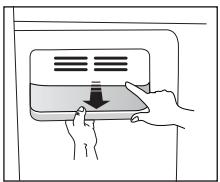
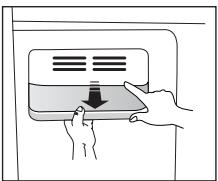
- Softly press the upper center of the Home Bar to open (one-touch push type).
- You can access the refreshment compartment without opening the door, thus saving electricity.
- The refrigerator lamp is lit when the refreshment compartment door is open. It is easy to identify the contents.

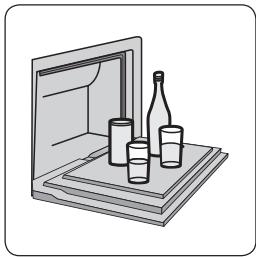
- You can put your wine or food on the opened Home Bar cover.
- Leaving the cover open for too long could weaken cooling performance.
How to use the Dispenser
Select the 'WATER' or 'ICE' button and push the lever gently with your cup.
Your selection will come out 1~2 seconds later.

Press the 'WATER' button and the icon lights up.

Press the 'ICE' button and the icon lights up.
WATER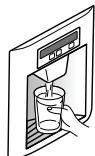
CUBED ICE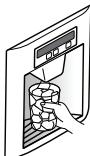

When cleaning the ice cube case assembly or if you will not use it for a long time, remove the ice cubes from the ice storage case and lock the icemaker by pressing the 'ICE' button for 3 seconds.

Caution
● Avoid using thin fragile cups or crystal glasses when taking ice cubes. ● For your safety, never insert your fingers or other tools into the dispenser outlet. - If you find the ice cubes are discolored, stop using the dispenser and call a service agent.
How to use the Automatic Icemaker
- About 10 ice cubes (14~15 times a day) are made at one time. If the ice storage case is full, icemaking stops. ● It is normal for the icemaker to make banging sounds when the ice cubes are falling into the ice storage case. ● To prevent bad odors or smells, regularly clean the ice cube storage case.
- If the amount of ice in the storage case is not sufficient, the ice may not be dispensed. Wait a day or so to make more ice.
- If the ice does not dispense easily, ensure the dispenser outlet is not blocked.
In case the icemaker doesn't work
If the ice cubes get stuck and not
dispensed
● Pull out the ice storage case and separate any ice cubes that may have stuck together. - If the amount of water which is supplied to the icemaker needs adjusting, call for a service agent.
In case of power failure
● The ice cubes in the case may melt and flow to the room. - If many hours of power failure is predicted, pull out the case, remove the ice cubes in it and replace it back when power resumes.
Care & Cleaning
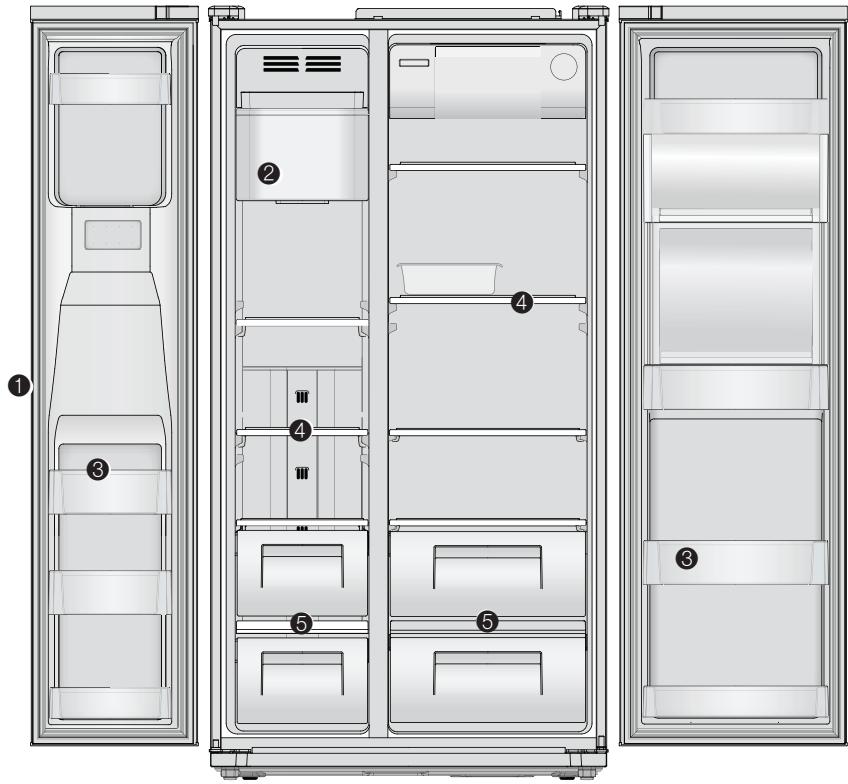
※ The real features are model dependent.
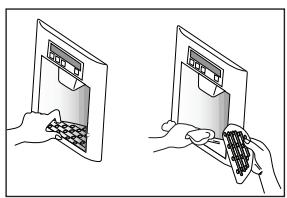
① Dispenser Water Shelf
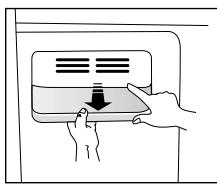
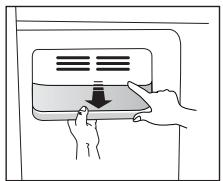
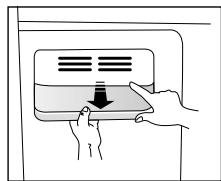
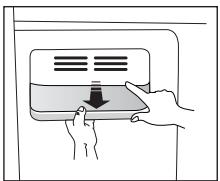
- Remove the spill grill and clean the water shelf regularly. (The spill shelf is not self-draining.)
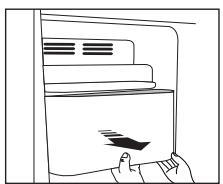
② Ice Cube Storage Case
● Removing: Pull the case assembly forward to remove. ● Replacing: Fit to the side grooves and insert to the end. If it is difficult to fully insert the case, remove it, rotate the swirl coil in the case or drive mechanism a quarter turn and insert again.
Do not store the ice cubes for too long.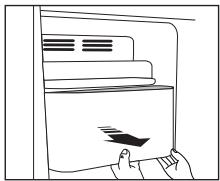
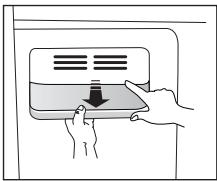
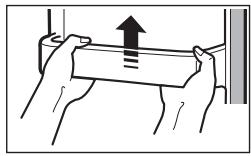
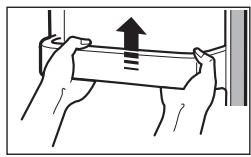
③ Freezer & Refrigerator Pockets
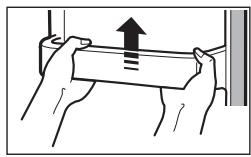
● Hold both ends and pull up.
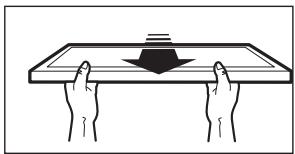
④ Freezer & Refrigerator Shelves
- Open the doors fully, then pull the shelves forward to remove.
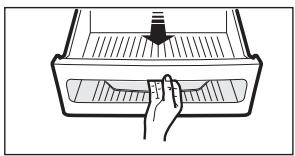
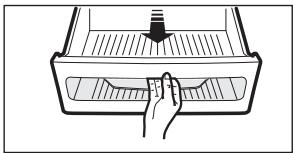
⑤ Vegetable Case & Fruit Case
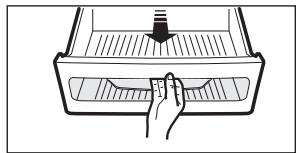
● Pull forward and lift up a little to remove.
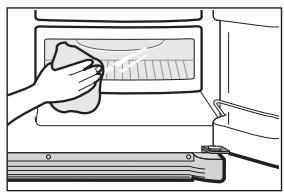
How to Clean
Interior Parts
Use a cloth with water and mild detergent to clean.
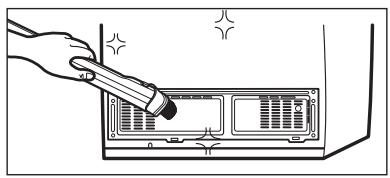
Back (Machine section)
Remove dust on the grill with a vacuum cleaner at least once a year.

Caution
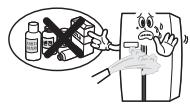
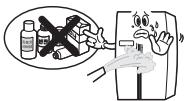
Never use petrol, benzene, thinners, scouring pads, or harsh abrasives, as they can damage the surfaces.
Before You Call for Service...
Please check the following troubleshooting tips before you call for service!

Problem
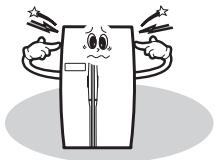
It never gets cold inside. Freezing & refrigerating is not very good.
Checkup Point
① Is the refrigerator unplugged? ② Is the temperature set to [Low Mode]? ③ Is the refrigerator under direct sunlight or is a heat appliance placed near it? ④ Is the space between the refrigerator back and the wall too close?
Action
① Plug in the refrigerator. ② Set the temperature mode to Middle or High. ③ Move to a place where there is no direct sunlight, no heat appliances around. ④ Keep sufficient space between the back of the refrigerator and the wall.
Problem
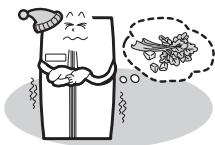
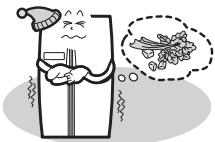
Foods in the refrigerator get frozen.
Checkup Point
① Is temperature set to [High]? ② Is the room temperature too low? ③ Is food with moisture stored close to the cold air spout?
Action
① Set the temperature to [Middle] or [Low]. ② Foods can be frozen if ambient temperature is below 5°C. Move to a place where the temperature is over 5°C. ③ Place foods with moisture on the shelves close to the doors.
Problem
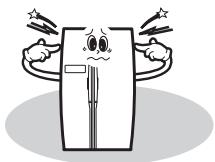
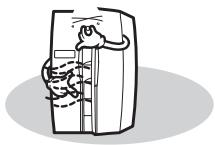
Strange sounds from the refrigerator.
Checkup Point
① Is the floor beneath the refrigerator uneven? ② Is the space between the refrigerator back and the wall too close? ③ Does any object touch the refrigerator?
Action
① Move the refrigerator to a level and even floor. ② Keep sufficient space. ③ Remove any object which touches the refrigerator.
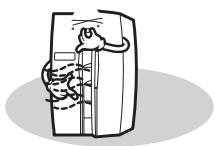
Problem
Odour or unpleasant smell from the inside.
Checkup Point
① Is the food stored uncovered or unwrapped? ② Are the shelves and pockets stained with food stuff? ③ Is the food stored too long?
Action
① Be sure to cover and wrap the foods. ② Clean them regularly. Once smell gets soaked into those parts, it is not easy to remove. ③ Do not store foods for too long. A refrigerator is neither a perfect nor a permanent food keeper.
Something strange? Don't worry. Here is the answer.
| Case | Explanation | ||
| Heat | Front and side of refrigerator feels warm or hot. | 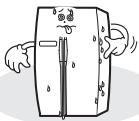 | ●Pipes (refrigerant vessel) are placed beneath the surface to prevent moisture forming on it. |
| Door is sticky | Doors do not open easily. | 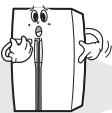 | ●When you close the door and then open it again immediately, the door is not easy to open. Warm air rushes into the inside to create the pressure difference. In this case wait for a minute, it will then open easily. |
| Strange Sound | It sounds like water is flowing from the refrigerator. | 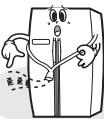 | ●When the compressor starts to run or stops, refrigerant which makes the inside cold flowing in the pipes can make such a sound. ●Defrosted water can also make such a sound. (This refrigerator adopts an automatic defrosting system.) |
| Cracking or clicking sounds. |  | ●Inside parts shrink and/or expand due to temperature change --- When the inside gets cold or when the door is open, such sounds can be made. | |
| Humming or buzzing sounds. | ●Compressor or fans for cold air circulation can make such working sound. (If the refrigerator is not level, the sound can be louder.) | ||
| Frost & Dew | Dew or frost on the wall and/or food container surface in the freezer and refrigerator compartment. |  | Frost and/or dew can be made in the following cases; ●High temperature and/or high humidity around the refrigerator. ●When doors are open too long. ●Foods with much moisture are stored uncovered or unwrapped. ※You can see the same appearance when cold water is poured in a glass cup and dew is forming on the surface of it. |
| Dew on the cabinet surface. | ●If it is highly humid around the refrigerator, moisture in the air sticks to the surface to form dew. | ||
Installation Preparation
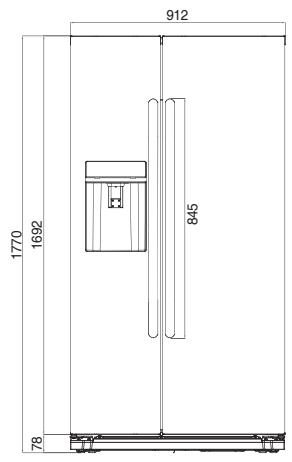
Dimensions (including Door Handles)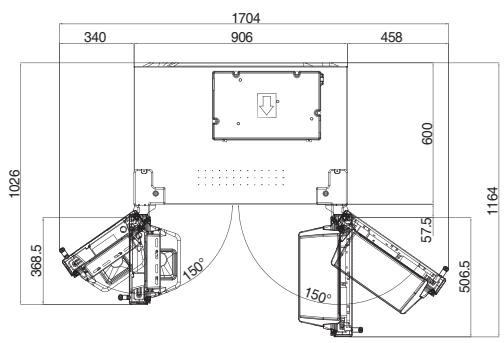
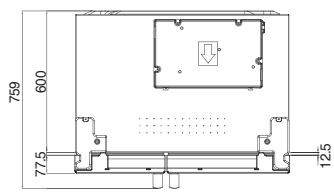
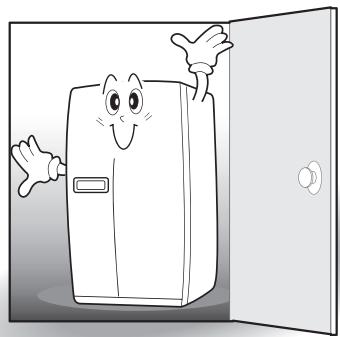
Check if the refrigerator can pass a doorway or enter a door first.
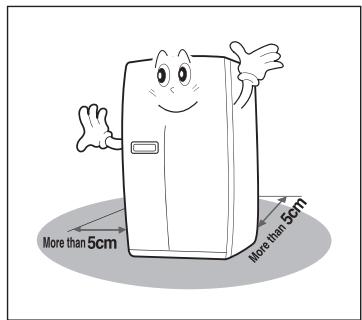
Find a suitable place to install
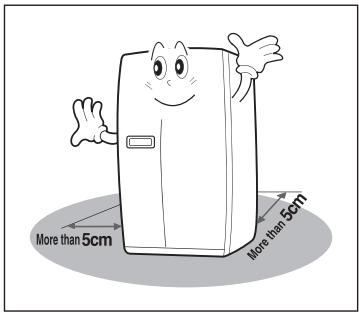
Ensure sufficient space from the back of refrigerator to the wall for free air ventilation.
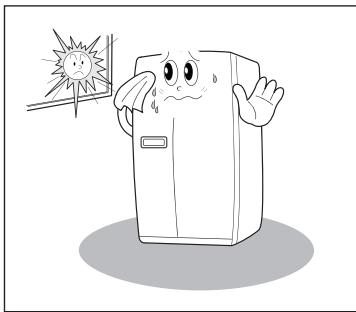
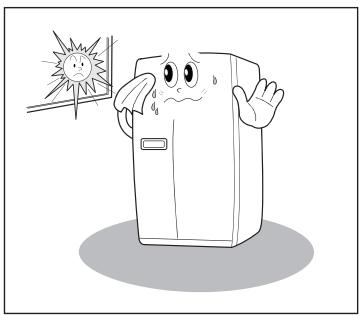
Avoid direct sunlight.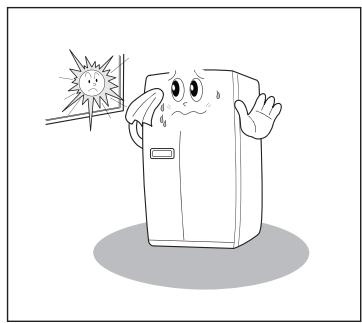
- Once the installation place is ready, follow the installation instructions. If the surrounding temperature of the refrigerator is low (below 5°C), foods can be frozen or the refrigerator can function abnormally.
If the refrigerator can not pass through a door during installation, follow these steps.
(This guide refers to several models. The real features are model dependent..)
Removing Freezer Door
※Remove front bottom cover first, if it is attached.
1 Pull out bending tube guide and the left water tube. (Dispenser Models Only)
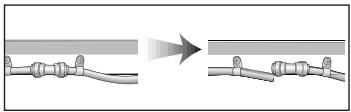
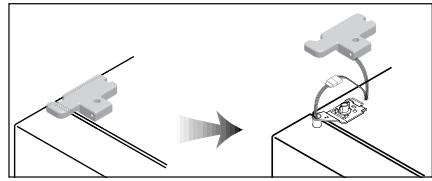
2 Unscrew the top hinge cover with a screwdriver.
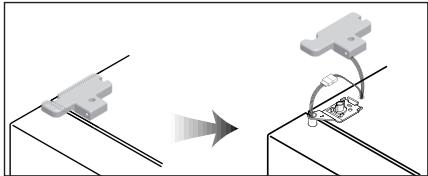
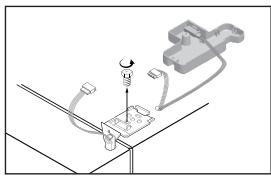
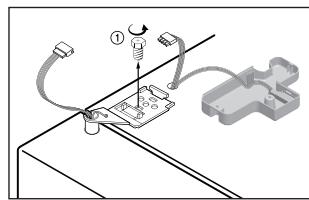
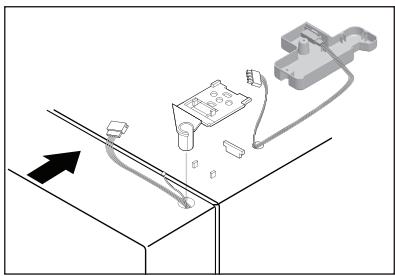
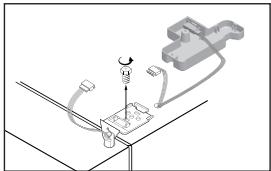
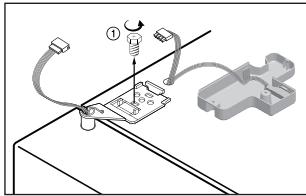
3 Turn the top hinge fastener counterclockwise 3 to 4 times. Disconnect the harness wires.
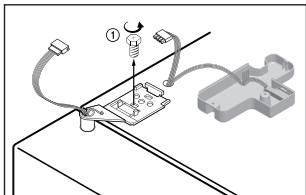
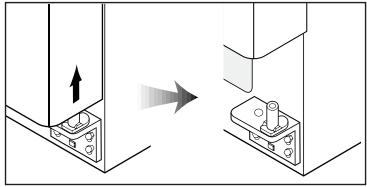
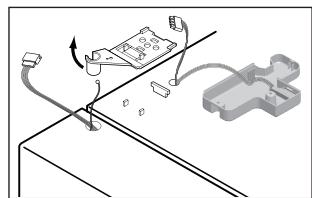
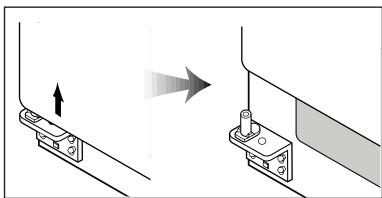
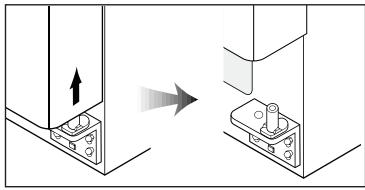
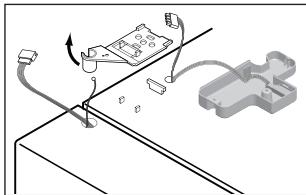
4 Lift up the front of the hinge to remove it. (After the hinge is removed, the door can fall forward. Be careful!)
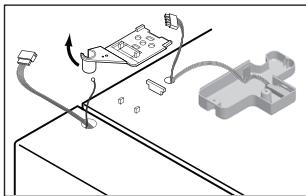
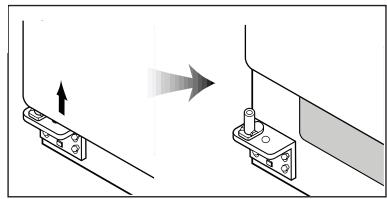
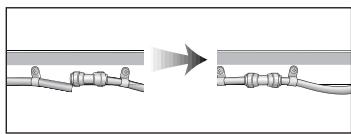
5 Be careful not to damage the water line when removing the door.
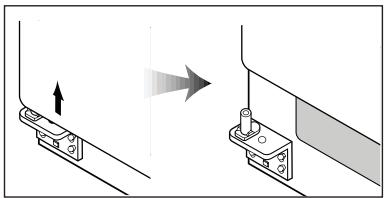
Removing the Refrigerator Door
1 Unscrew the top hinge cover with a screwdriver. Insert a thin screwdriver into the side groove of the cover to remove it.
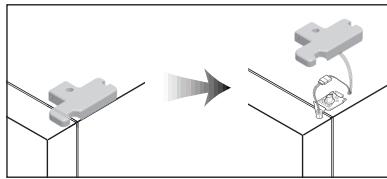
2 Turn the top hinge fastener counterclockwise 3 to 4 times. Disconnect the harness wires (model dependent).
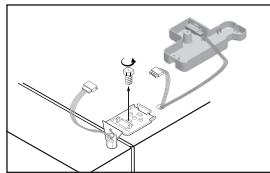
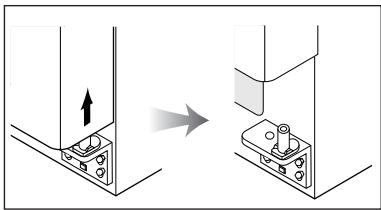
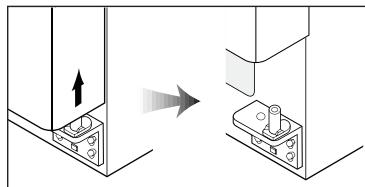
3 Lift the door straight up to remove it.
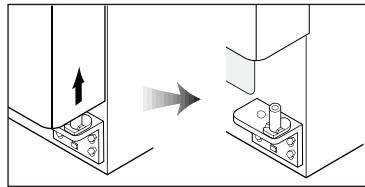
Replacing the Freezer Door
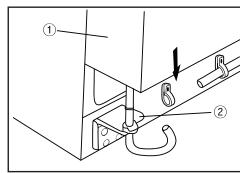
1 Insert the water tube into the hole of the bottom hinge pin first.
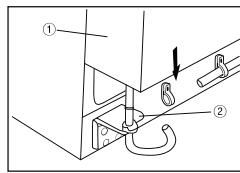
2 Let the top of the door close and insert the top hinge pin into the top hole of the freezer door. (Insert the back of the hinge into the groove of the protrusion first, then the front into the top hole of the door.)
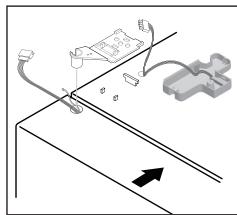
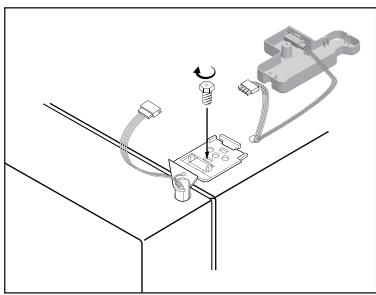
3 Turn the hinge fastener tightly to the end. Connect the harness wirings and screw down the ground wire.
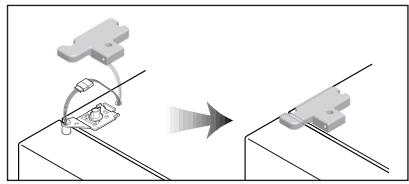
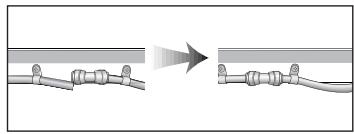
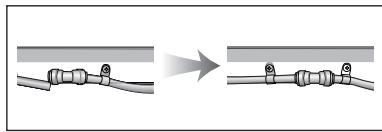
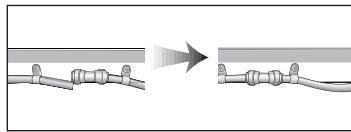
4 Fasten the bending tube guide and insert the water tube far into the coupling. (Dispenser models only)
Replacing the Refrigerator Door
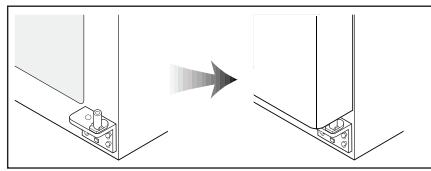
1 Insert the bottom hole of the refrigerator door straight into the bottom hinge pin.
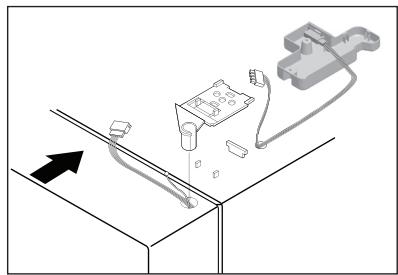
2 Let the top of the door close and insert the top hinge pin into the top hole of the refrigerator door. (Insert the back of the hinge into the groove of the protrusion first, then the front into the top hole of the door.)
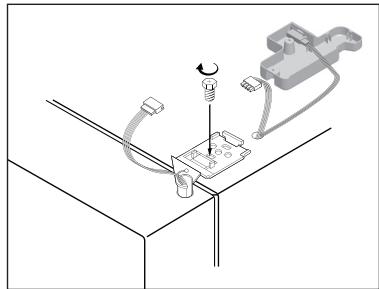
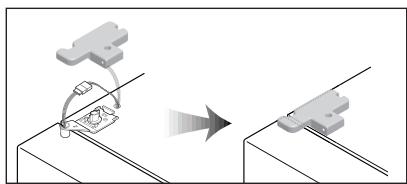
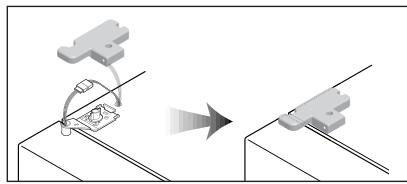
3 Turn the hinge fastener tightly to the end. Connect harness wirings (model dependent) and screw down the ground wire. Click and screw the top hinge cover.
Refrigerator Leveling & Door Adjustment (If needed)
The refrigerator must be level in order to maintain optimal performance and desirable front appearance. (If the floor beneath the refrigerator is uneven, the freezer and refrigerator doors may look unbalanced.)
In case freezer door is lower than refrigerator door...
1 Insert a screwdriver (flat tip) into a groove of the left wheel (bottom of freezer) and turn it clockwise until the door is balanced. (Clockwise to raise freezer door, counterclockwise to lower.)
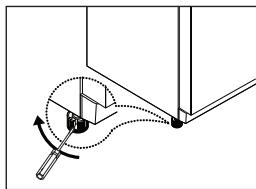
※ If the freezer door is not balanced by step 1, then follow the next steps.
2 Open the doors, unscrew the front cover and remove, if it is attached.
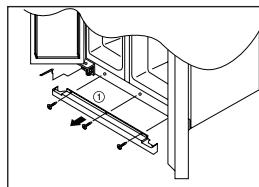
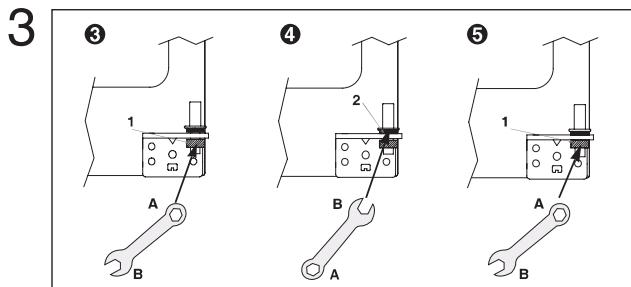
3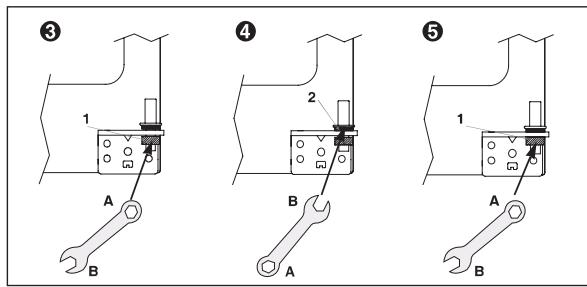
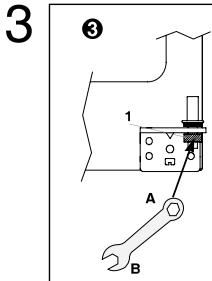
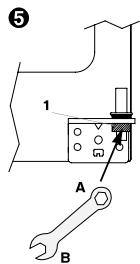
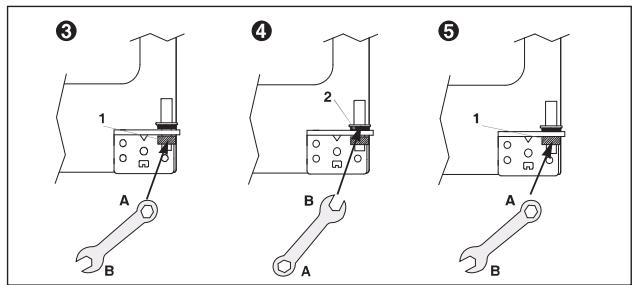
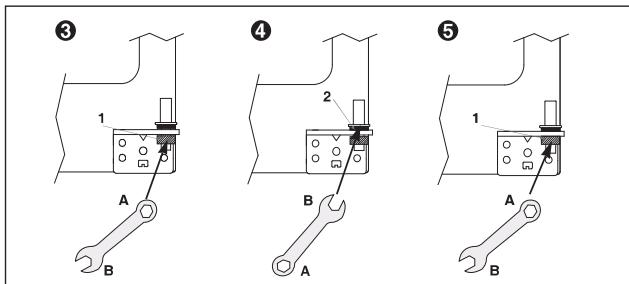
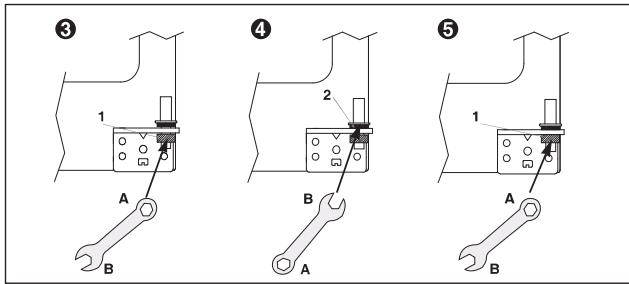
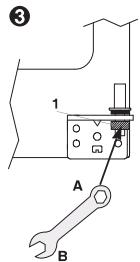
Insert a spanner (A part) into the hinge nut (1 part) and unscrew the nut by turning clockwise.
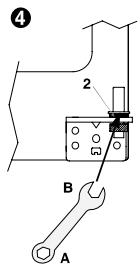
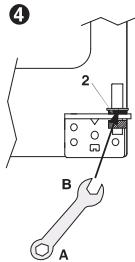
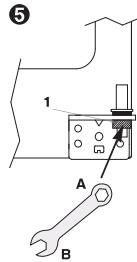
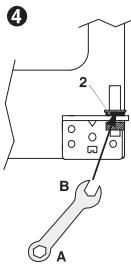
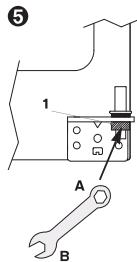
4 Insert a spanner (B part) into the hinge nut (2 part) and turn clockwise to lower the door. 5 If the door is aligned, fasten the nut (1) tightly by turning counter-clockwise.
In case refrigerator door is lower than freezer door...
1 Insert a screwdriver (flat tip) into a groove of the right wheel (bottom of refrigerator) and turn it clockwise until the door is balanced. (Clockwise to raise refrigerator door, counterclockwise to lower.)
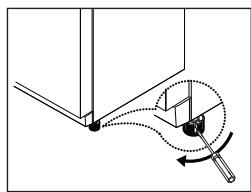
※ If the refrigerator door is not balanced by step 1, then follow the next steps.
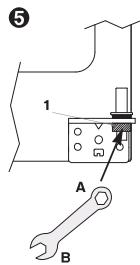
2 Insert a spanner (A part) into the hinge nut (1 part) and unscrew the nut by turning clockwise. 3 Insert a spanner (B part) into the hinge nut (2 part) and turn counter-clockwise to tighten the door.
If the door is aligned, tighten the nut (1) securely.
Front Cover
After installation and/or door leveling, fasten the front cover with screws. (First remove the screws on the front bottom panel. Then click the cover into place and screw it on.)

Caution
- The front of the refrigerator should be slightly higher than the back to allow the door to close easily. However, if the wheel is raised too much for door balance, making the front much higher than the back, it may be difficult to open the door.
Information about the water filter
- After use, the water system is under low pressure. Be careful when removing the filter.
- Flush the water system if the appliance has not been used for a long time, or if the ice or water has an unpleasant taste or smell. To do this, dispense water through the water dispenser for several minutes. If the unpleasant taste or smell persists, replace the filter.
- Protect from frost: remove the filter cartridge if you expect the temperature to drop below freezing.
- If pressure surges could occur in the water pipe, do not install the water filter without a suitable surge eliminator. Contact an installation expert if you are unsure whether pressure surges could occur in the water pipe.
- After installing a new filter: discard any ice produced in the first 24 hours after switching on.
- If no ice has been removed for a long period, empty the ice box and discard any ice produced over the next 24 hours.
How to install the water line
- The water pressure should be 2.0~12.5 kgf/cm² (1.96~12.26 Bar) or more to run the automatic icemaker. Check your tap water pressure; if a cup of 180cc fills within 10 seconds, the pressure is sufficient.
- When installing the water tubes, ensure they are not close to any hot surfaces.
- The water filter only filters water; it does not eliminate any bacteria or microbes.
- If the water pressure is not sufficient to run the icemaker, call the local plumber to get an additional water pressure pump.
- The filter life depends on the amount of use. We recommend you to replace the filter at least once every 6 months.
- After installation of refrigerator and water line system, select [WATER] on your control panel and press it for 2\~3 minutes to supply water into the water tank and dispense water.
- Use plumbers thread sealing tape on every connection of pipes/tubes to ensure there is no water leaks.
- The water tube should be connected to the cold water line.
WATER SUPPLY KIT
※ Check the parts below for installing water supply. Necessary parts are available at your local service agents.
Connector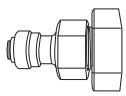
Filter Box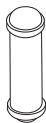
Water tube
Installation Procedure
1. Join connector to the tap water line
Figure A Connector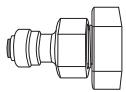
Filter Box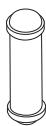
Water tube
Figure B![graph LR A["Water Tube"] --> B["Connector A"] B --> C["Connector B"] C --> D["Rubber Packing"] D --> E["Tap"]](/content/2024/12/227551/images/2ef37330ace70bb296ac1cb20afe9f48d3188641a64bfe05b44219b62160fb95.jpg)

Place the rubber washer inside the tap connector and screw onto the water tap.
2. Connect the Water Tube to the refrigerator.
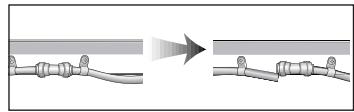
1) Remove the rear cover at the bottom back of the refrigerator. 2) Insert the fastening ring into the Water tube. (Be careful to follow the direction of the nut.) 3) Insert the Water Tube into the top of the Water Valve, turn the nut clockwise to fasten it. (The Water valve is to the right of the motors.) 4) Check for any bent tubes or water leaks; if so, recheck installation procedure. 5) Replace the rear cover. (The Water Tube should be placed between the groove of the refrigerator back and motor cover.)
※Set the tube upright as the figure shows.
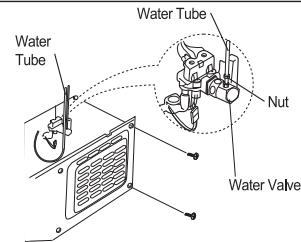
3. After installation of Water Supply System
1) Plug in the refrigerator, press the [WATER] button on the control panel for 2~3 minutes to remove any air (bubble) in the pipes and drain out the initial water. 2) Check for the water leaks again through the water supply system (tubes, connectors and pipes). Rearrange the tubes again and do not move the refrigerator.
1. Taste FRZ.SET

③ Ice cube compartment
Cleaning procedure
Interior parts

Caution
Problem
Problem
Check if the refrigerator can pass through a doorway or enter a door first.
Disposal of used electrical and electronic equipment
② Shelf
③ Ice cube storage drawer
⑤ Vegetable & fruit drawer
- Pull forward and lift slightly to remove the drawer.

Caution

Caution
Problem
It is never cold inside. Freezing and cooling are not effective.
Check
Problem
Problem
4 Lift the door upward to remove it.
5 Insert the water hose deeply into the connection. (Models with water dispenser only)
- Gently press the center top of the home bar door to open that section (a single touch or light press is sufficient).
② Drawer
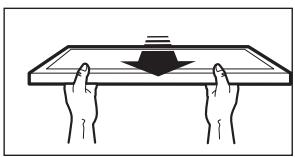
● Remove it by grasping both sides and lifting.
③ Ice cube storage drawer
● Removal: pull the drawer outward. ● Reinstallation: insert the drawer into the side grooves and push it all the way in. - If you have difficulty inserting the drawer, remove it, rotate the screw in the drawer a quarter turn, and try again. * Do not store ice cubes for too long.
● Never use any electrical appliances inside the refrigerator to avoid electric shock or fire.
④ Freezer and refrigerator shelves
● Grasp them on both sides and lift.

Caution
For your own safety, press the ICE MAKER LOCK once when cleaning (removing and reinstalling) the ice storage accessories.
Rear side (machine parts)

Caution
Troubleshooting
The interior is never cold enough. Freezing and cooling are not efficient.
Check
① Is the refrigerator plugged into the electrical outlet? ② Is the temperature set to a less cold setting [Low Mode]? ③ Is the refrigerator exposed to direct sunlight, or is there a heating device near the appliance? ④ Is there enough space between the refrigerator and the wall?
Solution
① Plug the refrigerator into the power supply. ② Set the temperature to medium or stronger cooling (Middle or High). ③ Move the refrigerator to a position where there is no direct sunlight or heating devices. ④ There must be enough space (more than 10 cm) between the back wall of the refrigerator and the wall.
Problem
Food in the refrigerator freezes.
Check
① Is the temperature set to the highest cooling level [High]? ② Is the ambient temperature too low? ③ Are foods with a high moisture content placed too close to the cold air outlet?
Solution
① Lower the temperature setting and choose medium or lower cooling ([Middle] or [Low]). ② Food may freeze if the ambient temperature is below 5°C. Move the refrigerator to a place where the temperature is above 5°C. ③ Place foods with high moisture content on shelves closer to the door.
Problem
A strange noise comes from the refrigerator.
Check
① Is the floor under the refrigerator uneven? ② Is there too little space between the back of the refrigerator and the wall? ③ Is any object touching the refrigerator?
Solution
① Place the refrigerator on a level surface. ② Leave enough space around the appliance. ③ Remove any objects that touch the refrigerator.
Problem
A bad smell spreads from inside the refrigerator.
Check
① Have you placed uncovered or unpackaged food in the refrigerator? ② Are the shelves dirty with food residue? ③ Have food items been left in the refrigerator for too long?
Solution
① Cover or wrap food items. ② Clean the shelves regularly. If the smell gets into these parts, it is not easy to get rid of. ③ Do not keep food in the refrigerator for too long. The refrigerator is neither a perfect nor a permanent place for storing food.
Choose a suitable location for installation
Leave enough space between the back of the refrigerator and the wall for unobstructed air circulation.
Avoid exposing the appliance to direct sunlight.
- Once you have chosen a suitable location for installation, follow the installation instructions. If the ambient temperature is too low (below 5°C), food inside may freeze, or the refrigerator may operate abnormally.
2 Turn the upper hinge bracket 3 to 4 times counterclockwise. Disconnect the wires. Lift the front part of the hinge and remove it (when the hinge is removed, the door may fall. Be careful!).
3 Lift the door upward and remove it.
Removing the freezer door
1 First, remove the bottom cover. Then pull out the left connection gasket and pull out the left water hose (only for models with a water dispenser):
2 Unscrew the upper hinge cover.
3 Turn the upper hinge fixing bracket 3 to 4 times counterclockwise. Disconnect the wires.
4 Lift the front part of the hinge and remove it (when the hinge is removed, the door may fall. Be careful!).
5 When removing the door, be careful not to damage the water supply installation.
Reassembling the refrigerator door
2 Move the upper part of the door toward the cabinet and place the upper hinge pin into the upper hole of the door (first fit the rear part of the hinge into the groove on the pin, then adjust the front part onto the upper hole of the door).
3 Turn the hinge fixing bracket fully. Connect the wires and screw in the ground wire. Fit and screw on the upper hinge cover.
Reassembling the freezer door
1 First, push the water hose into the hole in the lower hinge (only models with a water dispenser). Fit the bottom of the freezer door onto the lower hinge pin.
3 Turn the hinge fixing bracket fully. Connect the wires and screw in the ground wire.
4 Secure the bent hose guide and push the water hose deep into the connection (only models with a water dispenser).
Leveling the refrigerator and adjusting the doors (if necessary)
※ If you were unable to align the freezer door according to the instructions in step 1, proceed according to the following instructions.
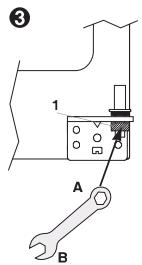
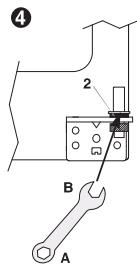
3 Place the wrench (part A) on the hinge nut (part 1) and unscrew the nut by turning the wrench clockwise. 4 Now place the wrench (part B) on the hinge nut (part 2) and turn it clockwise to lower the door. 5 When the door is aligned, firmly tighten the nut (1) by turning it clockwise.
If the refrigerator door is lower than the freezer door...
1 Insert a flathead screwdriver into the slot on the left wheel (at the bottom of the refrigerator) and turn it clockwise until the door is level (turn clockwise to raise the door, counterclockwise to lower it).
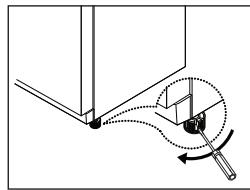
※ If you were unable to level the refrigerator door according to the instructions in step 1, proceed according to the following instructions.
2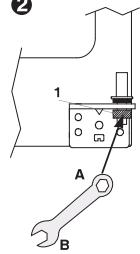
③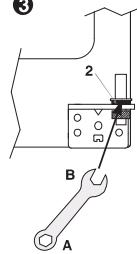
4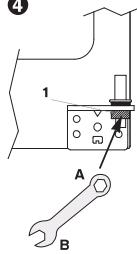
2 Place the wrench (part A) on the hinge nut (part 1) and loosen the nut by turning the wrench clockwise. 3 Now place the wrench (part B) on the hinge nut (part 2) and secure the door by turning the wrench counterclockwise. 4 Once the door is level, firmly tighten the nut (1) by turning it clockwise.
Front cover
After adjusting and/or leveling the door, tighten the front cover with screws.
(First remove the screws from the front bottom panel. Then install and tighten the cover).

Caution!
The front of the refrigerator must be slightly higher than the back, so that the door can close easily. In fact, if the wheel is raised too much due to door leveling, so that the front is noticeably higher than the back, the door may become harder to open.
Water filter information
- After use, the pressure in the water system is low. Be careful when removing the filter. If the appliance has not been used for a long time, or if you notice that the ice or water has an unpleasant taste, flush the water supply system. Do this by dispensing water from the water dispenser for a few minutes. If this does not noticeably improve the unpleasant taste or odor, replace the filter.
- Protect the system from freezing: if temperatures are expected to drop below 0°C, remove the filter cartridge.

How to clean
Internal parts

Warning
Problem
Problem

- Never start up an appliance showing any signs of damage. If in doubt, consult your dealer.
RoHS (Directive 2011/65/EU) Compliant

How to clean
rear (motor area)

Attention
Problem
Problem
3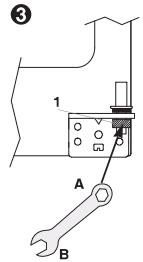
WATER SUPPLY KIT
③ Ice cube tray
- Removal: Pull the tray forward. ● Replacement: Insert into the side grooves and push in until it stops. If the tray is difficult to insert, remove it, turn the spiral in the tray or the drive mechanism by a quarter turn, and reinsert.
Proper cleaning
Interior parts

Warning
Problem
The interior never cools down.
Problem
Food in the refrigerator freezes.
Check point
Problem
Strange noises from the refrigerator
Check point

5 Be careful not to damage the water pipes when removing the doors.
3 Lift the doors straight up and remove.
Front cover
- Freezer door pocket for short-term storage of food and ice cream.
- Freezer door shelf for holding frozen foods.
- Freezer shelf For holding food items such as meat, fish, ice cream, etc.
- Freezer drawer For holding dried foods, meat, fish, poultry, covered or wrapped in foil.
- Ice maker and ice container
- Quick cooling for cans For holding beverages (quick cooling area).
- Refrigerator shelf For holding common food items.
- Portable egg tray Place it wherever you find most convenient (do not use the tray for holding ice cubes, and do not put it in the freezer).
- Vegetable drawer
- Fruit drawer
- Multi-purpose area Multi Plus For holding a variety of food items.
- Refreshment shelf (optional). For cans, bottled water, and drinks you use frequently.
- Refrigerator door shelf For storing items such as milk, juices, beer, and similar.

Caution
- Gently press the middle upper part of the home bar door to open that section (a single touch or light press is sufficient). The contents of the refreshment drawer are accessible without opening the refrigerator door, saving some electricity. When the refreshment drawer door is open, the light inside the refrigerator turns on. The contents of the drawer are visible and easily accessible.
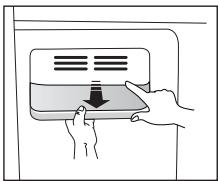
② Drawer
●Remove it by grasping it on both sides and lifting.
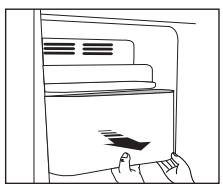
③ Ice cube storage drawer
●Removal: pull the drawer outward. ●Replacement: insert the drawer into the side slots and push it all the way in. - If you have difficulty inserting the drawer, remove it, turn the screw in the drawer a quarter turn, and try pushing it in again. * Never store ice cubes for too long.
- Never use any electrical appliances inside the refrigerator to avoid electric shock or fire.
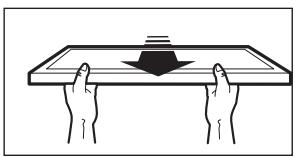
④ Freezer and refrigerator shelves
●Grasp them on both sides and lift.
⑤ Fruit and vegetable drawer
●Pull forward (toward you) and lift slightly, then pull the drawer out.

Caution
For your own safety, press ICE MAKER LOCK once when cleaning (removing and reinstalling) the ice cube storage accessories.

Warning
For cleaning, never use gasoline, benzene (benzol), thinners, etc., as they may damage the surface.
Troubleshooting
Troubleshooting
A strange sound is heard from the refrigerator.
Check
Avoid exposing the appliance to direct sunlight.
2 Turn the upper hinge bracket 3 to 4 times counterclockwise. Disconnect the wires. Lift the front part of the hinge and remove it (when the hinge is removed, the door may fall. Be careful!).
3 Lift the door upward and remove it.
Removing the freezer door
3 Turn the upper hinge bracket 3 to 4 times counterclockwise. Disconnect the wires.
4 Lift the front part of the hinge and remove it (when the hinge is removed, the door may fall. Be careful!).
5 When removing the door, be careful not to damage the water supply installation.
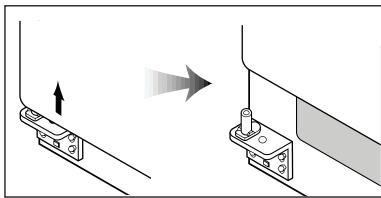
Reassembling the refrigerator door
3 Turn the hinge bracket fully. Connect the wires and tighten the ground wire. Adjust and tighten the upper hinge cover.
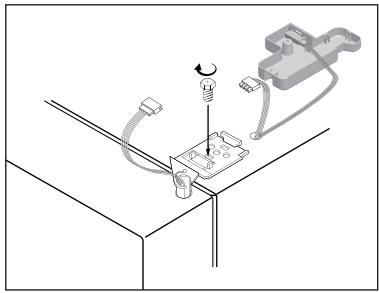
Reinstalling the freezer door
3 Turn the hinge bracket all the way. Connect the wires and tighten the ground wire.
4 Push the water tube deep into the connector (only models with a water dispenser).
Leveling the refrigerator and adjusting the doors (if necessary)
SAFETY WARNING

6. Xpress Can Chiller
① Water Dispenser Plank
② The shelf
⑤ Vegetable & Fruit bin

carefully

carefully
Problem
Problem
Food in the refrigerator is freezing.
Checkpoint
Problem
Problem

② Door shelves of the freezer and refrigerator
③ Ice cube tray
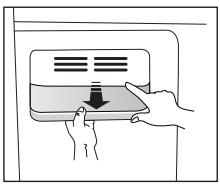
④ Shelves of the freezer and refrigerator.
How to clean

Warning
Problem
Problem

Refrigerator – Freezer
How to clean
Interior parts

Caution
Problem
Problem
3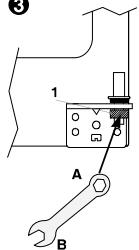
4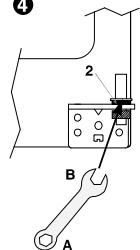
5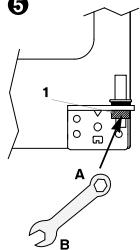
How to Clean
Internal Parts

Caution
Problem
Problem
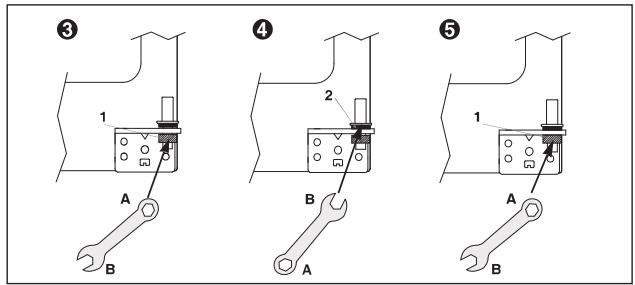
Figure B
![graph LR A["Water Tube"] --> B["Connector A"] B --> C["Rubber Packing"] C --> D["Tap"]](/content/2024/12/227551/images/853bea05a67d89d3f44ba20c7fff16815bd0d359753054d8489675043b360c1e.jpg)

3. After Installation of the Water Supply System
Cleaning

Warning
Problem
Problem
Problem


GNTC - Gorenje Niti Tiki Company
Veternik B.B.
10000 Priština KOSOVO
Tel.: 00381 (0) 38 55 66 88
- DISPOSAL OF USED ELECTRICAL & ELECTRONIC EQUIPMENT
- SAFETY WARNING
- ROHS (DIRECTIVE 2011/65/EU) COMPLIANT
- OBSERVE AMBIENT TEMPERATURE
- NOTE
- CONTENTS
- BE SURE TO KEEP FOR SAFETY
- OTHER SIGNS
- CAUTION
- WARNING
- INSTALLATION GUIDE
- PRECAUTIONS IN INSTALLATION AND POWER CONNECTION
- PRECAUTIONS IN USE
- ACCESSORIES
- CONTROL PANEL
- FRZ.SET BUTTON
- LIGHT/FILTER BUTTON
- ALARM DISPLAY
- DISPLAYS THE BUTTON 'LOCK
- FILTER EXCHANGE DISPLAY
- BUTTON FOR WATER DISPENSING. WATER SYMBOL (☐) LIGHTS UP WHEN SELECTED
- SELECTION BUTTON FOR ICE DISPENSING AND LOCK FOR ICE MAKER
- TEMPERATURE CONTROL
- FREEZER COMPARTMENT
- FASTER FREEZING
- REFRIGERATOR COMPARTMENT
- FASTER COOLING OR REFRIGERATION
- TEMPERATURE INDICATOR CONVERT FUNCTION (FAHRENHEIT ↔ CELSIUS)
- HOW TO USE THE INTERIOR PARTS
- FOOD STORAGE TIPS
- REFRESHMENT COMPARTMENT (OPTION)
- HOW TO USE THE DISPENSER
- HOW TO USE THE AUTOMATIC ICEMAKER
- IN CASE THE ICEMAKER DOESN'T WORK
- IF THE ICE CUBES GET STUCK AND NOT
- DISPENSED
- IN CASE OF POWER FAILURE
- CARE & CLEANING
- ① DISPENSER WATER SHELF
- ② ICE CUBE STORAGE CASE
- ③ FREEZER & REFRIGERATOR POCKETS
- ④ FREEZER & REFRIGERATOR SHELVES
- ⑤ VEGETABLE CASE & FRUIT CASE
- HOW TO CLEAN
- INTERIOR PARTS
- BACK (MACHINE SECTION)
- BEFORE YOU CALL FOR SERVICE
- PROBLEM
- CHECKUP POINT
- ACTION
- SOMETHING STRANGE? DON'T WORRY. HERE IS THE ANSWER
- INSTALLATION PREPARATION
- FIND A SUITABLE PLACE TO INSTALL
- IF THE REFRIGERATOR CAN NOT PASS THROUGH A DOOR DURING INSTALLATION, FOLLOW THESE STEPS
- REMOVING FREEZER DOOR
- REMOVING THE REFRIGERATOR DOOR
- REPLACING THE FREEZER DOOR
- REPLACING THE REFRIGERATOR DOOR
- REFRIGERATOR LEVELING & DOOR ADJUSTMENT (IF NEEDED)
- IN CASE FREEZER DOOR IS LOWER THAN REFRIGERATOR DOOR
- IN CASE REFRIGERATOR DOOR IS LOWER THAN FREEZER DOOR
- FRONT COVER
- INFORMATION ABOUT THE WATER FILTER
- HOW TO INSTALL THE WATER LINE
- WATER SUPPLY KIT
- INSTALLATION PROCEDURE
- JOIN CONNECTOR TO THE TAP WATER LINE
- CONNECT THE WATER TUBE TO THE REFRIGERATOR
- AFTER INSTALLATION OF WATER SUPPLY SYSTEM
- TASTE FRZ.SET
- ③ ICE CUBE COMPARTMENT
- CLEANING PROCEDURE
- DISPOSAL OF USED ELECTRICAL AND ELECTRONIC EQUIPMENT
- ② SHELF
- ③ ICE CUBE STORAGE DRAWER
- ⑤ VEGETABLE & FRUIT DRAWER
- CHECK
- ② DRAWER
- ④ FREEZER AND REFRIGERATOR SHELVES
- REAR SIDE (MACHINE PARTS)
- TROUBLESHOOTING
- SOLUTION
- CHOOSE A SUITABLE LOCATION FOR INSTALLATION
- REMOVING THE FREEZER DOOR
- REASSEMBLING THE REFRIGERATOR DOOR
- REASSEMBLING THE FREEZER DOOR
- LEVELING THE REFRIGERATOR AND ADJUSTING THE DOORS (IF NECESSARY)
- IF THE REFRIGERATOR DOOR IS LOWER THAN THE FREEZER DOOR
- WATER FILTER INFORMATION
- INTERNAL PARTS
- REAR (MOTOR AREA)
- ATTENTION
- ③ ICE CUBE TRAY
- PROPER CLEANING
- CHECK POINT
- ⑤ FRUIT AND VEGETABLE DRAWER
- REINSTALLING THE FREEZER DOOR
- XPRESS CAN CHILLER
- ① WATER DISPENSER PLANK
- ② THE SHELF
- ⑤ VEGETABLE & FRUIT BIN
- CAREFULLY
- CHECKPOINT
- ② DOOR SHELVES OF THE FREEZER AND REFRIGERATOR
- ④ SHELVES OF THE FREEZER AND REFRIGERATOR
- AFTER INSTALLATION OF THE WATER SUPPLY SYSTEM
- CLEANING
Brand : GORENJE
Model : NRS9182CBBK
Category : Combined refrigerator