
CA2861 - Fridge BRANDT - Free user manual and instructions
Find the device manual for free CA2861 BRANDT in PDF.
| Brand | BRANDT |
| Model | CA2861 |
| Product type | Refrigerator with *** freezer compartment |
| Niche dimensions (H x W x D) | 1780 x 560 x 550 mm |
| Power supply | 220-240 V, with earth connection |
| Climate class | N (16-32 °C), ST (18-38 °C), T (18-43 °C) |
| Refrigerant | Isobutane (flammable) |
| Temperature setting | Rotary thermostat (position 0 = off, positions 2-3 recommended) |
| Refrigerator defrosting | Automatic (water evaporated) |
| Freezer defrosting | Manual (when frost reaches 4 mm, at least once a year) |
| Coldest zone | Indicated by a symbol, temperature ≤ +4 °C |
| Door reversal | Possible (unplug before) |
| Interior lighting | Replaceable bulb (same wattage, unscrew counterclockwise) |
| Cleaning | Warm water and baking soda, do not use abrasive detergent |
| Food safety | Temperature indicator OK at +4 °C |
| Spare parts | Certified original, Brandt after-sales service |
Frequently Asked Questions - CA2861 BRANDT
User questions about CA2861 BRANDT
0 question about this device. Answer the ones you know or ask your own.
Ask a new question about this device
Download the instructions for your Fridge in PDF format for free! Find your manual CA2861 - BRANDT and take your electronic device back in hand. On this page are published all the documents necessary for the use of your device. CA2861 by BRANDT.
USER MANUAL CA2861 BRANDT
FR GUIDE D'INSTALLATION ET D'UTILISATION
natural_image
Pure mechanical diagram showing a lever and pivot point without any text or symbols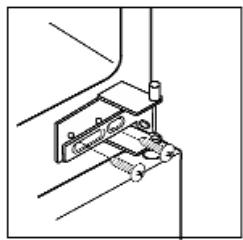
natural_image
Pure mechanical assembly diagram without any text, numbers, or symbols
natural_image
Diagram showing a mechanical assembly with arrows indicating direction of motion (no text or symbols)natural_image
Technical line drawing of a mechanical component with a circular inset showing a curved feature and an arrow indicating direction (no text or symbols)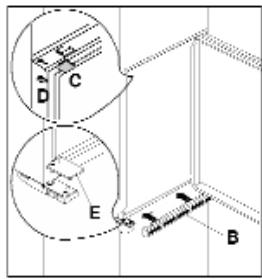
INSTRUCTIONS POUR L'ENCASTREMENT
(suite)
FR 2 / UTILISATION DE VOTRE APPAREIL
UTILISATION DE LA PARTIE REFRIGERATEUR
natural_image
Line drawing of a mechanical component with a rotating arrow and circular feature, no text or symbols present
Conseils :
2006/95.004/108, 96/57, 92/31, 94/62
FR 5 / SERVICE APRES-VENTE
natural_image
Pure mechanical diagram showing a lever and pivot point without any text or symbolsnatural_image
Pure mechanical assembly diagram without any text, numbers, or symbolsnatural_image
Diagram showing a mechanical assembly with a vertical rod and a camera, no text or symbols presentEINBAUANWEISUNGEN
natural_image
Technical line drawing of a mechanical component with a circular inset showing a curved feature and an arrow indicating direction (no text or symbols)

EINBAUANWEISUNGEN
(Fortsetzung)
natural_image
Line drawing of a mechanical component with a rotating knob and base plate (no text or symbols)
Hinweis:
2006/95.004/108, 96/57, 92/31, 94/62
1 / INSTALLATION AF APPARATET
natural_image
Pure mechanical diagram showing a lever and pivot point without any text, numbers, or symbolsnatural_image
Pure mechanical assembly diagram without any text, numbers, or symbolsnatural_image
Technical line drawing of a curved pipe or duct with an arrow indicating direction, no text or symbols present
VEJLEDNING TIL INDBYGNING
(forts.)
ANVENDELSE AF K∅LESKABET
natural_image
Line drawing of a mechanical component with a rotating knob and curved base (no text or symbols)
Gode råd:
2006/95.004/108, 96/57, 92/31, 94/62
You have just acquired a BRANDT refrigerator and we would like to thank you.
We have invested all our dedication and know-how in this appliance so that it would best meet your needs. With innovation and power, we designed it to be always easy to use.
In the BRANDT product line, you will also find a wide range of microwaves, hobs, ventilation hoods, ovens, dishwashers, washing machines, driers, and freezers, that you can coordinate with your new BRANDT refrigerator.
Of course, in an ongoing effort to satisfy your demands with regard to our products as best as possible, our after-sales service department is at your disposal and ready to respond to all of your questions and suggestions (contact information at the end of this booklet).
You can also log on to our web site at www.Brandt.com where you will find information on all our products, as well as other useful information.
BRANDT
As part of our commitment to constantly improving our products, we reserve the right to make changes to them based on technical advances to their technical and functional features and appearance.

Attention: Before installing and using your appliance, please carefully read this Installation and Usage Guide, which will allow you to quickly familiarise yourself with its operation.
www.brandt.com

- Safety recommendations ____ 04
1 / INSTALLING YOUR APPLIANCE
- Electrical connection ____ 05
- Before connecting your appliance 05
• Protection of the environment ____ 05 - Recycling 05
• Description of your appliance ____ 06 - Reversing the opening direction of the door 06
- Instructions for fitting ____ 07
2 / USING YOUR APPLIANCE
• Using the refrigeration section ____ 09
- Using the freezer section * 09
• Power safety (according to model) ____ 10
3 / MAINTAINING YOUR APPLIANCE
- De-icing 11
- Cleaning 11
- Replacing the bulb 11
4 / SPECIAL MESSAGES, INCIDENTS
- Operating problems ____ 12
5 / AFTER SALES SERVICE 13
This appliance has been designed for cooling food. Any other use would be incorrect.
Installation must be according to the instructions in this manual; poor installation can damage the appliance.
For potential operating problems of the appliance, always contact only the authorised customer care After Sales Service or qualified personnel.
For all servicing, first disconnect the apparatus avoiding pulling on the power cable.
If this refrigerator replaces another, that uses a latch closure, spring, lock or other, do not forget to destroy the closing mechanism or, better still, remove the door of your old appliance in order to prevent anyone from becoming trapped inside it (playing children, animals, etc).
After unwrapping your appliance, make sure it has not been damaged. Any damage must be brought to the attention of the retailer within 24 hours of delivery. The materials used for packaging are completely recyclable (cardboard, PE pellets, EPS, etc). Keep these materials out of the hands of children.

Danger:
The appliance's refrigeration circuit contains isobutane coolant, a low-polluting natural gas but nevertheless flammable. During transport and installation of the appliance, make sure that no components of the refrigeration circuit are damaged. In case of damage, leave it away from flames and sources of flames and thoroughly air the room in which it is placed.
For optimal functioning of the appliance, install it far from heat sources and make sure that air can easily circulate around it (see appliance installation).
This appliance is not intended to be used by persons (including children) with impaired physical, sensory or mental abilities, or persons who have no experience or knowledge, except where they can use it via the intervention of a person responsible for their safety, monitoring and their prior instruction in the use of this appliance.
Children should be supervised to ensure they do not play with the appliance.

Attention:
Before proceeding with the installation, read carefully the safety instructions, in order to avoid certain problems.
Install the appliance in a dry well-aired room, far from any source of heat.
The climatic classification of your refrigerator is indicated on the reference plate. It determines the range of ambient temperatures for which the refrigerator unit is designed, ensuring the appliance works properly.
| Class | Ambient temperatures |
| N | 16° to 32° |
| ST | 18° to 38° |
| T | 18° to 43° |
ELECTRICAL CONNECTION
Socket characteristics: 220-240V with earth connection.
Avoid using adaptors or extension cords.
Do not let the cable touch the compressor.
Do not let the cable be trapped under the appliance.
The electrical installation of the appliance is supplied with an earth. For your safety, connect the appliance to a socket supplied with an effective earth (conforming to current standards for the safety of electrical installations).
The manufacturer declines all responsibility for any damage that may be caused by the lack of an earth connection.

BEFORE CONNECTING YOUR APPLIANCE
- Clean the interior of the refrigerator with lukewarm water with some bicarbonate added. Rinse and dry it carefully.
- Wait 2 hours before turning it on to ensure the stability of compressor-motor lubrication.
PROTECTION OF THE ENVIRONMENT
This appliance contains no cooling gases harmful to the ozone layer in its cooling circuit or in its insulation material.
It must not be discarded as normal urban waste or scrap as this may damage the cooling circuit, especially at the back of the appliance. Contact your local authority for information about having this type of appliance collected.
RECYCLING
This appliance's packing materials are recyclable. Recycle them and play a role in protecting the environment by depositing them in municipal containers provided for this purpose.
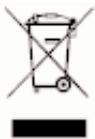
Your appliance also contains various recyclable materials. It is therefore marked with this logo to indicate that used appliances must not be mixed with other waste. Recycling of the appliances organised by your manufacturer will thus be undertaken in optimum conditions, in accordance with European directive 2002/96/CE relating to electrical and electronic equipment waste. Consult your local authority or your retailer to find the drop-off points for used appliances that is nearest to your home.
We thank you for your help in protecting the environment.
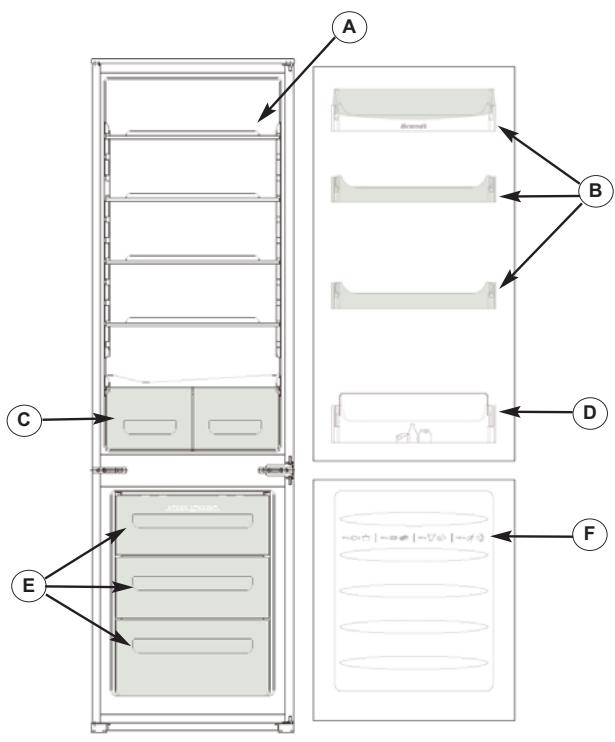
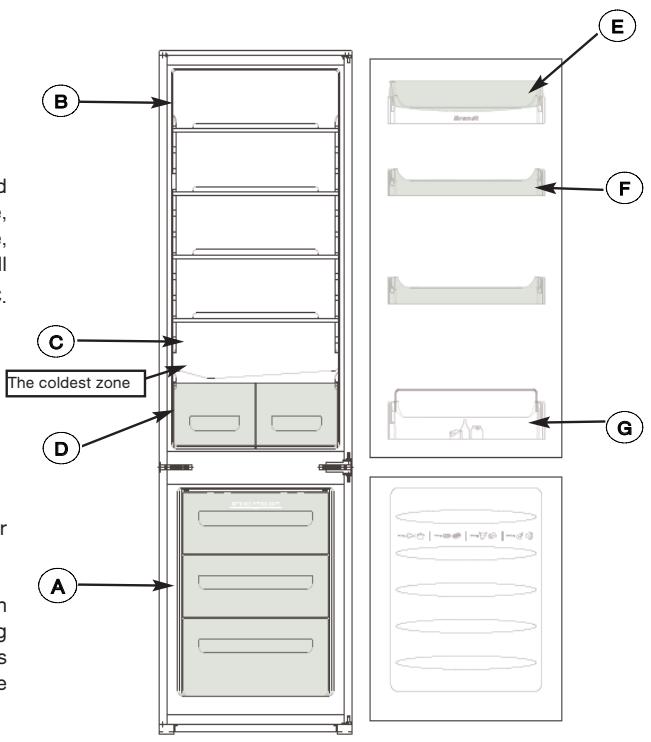
DESCRIPTION OF YOUR APPLIANCE (depending on model)
REVERSING THE OPENING DIRECTION OF THE DOOR
It is possible to reverse the direction in which the door opens:
The appliance must always be disconnected before proceeding to change the door direction.
- Lean the appliance back gently and secure it in this position.
- Unscrew the upper pivot and lift off the hinge.
-
Remove the upper door
-
Unscrew the middle hinge and the brackets and replace them on the opposite side.
-
Replace the upper door, the upper part of the hinge on the opposite side
-
Unscrew the lower pivot of the freezer door, lift the hinge and remove the door.
- Replace the whole thing on the opposite side.
natural_image
Pure mechanical diagram showing a lever and pivot point without any text, numbers, or symbols
natural_image
Pure mechanical assembly diagram without any text, numbers, or symbols
natural_image
Diagram showing a mechanical assembly with arrows indicating direction of motion (no text or symbols)A Thermostat
B Door racks
© Vegetable container
D Bottle rack
E Freezer drawers * ***
F Freezing guide
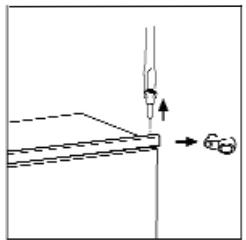
INSTRUCTIONS FOR FITTING
Size of the space
Height (1) 1,780 mm
Depth (2) 550 mm
Width (3) 560 mm
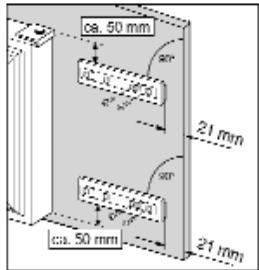
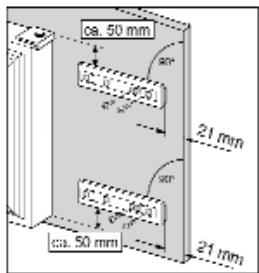
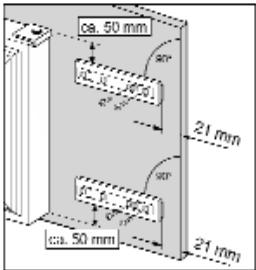
For safety reasons, ventilation must be provided as indicated in the diagram opposite.

Warning: do not obstruct the lation openings.
It is also necessary that the space has a ventilation opening with the following measurements:
Depth 50 mm
Width 540 mm


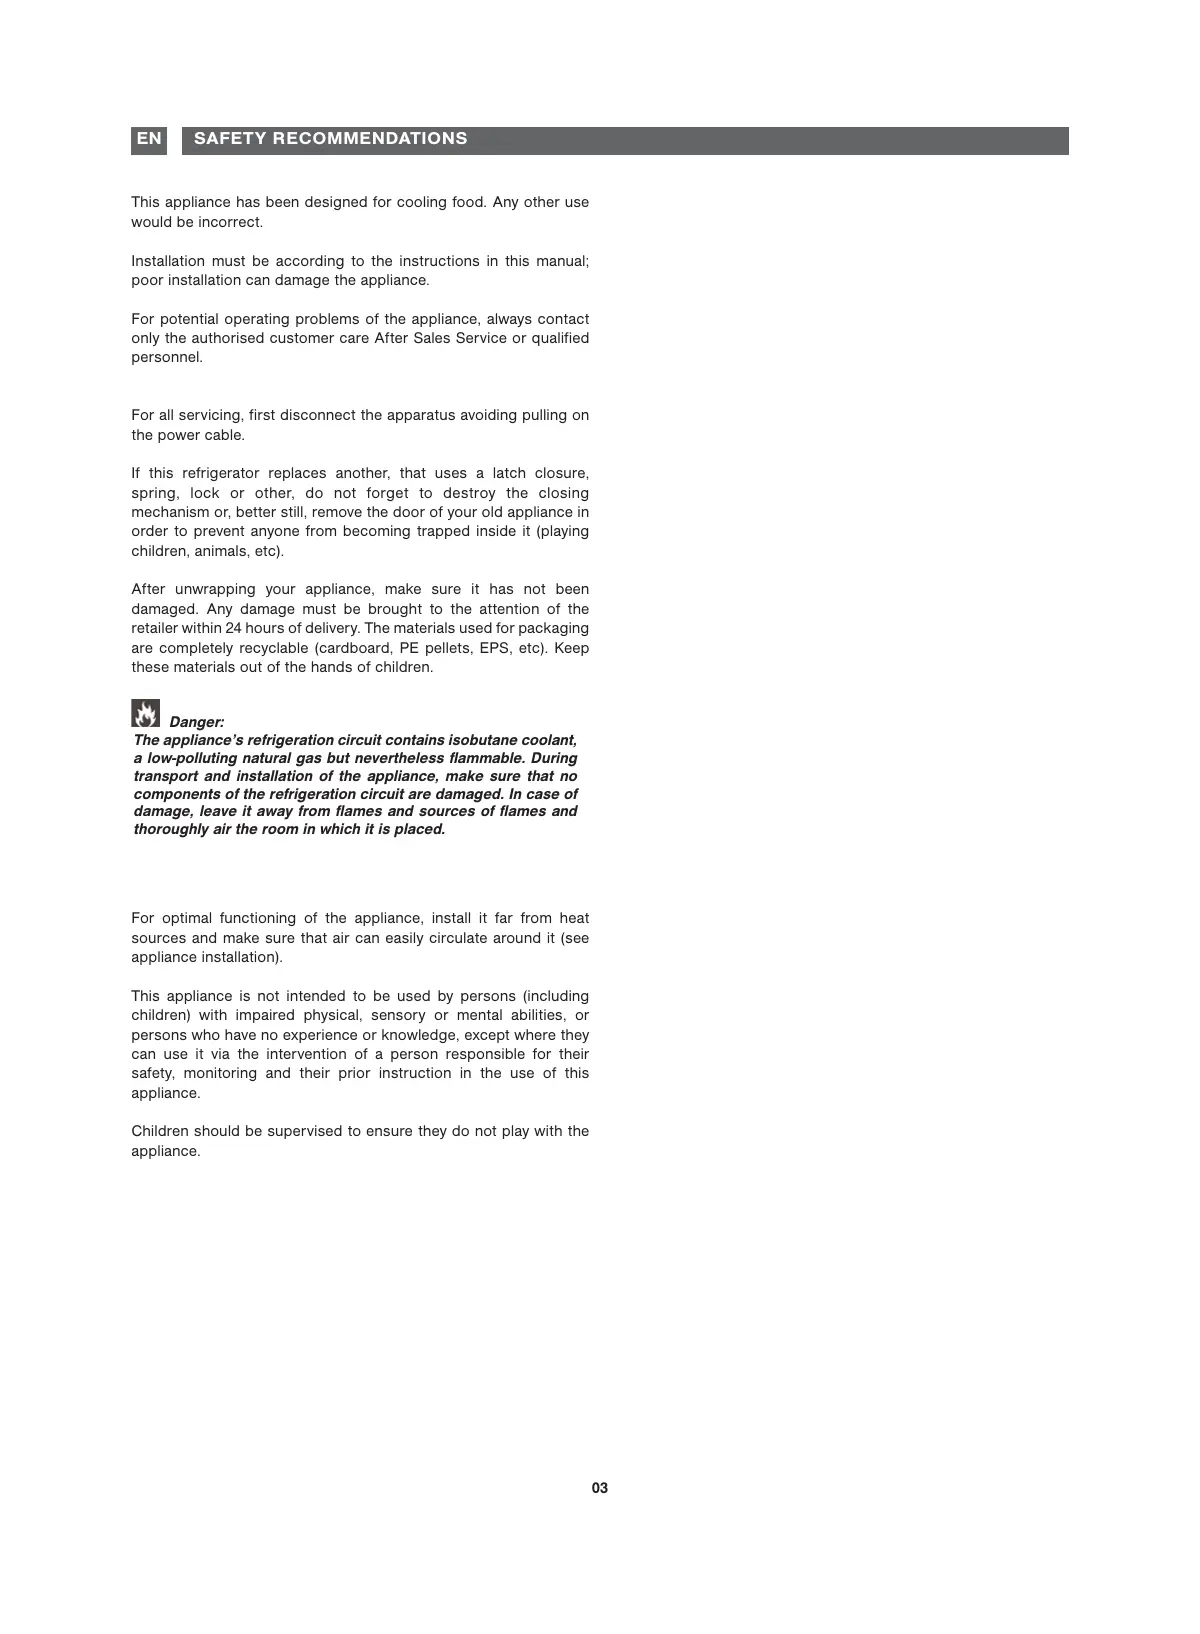
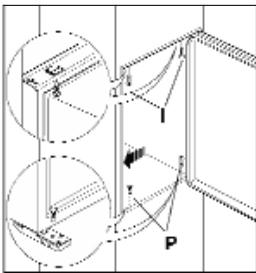
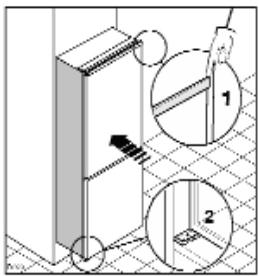
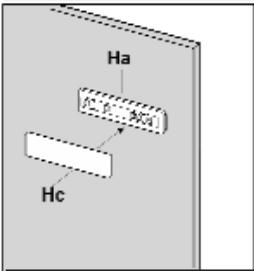
Insert the appliance into the space against the internal partition, corresponding to the hinging side of the door, so the upper cover cap is just proud (1) and the bottom hinge is aligned with the partition of the furniture (2).
Fix the appliance in place with the 6 screws provided for this purpose. (I = 4 short screws) (P = 2 long screws)
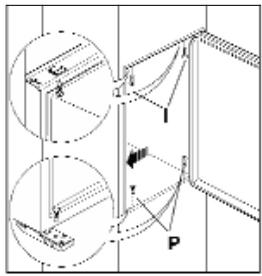
Insert the compressible gasket between the appliance and the furniture.
cabinet
Insert the caps (C-D) on the fin stops and in the holes of the hinges.
Depending on the model, apply the ventilation grill (B) and the hinge cover.
(E).
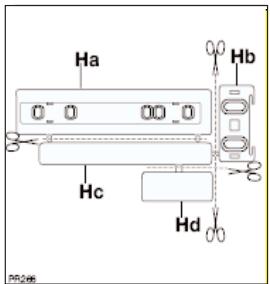
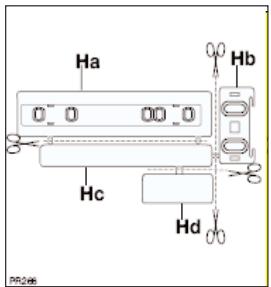
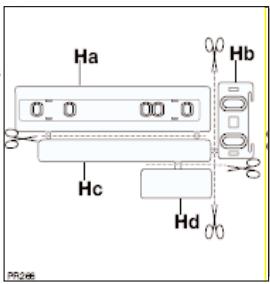
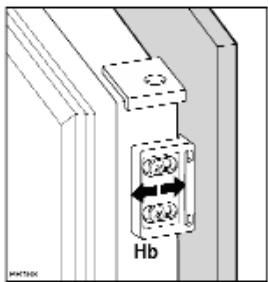
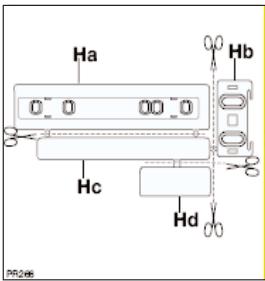
Separate the parts Ha, Hb, Hc, Hd as shown in the drawing.
Place the runners (Ha) on the internal part of the furniture support and mark the position of the external holes. After trying out the holes, fix the runners with the screws provided.
Click the cover (Hc) onto the runner (Ha).
natural_image
Technical line drawing of a mechanical component with a circular inset showing a curved feature and an arrow indicating direction (no text or symbols)


INSTRUCTIONS FOR FITTING
(continued)
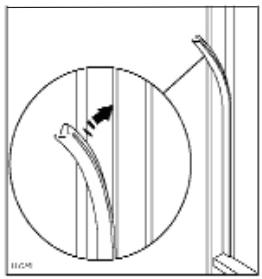
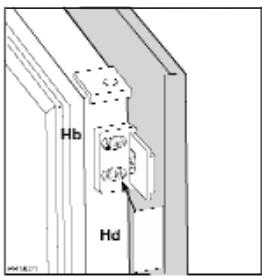
Open the door of the appliance and of the furniture about 90°. Insert the bracket (Hb) into the runner (Ha). Hold appliance and furniture doors together and mark the position of the holes as shown in the drawing.
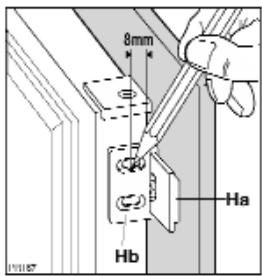
Remove the bracket and make holes 8 mm from the outer edge of the door using a drill fitted with a 2 mm drill bit.
Put the bracket back on the runner and fix it with the 8 screws provided. Use the set of oval holes to align the door of the furniture if necessary. At the end, it is necessary to check that the door of the appliance can shut perfectly.
Click the cover (Hd) onto the runner (Hb).
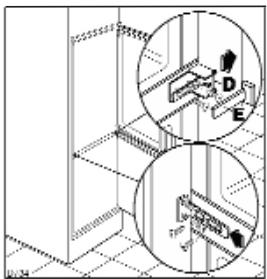
If the appliance is fixed laterally to the furniture column, unscrew the screws of the brackets (D) and move them as in the drawing. Fix them again. Put on the cover (E).
USING THE REFRIGERATOR SECTION
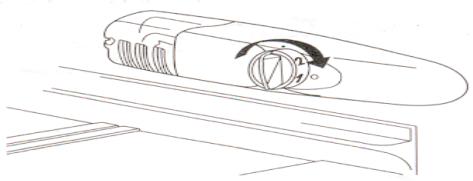
The thermostat located in the refrigerator regulates the temperature in the 2 spaces. To adjust it, turn the knob at the right side of the casing. In position 0, the appliance is off. It is advisable to select a middle position: 2 or 3.
natural_image
Line drawing of a mechanical component with a rotating knob and curved base (no text or symbols)
Tips:
- Do not put hot foods or uncovered liquid in the refrigerator.
- NEVER put volatile or flammable or explosive liquids such as solvents, alcohol, acetone or fuel. They could explode.
- It is advisable to wrap meat and fish to prevent odours.
- Leave enough space between the foods to allow air to circulate freely between them. Similarly, when arranging them, avoid placing them in contact with each other.
- Do not let food come into contact with the cold partition at the bottom of the refrigerator.. The racks have stops for that reason.
- The door must not be left open longer than necessary.
USING THE FREEZER SECTION \* \* \* \*
This compartment allows deep-frozen food to be kept, fresh produce to be frozen and ice cubes to be made.
Do not freeze too large a quantity of food all at once, the more quickly the food can be frozen, the longer it will keep properly. Similarly, wrap your food well before freezing, to conserve all its flavour and so it does not affect other products.
The length of time that food can be kept frozen or deep-frozen depends on the type of food. See the instructions on the packaging of the food. Do not put bottles or cans in the freezer compartment. They can burst when frozen. Highly carbonated drinks can also explode! NEVER freeze lemonade, fruit juice, beer, wine, champagne, etc, in the freezer compartment.
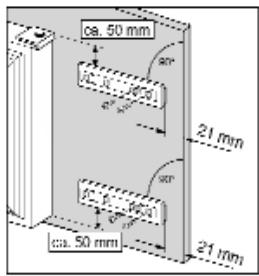
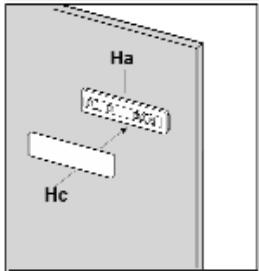
FOOD SAFETY (according to model)

Explanatory diagram for the coldest part.

The symbol opposite shows the location of the coldest of your refrigerator, where the temperature is ≤ +4^ .
You can place meat there, fowl, fish, cold cooked meats, prepared food, salads, egg and cream based foods and pastries, fresh paté, pastries, pizzas/quiches, fresh products and raw milk cheese, ready to eat vegetables sold in plastic wrapping and generally all fresh products whose use by date suits a temperature of ≤ +4^ .
Temperature indicator:

Adjust your thermostat

Correct temperature
The temperature indicator allows you to control the proper functioning of your refrigerator.
The indicator displays “OK” when the coldest zone reaches an average temperature of ±4^ (4 hours after being turned on). If the temperature exceeds +4^ , the indicator remains black. The user must therefore lower the temperature of the refrigerator by adjusting the thermostat.

Warning:
Keeping the refrigerator door open for a long time produces a temperature rise inside. In order to measure the temperature properly, the indicator should be read within 30 seconds. Similarly, it is useful to consider that the temperature is not totally uniform throughout the appliance, which is why there are different zones suitable for each type of food.
A Conservation of frozen or deep-frozen food.
B Milk products, cheese
© Meat, cold cooked meat, fish
D Fruit and vegetables
E Butter and eggs
F Condiments
G Drinks
DE-ICING
Your refrigerator has an automatic de-icing system. The rear face of the appliance covers itself with ice when the compressor is working and de-ices when the compressor is off. When the ice melts, the water evaporates by itself.
The freezer compartment * * * * must always be de-iced when the ice layer has reached a thickness of approximately 4mm. In any case, this compartment must be de-iced at least once a year.
To de-ice it, you can use a scraper or any plastic utensil but never an metal instrument or an electric appliance.
Disconnect your refrigerator before proceeding to de-ice it.
- Wrap your frozen food in a freezer bag and keep it cool.
- Leave the door open and sponge the melting water as necessary.
- To speed up de-icing, you can place a container of hot water in the compartment and shut the door.
- Once the de-icing has finished, clean your appliance.
CLEANING AND MAINTENANCE
Disconnect your refrigerator before cleaning it.
We recommend that you clean and disinfect your appliance it regularly.
- Clean the inside with water and bicarbonate with a sponge or dishcloth to avoid the formation of unpleasant odours.
- Never use a solvent or an abrasive detergent, as it can damage the inside of your refrigerator. Do not put any accessories into a dishwasher.
- It is advisable to wipe the back of the appliance with a cloth once a year, as the efficiency of the refrigerator drops and power consumption increases when it is dirty.
REPLACING THE BULB
Disconnect your refrigerator before changing the bulb.
- The bulb is behind the thermostat panel. Pull back the grill.
- Rmove the bulb by unscrewing it counterclockwise.
- Replace it with a new bulb of the same wattage.
- Replace the grill, reconnect the appliance and turn it back on.
OPERATING PROBLEMS
The refrigerator makes some entirely normal sounds:
- The cooling gas can produce a bubbling when circulating in the cooling circuit.
- The compressor can produce a hum which can be louder at startup.
- A “crack” is produced by the expansion and contraction of the materials used.
| PROBLEM | SOLUTION |
| The appliance does not start. | Check that the power lead is properly connected, that the fuse has not blown and that the circuit-breaker has not tripped. |
| The refrigerator vibrates or makes noise | Check that it is properly level. Adjust the feet. |
| The refrigerator cools too much / not enough | Check the position of the thermostat and adjust it to a better temperature. |
| The refrigerator bulb does not light up | Check the bulb and change it if necessary. If the problem persists, check that your appliance is properly connected to the power. |
| The compressor does not restart after a change of temperature. | This is normal, the compressor restarts after a certain length of time. |
| There is water at the bottom of the racks. | The hole allowing the de-icing water to drain must be blocked. Unblock it with a knitting needle. |
TECHNICAL HELP DEPARTMENT
If you have already made the indicated checks and your problem persists, DO NOT DO ANY REPAIRS YOURSELF. Contact the nearest Technical Help Department.

THIS APPLIANCE CONFORMS TO THE EEC DIRECTIVES
2006/95.004/108, 96/57, 92/31, 94/62
5 / AFTER-SALES SERVICE
EN
Any repairs that are made to your appliance must be handled by a qualified professional authorised to work on the brand. When you call, mention your appliance's complete reference (model, type, serial number). This information is on your guarantee certificate and on the reference plate.
GENUINE REPLACEMENT PARTS: During maintenance work, request the exclusive use of certified genuine replacement parts.
To preserve your appliance, we recommend that you use Clearit cleaning products.

Professional expertise working for you at home
Clearit offers you professional products and solutions designed for the daily care of your household appliances and kitchens. They are on sale at your regular retailer, along with a complete line of accessories and consumable products.
Geachte Klant,
1 / INSTALLATIE VAN HET APPARAAT
natural_image
Pure mechanical diagram showing a lever and pivot point without any text, numbers, or symbols
natural_image
Pure mechanical assembly diagram without any text, numbers, or symbols
natural_image
Diagram showing a mechanical assembly with a tool and a camera, no text or symbols presentnatural_image
Technical diagram showing a circular component with an arrow pointing to a curved structure, no text or symbols present.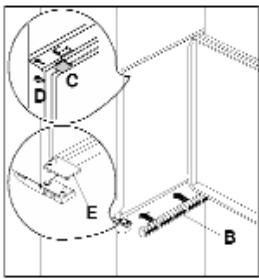
natural_image
Technical diagram showing two circular views of mechanical components with labeled points (D, E, F) and dimension lines, no readable text or symbols.natural_image
Line drawing of a mechanical component with a rotating knob and curved base (no text or symbols)
Tips:
2006/95.004/108, 96/57, 92/31, 94/62
- INSTRUCTIONS POUR L'ENCASTREMENT
- FR 2 / UTILISATION DE VOTRE APPAREIL
- UTILISATION DE LA PARTIE REFRIGERATEUR
- Conseils :
- FR 5 / SERVICE APRES-VENTE
- EINBAUANWEISUNGEN
- (Fortsetzung)
- Hinweis:
- / INSTALLATION AF APPARATET
- VEJLEDNING TIL INDBYGNING
- ANVENDELSE AF K∅LESKABET
- Gode råd:
- / INSTALLING YOUR APPLIANCE
- / USING YOUR APPLIANCE
- / MAINTAINING YOUR APPLIANCE
- / SPECIAL MESSAGES, INCIDENTS
- / AFTER SALES SERVICE 13
- Danger:
- Attention:
- ELECTRICAL CONNECTION
- BEFORE CONNECTING YOUR APPLIANCE
- PROTECTION OF THE ENVIRONMENT
- RECYCLING
- DESCRIPTION OF YOUR APPLIANCE (depending on model)
- REVERSING THE OPENING DIRECTION OF THE DOOR
- INSTRUCTIONS FOR FITTING
- Size of the space
- USING THE REFRIGERATOR SECTION
- Tips:
- USING THE FREEZER SECTION \* \* \* \*
- FOOD SAFETY (according to model)
- DE-ICING
- CLEANING AND MAINTENANCE
- REPLACING THE BULB
- OPERATING PROBLEMS
- TECHNICAL HELP DEPARTMENT
- / AFTER-SALES SERVICE
- / INSTALLATIE VAN HET APPARAAT
Brand : BRANDT
Model : CA2861
Category : Fridge