
CBG625/1N - CBG625/1X/P - Range hood CANDY - Free user manual and instructions
Find the device manual for free CBG625/1N - CBG625/1X/P CANDY in PDF.

| Product type | Built-in extractor hood |
| Brand | Candy |
| Compatible models | CBG625/1N, CBG625/1X/P |
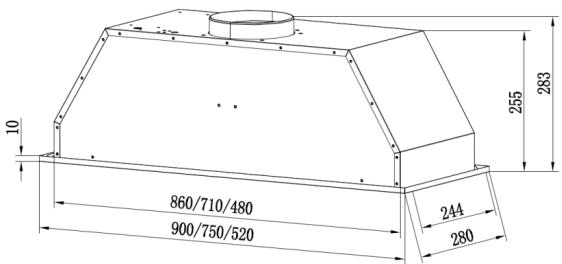
| Cutout dimensions (W x D) | 490 x 250 mm |
| Minimum distance above hob | 65 to 75 cm |
| Installation | Built into a suspended/wall-mounted cabinet |
| Number of speeds | 3 (low, medium, high) |
| Lighting | LED lamp 2 W max (220 V) |
| Grease filter | Non-stick, monthly cleaning with detergent |
| Activated charcoal filter | Optional, annual replacement for recirculation mode |
| Power supply | Earthed plug |
| Use | Household use only |
| Routine maintenance | Monthly cleaning of grease filter |
| Annual replacement | Activated charcoal filter (if installed) |
| Bulb replacement | LED of same type (2 W, 220 V) |
| Repairs | Only carried out by a qualified technician |
| Safety | Do not flambé under the hood, adequate ventilation |
| Environmental protection | Recycle according to WEEE directive 2012/19/EU |
Frequently Asked Questions - CBG625/1N - CBG625/1X/P CANDY
User questions about CBG625/1N - CBG625/1X/P CANDY
0 question about this device. Answer the ones you know or ask your own.
Ask a new question about this device
Download the instructions for your Range hood in PDF format for free! Find your manual CBG625/1N - CBG625/1X/P - CANDY and take your electronic device back in hand. On this page are published all the documents necessary for the use of your device. CBG625/1N - CBG625/1X/P by CANDY.
USER MANUAL CBG625/1N - CBG625/1X/P CANDY
INSTALLATION AND USER'S MANUAL
CONTENT
INTRODUCTION. 3
SAFETYPRECAUTION. 3-4
PREPARE FOR INSTALLATION. 5
SKPECIFICATIONS. 5
INSTALLATION 6-7
OPERATION 7-8
MAINTENANCE. 8
TROUBLESHOOTING 9
ENVIRONMENTALPROTECTION. 9
INTRODUCTION
Thank you for choosing this cooker hood.
This instruction manual is designed to provide you with all required Instructions related to the installation, use and maintenance of the appliance.
In order to operate the unit correctly and safety, please read this instruction manual carefully before installation and usage.
The cooker hood use high quality materials, and is made with a streamlined design. Equipped with large power electric motor and centrifugal fan, it also provides strong suction power, low noise operation, non-stick grease filter and easy assembly installation.
SAFETY PRECAUTION
- Never let the children operate the machine.
- The cooker hood is for home use only, not suitable for barbecue, roast shop and other commercial purpose.
- The cooker hood and its filter should be clean regularly in order to keep in good working condition.
- Clean the cooker hood according to the instruction manual and keep the unit from danger of burning. There is a fire risk if cleaning is not carried out in accordance with the instructions.
- Forbid the direct baking from the gas cooker.
- Please keep the kitchen room a good convection.
- If the supply cord is damaged, it must be replaced by the manufacturer, its service agent similarly qualified persons in order to avoid a hazard.
- There shall be adequate ventilation of the room when the range hoods used at the same time as appliances burning gas or
other fuels;
- The air must not be discharged into a flue that is used for exhausting fumes from appliances burning gas or other fuels;
- Regulations concerning the discharge of air have to be fulfilled.
- This appliance can be used by children aged from 8 years and above and persons with reduced physical, sensory or mental capabilities or lack of experience and knowledge if they have been given supervision or instruction concerning use of the appliance in a safe way and understand the hazards involved.
Children should be supervised to ensure that they do not play with the appliance. - Cleaning and user maintenance shall not be made by children without supervision.
- Do not flame under the range hood.
- CAUTION: Accessible parts may become hot when used with cooking appliance.
- The warning shall be in the same part of the instructions that include details of how to mount the equipment.
Electrical Shock Hazard
- Only plug this unit into a properly earthed outlet. If in doubt seek advice from a suitably qualified engineer.
- Failure to follow these instructions can result in death, fire, or electrical shock.
Prepare for installation:
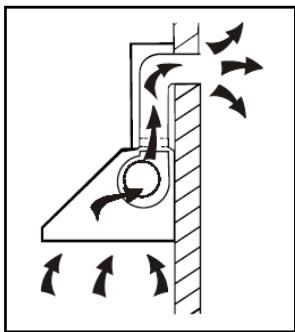
a. If you have an outlet to the outside, your cooker hood can be connected as below picture by means of an extraction duct (enamel, aluminum, flexible pipe or inflammable material with an interior diameter of 150mm )
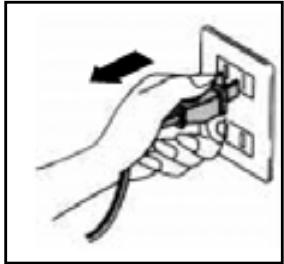
b. Before installation, turn the unit off and unplug it from the outlet.
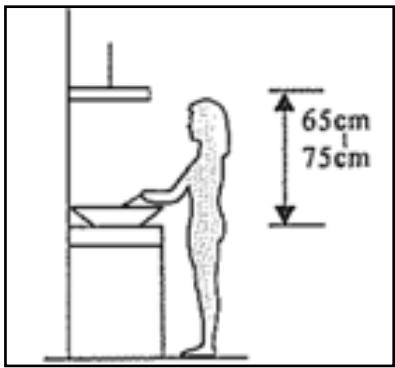
c. The cooker hood should be placed at a distance of 65 75cm above the cooking plane for best effect.
CBG620/1X
CBG620/1W
CBG620/1N
CBG625/1X
CBG625/1W
CBG625/1N
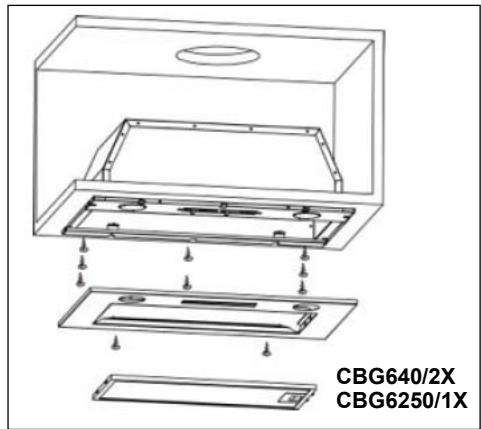
CBG640/2X CBG6250/1X
CBG620/1X CBG620/1W CBG620/1N CBG625/1X CBG625/1W CBG625/1N
Installation
-
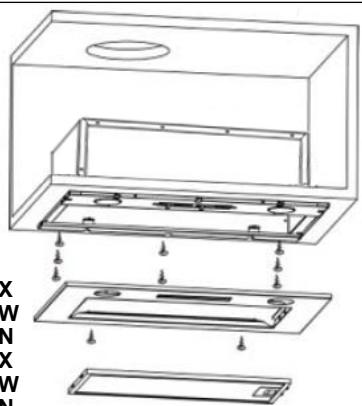
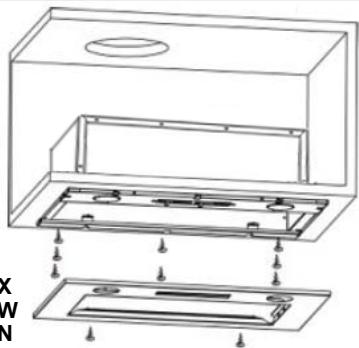
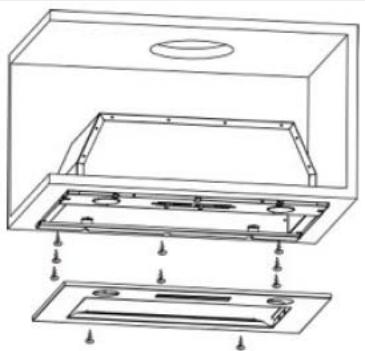
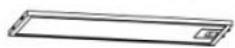
The typical installation method for your range hood is into a purpose built overhead/wall cabinet.
-
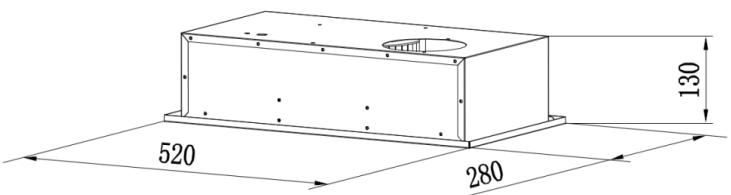
Using a jigsaw, create the required cut-out for your range hood, as 490 × 250mm
-
Make sure the cut-out is at least 35mm from the cabinet edge.
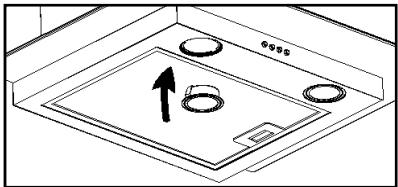
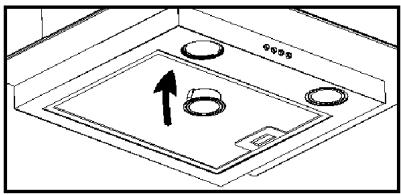
- Remove the grease filter and remove the 2 screws on the panel.
- Screw the range hood into the cabinet using 8 screws (supplied).
- Re-fit the panel with the 2 screws (previously removed).
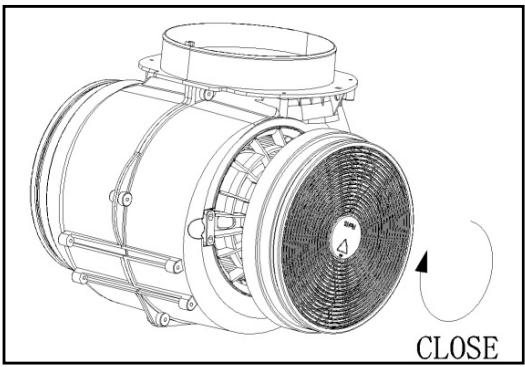
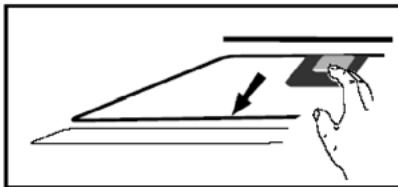
Activated carbon filter can be used to trap odors.
In order to install the activated carbon filter, the grease filter should be detached first. Press the lock and pull it downward.

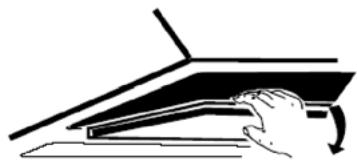
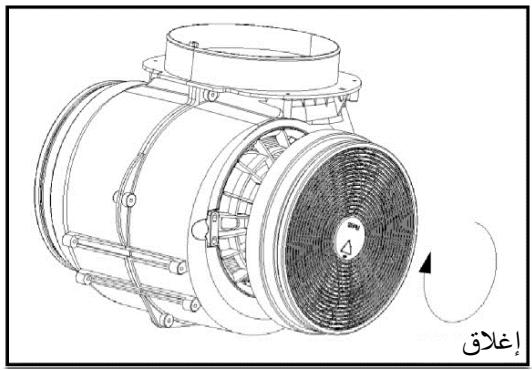
Plug the activated carbon filter into the unit and turn it in clockwise direction. Repeat the same on the other side.
NOTE:
○ Make sure the filter is securelylocked. Otherwise, it would loosen and cause dangerous.
- When activated carbon filter attached, the suction power will be lower.
DESCRIPTION OF COMPONENTS


OPERATION
Low Speed button 1
It's used for Ventilation on the kitchen. It is suitable for simmering and cooking which do not make much steam.
Medium Speed button

2
Airflow speed is ideally for ventilation in standard cooking operation.
High Speed button 3

3
When high density of smoke or steam produced, press high-speed button for highest effective ventilation.
Light button

NOTE: If Low / Medium / High speed buttons are press at the same time, the unit will only operate at the highest speed.
MAINTENANCE
Before cleaning switch the unit off and pull out the plug.
I. Regular Cleaning
Use a soft cloth moistened with hand-warm mildly soapy water or household cleaning detergent. Never use metal pads, chemical, abrasive material or stiff brush to clean the unit.
II. Monthly Cleaning for Grease Filter
ESSENTIAL: Clean the filter every month can prevent any risk of fire.
The filter collects grease, smoke and dust....so the filter is directly affecting the efficiency of the cooker hood. If not cleaned, the grease residue (potential flammable) will saturate on the filter. Clean it with household cleaning detergent.
III. Annual Cleaning for Activated Carbon Filter
Apply SOLELY to unit that installed asa recirculation unit (not vented to the outside). This filter traps odours and must be replaced at least once a year depending on how frequent the cooker hood used.
III. Bulb Replacement
- Switch the unit off and unplug the appliance.
2.Remove the lamp cover by unscrewing the 2 screws.
3.Unscrew the LED lamp - Replace with the same type and lamp
LED lamp (220V max, 2W).
TROUBLESHOOTING
| Fault | Cause | Solution |
| Light on, but fan does not work | The fan blade is jammed. | Switch of the unit and repair by qualified service personnel only. |
| The motor is damaged. | ||
| Both light and fan do not work | light bulb burn. | Replace the bulb with correct rating. |
| Power cord looses. | Plug in to the power supply again. | |
| Serious Vibration of the unit | The fan blade is damaged. | Switch of the unit and repair by qualified service personnel only. |
| The fan motor is not fixed tightly. | Switch of the unit and repair by qualified service personnel only. | |
| The unit is not hung properly on the bracket. | Take down the unit and check whether the bracket is in proper location. | |
| Suction performance not good | Too long distance between the unit and the cooking plane | Readjust the distance to 65-75cm |
ENVIRONMENTAL PROTECTION
Waste electrical products should not be disposed of with household waste. Please recycle where facilities exist. Check with your Local Authority or retailer for recycling advice.

This appliance is marked according to the European directive 2012/19/EU on Waste Electrical and Electronic Equipment (WEEE).
By ensuring this product is disposed of correctly, you will help prevent potential negative consequences for the environment and human health, which could otherwise be caused by inappropriate waste handling of this product.
The symbol on the product indicates that this product may not be treated as household waste. Instead it shall be handed over to the applicable collection point for the recycling of electrical and electronic equipment
Disposal must be carried out in accordance with local environmental regulations for waste disposal.
For more detailed information about treatment, recovery and recycling of this product, please contact your local city office, your household waste disposal service or the shop where you purchased the product.
unll gisinnall jll
12
12.
14.
15.
15-16.
17.
18.
19 1
19 2
jglgblal jglg
aalldi, jgllll aie alj yaiiaial lall ball cailll gll lclll
A
ailll aac 1j laiy iis cailll lal o jg aiol g aiae o
.
y
a aalalalalalalalalal al al alalal alalal alalal alalal alalal
.
x 490 waiy yaii ball baiy ai baiy baiy jay jaiy jaiy jaiy
250
35 35 aIaI jIJI JcJcJcJI JcJI
aagaaagaaagaaagaaagaaagaaagaaagaaagaaagaaagaaagaaagaaagaaagaaagaaagaaagaaagaaagaaagaaagaaagaaagaaagaaagaaagaaagaaagaaagaaagaaagaaagaaagaaagaaagaaagaaagaa
()8jall
(1)
CBG620/1X
CBG620/1W
CBG620/1N
CBG625/1X
CBG625/1W
CBG625/1N
CBG640/2X
CBG6250/1X
Jaiy Jiaai jaii jaii jaii jaii jaii jaii jaii jaii jaii jaii jaii jaii jaii jaii jaii jaii jaii jaii jaii jaii jaii jaii jaii jaii jaii jaii jaii jaii jaii jaii jaii jaii jaii jaii
JyI yIyI yIyI yIyI yIyI yIyI yIyI yIyI yIyI yIyI yIyI yIyI yIyI yIyI yIyI yIyI yIyI yIyI yIyI yIyI yIyI yIyI yIyI yIyI yIyI yIyI y
4k - 1 = 0( k ≥ 1)
. 100000000000000000000000000000000000000000000


1 aes
J 1

2 ae wss
aall aac 100000000000000000000000000000000000000
3 3
j
#
al 1alba pssu 2 Aaie Caii 10 g aiae b 10 y aaiy aaiy aaiy aaiy aaiy aaiy aaiy aaiy
a
a a a a a a a a a a a a a a a a a a a a a a
aaiie gilln clll aaii 4
.2LED220
EUEU/2012/19 pRgRgRgRgRgRgRgRgRgRgRgRgRgRgRgRgRgRgRgRgRgRgRgRgRgRgRgRgRgRgRgRgRgRgRgRgRgRgRgRgRgRgRgRgRgRgRgRgRgRgR
NAVOD K INSTALLACIA OBSLUZE
OBSAH
UVOD 21
BEZPECNOSTNI OPATRENI 21-22
PRIPRAVA K INSTALACI: 23
SPECIFIKACE 24
INSTALACE 24-25
OVLADANI 26
UDRZBA 27
RESENI PROBLEMU 28
OCHRANA ZIVOTNIHO PROSTREDI 28
UVOD
Dekujeme vam, zeiste si vybrali tutodigestor.
TEXHnKA B3OpACHOCTN 78-80
ПОДГOTOBКУCTAHOBKE 81
KhoNka BbICOKO CKOpocTn 3
Дя HanboJee 3ФфektNBHOB BeHTNJIaUH NaxMNTe KHOKNy BbICOKOcKOPoCTn, KOrda o6pa3yeTc8 BBICOKOKOHceHTpnpOBaHHbI DbIM NII nap.
Khonka noCDBeTK

ПРИМЕЧАHЕ.Еспо odhoepeMeHNo Haxamb KhoNku MaIoU, cpeDHeu u ebICOKOckopocMu, bIMxKka byem pa6omamb mIoBko Ha caMoI ebICOKOckopocMu.
OBCJNYKINBAHNE
Ipeed uicTKoB BbIKIOHTe BbITJXKU N 3BJIeKITE BUNKy UHypa INTaHnN I3 pO3eTKn.
I. Perynnapna YncTk
IcnoJIb3yIne Mrgkyo TkaHc TeNIO MblbHO BDOIO NIN 6bITOBIM MOIOUIM CpeDCTBOM. He IcnoJIb3yIne DnA YnCTKn N3deJnMaTeaIIuYeCKne ry6Kn, XmMueCKne nIa 6pa3nBhIbe MaTePnaJIbI, a TaKKe JCeTKn IeTKn.
II. ExeMeecyHna YnCTka XnpoynBaBnBaIOUeO fNJIbTpa
BAJHO! ExemecyHnay Yucmka fUlbmpa Moxem npedomepaumb onacnocmb 6032opauHua.
Фильтулавливаетхир,дынпьл,пOTOMУОн HeNOCpeДСТBEHNOВИЯETHa3ФфЕKTINBHOCTb KUXOHNo BbITJxKn.EcNi He YIcTtBФильТp,OTLOXeHNYKupa(NOTEHuaJIbHO BOCIIaMeHЯJOUncEa)3aONJIrTФильТp.ПROMоITEero cпрIMeHHeMбItOBOr MOJOUSeO cpeDCTBa.
III. ExeeroHa nca qnIbTpca cakTNBnpoBaHHbIM yrJIem
ПрименяетсTOЛьКО ДЯиЗдел,在YCTановленигOBуВkaчecтBEцИркУлцИонHoBbITЯЖКи(KOTOPaH He OTBOДNT Bo3dUx HApyKу).3TOTФИльТуЛавиBaeТЗахи,eRo CNeДуeТЗamEHЯТь He pEXe OndHOrO pa3aВ rOД,В 3aBNCIMOCtN OT INHTEHCBHOCtN ICNoJIb3OBAHnI KYXOHHO BbITЯЖКи.
III. 3aMeHa JIaMnbl
- BbIKJHouHTe BbITaKky NOTKJIHOHTe ee OT cETn.
- CHIMITE 3auntHOe CTeKIO NaMnbl, OTKpyTbB 2 BnHTa.
- BbIBnHTnte CBETOINOHyU JAmny.
-
3aMeHInTe JAmnY HOBoJ lamOy TaKOrO Je Tuna.
-
CBeToDIOHna JAmNa (MaKc. 220 B, 2 BT).

RIESENIE PROBLEMOV. 96
OCHRANA ZIVOTNÉHO PROSTREDA. 96