KFIA19R - Combined refrigerator ELECTROLUX - Free user manual and instructions
Find the device manual for free KFIA19R ELECTROLUX in PDF.

| Product type | Range hood |
| Brand | Electrolux |
| Model | KFIA19R |
| Control type | Touch electronic |
| Number of speeds | 4 (1, 2, 3, Max) |
| Lighting | LED |
| Grease filter | Dishwasher safe, clean monthly |
| Charcoal filter | Replace every 4 to 6 months |
| Hob²Hood function | Yes, automatic connection with the hob |
| Power supply | 230 V (typical) |
| Maintenance | Clean the appliance with a soft cloth and mild detergent |
| Safety | Refer to the manual, bulb replacement by a technician |
| Environmental protection | Recycle the appliance at a recycling center |
| Rating plate | Model, PNC, serial number |
| Included accessories | Grease and charcoal filters |
Frequently Asked Questions - KFIA19R ELECTROLUX
User questions about KFIA19R ELECTROLUX
0 question about this device. Answer the ones you know or ask your own.
Ask a new question about this device
Download the instructions for your Combined refrigerator in PDF format for free! Find your manual KFIA19R - ELECTROLUX and take your electronic device back in hand. On this page are published all the documents necessary for the use of your device. KFIA19R by ELECTROLUX.
USER MANUAL KFIA19R ELECTROLUX
3. BCEKДнHEBHA YПOTPEБА
KataxwpioTeToTPOIOvOa,waTeVaexTeKaLATEPOePbic:
www.registerelectrolux.com

AyopaoTe aegouap, avawoiqa kai yviia avtalaktiKa yia t oukeun ca:
www.electrolux.com/shop
EYHPETHH IANATQN KAI ZEPBIZ
XpəiμoTioEite TáVtα μóvo yvniδa avTaλλakTiKa.
WE'RE THINKING OF YOU
Thank you for purchasing an Electrolux appliance. You've chosen a product that brings with it decades of professional experience and innovation. Ingenious and stylish, it has been designed with you in mind. So whenever you use it, you can be safe in the knowledge that you'll get great results every time.
Welcome to Electrolux.
Visit our website to:

Get usage advice, brochures, trouble shooter, service and repair information: www.electrolux.com/support

Register your product for better service: www.registerelectrolux.com

Buy Accessories, Consumables and Original spare parts for your appliance: www.electrolux.com/shop
CUSTOMER CARE AND SERVICE
Always use original spare parts.
When contacting our Authorised Service Centre, ensure that you have the following data available: Model, PNC, Serial Number.
The information can be found on the rating plate.

Warning / Caution-Safety information

General information and tips

Environmental information
Subject to change without notice.
1. SAFETY INFORMATION AND INSTALLATION

WARNING!
Refer to the separate
Installation Instructions
booklet for Safety
Information and Installation.
Read carefully the Safety
chapters before any use or
maintenance of the
appliance.
2. PRODUCT DESCRIPTION
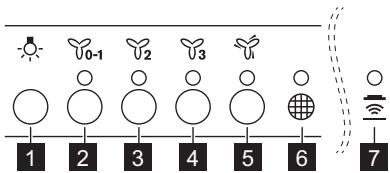
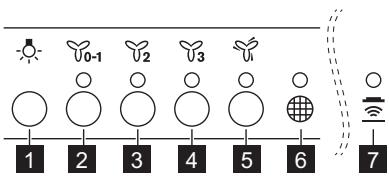
2.1 Control panel overview
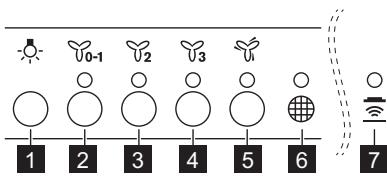
| Function | Description | |
| 1 | Lamp | Turns the lights on and off. |
| 2 | First speed / Off | The motor switches to first speed level. Second press turns off the appliance. |
| 3 | Second speed | The motor switches to second speed level. |
| 4 | Third speed | The motor switches to third speed level. |
| 5 | Maximum speed | The motor switches to maximum speed level. After 5 minutes appliance switches to third speed. |
| 6 | Filter notification | Reminds to change or clean the charcoal filter and clean the grease filter. |
| 7 | Hob?Hood | Indicator of the function to control hood from hob. For some models the symbol present on the control panel. |
3. DAILY USE
3.1 Using the hood
Check the recommended speed according to the table below.
| ♀0-1 | While heating up food, cooking with covered pots. |
| ♀2 | While cooking with covered pots on multiple cooking zones or burners, gentle frying. |
| ♀3 | While boiling and frying big quantities of food without a lid, cooking on multiple cooking zones or burners. |
| ♂ | While boiling and frying big quantities of food without a lid, big humidity. |

It is recommended to leave the hood operating for approximately 15 minutes after cooking.
To operate the hood:
- Press the first speed button to switch on the appliance.
- If needed, change the speed by pressing the desired button.
The hoods light works independently to other hood functions. To illuminate the cooking surface press the light button
To turn off the appliance press the first speed button 0 - 1 again.
3.2 Hob²Hood function
It is an automatic function which connects the hob with a hood. Both the hob and the hood have an infrared signal communicator. Speed of the fan is defined automatically on basis of mode setting and temperature of the hottest cookware on the hob. You can also operate the fan using the hob manually. The function can be activated from panel of the hob.
For more information how to use the function refer to the hob user manual.
3.3 Filter notification
Filter alarm reminds to change or clean the charcoal filter and clean the grease
filter. The filter indicator is turned on for 30 seconds if the grease filter must be cleaned. The filter indicator flashes for 30 seconds if the charcoal filter must be replaced or cleaned.
Refer to cleaning the grease filter in care and cleaning chapter.
Refer to cleaning the charcoal filter or replacing the charcoal filter in care and cleaning chapter.
To reset the function press the button _3 for 3 seconds.
To activate or deactivate function:
- To activate function press the button _2 for 3 seconds. If the function is activated, the indicator _2 flashes two times.
- To deactivate function press the button _2 for 3 seconds. If the function is deactivated, the indicator _2 flashes ones.
4. CARE AND CLEANING
4.1 Notes on cleaning
| Cleaning Agents | Do not use abrasive detergents and brushes. Clean the surface of the appliance with a soft cloth with warm water and a mild detergent. |
| After cooking some parts of appliance can get hot. To avoid stains appliance must be cooled down and dried with clean cloth or paper towels. | |
| Clean stains with a mild detergent. To clean glass surfaces, use alcohol-based detergent. | |
| Keep the hood clean | Clean the appliance and grease filters each month. Clean the inter- rior and grease filters carefully from fat. Fat accumulation or other residue may cause fire. Follow the instructions for cleaning the accessories when filter noti- fication is on. Refer to Filter notification in daily use chapter. |
| Grease filters can be washed in a dishwasher. The dishwasher must be set to a low temperature and a short cy- ccle. The grease filter may discolour, it has no influence on the per- formance of the appliance. | |
| Charcoal filter | The time of saturation of the charcoal filter varies depending on the type of cooking and the regularity of cleaning the grease filter. The activated charcoal filter is not washable, cannot be regenerated and must be replaced approximately every 4/6 months of operation, or more frequently for particularly heavy usage. |
4.2 Cleaning the grease filter
Filters are mounted with the use of clips and pins on the opposite side.
To clean the filter:
- Press the handle of the mounting clip on the filter panel underneath the hood (1).
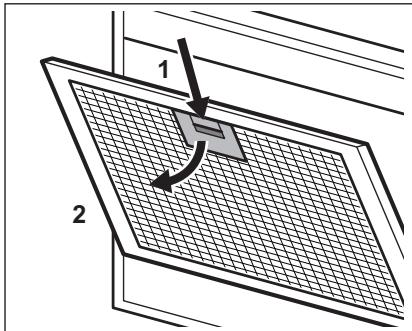
- Slightly tilt the front of the filter downwards (2), then pull.
Repeat the first two steps for all filters. - Clean the filters using a sponge with non abrasive detergents or in a dishwasher.

The dishwasher must be set to a low temperature and a short cycle. The grease filter may discolour, it has no influence on the performance of the appliance.
- To mount the filters back follow the first two steps in reverse order.
Repeat the steps for all filters if applicable.
4.3 Replacing the charcoal filter

WARNING!
The charcoal filter is non-washable!
To replace the filter:
- Remove the grease filters from the appliance.
Refer to "Cleaning the grease filter" in this chapter. - Remove the clips holding the filter bed, then the filter bed.
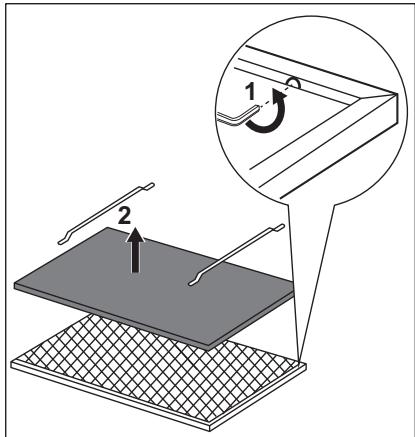
- To install a new filter, perform the same steps in reverse order.
In any case, it is necessary to replace the filters at least every four months.
4.4 Replacing the lamp
This appliance is supplied with a LED lamp and separate control gear (LED
driver). These parts can be replaced by a technician only. In case of any malfunction refer to "Service" in the "Safety Instructions" chapter.
5. ENVIRONMENTAL CONCERNS
Recycle materials with the symbol Put the packaging in relevant containers to recycle it. Help protect the environment and human health by recycling waste of electrical and electronic appliances. Do not dispose of
appliances marked with the symbol with the household waste. Return the product to your local recycling facility or contact your municipal office.
CONTENIDO
- INDICACIONES DE SEGURIDAD E INSTALLACION 32
2.DESCRIPTION DEL PRODUCTO 33
3.USO DIARIO. 33 - MANTENIMIENTO Y LIMPIEZA 35
- ASPECTOS MEDIOAMBIENTALES 36
PENSAMOS EN USTED
4.3 Söeffltr vahetamine

HOIATUS!
Söeffilter ei ole pestav!
3. SVAKODNEVNA UPORABA
3.1 Uporaba nape
Provjerite preporucenu brzinu prema tablici u nastavku.
| ♀0-1 | Prilikom zagrijavanja hrane, kuhanja sPokrivenim posudama. |
| ♀2 | Prilikom kuhanja sPokrivenim posudama na više zona kuhanja ili plame-nika, lagano pržanje. |
| ♀3 | Prilikom ključanja i prženja velikih količina hrane bezPoklopca, kuhanja na više zona kuhanja ili plamenika. |
| ♂ | Prilikom ključanja i prženja velikih količine hrane bezPoklopca, visoka VLCažnost. |

Preporuca se ostaviti napu da radioko 15 minuta nakon kuhanja.
- Pritisnite tipku prve brzine 0 - 1 kakobiste ukljuci urejad.
- Ako je potrebno, promijenite brzinu pritiskom na zenjenu tipku.
Za upravljanje napom:
4. MANUTENÇÂO E LIMPEZA
KOPINCHNCHKA NOIDPISHA I CEPBNC
YBeK KOpNCTnTe OpUInHaJIne pe3epBHe JeIOBe.
Kaanda KONTAKTupate OBnawheHn cepBnCHn ceHTap, BOiNTe paUyHa da KoIcceb imate cnepehe noaTe: Moen, 6poj npOn3BoDa, cepNJckn 6poj.
IopauMoryda cpe npohyHa nlouCn caTexHnKIM KapaKtepnckama.

Yno3opehe/Oppe3 - HnΦopMaunje o 6e3eHnocTn

OnuTe nHopmaunje n cabTe

IHHopmauzije o JxIBOTHOJ cpeINH
3aDpxKaHO npaBO n3MeHa.
1. INHΦOPMALUJNE O B6E3BEdHOCTN INHCTAJIALUJN

YN03OPEHbE!
Iorneajte 3ace6Hy
6poowpy c ynyTCTBIma 3a
nHCTanauijy 3a
InhΦopMaunje o
6e36eHocntu
nHCTanauijN. PaxkBo
npoNTaJIte norgaBrBa o
6e36eHnocTn pne 6nlo
kaKBOr kOpniSheHa a nn
OdpKabAha ypeaja.
2.ОПИС ПОНЗВОДА
2.1 Перлед Командп Табл e
reparationsinformation:
www.electrolux.com/support
registrar din produit for bättre service:
www.registerelectrolux.com

3i BCTaHOBnEHn. Ipeed
BVKOPNCTAHNM YN
O6cIyroBvBaHHm npHnAdy
yBaXHo npOuHTaTte po3diN
soofo6e3nekn.
2.ОПИСВИРОБУ
2.1 Ornay naneji KepyBaHHa
[\therefore \lg q \geq b]
Jgglj 100
slll lll
Ssol = j1j2·s js^2 且 Si = j = 1^sa_ij
p>Jjol Jlswl 4.3
j !
aJlglal.5
jolj Jaxi jll algall yucl 12cIw. gill oIcY aIwio agb aaley 03cl, p9g aIwyl aalgl aIwIaIa
30 30 30 30 30 30 30 30 30 30 30 30 30 30 30 30 30 30 30 30 30 30 30 30 30 30 30 30 30 30 30 30 30 30
uJl jL aBau PwG J L .aBaiIg aiaIJIa
i
gJ gJ 19 19 JgJgJgJgJgJgJgJg
i
03 jll lc baiol aagbll bao 3
aaaabglbawwla
2 1c b20a aagbgl 3
Y2 wgl aog, abwio aagbgl 1s1
U2jll lcbzol aabgll bssclly .2 30al Jwgal Joog abaaio acabgll cils15
Jswelbella Jaa
aaiiiae jaae
all ao ool y
2laaljjbs
aerll jIc bdoJgall Jy 0-1 yyl
Hob²Hood 3.2 a b g
sIgall Joo aiaa iaiai aagb Igi
OJwyl Jogol gllalgagall.aiso
a>grall acrswd jraa ll aee aee
glj oJrge gio gao 1scl w> liai
Llciok .gall lce agzsw 1y
Llssn koy dgoall a>grall J
aagcogaleall no dyal all JdJgJ aabglol pdo
i
juljI jswl 3.3
jol jol jol jol jol jol jol jol jol jol jol jol jol jol jol jol jol jol jol jol jol jol jol jol jol jol jol jol jol jol jol jol jol jol jol jol jol jol jol jol jol jol jol jol jol jol jol jol jol jol jol
a.4
aBbI Ic Ib>Lo 4.1
a 1 a 1 1 1 1 1 1 1 1 1 1 1 1 1 1 1 1 1 1 1 1 1 1 1 1 1 1 1 1 1 1
aaiy jia jia gao 10g2o
jlll: jlll llll llll llll llll llll llll llll
Julll PNC
a>gl 1c loglaall o i j k a
a0dwl10og120-a/
aole jilagogloglo ①
aLoglo
jolw jgduy aio
jlllJalalaloglo .1

J 1
Jg>J
Jg>J
Jg>J
Jg>J
Jg>J
Jg>J
Jg>J
Jg>J

C E