USER MANUAL TREADWELL NEO CANNONDALE
MY20 Quick Neo SL, Treadwell Neo
w/ Ebikemotion® X35 Drive System
About Technical Supplements
This document is intended only for competent, experienced bicycle mechanics familiar with bicycle terminology, service techniques and equipped with proper tools.
This document is not an Owner's Manual or Owner's Manual Supplement. These resources can be found as downloadable Adobe PDFs from our website: www.cannondale.com
CONTENTS
Cable Routing Frame Overview. 2
Cable Routing Rear Wheel. 3
Bottom Bracket & Cover 6
Internal Battery Assembly Overview 4
Internal Battery Replacement 5
Specifications &
Replacement Parts 8
Symbols in Use


- Loctite® 242 (blue) or equivalent
N·m - Newton meter
OTHER RESOURCES
Ebikemotion® Drive System Manuals
The following internet links will direct you to the drive manufacturer's website and a specific user manual or quick guide you will need to read and consult:
URL
https://www.ebikemotion.com
http://iWocONE-Quick-User-Guide
http://User-Guide-X35-Connection+Mount
http://User-Guide-X35-Care+Maintenance
Periodically, check back with the manufacturers' website for revisions and/or additions to drive system manuals.

WARNING
Information intended for service professionals only. Improper mechanical work increases the risk of an accident. Any bicycle accident has risk of serious injury or death.
If you have any questions about this supplement please call:
Your Warranty/Technical Representative
The DT is an extrusion that has 2 compartments. The top compartment is for brake and RD housing.
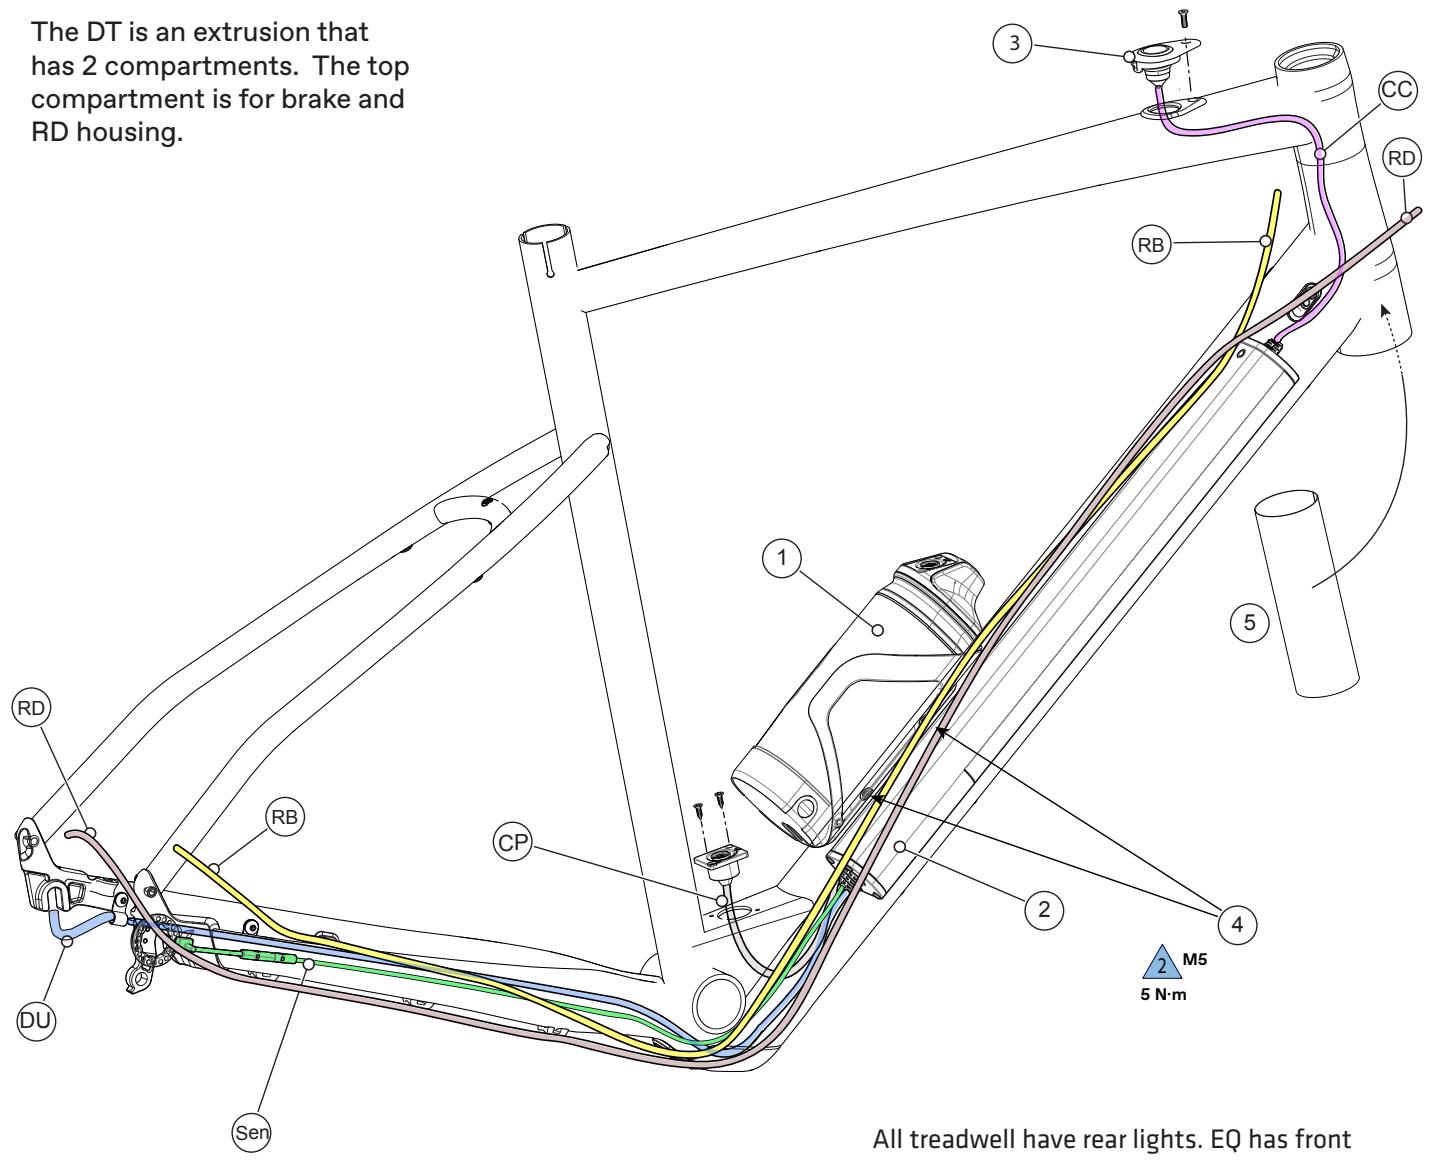
All treadwell have rear lights. EQ has front and rear. Light wire comes out bottom of battery.
Identification
- Battery, External (optional)
- Battery, Internal
- iWoc ONE (drive interface)
- Water Bottle Mounting Bolts
- Headtube Plastic Cable Sheet
RB - Rear Brake Line
RD - Rear Derailleur Housing
DU - Drive Unit Cable
FD - Front Derailleur Housing
CP Charge Port Cable
CC-iWocONE Cable
Sen - PAS Sensor Cable
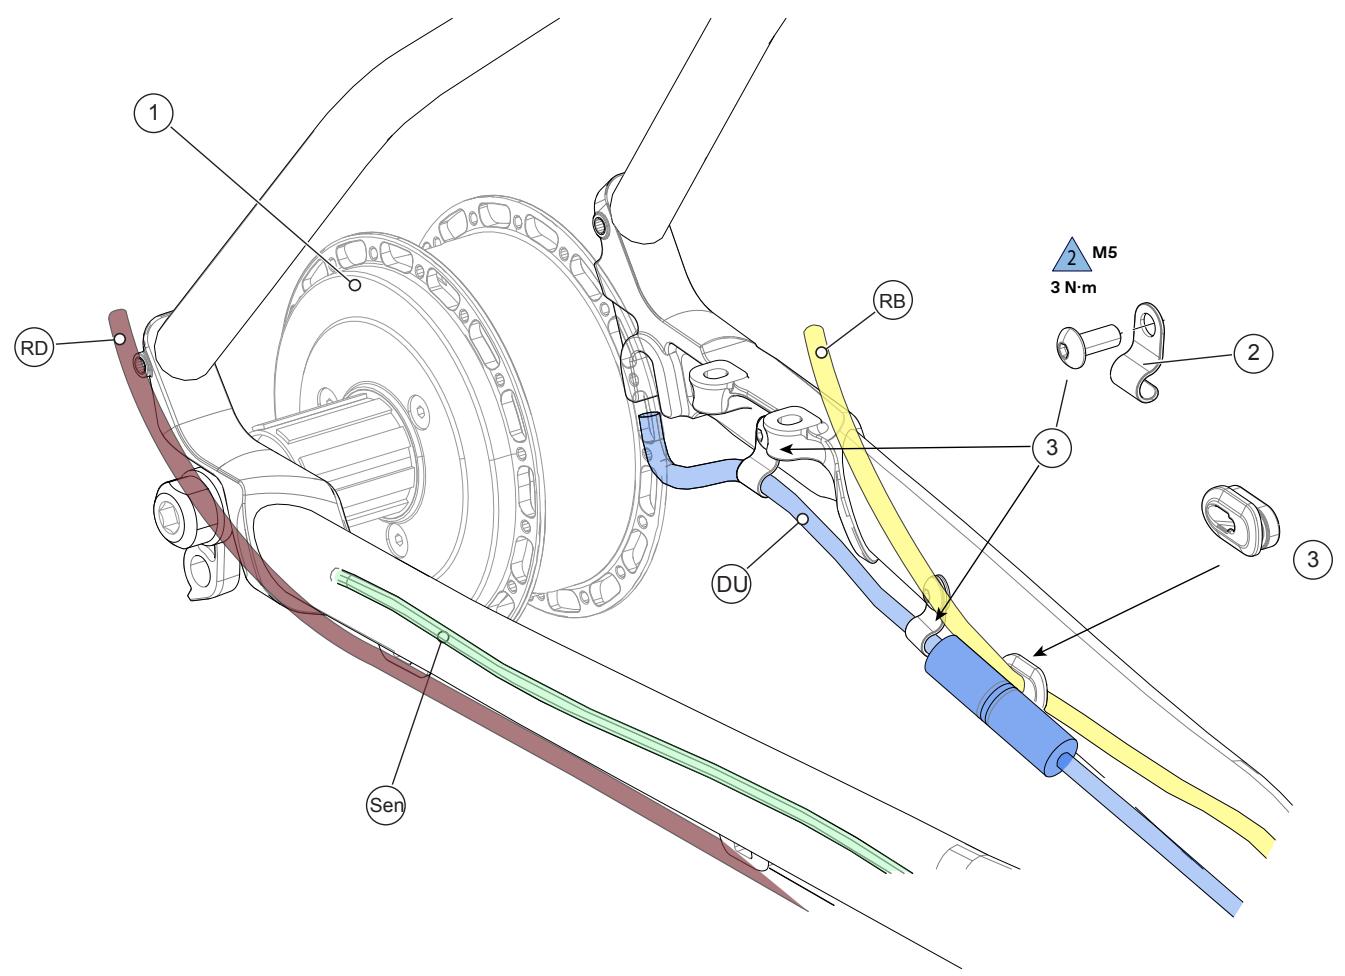

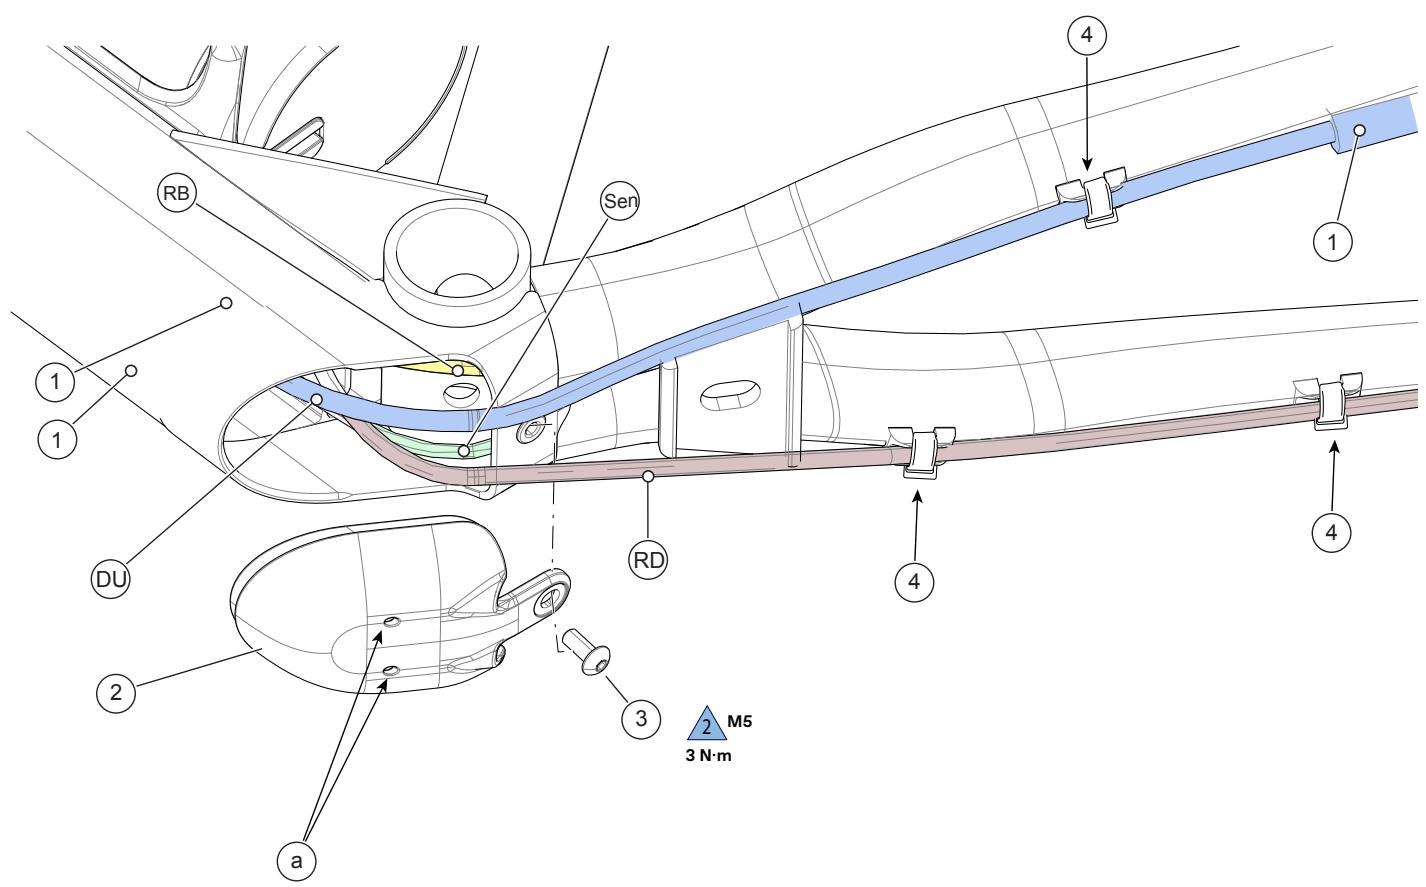
WARNING
Secure drive unit cable (DU) to frame with clips.
Prevent cable from contacting brake rotor.
Identification
- X35 Drive Unit (rear hub)
- Cable Clip
- Bolt
- Grommet
RB - Rear Brake Line
DU - Drive Unit Cable
- Battery, Internal
- Upper Battery Cables
- Lower Battery Cables
4.3MTM Tape
-
Washer, M5
-
Battery Spacer
- Mounting Bolt
- Water Bottle Mounting Bolts
a. Flat side
b. Curved side
NOTICE
Do not use mounting bolts longer than the maximum specified.
Longer bolts will protrude into the down tube and damage the internal battery.
Remove
- Disconnect the rear hub and battery connector on the left chainstay
- Disassemble the headset cap so that the fork may be lowered slightly within the headtube. This is required to enable adequate cable slack.
- Remove the retaining bolt for the iWoc® ONE on the top tube and lift up the device. Disconnect it from the battery cable.
- Disconnect any attached optional lighting from the battery connector.
- Remove the bottom bracket cover.
- Remove the screws and lift up the charge port. Disconnect the device from the battery cable.
- At the bottom bracket:
Disconnect the wheel sensor, drive unit battery connectors.
- Remove the three bolts and washers on the underside of the downtube to release the internal battery.
- Slide the internal battery down and out of the bottom bracket opening.
- Remove the three battery spacers from the battery.
- There are no servicable parts of the battery. The removed battery must be handled as electronic waste, subject to regulations regarding handling or used batteries in your area.
Install
- Attach the three battery spacers onto the replacement internal battery at the mounting points on the lower surface of the battery.
Affix the flat side of the spacers to the battery over the mounting holes.
- Insert the upper parts of the battery into the downtube.
Make sure other cables and housing inside the downtube are positioned on the top of the battery inside the downtube.
Align the holes in the battery with the holes in the frame and install the washers and bolts.
Apply Loctite 242 (blue) to the bolt threads and tighten to the specified torque.
- Reconnect the battery to the iWoc® ONE and charge port and re-install both devices into the frame. Tighten to the specified torque.
- At the bottom bracket:
Reconnect the rear hub and battery cable on the left chainstay.
Reconnect the sensor to the battery.
- Reinstall the bottom bracket cover and tighten the cover bolt to the specified torque.
- Charge the battery.
- Test the operation of the drive system.
Identification
- Downtube
- Bottom Bracket Cover
- Bolt
- Cable Tie
RB - Rear Brake Line
DU - Drive Unit Cable
| Item | Specification |
| Drive System | E-Bike Motion X35 M1-C |
| Battery | E-Bike Motion X35 B1-C |
| Drive-Assist Owner's Manual | https://www.ebikemotion.com/web/ |
| Head Tube | UPR: 1-1/8in, LWR: 1-1/4in |
| Headset | Integrated, 1-1/8in - 1-1/4in |
| Bottom Bracket: Type/Width | BSA/73mm |
| Front Derailleur | N/A |
| Seat Post: Dia./Binder | 31.6mm/34.9mm |
| ▲ Min. Seat Post Insert | 65mm |
| Item | Specification |
| ▲ Tire Size x Max. Tire Width | 700c x 42mm |
| Brakes: Mount Type / Min./Max. Rotor Dia. | RR: Flat Mount/160mm/160mm, FT: Flat Mount/140mm/160mm |
| Axles: Type/Length | RR: EBM X35 FR: Maxle TA/ 100×12 125mm length |
| ▲ Intended Use | ASTM CONDITION 2: General Purpose Riding |
| ▲ Max. Weight Limit: Total (Rider+All Equipment) | 305lbs/138kg |

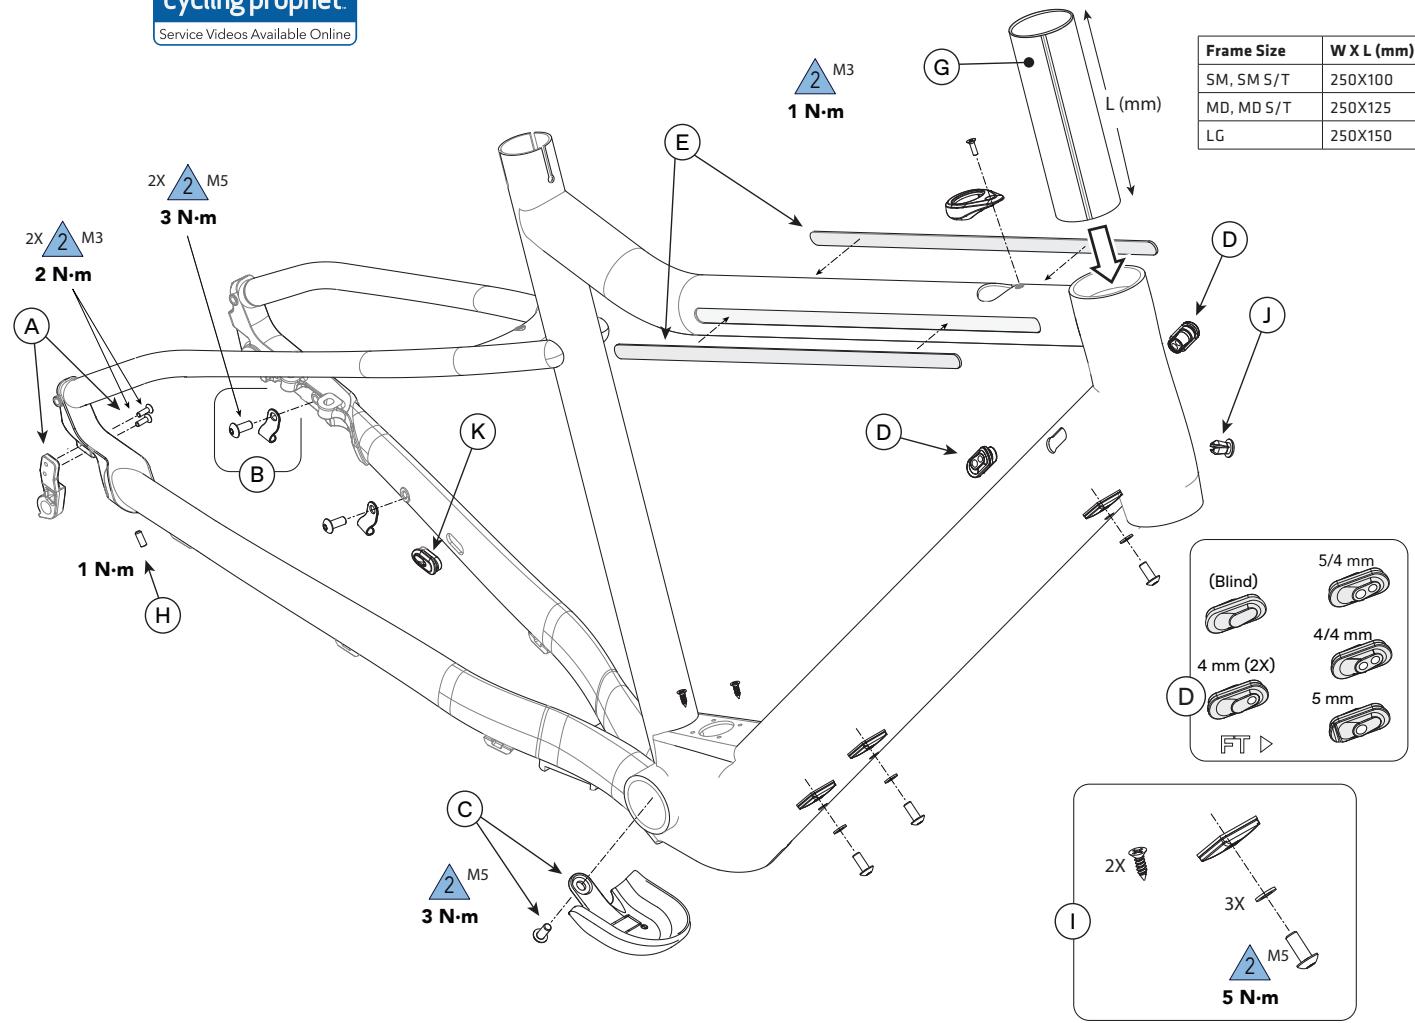
| ID | Part Number | Description |
| A | K33050 | Derailleur Hanger BT ST SS 077 |
| B | K32240 | NDS EBM Cable Clips Qty 2 |
| C | K34030 | Alloy Frame Battery Door |
| D | K32000 | Shift/Brake Keyhole Grommets |
| G | K34020 | HT Plastic Cable Sheet |
| H | K33080 | Dropout Bolts M4x10mm Qty 2 |
| I | K76040 | X35 Battery/Charge Mounting Hardware |
| ID | Part Number | Description |
| J | K34090 | DT Light Cable Grommet |
| K | KP312/ | Open Oval Grommet x10 (QTY 10) |
| -- | K14040 | Herrmans H-Trace E-Bike Rear Light |
| -- | K83038 | Ratchet Lever Maxle 100x12 125mm |
| Item | Specification |
| Drive System | E-Bike Motion X35 M1-C |
| Battery | E-Bike Motion X35 B1-C |
| Drive-Assist Owner's Manual | https://www.ebikemotion.com/web/ |
| Head Tube | UPR: 1-1/8in
LWR: 1-1/8in |
| Headset | Semi-integrated, 11/8in -11/8in |
| Bottom Bracket: Type/Width | BSA/73mm |
| Front Derailleur | N/A |
| Seat Post: Dia./Binder | 31.6mm/34.9mm |
| Item | Specification |
| ▲ Min. Seat Post Insert | 65mm |
| ▲ Tire Size x Max. Tire Width | 650b x 48mm |
| Brakes: Mount Type / Min./Max. Rotor Dia. | RR: Flat Mount/160mm/160mm, FT: Flat Mount/140mm/160mm |
| Axles: Type/Length | RR: EBM X35 FR: QR /100 × 9mm" |
| ▲ Intended Use | ASTM CONDITION 2: General Purpose Riding |
| ▲ Max. Weight Limit: Total (Rider+All Equipment) | 305lbs/138kg |
cycling prophet
Service Videos Available Online
| ID | Part Number | Description |
| A | K33050 | Derailleur Hanger BT ST SS 077 |
| B | K32240 | NDS EBM Cable Clips (QTY 2) |
| C | K34030 | Alloy Frame Battery Door |
| D | K32000 | Shift/Brake Keyhole Grommets |
| E | K34000 | Treadwell Top Tube Scuff Guard |
| F | K32230 | Treadwell Neo Bezel |
| G | K34020 | HT Plastic Cable Sheet |
| H | K33080 | Dropout Bolts M4x10mm (QTY 2) |
| ID | Part Number | Description |
| I | K76040 | X35 Battery/Charge Mounting Hardware |
| J | K34090 | DT Light Cable Grommet |
| K | KP312/ | Open Oval Grommet x10 (QTY 10) |
| -- | K13000 | Treadwell Front Rack w/ Bamboo Tray |
| -- | K14040 | Herrmans H-Trace E-Bike Rear Light |
| -- | K21000 | Cruise Control Handlebar 740 x 31.8mm |
| -- | K83038 | Ratchet Lever Maxle 100x12 125mm |