
LFT766X - Dishwasher ELECTROLUX - Free user manual and instructions
Find the device manual for free LFT766X ELECTROLUX in PDF.

| Product type | Exhaust/Recirculation hood |
| Brand | Electrolux |
| Model | LFT766X |
| Width | 60 cm (estimated) |
| Depth | 50 cm (estimated) |
| Height | 15 cm (estimated) |
| Weight | 12 kg (estimated) |
| Power supply | 220-240 V, 50 Hz (standard) |
| Motor power | 200 W (estimated) |
| Lighting | LED, 2 x 3 W (estimated) |
| Motor speeds | Speed 1, 2, 3, and high speed (8 min) |
| Blow function | Very low speed for less than 1 hour |
| Filter alarm indicator | Grease filter cleaning after 40h, charcoal replacement after 160h |
| H2H indicator | Connection with hob |
| Installation type | Exhaust or recirculation |
| Grease filter | Dishwasher safe, clean every 2 months |
| Charcoal filter | Not washable, replace every 4 months |
| Maintenance | Clean with soft cloth and neutral detergent |
| Safety | Automatic high speed stop, overvoltage protection |
| Spare parts | Filters, LED bulbs, remote control (not included?) |
| Repairability | Use an authorized service, use original parts |
| Warranty | Standard 2 years (to check) |
Frequently Asked Questions - LFT766X ELECTROLUX
User questions about LFT766X ELECTROLUX
0 question about this device. Answer the ones you know or ask your own.
Ask a new question about this device
Download the instructions for your Dishwasher in PDF format for free! Find your manual LFT766X - ELECTROLUX and take your electronic device back in hand. On this page are published all the documents necessary for the use of your device. LFT766X by ELECTROLUX.
USER MANUAL LFT766X ELECTROLUX
WE'RE THINKING OF YOU
Thank you for purchasing an Electrolux appliance. You've chosen a product that brings with it decades of professional experience and innovation. Ingenious and stylish, it has been designed with you in mind. So whenever you use it, you can be safe in the knowledge that you'll get great results every time.
Welcome to Electrolux.
Visit our website to:

Get usage advice, brochures, trouble shooter, service information:
www.electrolux.com

Register your product for better service:
www.registerelectrolux.com

Buy Accessories, Consumables and Original spare parts for your appliance:
www.electrolux.com/shop
CUSTOMER CARE AND SERVICE
Always use original spare parts.
When contacting our Authorised Service Centre, ensure that you have the following data available: Model, PNC, Serial Number.
The information can be found on the rating plate.
⚠ Warning / Caution-Safety information
i General information and tips
Environmental information
Subject to change without notice.
1. ⚠️ SAFETY INFORMATION
Before the installation and use of the appliance, carefully read the supplied instructions. The manufacturer is not responsible for any injuries or damages that are the result of incorrect installation or usage. Always keep the instructions in a safe and accessible location for future reference.
1.1 Children and vulnerable people safety
- This appliance can be used by children aged from 8 years and
above and persons with reduced physical, sensory or mental capabilities or lack of experience and knowledge if they have been given supervision or instruction concerning the use of the appliance in a safe way and understand the hazards involved.
- Children between 3 and 8 years of age and persons with very extensive and complex disabilities shall be kept away unless continuously supervised.
- Children of less than 3 years of age should be kept away unless continuously supervised.
- Do not let children play with the appliance.
- Keep all packaging away from children and dispose of it appropriately.
- Keep children and pets away from the appliance when it operates.
- Children shall not carry out cleaning and user maintenance of the appliance without supervision.
1.2 General Safety
- This appliance is intended for domestic use above hobs, cookers and similar cooking devices.
- Before carrying out any maintenance, disconnect the appliance from the power supply.
- CAUTION: Accessible parts may become hot during use with cooking appliances.
- Use only the fixing screws supplied with the appliance if not supplied, use the screws recommended in the installation instructions.
- Do not use adhesives to fix the appliance.
- The minimum distance between the hob surface on which the pans stand and the lower part of the appliance shall be at least 65 cm, unless otherwise specified in the installation instructions. If the hob installation instructions specify a greater distance, it must be taken into account.
- The discharge of air must comply with local authorities regulations.
- Ensure good air ventilation in the room where the appliance is installed to avoid the backflow of unwanted gases into the room from appliances burning gas or other fuels, including open fires.
- Make sure that the ventilation openings are not blocked and the air collected by the appliance is not conveyed into a duct used to
exhaust smoke and steam from other appliances (central heating systems, thermosiphons, water-heaters, etc.).
- When the appliance operates with other appliances the maximum vacuum generated in the room should not exceed 0.04 mbar.
- Make sure not to cause damage to the mains cable. Contact our Authorised Service Centre or an electrician to change a damaged mains cable.
- If the appliance is connected directly to the power supply, the electrical installation must be equipped with an isolating device that allows to disconnect the appliance from the mains at all poles. Complete disconnection must comply with conditions specified in the overvoltage category III. The means for disconnection must be incorporated in the fixed wiring in accordance with the wiring rules.
- Do not flambé under the appliance.
- Do not use to exhaust hazardous or explosive materials and vapours.
- Clean the appliance regularly to prevent the deterioration of the surface material.
- Clean the appliance with a soft cloth regularly.
- Do not use a steam cleaner, water spray, harsh abrasive cleaners or sharp metal scrapers to clean the surface of the appliance. Use only neutral detergents.
- Clean grease filters regularly (at least every 2 months) and remove grease deposits from the appliance to prevent the risk of fire.
- Use a cloth or brush to clean the interior of the appliance.
2. SAFETY INSTRUCTIONS
2.1 Installation

WARNING!
Risk of injury, electric shock, fire, burns or damage to the appliance.
- Only a qualified person must install this appliance.
- Do not install or use a damaged appliance.
- Follow the installation instructions supplied with the appliance.
• Always take care when moving the appliance as it is heavy. Always use safety gloves and enclosed footwear. - Before installing the appliance remove all the packaging, the labelling and the protective film.
- Do not install the exhaust air into a wall
cavity, unless the cavity is designed for that purpose.
2.2 Electrical connection

WARNING!
Risk of fire and electric shock.
- All electrical connections should be made by a qualified electrician.
- Make sure that the parameters on the rating plate are compatible with the electrical ratings of the mains power supply.
- If the symbol (回) is not printed on the rating plate, the appliance must be earthed.
- Always use a correctly installed hockproof socket.
-
Do not let the electricity mains cable tangle.
-
Do not use multi-plug adapters and extension cables.
- If the mains socket is loose, do not connect the mains plug.
- Do not pull the mains cable to disconnect the appliance. Always pull the mains plug.
- The shock protection of live and insulated parts must be fastened in such a way that it cannot be removed without tools.
- Make sure the appliance is installed correctly. Loose and incorrect electricity mains cable can make the terminal become too hot.
- Connect the appliance at the end of the installation. Make sure that there is access to the mains after the installation.
2.3 Use

WARNING!
Risk of injury, burns and electric shock.
- This appliance is for cooking purpose only. Do not use the appliance for other purpose.
- Do not change the specification of this appliance.
- Do not operate the appliance with wet hands or when it has contact with water.
- Use only the accessories supplied with the appliance.
- Keep flames or heated objects away from fats and oils during cooking and frying.
- Do not use uncovered electric grates.
- Do not use the appliance as a storage surface.
- Do not use magnifying glasses, binoculars or similar optical devices to look directly at the lighting of the appliance.
2.4 Service
- To repair the appliance contact an Authorised Service Centre.
- Use original spare parts only.
2.5 Disposal

WARNING! Risk of injury or suffocation.
- Contact your municipal authority for information on how to discard the appliance correctly.
- Disconnect the appliance from the mains supply.
- Cut off the mains electrical cable close to the appliance and dispose of it.
3. MAINTENANCE
Clean grease filters in relation to use, at least every 2 months to prevent the risk of fire. Hand wash or clean in a dishwasher using a neutral detergent. If washing in the dishwasher, possible discoloration of the filters does not in any way compromise their functioning.
natural_image
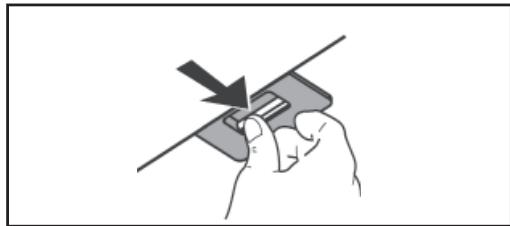
Hand holding a device with a downward arrow indicating compression or disassembly (no text or symbols)The activated charcoal filter is not washable and cannot be regenerated, and must be replaced approximately every 4 months of operation, or more frequently for particularly heavy usage.

natural_image
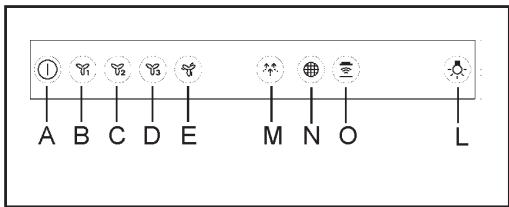
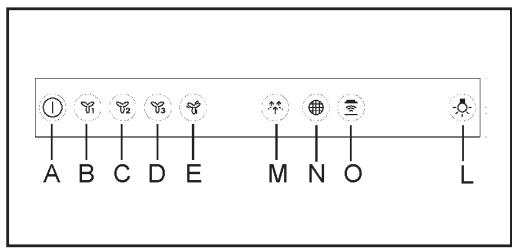
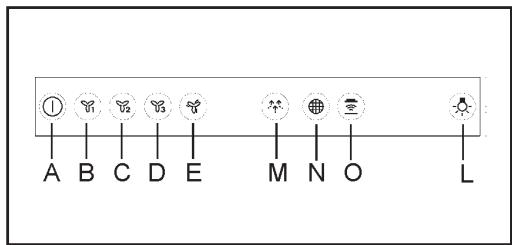
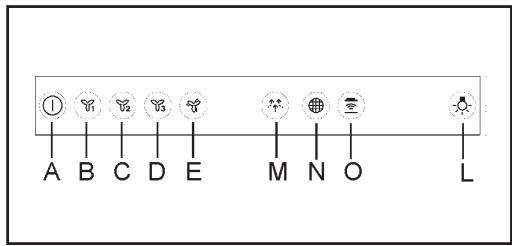
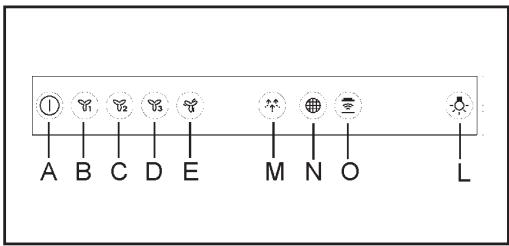
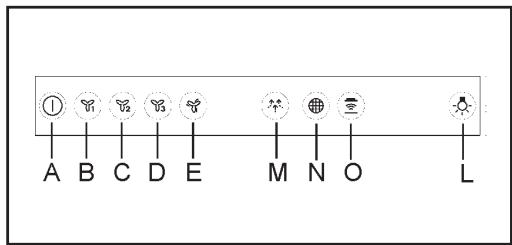
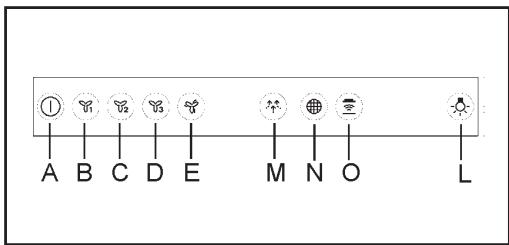
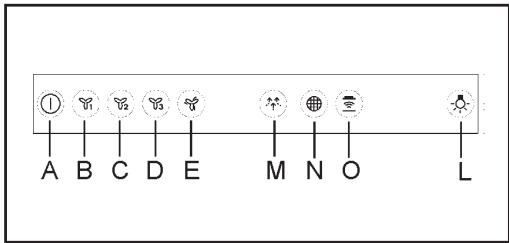
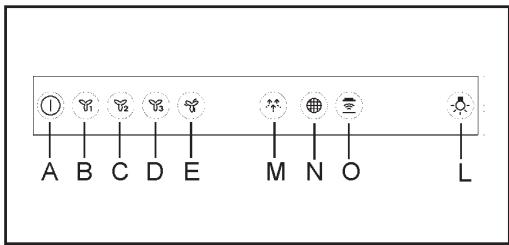
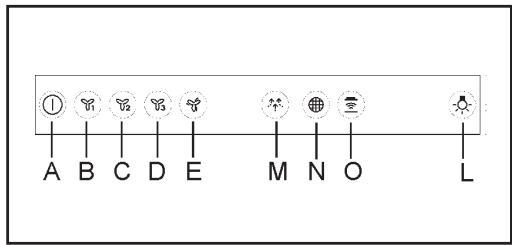
Diagram showing a ceiling-mounted panel with a downward arrow pointing to a grid-patterned panel (no text or symbols)4. CONTROLS

A: Motor ON/OFF
B: first speed motor
C: second speed motor
D: third speed motor
E: Intensive speed. This speed is timed to runs for 8 minutes. At the end of this time, the hood turns back automatically to the speed that was set before using this function. To switch off the speed, push key “Motor On/Off” (A).
M: Breeze function. This function can work for a maximum time of 1 hour. At the end of the time, the motor switch off. To deactivate breeze function, touch key “Motor On/Off” (A) or another speed key.
N: Filters alarm indicator/Reset. When the indicator is on, the grease filters must be cleaned (40 hours of operation). When the indicator flashing, the charcoal filters must be replaced (160 hours of operation) and the grease filters must be cleaned. Obviously, if the hood is not a filtering model and does not have a charcoal filters, clean only the grease filters. The filter alarm can be seen for about 30 seconds, when the hood is in Stand By. To RESET the hour counter, press for 3 seconds the indicator, when the hood is in off state.
O: H2H indicator. The indicator is on when the hood is working controlled by the hob. In case of no connection between hob&hood, the indicator is not backlighted.
L: Light ON/OFF
5. INSTALLATION METHODS
FILTERING OR DUCTING VERSION ?
The hood may be in filtering or in ducting version. Decide from the outset which type is to be installed.
For better efficiency, we recommend installing the hood in the ducting version (if possible).

Ducting version
The hood purifies the air and evacuates it to the outside through an exhaust duct.

Filtering version
The hood purifies the air and recycles the clean air back into the room.
6. LIGHTING
If the light spot is damaged, it must be replaced only by the manufacturer, its service agent or similarly qualified persons in order to avoid a hazard.
7. ENVIRONMENTAL CONCERNS
Recycle materials with the symbol 📁.
Put the packaging in relevant containers to recycle it. Help protect the environment and human health by recycling waste of electrical and electronic appliances. Do not dispose of
appliances marked with the symbol with the household waste.

Return the product to your local recycling facility or contact your municipal office.
INHALT
natural_image
Hand holding a device with a downward arrow indicating compression or disassembly (no text or symbols)natural_image
Diagram showing a ceiling-mounted panel with a downward arrow pointing to a grid-patterned panel (no text or symbols)4. BEDIENELEMENTE

A: Motor Ein/Aus
natural_image
Hand holding a tool with a downward arrow indicating compression or disassembly (no text or symbols)natural_image
Diagram showing a solar panel installation with an arrow pointing to it, no text or symbols present.4. COMMANDES

natural_image
Hand holding a small electronic component with a downward arrow indicating compression or disassembly (no text or symbols)natural_image
Diagram showing a ceiling-mounted panel with a downward arrow pointing to a grid-patterned panel (no text or symbols present)4. BEDIENINGEN
AFVOER OF RECIRCULATIE?
natural_image
Hand holding a device with a downward arrow indicating compression or disassembly (no text or symbols)natural_image
Diagram showing a ceiling-mounted panel with a downward arrow pointing to a grid-patterned panel (no text or symbols present)4. MANDOS
natural_image
Hand holding a small electronic component with a downward arrow indicating force or direction (no text or symbols)natural_image
Diagram showing a solar panel installation with a downward arrow indicating direction (no text or symbols present)4. COMANDOS

natural_image
Hand holding a small electronic component with a downward arrow indicating compression (no text or symbols)natural_image
Diagram showing a ceiling-mounted panel with a downward arrow pointing to a grid-patterned panel (no text or symbols present)4. COMANDI
natural_image
Hand holding a tool with a downward arrow indicating compression or disassembly (no text or symbols)natural_image
Diagram showing a solar panel installation with an arrow pointing to it, no text or symbols present4. KOMMANDON

A: Motor På/Av
KUNDESERVICE OG VEDLIKEHOLD
Vi anbefaler kun bruk av originale reservedeler.
Sørg for å ha følgende opplysninger for hånden när du kontakter det autoriserte servicesenteret: Modell, Produktkode (PNC), Serienummer.
natural_image
Hand holding a tool with a downward arrow indicating compression or disassembly (no text or symbols)natural_image
Diagram showing a ceiling-mounted panel with a downward arrow pointing to a grid-patterned panel (no text or symbols present)4. KONTROLLER
A: motor Av/ På
natural_image
Hand holding a tool with a black arrow indicating direction (no text or symbols)natural_image
Diagram of a solar panel installation with a downward arrow indicating material flow (no text or symbols)4. OHJAIMET
A: Moottori ON/OFF
natural_image
Hand holding a small electronic component with a downward arrow indicating compression (no text or symbols)natural_image
Diagram showing a ceiling-mounted panel with a downward arrow pointing to a solar panel (no text or symbols present)4. BETJENING

natural_image
Hand holding a tool with a downward arrow indicating compression or disassembly (no text or symbols)Угольный фильтр.
natural_image
Diagram showing a solar panel installation with an arrow pointing to a grid-patterned panel (no text or symbols present)natural_image
Hand holding a small electronic component with an arrow indicating direction (no text or symbols)natural_image
Diagram showing a ceiling-mounted panel with a downward arrow pointing to a grid-patterned panel (no text or symbols present)4. JUHIKUD
A: Mootor SISSE / VÄLJA
BRĪDINĀJUMS! Ugunsgrēka un as trieciena risks.
natural_image
Hand holding a tool with a downward arrow indicating compression or disassembly (no text or symbols present)natural_image
Diagram showing a ceiling-mounted panel with a downward arrow pointing to a grid-patterned surface (no text or symbols)4. VADĪBAS ELEMENTI

A: Motors ON/OFF
FILTRĒJOŠAIS VAI UZSŪCOŠAIS VEIDS?
natural_image
Hand holding a tool with a downward arrow indicating compression or disassembly (no text or symbols)natural_image
Diagram showing a ceiling-mounted panel with a downward arrow pointing to a solar panel (no text or symbols present)4. VALDYMAS

natural_image
Hand holding a tool with a downward arrow indicating compression or disassembly (no text or symbols)natural_image
Diagram showing a ceiling-mounted panel with a downward arrow pointing to a grid-patterned panel (no text or symbols present)natural_image
Hand holding a tool with an arrow indicating direction (no text or symbols)natural_image
Diagram showing a solar panel installation with a downward arrow indicating direction (no text or symbols present)4. KEZELŐSZERVEK
natural_image
Hand holding a tool with a downward arrow indicating compression or disassembly (no text or symbols)natural_image
Diagram showing a ceiling-mounted panel with a downward arrow pointing to a grid-patterned panel (no text or symbols)4. PŘÍKAZY

natural_image
Hand holding a small electronic component with an arrow indicating direction (no text or symbols)natural_image
Diagram showing a ceiling-mounted panel with a downward arrow pointing to a grid-patterned panel (no text or symbols)4. OVLÁDAČE
A: Zapnutie/vypnutie motora
natural_image
Hand holding a small electronic component with an arrow indicating direction (no text or symbols)natural_image
Diagram showing a ceiling-mounted panel with a downward arrow pointing to a solar panel (no text or symbols present)4. COMENZI

A: Motor pornit / oprit
natural_image
Hand holding a tool with a downward arrow indicating compression or disassembly (no text or symbols)natural_image
Diagram showing a ceiling-mounted panel with a downward arrow pointing to a solar panel (no text or symbols present)4. STEROWANIE

natural_image
Hand holding a tool with a downward arrow indicating compression or disassembly (no text or symbols)natural_image
Diagram of a ceiling-mounted solar panel with a downward arrow pointing to a grid-patterned panel (no text or symbols)4. NAREDBI

A: Motor Uključi/Isključi
B: motor u prvoj brzini
C: motor u drugoj brzini
D: motor u trećoj brzini
E: Velika brzina Ova brzina je programirana u 8-minutnim ciklusima. Nakon isteka ovog vremena napa će se automatski vratiti u brzinu koja je bila podešena prije uporabe ove
funkcije. Za isključivanje ove brzine pritisnite tipku „Motor Uključi/Isključi“ (A).
M: Funkcija puhanja. Pomoću ove funkcije motor se vrti vrlo malom brzinom, u trajanju od manje od sat vremena. Nakon isteka ovog vremena motor će se isključiti. Za uključivanje funkcije puhanja pritisnite tipku „Motor Uključi/Isključi“ (A) ili neku drugu tipku za podešavanje brzine.
N: Alarmni indikator filtera/reset. Ako je indikator upaljen, filteri se moraju očistiti (nakon 40 sati rada). Ako indikator pulsira, potrebno je zamijeniti ugljene filtere (nakon 160 sati rada) i očistiti filtere za mast. Naravno, ako napa nema funkciju filtriranja i nema ugljene filtere, onda je potrebno očistiti samo filtere za mast. Alarm filtera se vidi otprilike 30 sekundi dok je napa u modu Stand by (u pripravnosti). Za RESETIRANJE brojača sati pritisnite indikator i držite ga 3 sekunde dok je napa uključena. O: Indikator H2H. Ovaj indikator se pali kad radom nape upravlja ploča za kuhanje. Ako ploča za kuhanje nije spojena s napom, indikator nije osvijetljen.
natural_image
Hand holding a tool with a downward arrow indicating compression or disassembly (no text or symbols)natural_image
Diagram showing a ceiling-mounted panel with a downward arrow pointing to a small solar panel (no text or symbols present)4. UPRAVLJALNI GUMBI

A: motor: Vklop/Izklop
natural_image
Hand holding a small electronic device with a black arrow indicating force or direction (no text or symbols)natural_image
Diagram showing a ceiling-mounted panel with a downward arrow pointing to a solar panel (no text or symbols present)4. XEIPISTHPIA

natural_image
Hand holding a small electronic component with a downward arrow indicating compression (no text or symbols)natural_image
Diagram showing a ceiling-mounted panel with a downward arrow pointing to a grid-patterned panel (no text or symbols present)4. KONTROLLER
natural_image
Hand holding a tool with a downward arrow indicating compression or disassembly (no text or symbols)natural_image
Diagram showing a solar panel installation with an arrow pointing to a grid component (no text or symbols present)4. УПРАВЛЕНИЯ
natural_image
Hand holding a tool with a downward arrow indicating compression or disassembly (no text or symbols)natural_image
Diagram showing a ceiling-mounted panel with a downward arrow pointing to a grid-patterned panel (no text or symbols present)natural_image
Hand holding a tool with a downward arrow indicating compression or disassembly (no text or symbols)natural_image
Diagram showing a ceiling-mounted panel with a downward arrow pointing to a grid-patterned panel (no text or symbols present)4. КОНТРОЛИ
natural_image
Hand holding a tool with a downward arrow indicating compression or disassembly (no text or symbols)natural_image
Diagram showing a ceiling-mounted panel with a downward arrow pointing to a grid-patterned panel (no text or symbols present)4. KOMANDIMET

A: Motori Ndez/Mbyll
natural_image
Hand holding a small electronic component with a downward arrow indicating compression (no text or symbols)natural_image
Diagram showing a ceiling-mounted panel with a downward arrow pointing to a grid-patterned panel (no text or symbols present)4. КОМАНДЕ
A: Motor Uključi/Isključi
B: motor u prvoj brzini
C: motor u drugoj brzini
natural_image
Hand holding a small electronic component with a downward arrow indicating force or direction (no text or symbols)natural_image
Diagram showing a solar panel installation with an arrow pointing to a grid-patterned panel (no text or symbols present)استعمال 3.2
natural_image
Hand holding a small object with a downward arrow, no text or symbols visiblenatural_image
Diagram showing a ceiling-mounted panel with a downward arrow pointing to a grid array (no text or symbols present)4. VÂN HÀNH THIẾT BỊ
