USER MANUAL M300 MIO
PLEASE READ CAREFULLY BEFORE INSTALLING PRODUCT IN VEHICLE
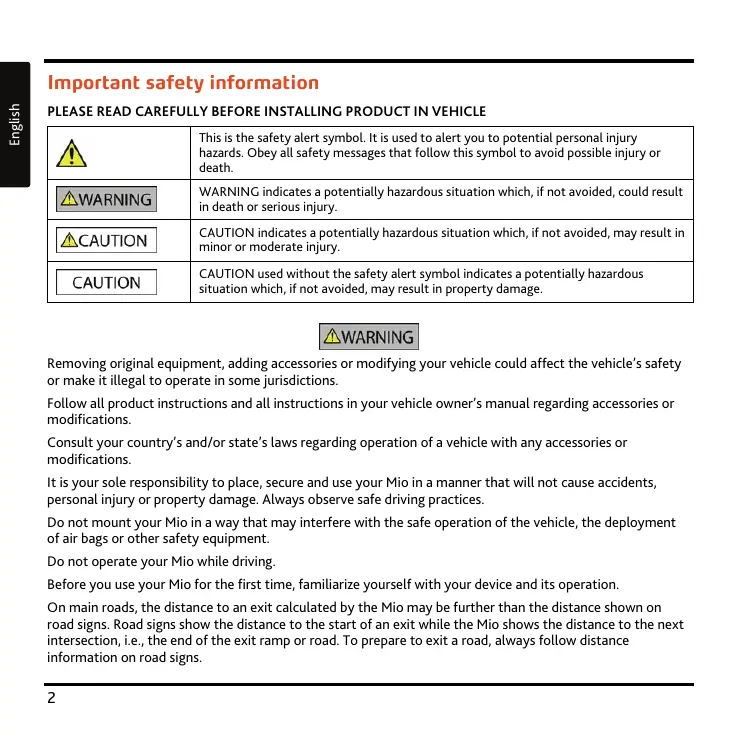
 | This is the safety alert symbol. It is used to alert you to potential personal injury hazards. Obey all safety messages that follow this symbol to avoid possible injury or death. |
 | WARNING indicates a potentially hazardous situation which, if not avoided, could result in death or serious injury. |
 | CAUTION indicates a potentially hazardous situation which, if not avoided, may result in minor or moderate injury. |
 | CAUTION used without the safety alert symbol indicates a potentially hazardous situation which, if not avoided, may result in property damage. |
WARNING
Removing original equipment, adding accessories or modifying your vehicle could affect the vehicle's safety or make it illegal to operate in some jurisdictions.
Follow all product instructions and all instructions in your vehicle owner's manual regarding accessories or modifications.
Consult your country's and/or state's laws regarding operation of a vehicle with any accessories or modifications.
It is your sole responsibility to place, secure and use your Mio in a manner that will not cause accidents, personal injury or property damage. Always observe safe driving practices.
Do not mount your Mio in a way that may interfere with the safe operation of the vehicle, the deployment of air bags or other safety equipment.
Do not operate your Mio while driving.
Before you use your Mio for the first time, familiarize yourself with your device and its operation.
On main roads, the distance to an exit calculated by the Mio may be further than the distance shown on road signs. Road signs show the distance to the start of an exit while the Mio shows the distance to the next intersection, i.e., the end of the exit ramp or road. To prepare to exit a road, always follow distance information on road signs.
The use of information regarding safety or speed camera locations may be subject to local laws in the country of use. You are responsible for checking that you can legally use the information in your country or in the country where the information will be used.
CAUTION
Do not handle the Mio while it is hot. Let the product cool, out of direct sunlight.
CAUTION
Do not expose the Mio to direct sunlight in an unattended vehicle for prolonged periods. Overheating may damage the unit.
Note: To discourage theft, do not leave the Mio, mounting bracket or any cables in plain view in an unattended vehicle.
WARNING
To charge your Mio from the mains power, use the home charger supplied by Mio as an accessory (may be sold separately). Using other home chargers with your Mio could result in serious injury or property damage.
Never use the charger if the plug or cord is damaged.
Do not expose the charger to moisture or water. Do not use the charger in a high moisture environment. Exposure to water may cause electrical sparks or fires.
Never touch the charger when your hands or feet are wet.
Allow adequate ventilation around the charger when using it to operate your Mio or charge the Mio internal battery. Do not cover the charger with paper or other objects that will reduce ventilation. Do not use the charger while it is inside a carrying case or other container.
Ensure that the charger is connected to a power source with the correct fitting and voltage requirements. The voltage requirements can be found on the home charger casing and/or packaging.
Do not attempt to service the charger as this could result in personal injury. Replace the charger if it is damaged or exposed to excess moisture.
WARNING
The Mio contains a non-replaceable internal lithium-ion polymer battery. The battery may burst or explode if mishandled, releasing hazardous chemicals. To reduce the risk of fire or burns, do not disassemble, crush or puncture the battery.
Recycle or dispose of the battery safely and properly according to local laws and regulations. Do not dispose of the battery in fire or water.
CAUTION
Only use the correct home charger (sold separately) or in-car charger supplied by Mio to charge the Mio internal battery. Only use the Mio internal battery with the Mio unit.
The Mio battery will stop charging when the ambient temperature is less than 0^ C ( 32^ F) or more than 40^ C ( 104^ F).
Failure to adhere to these warnings and cautions may lead to death, serious injury or property damage. Mio disclaims all liability for installation or use of the Mio that causes or contributes to death, injury or property damage or that violates any law.
Warning Notice to Drivers in the United States
State law may prohibit drivers in states such as Arizona, California and Minnesota from mounting objects on their windshields while driving. Please make sure you research and follow your most current State laws. An alternative mounting option is provided in the box with your product, also, stores offer additional mounting alternatives. Mio does not take any responsibility for any fines, penalties, or damages that may be incurred as a result of disregarding this notice.
Caring for your Mio
Taking good care of your Mio will ensure trouble-free operation and reduce the risk of damage to your Mio.
- Keep your Mio away from excessive moisture and extreme temperatures.
■ Avoid exposing your Mio to direct sunlight or strong ultraviolet light for extended periods of time.
■ Do not place anything on top of your Mio or drop objects on your Mio.
■ Do not drop your Mio or subject it to severe shock.
- Do not subject your Mio to sudden and severe temperature changes. This could cause moisture condensation inside the unit, which could damage your Mio. In the event of moisture condensation, allow the Mio to dry out completely before use.
- The screen surface can easily be scratched. Avoid touching it with sharp objects. Non-adhesive generic screen protectors designed specifically for use on portable devices with LCD panels may be used to help protect the screen from minor scratches.
■ Never clean your Mio with it powered on. Use a soft, lint-free cloth to wipe the screen and the exterior of your Mio.
■ Do not use paper towels to clean the screen.
- Never attempt to disassemble, repair or make any modifications to your Mio. Disassembly, modification or any attempt at repair could cause damage to your Mio and even bodily injury or property damage and will void any warranty.
■ Do not store or carry flammable liquids, gases or explosive materials in the same compartment as your Mio, its parts or accessories.
Contents
Important safety information....2
Home Charger-specific safety information ....3
Internal battery-specific safety information 4
Warning Notice to Drivers in the United States....4
Caring for your Mio....5
How do I install my Mio? 7
Moov M300-Series Installation....7
Moov M400-Series Installation 8
Getting to know your Mio 9
Moov M300-Series....9
Moov M400-Series....10
Turning on and off 11
Shutdown and hardware reset 11
Charging the battery via the USB cable....11
Navigating on the screen....13
Settings....14
Volume....14
Brightness....15
Language....15
Calibration....16
Reference 17
Troubleshooting....17
Compliance 17
Copyright....19
For more information....19
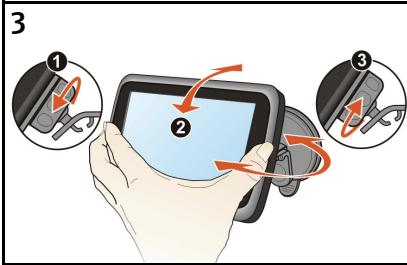
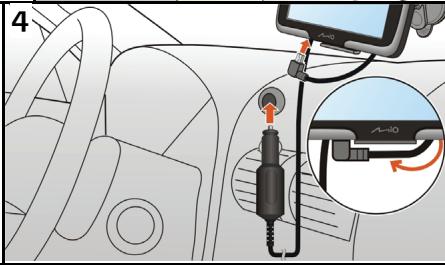
How do I install my Mio?
CAUTION:
- Select an appropriate location for mounting the Mio in a vehicle. Never place the Mio where the driver's field of vision is blocked.
- If the car's windscreen is tinted with a reflective coating, it may be athermic and impact the GPS reception. In this instance, please mount your Mio where there is a “clear area.”
- To protect your Mio against sudden surges in current, connect the car charger only after the car engine has been started.
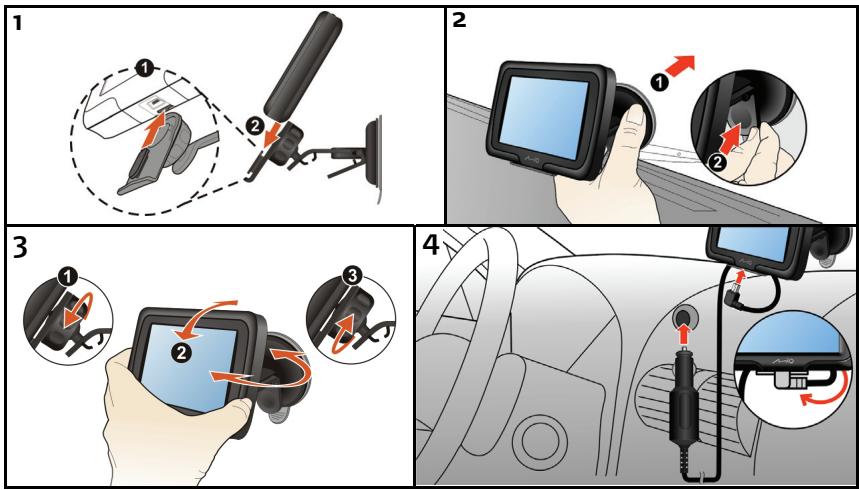
Moov M300-Series Installation
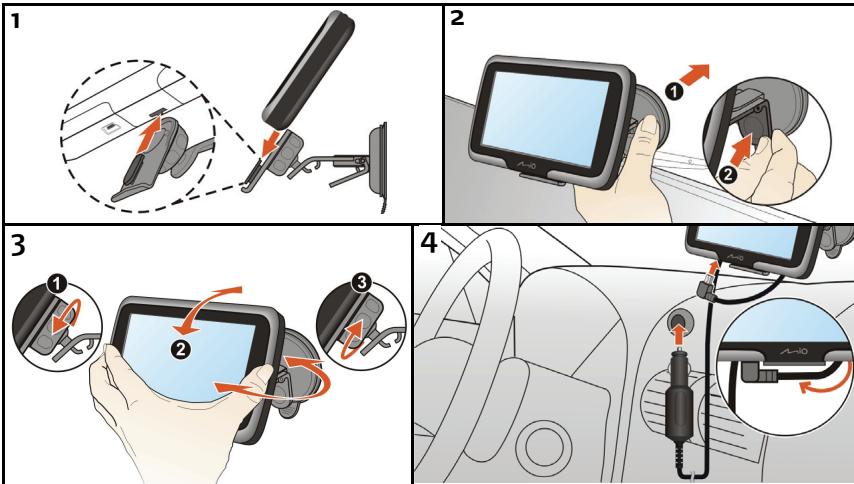
Moov M400-Series Installation
Getting to know your Mio
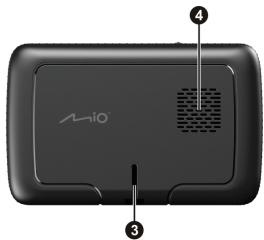
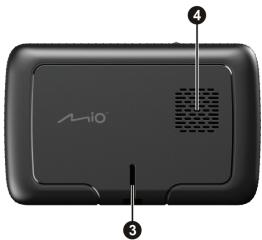
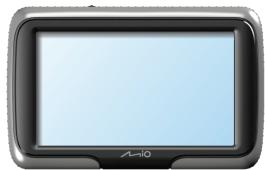
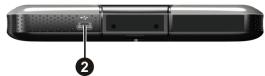
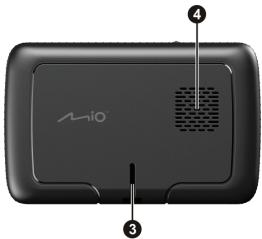
Moov M300-Series
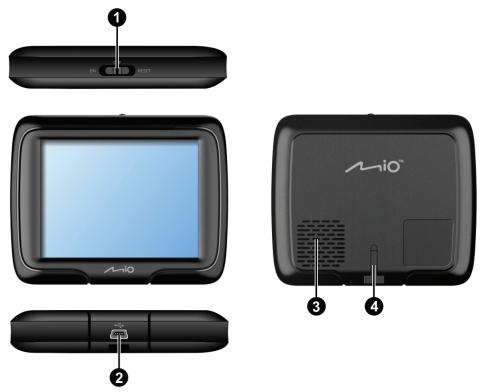
1 Power Switch
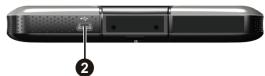
② Socket for in-car charger, USB cable, home charger (not supplied) and TMC accessory kit (not supplied)
③ Speaker
4 Cradle Socket
Moov M400-Series

natural_image
Three views of an A-l10 smartphone display showing front, top, and side (no text or symbols visible)
1 Power Switch
② Socket for in-car charger, USB cable, home charger (not supplied) and TMC accessory kit (not supplied)
③ Cradle Socket
4 Speaker
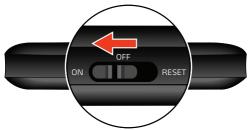
Turning on and off
For normal operation, turn off your Mio by sliding the power switch to the OFF position. Your Mio enters a suspended state. To use it again, slide the power switch to the ON position. Your Mio will be back to where you left off.
Moov M300-Series
Moov M400-Series
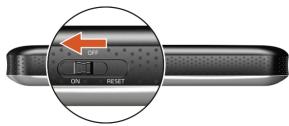
Shutdown and hardware reset
Occasionally, you may need to perform a hardware reset when your Mio stops responding; or appears to be "frozen" or "locked-up."
You can perform a hardware reset by shutting down your Mio and then turning it back on. To shut down your Mio, slide the power switch to the RESET position. To turn on your Mio after shutting it down, slide the power switch to the ON position.
Note: Switching to the Reset position turns the battery off. It is recommended you move the switch to this position if you are planning to store your Mio for any length of time.
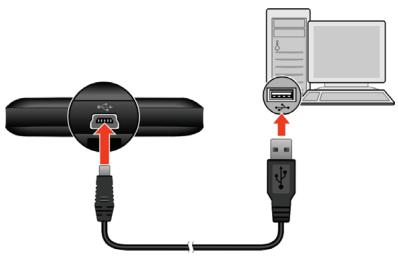
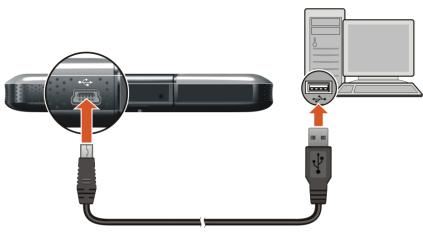
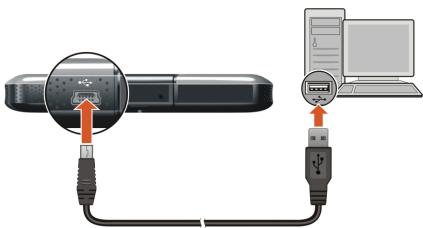
Charging the battery via the USB cable
If you intend to charge your Mio in this way, turn off your Mio so that it takes less time to charge the battery.
- Turn on the computer.
- Connect the mini-USB end of the USB cable to the bottom of your Mio and the other end to a USB port on your computer.
Note: If your Mio is on when connected to a computer, a screen appears to prevent you from using your Mio.
Note: When the Mio is connected to a computer, it is recognized as an external mass storage device. Do not delete any files pre-installed in the Mio. Deleting files of which the function is unknown can cause programs or features to malfunction.
Moov M300-Series
Moov M400-Series
CAUTION: For optimal performance of the lithium battery:
- Do not charge the battery where the temperature is high (e.g. in direct sunlight).
- There is no need to fully discharge the battery before charging. You can charge the battery before it is discharged.
- When storing the product for a long period of time, be sure to fully charge the battery at least once every two weeks. Over discharge of the battery can affect the charging performance.
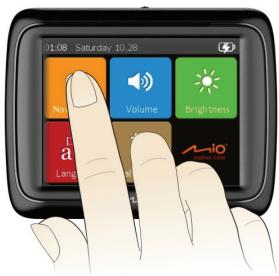
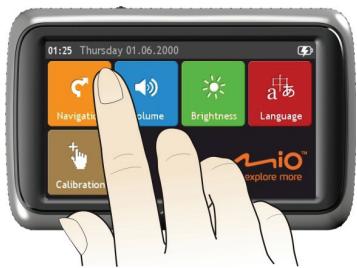
Navigating on the screen
To operate your Mio, touch the screen with your fingertip. You can perform the following actions:
Moov M300-Series
Moov M400-Series
- Tap
Touch the screen once with your fingertip to open items or select onscreen buttons or options.
- Drag
Hold your fingertip on the screen and drag up/down/left/right or across the screen. (This is not supported by all applications.)
- Tap and hold
Tap and hold your fingertip until an action is complete, or a result or menu is shown. (This is not supported by all applications.)
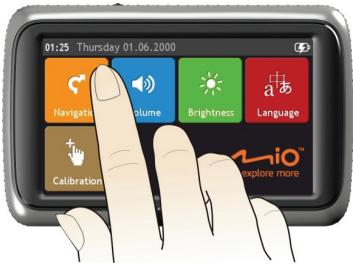
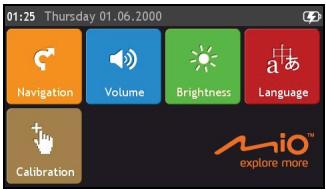
Settings
You can tap Volume, Brightness, Language or Calibration button on the Main Menu to customize the system settings.
Volume

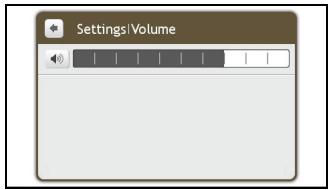
Complete the following:
| If you want to ... | Then... |
| increase or decrease the volume | Tap to move the Volume slider towards right to increase screen brightness.Tap to move the Volume slider towards left to decrease screen brightness. |
Brightness

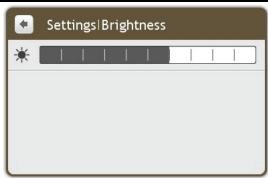
Complete the following:
| If you want to ... | Then... |
| change the screen brightness | Tap to move theScreen Brightnessslider towards right to increase screen brightness.Tap to move theScreen Brightnessslider towards left to decrease screen brightness. |
Language

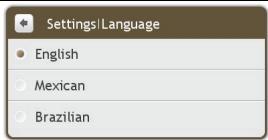
Complete the following:
| If you want to ... | Then... |
| change the on-screen language | Tap your preferred language. |
Calibration
Tap

Press and briefly hold on the center of the target. Repeat as the target moves around the screen.

Complete the following:
| If you want to ... | Then... |
| calibrate the touch screen | Tap and hold the centre of the target. Repeat as the target moves around the screen to complete the calibration. |
Reference
Troubleshooting
Note: If you encounter a problem you cannot solve, contact an authorised service center for assistance.
| Problems | Solutions |
| Power does not turn on when using battery power. | The remaining battery power may be too low to run your Mio. Charge the battery. |
| Screen responds slowly. | Make sure that your Mio is not running out of battery power. If the problem still persists, reset your Mio. |
| Screen freezes. | Reset your Mio. (See “Shutdown and hardware reset” for information.) |
| Screen is hard to read. | Make sure that the backlight of the display is set to a high-enough brightness. |
| Cannot establish a connection with a computer. | Make sure that your Mio and your computer are both turned on before trying to establish a connection.Make sure that the cable is securely plugged into the USB port on your computer and on the Mio. Connect the USB cable directly to your computer—do not run the cable through a USB hub.Reset your Mio before connecting the cable. Always disconnect your Mio before you restart your computer. |
Compliance
Note: Moov M300-Series is assigned a model number of N254 and Moov M400-Series is assigned a model name of N255.
CE
Products with the CE marking comply with Radio & Telecommunication Terminal Equipment Directive (R&TTE) (1999/5/EC), the Electromagnetic Compatibility Directive (2004/108/EC) and the Low Voltage Directive (2006/95/EC) - issued by the Commission of the European Community.
Compliance with these directives implies conformity to the following European Standards:
EN 301 489-1: Electronic compatibility and Radio spectrum Matters (ERM), ElectroMagnetic Compatibility (EMC) standard for radio equipment and services; Part 1: Common technical requirements
EN 55022: Radio disturbance characteristics
EN 55024: Immunity characteristics
EN 61000-3-2: Limits for harmonic current emissions
EN 61000-3-3: Limitation of voltage fluctuation and flicker in low-voltage supply system
IEC 60950-1:2001: Product Safety
The manufacturer cannot be held responsible for modifications made by the User and the consequences thereof, which may alter the conformity of the product with the CE Marking.
Hereby, Mio Technology declares that this N254/255 is in compliance with the essential requirements and other relevant provisions of Directive 1999/5/EC.

Federal Communications Commission (FCC) statement
This equipment has been tested and found to comply with the limits for a Class B digital device pursuant to Part 15 of the FCC Rules. These limits are designed to provide reasonable protection against harmful interference in a residential installation. This equipment generates, uses, and can radiate radio frequency energy and, if not installed and used in accordance with the instructions, may cause harmful interference to radio communications. However, there is no guarantee that interference will not occur in a particular installation. If this equipment does cause harmful interference to radio or television reception, which can be determined by turning the equipment off and on, the user is encouraged to try to correct the interference by one or more of the following measures:
■ Reorient or relocate the receiving antenna.
■ Increase the separation between the equipment and receiver.
■ Connect the equipment into an outlet on a circuit different from that to which the receiver is connected.
■ Consult the dealer or an experienced radio/TV technician for help.
Any changes or modifications not expressly approved by the manufacturer could void the user's authority to operate the equipment.
Copyright
© 2010 MiTAC International Corporation. Mio is either a registered trademark or trademark of MiTAC International Corporation and is used under licence by Mio Technology Limited. All rights reserved.
The software contains proprietary information of MiTAC International Corporation; it is provided under a licence agreement containing restrictions on use and disclosure and is also protected by copyright law. Reverse engineering of the software is prohibited.
No part of this publication may be reproduced, stored in a retrieval system, or transmitted in any form or by any means, electronic, mechanical, photocopying, recording or otherwise, without the prior written permission of Mio.
Microsoft, Windows, Windows Vista and Internet Explorer are either registered trademarks or trademarks of Microsoft Corporation in the United States and/or other countries. All rights reserved.
All other trademarks and registrations are the property of their respective owners.
Online support
For 24/7 help and support with Mio products, join Mio club at: www.mio.com
Mio Club
You can register your Mio with the Mio Club - a section of our website dedicated exclusively to owners of Mio navigation products: www.mio.com
Moov M300/M400
Manual del usuario
natural_image
Illustration of a rectangular electronic device with a labeled button (1) and indicator lights, no text or symbols present.

natural_image
Front view of a rectangular electronic device labeled 'A-l10' with no visible text or symbols on the screen.
natural_image
Close-up of a black electronic device with a labeled port and indicator button (no text or symbols beyond the label)
Moov M300-Series

Moov M400-Series
Moov M300-Series
Moov M400-Series
■ Tocar
Press and briefly hold on the center of the target. Repeat as the target moves around the screen.

natural_image
Close-up of a rectangular electronic device with a labeled component (1) and indicator lights, no readable text or symbols beyond the label.
natural_image
Front view of a rectangular electronic device with a blank screen and 'M-10' branding (no visible text or symbols on the device body)
natural_image
Exterior view of a device rear panel with labeled component (no text or symbols beyond label)
Moov M300-Series
natural_image
Diagram showing connection between a USB cable and a computer via USB port (no text or symbols present)
Moov M400-Series
Moov M400-Series
Clique
Press and briefly hold on the center of the target. Repeat as the target moves around the screen.