USER MANUAL FENNEL F6 GEO
Precision by tradition.
Inhaltsverzeichnis
Thank you for your confidence in us, having purchased a geo-Fennel instrument.
For the optimum performance of the instrument, please read this manual carefully and keep it in a convenient place for future reference. This manual contains important safety information that should be read and understood before use.
Technical specification and design are subject to chance without notification.
geo-FENNEL
Precision by tradition.
Contents
- Supplied with
- Power supply
- Features
- Operation
- Safety notes
A
B
C
D
E
A
SUPPLIED WITH
Two-way Radio F6 (PMR 446)
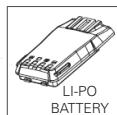
Li-Po rechargeable battery
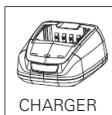
- Charger
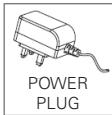
Power plug
Antenna
- Belt clip
Hand strip
User manual



Technische Daten
| RF output power | 0.5 W |
| Frequency range | 446.000 - 446.100 Mhz |
| Frequency stability | ± 5 ppm |
| Channels | 16 |
| Audio output | 1 W |
| Rechargeable battery | 12V Li-Po, 1300 mAh |
| Charging time | 3.5 h |
| Working time (per battery charge) | 12 h |
| 30 h (in battery save mode) |
| Weight | 225 g |
| Dimensions | 59 x 127 x 38 cm |
| Temperature range | -25°C - + 55°C |
| Dust / water protection | IP 54 |
| Shock / vibration | MIL STD 810 C/D/E & TIA/EIA 603 |
| Working ranges | |
| · outside, open terrain | 5 km |
| · outside, area between buildings | 3 km |
CHARACTERISTICS
Clear audio quality
Automatic squelch
Time-out timer (TOT): the transmission stops automatically after 60 sec.
Monitoring function
Housing made of die-cast and high-resistant plastic
- Powerful lithium-polymer rechargeable battery
Battery saver mode
- Channel annunciation in English language
An LED shows receipt, transmission and the battery status
European wide licence and toll free service
PC programmable (optional):
Frequency, functions and settings can be set by the optional programming software.
B POWER SUPPLY
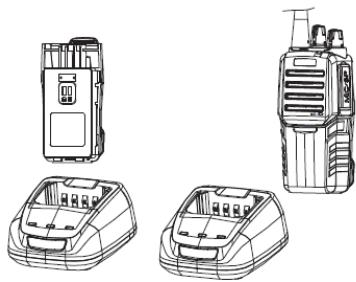
Connect the power plug with the charger and the socket.
Place the rechargeable battery only or the entire unit into the charger. Take care that the battery is connected correctly to the charger.
The red LED at the unit shows the start of the charging process. After approx. 3 to 4 hours the red LED stops flashing and the green LED begins to flash. Now the charging process is completed and the battery / unit can be taken off the charger.
The battery has not been fully charged from the factory. Before first use the battery must be fully charged. If necessary repeat the charging process several times.
In normal use do not recharge the battery if it has been fully charged or if the unit is not in low battery alarm state.
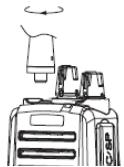
MOUNT THE ANTENNA
Screw the antenna with its base into the corresponding adapter.
Take care that the antenna is well fixed.
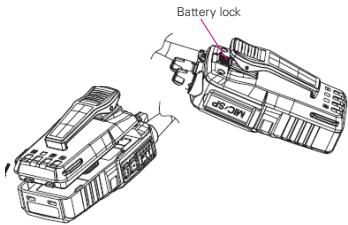
To remove the battery push the battery lock upwards and pull the battery out.
To install the battery match the two pins at the bottom of the battery with the corresponding slots at the bottom of the unit and press the top of the battery towards the unit until you hear a "click".
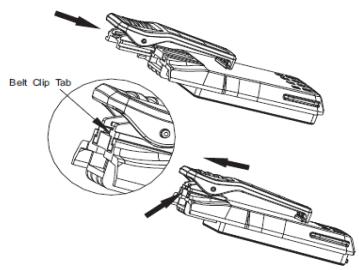
MOUNT THE BELT CLIP
Align the grooves of the belt clip with those of the rear of the battery and press until you hear a "click".
To remove the clip use a screw driver and press the clip lock away from the battery and slide the clip upwards.
FEATURES
C
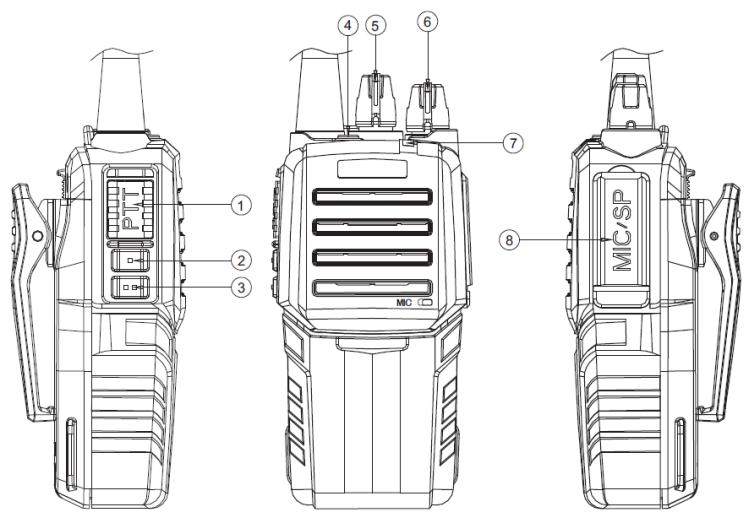
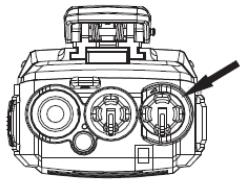
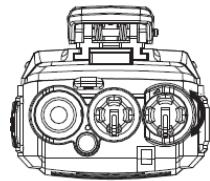
- Push-to-talk knob (PTT)
- Channel annunciation / battery status annunciation
- Monitoring function / squelch level
- Emergency button
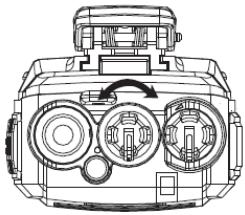
- Channel selection knob
- ON/OFF and VOLUME knob
- LED indication
- Ports for the optional programming kit

OPERATION
POWER ON THE UNIT (6)
Turn the ON/OFF knob clockwise until the "click" to power on the unit.
A beep will sound for confirmation and the channel that has been used last is annunciated.
Turn the ON/OFF knob counter-clockwise until the "click" to power off the unit.
VOLUME ADJUSTMENT (6)
When the unit is powered on turn the ON/OFF knob to adjust the volume.
CHANNEL SELECTION (5)
Select a channel from 1 to 16 with the channel selection knob. The selected channel is Annunciated in English language.
MAKE A CALL
To make a call press and hold the PTT button and speak into the microphone with normal voice.
Keep your mouth about 3 to 8 cm away from the microphone.
TIME-OUT-TIMER FUNCTION
When the PTT button has been used continuously for longer than 60 sec. a warning beep will sound and the transmission will be stopped automatically. Release the PTT button and press it again to continue the transmission.
This function prevents the user from blocking channels for too long.
RECEIVE A CALL
Adjust the volume as requested. Release the PTT button to receive a call.
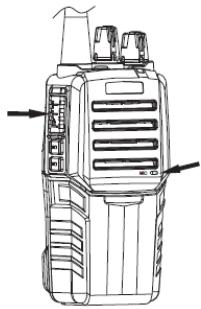
CHANNEL ANNUNCIATION / BATTERY STATUS ANNUNCIATION (2) (button on top)
Press the button briefly
- -> Channel annunciation from 1 to 16 in English language
Press and hold the button
- -> Battery status annunciation from 1 to 4 (4 = fully charged)
MONITORING FUNCTION / SQUELCH LEVEL (3)
(bottom button)
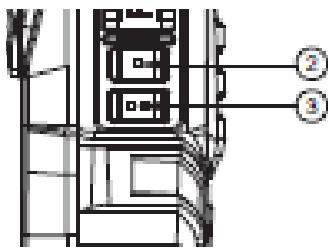
Press the button briefly
Monitor function
For monitoring the transmission and weak signals on the channel open the squelch:
- Avoids making calls on a channel that is already used by others.
- The volume can be adjusted without the necessity of waiting for incoming calls.
- To avoid interruptions when receiving calls with a weak signal.
Release the button to re-activate the automatic squelch function.
Press and hold the button
Annunciation of the squelch level from 1 to 9
EMERGENCY BUTTON (4)
Press and hold the button to activate a warning tone signaling a danger.
Release the button to quit the emergency mode.
Whilst the use of the emergency button all other functions are disabled!
LED INDICATION (7)
The red LED indicates that a call is being made.
The green LED indicates that a call is being received.
The blinking red LED indicates that the battery power is low.
PORTS FOR THE OPTIONAL PROGRAMMING KIT (8)
To connect the programming kit open the cover of the ports.
E SAFTETY NOTES
INTENDED USE OF INSTRUMENT
PMR two-way radio for sending and receiving calls over a distance of up to 5 km.
CARE AND CLEANING
Handle electronic instruments with care. Clean with a soft cloth only after any use. If necessary damp the cloth with some water.
SPECIFIC REASONS FOR ERRONEOUS MEASURING RESULTS
Measurements through glass or plastic windows; dirty laser emitting windows; after the instrument has been dropped or hit. Please check the accuracy.
Large fluctuation of temperature: If the instrument will be used in cold areas after it has been stored in warm areas (or the other way round) please wait some minutes before carrying out measurements.
ELECTROMAGNETIC ACCEPTABILITY (EMC)
It cannot be completely excluded that this instrument will disturb other instruments (e.g. navigation systems); will be disturbed by other instruments (e.g. intensive electromagnetic radiation nearby industrial facilities or radio transmitters).
This instrument has the CE mark according to EN 60950-1 + A11 + A1, EN 301 489-1 / -5, EN 300 296-1 / -2, EN 300 086-1 / -5.
WARRANTY
This product is warranted by the manufacturer to the original purchaser to be free from defects in material and workmanship under normal use for a period of two (2) years from the date of purchase. During the warranty period, and upon proof of purchase, the product will be repaired or replaced (with the same or similar model at manufacturers option), without charge for either parts or labour. In case of a defect please contact the dealer where you originally purchased this product. The warranty will not apply to this product if it has been misused, abused or altered. Without limiting the foregoing, leakage of the battery, bending or dropping the unit are presumed to be defects resulting from misuse or abuse.
EXCEPTIONS FROM RESPONSIBILITY
- The user of this product is expected to follow the instructions given in the user manual. Although all instruments left our warehouse in perfect condition and adjustment the user is expected to carry out periodic checks of the product's accuracy and general performance.
- The manufacturer, or its representatives, assumes no responsibility of results of a faulty or intentional usage or misuse including any direct, indirect, consequential damage, and loss of profits.
- The manufacturer, or its representatives, assumes no responsibility for consequential damage, and loss of profits by any disaster (earthquake, storm, flood etc.), fire, accident, or an act of a third party and/or a usage in other than usual conditions.
- The manufacturer, or its representatives, assumes no responsibility for any damage, and loss of profits due to a change of data, loss of data and interruption of business etc., caused by using the product or an unusable product.
- The manufacturer, or its representatives, assumes no responsibility for any damage, and loss of profits caused by usage other than explained in the user manual.
- The manufacturer, or its representatives, assumes no responsibility for damage caused by wrong movement or action due to connecting with other products.
SAFETY INSTRUCTIONS
- Follow up the instructions given in the user manual.
- Carefully read the manual before use of the instrument.
- Do not open the instrument housing. Repairs should be carried out by authorized workshops only. Please contact your local dealer.
- Do not remove warning labels or safety instructions.
- Keep the instrument away from children.
The user manual must always be kept with the instrument.
Do not place the instrument on unstable surfaces and do not use it in extremely humid, wet or dusty conditions.
- Avoid extreme weather conditions such as extreme heat or cold.
- Turn the instrument off while taking on fuel or while parked at service stations.
- Turn the instrument off in explosive environment (inflammable gas, dust, smoke etc.)
- Do not immerse the instrument in water.
Cher client,
Precision by tradition.


