HT-ST5000 - Soundbar SONY - Free user manual and instructions
Find the device manual for free HT-ST5000 SONY in PDF.

| Product type | Soundbar with wireless subwoofer |
| Brand | Sony |
| Model | HT-ST5000 |
| Channel configuration | 7.1.2 (3 front channels, 2 side channels, 2 rear channels, 1 subwoofer, 2 up-firing channels) |
| Total power | 800 W (estimated) |
| Supported audio formats | Dolby Atmos, DTS:X, Dolby TrueHD, DTS-HD Master Audio, LPCM |
| HDMI inputs | 3 inputs (HDMI 1-3) + 1 HDMI ARC output |
| Other inputs | 1 digital optical input, 1 analog input (3.5 mm mini-jack) |
| Wireless connectivity | Bluetooth (NFC), built-in Wi-Fi (via SongPal) |
| Additional features | Night Mode, Voice (dialogue enhancement), sound modes (Movie1/2, Music, Game, Virtual Football), ClearAudio+ |
| Power supply | Soundbar section: 220-240 V AC, 50/60 Hz; subwoofer: 220-240 V AC, 50/60 Hz |
| Power consumption (soundbar) | Approx. 100 W (estimated) |
| Power consumption (subwoofer) | Approx. 40 W (estimated) |
| Dimensions (soundbar W x H x D) | 1200 x 80 x 120 mm (estimated) |
| Dimensions (subwoofer W x H x D) | 250 x 350 x 250 mm (estimated) |
| Weight (soundbar) | Approx. 5.5 kg (estimated) |
| Weight (subwoofer) | Approx. 6.5 kg (estimated) |
| Included accessories | Remote control, AAA batteries, digital optical cable, quick start guide, user manual |
| Maintenance and cleaning | Wipe with a soft dry cloth. Do not use solvents. Unplug before cleaning. |
| Safety | Do not expose to moisture, rain or heat sources. Use on a stable surface. |
| Repairability | Spare parts available from Sony authorized service center. 1-year warranty (parts and labor). |
Frequently Asked Questions - HT-ST5000 SONY
User questions about HT-ST5000 SONY
0 question about this device. Answer the ones you know or ask your own.
Ask a new question about this device
Download the instructions for your Soundbar in PDF format for free! Find your manual HT-ST5000 - SONY and take your electronic device back in hand. On this page are published all the documents necessary for the use of your device. HT-ST5000 by SONY.
USER MANUAL HT-ST5000 SONY
Operating Instructions
US
Mode d'emploi
HT-ST5
Owner's Record
The model and serial numbers are located on the rear of the Bar Speaker. Record the serial numbers in the space provided below. Refer to them whenever you call upon your Sony dealer regarding this product.
Model No. HT-ST5
Serial No.
WARNING
To reduce the risk of fire or electric shock, do not expose this apparatus to rain or moisture.
The unit is not disconnected from the mains as long as it is connected to the AC outlet, even if the unit itself has been turned off.
To reduce the risk of fire, do not cover the ventilation opening of the appliance with newspapers, tablecloths, curtains, etc.
Do not expose the appliance to naked flame sources (for example, lighted candles).
To reduce the risk of fire or electric shock, do not expose this appliance to dripping or splashing, and do not place objects filled with liquids, such as vases, on the appliance.
As the main plug is used to disconnect the unit from the mains, connect the unit to an easily accessible AC outlet. Should you notice an abnormality in the unit, disconnect the main plug from the AC outlet immediately.
Do not install the appliance in a confined space, such as a bookcase or built-in cabinet.
Do not expose batteries or appliances with battery-installed to excessive heat, such as sunshine and fire.
Indoor use only.
For the customers in the U.S.A.

This symbol is intended to alert the user to the presence of uninsulated "dangerous voltage" within the product's enclosure that may be of sufficient magnitude to constitute a risk of electric shock to persons.

This symbol is intended to alert the user to the presence of important operating and maintenance (servicing) instructions in the literature accompanying the appliance.
Important Safety Instructions
1) Read these instructions.
2) Keep these instructions.
3) Heed all warnings.
4) Follow all instructions.
5) Do not use this apparatus near water.
6) Clean only with dry cloth.
7) Do not block any ventilation openings. Install in accordance with the manufacturer's instructions.
8) Do not install near any heat sources such as radiators, heat registers, stoves, or other apparatus (including amplifiers) that produce heat.
9) Do not defeat the safety purpose of the polarized or grounding-type plug. A polarized plug has two blades with one wider than the other. A grounding type plug has two blades and a third grounding prong. The wide blade or the third prong are provided for your safety. If the provided plug does not fit into your outlet, consult an electrician for replacement of the obsolete outlet.
10) Protect the power cord from being walked on or pinched particularly at plugs, convenience receptacles, and the point where they exit from the apparatus.
11) Only use attachments/accessories specified by the manufacturer.
12) Use only with the cart, stand, tripod, bracket, or table specified by the manufacturer, or sold with the apparatus. When a cart is used, use caution when moving the cart/apparatus combination to avoid injury from tip-over.

13) Unplug this apparatus during lightning storms or when unused for long periods of time.
14) Refer all servicing to qualified service personnel. Servicing is required when the apparatus has been damaged in any way, such as power-supply cord or plug is damaged, liquid has been spilled or objects have fallen into the apparatus, the apparatus has been exposed to rain or moisture, does not operate normally, or has been dropped.
The following FCC statement applies only to the version of this model manufactured for sale in the U.S.A. Other versions may not comply with FCC technical regulations.
NOTE:
This equipment has been tested and found to comply with the limits for a Class B digital device, pursuant to Part 15 of the FCC Rules. These limits are designed to provide reasonable protection against harmful
interference in a residential installation. This equipment generates, uses and can radiate radio frequency energy and, if not installed and used in accordance with the instructions, may cause harmful interference to radio communications.
However, there is no guarantee that interference will not occur in a particular installation. If this equipment does cause harmful interference to radio or television reception, which can be determined by turning the equipment off and on, the user is encouraged to try to correct the interference by one or more of the following measures:
- Reorient or relocate the receiving antenna.
- Increase the separation between the equipment and receiver.
- Connect the equipment into an outlet on a circuit different from that to which the receiver is connected.
- Consult the dealer or an experienced radio/TV technician for help.
Properly shielded and grounded cables and connectors must be used for connection to host computers and/or peripherals in order to meet FCC emission limits.
CAUTION
You are cautioned that any changes or modifications not expressly approved in this manual could void your authority to operate this equipment.
This equipment must not be co-located or operated in conjunction with any other antenna or transmitter.
This equipment complies with FCC radiation exposure limits set forth for an uncontrolled environment and meets the FCC radio frequency (RF) Exposure Guidelines. This equipment should be installed and operated keeping the radiator at least 20cm or more away from person's body (excluding extremities: hands, wrists, feet and ankles).
Compliance with FCC requirement 15.407(c)
Data transmission is always initiated by software, which is the passed down through the MAC, through the digital and analog baseband, and finally to the RF chip. Several special packets are initiated by the MAC. These are the only ways the digital baseband portion will turn on the RF transmitter, which it then turns off at the end of the packet. Therefore, the transmitter will be on only while one of the aforementioned packets is being transmitted. In other words, this device automatically discontinue transmission in case of either absence of information to transmit or operational failure.
Frequency Tolerance: ± 20 ppm or less
5.15 - 5.25 GHz band is restricted to indoor operations only.
For the customers in Canada
Properly shielded and grounded cables and connectors must be used for connection to host computers and/or peripherals.
This device complies with Industry Canada licence-exempt RSS standard(s).
Operation is subject to the following two conditions: (1) this device may not cause interference, and (2) this device must accept any interference, including interference that may cause undesired operation of the device.
This equipment complies with IC radiation exposure limits set forth for an uncontrolled environment and meets RSS-102 of the IC radio frequency (RF) Exposure rules. This equipment should be installed and operated keeping the radiator at least 20cm or more away from person's body (excluding extremities: hands, wrists, feet and ankles).
5.15 - 5.25 GHz band is restricted to indoor operations only.
Table of contents
Useful functions
Modifying the angle of the Bar Speaker 6
Mounting the Bar Speaker on a wall 7
Enabling the IR repeater function (when you cannot control the TV) 8
Enabling the Secure Link function 9
Using the Control for HDMI function 11
Using "BRAVIA" Sync features 12
Controlling the system using a smartphone or tablet device (SongPal) 13
Adjusting the settings 15
Miscellaneous
Precautions 18
BLUETOOTH wireless technology 20
Troubleshooting 21
Parts and controls 24
Specifications 27
Refer to the supplied Startup Guide for setup and basic operations.
Useful functions
Modifying the angle of the Bar Speaker
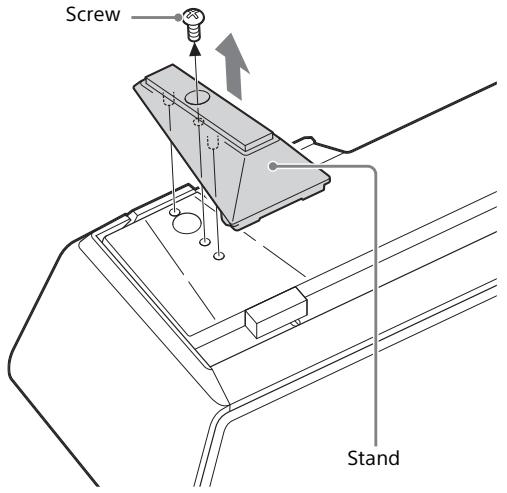
You can modify the angle of the Bar Speaker by detaching the stands on the bottom of the Bar Speaker.
You can detach the stands on the bottom of the Bar Speaker with the following step.
Note
When you mount the Bar Speaker on the wall, detach the stands beforehand.
Tip
When you place the Bar Speaker in a flat position above eye level, detaching the stands will ensure proper sound orientation.
Remove the screws fixing the stands from the bottom of the Bar Speaker.
The stands are attached to both sides of the bottom of the Bar Speaker.
To detach the stands, remove the stand screws with a screwdriver.
Mounting the Bar Speaker on a wall
You can mount the Bar Speaker on a wall.
Notes
- When you mount the Bar Speaker on the wall, detach the stands beforehand (page 6).
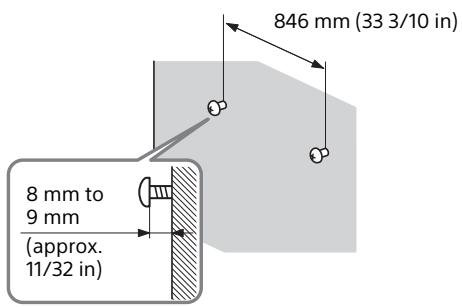
- Prepare screws (not supplied) that are suitable for the wall material and strength. As a plasterboard wall is especially fragile, attach the screws securely to two studs in the wall beam. Install the Bar Speaker horizontally, hung by screws in studs in a continuous flat section of the wall.
- Be sure to subcontract the installation to Sony dealers or licensed contractors and pay special attention to safety during the installation.
- Sony shall not be held responsible for accidents or damage caused by improper installation, insufficient wall strength, improper screw installation or natural calamity, etc.
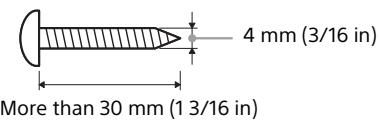
1 Prepare screws (not supplied) that are suitable for the holes on the rear of the Bar Speaker.
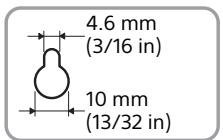
Hole on the rear of the Bar Speaker
2 Fasten the screws to two studs in the wall.
The screws should protrude by 8mm to 9mm (approx. 11/32 in).
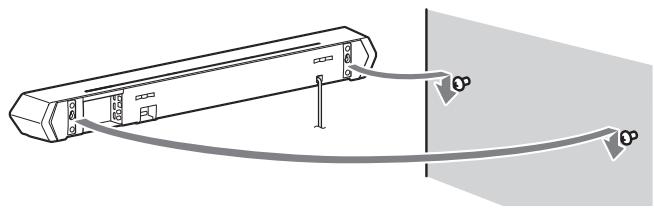
3 Hang the Bar Speaker on the screws.
Align the holes at the rear of the Bar Speaker with the screws, then hang the Bar Speaker on the two screws.
Note
When you use an HDMI IN 3 jack of the wall-mounted Bar Speaker, connect the swivel-type High Speed HDMI cable.
Enabling the IR repeater function (when you cannot control the TV)
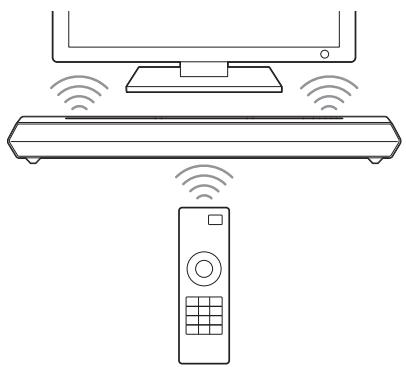
When the Bar Speaker obstructs the remote control sensor of the TV, the TV remote control may not work. In that case, enable the IR repeater function of the system.
You can control the TV with the remote control of the TV by sending the remote signal from the rear of the Bar Speaker.
Note
Be sure to check that the remote control of the TV cannot control the TV, then set "IR REP." to "ON." If it is set to "ON" when the remote control can control the TV, appropriate operation may not be obtained, because of the interference between the direct command from the remote control and the command via the Bar Speaker.
1 Press the MENU button on the remote control of the system.
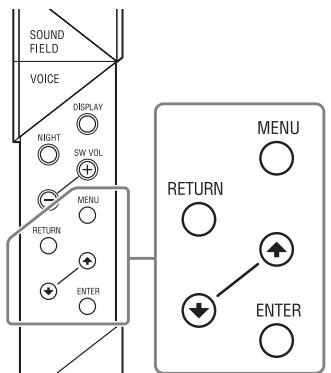
2 Select "SYSTEM" with the (select) buttons then press the ENTER button.
3 Select "IR REP." with the (select) buttons then press the ENTER button.
4 Select "ON" with the (select) buttons then press the ENTER button.
5 Press the MENU button. The menu goes off.
Note
On some TVs, this function may not work correctly. In this case, place the Bar Speaker slightly further away from the TV.
Enabling the Secure Link function
You can specify the wireless connection to be used to link the Bar Speaker to the subwoofer using the Secure Link function. This function is useful when you use multiple wireless products.
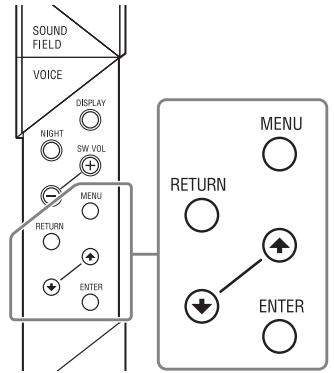
1 Press the MENU button on the remote control.
2 Select "WS" with the (select) buttons then press the ENTER button.
3 Select "SEC. ON" with the (select) buttons then press the ENTER button.
4 When "START" appears, press the ENTER button.
"SEARCH" appears, and the system seeks equipment usable with Secure Link.
Proceed to the next step within 2 minutes.
To quit the Secure Link function during the search for equipment, press the RETURN button.
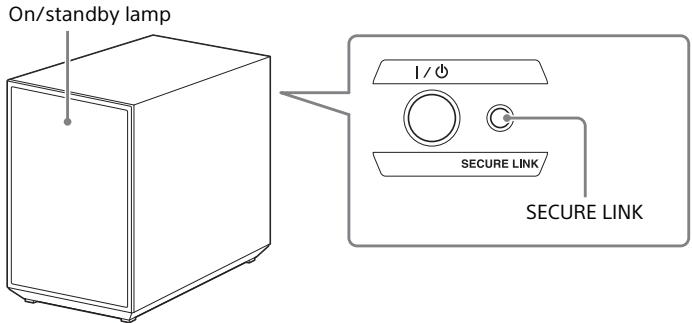
5 Press the SECURE LINK button on the subwoofer with the point of a pen, etc.
The on/standby lamp on the subwoofer lights in yellow, and "OK" appears on the front panel display of the Bar Speaker.
If "FAILED" appears, make sure that the subwoofer is turned on, and perform the process again from step 1.
6 Press the MENU button.
The menu goes off.
Cancelling the Secure Link function
1 Press the MENU button on the remote control.
2 Select "WS" with the (select) buttons then press the ENTER button.
3 Select "SEC.OFF" with the (select) buttons then press the ENTER button.
4 When "OK?" appears, press the ENTER button. "FINISH" appears on the front panel display.
Press the MENU button. The menu goes off.
6 Press and hold the SECURE LINK button on the subwoofer for several seconds until the on/standby lamp on the subwoofer turns green or flashes in green. Be sure to press the SECURE LINK button with the point of a pen, etc.
Using the Control for HDMI function
By using the Control for HDMI function, and connecting equipment that is compatible with the Control for HDMI function via a High Speed HDMI cable, operation is simplified with the features below. The Control for HDMI function is enabled by setting "CTRL (Control for HDMI)" to "ON" (page 16). The default setting is "ON."
System Power Off
When you turn off the TV, the system and the connected equipment will turn off automatically.
System Audio Control
If you turn on the system while you are watching the TV, the TV sound will be output from the speakers of the system automatically. The volume of the system will be adjusted when you adjust the volume using the TV's remote control. If the TV sound was output from the speakers of the system the last time you watched the TV, the system will be turned on automatically when you turn on the TV again.
Audio Return Channel (ARC)
If the TV is compatible with the Audio Return Channel (ARC) technology, a High Speed HDMI cable connection will also allow sending digital audio signals from the TV to the system. You do not need to make a separate audio connection for listening to TV sound from the system. The ARC function is enabled by setting "ARC (Audio return channel)" to "ON" (page 16). The default setting is "ON."
One-Touch Play
When you activate the equipment (Blu-ray Disc^TM player, "PlayStation ^® 4," etc.) connected to the system with a High Speed HDMI cable, the connected TV is turned on automatically and the input signal of the system is switched to the appropriate HDMI input.
Notes
- The above features may not operate with certain equipment.
- Depending on the settings of the connected equipment, the Control for HDMI function may not work correctly. Refer to the operating instructions of the equipment.
Using "BRAVIA" Sync features
The original Sony functions listed below can also be used with products that are compatible with "BRAVIA" Sync.
Power save
If a "BRAVIA" Sync-compatible TV is connected to the system, the power consumption will be reduced in standby mode by stopping HDMI signal transmission when the TV is turned off with the pass-through function* (P. THRU (Pass through)) of the system set to "AUTO" (page 16).
The default setting is "AUTO." If any TV other than "BRAVIA" is connected, set the item to "ON" (page 16).
- The pass-through function for HDMI signals is used to output the signals from the HDMI OUT jack of this system even if it is in standby mode.
Notes on HDMI connections
- Use a High Speed HDMI cable. If you use a Standard HDMI cable, 1080p, Deep Color, 3D, and 4K images may not be displayed properly.
- Use an HDMI-authorized cable.
Use a Sony High Speed HDMI cable with the Cable Type Logo. - We do not recommend using an HDMI-DVI conversion cable.
- Check the setup of the connected equipment if an image is poor or the sound does not come out of the equipment connected via the HDMI cable.
-
Audio signals (sampling frequency, bit length, etc.) transmitted from an HDMI jack may be suppressed by the connected equipment.
-
Sound may be interrupted when the sampling frequency or the number of channels of audio output signals from the playback equipment is switched.
- If the connected equipment is not compatible with copyright-protection technology (HDCP), the image and/or the sound from the HDMI OUT jack of this system may be distorted or may not be output. In such a case, check the specifications of the connected equipment.
- When "TV" is selected as the input source of the system, video signals via one of the HDMI IN 1/2/3 jacks selected last time are output from the HDMI OUT jack.
- This system supports Deep Color, "x.v.Color," 3D, and 4K transmission.
- To enjoy 3D images, connect a 3D-compatible TV and video equipment (Blu-ray Disc player, "PlayStation®4," etc.) to the system using High Speed HDMI cables, put on 3D glasses, and then play back a 3D-compatible Blu-ray Disc, etc.
- To enjoy 4K images, the TV and players that are connected to the system must be compatible with 4K images.
Controlling the system using a smartphone or tablet device (SongPal)
"SongPal" is the application to operate the system with your smartphone or tablet, etc.
"SongPal" is available from either Google Play™ or the App Store. This function is enabled by setting "BT PWR (BLUETOOTH power)" to "ON" (page 16). The default setting is "ON."
When using an Android™ device
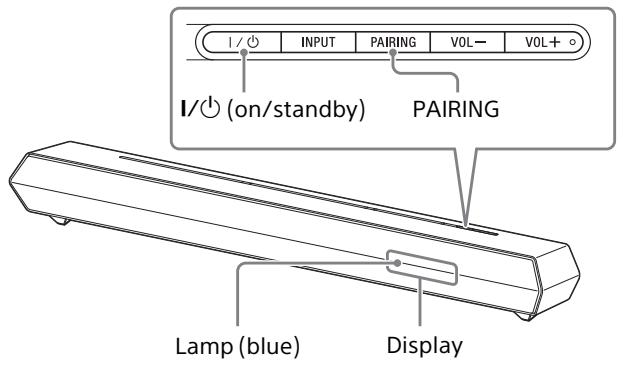
1 Press the I/ (on/standby) button on the Bar Speaker. The display of the Bar Speaker lights.
2 Search for "SongPal" with the Android device and download that application.
3 Run "SongPal" then follow the on-screen instructions.
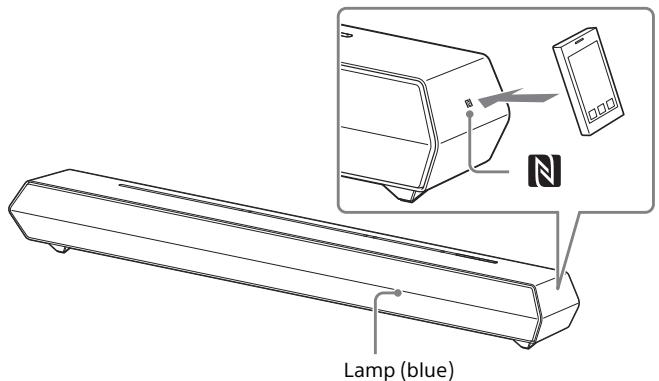
4 After the BLUETOOTH connection display appears on the Android device, press the PAIRING button on the Bar Speaker.
The lamp (blue) flashes quickly during BLUETOOTH pairing.
5 Select "SONY:HT-ST5" from the BLUETOOTH device list of the Android device.
When the connection has been established, the lamp (blue) of the Bar Speaker lights.
6 Operate the system with the display of the connected Android device.
One-Touch connection using the Android device with the NFC function built-in (NFC)
1 Perform steps 1 to 3 of "When using an Android device."
2 After the BLUETOOTH connection display appears on the Android device, touch the Android device with the N mark on the right side of the Bar Speaker.
When the connection has been established, the lamp (blue) of the Bar Speaker lights.
3 Operate the system with the display of the Android device.
When using an iPhone/iPod touch
1 Press the I/O (on/standby) button on the Bar Speaker. The display of the Bar Speaker lights.
2 Press the PAIRING button on the Bar Speaker. The lamp (blue) of the Bar Speaker flashes quickly during BLUETOOTH pairing.
3 Set the iPhone/iPod touch to pairing mode and select "SONY:HT-ST5" from the BLUETOOTH device list on the iPhone/iPod touch. When the connection has been established, the lamp (blu the Bar Speaker lights.
4 Search for "SongPal" with the connected iPhone/iPod touch and download that application.
5 Run "SongPal" then operate the system with the display of the iPhone/iPod touch.
Adjusting the settings

You can set the following items with the MENU button on the remote control. Your settings are retained even if you disconnect the AC power cord (mains lead).
1 Press the MENU button on the remote control to display the setting menu on the display of the Bar Speaker.
2 Select the desired setting with the following operation:
: Select the setting item.
ENTER: Shifts to the lower level menu, or enters the displayed setting.
RETURN: Returns to the upper level menu.
3 Press the MENU button to exit the menu.
| Menu | Function | Default | |
| LEVEL | DRC (Dynamic range control) | You can enjoy Dolby Digital sound at low sound volumes. (ON/ AUTO/OFF) ON: Compresses sound in accordance with the compression information contained in the content. AUTO: Automatically compresses sound encoded in Dolby TrueHD. OFF: Sound is not compressed. | AUTO |
| AUDIO | SYNC (AV sync) | You can adjust the sound when the image and the sound are not in sync. (1-4/OFF) | OFF |
| DUAL (Dual mono) | You can enjoy multiplex broadcast sound of Dolby Digital audio. (M/S /MAIN/SUB) M/S: Main and sub channels MAIN: Main channel SUB: Sub channel | MAIN | |
| HEQ (Harmonics equalizer) | Reproduces the very low volume sounds. (ON/OFF) Note: The HEQ function only works when the SOUND FIELD setting is set to “MUSIC” and either “ANALOG” or “BT AU” is selected as the input. This does not function with any other inputs, even though the item may be displayed on the front panel. | ON | |
| AAV (Advanced auto volume) | Reduces the volume discrepancies between different programs or between programs and commercials. (ON/OFF) Note: When the SOUND FIELD setting is set to “FOOTBALL,” “AAV (Advanced auto volume)” may not work. | OFF | |
| Menu | Function | Default | |
| HDMI | CTRL(Control for HDMI) | To switch the Control for HDMI function on or off. (ON/OFF)Refer to “Using the Control for HDMI function” (page 11) for details. | ON |
| P. THRU(Pass through) | To set the power saving mode of the pass-through function for HDMI signals. (AUTO/ON)AUTO: Outputs signals from the HDMI OUT jack of the system in standby mode according to the status of the TV. This setting saves power in standby mode compared with the “ON” setting.ON: Always outputs signals from the HDMI OUT jack in standby mode. If any TV other than “BRAVIA” is connected, use the system with the “ON” setting.Note: This item appears only when “CTRL (Control for HDMI)” is set to “ON.” | AUTO | |
| ARC(Audio return channel) | To listen to digital sound from a TV compatible with the Audio Return Channel (ARC) technology that is connected using a High Speed HDMI cable. (ON/OFF)Note: This item appears only when “CTRL (Control for HDMI)” is set to “ON.” | ON | |
| SET BT | BT PWR(BLUETOOTH power) | To switch the BLUETOOTH function of this system on and off. (ON/OFF)Note: If you change the setting to “OFF,” the BLUETOOTH function and the NFC function become disabled. | ON |
| BT.STBY(BLUETOOTH standby) | When the system has pairing information, the system is in the BLUETOOTH standby mode even when it is turned off. (ON/OFF) | ON | |
| AAC(Advanced audio coding) | To set whether or not the system will use AAC via BLUETOOTH. (ON/OFF)Note: If you change the setting when the system is connected with a BLUETOOTH device, the system will be disconnected from the device. | ON | |
| APTX(aptX) | To set whether or not the system will use aptX via BLUETOOTH. (ON/OFF)Note: If you change the setting when the system is connected with a BLUETOOTH device, the system will be disconnected from the device. | ON | |
| SYSTEM | A. STBY(Auto standby) | To switch the AUTO POWER OFF function on or off. (ON/OFF) The system turns off automatically when no operation has been made within a certain period (about 20 minutes) and the system is not receiving an input signal. | ON |
| IR REP.(IR repeater) | Enables the system to relay the signal from a remote control to the TV. (ON/OFF)Refer to “Enabling the IR repeater function” (page 8) for details. | OFF | |
| VER(Version) | To display the current firmware version. | - | |
| SYS.RST(System cold reset) | To reset menus and settings (sound fields, etc.) of the system to the initial status when it does not work properly.Refer to "Troubleshooting" (page 23) for details. | - | |
| WS | SEC. ON/SEC.OFF(Secure link on/Secure link off) | When the Secure Link connection is not established, "SEC. ON"appears.SEC. ON: Allows you to link the specified Bar Speaker and subwoofer when there are several wireless sound devices within range.When the Secure Link connection is established, "SEC.OFF"appears.SEC.OFF: Releases the Secure Link setting.Refer to "Enabling the Secure Link function" (page 9) for details. | - |
| BAND(Band mode select) | To switch the system frequency band mode between 5.2 and 5.8 GHz bands.(AUTO/5.2GHz/5.8GHz)Note: This item only appears when regions correspond to both 5.2 and 5.8 GHz frequency bands. | AUTO | |
| LNK.CHK(Link check) | To check whether the wireless sound system of the system can connect or not. (OK/NG) | - | |
Miscellaneous
Precautions
On safety
- Should any solid object or liquid fall into the system, unplug the system and have it checked by qualified personnel before operating it any further.
- Do not climb on the Bar Speaker and subwoofer, as you may fall down and injure yourself, or system damage may result.
On power sources
- Before operating the system, check that the operating voltage is identical to your local power supply. The operating voltage is indicated on the nameplate at the rear of the Bar Speaker.
- If you are not going to use the system for a long time, be sure to disconnect the system from the wall outlet (mains). To disconnect the AC power cord (mains lead), grasp the plug itself; never pull the cord.
- One blade of the plug is wider than the other for the purpose of safety and will fit into the wall outlet (mains) only one way. If you are unable to insert the plug fully into the outlet, contact your dealer.
- AC power cord (mains lead) must be changed only at a qualified service shop.
On heat buildup
Although the system heats up during operation, this is not a malfunction. If you continuously use this system at high volume, the system temperature at the rear and bottom rises considerably. To avoid burning yourself, do not touch the system.
On placement
- Place the system in a location with adequate ventilation to prevent heat buildup and prolong the life of the system.
-
Do not place the system near heat sources or in a place subject to direct sunlight, excessive dust, or mechanical shock.
-
Do not place anything at the rear of the Bar Speaker and subwoofer that might block the ventilation holes and cause malfunctions.
- If the system is being used in combination with a TV, VCR, or tape deck, noise may result and picture quality may suffer. In such a case, place the system away from the TV, VCR, or tape deck.
- Use caution when placing the system on a surface that has been specially treated (with wax, oil, polish, etc.), as staining or discoloration of the surface may result.
- Take care to avoid any possible injury from the corners of the Bar Speaker and subwoofer.
On operation
Before connecting other equipment, be sure to turn off and unplug the system.
If you encounter color irregularity on a nearby TV screen
Color irregularities may be observed on certain types of TV sets.
If color irregularity is observed...
Turn off the TV set, then turn it on again after 15 to 30 minutes.
If color irregularity is observed again...
Place the system further away from the TV set.
On cleaning
Clean the system with a soft, dry cloth. Do not use any type of abrasive pad, scouring powder, or solvent such as alcohol or benzine.
If you have any question or problem concerning your system, please consult your nearest Sony dealer.
Copyrights
This system incorporates Dolby Digital and the DTS* Digital Surround System.
- Manufactured under license from Dolby Laboratories. Dolby, and the double-D symbol are trademarks of Dolby Laboratories.
** For DTS patents, see http://patents.dts.com. Manufactured under license from DTS Licensing Limited. DTS, DTS-HD, the Symbol, & DTS and the Symbol together are registered trademarks, and DTS-HD Master Audio is a trademark of DTS, Inc. © DTS, Inc. All Rights Reserved.
The BLUETOOTH® word mark and logos are registered trademarks owned by Bluetooth SIG, Inc. and any use of such marks by Sony Corporation is under license.
This system incorporates High-Definition Multimedia Interface (HDMI™) technology.
The terms HDMI and HDMI High-Definition Multimedia Interface, and the HDMI Logo are trademarks or registered trademarks of HDMI Licensing LLC in the United States and other countries.
The N Mark is a trademark or registered trademark of NFC Forum, Inc. in the United States and in other countries.
Android and Google Play are trademarks of Google Inc.
© 2013 CSR plc and its group companies.
The aptX® mark and the aptX logo are trade marks of CSR plc or one of its group companies and may be registered in one or more jurisdictions.
Apple, the Apple logo, iPhone, iPod, and iPod touch are trademarks of Apple Inc., registered in the U.S. and other countries. App Store is a service mark of Apple Inc.
Made for

"Made for iPod," and "Made for iPhone" mean that an electronic accessory has been designed to connect specifically to iPod or iPhone, respectively, and has been certified by the developer to meet Apple performance standards. Apple is not responsible for the operation of this device or its compliance with safety and regulatory standards. Please note that the use of this accessory with iPod or iPhone may affect wireless performance.
Compatible iPod/iPhone models
The compatible iPod/iPhone models are as follows. Update your iPod/ iPhone with the latest software before using with the system.
BLUETOOTH technology works with:
iPhone
iPhone 5s/iPhone 5c/iPhone 5/iPhone 4s/iPhone 4/iPhone 3GS
- iPod touch
iPod touch (5th generation)/iPod touch (4th generation)
"BRAVIA" logo is a trademark of Sony Corporation.
"ClearAudio+" is a trademark of Sony Corporation.
"x.v.Color" and "x.v.Color" logo are trademarks of Sony Corporation.
"PlayStation®" is a registered trademark of Sony Computer Entertainment Inc.
Other trademarks and trade names are those of their respective owners.
BLUETOOTH wireless technology
Supported BLUETOOTH version and profiles
Profile refers to a standard set of functions for various BLUETOOTH product features. Refer to "Specifications" (page 27) for the BLUETOOTH version and profiles supported by this system.
Notes
- To use the BLUETOOTH function, the BLUETOOTH device to be connected must support the same profile as this system. Even if the device supports the same profile, the functions may differ because of the specifications of the BLUETOOTH device.
- Audio playback on this system may be delayed from that on the BLUETOOTH device because of the characteristics of the BLUETOOTH wireless technology.
Effective communication range
BLUETOOTH devices should be used within approximately 10 meters (33 feet) (unobstructed distance) of each other. The effective communication range may become shorter under the following conditions;
- When a person, metal object, wall or other obstruction is between devices with a BLUETOOTH connection
- Locations where a wireless LAN is installed
- Around microwave ovens that are in use
- Locations where other electromagnetic waves are generated
Effects of other devices
BLUETOOTH devices and wireless LAN (IEEE 802.11b/g) equipment use the same frequency band (2.4 GHz). When using your BLUETOOTH device near a device with wireless LAN capability, electromagnetic interference may occur.
This could result in lower data-transfer rates, noise, or inability to connect. If this happens, try the following remedies:
- Connect this system and BLUETOOTH mobile phone or BLUETOOTH device when you are at least 10 meters (33 feet) away from the wireless LAN equipment.
- Turn off the power to the wireless LAN equipment when using your BLUETOOTH device within 10 meters (33 feet).
Effects on other devices
The radio waves broadcast by this system may interfere with the operation of some medical devices. Since this interference may result in malfunction, always turn off the power to this system, BLUETOOTH mobile phone and BLUETOOTH device in the following locations:
- In hospitals, on trains or airplanes, at gas stations, and any place where flammable gasses may be present
- Near automatic doors or fire alarms
Notes
- This system supports security functions that comply with the BLUETOOTH specification as a means of ensuring security during communication using BLUETOOTH technology. However, this security may be insufficient, depending on the settings and other factors. So always be careful when performing communication using BLUETOOTH technology.
- Sony shall not be held liable in any way for damages or other loss resulting from information leaks during communication using BLUETOOTH technology.
- BLUETOOTH communication is not necessarily guaranteed with all BLUETOOTH devices that have the same profile as this system.
- BLUETOOTH devices connected with this system must comply with the BLUETOOTH specification prescribed by the Bluetooth SIG, Inc., and must be certified to comply. However, even when a device complies with the BLUETOOTH specification, there may be cases where the characteristics or specifications of the BLUETOOTH device make it impossible to connect or may result in different control methods, display, or operation.
- Noise may occur or the audio may cut off, depending on the BLUETOOTH device connected with this system, the communications environment, or surrounding conditions.
Troubleshooting
If you experience any of the following difficulties while using the system, use this troubleshooting guide to help remedy the problem before requesting repairs. Should any problem persist, consult your nearest Sony dealer. Be sure to bring both your Bar Speaker and subwoofer, even if it seems as though only one has a problem, when you request to repair.
POWER
The system does not power up.
Check that the AC power cord (mains lead) is connected securely.
Disconnect the AC power cord (mains lead) from the wall outlet (mains), then reconnect after several minutes.
The system is turned off automatically.
The "A. STBY" function is working. Set "A. STBY (Auto standby)" to "OFF" (page 17).
SOUND
No TV sound is output from the system.
Repeatedly press the INPUT button on the remote control to display "TV" in the display (refer to "Listening to the audio of the TV" in the supplied Startup Guide).
Check the connection of the HDMI cable, optical digital cable, or audio cable that is connected to the system and the TV (refer to "Connection" in the supplied Startup Guide).
Check the sound output of the TV. Refer to the operating instructions of the TV for the TV settings.
Increase the volume on the TV or cancel muting.
When a TV compatible with the Audio Return Channel (ARC) technology is connected with an HDMI cable, make sure the cable is connected to the HDMI input (ARC) terminal of the TV (refer to "Connection" in the supplied Startup Guide).
If the TV is not compatible with the Audio Return Channel (ARC) technology, connect the optical digital cable in addition to the HDMI cable in order to output sound (refer to "Connection" in the supplied Startup Guide).
The sound is output from both the system and the TV.
Turn off the sound of the system or the TV.
The TV sound from this system lags behind the image.
Set "SYNC (AV sync)" to "OFF" if it is set to the range between "1" and "4" (page 15).
No sound or only a very low-level sound of the equipment connected to the Bar Speaker is heard from the Bar Speaker.
Press the VOL + button on the remote control and check the volume level (refer to "Parts and controls" (page 26)).
Press the MUTING or VOL + button on the remote control to cancel the muting function (refer to "Parts and controls" (page 26)).
Make sure the input source is selected correctly. You should try other input sources by pressing the INPUT button on the remote control several times (refer to "Listening to the sound" in the supplied Startup Guide).
Check that all the cables and cords of the system and the connected equipment are firmly inserted.
No sound or only a very low-level sound is heard from the subwoofer.
Press the SW VOL + button on the remote control to increase the subwoofer volume (refer to "Parts and controls" (page 26)).
Make sure that the on/standby lamp on the subwoofer is lit in green. If not, refer to "No sound is heard from the subwoofer." in "WIRELESS SOUND" (page 22).
A subwoofer is for reproducing bass sound. In the case of input sources that contain very little bass sound components (i.e., a TV broadcast), the sound from the subwoofer may be difficult to hear.
When you play content compatible with copyright protection technology (HDCP), it is not output from the subwoofer.
The surround effect cannot be obtained.
Depending on the input signal and the sound field setting, surround sound processing may not work effectively. The surround effect may be subtle, depending on the program or disc.
To play multi channel audio, check the digital audio output setting on the device connected to the system. For details, refer to the operating instructions supplied with the connected equipment.
continued
BLUETOOTH
BLUETOOTH connection cannot be completed.
Make sure that the lamp (blue) of the Bar Speaker is lit (refer to "Listening to the sound from BLUETOOTH devices" in the supplied Startup Guide).
| System status | Lamp (blue) status |
| During BLUETOOTH pairing | Flashes quickly |
| The system is attempting to connect with a BLUETOOTH device | Flashes |
| The system has established connection with a BLUETOOTH device | Lit |
| The system is in BLUETOOTH standby mode (when the system is off) | Unlit |
Make sure the BLUETOOTH device to be connected is turned on and the BLUETOOTH function is enabled.
Bring this system and the BLUETOOTH device closer together.
Pair this system and the BLUETOOTH device again. You may need to cancel the pairing with this system using your BLUETOOTH device first.
Set "BT PWR (BLUETOOTH power)" to "ON" if it is set to "OFF" (page 16).
Pairing cannot be achieved.
Bring this system and the BLUETOOTH device closer together (refer to "Listening to the sound from BLUETOOTH devices" in the supplied Startup Guide).
Make sure this system is not receiving interference from a wireless LAN equipment, other 2.4 GHz wireless devices, or a microwave oven. If a device that generates electromagnetic radiation is nearby, move the device away from this system.
No sound is output from the connected BLUETOOTH device.
Make sure that the lamp (blue) of the Bar Speaker is lit (refer to "Listening to the sound from BLUETOOTH devices" in the supplied Startup Guide).
Bring this system and the BLUETOOTH device closer together.
If a device that generates electromagnetic radiation, such as a wireless LAN equipment, other BLUETOOTH devices, or a microwave oven is nearby, move the device away from this system.
Remove any obstacle between this system and the BLUETOOTH device or move this system away from the obstacle.
Reposition the connected BLUETOOTH device.
Switch the wireless LAN frequency of any nearby Wi-Fi router or personal computer to 5 GHz range.
Increase the volume on the connected BLUETOOTH device.
The sound is not in sync with the image.
→ When you are watching movies, you may hear the sound with a slight delay from the image.
WIRELESS SOUND
No sound is heard from the subwoofer.
Check that the AC power cord (mains lead) of the subwoofer is connected properly. (Refer to "Turning on the system" in the supplied Startup Guide.)
The on/standby lamp of the Bar Speaker does not light.
- Check that the AC power cord (mains lead) of the subwoofer is connected properly.
- Press the I/① (on/standby) button of the subwoofer to turn on the power.
The on/standby lamp of the Bar Speaker flashes slowly in green or lights in red.
- Move the subwoofer to a location near the Bar Speaker so that the on/standby lamp of the Bar Speaker lights in green.
- Follow the steps in "Enabling the Secure Link function" (page 9).
- Check the connection status of the wireless sound system with the "LNK.CHK" of the menu (page 17).
The on/standby lamp of the Bar Speaker flashes quickly in green. Consult your nearest Sony dealer.
The on/standby lamp of the Bar Speaker flashes in red.
- Press the I/() (on/standby) button of the subwoofer to turn off the power and check whether the ventilation opening of the subwoofer is blocked or not.
The subwoofer is designed for playback of bass sound. When the input source does not contain much of bass sound, as is the case with most TV programs, the bass sound may not be audible.
Press the SW VOL + button on the remote control to increase the volume of the subwoofer (refer to "Parts and controls" (page 26)).
Sound skips or has noise.
If there is a device nearby that generates electromagnetic waves like a wireless LAN or an electronic oven in use, locate the system apart from it.
If there is an obstacle between the Bar Speaker and the subwoofer, move or remove it.
Locate the Bar Speaker and the subwoofer as close as possible.
Switch the wireless LAN frequency of any nearby Wi-Fi router or personal computer to 2.4 GHz range.
Switch the LAN connection of the TV or Blu-ray Disc player from wireless to wired.
REMOTE CONTROL
The remote control of this system does not function.
Point the remote control at the remote control sensor on the Bar Speaker (refer to "Parts and controls" (page 24)).
Remove any obstacles in the path between the remote control and the system.
Replace both batteries in the remote control with new ones, if they are weak.
Make sure you are pressing the correct button on the remote control.
TV remote control does not work.
This problem might be solved by enabling the IR repeater function (page 8).
OTHERS
The Control for HDMI function does not work properly.
Check the HDMI connection (refer to "Connection" in the supplied Startup Guide).
Set up the Control for HDMI function on the TV. Refer to the operating instructions supplied with the TV for TV setting.
Make sure that any equipment connected is compatible with "BRAVIA" Sync.
Check the Control for HDMI settings on the connected equipment. Refer to the operating instructions supplied with the connected equipment.
If you connect/disconnect the AC power cord (mains lead), wait more than 15 seconds before operating the system.
If you connect the audio output of video equipment with the system, using a cable other than an HDMI cable, no sound may be output because of "BRAVIA" Sync. In such a case, set "CTRL (Control for HDMI)" to "OFF" (page 16) or connect the cable from the audio output jack of the video equipment directly to the TV.
"PRTECT (protect)" appears on the display of the Bar Speaker.
Press the I/O (on/standby) button to turn off the system. After the lamp disappears, disconnect the AC power cord (mains lead) then ensure nothing is obstructing the ventilation holes of the system.
Sensors of the TV do not work properly.
The Bar Speaker may block some sensors (such as the brightness sensor) and the remote control receiver of your TV, or the "emitter for 3D glasses (infrared transmission)" of a 3D TV that supports the infrared 3D glass system. Move the Bar Speaker away from the TV within a range that allow those parts to operate properly. For the locations of the sensors and remote control receiver, refer to the operating instructions supplied with the TV.
RESET
If the system still does not operate properly, reset the system as follows:
1 Press the I/ (on/standby) button on the remote control to turn the Bar Speaker on.
2 Press the MENU button on the remote control.
3 Press the (select) button repeatedly until "SYSTEM" appears, then press the ENTER button.
4 Press the (select) button repeatedly until "SYS.RST" appears, then press the ENTER button (page 17).
5 Press the ENTER button after displaying "START." "RESET" appears on the display, and the settings of the menu and sound fields, etc. return to their initial statuses.
6 Disconnect the AC power cord (mains lead) after "RESET" disappears from the display.
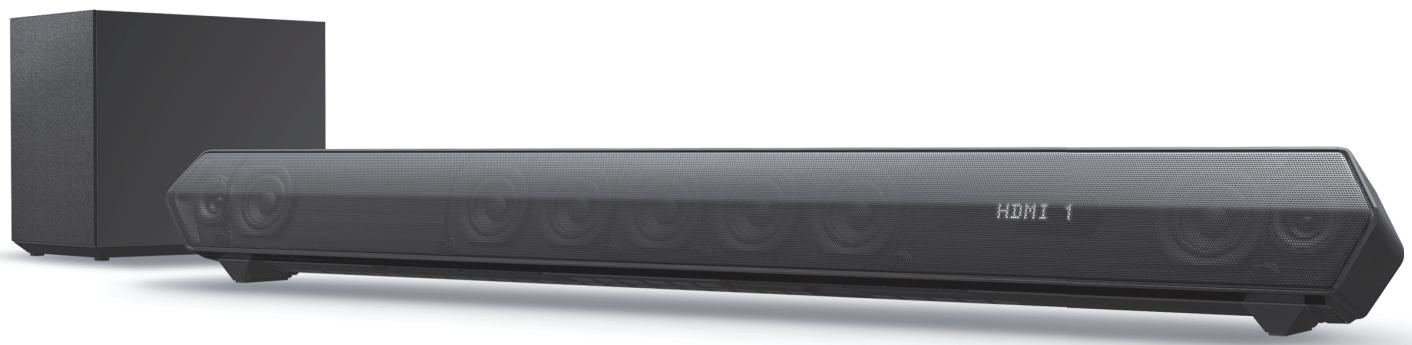
Parts and controls
Bar Speaker
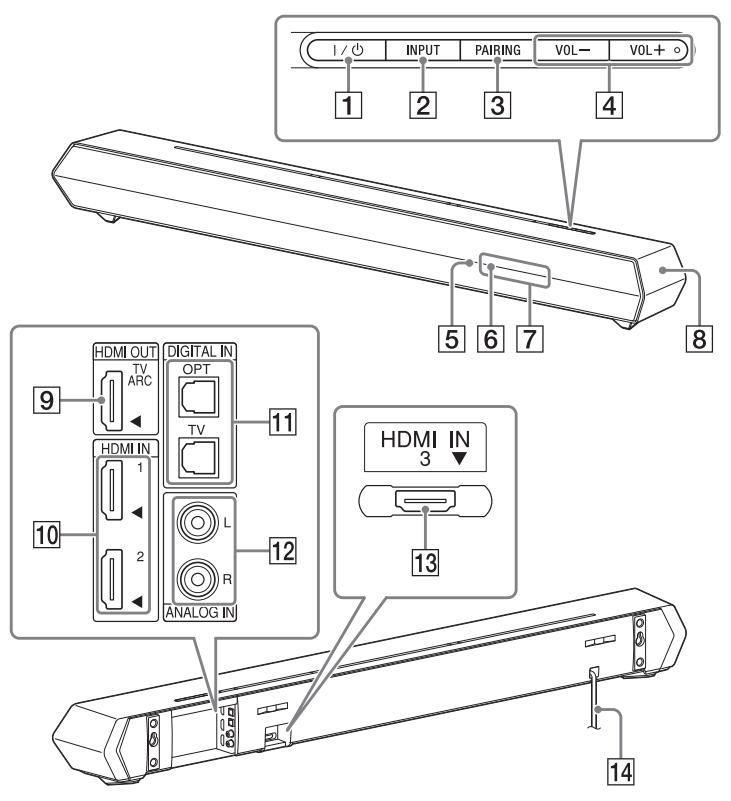
Front/Top
1 I/O (on/standby) button
2 INPUT button
3 PAIRING button
4 VOL (volume) +/- buttons
5 Remote control sensor
6 Lamp
- Lit (white): Power is on and the display is "Off."
- Flashes quickly (blue): During BLUETOOTH pairing.
- Flashes (blue): Attempting to connect with a BLUETOOTH device.
- Lit (blue): BLUETOOTH connection established.
7 Display
8 N mark
When using the NFC function, touch your NFC device to the mark.
Rear
9 HDMI OUT (TV ARC) jack
10 HDMI IN 1/2 jacks
DIGITAL IN (OPT/TV) jacks
12 ANALOG IN (L/R) jacks
13 HDMI IN 3 jack
When you use an HDMI IN 3 jack of the wall-mounted Bar Speaker, connect the swivel-type High Speed HDMI cable.
14 AC power cord (mains lead)
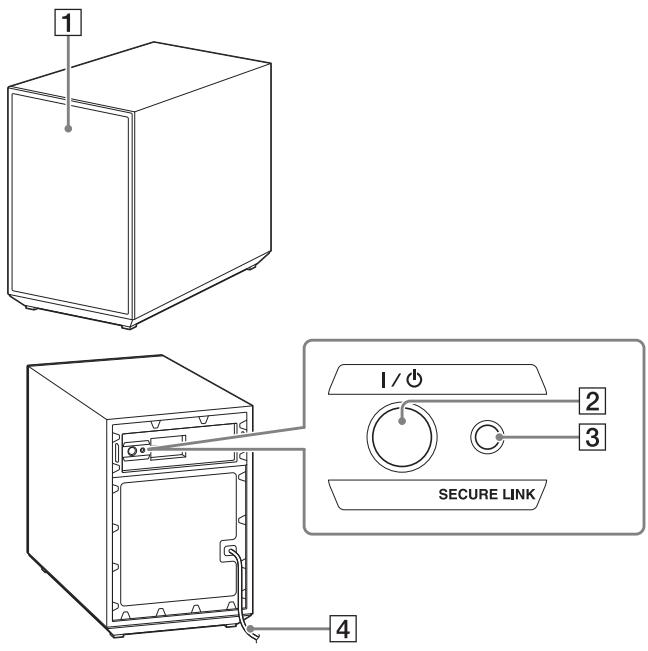
Subwoofer
1 On/standby lamp
- Lit (red): Power is off.
- Lit (green): Power is on.
- Lit (yellow): SECURE LINK connection is established.
2 I/O (on/standby) button
3 SECURE LINK button
4 AC power cord (mains lead)
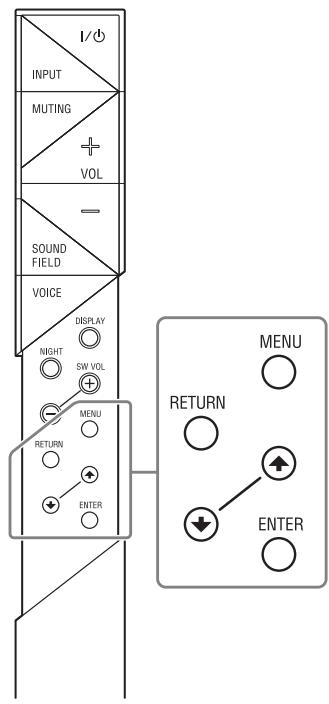
Remote control
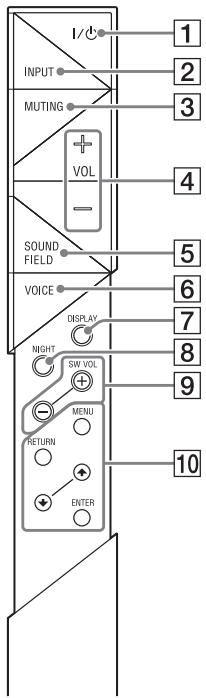
1 I/ (on/standby) button
2 INPUT button
3 MUTING button
4 VOL (volume) +/- buttons
5 SOUND FIELD button
6 VOICE button
7 DISPLAY button
The display brightness can be switched.
Bright Dark Off
- When the display brightness is set to "Off," the display is turned off after the display shows operation status for several seconds.
- When the setting is changed to "Bright" from "Off," the display shows the audio stream information.
8 NIGHT (night mode) button*
SW VOL (subwoofer volume) +/- buttons
Adjusts the volume of the bass sound.
10 MENU/↑ (select)/ENTER/RETURN buttons
Select the desired setting by pressing the (select) buttons then register it by pressing the ENTER button.
- Refer to "Enjoying the sound effects" in the supplied Startup Guide.
Specifications
Bar Speaker (SA-ST5)
Amplifier section
U.S. models:
POWER OUTPUT AND TOTAL HARMONIC DISTORTION:
(FTC)
Front L + Front R:
With 8 ohms loads, both channels driven, from 200 - 20,000 Hz;
rated 15 Watts per channel minimum RMS power, with no more than
1% total harmonic distortion from 250 milliwatts to rated output.
POWER OUTPUT (reference)
Front L/Front R speaker blocks: 40 Watts (per channel at 8 ohms, 1 kHz)
Center speaker block: 40 Watts (per channel at 8 ohms, 1 kHz)
Canadian models:
POWER OUTPUT (rated)
Front L + Front R: 35 W + 35 W
(at 8 ohms, 1 kHz, 1% THD)
POWER OUTPUT (reference)
Front L/Front R speaker blocks: 40 Watts (per channel at 8 ohms, 1 kHz)
Center speaker block: 40 Watts (per channel at 8 ohms, 1 kHz)
Inputs
HDMI IN 1/2/3*
OPTICAL IN (OPT/TV)
ANALOG IN
- These 3 jacks are identical. Using any of them makes no difference.
Output
HDMI OUT (TV ARC)
BLUETOOTH section
Communication system
BLUETOOTH Specification version 3.0
Output
BLUETOOTH Specification Power Class 2
Maximum communication range
Line of sight approx. 10m (33 ft) ^1)
Maximum number of devices to be registered 9 devices
Frequency band
2.4 GHz band (2.4000 GHz - 2.4835 GHz)
Modulation method
FHSS (Freq Hopping Spread Spectrum)
Compatible BLUETOOTH profiles
A2DP 1.2 (Advanced Audio Distribution Profile)
AVRCP 1.3 (Audio Video Remote Control Profile)
Supported Codes3)
SBC4), AAC5), aptX
Transmission range (A2DP)
20 Hz - 20,000 Hz (Sampling frequency 44.1 kHz)
1) The actual range will vary depending on factors such as obstacles between devices, magnetic fields around a microwave oven, static electricity, cordless phone, reception sensitivity, operating system, software application, etc.
2) BLUETOOTH standard profiles indicate the purpose of BLUETOOTH communication between devices.
3) Codec: Audio signal compression and conversion format
4) Subband Codec
5) Advanced Audio Coding
Front L/Front R speaker blocks
Speaker system
2-way speaker system, Acoustic suspension
Speaker
Woofer: 60 mm (2 3/8 in) cone type
Tweeter: 20 mm (13/16 in) balanced drive type
Rated impedance
8 ohms
Center speaker block
Speaker system
Full range speaker system, Acoustic suspension
Speaker (5 speakers)
60 mm (2 3/8 in) cone type
Rated impedance
8 ohms
General
Power requirements
120 V AC, 60 Hz
Power consumption
On: 55 W
Standby mode: 0.5 W or less
BLUETOOTH Standby mode: 0.5 W or less
Dimensions (approx.) (w / h / d)
1,030 mm × 120 mm × 120 mm (40 5/8 in × 4 3/4 in × 4 3/4 in) (with stands)
1,030 mm × 101 mm × 116 mm (40 5/8 in × 4 in × 4 5/8 in) (without stands)
Mass (approx.)
6.1 kg (13 lb 7 1/8 oz)
Subwoofer (SA-WST5)
POWER OUTPUT (reference)
100 W (per channel at 4 ohms, 100 Hz)
Speaker system
Subwoofer, Acoustic suspension
Speaker
180 mm (7 1/8 in) cone type
Rated impedance
4 ohms
Power requirements
120 V AC, 60 Hz
Power consumption
On: 30 W
Standby mode: 0.5 W or less
Dimensions (approx.)
242mm× 355mm× 407mm (95/8 in × 14 in × 16 1/8 in) (w/h/d)
Mass (approx.)
11 kg (24 lb 4 oz)
Wireless transmitter/receiver section
Communication system
Wireless Sound Specification version 3.0
Frequency band
5.2 GHz (5.180 GHz - 5.240 GHz)
5.8 GHz (5.736 GHz - 5.814 GHz)
Modulation method
DSSS
Digital audio input formats supported by the system
Dolby Digital
DTS-HD Master Audio*
Dolby Digital Plus*
DTS-HD High-Resolution Audio*
Dolby TrueHD*
DTS-HD Low Bit Rate*
DTS
Linear PCM 2ch 48 kHz or less
DTS 96/24
Linear PCM Maximum 7.1ch 192 kHz or less*
- It is possible to input these formats only with HDMI connection.
Video formats supported by the system
Input/Output (HDMI Repeater block)
| Format | 2D | 3D | ||
| Frame packing | Side-by- Side (Half) | Over-Under (Top-and-Bottom) | ||
| 4096 × 2160p @ 59.94/60 Hz*1 | ○ | - | - | - |
| 4096 × 2160p @ 50 Hz*1 | ○ | - | - | - |
| 4096 × 2160p @ 23.98/24 Hz*2 | ○ | - | - | - |
| 3840 × 2160p @ 59.94/60 Hz*1 | ○ | - | - | - |
| 3840 × 2160p @ 50 Hz*1 | ○ | - | - | - |
| 3840 × 2160p @ 29.97/30 Hz*2 | ○ | - | - | - |
| 3840 × 2160p @ 25 Hz*2 | ○ | - | - | - |
| 3840 × 2160p @ 23.98/24 Hz*2 | ○ | - | - | - |
| 1920 × 1080p @ 59.94/60 Hz | ○ | - | ○ | ○ |
| 1920 × 1080p @ 50 Hz | ○ | - | ○ | ○ |
| 1920 × 1080p @ 29.97/30 Hz | ○ | ○ | ○ | ○ |
| 1920 × 1080p @ 25 Hz | ○ | ○ | ○ | ○ |
| 1920 × 1080p @ 23.98/24 Hz | ○ | ○ | ○ | ○ |
| 1920 × 1080i @ 59.94/60 Hz | ○ | ○ | ○ | ○ |
| 1920 × 1080i @ 50 Hz | ○ | ○ | ○ | ○ |
| 1280 × 720p @ 59.94/60 Hz | ○ | ○ | ○ | ○ |
| 1280 × 720p @ 50 Hz | ○ | ○ | ○ | ○ |
| 1280 × 720p @ 29.97/30 Hz | ○ | ○ | ○ | ○ |
| 1280 × 720p @ 23.98/24 Hz | ○ | ○ | ○ | ○ |
| 720 × 480p @ 59.94/60 Hz | ○ | - | - | - |
| 720 × 576p @ 50 Hz | ○ | - | - | - |
| 640 × 480p @ 59.94/60 Hz | ○ | - | - | - |
1 YCbCr 4:2:0/Supported 8-bit only
2 Supported 8-bit only
Design and specifications are subject to change without notice.
Homi
http://www.sony.net/
©2014 Sony Corporation Printed in Malaysia
4-538-291-11(1)
SONY®
Sound Bar
Startup Guide
Startup Guide
US
Guide de démarrage
FR
HT-ST5
Table of contents / Table des matieres
Setup / Configuration
1 What's in the box / Que contient la boite ? 4
2 Installation / Installation 5
3 Connection / Raccordement 6
4 Turning on the system / Mise sous tension du système 8
5 Listening to the sound / Écoute du son 9
2 Installation / Installation
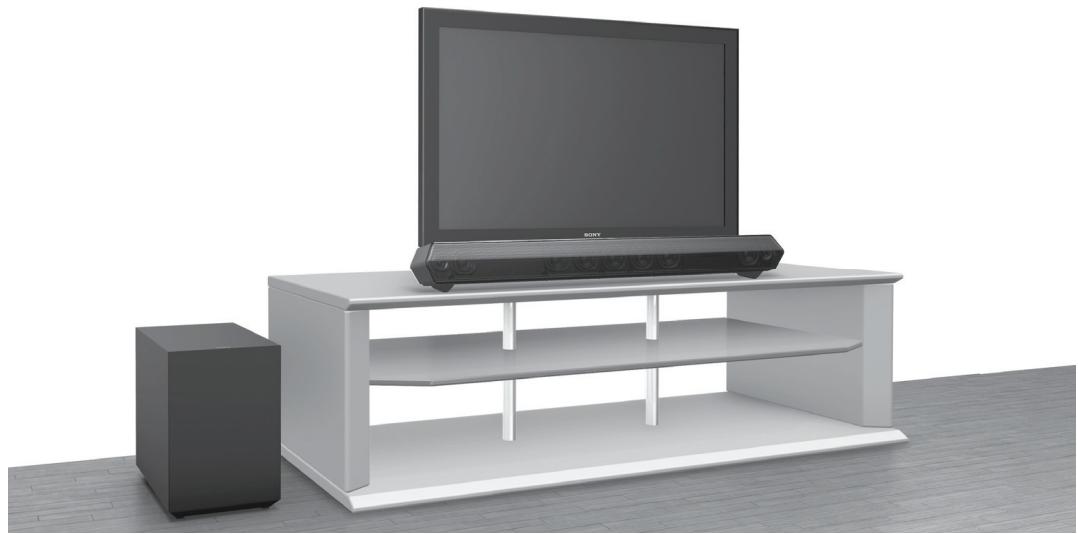
To prevent the Bar Speaker falling, place the rear side of the Bar Speaker facing upward and in a stable place for the cable connection. When doing so, spread a soft cloth etc. to prevent damage.
To modify the angle of the Bar Speaker Refer to the supplied Operating Instructions.
To mount the Bar Speaker on a wall Refer to the supplied Operating Instructions.
3 Connection / Raccordement
If the TV to be connected is not equipped with an optical audio output terminal, connect an HDMI cable (sold separately, High Speed type). Subsequently, you need to connect to the HDMI input terminal labeled "ARC."
If the HDMI input terminal labeled "ARC" is connected to another device, disconnect the other device from the TV and connect this Bar Speaker.
This is a connection for enjoying surround sound more effectively.
If the HDMI input terminal on the TV is not labeled "ARC," connect to the TV with optical digital cable A (included) in addition to HDMI cable B (sold separately, High Speed type).
For connection (sold separately, High Speed type), when connected to another device and the TV, disconnect the other device from the TV and connect it to the Bar Speaker.
1 Connect the AC power cords (mains leads).
2 Press the I/ (on/standby) button. The display lights.
3 Confirm that the on/standby lamp of the subwoofer is lit in green. If not, the wireless transmission is not activated. Refer to "No sound is heard from the subwoofer." of "Troubleshooting" in the supplied Operating Instructions.
4 Turn on the connected device.
Listening to the audio of the TV
1 Press the INPUT button repeatedly to select "TV" input.
2 Press the VOL button to adjust the volume.
To listen to audio from an input device other than the TV
Press the INPUT button repeatedly until the desired input device is indicated on the display.
TV→HDMI1→HDMI2→HDMI3→OPT→ANALOG→BT AU
Setup completed! Enjoy!
To set a sound effect, press one of the sound effect buttons on the remote control repeatedly to select the desired mode while checking the display.
| SOUND FIELD: Effects optimized to the input sound. | CLEARAUDIO+ | The suitable sound setting is automatically selected for the sound source. |
| STANDARD | Sound effects optimized for TV programs. | |
| MOVIE1 | Sound effects optimized for movie-viewing. Suitable to experience a wider surround- sound effect. | |
| MOVIE2 | Sound effects optimized for movie-viewing. Suitable to experience a stronger surround- sound effect. | |
| MUSIC | Sound effects optimized for music. | |
| GAME | Sound effects optimized for game play. | |
| FOOTBALL (virtual football mode) | Sound effects to give you a genuine in- stadium feeling when watching live football broadcasts. Note: This feature does not support monaural sound. | |
| VOICE: Helps make dialogues clearer. | TYPE1 | Standard |
| TYPE2 | Dialogue range is enhanced. | |
| TYPE3 | Dialogue range is enhanced, and the parts of range difficult to be discerned by the elderly are boosted. | |
| NIGHT: Sound is output at low volume with minimum loss of fidelity and clarity of dialogue. | ON | Activates the Night mode function. |
| OFF | Inactivates the Night mode function. |
To pair the system with the device (Pairing)
1 Press the PAIRING button.
The lamp flashes quickly during BLUETOOTH pairing.
2 Set your BLUETOOTH device to pairing mode and select "SONY:HT-ST5." If a Passkey is requested, enter "0000."
3 Make sure that the lamp lights up. (Connection has been established.)
Hint
Once the BLUETOOTH connection is established, an indication recommending which application to download will be displayed, according to what equipment you have connected.
Following the instructions displayed, an application called "SongPal," which will enable you to operate this system, can be downloaded.
Refer to "Controlling the system using a smartphone or tablet device (SongPal)" in the supplied Operating Instructions for details on "SongPal."
To listen to the sound of the registered device
1 Press the INPUT button repeatedly to display "BT AU." The lamp flashes during attempting BLUETOOTH pairing.
2 On the BLUETOOTH device, select "SONY:HT-ST5."
3 Make sure that the lamp lights up. (Connection has been established.)
4 Start the audio playback with the music software in the connected BLUETOOTH device.
1 Download, install, and start the "NFC Easy Connect" app on your smartphone.

2 Touch the N mark of the Bar Speaker with the smartphone.
3 Make sure that the lamp lights up. (Connection has been established.)
- Compatible devices
Smartphones, tablets, and music players with the NFC function built-in (OS: Android™ 2.3.3 or later, excluding Android 3.x)
© 2014 Sony Corporation Printed in Malaysia
4-538-290-12(1)
SONY
Thank you for purchasing this Sony product. Proper registration will enable us to send you periodic mailings about new products and other important announcements. Registering your product will also allow us to contact you in the unlikely event that it will need adjustment or modification. Please take the time to register your new product at our website:
http://www.sony.com/productregistration
You will find the product serial number on the main unit and the carton box.
If you have any operational questions regarding your new purchase, please contact your retailer. For the location of a Sony dealer in your area, or for any other questions, please call 1-800-222-SONY(7669).
Thank you.
© Sony Electronics Inc.

3-089-014-02
Consumer Warranty
Sony of Canada Ltd. (hereinafter referred to as "Sony") hereby warrants, subject to the terms and conditions herein set forth, this product against defects in material and workmanship during the specified warranty period. In the event of a defect of material or workmanship during the specified warranty period, Sony will, without charge for parts or labour, either repair the product, effecting all necessary parts replacements with either new or refurbished parts, or at Sony's sole discretion, replace the product with a refurbished product of equal or better quality. This limited warranty is valid only in Canada.
The Warranty Period:
- Labour: ONE YEAR from the date of original purchase at retail.
- Parts: ONE YEAR (thermal head and projector lamp: 90 days) from the date of original purchase at retail.
- Commercial or Rental Use: NINETY DAYS parts and labour from the date of original purchase.
Void or limited warranty:
This limited warranty is void if the product has been previously altered, modified, repaired or serviced by anyone other than the service facilities authorized by Sony, if the serial number on the product has been altered or removed, or if the product has been subject to accident, misuse, abuse, acts of God or operated contrary to the instructions contained in the Owner's Manual. This product is not intended for commercial or rental use. Should this product be used for commercial or rental use, Sony's standard ninety day commercial warranty will apply. The opinion of Sony with respect to these matters shall be final.
Proper Delivery for Service:
The product must be shipped, freight prepaid, or delivered to one of the nearest Sony service facilities in Canada in either its original package or similar package affording an equal degree of protection, and with instructions indicating a location within Canada to which the product should be returned. The repaired product will be returned to customer freight prepaid. Prior to shipping or delivering the product for repair, all accessories, media and other attachments should be removed from the product and all data and software must be backed up. It is likely that stored data and software will be lost, corrupted or reformatted in the course of service and Sony will not be liable for lost, corrupted or reformatted data or software. If more than the product is sent for repair, all items must be listed individually on the packing slip for the shipping documentation. Sony shall have no liability whatsoever for loss or damage to items that are not listed on the shipping documentation. Defective accessories should be returned to Sony as a separate repair item.
On-site service for televisions of certain dimensions may be available to a customer living within a 50km radius of an authorized Sony service facility, provided the residence can be accessed by an on-road service vehicle. Please go to www.fastracservice.ca or call 1-877-899-7669 to determine if on-site service applies to your television and residential location.
Proof of Original Purchase:
This limited warranty applies to the product from the date of original purchase.Therefore, the owner must furnish proof of original purchase at retail for the consumer warranty. For the commercial warranty, the owner must furnish proof of original purchase at retail or from a distributor. For subsequent purchasers, the date the first user acquired the product will apply as the original purchase.
This limited warranty does not extend to cosmetic damage, broken or damaged casing, accessories, exposed antennas and styluses, consumable items (such as batteries) provided with the product, parts wearing out due to normal wear and tear, damage caused by operation of the product with incompatible equipment or attachments, software issues (consult the End-User License Agreement for software terms and conditions, otherwise software is provided "AS IS") or to products sold "AS IS". This limited warranty does not cover regular product maintenance such as cleaning, lubrication or evaluation.
No Other Warranties; Limitation and Exclusion of Liability:
EXCEPT TO THE EXTENT PROHIBITED BY APPLICABLE LAW, ALL OTHER WARRANTY AND CONDITIONS, EXPRESS OR IMPLIED, AND WHETHER ARISING BY LAW, BY STATUTE, BY COURSE OF DEALING OR USAGE OF TRADE, INCLUDING WITHOUT LIMITATION IMPLIED WARRANTY OF MERCHANTABILITY, MERCHANTABLE QUALITY AND FITNESS FOR A PARTICULAR PURPOSE ARE DISCLAIMED. UNDER NO CIRCUMSTANCES SHALL SONY BE LIABLE FOR AN AMOUNT GREATER THAN THE ACTUAL PURCHASE PRICE OF THE UNIT, FOR ANY LOSS, DAMAGE OR CORRUPTION OF DATA, OR FOR ANY SPECIAL, INCIDENTAL OR CONSEQUENTIAL DAMAGES SUSTAINED IN CONNECTION WITH SAID UNIT AND SONY NEITHER ASSUMES NOR AUTHORizes ANY REPRESENTATIVE OR OTHER PERSON TO ASSUME FOR IT ANY OBLIGATION OR LIABILITY OTHER THAN SUCH AS IS EXPRESSLY SET FORTH HEREIN.
Product Registration and Customer Support:
Thank you for choosing a Sony product. At Sony, we strive to create products of the highest quality to enhance your experience and enjoyment. To provide the best support for your product, we request that you complete a product registration form at www.Sony.ca/registration within ninety (90) days of purchase.
For service assistance, product information, product registration or to locate an authorized service facility please go to www. fastracservice.ca, or call: 1-877-899-7669.
For information about a Sony Care Extended Warranty, please call 1-800-773-9667.
For online product support and updates at any time, please visit: www.sony.ca/support, or call the Sony Customer Information Centre at 1-877-899-7669.
Sony Electronics Inc. ("Sony") warrants this product against defects in material or workmanship for the time periods and as set forth below when purchased directly from Sony or a Sony Retailer. Pursuant to this Limited Warranty, Sony will, at its option, (i) repair the product using new or refurbished parts or (ii) replace the product with a new or refurbished product. For purposes of this Limited Warranty, "refurbished" means a product or part that has been returned to its original specifications. In the event of a defect, these are your exclusive remedies.
Labor: For a period of one (1) year from the original date of purchase of the product ("Labor Warranty"), Sony will, at its option, repair or replace with new or refurbished product, product determined to be defective. If Sony elects to replace the product after this Labor Warranty has expired but while the Parts Warranty below is still in effect, it will do so for the applicable labor charge.
Parts: For a period of one (1) year from the original date of purchase of product ("Parts Warranty"), Sony will supply new or refurbished replacement parts in exchange for parts determined to be defective.
This Limited Warranty covers only the hardware components packaged with the Product. It does not cover technical assistance for hardware or software usage and it does not cover any software products whether or not contained in the Product; any such software is provided "AS IS" unless expressly provided for in any enclosed software Limited Warranty. Please refer to the End User License Agreements included with the Product for your rights and obligations with respect to the software.
Instructions: To obtain warranty service, you must deliver the product, freight prepaid, in either its original packaging or packaging affording an equal degree of protection to the Sony authorized service facility specified. It is your responsibility to backup any data, software or other materials you may have stored or preserved on your unit. It is likely that such data, software, or other materials will be lost or reformatted during service and Sony will not be responsible for any such damage or loss. A dated purchase receipt from Sony or a Sony Retailer is required. For specific instructions on how to obtain warranty service for your product,
Visit Sony's Web Site:
www.sony.com/service
Or call the Sony Customer Information Service Center
1-800-222-SONY (7669)
For an accessory or part not available from your authorized dealer, call:
1-800-488-SONY (7669)
Repair / Replacement Warranty: This Limited Warranty shall apply to any repair, replacement part or replacement product for the remainder of the original Limited Warranty period or for ninety (90) days, whichever is longer. Any parts or product replaced under this Limited Warranty will become the property of Sony.
This Limited Warranty only covers product issues caused by defects in material or workmanship during ordinary consumer use; it does not cover product issues caused by any other reason, including but not limited to product issues due to commercial use, acts of God, misuse, limitations of technology, or modification of or to any part of the Sony product or product purchased from other than Sony or a Sony Retailer. To determine if a retailer is part of the Sony Retailer Network, please contact Sony's Customer Service Call Center or go to www.sony.com/support. This Limited Warranty does not cover Sony products sold AS IS or WITH ALL FAULTS or consumables (such as fuses or batteries). This Limited Warranty is invalid if the factory-applied serial number has been altered or removed from the product. This Limited Warranty is valid only in the United States.
LIMITATION ON DAMAGES: SONY SHALL NOT BE LIABLE FOR ANY INCIDENTAL OR CONSEQUENTIAL DAMAGES FOR BREACH OF ANY EXPRESS OR IMPLIED WARRANTY ON THIS PRODUCT.
DURATION OF IMPLIED WARRANTYES: EXCEPT TO THE EXTENT PROHIBITED BY APPLICABLE LAW, ANY IMPLIED WARRANTY OF MERCHANTABILITY OR FITNESS FOR A PARTICULAR PURPOSE ON THIS PRODUCT IS LIMITED IN DURATION TO THE DURATION OF THIS WARRANTY.
Some states do not allow the exclusion or limitation of incidental or consequential damages, or allow limitations on how long an implied warranty lasts, so the above limitations or exclusions may not apply to you. This Limited Warranty gives you specific legal rights and you may have other rights which vary from state to state.