USER MANUAL CD4000 MARANTZ
CLASS 1 LASER PRODUCT
LUOKAN 1 LASERLAITE
KCLASS 1 LASERAPPARAT
COMPACT

DIGITAL AUDIO
ENGLISH
WARRANTY
For warranty information, contact your local Marantz distributor.
RETAIN YOUR PURCHASE RECEIPT
Your purchase receipt is your permanent record of a valuable purchase. It should be kept in a safe place to be referred to as necessary for insurance purposes of when corresponding with Marantz.
IMPORTANT
When seeking warranty service, it is the responsibility of the consumer to establish proof and date of purchase. Your purchase receipt or invoice is adequate for such proof.
FOR U.K. ONLY
This undertaking is in addition to a consumer's statutory rights and does not affect those rights in any way.
FRANCAIS
GARANTIE
Use of controls or adjustments or performance of procedures other than those specified herein may result in hazardous radiation exposure.
Suomi:
VAROITUS!
FITTING A MAINS PLUG (U.K. only)
This apparatus is fitted with an approved 13 Amp plug. To change a fuse in this type of plug proceed as follows:
- Remove fuse cover and fuse.
Fix new fuse which should be a BS1362 5A, A.S.T.A. or BSI approved type.
- Refit the fuse cover.
If the fitted plug is not suitable for your socket outlets, it should be cut off and an appropriate plug fitted in its place.
If the mains plug contains a fuse, this should have a value of 5A. If a plug without a fuse is used, the fuse at the distribution board should not be greater than 5A.
NOTE
The severed plug must be disposed to avoid a possible shock hazard should it be inserted into a 13A socket elsewhere.
HOW TO CONNECT A PLUG
The wires in the mains lead are coloured in accordance with the following code:
BLUE = "NEUTRAL" ("N") and BROWN = "LIVE" ("L"). As these colours may not correspond with the colour markings identifying the terminals in your plug, proceed as follows:
- The BLUE wire must be connected to the terminal which is marked with the letter "N" or coloured BLACK.
- The BROWN wire must be connected to the terminal which is marked with the letter "L" or coloured RED.
- Do not connect either wires to the earth terminal in the plug which is marked by the letter "E" or by the safety earth symbol or coloured green or green-and-yellow.
Before replacing the plug cover, make certain that the cordgrip is clamped over the sheath of the lead - not simply over the two wires.
English 4
Enn
Francais. 12
Fannnnnns
Espanol 20
Espaniol
Deutsch 28
Dnnd
Nederlands 36
Nnnae
Italiano 44
aannnne aannnnnne
Svenska. 52
Svenska
Dansk 60
Danski
Portugués 68
Prrnne Prrnnnne
#
Table of contents
Maintenance 4
Technical data 4
CONTROLS AND CONNECTIONS
Controls on the front. 5
Connections at the back 5
INSTALLATION AND REMOTE CONTROL
Accessoires 6
Connections
Usual connection, LINE OUT 6
Digital connection, DIGITAL OUT 6
Mains 6
Remote control. 6
Batteries 6
PLAYBACK
Playing a CD 7
Selecting a track and searching
Selecting a track during CD play 7
Selecting a track when CD play is stopped. 7
Searching for a passage during CD play. 7
Random order playing (SHUFFLE) 7
Repeating a CD, a track or a program 7
ADDITIONAL FUNCTIONS
Programming track numbers 8
Clearing the program 8
Loudest passage searching 8
Time display 8
Fading out and in 9
Volume adjustment 9
Locking the volume 9
Headphone listening 9
Scanning the CD 9
Recording setup. 10
Environmental information. 10
TROUBLESHOOTING
Warning. 11
Troubleshooting 11


Maintenance
Clean the CD player with a soft, slightly dampened lint-free cloth. Do not use any cleaning agents as they may have a corrosive effect.

Do not expose the CD player, batteries or CDs to humidity, rain, sand or excessive heat (caused by heating equipment or direct sunlight).
This CD player can play all kinds of Audio Discs such as CD-Recordables and CD-Rewriteables. Do not try to play a CD-ROM, CD-I, CDV or computer CD.
If the CD player cannot read CDs correctly use a commonly available cleaning CD to clean the lens before taking the CD player to repair. Other cleaning methods may destroy the lens. Always keep the tray closed to avoid dust on the lens.
The lens may cloud over when the CD player is suddenly moved from cold to warm surroundings. Playing a CD is not possible then. Leave the CD player in a warm environment until the moisture evaporates.
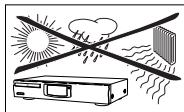
To clean a CD, wipe it in a straight line from the center toward the edge using a soft, lint-free cloth. A cleaning agent may damage the disc! Never write on a CD or attach a sticker to it.
Technical data
Subject to modification without notice.
Standby power consumption. 5W
Frequency range 20-20,000Hz
Amplitude linearity. <1dB (1kHz, -90dB)
Dynamic range. 95dB (1kHz)
Signal-to-noise ratio. 98dB (1kHz, A-weighted)
Channel separation. 85dB (1kHz)
Total harmonic distortion. 0.006% -84dB (1kHz)
Audio output. 2V RMS ±3dB, 1kΩ
Digital coaxial output. 75Ω acc. IEC 958
Impedance headphones.....30-600Ω (5V e. m. f. from 120Ω)
Dimensions. 435× 86× 265mm
Weight. 2.9kg
This set complies with the radio interference requirements of the European Community
CONTROLS AND CONNECTIONS
English
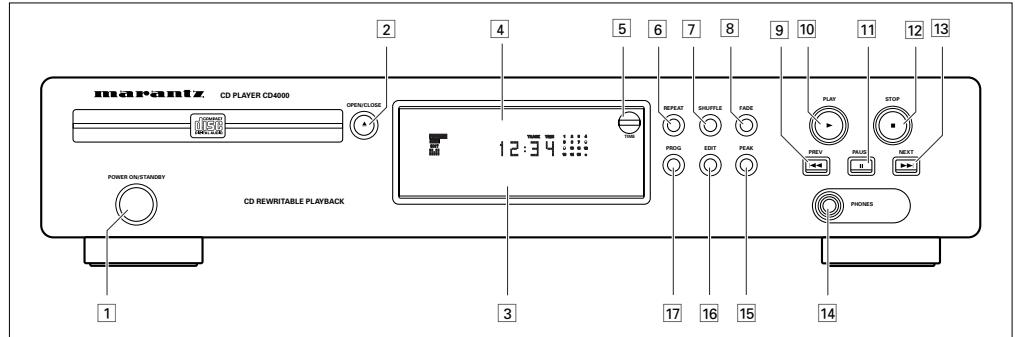
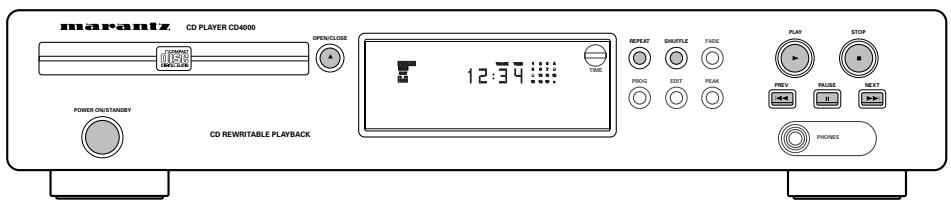
Controls on the front
1 POWER ON/STANDBY...switches the CD player on and to standby
2 OPEN-CLOSE. .opens and closes the CD tray
3 Sensor for the infrared remote control
4 Display
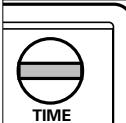
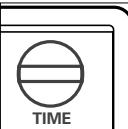
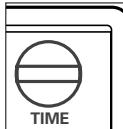
5 TIME.........switches through the different time information
6 REPEAT repeats a track, a program or the entire CD
7 SHUFFLE...plays a CD or a program in random order
8 FADE. fades CD play out and in
9 PREV. selects the beginning of the current or a previous track, and searches backward
10 PLAY>starts CD play
11 PAUSE II.....interrupts CD play
STOP stops CD play and clears a program
13 NEXT selects the beginning of a subsequent track, and searches forward
14 PHONES 6.3mm headphone socket
PEAK searches the loudest passage of a CD
16 EDIT changes the settings for recording on tape or CD-Recordable
17 PROGRAM .programs track numbers
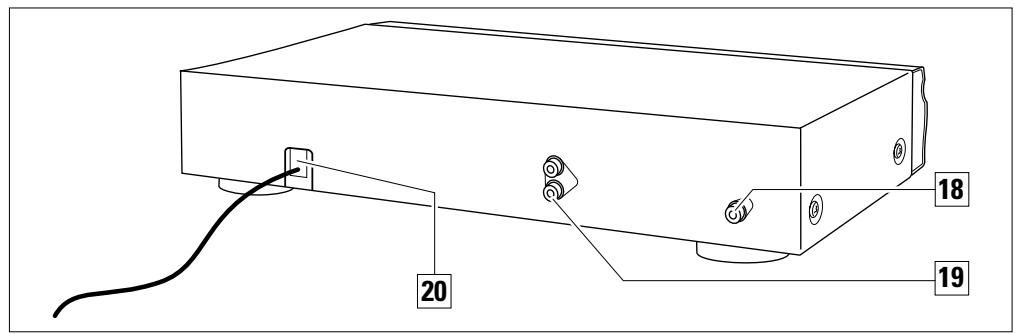
Connections at the back
DIGITAL OUT... to connect the digital input of a digital audio device
19 LINE OUT LR .to connect the audio input of an amplifier
20 MAINS LEAD After all other connections have been made, connect this mains lead to the wall socket.
INSTALLATION AND REMOTE CONTROL
yS!6u
Accessories
This CD player is supplied including:
- a remote control
- 2 batteries for the remote control
- a connection cable
- this instruction booklet
Connections
Usual connection, LINE OUT
1 Insert the red plug of the supplied connection cable into R and the other plug into L.
2 Insert the other side of the cable into the corresponding sockets of the CD or AUX input of your amplifier.
Important!
You may also use the TUNER or TAPE, but never the PHONO input of your amplifier!
Digital connection, DIGITAL OUT
Never connect this socket to a non-digital input - such as AUX, CD, PHONO, TAPE - of an amplifier. This output supplies a digital signal and can therefore only be connected to a digital input.
1 Insert an optional coaxial cable into DIGITAL OUT.
2 Insert the other side of the cable into the digital input of your digital device (e.g. CD Recorder).
Mains
The type plate is located on the bottom of the CD player.
1 Check whether the mains voltage as shown on the type plate corresponds to your local mains voltage. If it does not, consult your dealer or service organisation.
2 Connect the mains cable to the wall socket. This switches on the mains supply.
Note: To disconnect the CD player from the mains completely, remove the mains plug from the wall socket.
For users in the U.K.:
please follow the instructions on page 2.
Remote control

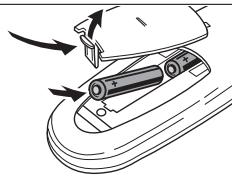
Batteries
- Open the battery compartment of the remote control and insert 2 alkaline batteries, type AAA (R03, UM-4).
Remove batteries if they are flat or the remote control is not going to be used for a long time.
Batteries contain chemical substances, so they should be disposed of properly.
TIME.........switches through the different time informations
. switches the CD player to standby
PROG....programs track numbers
FADE............fades CD play out and in
SHUFFLE...plays a CD or a program in random order
DIGITS 0-9.........selects a track by number
SCAN... plays the beginning of each track
REPEAT repeats a track, a program or the entire CD
VOLUME - .decreases the volume level
VOLUME ^+ .increases the volume level
PLAY .starts CD play
PREV. selects the beginning of the current or a previous track
NEXT selects the beginning of a subsequent track
STOP stops CD play and clears a program
一 searches backward
PAUSE II......interrupts CD play
searches forward
Discs for playback
This system can play all audio CD, finalized audio CD-Recordable and finalized audio CD-Rewritable format discs.


Playing a CD
1 Use POWER ON / STANDBY to switch on the CD player.
2 Press OPEN-CLOSE to open the CD tray. OPEN appears on the display.
3 Insert an audio CD (printed side up) and press OPEN-CLOSE to close the CD compartment. READING appears on the display. Then the number of tracks and the playing time is shown.
4 Press PLAY to start CD play. The display shows , TRACK, TIME, and the number and time of the actual track.
- You can interrupt CD play by pressing PAUSE II The display shows III and the track number and time where playback was stopped.
- Continue CD play by pressing PAUSE II again.
5 Press STOP to stop CD play. Note: Playback will also stop if the end of the CD is reached.
Selecting a track and searching
Selecting a track during CD play
- Briefly press PREV. or NEXT once or several times to skip to the beginning of the current, previous or subsequent track(s).
01
- Use the digits 0-9 on the remote control to key in the number of a track.
→ CD play continues with the selected track.
Selecting a track when CD play is stopped
1 Briefly press PREV. or NEXT once or several times. or
- Use the digits 0-9 on the remote control to key in the number of a track.
2 Press PLAY to start CD play. Playback starts with the selected track.
Searching for a passage during CD play
1 Hold down PREV. or NEXT to find a particular passage in a backward or forward direction. CD play continues at a low volume.
2 Release the button when you have reached the desired passage.
Note: In the shuffle and repeat mode and when playing a program, searching is only possible within the particular track.
Random order playing (SHUFFLE)
1 Press SHUFFLE before or during CD play to start shuffle play. SHUFFLE is shown in the display. All the tracks of the CD (or program if available) will now be played in random order.
2 Press SHUFFLE again to return to normal CD play.
Repeating the CD, a track or a program
1 Press repeatedly REPEAT during CD play. The display shows the different repeating modes. REPEAT 1: the current track is played repeatedly. REPEAT: the entire CD or program (if available) is played repeatedly.
2 Press REPEAT until the display indication disappears to return to normal CD play.
Note: It is possible to activate the different playing modes at the same time, e. g. you can repeatedly play the entire CD or program in random order (PROGRAM REPEAT SHUFFLE).
ADDITIONAL FUNCTIONS
yS!6u
REPEAT

SHUFFLE

FADE

PROG

EDIT

PEAK

Programming track numbers
You can select a number of tracks and store these in the memory in the desired sequence. You can store any track more than once. At most, 30 tracks can be stored in the memory.
1 Press PROG to start programming.
PROGRAM flashes.
Note: If you press PROGRAM while playing a CD, the actual track will be added to the program.
2 Press PREV. or NEXT to select the desired track. or
Key in the number of a track with the digits 0-9 on the remote control.
3 Press PROG to store the track number.
TRACK, TOTAL TIME, and the number of the programmed track is displayed. The number of programmed tracks is increased and the time of the track is added to the total time of the program.
4 Repeat steps 2 and 3 for all tracks to be programmed.
5 Press STOP to end programming.
→PROGRAM lights permanently.
- It is possible to review the program using the PREV. or NEXT You can add more tracks by pressing PROGRAM like you have done before.
6 Press PLAY to start program play.
Note: If you try to store more than 30 tracks
PROGRAM FULL scrolls through the display.
Clearing the program
1 If necessary press STOP to stop program playing.
2 Press STOP to clear the program.
→PROGRAM CLEARED scrolls through the display, PROGRAM disappears and your program is cleared.
Note: The program will also be cleared if you open the tray.
Loudest passage searching
You can search for the loudest passage of a CD or program. This will help you in adjusting your recording device if required.
1 If necessary press STOP to stop CD play.
2 Press PEAK to start searching.
PEAK starts flashing. Searching may need a few minutes. Then 4 seconds of the loudest passage are played repeatedly.
- You can interrupt peak play by pressing PAUSE II Continue peak play by pressing PAUSE II again.
3 Press STOP to stop playing. or
- Press PLAY to start CD play.
Time display
You can display time information which is stored on the CD.
While playing a CD or a program the number and elapsed time of the actual track, and TIME are displayed.
- Press TIME several times to display:
The number and remaining time of the actual track, and REM TIME.
The number of the actual track, the total elapsed time of the CD, and TOTAL TIME.
The number of the actual track, the total remaining time of the CD, and TOTAL REM TIME.
Note: If you press TIME when the CD is not playing you may only display the total time of the CD.
REPEAT

SHUFFLE

FADE

PROG

EDIT

PEAK

Fading out and in
You can fade out and in CD play, e. g. to stop and start a recording softly.
1 Press FADE during CD play to fade out.
The display shows in steps. The volume is lowered continuously until CD play is paused.
2 Press FADE again to fade in.
The display shows in steps. CD play starts and the volume is raised continuously to its previous level.
Note: You may use FADE anytime when CD play is paused to fade in.
Volume adjustment
The volume of the CD player can be adjusted. This affects the DIGITAL OUT output as well.
- Press VOLUME - or VOLUME + on the remote control.
The volume of the CD player is lowered or raised. The display shows the actual value between POLMIN and POLMAX .
Important!
VOLUME - / + is altering the signal of the output. Before recording set the volume to VOL MAX and do not change during recording.
Locking the volume
It is possible to lock the output volume to its maximum. This affects the DIGITAL OUT output as well. Locking the volume can be useful when recording from the CD-player.
- Keep EDIT pressed for more than 2 seconds.
If the voulme was unlocked:
The display shows VOL FIX and the volume is locked.
If the voulme was locked:
The display shows VCL MAX and the volume is unlocked.
Note: If you press VOLUME - / + and the volume is locked the display shows VOL FIX.
Headphone listening
1 Connect your headphones to the 6.3mm PHONES socket.
2 Press VOLUME - or VOLUME + on the remote control to adjust the volume (see "Volume adjustment").
Important!
The volume of the headphones is in line with the volume of the output. Therefore do not use VOLUME - / + during recording.
Scanning the CD
It is possible to listen to the beginning of each track of a CD or program. You can choose whether to play 10, 20 or 30 seconds of each track.
1 Press SCAN on the remote control repeatedly to switch through the different scan modes.
SCAN 10,SCAN 20,SCAN 30,SCAN OFF... (SCAN OFF aborts the scan function).
2 As soon as the desired scan mode is displayed do not press the button again.
After 1 second scanning starts. The number and remaining time of the actual track, and REM TIME are displayed.
- You can interrupt scan by pressing PAUSE II. Continue scan by pressing PAUSE II again.
3 Press STOP to stop scanning.
or
- Press PLAY to start CD play with the actual track.
Note: If you press SCAN while SHUFFLE is active, shuffle will be stopped before scanning.
ADDITIONAL FUNCTIONS
yS!6u
REPEAT

SHUFFLE

FADE

PROG

EDIT

PEAK

Recording setup
It is possible to set up the CD player in a way that it will calculate which tracks will fit on your recording media. It is only possible to use the edit function if a disc has not more than 29 tracks.
If you use NORMAL the recording stops after the last track that fits on one side of your recording media. Notice that CD-Recordables are single-sided only! If you use OPTIMAL some tracks will be skipped to minimise the unused space on your recording media. The sequence of the tracks stays as the original.
1 Insert a CD and, if desired, program track numbers.
2 Press EDIT to start the setup.
The display shows EDIT and NORMAL.
3 Press PREV. or NEXT to switch through the different scan modes.
→NORMAL, OPTIMAL, STOP... (STOP aborts the edit function).
4 As soon as the desired edit mode is displayed press EDIT.
The display shows C 90.
5 Press PREV. or NEXT (PREV. or NEXT on the remote control) to switch through the different recording times and media.
→C 100, C 120, CDR 21, CDR 60, CDR 74, C 30, C 45, C 60, C 90...
Note: C is for cassette, CDR is for CD-Recordable and CD-Rewriteable and therefore for single-sided recording only.
6 As soon as the desired recording time and media is displayed press EDIT.
The number of tracks and the playing time are displayed.
7 Start your recording and press PLAY to start CD play.
If cassette () was selected the CD player pauses after playing the calculated tracks for side A. If CD-Recordable () was selected the CD player stops.
8 If required switch tape sides.
9 Press PLAY to start CD play again.
The number of tracks and the playing time are displayed. The remaining tracks for side B are played.
Note: It is possible to switch between A and B by using PREV. or NEXT
All redundant packing material has been omitted. We have done our utmost to make the packaging easily separable into three mono materials: cardboard (box), polystyrene foam (buffer) and polyethylene (bags, protective foam sheet).
Your set consists of materials which can be recycled if disassembled by a specialized company. Please observe the local regulations regarding the disposal of packing materials, exhausted batteries and old equipment.
WARNING
Under no circumstances should you try to repair the CD player yourself as this will invalidate the guarantee.
If a fault occurs, first check the points listed below before taking the set for repair.
If you are unable to solve a problem by following this checklist, consult your dealer or service center.
| Problem | Possible cause | Solution |
| No power | Mains cable is not securely connected. | Connect mains cable properly. |
| No or bad sound | Volume is too low. | Adjust volume. |
| Interference caused by electric equipment like TVs, computers, engines, etc. | Keep the CD player away from electrical equipment. |
| Loose or wrong connections. | Connect the CD player correctly. |
| No or bad headphone sound | Volume is too low. | Adjust VOLUME -/+ |
| Headphone plug is dirty. | Clean headphone plug. |
| No or low quality recording | Volume is too low. | Adjust VOLUME -/+ |
| Loose or wrong connections. | Connect the CD player correctly. |
| No reaction to operation of any keys | Electrostatic discharge. | Disconnect the CD player from mains, reconnect after a few seconds. |
| NO DISC is displayed | No CD is inserted. | Insert a CD. |
| The CD is badly scratched or dirty. | Replace or clean the CD. |
| The CD is inserted upside down. | Insert CD with label upwards. |
| DISC NOT FINALIZED is displayed | The CD-RW (or CD-R) is not properly recorded for the use on a standard CD player. | Read the instruction booklet of your CD-Rewritable (or CD-Recordable) recorder on how to finalize a recording. |
| The CD is badly scratched or dirty. | Replace or clean the CD. |
| WRONG TRACK is displayed | Chosen track number is higher than the highest track number on the CD. | Key in a track number within the range of the track numbers on the CD. |
| 0 0:00 is displayed | First track of the CD is longer than the first side of the chosen recording media. | Choose a recording media with a recording time longer than the first track of the CD. |
| POL FIX is displayed | Volume is locked. | Press EDIT for more than 2 seconds to unlock the volume. |
| CD skips tracks | SHUFFLE or PROGRAM is active. | Switch off SHUFFLE or PROGRAM play. |
| The CD is badly scratched or dirty. | Replace or clean the CD. |
| Laser lens is dirty. | Clean with a commonly available cleaning CD. |
| The laser lens is steamed up. | Wait until the lens has cleared. |
| Remote control does not function properly | Batteries are inserted incorrectly. | Insert batteries correctly. |
| Batteries are flat. | Insert fresh batteries. |
| Distance to the CD player is too large. | Reduce distance. |
| COUNTRY | COMPANY | ADDRESS |
| AUSTRALIA | Scan audio Pty. Ltd. | 4 Station Street, Thornleigh NSW 2120, Australia |
| AUSTRIA | Huber & Prohaska GmbH | Taborstraße 95 / Ladestraße 1, Gebäude Hangartner, A-1200 Wien, Austria |
| BELGIUM | Van der Heyden Audio N.V. | Brusselbaan 278, 9320 Erembodegem, Belgium |
| BULGARIA | Ariescommerce GmbH | Makedonia Blvd. 16, 1606 Sofia, Bulgaria |
| CANADA | Lenbrook Industries Limited | 633 Granite Court, Pickering, Ontario |
| CYPRUS | Empire Hifi systems Ltd. | P.O. Box 5604, Nicosia, Cyprus |
| CZECH REPUBLIC | Audio International | Fugnerova 1, 67801 Blansko, Czech Republic |
| DENMARK | Hi-Fi Klubben Denmark | Aboulevarden 1, DK-8000 Arhus C., Denmark |
| DUBAI | V.V.& SONS | P.O. Box 105, Dubai, U.A.E. |
| ESTONIA | Audio International Baltic | Lo Hu 12, EE0026 Tallin, Estonia |
| F.Y.R.O.M. | T.P. KODI | ul.Cedomir Kantargiev 21a, Skopje, Former Yugoslavian Republic of Macedonia |
| FINLAND | Hi-Fi Klubi Finland | Uudenmaankatu 4-6, SF-00120 Helsinki, Finland |
| FRANCE | Marantz France | A division of Marantz Europe B.V., P.O. Box 301, 92 156 Suresnes Cedex, France |
| GERMANY | Marantz Deutschland | Hakenbusch 3, 49078 Osnabrück, Germany |
| GREECE | Adamco S.A. | 188, Hippocraticus Street, 11471 Athens, Greece |
| HEADQUARTERS EUROPE: | Marantz Europe B.V. | Building SFF-2, P.O. Box 80002, 5600 JB Eindhoven, The Netherlands |
| HONG KONG | Forward International Corp. Ltd. | 10/F, Block B, Wo Kee Hong Building, 585-609 Castle Peak Road, Kwai Chung New Territories, Hong Kong |
| HUNGARY | Infovox Ltd. | Terez Krt.31, 1067 Budapest, Hungary |
| ICELAND | Radiobudin HF | Skipholti 19, P.O. Box 424, 121 Reykjavik, Iceland |
| INDIA | Marantz India | c/o Philips India Ltd., Plot 80, Bhosari Industrial Estate Pune - 411026, India |
| IRAN | Home Co. | 5th floor no 878 Philips Building Enghelab ave, P.O. 11365/7844 Tehran, Iran |
| IRELAND | Marantz Ireland | Clonskeagh, Dublin 14, Ireland |
| ISRAEL | Elmor Ltd. | 52 Heh Beiyar Street, Kikar Hamedina, Tel Aviv, Israel |
| ITALY | Marantz Italy | Via Casati 23, 20052 Monza (Milano), Italy, Servizio Consumatori 1678-20026,Numero Verde |
| JAPAN | Marantz Japan Inc. | 35-1 Sagami Ohno 7-Chome, Japan |
| KOREA | Mk Enterprises Ltd. | 121-210, 2F Shinhan Bldg., 247-17 Seokyo-dong, Mago-ku, Seoul, Korea |
| KUWAIT | alAlamiah Electronics Intl. | P.O. Box 8196, Salmiah 22052, Kuwait |
| LATvia | Ace Ltd. | 61, LacPlesa Str., Riga LV 1011, Latvia |
| LEBANON | AZ Electronics S.A., 1, | P.O. Box 11 2833, Beirut, Lebanon |
| LITHUANIA | A Accapella Ltd. | Ausros, Vartu G5, Pasazo Skrg, 2001 Vilnius, Lithuania |
| MALAYSIA | Wo Kee Hong Electronics Sdn. Bhd. | 102 Jalan SS 21/35, Damansara Utama, 47400 Petaling Jaya, Selangordarul Ehsan, Malaysia |
| MALTA | Doneo Co Ltd. | 78 The Strand, Sliema SLM07, Malta |
| MAURITIUS | SKR Electronics Ltd. | P.O. Box 685, Bell Village, Port Louis, Mauritius |
| NETHERLANDS | Marantz Trading | A division of Marantz Europe B.V., Building SFF-2, P.O. Box 80002, 5600 JB Eindhoven, The Netherlands |
| NEW ZEALAND | Scan audio Pty. Ltd. | 4 Station Street, Thornleigh NSW 2120, Australia |
| NORWAY | Hi-Fi Klubbem Norway | Lillegrensen 7, N-0159 Oslo, Norway |
| OMAN | Mustafa & Jawad Trading CO. | P.O. Box 1918, Ruwi, Oman |
| POLAND | Marantz Polska | Ul. Marszalkowska 45/49, 00-648 Warszawa, Poland |
| PORTUGAL | Corel2 | Comercio de Electrónica Lda., Av. Luis Bivar, No 85 A, 1050 Lisboa, Portugal |
| PROFESSIONAL EUROPE | Marantz Professional Products | Kingsbridge House, Padbury Oaks, 575-583 Bath Road, Longford, Middlesex UB7 0EH, U.K. |
| PROFESSIONAL U.S.A. | Marantz Professional Products | Distributed by: Superscope Technologies Inc., 1000 Corporate Blvd. Ste.D, Aurora, Illino |
| QATAR | Almana & Partners W.W.L. | P.O. Box 49, Doha, Qatar |
| REUNION | Vision + | 180 Rue du Marechal Leclerc, 97400 Saint Denis, Ile de la Reunion |
| ROMANIA | Alltrom SRL | Soseaua Bucuresti, Ploiesti 10, Sector 1, Bucharest, Romania |
| RUSSIA | Trade Company SV | Bld. 2, 7 Montazhnaya Street, 107497 Moscow, Russia |
| SAUDI ARABIA | Ultimate Fidelity | Sameria Comm. Center, Roadah Dist., P.O. Box 7760, Jeddah 21472, Saudi Arabia |
| SINGAPORE | Forward Marketing (S) Pte. Ltd. | Wo Kee Hong Centre, 29 Leng Kee Road, Singapore 159099, Singapore |
| SLOVAKIA | Audio International Slovakia | Nam. SNP 10, 96001 Zvolem, Slovakia |
| SLOVENIA | Bofex | Smartinska 152, HALA V/3, 61000 Ljubljana, Slovenia |
| SOUTH AFRICA | Coherent Imports (PTY) Ltd. | P.O. Box 1614, Alberton, 1450, South Africa |
| SPAIN | Marantz Spain | Martinez Villergas 2, Apartado 2065, Madrid 28027, Spain |
| SWEDEN | Hi-Fi Klubbem A.B. | Tegnersgatan 21, S-412 52 Gotenborg, Sweden |
| SWITZERLAND | Sound Company AG | Postfach, 8010 Zürich, Switzerland |
| TAHITI | Covecolor | Av. Prince Hinoi, Cours de l'union sacré, P.O. Box 2334, Papeete, Tahiti |
| TAIWAN | Pai-Ying Co. Ltd. | 6th No 148 Sung Kiang Road, Taipei 10429, Taiwan R.O.C. |
| THAILAND | Marantz Standard Co. Ltd. | 746-750 Mahachai Road, Wangburapa, Bangkok 10200, Thailand |
| TURKEY | Penta Elektronie | Sanayi Ve Ticaret Ltd. Sti., Selvi Kokak, No. 4/1, Senlikoy, 34810 Florya, Istanbul, Turkey |
| U.K. | Marantz Hifi UK Ltd. | Kingsbridge House, Padbury Oaks, 575-583 Bath Road, Longford, Middlesex UB7 0EH, U.K. |
| U.S.A. | Marantz America Inc. | 440 Medinah Road, Roselle, IL 60172, U.S.A. |
| YUGOSLAVIA | ITM | Ljutice Bogdana la, Belgrade, Yugoslavia |
| EXPORT | Marantz Trading | A division of Marantz Europe B.V., Building SFF-2, P.O. Box 80002, 5600 JB Eindhoven, The Netherlands |
marantz® is a registered trademark.