THETA X - Caméra 360 RICOH - Free user manual and instructions
Find the device manual for free THETA X RICOH in PDF.
Download the instructions for your Caméra 360 in PDF format for free! Find your manual THETA X - RICOH and take your electronic device back in hand. On this page are published all the documents necessary for the use of your device. THETA X by RICOH.
USER MANUAL THETA X RICOH
A New Way to Enjoy Photography ● Easy Operation Introduction Video You can watch a video of how to use this product. https://www.thetalab.ricoh/en/howto/tips/ thetax/
● Product Website You can see the latest product information and useful hints and tips on using this product. https://theta360.com/en/
● Brand Website You can see the tips on how to enjoy this product, various events, and other information. https://www.thetalab.ricoh/en/
● User Guide You can access the user guide for details on how to use this product. https://support.theta360.com/en/manual/
● Support Information You can see the support information and entire warranty provisions. https://support.theta360.com/en/
Receptor4.0_QSG.indb
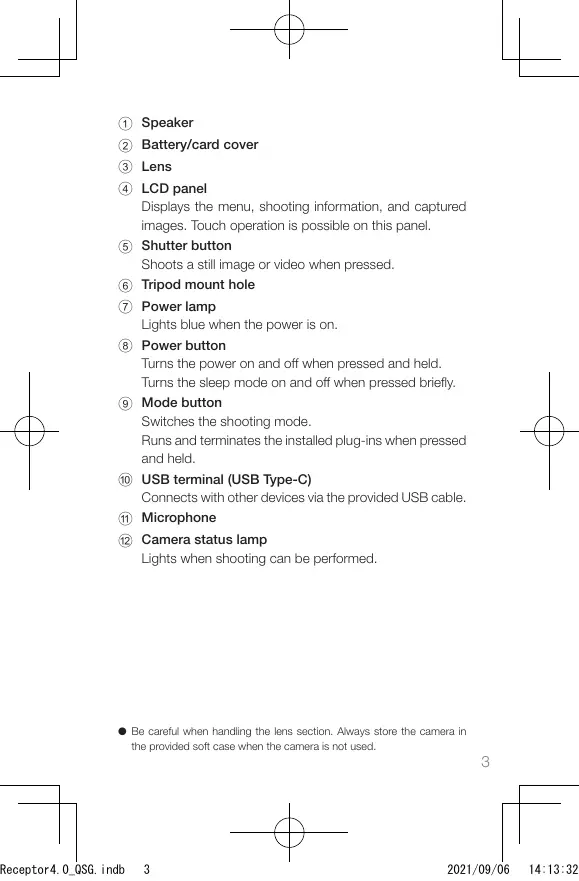
1 Speaker 2 Battery/card cover 3 Lens 4 LCD panel Displays the menu, shooting information, and captured images. Touch operation is possible on this panel. 5 Shutter button Shoots a still image or video when pressed. 6 Tripod mount hole 7 Power lamp Lights blue when the power is on. 8 Power button Turns the power on and off when pressed and held. Turns the sleep mode on and off when pressed briefly. 9 Mode button Switches the shooting mode. Runs and terminates the installed plug-ins when pressed and held. 0 USB terminal (USB Type-C) Connects with other devices via the provided USB cable. a Microphone b Camera status lamp Lights when shooting can be performed.
● Be careful when handling the lens section. Always store the camera in the provided soft case when the camera is not used.
Receptor4.0_QSG.indb
Check that the power of the camera is off. Slide the battery/card cover in the direction of the arrow to open it.
Check that the orientation of the battery is cor‑ rect, and insert it all the way while pushing the latch sideways. To remove the battery, slide the latch.
Check that the orientation of the memory card is correct, and insert it. Use a commercially available microSDXC card (64 GB or higher, UHS-I).
Close the battery/card cover. Connect the camera to a computer with the pro‑ vided USB cable to charge the battery. The battery level can be checked on the LCD panel. The power lamp lights green during charging, and the lamp turns off when charging is complete.
● Update the camera firmware to the latest version before using the camera. For details on the operation, refer to the user guide. https://support.theta360.com/en/manual/
Receptor4.0_QSG.indb
Basic Operation ● Turning the Camera On Press and hold the power button for approx. 1 second. The power lamp starts to flash. In the sleep mode, briefly press the power button to recover from the sleep mode. Touch on the LCD panel for subsequent operations.
● Making Initial Settings When the camera is started for the first time, set the language, position information, and date and time according to the on-screen instructions. Then the LCD panel shows how to operate on the shooting, setting, and playback screens and how to connect the camera to a smartphone. If [Auto] is set in the date and time setting, the date and time of the camera is synchronized with those of the smartphone when the camera is connected to the basic app for smartphone. When the initial settings are complete, the shooting screen appears.
● Switching the Screen Swipe from the edge of the LCD panel while the shooting screen is displayed to switch the screen.
3 1 Swiping down: Camera setting screen 2 Swiping right: Playback screen 3 Swiping up: Shooting parameter setting screen Swiping up again: Shooting setting screen 4 Swiping left: Plug-in selection screen ● Swipe the bar at the edge of each screen toward the center to return to the shooting screen. The panel display returns to the shooting screen also when the shutter button is pressed.
● Shooting Screen 3 2 1
Wireless LAN communication status Bluetooth® Position information Remote control Plug-in Memory card Battery level Self-timer Shooting mode Exposure program
● For 8, 9, and 0, you can make settings by tapping them.
Downloading the App You can capture and play back images with this camera alone, but furthermore, you can use a smartphone app to shoot, view, and share images from your smartphone. Download the basic app that is compatible with your smartphone.
https://support.theta360.com/en/download/ The app “THETA+” for editing captured still images and videos is also available.
Receptor4.0_QSG.indb
Connecting to a Smartphone You can use the Bluetooth® function to connect the camera to a smartphone via a wireless LAN.
Turn the power on, and then tap
era setting screen. appears on the LCD panel. Turn on the Bluetooth® and Wi‑Fi™ functions of the smartphone. Start the basic app for smartphone. Tap on the screen of the basic app, and then follow the on‑screen instructions.
● When the Bluetooth® Function Is Not Used Select the SSID of this camera in the network list of the Wi-Fi™ settings on the smartphone, and then enter the password.
The serial number printed on the bottom of the camera is the same as the SSID and password. Password (00001017 in this case) YR 00 001017
SSID THETA + Serial number + .OSC (THETAYR00001017.OSC in this case)
● You can change the password from the smartphone.
● When the Connection Cannot Be Estab‑ lished
Receptor4.0_QSG.indb
off and back on on the camera setting
screen. Check that the camera is not connected to an‑ other wireless LAN such as a public Wi‑Fi™ net‑ work. Execute [Reset password] on the camera setting screen. Turn off the power of the camera, restart the ba‑ sic app for smartphone, and then turn the power on again.
Connecting to a Wireless Router You can connect the camera to a wireless router in the client mode.
Select [SSID] in [Client mode] on the camera set‑
ting screen, and then enter the password.
Shooting and Viewing ● Switching the Shooting Mode You can switch the shooting mode by tapping or on the shooting screen. Alternatively, press the mode button on the side to switch the shooting mode. Still image
● Shooting Still Images and Videos You can shoot still images and videos from the camera or smartphone. To shoot still images and videos using the camera, press the shutter button. To shoot still images and videos using the smartphone, use the basic app for smartphone. For how to shoot with the remote control (TR-1) sold separately, refer to the user guide. https://support.theta360.com/en/manual/
● Viewing Still Images and Videos You can view captured still images and videos on the LCD panel. You can also send still images and videos to the smartphone for viewing, using the basic app for smartphone.
Receptor4.0_QSG.indb
Sharing on SNS You can share captured still images and videos on social networking services such as Twitter and Facebook. Still images and videos can be shared from the basic app for smartphone, editing app “THETA+”, or basic app for computer.
● You need to register with an account on each service in order to use the services. ● For details on viewing and sharing images from a computer, refer to the user guide. https://support.theta360.com/en/manual/
Extending the Functions You can use the camera in special modes by using the plugins installed in the camera.
● Running and Terminating the Plug‑in
Swipe left on the LCD panel to display the plug‑in selection screen. Tap the plug‑in to use. The plug-in is run. Press and hold the mode button on the side to terminate the plug‑in.
● The next time the mode button is pressed and held, the last selected plug-in is run. If a plug-in has never been run, the plug-in selection screen appears. ● In addition to the pre-installed plug-ins, you can add new plug-ins. When the connection is established in the client mode, you can install plug-ins on the plug-in selection screen. ● For details on the plug-in, refer to the user guide. https://support.theta360.com/en/manual/
Receptor4.0_QSG.indb
● Facebook, the Facebook logo, and “f” logo are trademarks or registered trademarks of Facebook, Inc. ● Twitter, the Twitter logo, Twitter “t” logo, and Twitter blue bird are registered trademarks of Twitter, Inc. in the United States and other countries. ● Wi-Fi is a registered trademark of Wi-Fi Alliance. ● Bluetooth is a registered trademark of Bluetooth SIG, Inc. ● USB Type-C is a trademark of USB Implementers Forum. ● The images, illustrations, and screen captures used in this guide may differ from those of the actual device.
Unauthorized reproduction of this document in whole or in part is strictly prohibited. The content of this document may be changed at any time without prior notice. © 2021 RICOH COMPANY, LTD.
https://theta360.com/ja/
https://www.thetalab.ricoh/
https://support.theta360.com/ja/manual/
● サポートのご案内 サポートについての情報、および保証規定全文を入手でき ます。
https://support.theta360.com/ja/
https://support.theta360.com/ja/manual/