USER MANUAL 1181N JUKI
TO ENSURE SAFE USE OF YOUR SEWING MACHINE
For the sewing machine, automatic machine and ancillary devices (hereinafter collectively referred to as "machine"), it is inevitable to conduct sewing work near moving parts of the machine. This means that there is always a possibility of unintentionally coming in contact with the moving parts. Operators who actually operate the machine and maintenance personnel who are involved in maintenance and repair of the machine are strongly recommended to carefully read to fully understand the following SAFETY PRECAUTIONS before using/maintaining the machine. The content of the SAFETY PRECAUTIONS includes items which are not contained in the specifications of your product.
The risk indications are classified into the following three different categories to help understand the meaning of the labels. Be sure to fully understand the following description and strictly observe the instructions.
(I) Explanation of risk levels
| DANGER :This indication is given where there is an immediate danger of death or serous injury if the person in charge or any third party mishandles the machine or does not avoid the dangerous situation when operating or maintaining the machine. |
| WARNING :This indication is given where there is a potentiality for death or serious injury if the person in charge or any third party mishandles the machine or does not avoid the dangerous situation when operating or maintaining the machine. |
| CAUTION :This indication is given where there is a danger of medium to minor injury if the person in charge or any third party mishandles the machine or does not avoid the dangerous situation when operating or maintaining the machine. |
| Items requiring special attention. |
(II) Explanation of pictorial warning indications and warning labels
| Pictorial warning indication | | There is a risk of injury if contacting a moving section. | Pictorial warning indication | | Be aware that holding the sewing machine during operation can hurt your hands. |
| There is a risk of electrical shock if contacting a high-voltage section. | | There is a risk of entanglement in the belt resulting in injury. |
| There is a risk of a burn if contacting a high-temperature section. | | There is a risk of injury if you touch the button carrier. |
| Be aware that eye deficiency can be caused by looking directly at the laser beam. | Indication label | | The correct direction is indicated. |
| There is a risk of contact between your head and the sewing machine. | | Connection of a earth cable is indicated. |
| Warning label | 1→
2→ | 1
2 | ←3 | 1
2 | ←4
3 |
| 1·There is the possibility that slight to serious injury or death may be caused.
·There is the possibility that injury may be caused by touching moving part.
2·To perform sewing work with safety guard.
·To perform sewing work with safety cover.
·To perform sewing work with safety protection device.
3·Be sure to turn the power OFF before carrying out "machine-head threading", "needle changing", "bobbin changing" or "oiling and cleaning". | 1
2 | ←5
3 |
| Electrical-shock danger label | 危险 | DANGER |
| 高電圧部分に触い、大千伏するこお願いいたします。
電源を切て、5分以上Voltadaかか力ローはすります。 | Hazardous voltage will cause injury.
Turn off main switch and unplug power cord and wait at least 5 minutes before opening this cover. |

DANGER
- When it is necessary to open the control box containing electrical parts, be sure to turn the power off and wait for five minutes or more before opening the cover in order to prevent accident leading to electrical shock.

CAUTION
Basic precaution
- Be sure to read the instruction manual and other explanatory documents supplied with accessories of the machine before using the machine. Carefully keep the instruction manual and the explanatory documents at hand for quick reference.
- The content of this section includes items which are not contained in the specifications of your product.
- Be sure to wear safety goggles to protect against accident caused by needle breakage.
- Those who use a heart pacer have to use the machine after consultation with a medical specialist.
Safety devices and warning labels
- Be sure to operate the machine after verifying that safety device(s) is correctly installed in place and works normally in order to prevent accident caused by lack of the device(s).
- If any of the safety devices is removed, be sure to replace it and verify that it works normally in order to prevent accident that can result in personal injury or death.
- Be sure to keep the warning labels adhered on the machine clearly visible in order to prevent accident that can result in personal injury or death. If any of the labels has stained or come unstuck, be sure to change it with a new one.
Application and modification
- Never use the machine for any application other than its intended one and in any manner other than that prescribed in the instruction manual in order to prevent accident that can result in personal injury or death. JUKI assumes no responsibility for damages or personal injury or death resulting from the use of the machine for any application other than the intended one.
- Never modify and alter the machine in order to prevent accident that can result in personal injury or death. JUKI assumes no responsibility for damages or personal injury or death resulting from the machine which has been modified or altered.
Education and training
- In order to prevent accident resulting from unfamiliarity with the machine, the machine has to be used only by the operator who has been trained/educated by the employer with respect to the machine operation and how to operate the machine with safety to acquire adequate knowledge and operation skill. To ensure the above, the employer has to establish an education/training plan for the operators and educate/train them beforehand.
Items for which the power to the machine has to be turned off
Turning the power off: Turning the power switch off, then removing the power plug from the outlet. This applies to the following.
- Be sure to immediately turn the power off if any abnormality or failure is found or in the case of power failure in order to protect against accident that can result in personal injury or death.
- To protect against accident resulting from abrupt start of the machine, be sure to carry out the following operations after turning the power off. For the machine incorporating a clutch motor, in particular, be sure to carry out the following operations after turning the power off and verifying that the machine stops completely.
2-1. For example, threading the parts such as the needle, looper, spreader etc. which have to be threaded, or changing the bobbin.
2-2. For example, changing or adjusting all component parts of the machine.
2-3. For example, when inspecting, repairing or cleaning the machine or leaving the machine.
- Be sure to remove the power plug by holding the plug section instead of the cord section in order to prevent electrical-shock, earth-leakage or fire accident.
- Be sure to turn the power off whenever the machine is left unattended between works.
- Be sure to turn the power off in the case of power failure in order to prevent accident resulting of breakage of electrical components.
PRECAUTIONS TO BE TAKEN IN VARIOUS OPERATION STAGES
Transportation
- Be sure to lift and move the machine in a safe manner taking the machine weight in consideration. Refer to the text of the instruction manual for the mass of the machine.
- Be sure to take sufficient safety measures to prevent falling or dropping before lifting or moving the machine in order to protect against accident that can result in personal injury or death.
- Once the machine has been unpacked, never re-pack it for transportation to protect the machine against breakage resulting from unexpected accident or dropping.
Unpacking
- Be sure to unpack the machine in the prescribed order in order to prevent accident that can result in personal injury or death. In the case the machine is crated, in particular, be sure to carefully check nails. The nails have to be removed.
- Be sure to check the machine for the position of its center of gravity and take it out from the package carefully in order to prevent accident that can result in personal injury or death.
Installation
(I) Table and table stand
- Be sure to use JUKI genuine table and table stand in order to prevent accident that can result in personal injury or death. If it is inevitable to use a table and table stand which are not JUKI genuine ones, select the table and table stand which are able to support the machine weight and reaction force during operation.
- If casters are fitted to the table stand, be sure to use the casters with a locking mechanism and lock them to secure the machine during the operation, maintenance, inspection and repair in order to prevent accident that can result in personal injury or death.
(II) Cable and wiring
- Be sure to prevent an extra force from being applied to the cable during the use in order to prevent electrical-shock, earth-leakage or fire accident. In addition, if it is necessary to cable near the operating section such as the V-belt, be sure to provide a space of 30~mm or more between the operating section and the cable.
- Be sure to avoid starburst connection in order to prevent electrical-shock, earth-leakage or fire accident.
- Be sure to securely connect the connectors in order to prevent electrical-shock, earth-leakage or fire accident. In addition, be sure to remove the connector while holding its connector section.
(III) Grounding
- Be sure to have an electrical expert install an appropriate power plug in order to prevent accident caused by earth-leakage or dielectric strength voltage fault. In addition, be sure to connect the power plug to the grounded outlet without exceptions.
- Be sure to ground the earth cable in order to prevent accident caused by earth leakage.
(IV) Motor
- Be sure to use the specified rated motor (JUKI genuine product) in order to prevent accident caused by burnout.
- If a commercially available clutch motor is used with the machine, be sure to select one with an entanglement preventive pulley cover in order to protect against being entangled by the V-belt.
Before operation
- Be sure to make sure that the connectors and cables are free from damage, dropout and looseness before turning the power on in order to prevent accident resulting in personal injury or death.
- Never put your hand into the moving sections of the machine in order to prevent accident that can result in personal injury or death. In addition, check to be sure that the direction of rotation of the pulley agrees with the arrow shown on pulley.
- If the table stand with casters is used, be sure to secure the table stand by locking the casters or with adjusters, if provided, in order to protect against accident caused by abrupt start of the machine.
During operation
- Be sure not to put your fingers, hair or clothing close to the moving sections such as the handwheel, hand pulley and motor or place something near those sections while the machine is in operation in order to prevent accident caused by entanglement that can result in personal injury or death.
- Be sure not to place your fingers near the surround area of the needle or inside the thread take-up lever cover when turning the power on or while the machine is in operation in order to prevent accident that can result in personal injury or death.
- The machine runs at a high speed. Never bring your hands near the moving sections such as looper, spreader, needle bar, hook and cloth trimming knife during operation in order to protect your hands against injury. In addition, be sure to turn the power off and check to be sure that the machine completely stops before changing the thread.
-
Be careful not to allow your fingers or any other parts of your body to be caught between the machine and table when removing the machine from or replacing it on the table in order to prevent accident that can result in personal injury or death.
-
Be sure to turn the power off and check to be sure that the machine and motor completely stop before removing the belt cover and V-belt in order to prevent accident caused by abrupt start of the machine or motor.
- If a servomotor is used with the machine, the motor does not produce noise while the machine is at rest. Be sure not to forget to turn the power off in order to prevent accident caused by abrupt start of the motor.
- Never use the machine with the cooling opening of the motor power box shielded in order to prevent fire accident by overheat.
Lubrication
- Be sure to use JUKI genuine oil and JUKI genuine grease to the parts to be lubricated.
- If the oil adheres on your eye or body, be sure to immediately wash it off in order to prevent inflammation or irritation.
- If the oil is swallowed unintentionally, be sure to immediately consult a medical doctor in order to prevent diarrhea or vomiting.
Maintenance
- In prevention of accident caused by unfamiliarity with the machine, repair and adjustment has to be carried out by a service technician who is thoroughly familiar with the machine within the scope defined in the instruction manual. Be sure to use JUKI genuine parts when replacing any of the machine parts. JUKI assumes no responsibility for any accident caused by improper repair or adjustment or the use of any part other than JUKI genuine one.
- In prevention of accident caused by unfamiliarity with the machine or electrical-shock accident, be sure to ask an electrical technician of your company or JUKI or distributor in your area for repair and maintenance (including wiring) of electrical components.
- When carrying out repair or maintenance of the machine which uses air-driven parts such as an air cylinder, be sure to remove the air supply pipe to expel air remaining in the machine beforehand, in order to prevent accident caused by abrupt start of the air-driven parts.
- Be sure to check that screws and nuts are free from looseness after completion of repair, adjustment and part replacement.
- Be sure to periodically clean up the machine during its duration of use. Be sure to turn the power off and verify that the machine and motor stop completely before cleaning the machine in order to prevent accident caused by abrupt start of the machine or motor.
- Be sure to turn the power off and verify that the machine and motor stop completely before carrying out maintenance, inspection or repair of the machine. (For the machine with a clutch motor, the motor will keep running for a while by inertia even after turning the power off. So, be careful.)
- If the machine cannot be normally operated after repair or adjustment, immediately stop operation and contact JUKI or the distributor in your area for repair in order to prevent accident that can result in personal injury or death.
- If the fuse has blown, be sure to turn the power off and eliminate the cause of blowing of the fuse and replace the blown fuse with a new one in order to prevent accident that can result in personal injury or death.
- Be sure to periodically clean up the air vent of the fan and inspect the area around the wiring in order to prevent fire accident of the motor.
Operating environment
- Be sure to use the machine under the environment which is not affected by strong noise source (electromagnetic waves) such as a high-frequency welder in order to prevent accident caused by malfunction of the machine.
- Never operate the machine in any place where the voltage fluctuates by more than "rated voltage ± 10% " in order to prevent accident caused by malfunction of the machine.
- Be sure to verify that the air-driven device such as an air cylinder operates at the specified air pressure before using it in order to prevent accident caused by malfunction of the machine.
- To use the machine with safety, be sure to use it under the environment which satisfies the following conditions:
Ambient temperature during operation 5^ C to 35^ C
Relative humidity during operation 35% to 85%
- Dew condensation can occur if bringing the machine suddenly from a cold environment to a warm one. So, be sure to turn the power on after having waited for a sufficient period of time until there is no sign of water droplet in order to prevent accident caused by breakage or malfunction of the electrical components.
- Be sure to stop operation when lightning flashes for the sake of safety and remove the power plug in order to prevent accident caused by breakage or malfunction of the electrical components.
- Depending on the radio wave signal condition, the machine may generate noise in the TV or radio. If this occurs, use the TV or radio with kept well away from the machine.
- In order to ensure the work environment, local laws and regulations in the country where the sewing machine is installed shall be followed.
In the case the noise control is necessary, an ear protector or other protective gear should be worn according to the applicable laws and regulations.
- Disposal of products and packages and treatment of used lubricating oil should be carried out properly according to the relevant laws of the country in which the sewing machine is used.
FOR SAFE OPERATION
| 1. To avoid electrical shock hazards, neither open the cover of the electrical box for the motor nor touch the components mounted inside the electrical box. |
| 1. To avoid personal injury, never operate the machine with any of the belt cover, finger guard or safety devices removed.
2. To prevent possible personal injuries caused by being caught in the machine, keep your fingers, head and clothes away from the handwheel, V belt and the motor while the machine is operation. In addition, place nothing around them.
3. To avoid personal injury, never put your hand under the needle when you turn “ON” the power switch or operate the machine.
4. To avoid personal injury, never put your fingers into the thread take-up cover while the machine is in operation.
5. The hook rotates at a high speed while the machine is in operation. To prevent possible injury to hands, be sure to keep your hands away from the vicinity of the hook during operation. In addition, be sure to turn OFF the power to the machine when replacing the bobbin.
6. To avoid possible personal injuries, be careful not to allow your fingers in the machine when tilting/raising the machine head.
7. To avoid possible accidents because of abrupt start of the machine, turn OFF the power to the machine when tilting the machine head or removing the belt cover and the V belt.
8. If your machine is equipped with a servo-motor, the motor does not produce noise while the machine is at rest. To avoid possible accidents due to abrupt start of the machine, be sure to turn OFF the power to the machine.
9. To avoid electrical shock hazards, never operate the sewing machine with the ground wire for the power supply removed.
10. To prevent possible accidents because of electric shock or damaged electrical component(s), turn OFF the power switch in prior to the connection/disconnection of the power plug.
11. Be sure to confirm that the machine head support bar is properly set in place before tilting the machine head.
12. This product is a precision instrument, and be very careful not to splash water or oil on it, or |
BEFORE OPERATION

CAUTION : To avoid malfunction and damage of the machine, confirm the following.
- Before you put the machine into operation for the first time after the set-up, clean it thoroughly.
- Remove all dust gathering during transportation and oil it well.
- Confirm that the power plug has been properly connected to the power supply.
- Confirm that the voltage has been properly set.
- Never use the machine in the state where the voltage type is different from the designated one.
- The direction of rotation of the sewing machine is counterclockwise as observed from the handwheel side. Be careful not to rotate it in reverse direction.
- For the first month, run the machine at a speed of 1,800sti/min or less.
DECLARATION OF INCORPORATION OF PARTLY COMPLETED MACHINERY
We hereby declare that the sewing machine (sewing head) described below ;
- Must not be put into service until the machinery to which it is incorporated has been declared in conformity with the provisions of the Directive 2006/42/EC, and
- Conforms to the essential requirements of the Directive 2006/42/EC, described in the technical documentation, and
- To be prepared with the above technical documentation compiled in accordance with part B of Annex VII, and
- Also to conform to the RoHS Directive 2011/65/EU
- Relevant information on which should be transmitted in response to a reasoned request by the national authorities, by the electronic method or other according to the request.
Model
DU-1181N Series
Description
Industrial Sewing Machine
Function
make stitches and sew
Applied harmonized standards, in particular :
EN ISO12100, EN ISO10821, EN 50581
Manufacturer :
JUKI CORPORATION
2-11-1, Tsurumaki, Tama-shi, Tokyo, Japan
| Type of sewing machine head | 1-Needle, Top and Bottom Feed Lockstitch Machine | Needle to be used | DP x17 (DB x 1 can be used.) |
| Needle system | #14 - #23 (Standard #21) |
| Application | For medium and heavy-weight materials | Thread | #40 - #8 |
| Sewing speed | Max. 2,000 sti/min | Stitch adjusting method | Dial |
| Stitch length | Max. 9 mm | Lubrication method | Automatic lubrication(top feed : manual) |
| Lift of presser foot | Hand lifter 5.5 mmKnee lifter 15 mm |
| Thread take-up lever | Link-type thread take-up lever | Motor to be used | 400W clutch motor (4P) |
| Needle bar stroke | 36.5mm | Oil be used | JUKI Machine Oil No.7 |
| - Equivalent continuous emission sound pressure level (LpA) at the workstation:A-weighted value of 80.0 dB; (Includes KpA = 2.5 dB); according to ISO 10821- C.6.2 -ISO 11204 GR2 at 2,000 sti/min.- Sound power level (LwA);A-weighted value of 85.0 dB; (Includes KwA = 2.5 dB); according to ISO 10821- C.6.2 -ISO 11204 GR2 at 2,000 sti/min. |
1. TECHNISCHE DATEN
(1) Installing the under cover
1) The under cover should rest on the four corners of the machine table groove.
2) Two rubber seats 1 for supporting the head portion on the operator side A are fixed on the extended portion of the table by hitting the nail 2, and the other two rubber cushion seats 3 on the hinge side B are fixed by using a rubber-based adhesive. Then, oil pan 4 is placed.
3) Fit hinge ⑤ into the opening in the machine bed, and fit the machine head to table rubber hinge ⑥ before placing the machine head on cushions ⑦ on the four corners.
To avoid possible personal injury due to abrupt start of the machine, turn off the power to the machine and check to be sure that the motor has totally stopped rotating in prior.
WARNING :
(Installing procedure)
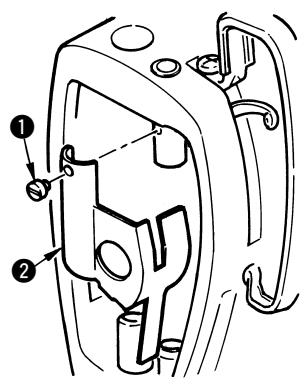
1) Put the V belt on the pulley of the sewing machine.
2) Attach belt cover support 1 on the arm.
3) Attach belt cover ② on the arm and the support.
4) Place bobbin winder 3 in the belt cover, and position it so that it does not contact the machine arm or the belt cover before fixing it with wooden screws.
5) Attach the pulley which is held by hand with screws.
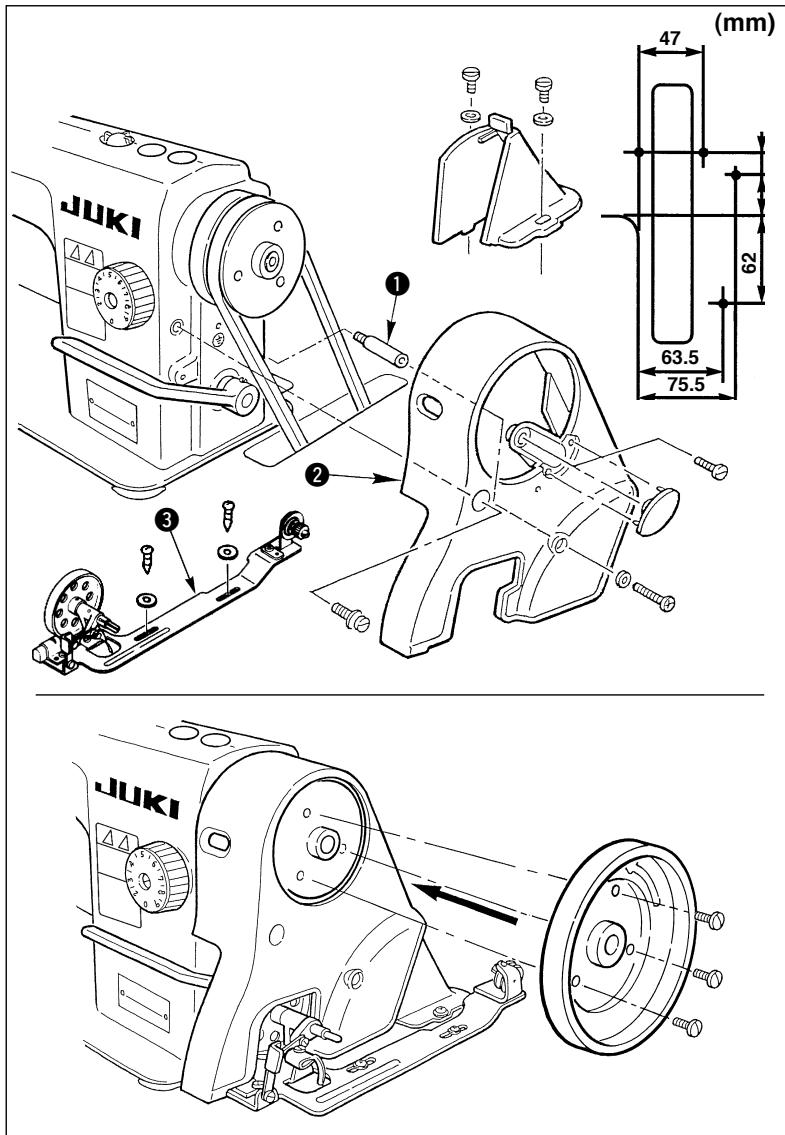
1) Assemble the thread stand unit, and insert it in the hole in the machine table.
2) Tighten locknut 1 to fix the thread stand.
3) For ceiling wiring, pass the power cord through spool rest rod ②.
1) Die Garnständereinheit zusammenbauen und in das Loch im Maschinentisch einsetzen.
2) Die Gegenmutter ① zur Befestigung des Garnständers anziehen.
3) Bei Deckenverkabelung ist das Netzkabel durch die Spulenstütze zu führen.
1) Assembler le porte-bobines et l'introduire dans l'orifice de la table de la machine.
2) Serrer le contre-écrou ① pour fixer le porte-bobines.
3) Pour un cablage par le plafond, faire passer le cordon d'alimentation par la tige du porte-bobines 2.
1) Ensamle la unida del estante de hilo, e insertelo en el agujero en la tabla de laquina de coser.
2) Apriete la contratuerca 1 para sutar el estante de hilo.
3) Para el alambrado del techo, pase el cable de la corriente electrica por la varilla 2 de soporte del carrete.
1) Montare l'insieme del portafilo, e inserirlo nel foro nel ravolo della macchina.
2) Stringere il controdado 1 per fissare il portafilo.
3) Per il cablaggio ad una presa di alimentazione aerea, far passare il cavo di alimentazioneattraverso I'sta porta rocchetto 2.
To avoid possible personal injury due to abrupt start of the machine, turn off the power to the machine and check to be sure that the motor has totally stopped rotating in prior. The machine is rotating athigt speed. To avoid possible personal injury, be very careful when adjusting the amount of oil.
WARNING :
1) Fill oil pan ① with JUKI Machine Oil No. 7 up to HIGH mark A.
2) When the oil level lowers below LOW mark B, refill the oil pan with the specified oil.
3) Apply an adequate amount of oil to the points marked with the arrows of the face plate components. (Be sure to apply an adequate amount of oil once a day.)

Remove rubber plug ③ to lubricate the upper feed cam, and fill the felt portion in the figure with oil.
4) When you operate the machine after lubrication, you will see splashing oil through oil sight window if the lubrication is adequate.
5) Note that the amount of the splashing oil is unrelated to the amount of the lubricating oil.

When the sewing machine is used at low speed (1,000 sti/min or less), operate the sewing machine at 1,500 sti/min or more for approximately 10 minutes once a day in order to circulate the oil.
(1) Instructions de lubricification
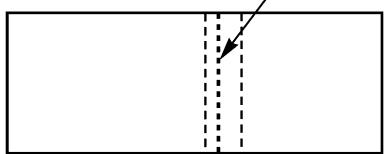
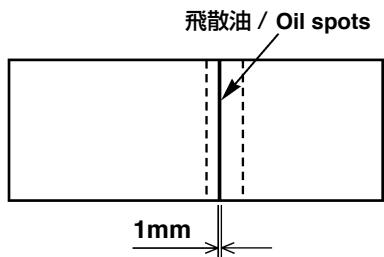
飛散油/Oil spots
適量(最少)/
Adequate amount (minimum)

適量(最多)/
Adequate amount (maximum)
图1/Fig.1
(2) 面部油量調節
(2) Adjusting the amount of oil supplied to the face plate parts
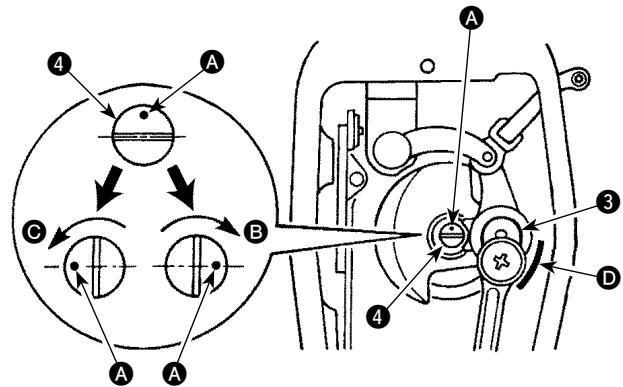
1) Loosen setscrew ① in the oil shield plate, and remove oil shield plate ②.
2) Adjust the amount of oil supplied to the thread take-up and needle bar crank 3 by turning adjust pin 4.
3) The adjust pin has been attached so that its engraved marker dot A is brought to the position as shown in the figure at the time of delivery. Turn the pin in direction B to increase the amount of oil, or in direction C to decrease it.
The amount of oil is maximized by turning the pin in direction ⑧ by 90 degrees of an angle, or minimized by turning it in direction ⑨ by the same degrees of an angle. Adjust the pin position so that an adequate amount of oil is supplied.

Amount of oil as shown in Fig.1 is the factory-adjusted amount of oil at the time of delivery. Check the amount of oil before using the sewing machine, and use the sewing machine after adjusting so that the amount of oil is adequate as shown in Fig.1.
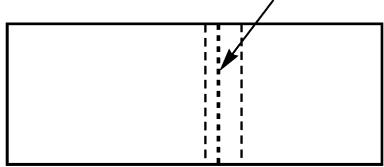
4) Make the sewing machine run idle for approximately 30 seconds after adjusting the amount of oil with the adjust pin. Then, insert a sheet of paper for checking the amount of oil (oil spots) into location D to measure the amount of oil for 10 seconds. (The sewing speed during idling before the oil-amount measurement and during the measurement should be 2,000 sti/min.)
B: maximal / maximum / maximizing / massima / 最大
C: minimal / minimum / minima / minima / 最小
Ölspritzer / Projections d'huile /
Salpicaduras de aceite / Spruzzi di olio / 飞溅油
(3) Adjusting the amount of oil in the hook
1) Turning the oil amount adjustment screw attached on the hook driving shaft front bushing in the “+” direction (in direction A) will increase the amount of oil (oil spots) in the hook, or in the “-” direction (in direction B) will decrease it. Adjust so that the amount of oil is adequate.
2) After the amount of oil in the hook has been properly adjusted with the oil amount adjustment screw, make the sewing machine run idle for approximately 30 seconds, and insert a sheet of paper for confirming the oil amount (oil spots) under the hook for 5 seconds to measure the amount of oil in the hook.
To avoid possible personal injury due to abrupt start of the machine, turn off the power to the machine and check to be sure that the motor has totally stopped rotating in prior.

WARNING
The standard needle is a DB x 17 #21.
1) Turn the handwheel to move the needle bar up to its highest position.
2) Loosen needle clamping screw ②, and hold needle ① so that long groove A in needle ① faces exactly to the left.
3) Insert the needle into the needle bar until it will go no further. Securely tighten the needle clamping screw.
To avoid possible personal injury due to abrupt start of the machine, turn off the power to the machine and check to be sure that the motor has totally stopped rotating in prior.
WARNING :

1) Route the thread in the order of A, B, and C, and then wind it round the bobbin several times.
2) Set bobbin presser 1 down to make the winder come in contact with the belt.
3) Adjust adjustment screw ② of the amount of bobbin thread to be wound round the bobbin so that the bobbin is wound with thread about 80% . Turn the adjustment screw ② clockwise to increase the bobbin thread amount or counterclockwise to decrease it.
4) If thread is wound unevenly, move winder tension adjust base 3 to the right or left until it is correctly positioned.
5) The moment the bobbin has been wound up, the bobbin presser is released, and the bobbin winder will stop automatically.

When making the sewing machine run idle, remove the bobbin case and the bobbin since there is the possibility that thread is entangled in the hook.
6) If thread is apt to come off from B , use either of the methods below to manage it.
Turn the thread once around the eyelet of thread stand arm 4.
Change the direction of thread passing to B.
To avoid possible personal injury due to abrupt start of the machine, turn off the power to the machine and check to be sure that the motor has totally stopped rotating in prior.

WARNING :
1) Removing the bobbin case
Raise the bobbin case latch to remove the bobbin case.
2) Threading the bobbin case
- Pass the thread through threading slit 1 in the bobbin case, and route it under tension spring 2.
- Hold the latch of the bobbin case, and set the bobbin case into the hook.

Place the bobbin in the bobbin case taking care of the winding direction of the thread. (The bobbin should turn in the direction of arrow E when the thread is pulled in the direction of arrow A .)
To avoid possible personal injury due to abrupt start of the machine, turn off the power to the machine and check to be sure that the motor has totally stopped rotating in prior.

WARNING :
Move pedal adjustment plate ③ to the right or left until motor control lever ① is leveled and link rod ② is vertically positioned.
2) Pedal angle
The pedal angle can be changed as desired by adjusting the length of the link rod.
Loosen the adjustment screw, and adjust the length of the link rod.
To avoid possible personal injury due to abrupt start of the machine, turn off the power to the machine and check to be sure that the motor has totally stopped rotating in prior.
WARNING :
Thread the machine head in the order as illustrated in the figure.
1) Adjusting the needle thread tension
Turn tension nut 1 toward A to increase the needle thread tension, or toward B to decrease it.
2) Adjusting the bobbin thread tension
Turn thread tension screw 2 toward A to increase the bobbin thread tension, or toward E to decrease it.
(1) Changing the stroke of thread take-up spring 1
1) Loosen setscrew ②.
2) As you turn tension post 3 in direction A, the stroke of the thread take-up spring will be increased.
3) As you turn the knob in direction B, the stroke will be decreased.
(2) Changing the pressure of thread take-up spring 1
1) Loosen setscrew ②, and remove thread tension atm ⑤.
2) Loosen setscrew 4.
3) As you turn tension post ③ in direction A, the pressure will be increased.
4) As you turn the tension post in direction B , the pressure will be decreased.
Adjust the pressure applied to presser spring regulator A (standard : 21 mm) and adjusting thumb screw B (standard : 16 mm) according to the type of material to be sewn.
Note) Use the machine with the minimum pressure which is necessary.
To avoid possible personal injury due to abrupt start of the machine, turn off the power to the machine and check to be sure that the motor has totally stopped rotating in prior.
WARNING
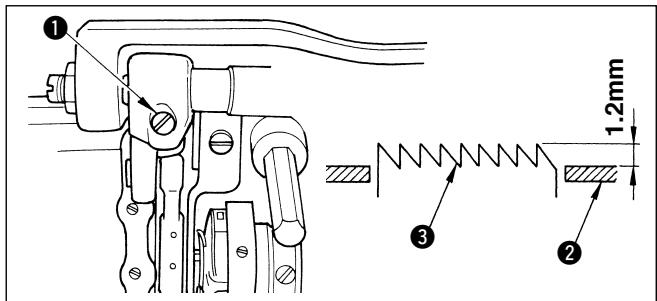
Feed dog 3 is factory-adjusted to jut out 1.2mm from the surface of throat plate 2.
When the feed dog height needs to be adjusted according to the sewing specifications or after the feed dog is replaced, do as follows :
- Loosen screw ①.
-
Move the feed dog up or down to perform adjustment, then securely tighten the screw.
-
When sewing an extra heavy-weight material or the material which has many multi-layered parts, increasing the feed dog height is effective to help achieve consistent material feed.
If puckering occurs when sewing a light-weight material, decreasing the feed dog height is effective to help prevent it.

When increasing the feed dog height, take care not to allow the feed dog to come in contact with the throat plate.
To avoid possible personal injury due to abrupt start of the machine, turn off the power to the machine and check to be sure that the motor has totally stopped rotating in prior.

WARNING :
Tilt of the feed dog can be adjusted with the procedure described below.
- To tilt the feed dog so that it is in parallel with the throat plate, loosen the set screw, insert a screwdriver into the feed bar shaft, and turn it by 90^ in the direction of arrow mark.
Turn stitch length adjustment dial ① to bring the desired value at the top so that the desired value meets the pin.
[Reverse feed stitching]
Push reverse feed lever 2 down. The machine performs reverse feed stitching as long as the lever is held depressed.
Release the lever, and the machine will immediately resume the forward stitching mode.
To avoid possible personal injury due to abrupt start of the machine, turn off the power to the machine and check to be sure that the motor has totally stopped rotating in prior.
WARNING :
![JUKI 1181N - [Reverse feed stitching] - 1](/content/2024/11/220184/images/ac45dd4551bc28a5264dccb29c28674574f8aefbf7e6203faafddef030f0b3bf.jpg)
1) Positioning the needle bar.
Tighten needle bar connection screw ② in needle bar connection ③ so that the marker line of the needle bar aligns with the bottom end of needle bar lower bushing ① at the lowest position of the needle bar.
(Fourth line A from the bottom for a DB x 1, second line B from the bottom for DP x 17)
![JUKI 1181N - [Reverse feed stitching] - 2](/content/2024/11/220184/images/c585b5c79509aec3b53ff0aef1b754058f37ff3cd21a988931704bbcff9e2132.jpg)
After the height of the needle bar has been properly adjusted, check that the needle bar does not come in contact with the walking foot.
2) Position the needle and the hook.
Adjust so that the specified marker line (third line from the bottom for a DB x 1 needle, or line at the bottom for a DP x 17 needle) on the ascending needle bar aligns with the bottom end of lower bushing . Further adjust to make hook point nearly meet the center of needle , and adjust the clearance between needle and hook point to 0.02 to 0.05 ~mm . Then tighten hook screw . Remove the throat plate, loosen hook screw and adjust the hook.
To avoid possible personal injury due to abrupt start of the machine, turn off the power to the machine and check to be sure that the motor has totally stopped rotating in prior.
![JUKI 1181N - [Reverse feed stitching] - 3](/content/2024/11/220184/images/91f35110da665d87d429ad1404acb415282a5946b6fca060f4680bc0b9cd544b.jpg)
WARNING
1) Maximize the stitch length, and turn the handwheel until walking foot 1 reaches its front end position. Now, loosen screw 2 in the center shaft bell crank.
2) Bring the walking foot as close to presser foot 3 as possible to the extent that it does not come in contact with the rear face of presser foot. Securely tighten screw 2 in the center shaft bell crank.
![JUKI 1181N - [Reverse feed stitching] - 4](/content/2024/11/220184/images/ccbdd7716625e11ae50661d19eaab442c7692fd2b0695a40f64bf97ca86454a5.jpg)
- If the multi-layered part of the material cannot be fed smoothly, the longitudinal position of the presser foot should be adjusted with the stitch pitch remained as it is. In the case you want to change stitch pitch after having adjusted the longitudinal position of the presser foot with the stitch pitch which is not the maximum one, check to be sure that the presser foot does not come in contact with the walking foot.
- When you tighten center shaft bell crank clamping screw ② after the adjustment, take care to remove a backlash in the center shaft. If the center shaft has a backlash, the related components may wear out earlier than their life or may break.
The standard ratio between the alternating vertical motions of the presser foot and walking foot is 1:1 (equal amount of motion). Depending on the type of material to be sewn, however, the alternate motions of the walking foot and the presser foot may be changed.
1) Loosen screw 4.
2) Adjust the main shaft phase to the highest position of the thread take-up with the presser foot held lowered.
3) Move the walking foot rock shaft :
To A The vertical stroke of the presser foot will increase.
To B The vertical stroke of the presser foot will decrease.

- In the case of sewing with the alternating vertical strokes nearly maximized, adjust the ratio between the alternating vertical motions of the presser foot and walking foot to 1:1. If the ratio is not 1:1, the relevant parts can interfere with each other to cause the sewing machine to lock.
- When you tighten walking foot adjusting lever clamping screw ④ after the adjustment, take care to remove a backlash in the walking foot rock shaft. If the rock shaft has a backlash, the related components may wear out earlier than their life or may break.
The standard amount of the alternating vertical motions is 2.5 mm . To improve sewing performance of the sewing machine for some types of sewing materials, however, it is better to change the amount of the alternating vertical motions of the presser foot and walking foot.
1) Adjust the main shaft phase to the highest position of the thread take-up.
2) Losen screw ⑤ , and change the position of the cam rod boss.
UP position (A) The amount of motion is large. (max.: approx. 5 mm)
DOWN position (B) The amount of motion is small. (min.: approx. 2 mm)

- When sewing is performed near the maximum alternate vertical amount, the sewing pitch may be uneven. In this case, lower the sewing speed for use.
- When changing the alternate vertical amount and sewing thick sewing products, check that the needle bar does not come in contact with the walking foot.
The ration of the bottom feed amount to the top feed amount is factory-adjusted to 1:1 . If necessary, the top feed amount may be changed as follows:
1) Loosen nut ⑥, and move the slide block up or down.
UP position (E) top feed amount is small.
DOWN position (A) top feed amount is large.
To avoid possible personal injury due to abrupt start of the machine, turn off the power to the machine and check to be sure that the motor has totally stopped rotating in prior.
WARNING
The standard adjustment of the feed and needle is such a state that the needle tip aligns with the throat plate surface at the moment when the first or the second tooth of the top end of feed dog starts descending from the throat plate surface turning the handwheel toward you with the scale dial set to 9mm .
Follow the procedure described below to perform the standard adjustment.
1) Loosen setscrews 2 in the vertical driving cam.
2) Turn the vertical driving cam to the position where throat plate surface 3 and needle tip 4 align with each other, and the first or the second tooth of the top end of feed dog 5 descends from the throat plate surface. Then fix the vertical driving cam in place. At this time, be careful that the vertical driving cam does not slip in the lateral direction. (If it slips, sewing machine torque may occur.) After this adjustment, loosen setscrews 1 in the feed driving cam, and align marker dot A on the feed driving cam with marker dot A on the vertical driving cam, and fix the feed driving cam. Also, at this time, be careful that the feed driving cam does not slip in the lateral direction.
(Reference for standard adjustment)
Three points of screws No. 1 in the vertical driving cam and the feed driving cam, and screw No. 2 in the upper bevel gear ⑥ are nearly aligned.
(Simplified adjustment procedure)
It is possible to adjust by only removing the rubber plug on the machine arm surface without removing the window plate as shown in the figure.
To avoid possible personal injury due to abrupt start of the machine, turn off the power to the machine and check to be sure that the motor has totally stopped rotating in prior.

WARNING :
For standard adjustment, the top end of the needle eyelet aligns with throat plate surface 2 when needle
1 descends and also presser foot 3 descends, and when the presser foot aligns with throat plate surface 2.
Follow the procedure described below to perform the standard adjustment.
1) Remove the rubber plug on the machine arm surface.
2) Loosen two setscrews 5 in top feed cam 4.
3) Turn the top feed cam until it reaches the position to allow the three components such as the throat plate surface, top end of needle eyelet and presser foot (pressing plane) to align, and fix the cam at that position.

When fixing setscrews ⑤ , be careful that the vertical driving cam does not slip in the lateral direction. (If it slips, sewing machine torque may occur.)
To avoid possible personal injury due to abrupt start of the machine, turn off the power to the machine and check to be sure that the motor has totally stopped rotating in prior.

WARNING :
1) When sewing heavy-weight materials, move thread guide 1 in direction A to increase the length of thread pulled out by the thread take-up.
2) When sewing light-weight materials, move thread guide 1 in direction B to decrease the length of thread pulled out by the thread take-up.
3) Normally, thread guide ① is positioned in a way that marker line ⑥ is aligned with the center of the screw.
1) Zum Nahlen schwerer Stoffe die Fadenführung ① in Richtung A schieben, um die Länge des vom Fadenhebel Herausgezogenen Fadens zu verlangern.
2) Zum Nahlen leichter Stoffe die Fadenführung 1 in Richtung 3 schieben, um die Länge des vom Fadenhebel Herausgezogenen Fadens zu verkürzen.
3) Normalerweise ist die Fadenführung ① so positioniert, dass die Markierungslinie ⑥ auf die Mitte der Schraube ausgerichtet ist.
1) Lors de la couture de tissus épais, déplacer le guide-fil ① dans le sens ② pour augmenter la longueur de fil tirée par le releveur de fil.
2) Lors de la couture de tissus légers, déplacer le guide-fil ① dans le sens ③ pour diminuer la longueur de fil tirée par le releveur de fil.
3) Normalement, le guide-fil ① est positionné de telle manière que le trait de repère © est en regard de l'axe de la vis.
1) Cuando se cosecen materials pesados, mueva la guía del hilo ① en la direccion ④ para augmentar la longitu de del hilo extraido al exterior por el tira-hilo.
2) Cuando se cosecen materials livianos, mueva la guía de hilo 1 en la direccion de 3 para disminuir la longitu de del hilo extraido por el tira-hilo.
3) Normally, la guía de hilo ① está positional de modo que el marcador ⑨ está alineado con el centro del tornillo.
1) Quando si procede alla cucitura di materiali pesanti, spostare il guidafilo ① nel senso A per aumentare la lunghezza del filo estratto dal tirafilo.
2) Quando si procede alla cucitura di materiali leggeri, spostare il guidafilo 1 nel senso 3 per diminuire la lunghezza del filo estratto dal tirafilo.
3) Solitamente il guidafilo 1iene posizionato in maniera tale che la riga di riferimento 6sia allineata al centro della vite.
1) 缝制厚料时,向 A 的方向移动线导向器 ①,则挑线量变多。
2)缝制薄料时,向 的方向移动线导向器 ,则挑线量变少。
3)线导向器 ① 在刻线 ② 对准螺丝的中心时是标准位置。
22. 逆送レバーナREVERSE FEED LEVER/Rückwärtnsportthebel/ Levier d'entrainment inverse/Palanca de transporte inverso/ Leva di inversionione del trasporto/倒送杆

警告:
三希不倒时是、挟之以人身的损伤的。
WARNING :
When tilting the sewing machine head, exercise added care not to allow any worker to be caught under the machine head so as to prevent personal injury.
WARNING :
Lever returning spring ① is to be put in catching hole A of feed spring peg ② (the state of the spring at the time of delivery).
To increase the returning force of the reverse feed lever, put lever returning spring 1 in catching hole B of feed spring peg 2.
- In the case the spring is put in B , the revere feed lever will not move smoothly. Put the spring in A or E , whichever provides better workability.
| Sewing speed | Hz | Outside diameter of motor puley | V-belt length |
| 2,000 sti/min | 50Hz | 105mm | M43 |
| 60Hz | 85mm | M42 |

| Trouble | Cause | Corrective measure |
| 1. Stitch skipping | ① The machine head has not been properly threaded.
② The hook has scratches.
③ The timing between the needle and hook is too early or too late.
④ The clearance between the needle and the hook point is too large.
⑤ The pressure of the presser foot is too low.
⑥ The needle number selected is improper. | ○Refer to "10. Thread the machine heads".
○Remove the scratches on the hook point using a fine emery paper.
○Refer to "17. Needle-to-hook relationship".
○Refer to "17. Needle-to-hook relationship".
○Tighten the pressure regulator.
○Replace the needle with one which is one count thicker. |
| 2. Thread breakage | ① The hook has scratches.
② The returning force of the thread take-up spring is insufficient.
③ The timing between the needle and hook is too early or too late.
④ The needle thread tension is excessive.
⑤ The needle comes in contact with the hook point.
⑥ The clearance between the needle and the hook point is too large.
⑦ Faulty adjustment of the needle thread take-up eyelet.
⑧ The needle number selected is improper. | ○Remove the scratches on the hook point using a fine emery paper.
○Decrease the tension and increase the stroke of the thread take-up spring.
○Refer to "17. Needle-to-hook relationship".
○Adjust the needle thread tension properly.
○Refer to "17. Needle-to-hook relationship".
○Refer to "17. Needle-to-hook relationship".
○Refer to "21. Adjusting the thread take-up stroke".
○Replace the needle with one which is one count thicker. |
| 3. Loose stitches (Isolated idling loops) | ① The thread has not been passed through the notch of the bobbin case tension spring.
② he thread path is poorly finished.
③ The bobbin does not rotate smoothly.
④ he bobbin thread tension is too high.
⑤ The bobbin thread tension is too low.
⑥ An untwisted synthetic thread is used.
⑦ The needle number selected is improper. | ○Properly thread the bobbin case.
○Grind it using a fine emery paper or buff it up.
○Replace the bobbin or the bobbin case.
○Decrease the bobbin thread tension.
○Increase the bobbin thread tension.
○Slightly lower the sewing speed. (1,800 sti/min)
○Replace the needle with one which is one count thicker. |
| 4. Faulty feed (Multi-layered parts of the material cannot be fed smoothly / puckering) | ① Faulty adjustment of the longitudinal position of the presser foot.
② Feed dog height is not enough.
③ Feed dog height is excessive. | ○Refer to "18. Adjusting the walking foot and the presser foot".
○Refer to "14. Height of the feed dog".
○Refer to "14. Height of the feed dog". |
PHONE:(81)42-357-2371
FAX:(81)42-357-2380
http://www.juki.com
Copyright © 2010-2013 JUKI CORPORATION
·本書の内容を無断で軸載、複写するとを禁止いたします。
- All rights reserved throughout the world.
- Alle Rechte weltweit vorbehalten.
- Tous droits réservés partout dans le monde.
- Reservados todosarethos en el mundo entero.
- Tutti i diritti sono riservati in tutto il mondo.
·版权所有,严禁擅自转载、翻印本书的内容。