EEA111 - Coffee maker ELECTROLUX - Free user manual and instructions
Find the device manual for free EEA111 ELECTROLUX in PDF.

| Product type | Espresso coffee maker with milk frother |
| Brand | Electrolux |
| Model | EEA111 |
| Power supply | 220-240 V, 50-60 Hz |
| Power | 1100 W |
| Dimensions (approx.) | 30 x 25 x 32 cm |
| Weight | 4.5 kg |
| Water tank capacity | 1.2 L |
| Pump pressure | 15 bars |
| Functions | Espresso, steam/hot water, cup warming plate |
| Safety | Automatic shut-off in case of overheating, protection fuse |
| Housing material | Plastic |
| Maintenance | Regular descaling recommended |
| Removable parts | Water tank, filter holder, filter, measuring spoon, drip tray grid |
| Warranty | 2 years (in accordance with legislation) |
Frequently Asked Questions - EEA111 ELECTROLUX
User questions about EEA111 ELECTROLUX
0 question about this device. Answer the ones you know or ask your own.
Ask a new question about this device
Download the instructions for your Coffee maker in PDF format for free! Find your manual EEA111 - ELECTROLUX and take your electronic device back in hand. On this page are published all the documents necessary for the use of your device. EEA111 by ELECTROLUX.
USER MANUAL EEA111 ELECTROLUX
CS PŘÍRUČKA K POUŽITÍ
DA VEJLEDNING
DE ANLEITUNG
EE KASUTUSJUHEND
EN INSTRUCTION BOOK
WE'RE THINKING OF YOU
Thank you for purchasing an Electrolux appliance. You've chosen a product that brings with it decades of professional experience and innovation. Ingenious and stylish, it has been designed with you in mind. So whenever you use it, you can be safe in the knowledge that you'll get great results every time.
Welcome to Electrolux.
Visit our website to:

Get usage advice, brochures, trouble shooter, service information: www.electrolux.com

Register your product for better service: www.electrolux.com/productregistration

Buy Accessories and Consumables for your appliance: www.electrolux.com/shop
CUSTOMER CARE AND SERVICE
When contacting Service, ensure that you have the following data available. The information can be found on the rating plate. Model, PNC, Serial Number.

Warning / Caution-Safety information

General information and tips

Environmental information
Subject to change without notice.
BG
Компоненти
natural_image
Exterior view of a modern coffee maker with a power outlet connected to its side panel (no visible text or symbols)natural_image
Modern espresso machine with control panel and side arm (no visible text or symbols)natural_image
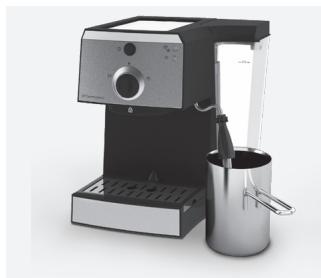
Exterior view of a modern coffee maker with control panel and side-mounted stand (no visible text or symbols)- поставете подходящ съд на решетката за изкапване. Изчакайте, докато индикаторната лампичка за готовност започне да свети постоянно. Без да поставьте държателя на цедката, завъртете превключвателя към символ Изчакайте изпразване на водния резервоар за изплакване на подгряващата система.
- Umístěte konvici na odkapávací mřížku. Vyčkejte, dokud se trvale nerozsvití kontrolka hotové přípravy. Bez vložení držáku filtru otočte voličem na ☐: Nechte plný zásobník vody protéci přístrojem, vypláchne se tak ohřivací systém.
- Placér en skål på drypgitteret. Vent til Klar-lampen lyser konstant. Drej knappen ☐: Lad en tankfuld af vand passere gennem maskinen for at rense varmesystemet.
- Setzen Sie den Siebträger ohne Filter ein und stellen Sie das Gefäß auf das Tropfblech unter den Siebträger. Warten Sie, bis die Bereitschaftsanzeige konstant leuchtet. Drehen Sie den Wahlschalter auf □: Lassen Sie einen vollen Wassertank durch die Maschine laufen, um das Heizsystem zu spülen. Drehen Sie anschließend den Wahlschalter wieder auf.

natural_image
Close-up of a portable kitchen appliance with control panel and close-up inset showing a button (no visible text or symbols)-
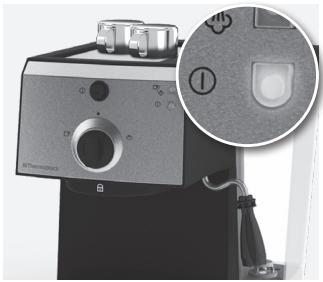
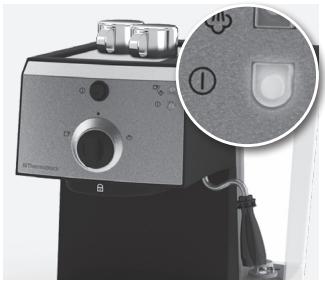
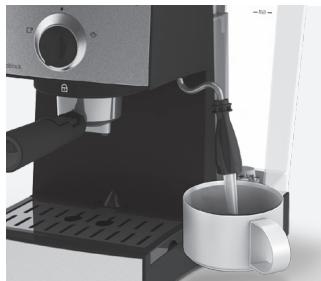
Правене на еспресо: Машината е готова за използване, когато индикаторната лампичка за готовност започне да свети постоянно. След това изпълнете инструкциите в стъпки 5 - 7.
-
Příprava espresa: Spotřebič je připraven k použití, když kontrolka hotové přípravy trvale svítí. Poté pokračujte podle pokynů v krocích 5 až 7.
-
Brygning af espresso: Maskinen er klar til brug, när Klar-lampen lyser konstant. Følg derefter vejledning i trin 5-7.
-
Espresso-Herstellung: Die Maschine ist betriebsbereit, sobald die Bereitschaftsanzeige konstant leuchtet. Folgen Sie dann den Anleitungen in Schritt 5-7.

natural_image
Illustration of a espresso machine with a spoon and three cups, showing internal components (no text or symbols)-
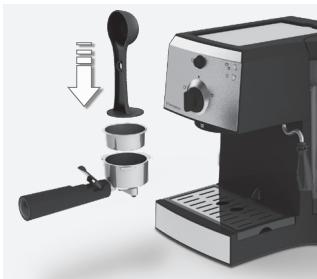
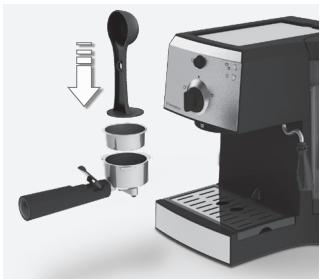
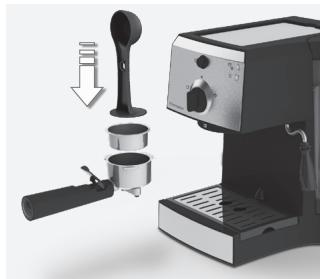
Сгънете назад предпазителя за пръсти и поставете филтъра в държача му. Напълнете филтъра с мляно кафе. Притиснете леко смляното кафе във филтъра, като използвате трамбовката от обратната страна на мерителната лъжичка.
-
Odklopte chránič prstů a do držáku vložte filtr. Filtr naplňte mletou kávou. Použijte pěchovač na opačné straně odměrky a kávu lehce stlačte.
-
Vip fingerbeskyttelsen tilbage og anbring filteret i filterholderen. Fyld filteret med friskmalet kaffe. Brug stamperen på den anden side af skeen til at presse den færdigmalede kaffe let.
-
Klappen Sie den Fingerschutz nach hinten und setzen Sie das Sieb in den Siebträger. Füllen Sie gemahlenen Kaffee in das Sieb. Drücken Sie das Kaffeepulver mit dem Stampfer am anderen Ende des Löffels leicht an.

natural_image
Exterior view of a modern espresso machine with a lock icon overlay (no text or symbols on the device itself)natural_image
Exterior view of a modern coffee maker with a hand holding a cup, showing its interior and control panel (no text or symbols visible)natural_image
Exterior view of a modern coffee maker with control panel and indicator lights (no text or symbols visible)natural_image
Exterior view of a modern coffee maker with control panel and side arm (no visible text or symbols)natural_image
Exterior view of a modern espresso machine with adjustable arm and control panel (no visible text or symbols)natural_image
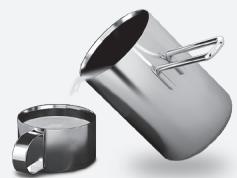
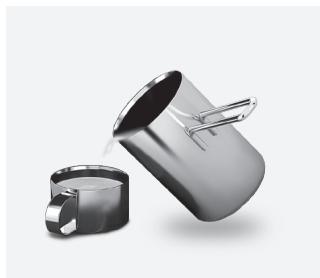
Two metallic kitchen utensils, one pouring liquid from a container (no text or symbols visible)-
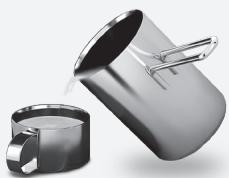
Приготвяне на Cappuccino: Разпенете млякото, както е описано в предишните стъпки от 1-2 и го излейте върху предварително приготвеното Espresso.
-
Příprava Cappuccino: Zpěňte mléko dle návodu uvedeného v krocích 1–2 a nalijte jej na již připravené Espresso.
-
Tilberedning af Cappuccino: Skum mælken som beskrevet i forrige trin 1-2, og hæld det i den tidligere fremstillede Espresso.
-
Zubereiten von Cappuccino: Schäumen Sie die Milch, wie in den obigen Schritten 1-2 erläutert, auf und gießen Sie sie in den zubereiteten Espresso.

natural_image
Exterior view of a modern espresso machine with a mug and stand mixer (no visible text or symbols)natural_image
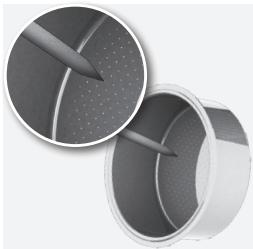
Two views of a cylindrical mechanical component with internal features, showing textured surfaces and a pointed tip (no text or symbols)- Изключете кафе машината и я оставете да изстине. Избършете всички външни повърхности с влажна кърпа. Почистете задръстените дупчици във филтъра и държача на филтъра с игла или четчица.
- Přístroj vypněte a nechejte jej vychladnout. Všechny vnější povrchy otřete vlhkou utěrkou. Zanesené otvory v sítku a držáku sítka vyčistěte pomocí špendlíku nebo malého kartáčku.
- Sluk apparatet, og lad det køle af. Tør alle overflader af med en fugtig klud. Rengør tilstoppede huller i filteret og filterholderen med en nål eller en lille børste.
- Schalten Sie die Maschine aus und lassen Sie sie abkühlen. Wischen Sie alle äußeren Flächen mit einem feuchten Tuch ab. Reinigen Sie verstopfte Öffnungen des Filters und den Filterhalter mit einem Nadel oder einer kleinen Bürste.
natural_image
Illustration of a microwave oven with paper feed and control panel (no text or symbols)natural_image
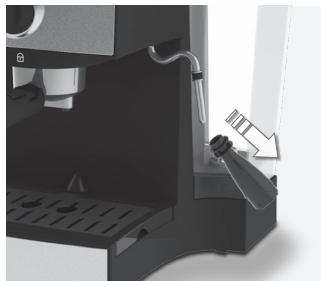
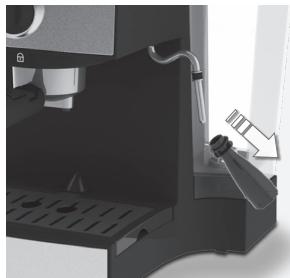
Close-up of a mechanical device with a lever and adjustment knob (no visible text or symbols)- Развийте накрайника за пара и го измийте на течаща вода. Почистете тръбичката с кърпа. Извадете резервоара за вода и го изплагнете с течаща вода.
- Uvolněte parní trysku a umyjte ji pod tekoucí vodou. Malou trubičku otřete utěrkou. Vyjměte zásobník na vodu a opláchněte jej pod tekoucí vodou.
- Løsn dampdysen, og vask den under rindende vand. Rengør den lille dyse med en klud. Løft vandtanken ud, og rens den under rindende vand.
- Lösen Sie die Dampfdüse und waschen Sie diesen unter fließendem Wasser. Reinigen Sie das kleine Rohr mit einem Tuch. Nehmen Sie den Wassertank heraus und spülen Sie ihn unter fließendem Wasser.

natural_image
Close-up of a ceiling fan with a metallic ring and circular base (no text or symbols visible)natural_image
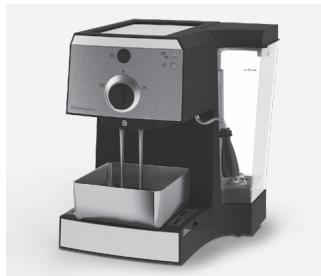
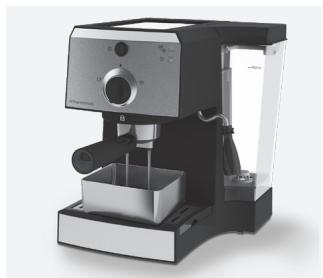
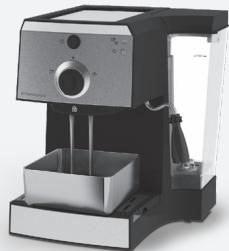
Exterior view of a modern coffee maker with control panel and side arm (no visible text or symbols)- Включете кафе машината и изчакайте да загрее. Поставете държача за филтъра на мястото му, без в него да има филтър. Поставете купа върху решетката за отцеждане. Завъртете селектора до положение □ и оставете 1/4 от разтвора да премине през системата. Изключете кафе машината и я оставете да изстине в продължение на 10 минути.
- Zapněte přístroj a nechejte jej zahřát. Vložte držák sítka (bez sítka) na své místo. Na odkapávací mřížku položte misku. Nastavte otočný ovladač do polohy ☐ a nechejte protéci asi 1/4 roztoku. Přístroj vypněte a vyčkejte 10 minut.
- Tænd apparatet, og lad det varme op. Indsæt filterholderen uden filter. Placér en skål på drypgitteret. Drej drejeknappen til indstillingen □, og lad 1/4 af blandingen løbe igennem systemet. Sluk apparatet, og vent i 10 minutter.
- Schalten Sie die Maschine ein und warten Sie, bis sie sich aufgeheizt hat. Setzen Sie den Filterhalter ohne Filter ein. Stellen Sie eine Schüssel auf das Abtropfgitter. Drehen Sie den Wahlschalter in Stellung □ und lassen Sie 1/4 der Lösung durchlaufen. Schalten Sie die Maschine aus und warten Sie 10 Minuten.

natural_image
Modern coffee maker with a side arm and cup, no visible text or symbolsEE
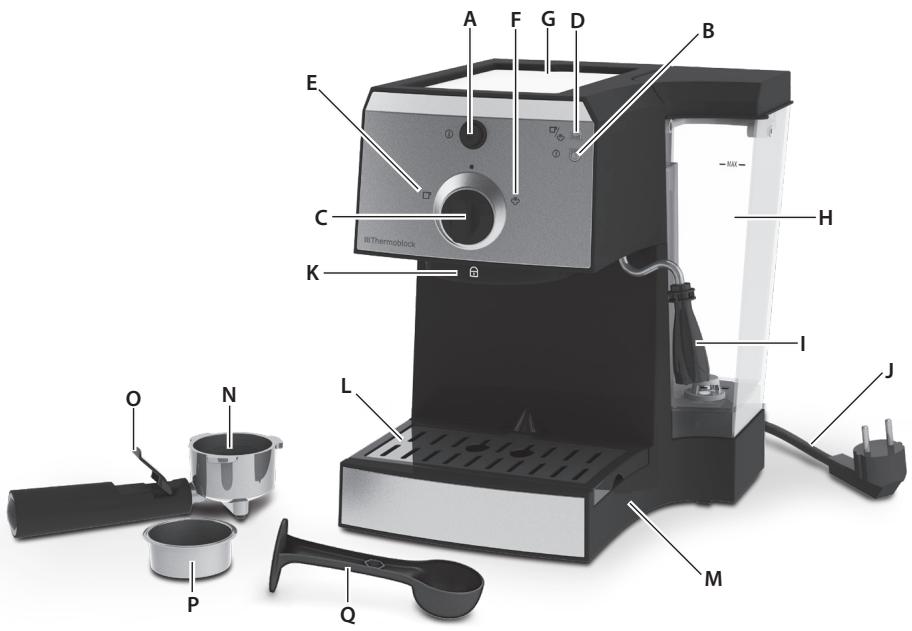
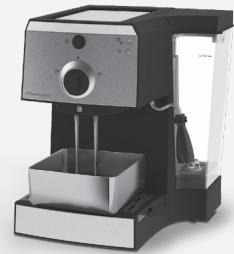
Koostisosad
B. Power indicator light
C. Selector dial
D. Ready indicator light
E. Coffee position
F. Steam/Hot water position
G. Cup warming plate
H. Water tank
I. Steam/hot water nozzle
J. Power cord & plug
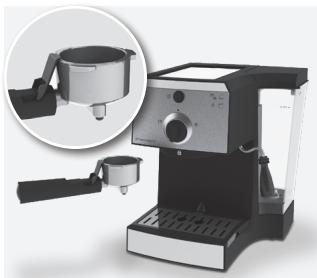
K. Brewing head
L. Drip grid
M. Drip tray
N. Filter holder
O. Finger protector
P. Filter
Q. Measuring spoon with tamper
ES
Componentes
Read the following instruction carefully before using machine for the first time.
- This appliance can be used by children aged from 8 years and above and persons with reduced physical, sensory or mental capabilities or lack of experience and knowledge if they have been given supervision or instruction concerning use of the appliance in a safe way and understand the hazards involved. Children shall not play with the appliance. Cleaning and user maintenance shall not be made by children without supervision.
- Keep the appliance and its cord out of reach of children less than 8 years.
- The appliance may only be connected to a power supply whose voltage and frequency comply with the specifications on the rating plate!
- Never use or pick up the appliance if – the supply cord is damaged, – the housing is damaged.
- The appliance must only be connected to an earthed socket. If necessary an extension cable suitable for 10 A can be used.
- If the appliance or the supply cord is damaged, it must be replaced by the manufacturer, its service agent or similarly qualified person, in order to avoid hazard.
• Always place the appliance on a flat, level surface. - Never leave the appliance unattended while connected to the supply mains.
- The appliance must be switched off and the mains plug withdrawn each time after use, before cleaning and care.
- The appliance and accessories become hot during operation. Use only designated handles and knobs. Allow to cool down before cleaning or storage.
- The mains cable must not come into contact with any hot parts of the appliance.
- Do not remove the filter holder during the brewing process as the appliance is pressurised. The risk of burns exists.
- When the steam function is used there can be some hot water dripping from the brewing head. DANGER! The water is hot, there is a risk for scalding.
- When opening the steam valve there is a shot of hot water coming out. Be careful and open the steam valve slowly. DANGER! The water is hot, there is a risk for scalding.
- Do not immerse the appliance in water or any other liquid.
- Do not exceed the maximum filling volume as indicated on the appliances.
- Fill the water tank only with cold water, never with milk or other liquids.
- Do not use the appliance if the water tank has not been filled.
- Do not use the appliance without the drip tray or the drip grid.
- This appliance is intended for domestic use only. The manufacturer cannot accept any liability for possible damage caused by improper or incorrect use.
natural_image
Exterior view of a modern coffee maker with a power outlet and charging cable (no visible text or symbols)natural_image
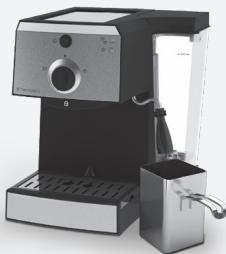
Exterior view of a modern coffee maker with control panel and side arm (no visible text or symbols)- Enne seadme esmakordset kasutamist: Asetage kontiner auru otsiku alla. Oodake, kuni valmis-indikaatortuli põleb ühtlaselt. Loputamaks auru otsiku, keeake pöördlüliti. Protsessi lõpetamiseks vajutage uuesti samale lülitile. Kui seadet käsitsi välja ei lülitata, lülitab automaatne väljalülitusfunktsioon selle 30 minuti pärast ise välja.
- When starting the machine for the first time, first place a container under the steam nozzle. Wait until the Ready indicator light is steady. Turn the selector dial to 📋 to rinse out the steam nozzle. If the machine is not turned off manually, the Safety Auto-Off function turns it off after 30 minutes.
- Cuando utilize la máquina por primera vez, coloque un recipiente debajo del inyector de vapor. Espere hasta que el indicador de preparado esté fijo. Conecte al selector marcado para aclarar el inyector de vapor. Si la cafetera no se apaga manualmente, la función de desconexión automática la apaga transcurridos 30 minutos.
- Kun kone käynnistetään ensimmäistä kertaa. Laita säiliö höyrysuuttimen alle. Odota, kunnes Valmis-merkkivalo palaa pysyvästi. Käännä valintanuppia huheddalksesi höyrysuuttimen. Mikäli et katkaise laitteesta virtaa, automaattinen virrankatkaisu katkaisee virran 30 minuutin kuluttua.
natural_image
Exterior view of a modern coffee maker with control panel and side-mounted stand (no visible text or symbols)- Asetage nõu tilguti alla. Oodake, kuni valmis-indikaatortuli põleb ühtlaselt. Soojendussüsteemi läbiloputamiseks keerake pöördlüliti ilma filtrit paigaldamata seni, kuni vee mahuti on täielikult tühi.
- Then place a bowl on the drip grid. Wait until the Ready indicator light is steady. Without inserting the filter holder, turn selector dial to ☐. Let a full tank of water pass through the machine to rinse out the heating system.
- Colocar un recipiente sobre la rejilla de goteo. Espere hasta que el indicador de preparado esté fijo. Sin insertar el filtro de la manilla, conecte el mando selector □: Deje pasar el agua del contenedor atraves de la maquina con el fin de aclarar el area de calentamiento.
- Laita kulho ritilän päälle. Odota, kunnes Valmis-merkkivalo palaapysyvästi. Älä laita suuttimen pidikettä paikalleen, käännä valintanuppia □-asentoon. Anna täyden vesisäiliön vettä huuhdella kone, jotta kuumennus järjestelmä puhdistuu.
natural_image
Close-up of a Smart air purifier device with control panel and close-up inset showing internal components (no text or symbols visible)-
Espresso valmistamine. Masin on kasutamiseks valmis, kui valmis-indikaatortuli põleb ühtlaselt. Edasi järgige juhise samme 5–7.
-
Making an espresso: The machine is ready to use when the Ready indicator light is steady. Then follow the instructions in step 5-7.
-
Preparación de un espresso: La máquina está para usar cuando el indicador de preparado está fijo. A continuación, siga las instrucciones de los pasos 5 al 7.
-
Espresson valmistus: Laite on valmis käytettäväksi, kun Valmis-merkkivalo palaa pysyvästi. Noudata vaiheiden 5–7 ohjeita.
natural_image
Illustration of a espresso machine with a handle and lid, showing internal components and a downward arrow indicating compression (no text or symbols present)-
Lükake sörmekaitse tagasi ja asetage filter filtrihoidikusse. Täitke filter jahvatatud kohviga. Kasutage lusika teisel poolel olevat tampijat jahvatatud kohvi kergeks kokkusurumiseks.
-
Fold back the finger protector and put the filter in the filter holder. Fill the filter with ground coffee. Use the tamper on the other side of the spoon to press ground coffee lightly.
-
Pliegue el protector para los dedos y coloque el filtro en el soporte. Introduzca café molido en el filtro. Utilice el compactador (el extremo opuesto de la cucharilla) para compactar ligeramente el café molido.
-
Taita sormisuojus taakse ja aseta suodatin suodattimen pidikkeeseen. Täytä suodatin kahvijauheella. Paina kahvijauhe hiukan tiiviimmin suodattimeen tiivistimellä, joka on kahvimitan varren toisessa päässä.

natural_image
Exterior view of a modern espresso machine with a glass lid and cup (no visible text or symbols)-
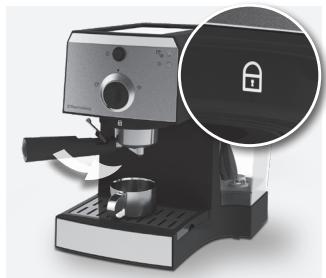
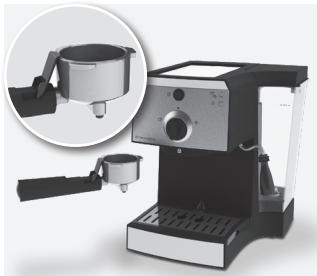
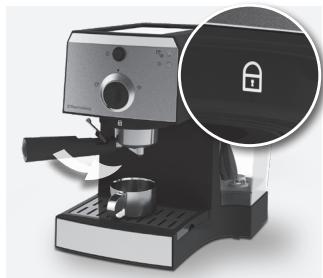
Pange filtrihoidik oma kohale nii, nagu pildil näha. Keerake hoidikut vastupäeva ja kinnitage kohale nii, nagu pildil näha. Liigse jõu kasutamine võib komponentide eluiga lühendada. Kui kuumutamine on lõppenud, põörake valikunupp asendisse □. Espresso hakkab kohvi väljalaskeavast välja voolama — põörake valikunupp asendisse ■, kui olete saavutanud soovitud koguse.
-
Insert the filter holder into position as shown. Turn the handle counterclockwise to tighten its position, see image. Please note that to much force will shorten the components lifespan. When the heating is finished turn the selector dial to ☐. Espresso begins to flow through the coffee outlet – turn the selector dial to ■ when you have reached a desired amount.
-
Inserte el soporte del filtro en su posición como se muestra. Gire este soporte a la izquierda y apriételo en la posición como se muestra. Tenga en cuenta que si aplica demasiada fuerza, se reducirá la vida útil de los componentes. Una vez que el calentamiento haya concluido, sitúe el mando selector en la posición □. El espresso comenzará a salir por la salida de café. Sitúe el mando selector en la posición ■ cuando haya alcanzando la cantidad de su preferencia.
-
Aseta suodattimen pidike paikoilleen kuvan mukaisesti. Käännä tätä pidikettä vastapäivään ja kiristä se paikoilleen kuvan mukaisesti. Huomaa, että osien käyttöikä lyhenee, jos niihin kohdistetaan suuria voimia. Kun kuumennus on valmis, käännä valintanuppi -asentoon. Espressoa alkaa valuia keittimestä – käännä valintanuppi -asentoon, kun espressoa on kupissa haluttu määrä.
natural_image
Exterior view of a modern coffee maker with a hand holding a cup, showing its interior and control panel (no text or symbols visible)- Keetmise löppedeseemaldage filtriroidik. Keerake seda vasakule ning vötke see kinnitusrakisest välja. Voltige sörmekaitse algasendisse ja eemaldage kasutatud kohvipuru filtrist. Seejärel vötke see hoidikust välja ja puhastage veega. Enne filtrikarbi tagasipanemist kuivatage see riidelapiga.
- After brewing, remove the filter holder. Twist it to the left and take it out of the retainer. Fold finger protector forwards and remove used coffee grounds from the filter. Then take it out of the holder and clean it with water. Dry with a cloth before putting it back into the filter box.
- Una vez preparada la bebida podrá retirar el soporte del filtro. Girelo hacia la izquierda y extráigalo del retén. Posicione el protector de dedos hacia adelante y retire el café molido del filtro. A continuación, extraiga el soporte y lávelo con agua. Séquelo con un paño antes de volver a guardarlo en el receptáculo del filtro.
- Irrota suodattimen pidike suodatuksen jälkeen. Käännä sitä vasemmalle ja ota se ulos kiinnikkeestä. Käännä sormisuoja eteenpäin ja ota kahvinporot suodattimesta. Ota suodatin pois pidikkeestä ja puhdista vedellä. Kuivaa suodatin kangasliinalla, ennen kuin panet sen takaisin suodatinrasiaan.

natural_image
Exterior view of a modern coffee maker with control panel and indicator lights (no text or symbols on device)natural_image
Exterior view of a modern coffee maker with control panel and side arm (no visible text or symbols)natural_image
Exterior view of a modern espresso machine with adjustable arm and control panel (no visible text or symbols)- Asetage kauss auruotsaku alla ja pöörake valikunupp paariuks sekundiks tagasi asendisse 📋. Sedasi eemaldate köik kuuma vee/piima jäägid auruotsakust. Ettevaatust: aurutoru on tuline! Laske aurutorul maha jahtuda ja puhastage see seejärel lapiga.
- Place a bowl under the steam nozzle and turn the selector dial back to 📋 for a few seconds. This will remove any residue of hot water/milk from the steam nozzle. Caution: the steam pipe is hot! Allow to cool down, then clean the steam pipe with a cloth.
- Coloque un recipiente debajo de la boquilla de vapor y vuelva a situar el mando selector en la posición durante unos instantes. De este modo podrá eliminar cualquier residuo de agua o de leche caliente de la boquilla de vapor. Precaución: jel conducto de vapor está caliente! Espere a que el tubo de vapor se enfríe y, a continuación, limpieło con un paño.
- Pane kulho höyrysuuttimen alle ja käännä valintanuppi takaisin -asentoon muutamaksi sekunniksi. Höyrysuuttimeen jäänyt kuuma vesi tai maito poistuu. Varoitus: höyryputki on kuuma! Anna höyryputken jäähtyä ja puhdista se sitten kankaalla.
natural_image
Two metallic kitchen utensils, one pouring liquid from a container (no text or symbols visible)- Cappuccino valmistamine: Vahustage piim, nagu kirjeldatud punktides 1-2 ning kallake see eelnevalt valmistatud Espresso.
- Preparing Cappuccino: Froth the milk as described in previous steps 1-2 and pour it onto the previously prepared Espresso.
- Preparación de Cappuccino: Cree espuma como se describe en los pasos anteriores 1-2 y viértala en el Espresso preparado previamente.
- Cappuccino valmistaminen: Vaahdota maito kohtien 1-2 mukaisesti ja kaada se sitä ennen valmistettuun Espresso-kahviin.
natural_image
Exterior view of a modern coffee machine with a mug and stand mixer (no visible text or symbols)natural_image
Two views of a cylindrical mechanical component with internal features, showing textured surfaces and a pointed tip (no text or symbols)natural_image
Illustration of a microwave oven with control panel and paper tray, showing internal components (no text or symbols)natural_image
Mechanical device interior view showing a lever mechanism and base mount (no text or symbols visible)natural_image
Close-up of a ceiling-mounted air vent with a metallic ring and circular base (no text or symbols visible)-
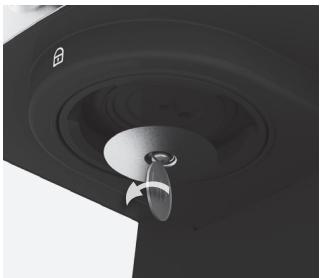
Katlakivi eemaldamist soovitatakse teha regulaarselt, sõltuvalt vee karedusest. Eemaldage mündi abil keeduplokk (hoidke komponendid üheskoos) enne, kui täidate veenõu tootejuhistele vastavalt vee ja katlakivi eemaldajaga.
-
Decalcifying is recommended regularly, depending on water hardness. Remove the brewing head (keep components together) with a coin before filling the tank with water and decalcifier according to product instructions.
-
Se recomienda descalcificar la máquina periódicamente. Los intervalos dependerán de la dureza del agua. Retire el cabezal difusor (manteniendo juntos sus componentes) con una moneda antes de cargar el depósito con agua y descalcificador según las instrucciones del producto.
-
Kalkinpoisto on suositeltavaa tehdä säännöllisesti veden kovuuden mukaan. Irrota suodatinpää (pidä osat yhdessä) kolikon avulla ennen kuin täytät säiliön vedellä ja kalkinpoistoaineella tuoteohjeiden mukaan.
natural_image
Exterior view of a modern coffee maker with control panel and side arm (no visible text or symbols)- Lülitage seade sisse ja laske sel kuumeneda. Asetage filtrihoidja oma kohale ilma filtrita. Asetage kauss tilgarestile. Keerake valikunupp asendisse □ ja laske 1/4 lahusest läbi voolata. Lülitage masin välja ja oodake 10 minutit.
- Switch the machine on and let it heat up. Place the filter holder in position, without any filter. Place a bowl on the drip grid. Turn the selector dial to □ and let 1/4 of the solution pass through. Turn the machine off and wait for 10 minutes.
- Encienda la máquina y deje que se caliente. Coloque el soporte del filtro en su posición, aunque sin el filtro. Coloque un recipiente sobre la bandeja de goteo. Gire el mando selector hasta situarlo en la posición □ y espere hasta que una cuarta parte de la solución pase por el sistema. Apague la máquina y espere unos 10 minutos.
- Käynnistä kone ja anna sen lämmetä. Pane suodattimen pidike paikoilleen ilman suodatinta. Pane kulho ritilän päälle. Käännä valintanuppi -asentoon ja anna neljäsosan liuoksesta kulkea järjestelmän läpi. Sammuta kone ja odota kymmenen minuuttia.

natural_image
Modern coffee maker with a stand and side arm, no visible text or symbolsA) Both power and steam indicator lights are flashing:
- Check that the selector dial is turned to ■.
- If steam/hot water has been used for too long, make a pause for 30 seconds.
- Switch the machine off for 5 minutes and restart it. If the lights are still flashing, contact customer support.
B) The espresso temperature is too low:
- Carry out the brewing procedure without using espresso grounds, but using the filter and filter holder, in order to preheat the system.
• Preheat the cups.
• Decalcify the appliance.
C) The flow speed decreases noticeably:
- Do not press the espresso grounds too firmly into the filter.
- Do not grind the espresso grounds too finely ("medium" fineness).
• Decalcify the appliance.
D) The espresso is flowing out of the side of the filter holder:
- Ensure that the filter holder has been placed correctly.
- Twist the filter holder a little more firmly into the retainer.
- Clean any espresso grounds away from the rim of the filter holder.
E) No espresso is coming out:
- If there is a loud noise from the machine, this means air is in the system. Let hot water flow through the nozzle until there is a steady flow. Then try brewing coffee again.
- Ensure that the water tank has been filled and is correctly in place. Activate hot water. Then, try brewing coffee again.
- Ensure that the filter holder has been placed correctly.
- Ensure that the selector dial has been turned right to the position.
- Do not press the espresso grounds too firmly into the filter.
- Clean the brew filter.
• Decalcify the appliance.
F) The crema is no longer being produced as it should:
- Ensure that there are enough espresso grounds in the filter.
• Press the espresso grounds lightly. - Clean the filter.
G) Too little milk froth is created when steaming milk:
• Always use cool, fresh, low-fat milk.
- Clean the steam nozzle.
H) The flow increases:
• The espresso grounds have been ground too rough.
- Ensure that there are enough espresso grounds in the filter.
I) The coffee machine switches itself off while operating:
- The appliance pump is equipped with a temperature fuse that protects it from overheating. The temperature fuse interrupts the machine's operation, if the machine is operated for too long or if the pump is run without water.
- Set the selector dial to "0" and remove the plug from the mains socket.
- Leave the machine to cool for at least 20 minutes. Fill up with water.
- Plug the appliance into the mains again and switch it on. If the appliance still does not work, please contact our Customer Care Department.
FR
Composants
natural_image
Exterior view of a modern coffee maker with a power outlet connected to its side panel (no visible text or symbols)natural_image
Exterior view of a modern espresso machine with control panel and side arm (no visible text or symbols)natural_image
Exterior view of a modern coffee maker with control panel and side-mounted stand (no visible text or symbols)natural_image
Close-up of a portable kitchen appliance with control panel and close-up inset showing a button (no visible text or symbols)natural_image
Exterior view of a coffee maker with a spoon and cooking pan (no text or symbols visible)natural_image
Exterior view of a modern espresso machine with a lock icon overlay (no text or symbols on the device itself)natural_image
Exterior view of a modern coffee maker with a hand holding a cup, showing its interior and control panel (no text or symbols visible)natural_image
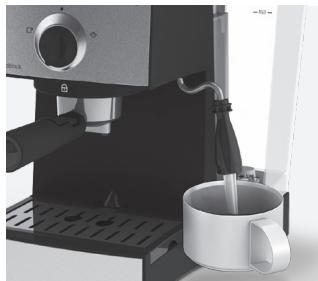
Exterior view of a modern coffee maker with control panel and indicator lights (no text or symbols on device)- Il est possible d'utiliser de la vapeur pour former une mousse de lait ou pour chauffer des liquides. Attendez que le voyant Prêt reste allumé fixement. Immergez la buse vapeur dans un récipient ne craignant pas la chaleur rempli de lait.
- Para se može upotrijebiti za pravljenje mliječne pjene ili grijanje tekućina. Pričekajte dok se trajno ne uključi indikator spremnosti za upotrebu. Umetnite ispust za paru u spremnik s mlijekom.
- A gözt használhatja tejhabosításra vagy folyadékok felmelegítésére. Várjon, amíg a készenléti állapot jelző folyamatosan nem világít. A gőz/forró víz fúvókát merítse hőálló edénybe öntött tejbe.
- È possibile utilizzare il vapore per ottenere schiuma di latte o per riscaldare altri liquidi. Attendere fin quando la spia di pronto smette di lampeggiare. Immergere il beccuccio del vapore in un recipiente resistente al calore contenente latte.

natural_image
Exterior view of a modern coffee maker with control panel and side arm (no visible text or symbols)natural_image
Exterior view of a modern espresso machine with control panel and side arm (no visible text or symbols)natural_image
Two metallic kitchen utensils, one pouring liquid from a cup and the other holding a handle (no text or symbols visible)natural_image
Exterior view of a modern espresso machine with a white mug and stand mixer (no visible text or symbols)natural_image
Two views of a cylindrical mechanical component with internal features, showing textured surfaces and a pointed tip (no text or symbols)natural_image
Illustration of a coffee maker with open lid and tray, showing mechanical components and directional arrows (no text or symbols)natural_image
Mechanical assembly diagram showing a piston and valve mechanism (no text or symbols)natural_image
Close-up of a ceiling-mounted air duct with a metallic component and circular base (no text or symbols visible)natural_image
Exterior view of a modern coffee maker with a glass stand and control panel (no visible text or symbols)natural_image
Modern espresso machine with a side arm and a cup of milk (no visible text or symbols)LT
Sudedamosios dalys
natural_image
Exterior view of a modern coffee maker with a power outlet connected to its side panel (no visible text or symbols)natural_image
Exterior view of a modern espresso machine with control panel and side arm (no visible text or symbols)- Ijungus prietaisą pirmajį kartą padėkite indą po garų vamzdeliu. Palaukite, kol parengties kontrolinė lemutė imės šviesti be perstojo. Pasukite programų rankenėlę iki ĝgų/karšto vandens ženklo ir išskalaukite garų vamzdelį. Jeigu prietaisas neišjungiamas rankiniu būdu, po 30 minučių jį išjungia.
- Pirms izmantojiet ierici pirmo reizi, novietojiet krūzīti zem tvaika sprauslas. Sagaidiet, kamēr gatavības gaismsan indikators ir nepārtraukti izgaismots. Pagrieziet pārslēgu uz tvaika sprauslas izskalošanai. Ja ierice netiek izslēgta manuāli, automātiskā drošības izslēgšanās funkcija to izslēgs pēc 30 minūtēm.
- Als u het apparaat voor het eerst gebruikt, plaats een container onder de stoompijp. Wacht tot het Indicatielampje apparaat klaar permanent brandt. Zet de keuzeknop aan ⚙ om de stoompijp te spoelen. Als de machine niet handmatig wordt uitgeschakeld, schakelt de beveiligingsfunctie de machine na 30 minuten automatisch uit.
- Når maskinen startes for første gang: Plasser en beholder under damputtaket. Vent til Klarindikatorlampen lyser fast. Vri på hjulet ( ), for å rense uttaket. Hvis maskinen ikke skrus av manuelt, skur sikkerhetsfunksjonen for automatisk avstengning den av etter 30 minutter.
natural_image
Exterior view of a modern coffee maker with control panel and side-mounted stand (no visible text or symbols)- Padékite indą ant nutekėjimo grotelių. Palaukite, kol parengties kontrolinė lemutė imė šviesti be perstojo. Nejdėję filtro laikiklio, pasukite programų rankenėlę iki □P kavos ruošimo ženklo, kad vandens talpa ištuštėtų ir išskalautų kaitinimo sistema.
- Novietojiet krūzīti uz pilienu savākšanas pamatnes. Sagaidiet, kamēr gatavības gaismas indikators ir nepārtraukti izgaismots. Neievietojot filtra turētāju, pagrieziet pārslēgu uz ☐: laujiet visam ūdens daudzumam iziet caur aparātu, lai izskalotu sildelementu.
- Plaats een kom op het druppelrooster. Wacht tot het Indicatielampje apparaat klaar permanent brandt. Zet, zonder de filterhouder te plaatsen, de keuzeknop aan □: Laat een vol waterreservoir door het apparaat lopen om het verwarmingssysteem door te spoelen.
- Plassèr en bolle på dryppbrettet. Vent til Klar-indikatorlampen lyser fast. Uten å sette i filterholderen, vri på hjulet □. La en full tank vann passere gjennom maskinen. Gjøres for å rense varmesystemet.
natural_image
Close-up of a portable kitchen appliance with control panel and close-up inset showing a button (no visible text or symbols)natural_image
Exterior view of a coffee maker with a spoon and cooking pan (no text or symbols visible)- Atlenkite pirštų apsaugos įtaisą ir įdėkite filtrą į filtro laikiklį. Pridėkite į filtrą maltos kavos. Naudodami kitame šaukšto gale esantį grūstuvą švelniai paspauskite maltą kavą.
- Atlokiet pirkstu aizsargu un ievietojiet filtra turētājā filtru. Piepildiet filtru ar maltu kafiju. Izmantojot mērkarotes otrā galā esošo blieti, viegli piespiediet malto kafiju.
- Vouw de vingerbescherming naar achter en plaats de filter in de filterhouder. Vul de filter met gemalen koffie. Gebruik de aanstamper aan het uiteinde van de lepel om de gemalen koffie zachtjes aan te drukken.
- Brett bakover fingerbeskytteren og sett filteret inn i filterholderen. Fyll filteret med oppmalt kaffe. Bruk stamperen på den andre siden av skjeen til å trykke den malte kaffen lett sammen.
natural_image
Exterior view of a modern espresso machine with a lock icon overlay (no text or symbols on the device itself)natural_image
Exterior view of a modern coffee maker with a hand holding a cup, showing its interior and control panel (no text or symbols visible)natural_image
Exterior view of a modern coffee maker with control panel and indicator lights (no text or symbols on device)- Garus galima naudoti pieno putoms daryti arba skysčiams kaitinti. Palaukite, kol parengties kontrolinė lemputė ims šviesti be perstojo. Įmerkite garų antgalį į karščiui atsparų indą su pienu.
- Tvaiku var lietot, lai saputotu pienu vai uzsildītu šķidrumus. Sagaidiet, kamēr gatavības gaismas indikators ir nepārtraukti izgaismots. levietojiet tvaika sprauslu karstumizturīgā traukā ar pienu.
- Stoom kan worden gebruikt om melk op te schuimen of om vloeistoffen te verwarmen. Wacht tot het Indicatielampje apparaat klaar permanent brandt. Zet de stoompijp in een hittebestendige kan met melk.
- Damp kan brukes til å få melken til å skumme eller til å varme opp væsker. Vent til Klar-indikatorlampen lyser fast. Senk damputtaket ned i en varmebestandig beholder med melk.

natural_image
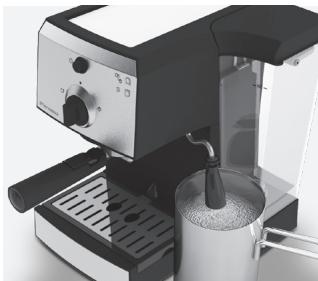
Exterior view of a modern coffee maker with control panel and side arm (no visible text or symbols)- Paleiskite garus, pasukdami regulatoriaus rankenėlę į padėtį 🌐. Judinkite indą sukamaisiais judesiais, antgalis neturėtį liesti dugno. Norėdami sustabdyti garus, pasukite regulatoriaus rankenėlę į padėtį ■, kai pasieksite norimą kiekį putų.
- Sāciet tvaika padevi, pagriežot pārslēgu uz Ⓥ. Grieziet trauku, izmantojot rinkveida kustības, uzgalis nedrikst pieskarties trauka pamatni. Kad sasniegts vēlamais putu daudzums, pagrieziet pārslēgu uz ■, lai pārtrauktu tvaika padevi.
- Door de keuzeknop op te zetten, begint het stomen. Beweeg de kan met ronddraaiende bewegingen, maar zorg ervoor dat de pijp de bodem niet raakt. Om het stomen te stoppen, zet u de keuzeknop op indien u de juiste hoeveelheid schuim heeft.
- Skru på dampen ved å vri hjulet til Ⓤ. Beveg beholderen i sirkelbevegelser, damputtaket skal ikke treffe beholderens bunn. Når ønsket mengde melkeskum og oppvarming er nådd, stoppes dampen ved å vri hjulet tilbake til ■.

natural_image
Exterior view of a modern espresso machine with control panel and side arm (no visible text or symbols)- Pakiškite dubenį po garų angtaliu ir gražinkite regulatoriaus rankenėlę keletui sekundžių į padėtį 🚫. Taip iš garų angtalio bus pašalinti visi karšto vandens / pieno likučiai. Ispėjimas: garų vamzdelis yra karštas! Leiskite atvėsti, tada nuvalykite garų vamzdelį šluoste.
- Novietojiet trauku zem tvaika uzgala un neilgu bridi pagrieziet pārslēgu atpaka] uz ①. Tādējādi no tvaika uzgala tiks iztīritas visas karstā üdens/piena daļiņas. Piesardzigi: tvaika caurulite ir karsta! ħaujiet tvaika uzgalim atdzist un pēc tam notīriet to ar drāniņu.
- Zet een kommetje onder het stoommondstuk en draai de keuzeknop terug in de stand ♦ gedurende een paar seconden. Hiermee wordt resterend heet water of resterende melk uit het mondstuk verwijderd. Waarschuwing: het stoompijpje is heet! Laat het stoompijpje afkoelen en reinig het vervolgens met een doek.
- Sett en bolle under dampdysen, og drei velgerbryteren tilbake til i noen sekunder. Da vil eventuelle rester av varmt vann/melk fjernes fra dampdysen. Forsiktig: damprøret er varmt! La damprøret avkjøle, og rengjør det deretter med en klut.

natural_image
Two metallic kitchen pots, one pouring liquid from a container (no text or symbols visible)- „Cappuccino“ ruošimas: Suplakite pieną kaip aprašyta pirmiau pateiktuose 1–2 žingsniuose ir supilkite jį i prieš tai paruoštą „Espresso“ kavą.
- Cappuccino pagatavošana: Saputojiet pienu, kā aprakstīts 1. un 2. solī, un pārlejiet to pāri iepriekš pagatavotajam Espresso.
- Cappuccino maken: Schuim de melk op zoals beschreven in vorige stappen 1-2 en giet deze op de eerder gemaakte Espresso.
- Forberede Cappuccino: Skum melken som beskrevet i trinn 1-2 og hell den i den tidligere forberedte Esressoen.

natural_image
Exterior view of a modern espresso machine with a mug and stand mixer (no visible text or symbols)- Norėdami pakaitinti vandenį pakiškite puodelį po garų antgaliu ir pasukite reguliatoriaus rankenėlę į padėtį 📋. Pro antgalį išteka karštas vanduo. Gražinkite rankenėlę į padėtį ■, norėdami sustabdyti vandenį.
- Lai iegūtu karstu ūdeni,, novietojiet tasīti zem tvaika uzgaļa un pagrieziet pārslēgu uz 📋. Caur uzgali iztecės karsts ūdens. Lai pārtrauktu ūdens padevi, pagrieziet pārslēgu uz ■.
- Voor heet water zet u een kopje onder het stoommondstuk en draait u de keuzeknop in de stand ⚙. Er komt heet water uit het mondstuk. Draai de keuzeknop terug in de stand ■ om het water te stoppen.
- Skal du ha varmt vann, setter du en kopp under dampdysen og dreier velgerbryteren til ⏻. Det kommer varmt vann ut av dysen. Drei bryteren tilbake for å ■ stoppe vannet.
Valymas ir priežiūra / Tīrīšana un apkope Reiniging en onderhoud / Rengjøring og vedlikehold
natural_image
Two views of a cylindrical mechanical component with internal features, showing textured surfaces and a pointed tip (no text or symbols)natural_image
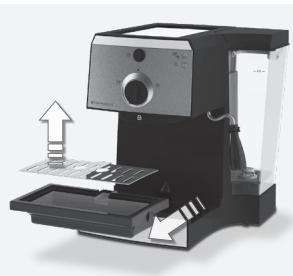
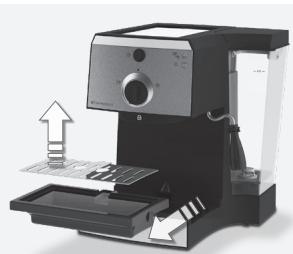
Illustration of a coffee maker with open lid and tray, showing mechanical components (no text or symbols)- Lašų surinkimo padėklui prisipildžius, jį reikia ištuštinti. Iškelkite lašėjimo groteles, ištuštinkite, paskalaukite ir nusausinkite groteles bei padėklą. Higienos sumetimais tai reikia daryti reguliariai.
- Kad pilienu paplāte ir pilna, tā ir jāiztukšo. Iznemiet pilienu režgi; iztukšojiet, noskalojiet un nosusiniet pilienu tekni. Higiēnas apsvērumu dēļ to ir vēlams darīt regulāri.
- Als ze vol is, moet de druiplade worden geledigd. Til het druppelrooster uit het apparaat, leeg de opvangbak, spoel deze om en droog deze af. Omwille van de hygiène raden we aan om dit regelmatig te doen.
- Når det er fullt, må dryppebrettet tømmes. Løft ut dryppristen, tøm, skyll og tørk risten og skålen. Av hygieniske årsaker anbefaler vi å gjøre dette regelmessig.
natural_image
Close-up of a mechanical device with a lever and adjustment knob (no visible text or symbols)natural_image
Close-up of a ceiling-mounted air duct with a metallic ring and circular base (no text or symbols visible)natural_image
Exterior view of a modern coffee maker with control panel and side arm (no visible text or symbols)natural_image
Modern coffee maker with a side arm and cup, no visible text or symbols- Pasukite parinkčių ratuką ties 🚫 ir palaukite, kol likęs tirpalas ištekės pro garų antgalį. ľ vandens indą pripilkite švaraus vandens ir leiskite aparatui veikti, kol indas ištuštės. Naudodami švarų vandenį pakartokite du kartus. Vėl įtaisykite sudedamąsias dalis ir tinkamai įstatykite filtrą.
- Pagrieziet selektora slēdzi pozicijā un laujiet atlikušajam škidrumam iztecēt pa tvaika sprauslu. Piepildiet ūdens tvertni ar ūdeni un darbiniet ierici, lidz vtertne ir tukša. Atkārtojiet šo darbību divas reizes, katru reizi nomainot ūdeni. Atkārtoti ievietojiet sastāvdaļas un nostipriniet filtru.
- Zet de selectieknop op stand 📄 en laat de resterende vloeistof door de stoomtuit stromen. Vul het waterreservoir met schoon water en laat het apparaat lopen totdat het reservoir leeg is. Herhaal dit tweemaal met schoon water. Plaats de onderdelen terug en bevestig het filter op de juiste wijze.
- Drei til velgerknappen til 📋 og la den gjenværende løsningen strømme gjennom dampdysen. Fyll vannbeholderen med friskt vann, og la maskinen gå til beholderen er tom. Gjenta to ganger med friskt vann. Sett inn delene igjen og fest filteret skikkelig.
PL
Elementy
natural_image
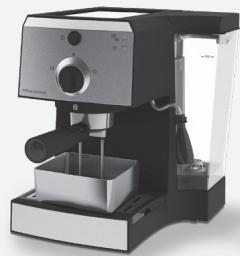
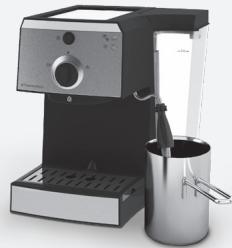
Exterior view of a modern coffee maker with a power outlet and charging cable (no visible text or symbols)- Ustaw urządzenie na płaskiej powierzchni i napełnij zbiornik zimną wodą. (Nie wolno korzystać z urządzenia z pustym zbiornikiem!) Podłącz przewód zasilający do gniazdka i naciśnij przycisk ON.
- Coloque a máquina sobre uma superfície plana e encha o depósito com água fria. (A máquina não deve ser utilizada com um depósito vazio!) Ligue o cabo à tomada e prima o botão LIGAR.
- Aşezati aparatul pe o suprafață plană și umpleți rezervorul cu apă rece. (Aparatul nu trebuie folosit dacă rezervorul este gol!) Conectați cablul de alimentare la sursa de curent și apăsați butonul PORNIRE.
- Поместите машину на плоскую поверхность и наполните бачок холодной водой. (Использовать машину при пустом бачке нельзя!) Вставьте шнур питания в розетку и нажмите кнопку ВКЛ.
natural_image
Exterior view of a modern espresso machine with control panel and side arm (no visible text or symbols)- Przed pierwszym użyciem, ustaw pojemnik pod dyszą pary. Zaczekać, aż kontrolka trybu gotowości zacznie świecić w sposób ciągły. Ustaw pokrętło wyboru na symbolu 📋 wody, aby przepłukać dyszę pary. Jeśli urządzenie nie zostanie wyłączone ręcznie, funkcja samoczynnego wyłączenia wyłączy je po 30 minutach.
- Quando ligar a máquina pela primeira vez, coloque o recipiente debaixo do bocal de saída de vapor. Aguarde até a luz indicadora de máquina pronta deixar de piscar. Rode o botão selector em para lavar o bocal de saída de vapor. Se o aparelho não for desligado manualmente, a função Desligar Automático de Segurança desliga-o após 30 minutos.
- Prima utilizare a aparatului presupune următorii pași: așezați un vas colector sub duza pentru abur. Așteptați până când indicatorul luminos Pregătit este constant. Direcționați selectorul în direcția abur sau apă fierbinte pentru curățarea duzei de abur. Dacă aparatul nu este oprit manual, funcția Opire automată de siguranță îl oprește după 30 de minute.
- При включении аппарата в первый раз: установите контейнер под парообразователем. Дождитесь постоянного свечения индикатора готовности. Для промывания парообразователя поверните селектор в нужное положение ⚙️. . Если не отключить прибор вруч- ную, то система автоматического предохранительного отключения сделает это через 30 минут.

natural_image
Exterior view of a modern stainless steel coffee maker with control panel and side shelves (no visible text or symbols)natural_image
Close-up of a modern kitchen appliance with control panel and close-up inset showing a button (no text or symbols visible)-
Zaparzanie espresso: Urządzenie będzie gotowe do pracy, gdy kontrolka trybu gotowości zacznie świecić w sposób ciągły. Wykonaj kroki 5–7.
-
Fazer um espresso: A máquina está pronta quando a luz de máquina pronta deixar de piscar. Em seguida, siga as instruções nos passos 5-7.
-
Realizarea unui espresso: Maşina este pregătită de utilizare când indicatorul luminos Pregătit este constant. Urmați, apoi, instrucțiunile de la pașii 5-7.
-
Приготовление эспрессо. Постоянное свечение индикатора готовности свидетельствует о том, что кофеварка готова к работе. Следуйте инструкциям (шаги 5–7).
natural_image
Illustration of a espresso machine with a spoon and three cups, showing internal components (no text or symbols)-
Złożyć ochraniacz na palce i umieścić filtr w uchwycie. Napelnić filtr zmieloną kawą. Lekko dociśnij zmieloną kawę w filtrze, używając ugniatacza na drugim końcu łyżeczki.
-
Dobre o protetor de dedo para trás e coloque o filtro no respetivo suporte. Encha o filtro com café moído. Utilize a calcadeira no outro lado da colher para comprimir ligeiramente o café moído.
-
Strângeți protecția pentru degete și puneți filtrul în suportul său. Umpleți filtrul cu cafea măcinată. Utilizați tasatorul de pe cealaltă parte a lingurii pentru a presa ușor cafeaua măcinată.
-
Нажмите на устройство защиты пальцев и установите фильтр в держатель для фильтра. Насыпьте в фильтр молотый кофе. Пестом на ложечке слегка спрессуйте молотый кофе.

natural_image
Exterior view of a modern espresso machine with a lock icon overlay (no text or symbols on the device itself)-
Włożyć uchwyt filtra na swoje miejsce jak pokazano na rysunku. Obrócić uchwyt w kierunku przeciwnym do ruchu wskazówek i dokręcić go jak pokazano na rysunku. Użycie zbyt dużej siły powoduje skrócenie żywotności elementów. Po zakończeniu podgrzewania ustaw pokrętło wyboru w położeniu. Z wylotu kawy zacznie wypływać espresso – ustaw pokrętło w położeniu, kiedy uzyskasz żądaną ilość kawy.
-
Introduza o suporte do filtro na devida posição, conforme ilustrado. Rode este suporte no sentido anti-horário e aperte-o na devida posição, conforme ilustrado. Tenha em atenção que o uso de força excessiva encurta a duração dos componentes. Quando o aquecimento terminar, rode o selector para a posição □. O café espresso começa a fluir através da saída de café – rode o selector para a posição ■ quando atingir a quantidade pretendida.
-
Introduceți suportul filtrului în poziția din imagine. Rotiți acest suport spre stânga și strângeți la poziția din imagine. Dacă aplicați prea multă fortă, acest lucru va scurta durata de funcționare a componentelor. După terminarea procesului de fierbere, rotiți cadranul selector la ☐. Espresso începe să curgă prin orificiul de scurgere a cafelei – rotiți cadranul selector la ■ atunci când ați obținut cantitatea dorită.
-
Вставьте держатель фильтра на место, как показано на рисунке. Поверните держатель против часовой стрелки и затяните, как показано на рисунке. Обратите внимание, что чрезмерное применение силы сократит срок службы компонентов прибора. По завершении нагрева поверните диск регулятора в положение □ . Эспрессо начинает вытекать из отверстия для кофе. Получив нужное количество, поверните диск регулятора в положение ■
natural_image
Exterior view of a modern coffee maker with a hand holding a cup, showing its interior and side profile (no text or symbols visible)- Po zakończeniu parzenia zdejmij uchwyt filtra. Przekręć go w lewo i wyjmij z obręczy. Przełoż ochraniacz palca na filtr i usuń zużytą kawę z filtra. Następnie wyjmij filtr z uchwytu i opłucz woda. Przed ponownym umieszczeniem filtra w schowku osusz go miękką ściereczką.
- Depois da infusão pode remover o suporte do filtro. Rode-o para a esquerda e tire-o para fora da retenção. Empurre o protector de dedos para a frente e remova as borras de café usadas do filtro. Em seguida, retire-o do suporte e limpe-o com água. Seque-o com um pano antes de o colocar novamente na caixa de filtros.
- După fierbere, îndepărtați suportul pentru filtru. Rotiți-l spre stânga și scoateți-l din suport. Pliați în față protecția pentru deget și scoateți cafeaua folosită din filtru. Apoi, scoateți-l din suport și curătați-l cu apă. Uscați-l cu o cârpă înainte de a-l pune la loc în cutia pentru filtru.
- После варки выньте держатель фильтра. Поверните его влево и выньте из фиксатора. Откиньте защиту пальцев вперед и удалите использованный молотый кофе из фильтра. Выньте фильтр из держателя и промойте водой. Перед тем как поместить в ящик для фильтров, протрите его насухо тканью.

natural_image
Exterior view of a modern coffee maker with control panel and indicator lights (no text or symbols on device)natural_image
Exterior view of a modern coffee maker with control panel and side arm (no visible text or symbols)- Aby rozpocząć wypływ pary ustaw pokrętło wyboru w położeniu 📋. Poruszaj pojemnikiem okrężnymi ruchami, dysza nie powinna dotykać dna naczynia. Aby zatrzymać wypływ pary, obroć pokrętło w położenie ■ po uzyskaniu żądanej ilości piany.
- Inicie o vapor ao rodar o selector para a posição Vire o recipiente em movimentos circulares, com cuidado para o bocal não tocar no fundo do recipiente. Para parar o vapor, rode o selector para a posição quando atingir a quantidade de espuma pretendida.
- Porniți producerea aburului prin rotirea selectorului în poziția ♦. Mișcați containerul în sens circular, duza nu trebuie sa atingă baza containerului. Pentru a opri aburul, rotiți selectorul în poziția ■ atunci cand considerați că, spuma obținută este cea dorită.
- Включите пар, повернув селектор в нужное положение ⚫. Покрутите контейнер, но парообразователь не должен касаться кнопки. Для остановки парообразования поверните селектор в нужное положение ⚪, когда вы уже достигли нужный вам эффект.

natural_image
Exterior view of a modern espresso machine (no visible text or labels)- Umieść miseczkę pod dyszą pary i przekręć pokrętło wyboru z powrotem w położenie 📋 na kilka sekund. Spowoduje to usunięcie pozostałości gorącej wody i mleka z dyszy pary. Ostrzeżenie: dysza pary jest gorąca! Poczekaj, aż dysza pary ostygnie i oczyść ją szmatką.
- Coloque um recipiente debaixo do bocal de vapor e rode novamente o selector para a posição durante alguns segundos. Deste modo, remove quaisquer resíduos de água quente/leite do bocal de vapor. Atenção: o tubo de vapor está quente! Deixe arrefecer e, em seguida, limpe o tubo de vapor com um pano.
- Aşezati un vas sub duza de aburi și rotiți cadranul selector înapoi la pentru câteva secunde. Astfel se vor îndeparța toate reziduurile de apă fierbinte/lapte de pe duza de abur. Atenție: țeava de abur este fierbinte! Lăsați țeava de abur să se răcească, după care curățați-o cu o cârpă.
- Поставьте чашу под насадку для пара и на несколько секунд поверните диск регулятора назад в положение ⚫». Это удалит из насадки для пара остатки горячей воды или молока. Осторожно! Трубка для пара разогрета! Дайте трубке для пара остыть и протрите ее тканью.
natural_image
Two metallic kitchenware items: a large cylindrical pot and a smaller cup with liquid, shown against a plain background (no text or symbols visible)- Przygotowywanie Cappuccino: Spienić mleko w sposób opisany w punktach 1–2 i wlać je do uprzednio przygotowanego Espresso.
- Preparar um Cappuccino: Espume o leite conforme descrito nos passos 1-2 acima e verta-o sobre o café Espresso que tirou.
- Prepararea de Cappuccino: Spumați laptele conform instrucțiunilor de la pașii 1-2 și turnați-l peste Espresso-ul preparat anterior.
- Приготовление Саррuccino: Вспеньте молоко, как описано в предыдущих действиях 1 и 2, и залейте им предварительно приготовленный кофе Espresso.
natural_image
Exterior view of a modern espresso machine with a mug and stand mixer (no visible text or symbols)natural_image
Two views of a cylindrical mechanical component with internal features, showing textured surfaces and no visible text or symbols.- Wyłącz urządzenie i poczekaj aż ostygnie. Wytrzyj ściereczką wszystkie powierzchnie zewnętrzne. Oczyć zatkane otwory w filtrze i uchwycie filtra za pomocą szpilki lub małej szczotki.
- Desligue a máquina e deixe-a arrefecer. Limpe todas as superfícies exteriores com um pano húmido. Limpe os orifícios obstruídos do filtro e o suporte do filtro com um alfinete ou uma escova pequena.
- Opriți aparatul și lăsați-l să se răcească. Ștergeți toate suprafețele externe cu o cârpă umedă. Curățați orificiile înfundate ale filtrului și suportul de filtru cu un ac sau o perie mică.
- Выключите машину и дайте ей остыть. Протрите внешние поверхности влажной тканью. Очистите засоренные отверстия фильтра и держатель булавкой или щеточкой.

natural_image
Illustration of a microwave oven with an open lid and control panel, showing internal components and airflow direction (no text or symbols)natural_image
Mechanical device interior view showing a valve and handle mechanism (no text or symbols visible)natural_image
Close-up of a ceiling fan with a metallic ring and circular base (no text or symbols visible)natural_image
Exterior view of a modern coffee maker with control panel and side arm (no visible text or symbols)-
Włącz urządzenie i podgrzej je. Umieść uchwyt filtra na jego miejscu, bez włożonego filtra. Postaw miskę na płytce ociekacza. Ustaw pokrętło wyboru w położeniu □ i poczekaj, aż około 1/4 roztworu przepłynie przez system. Wyłącz urządzenie i poczekaj 10 minut.
-
Ligue a máquina e deixe-a aquecer. Coloque o suporte do filtro na posição correcta, sem qualquer filtro. Coloque um recipiente sobre a grelha de gotejamento. Rode o selector para a posição □ e deixe 1/4 da solução passar. Desligue a máquina e aguarde 10 minutos.
-
Porniți aparatul și lăsați-l să se încălzească. Puneți suportul pentru filtruin poziția sa, fără filtru. Așzeați un vas pe grilajul de scurgere. Rotiți cadranul selector la Ș și lăsați 1/4 din soluție să treacă. Opriți aparatul și așteptați 10 minute.
-
Включите машину и дайте ей прогреться. Вставьте на место держатель фильтра без фильтра. Поставьте чашу на решетку для конденсата. Поверните диск регулятора в положение □ и дайте четверти раствора протечь сквозь систему. Выключите машину и подождите 10 минут.
natural_image
Modern coffee maker with a side arm and cup, no visible text or symbols-
Ustawić pokrętło w położeniu i pozwolić, by pozostały płyn wypłynął z dyszy pary. Napelnij zbiornik świeżą wodą i włącz urządzenie, aby przepuścić przez nie całą wodę ze zbiornika. Powtórz ten krok dwukrotnie, używając świeżej wody. Ponownie zainstaluj części i odpowiednio ustaw filtr.
-
Rode o seletor para a posição e deixe a solução restante fluir pelo bico de vapor. Encha o depósito de água com água fresca e deixe a máquina a funcionar até esvaziar o depósito. Repita duas vezes, com água fresca. Volte a instalar os componentes e coloque o filtro correctamente.
-
Rotiți discul selector la și läsați restul soluției să curgă prin duza pentru abur. Umpleți rezervorul de apă cu apă proaspătă și läsați aparatul să meargă până se golește rezervorul. Repetați această procedură de două ori, cu apă proaspătă. Reinstalați componentele și fixați filtrul corespunzător.
-
Установите селектор на отметку ⚫ и дайте оставшемуся раствору выпечь через сопло для взбивания молочной пены. Наполните бачок пресной водой и дайте машине поработать до опустошения бачка. Повторите процедуру с пресной водой дважды. Установите компоненты на место и закрепите фильтр надлежащим образом.
SK
Komponenty
natural_image
Exterior view of a modern coffee maker with a power outlet connected to its side panel (no visible text or symbols)- Prístroj umiestnite na rovnú plochu a naplňte nádobu na vodu studenou vodou. (Prístroj sa nesmie používať, ak je nádoba prázdna!) Zapojte kábel napájania do elektrickej zásuvky a stlačením vypínača prístroj zapnite.
- Napravo postavite na ravno površino in posodo za vodo napolnite z mrzlo vodo. (Naprave ne uporabljajte, će je posoda za vodo prazna!) Priklopite napajalni kabel v električno omrežje in pritisnite gumb za vklop.
- Postavite aparat na ravnu ravnu površinu i napunite rezervoar hladnom vodom. (Aparat ne sme da se koristi ukoliko je rezervoar prazan!) Uključite kabl za napajanje u struju i pritisnite dugme za uključivanje.
- Ställ maskinen på en plan yta och fyll behållaren med kallt vatten. (Maskinen får inte användas när behållaren är tom.) Anslut strömsladden till ett eluttag och tryck in på-knappen.

natural_image
Exterior view of a modern espresso machine with control panel and side arm (no visible text or symbols)- Pri prvom spustení spotrebiča postupujte takto: Pod parnú dýzu umiestnite vhodnú nádobu. Počkajte, kým nebude nepretržite svietiť ukazovatel' pripravenosti. Otočením otočného ovládača na symbol 🌐 vody prepláchnite parnú dýzu. Ak spotrebič nevypnete manuálne, funkcia automatického vypnutia ho vypne po 30 minútach.
- Ko prvič aktivirate aparat: Pod šobo za paro podstavite posodo. Počakajte, da začne indikatorska lučka pripravljenosti svetiti. Obrnite stikalo na simbol za 🚪 vodo, da izperete šobo za paro. Če naprave ne izklopite ročno, jo po 30 minutah izklopi funkcija varnostnega samodejnega izklopa.
- Kada startujete mašinu prvi put, postavite kontejner ispod parne mlaznice. Sačekajte dok se indikatorska lampica Spremno ne ujednači. Uključite komandno dugme da bi isprali parnu mlaznicu. Ako se mašina ručno ne isključi, bezbednosna funkcija automatskog isključivanja je iskljućuje nakon 40 minuta.
- Genomför följande procedur vid första uppstarten: Placera en stor behållare under ångmunstycket. Vänta tills klar-kontrollampan lyser med fast sken. Vrid reglaget till för att skölja ur ångmunstycket. Om kaffekokaren inte stängs av manuellt stängs den av automatiskt efter 30 minuter.
natural_image
Exterior view of a modern coffee maker with control panel and side arm (no visible text or symbols)- Na odkvapkávaciu mriežku položte vhodnú nádobu. Počkajte, kým nebude nepretržite svietiť ukazovateľ pripravenosti. Bez toho, aby ste vložili držiak filtra, otočte otočný ovládač na symbol ☐: cez spotrebič nechajte pretiect celú nádržku vody, aby sa ohrevný systém prepláchol.
- Na rešetko za odcejanje vode postavite posodo. Počakajte, da začne indikatorska lučka pripravljenosti svetiti. Ne vstavite držala filtra, ampak obrnite stikalo na simbol za ☐. Počakajte, da iz rezervoarja izteče vsa voda. Na ta način izperete grelni sistem.
- Postavite posudu na rešetku za cedjenje. Sačekajte dok se indikatorska lampica Spremno ne ujednači. Uključite komandno dugme □, ne ubacujući držać filtra. Da bi ste isprali sistem zagrevanja, pustite da ceo rezervoar vode prodje kroz mašinu.
- Placera en stor behållare på droppbrickan. Vänta tills klarkontrollampan lyser med fast sken. Vrid regalget till □: Låt en hel vattentank rinna genom maskinen. Detta sköljer ur värmesystemet.

natural_image
Close-up of a modern kitchen appliance with control panel and close-up inset showing a button (no visible text or symbols)- Príprava espressa: Spotrebič je pripravený na použitie, keď nepretržite svieti ukazovatel’ pripravenosti. Potom postupujte podľa pokynov v krokoch číslo 5 – 7.
- Priprava espressa: Aparat je pripravljen za uporabo, ko sveti indikatorska lučka pripravljenosti. Ravnajte v skladu z navodili v korakih 5-7.
- Pripremanje espresso kafe: Uređaj je spreman za upotrebu kada se ujednači svetlo indikatorske lampice Spremno. Nakon toga sledite uputstva u koracima 5-7.
- Göra en espresso: Maskinen är klar att använda när klar-kontrollampan lyser med fast sken. Följ sedan instruktionerna i steg 5–7.
natural_image
Exterior view of a coffee machine with a handle and lid assembly (no text or symbols visible)- Zložte chránič prstov a vložte filter do držiaka filtra. Filter naplňte mletou kávou. Pomletú kávu jemne zatlačte pomocou tampera na opačnej strane lyžičky.
- Stisnite prstno varovalo in položite filter v držalo filtra. Filter napolnite z zmleto kavo. S potiskalom, ki je na nasprotni strani žlice, nežno potlačite mleto kavo.
- Savijte unazad zaštitu za prste i postavite filter u držač za filter. Napunite filter mlevenom kafom. Koristite podešivač na drugoj strani kašike da biste lagano pritisli mlevenu kafu.
- Vik tillbaka fingerskyddet och sätt filtret i filterhållaren. Fyll filtret med malet kaffe. Tryck till kaffet lätt med stampen som finns på skedens andra sida.
natural_image
Exterior view of a modern espresso machine with a glass lid and cup (no visible text or symbols)- Držiak filtra vložte na miesto podľa obrázku. Filter otočte proti smeru hodinových ručičiek a dotiahnite ho podľa obrázku. Pozor, vkladanie príliš veľkou silou skráti životnosť komponentov. Po ukončení zahrievania nastavte otočný regulátor do polohy □ . Espresso začne vytekať cez vývod na kávu – po dosiahnutí požadovaného množstva nastavte otočný regulátor do polohy ■
- Držalo filtra vstavite v položaj, kot je prikazano. Držalo obrnite v nasprotni smeri urnega kazalca in privijte, kot je prikazano. Prehuda obremenitev bo skrajšala življenjsko dobo sestavnih delov. Ko je segrevanje končano, obrnite vrtljivi gumb v položaj □. Espresso začne iztekati skozi odprtino za kavo. Ko se je natekla želena količina kave, obrnite vrtljivi gumb v položaj ■.
- Убаците држач филтера у положај као што је приказано. Окрените овај држач у смеру супротном од кретања казаљке на сату и затегните у положај као што је приказано. Имајте у виду да ће примена претеране силе скратити радни век компоненти. Kada se voda zagreje, okrenite prekidač za izbor u položaj ☐. Espresso počinje da teče kroz otvor za kafu – okrenite prekidač za izbor u položaj ■ kada dobijete željenu količinu.
- Sätt filterhållaren på plats. Vrid handtaget motsols enligt bild. Notera att för mycket kraft skadar komponenten. Vrid vridreglaget till □när maskinen är uppvärmd. Espresso börjar rinna genom kaffeutgången – vrid reglaget till ■när kopparna är lagom fyllda.
natural_image
Exterior view of a modern coffee maker with a hand holding a cup, showing its interior and control panel (no text or symbols visible)- Po dovarení vyberte držiak filtra. Otočte ho doľava a vyberte von zo strmeňa. Posuňte pomôcku na ochranu prstov dopredu a odstráňte z filtra kávovú usadeninu. Potom filter vyberte z držiaka a vyčístite ho vodou. Skôr ako ho vrátite na svoje miesto, vysušte ho utierkou.
- Po pripravi kave odstranite nosilec filtra. Zasučite ga v levo in ga odstranite iz njegovega sedeža. Preklopite varovalo za prste naprej in odstranite uporabljeno mleto kavo iz filtra. Nato filter vzemite iz nosilca in ga očistite z vodo. Preden ga vrnete v prostor za shranjevanje filtrov, ga do suhega obrišite s krpo.
- Uklonite držač filtera nakon kuvanja. Okrenite ga nalevo i izvadite ga iz ležaja. Savijte hvataljku unapred i uklonite ostatke mlevene kafe iz filtera. Nakon toga izvadite filter iz držača i isperite ga vodom. Obrišite ga krpom pre nego što ga vratite u kućište filtera.
- Efter bryggningen avlägsnar du filterhållaren. Vrid den åt vänster och ta ut den ur hållaren. Fäll fingerskyddet framåt och ta bort förbrukat kaffe från filtret. Ta ut filtret från hållaren och rengör med vatten. Torka med en trasa innan du sätter tillbaka det i filterlådan.

natural_image
Exterior view of a modern coffee maker with control panel and indicator lights (no text or symbols on device)- Paru možno použiť na napenenie mlieka alebo zohrievanie tekutín. Počkajte, kým nebude nepretržite svietiť ukazovatel' pripravenosti. Parnú dýzu ponorte do mlieka v teplovzornej nádobe.
- Paro lahko uporabite za pripravo spenjenega mleka ali za segrevanje tekočin. Počakajte, da začne indikatorska lučka pripravljenosti svetiti. Šobo za paro potopite v posodo z mlekom, odporno proti vročini.
- Para može da se koristi za pravljenje mlečne pene ili za zagrevanje tečnosti. Sačekajte dok se indikatorska lampica Spremno ne ujednači. Stavite raspršivač pare u vatrostalnu posudu sa mlekom.
- Ånga kan användas för att skumma mjölk eller värma vätskor. Vänta tills klar-kontrollampan lyser med fast sken. Sänk ned ångmunstycket i en värmetålig behållare med mjölk.
natural_image
Exterior view of a modern coffee maker with control panel and side arm (no visible text or symbols)- Paru spustíte otočením otočného ovládača do polohy 📋. Nádobku krúživo pohybujte a dbajte na to, aby sa dýza nedotkla dna nádoby. Ak ste dosiahli požadovanú penu a chcete paru zastaviť, otočte otočný ovládač do polohy ■.
- Obrnite vrtljivi gumb v položaj 📄, da začne izhajati para. Posodo krožno premikajte, pri tem pa se šoba ne sme dotakniti dna posode. Ko je nastala želena količina pene, obrnite vrtljivi gumb v položaj 📄, da prekinete izhajanje pare.
- Pokrenite paru tako što ćete okrenuti prekidač za izbor u položaj 🚫. Kružnim pokretima okrećite posudu pazeći da raspršivač ne dodiruje dno posude. Da biste zaustavili paru, okrenite prekidač za izbor u položaj ■ kada dobijete željenu količinu pene.
- Starta ångan genom att vrida reglaget till ⬇. Rör behållaren i cirklar och låt inte munstycket nå botten av behållaren. Vrid reglaget till ■ för att stoppa ångan när du har fått lagom mycket skum.

natural_image
Exterior view of a modern espresso machine with adjustable arm and control panel (no visible text or symbols)natural_image
Two metallic kitchen pots, one pouring liquid from a container (no text or symbols visible)natural_image
Exterior view of a modern espresso machine with a mug and stand mixer (no visible text or symbols)natural_image
Two views of a cylindrical mechanical component with internal features, showing textured surfaces and a pointed tip (no text or symbols)- Vypnite prístroj a nechajte ho vychladnút. Vlhkou utierkou utrite všetky vonkajšie povrchy. Pomocou ihlice alebo malej kefky vyčistite upchaté otvory filtra a držiaka filtra.
- Napravo izključite in počakajte, da se ohladi. Z vlažno krpo obrišite vse zunanje površine naprave. Z majhno ščetko ali iglo očistite zamašene luknjice v filtru in nosilcu filtra.
- Isključite aparat i ostavite ga da se ohladi. Obrišite sve spoljne površine vlažnom krpom. Očistite zapušene otvore u filteru i držaču filtera pomoću iglice ili male četke.
- Stäng av maskinen och låt den svalna. Torka av alla yttre ytor med en fuktad trasa. Rengör tilltäppta håll i filtret och filterhållaren med en nål eller liten borste.
natural_image
Illustration of a microwave oven with a paper feed tray and control panel (no text or symbols visible)- Po naplnení musíte vyprázdnit' odkvapkávaciu misku. Nadvihnite mriežku na odkvapkávanie a potom opláchnite a utrite mriežku a zásobník na odkvapkávanie. Z hygienických dôvodov odporúčame vykonávať tento postup pravidelne.
- Ko je prestrezni pladenj napolnjen, ga morate izprazniti. Dvignite odkapno rešetko ter izpraznite, sperite in posušite rešetko in posodo. Iz higienskih razlogov priporočamo redno praznjenje.
- Kada napunite, ne sme više da kaplje. Izvadite, ispraznite, isperite i osušite rešetku i korito za kapljanje. Iz higijenskih razloga preporučujemo vam da ovo redovno radite.
- När droppbrickan är full måste den tömmas. Lyft ut dropgallret och töm, skölj av och torka droppbrickan. Av hygieniska skäl rekommenderar vi att man gör detta regelbundet.
natural_image
Mechanical device interior showing a lever mechanism with a handle and control panel (no visible text or symbols)- Uvolnite dýzu na paru a umyte ju pod tečúcou vodou. Malú trubičku vyčistite pomocou utierky. Vytiahnite nádobu na vodu a opláchnite ju pod tečúcou vodou.
- Odstranite šobo za paro in jo umijte pod tekočo vodo. Majhno cevko očistite s krpo. Snemite posodo za vodo in jo sperite pod tekočo vodo.
- Olabavite raspršivač pare i isperite ga pod mlazom vode. Krpom očistite malu cev. Izvadite rezervoar za vodu i isperite ga pod mlazom vode.
- Lossa ångmunstycket och tvätta det under rinnande vatten. Rengör det lilla röret med en trasa. Lyft ut vattenbehållaren och skölj den under rinnande vatten.
natural_image
Close-up of a ceiling-mounted air duct with a metallic ring and circular base (no text or symbols visible)- Prístroj sa odporúča pravidelne odvápňovať, v závislosti od tvrdosti vody. Podľa návodu na používanie prístroja pred naplnením nádoby vodou a odvápňovačom vyberte pomocou mince varnú hlavicu (komponenty nerozoberajte).
- Priporočamo redno odstranjevanje kotlovca v skladu s trdoto vode. S kovancem odstranite kuhalno glavo (sestavnih delov ne ločite), nato posodo za vodo napolnite z vodo in sredstvom za odstranjevanje kotlovca (upoštevajte navodila za uporabo sredstva za odstranjevanje kotlovca).
- Preporučuje se redovno uklanjanje kamenca, u zavisnosti od tvrdoće vode. Pomoću novčića uklonite glavni mehanizam za kuvanje (čuvajte komponente zajedno) pre nego što napunite rezervoar vodom i sredstvom za uklanjanje kamenca prema uputstvima za proizvod.
- Regelbunden avkalkning rekommenderas, anpassat efter vattnets hårdhetsgrad. Avlägsna brygghuvudet (förvara delarna tillsammans) med ett mynt innan du fyller behållaren med vatten och avkalkningsmedel enligt produktens instruktioner.
natural_image
Exterior view of a modern coffee maker with control panel and side arm (no visible text or symbols)- Zapnite prístroj a nechajte ho zahriat. Umiestnite držiak filtra na správne miesto bez filtra. Položte nádobu na mriežku na odkvapkávanie. Nastavte otočný regulátor do polohy a nechajte prístrojom pretieč štvrtinu roztoku. Vypnite prístroj a počkajte 10 minút.
- Vključite napravo in jo pustite, da se segreje. Namestite nosilec filtra na njegovo mesto, vendar brez filtra. Na odkapno rešetko postavite posodo. Vrtljivi gumb obrnite v položaj in pustite, da skozi napravo steče 1/4 raztopine. Napravo izključite in počakajte 10 minut.
- Uključite aparat i ostavite da se zagreje. Stavite držač filtera na svoje mesto, ali bez bilo kakvog filtera. Stavite posudu na rešetku za kapljanje. Okrenite prekidač za izbor u položaj ☐ i pustite 1/4 rastvora da istekne. Isključite aparat i sačekajte 10 minuta.
- Slå på maskinen och låt den värmas upp. Sätt filterhållaren på plats utan filter. Ställ en skål på droppgallret. Vrid reglaget till □ och låt en fjärdedel av lösningen passera genom systemet. Stäng av maskinen och vänta i tio minuter.
natural_image
Modern espresso machine with a side arm and a cup of milk (no visible text or symbols)- Otočte volič programu na 🚗 a nechajte zvyšný roztok pretiect cez parnu dýzu. Naplňte nádobu na vodu čerstvou vodou a nechajte prístroj zapnutý, kým sa nádoba nevyprázdni. Postup zopakujte dvakrát s čerstvou vodou. Komponenty znovu zložte a filter dôkladne upevnite.
- Obrnite izbirni gumb na in pustite, da preostala raztopina steče skozi sobo za paro. Posodo za vodo napolnite s svežo vodo in pustite napravo, da deluje, dokler ni posoda za vodo prazna. Postopek dvakrat ponovite, vsakič s svežo vodo. Znova namestite sestavne dele in pravilno pritrdite filter.
- Okrenite birač programa na i pustite da iscuri prestala tečnost kroz cevčicu za paru. Napunite rezervoar svežom vodom i koristite aparat sve dok se rezervoar ne isprazni. Ponovite ovo dva puta koristeći svežu vodu. Ponovo ugradite komponente i pravilno učvrstite filter.
- Vrid väljarratten till och låt återstående lösning rinna genom ångmunstycket. Fyll vattenbehållaren med rent vatten och kör maskinen tills behållaren är tom. Upprepa två gånger med rent vatten. Sätt tillbaka delarna och fäst filtret ordentligt.
TR
Bileşenler
natural_image
Exterior view of a modern coffee maker with a power outlet and charging cable (no visible text or symbols)natural_image
Modern coffee maker with control panel and side arm (no visible text or symbols)natural_image
Exterior view of a modern coffee maker with control panel and side-mounted stand (no visible text or symbols)natural_image
Close-up of a portable kitchen appliance with control panel and close-up inset showing a button (no visible text or symbols)natural_image
Exterior view of a coffee maker with a spoon and cooking pan (no text or symbols visible)-
Parmak koruyucusunu arkaya doğru katlayın ve filtre tutucusunu filtreye yerleştirin. Filtreyi öğütülmüş kahve ile doldurun. Öğütülmüş kahveyi hafifçe sıkıştırmak için kaşığın diğer tarafından sıkıştırıcıyı kullanın.
-
Відкиньте щиток для захисту пальців та встановіть фільтр в тримач фільтра. Насипте в фільтр мелену каву. Для утрамбовування кавового порошку використовуйте темпер, що знаходиться на іншому кінці ложки.

natural_image
Exterior view of a modern espresso machine with a lock icon overlay (no text or symbols on the device itself)-
Filtre tutucusunu, gösterildiği şekilde yerleştirin. Tutucuyu saat yönünün tersine çevirin ve gösterildiği şekilde sıkın. Aşırı güç kullanımının bileşenlerin ömrünü kısaltacağını lütfen unutmayın. Isıtma işlemi sona erdiğini de seçme düğmesini ☐ pozisyonuna döndürün. Espresso, kahve çıkışından akmaya başlar – istediğiniz miktara ulaşıldığında seçme düğmesini ■ pozisyonuna döndürün.
-
Вставте тримач фільтру у відповідне положення, як показано на малюнку. Поверніть тримач проти годинникової стрілки і затягніть, як показано. Не прикладайте надмірну силу, оскільки це призведе до швидкого зношення компонентів. Після нагрівання поставте перемикач у положення ⚠️. Коли еспресо потече з випускного отвору, дочекайтся бажаної кількості та поставте перемикач у положення ■
natural_image
Exterior view of a modern espresso machine with a side-view inset showing its lid (no text or symbols visible)natural_image
Exterior view of a modern coffee maker with control panel and display screen (no visible text or symbols)natural_image
Exterior view of a modern coffee maker with control panel and side arm (no visible text or symbols)- Seçme düğmesini ☐ pozisyonuna döndürerek buhar vermeye başlayın. Hazneyi dairesel hareketlerle oynatın ve ağız kısmının kabın dibine değmemesini sağlayın. Köpük istediğiniz miktara ulaştığında buharı durdurmak için, seçme düğmesini ■ pozisyonuna döndürün.
- Почніть подавання пари, поставивши перемикач програм у положення ⚫. Виконуйте колові рухи контейнером, наконечник не повинен торкатися його дна. Отримавши достатню кількість піни, поставте перемикач у положення ⚪, щоб вимкнути подавання пари.

natural_image
Modern espresso machine with black and silver casing, no visible text or labels-
Buhar ağzının altına bir kap yerleştirin ve seçme düğmesini birkaç saniye süreyle ☐ pozisyonuna geri döndürün. Bu işlemle birlikte buhar ağzındaki sıcak su/süt kalıntılarını gidermiş olursunuz. Dikkat: buhar borusu sıcaktır! Buhar borusunun soğumasını bekleyin ve ardından bir bezle temizleyin.
-
Поставте чашу під випускний отвір для пари та на кілька секунд поставте перемикач у положення (Ф). Таким чином залишок гарячої води або молока буде видалено з наконечника. Увара! Парова трубка гаряча! Дайте паровій трубці охолонути та очистіть її за допомогою тканини.
natural_image
Two stainless steel kitchen utensils, one open and one closed, against a plain white background (no text or symbols)natural_image
Exterior view of a modern espresso machine with a white mug and stand (no visible text or symbols)natural_image
Two views of a cylindrical container with internal structures, one showing a pointed tip and the other empty (no text or symbols visible)natural_image
Illustration of a microwave oven with open lid and tray, showing internal components and directional arrows (no text or symbols)natural_image
Close-up of a mechanical device with a lever and adjustment knob (no visible text or symbols)natural_image
Close-up of a ceiling-mounted air duct with a metallic ring and circular base (no text or symbols visible)natural_image
Exterior view of a modern coffee maker with a glass stand and control panel (no visible text or symbols)- Makineyi açın ve ısınmasını bekleyin. Filtre tutucusunu içerisinde herhangi bir filtre olmadan yerine takın. Damlama ızgarası üzerine bir kap yerleştirin. Seçme düğmesini ☐ pozisyonuna döndürün ve çözelinin 1/4'ünün sistemden geçmesini sağlayın. Makineyi kapatın ve 10 dakika bekleyin.
- Увімкніть машину, щоб вона розігрілась. Поставте тримач без фільтра у правильну позицію. Поставте чашу на решітку. Поставте перемикач програм у положення та дочекайтеся, доки 1/4 розчину пройде через систему. Вимкніть машину та зачекайте 10 хвилин.

natural_image
Modern espresso machine with a glass cup and metal stand (no visible text or symbols)Warranty Information
EN
The manufacturer provides warranty in accordance with the legislation of the customer's own country of residence, with a minimum of 1 year (Germany: 2 years), starting from the date on which the appliance is sold to the end user.
The warranty only covers defects in material or workmanship.
The repairs under warranty may only be carried out by an authorized service centre. When making a claim under the warranty, the original bill of purchase (with purchase date) must be submitted.
The warranty will not apply in cases of:
- Normal wear and tear
- Incorrect use, e.g. overloading of the appliance, use of nonapproved accessories
- Use of force, damage caused by external influences
- Damage caused by non-observance of the user manual, e.g. connection to an unsuitable mains supply or non-compliance with the installation instructions
- Partially or completely dismantled appliances
FI
Takuuehdot
This page has intentionally been left blank.
This page has intentionally been left blank.
This page has intentionally been left blank.
Electrolux Appliances AB
St. Göransgatan 143
S-105 45 Stockholm
Sweden
Share more of our thinking at www.electrolux.com

Printed on recycled paper