USER MANUAL IMAGERUNNER 2206N CANON
Parts and Their Functions 4
External View 5 Internal View 7 Control Panel 9 Display 12 Customizing the Screen 16
Logging on to the Machine 18
Using the Display 21
Entering Text 24
Placing Documents 26
Loading Paper 30
Loading Paper in the Paper Printer 32 Loading Paper in the Multi-Purpose Tray 36 Loading Envelopes in the Multi-Purpose Tray 39 Loading Preprinted Paper 42 45 Registering a Custom Paper Size 47
Registering in the Address Book 49
Registering Destinations in the Address Book 50 Registering Destinations for One-Touch Dial 55 Registering Multiple Destinations for Group Dial 60
Adjusting the Volume 63
Setting Auto Shutdown Time 65
66
Copying 69
Basic Copy Operations 71
Selecting Copy Paper 73
Canceling Copies 74
Various Copy Settings 76
Enlarging or Reducing 78 Selecting Document Type 79 Adjusting Density 80 2-Sided Copying 81 Copying Multiple Documents onto One Sheet (2 on 1/4 on 1) 84 Copying Both Sides of an ID Card onto One Page 86 Erasing Dark Borders and Frame Lines (Erase Frame) 87 Collating Copies by Page 89 Splitting Facing Page Documents into Separate Pages for Copying 91 Copying Different Size Documents Together (Different Size Originals) 92
Configuring Copy Settings to Your Needs 94
Changing Default Settings 95
Registering Frequently Used Copy Settings 96
Faxing (imageRUNNER 2206iF) 98
Sending Faxes 101
Canceling Sending Faxes 107
Sending from Registered Destinations 109
Specifying from Address Book 110
Selecting Destinations Directly by Entering Coded Dial Numbers 113
Specifying Destinations with the One-Touch Buttons 116
Specifying Previously Used Destinations 118
Specifying Destinations in an LDAP Server 121
Various Fax Settings 124
Adjusting Resolution 125
Adjusting Density 126
Scanning 2-Sided Documents 127
Changing Default Settings 128
Receiving Taxes 129
Sending and Receiving Faxes According to Your Purposes 133
Making a Call before Sending Faxes (Manual Sending) 134
Sending Faxes to Multiple Destinations Simultaneously (Sequential Broadcast) 135
Storing Received Faxes into Memory (Memory Reception) 137
Forwarding Received Faxes 140
Selecting a Document to Forward 141
Forwarding All the Received Documents Automatically 143
Receiving Fax Information Services 147
Checking Status and Log for Sent and Received Documents 149
Sending Faxes from Your Computer (PC Fax) 151
Sending PC Faxes 152
Using the Machine as a Printer 155
Printing from a Computer 156
Canceling Prints 158
Checking the Printing Status 161
Printing a Document Secured by a PIN (Secure Print) 163
Printing via Secure Print 164
Configuring Print Settings to Your Needs 167
Registering Combinations of Frequently Used Print Settings 168
Changing Default Settings 170
Using the Machine as a Scanner 173
Preparing to Use the Machine as a Scanner 174
Scanning from the Machine 175
Scanning from a Computer 178
Scanning Using an Application 179 Configuring Scan Settings in ScanGear MF 181 Using WSD 182
Convenient Scanning with a Machine-Based Operation 186
Sending Documents as E-Mails Directly from the Machine 187 Saving Documents Directly in Shared Folder 194 Canceling Sending Documents (E-Mail/Shared Folder) 197
Specifying Detailed Settings 199
Specifying a Scanning Size 200 Setting Color Mode 201 Selecting a File Format 202 Adjusting Density 203 Specifying Orientation of Your Document 204 Selecting Document Type 205 Scanning 2-Sided Documents 206 Adjusting Balance between File Size and Image Quality 207 Setting Gamma Values 208
Sending Using Registered Destinations (E-Mail/Shared Folder) 209
Specifying from Address Book 210 Selecting Destinations Directly by Entering Coded Dial Numbers 213 Specifying Destinations with the One-Touch Buttons 216 Specifying Previously Used Destinations 218 Specifying Destinations in an LDAP Server (E-Mail) 221
Changing Default Settings 225 Checking Status and Log for Sent Documents (E-Mail/Shared Folder) 227
Linking with Mobile Devices 230
Connecting with Mobile Devices 231
Connecting via a Wireless LAN Router (LAN Connection) 232 Connecting Directly (Access Point Mode) 233
Utilizing the Machine through Applications 235
Using AirPrint 236
Printing with AirPrint 241 Scanning with AirPrint 244 Faxing with AirPrint (imageRUNNER 2206iF) 246 If AirPrint Cannot Be Used 248
Using Google Cloud Print 249
Managing the Machine by the Remote Control 251
Network 253
Connecting to a Network 255
Selecting Wired LAN or Wireless LAN 257 Connecting to a Wired LAN 258 Connecting to a Wireless LAN 259 Setting Up Connection Using WPS Push Button Mode 261 Setting Up Connection Using WPS PIN Code Mode 263
Setting Up Connection by Selecting a Wireless Router 266 Setting Up Connection by Specifying Detailed Settings 269 Checking the SSID and Network Key 273
Setting IP Addresses 274
Setting IPv4 Address 275 Setting IPv6 Addresses 278
Viewing Network Settings 282
Configuring the Machine for Printing or Faxing from a Computer 286
Configuring Printing Protocols and WSD Functions 287 Configuring Printer Ports 290 Setting Up Print Server 293
Configuring Scan Settings (E-Mail/Shared Folders) 296
Configuring Scan Settings (Sending E-Mail) 297
Configuring Basic E-Mail Settings 298 Configuring E-Mail Communication Settings 302
Configuring the Machine for Scanning to Shared Folders 306 Setting a Shared Folder as a Save Location 307
Configuring the Machine for Your Network Environment 311
Configuring Ethernet Settings 312 Changing the Maximum Transmission Unit 314 Setting a Wait Time for Connecting to a Network 315 Configuring DNS 316 Configuring SMB 321 Registering LDAP Servers 323 Configuring SNTP 329 Monitoring and Controlling the Machine with SNMP 332
Security 338
Protecting the Machine from Unauthorized Access 339
Preventing Unauthorized Access 340 Setting Access Privileges 342
Setting the System Manager ID 343 Setting the Department ID Management 345 Setting a Remote UI PIN 352
LDAP Server Authentication 354 Restricting Communication by Using Firewalls 359
Specifying IP Addresses for Firewall Rules 360 Specifying MAC Addresses for Firewall Rules 364
Changing Port Numbers 367 Setting a Proxy 369
Restricting the Machine's Functions 371
Restricting Access to Address Book and Sending Functions 372 Setting a PIN for Address Book 373 Limiting Available Destinations 374 Prohibiting PC Faxing (imageRUNNER 2206iF) 375 Disabling Use of Previously Used Destinations 376
Checking Destinations before Sending Documents (imageRUNNER 2206iF) 377 Prohibiting Sequential Broadcasting (imageRUNNER 2206iF) 379 Restricting Printing from a Computer 380 Restricting USB Functions 381 Disabling HTTP Communication 382 Disabling Remote UI 383
Implementing Robust Security Features 384
Enabling TLS Encrypted Communication for the Remote UI 385 Configuring IEEE 802.1X Authentication 389
Configuring Settings for Key Pairs and Digital Certificates 394
Generating Key Pairs 395 Using CA-issued Key Pairs and Digital Certificates 402 Verifying Key Pairs and Digital Certificates 405
Using Remote UI 408
Starting Remote UI 409 Remote UI Screens 411 Managing Documents and Checking the Machine Status 415 Setting Up Menu Options from Remote UI 420 Saving/Loading Address Book from Remote UI 422 Registering Address Book from Remote UI 426
Network Settings 432 Preferences 443 Timer Settings 449 Common Settings 454 Copy Settings 458 Fax Settings (imageRUNNER 2206iF) 461 Scan Settings 473 Printer Settings 477 Adjustment/Maintenance 487 System Management Settings 492
Troubleshooting 502
Clearing Jams 504 Countermeasures for Each Message 519 Countermeasures for Each Error Code 530 Common Problems 537
Installation/Settings Problems 539 Copy/Printing Problems 543 Faxing/Telephone Problems 546 Miscellaneous Problems 548
When You Cannot Print Properly 549
Printing Results Are Not Satisfactory 551
Paper Creases or Curls 555
Paper Is Fed Incorrectly 557
When a Problem Cannot Be Solved 559
Maintenance 561
Cleaning the Machine 562
Exterior 563
Platen Glass 564
Feeder 566
Transfer Roller 570
Drum 571
Fixing Assembly 572
Replacing the Toner Cartridges 574
Configuring Purchase Information for Consumables 576
How to Replace the Toner Cartridges 578
How to Replace the Drum Unit 581
Printing Reports and Lists 585
Fax TX Result Report (imageRUNNER 2206iF) 586
E-Mail/File TX Result Report 588
Communication Management Report 590
RX Result Report (imageRUNNER 2206iF) 592
Address Book List 593
User Data List/System Manager Data List 595
Department ID Management Report 596
PCL Font List 597
Copy/Print Charge Log Report 598
Viewing the Counter Value 599
Initializing Settings 601
Initializing Address Book 602
Initializing Menu 603
Initializing System Management Settings 604
Initializing All Data/Settings 605
Replacement Parts 606
Appendix 608
Third Party Software 609
Feature Highlights 610
Going Green and Saving Money 611
Improving Efficiency 614
Going Digital 616
So Much More 619
Specifications 622
Main Unit 623
Feeder (DADF-AY) 626 Available Paper 627 Cassette Feeding Module-AD 630 Duplex Unit-C 631 Fax Function (imageRUNNER 2206iF) 632 Scan Function 633 Printer Functions 634 Management Functions 636 System Environment 637 Network Environment 639
Options 640
Optional Equipment 641 System Options 644
Manuals and Their Contents 646
Using User's Guide 647
Screen Layout of User's Guide 648 Viewing User's Guide 651
Basic Windows Operations 652
Notice 660
Basic Operations
Basic Operations 2
Parts and Their Functions 4 External View 5 Internal View 7 Control Panel 9 Display 12 Customizing the Screen 16
Logging on to the Machine 18 Using the Display 21 Entering Text 24 Placing Documents 26 Loading Paper 30 Loading Paper in the Paper Drawer 32 Loading Paper in the Multi-Purpose Tray 36 Loading Envelopes in the Multi-Purpose Tray 39 Loading Preprinted Paper 42 45 Registering a Custom Paper Size 47 Registering in the Address Book 49 Registering Destinations in the Address Book 50 Registering Destinations for One-Touch Dial 55 Registering Multiple Destinations for Group Dial 60 Adjusting the Volume 63 Setting Auto Shutdown Time 65 Entering Sleep Mode 66
Basic Operations
36WC-000
This chapter describes basic operations, such as how to use the control panel or how to load the paper and documents, that are frequently performed to use the functions of the machine.
Parts and Their Functions
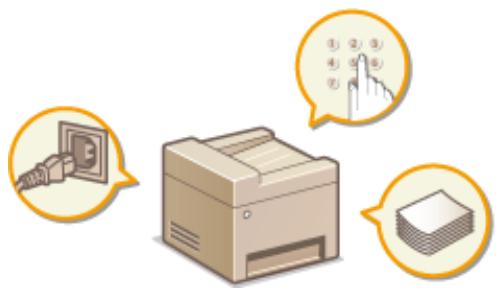
This section describes the exterior and interior parts of the machine and their functions, as well as how to use the keys on the control panel and how to view the display. Parts and Their Functions(P. 4)
Using the Display
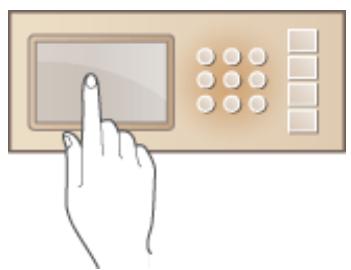
This section describes how to toggle the display and select items. Using the Display(P. 21)
■ Entering Text
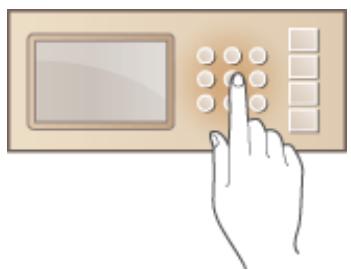
This section describes how to enter characters and numbers for registering destinations to the Address Book, sending faxes, etc. Entering Text(P. 24)
Placing Documents
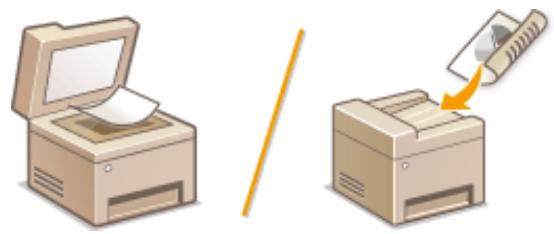
This section describes how to place documents on the platen glass and in the feeder. Placing Documents(P. 26)
Loading Paper
This section describes how to load the paper into the paper drawer and multi-purpose tray. Loading Paper (P. 30)
Registering in the Address Book
This section describes how to register destinations for sending faxes or scanned documents. Registering in the Address Book (P. 49)
Adjusting the Volume
This section describes how to adjust the volume of various machine sounds, such as those produced when fax sending is complete or when an error occurs. Adjusting the Volume (P. 63)
Entering Sleep Mode
This section describes how to set the sleep mode. Entering Sleep Mode (P. 66)
Parts and Their Functions
This section describes the parts of the machine (exterior, front and back side, and interior) and how they function. In addition to describing the parts of the machine used for such basic operations as placing documents, loading paper, and replacing the toner cartridges, this section also describes the keys on the control panel and display. Read this section for tips on how to use the machine properly.
External View (P. 5) Internal View (P. 7) Control Panel (P. 9)
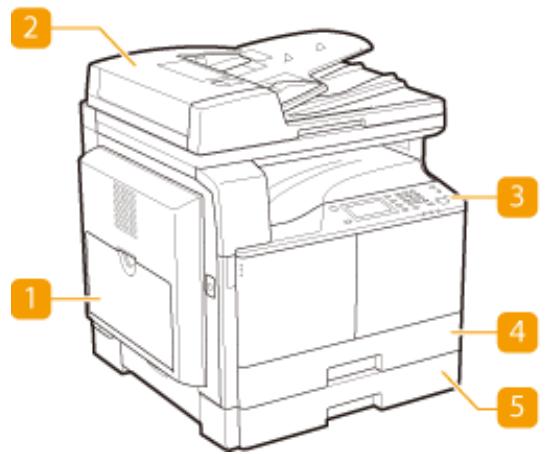
When the DADF-AY and Cassette Feeding Module-AD are attached:
NOTE
- Parts marked with "*1" are optional for the imageRUNNER 2206N.
- Parts marked with 2 are optional for all models.
- Parts marked with " ^*3 " are available only for the imageRUNNER 2206iF.
1 Multi-purpose tray
Load the paper into the multi-purpose tray when you want to temporarily use a type of paper different from that which is loaded in the paper drawer. Loading Paper in the Multi-Purpose Tray (P. 36)
2 Feeder *1
Automatically feeds documents into the machine for scanning. When two or more sheets are loaded in the feeder, documents can be scanned continuously. Placing Documents (P. 26)
3 Control panel
The control panel consists of keys such as the numeric keys and [Start] key, a display, and status indicators. You can perform all the operations and specify settings from the control panel. > Control Panel (P. 9) > Display (P. 12)
4 Paper drawer 1
Load the type of paper you frequently use into the paper drawer. Loading Paper in the Paper Drawer (P. 32)
5 Paper drawer 2*2
Load the type of paper you frequently use into the paper drawer. Loading Paper in the Paper Drawer (P. 32)
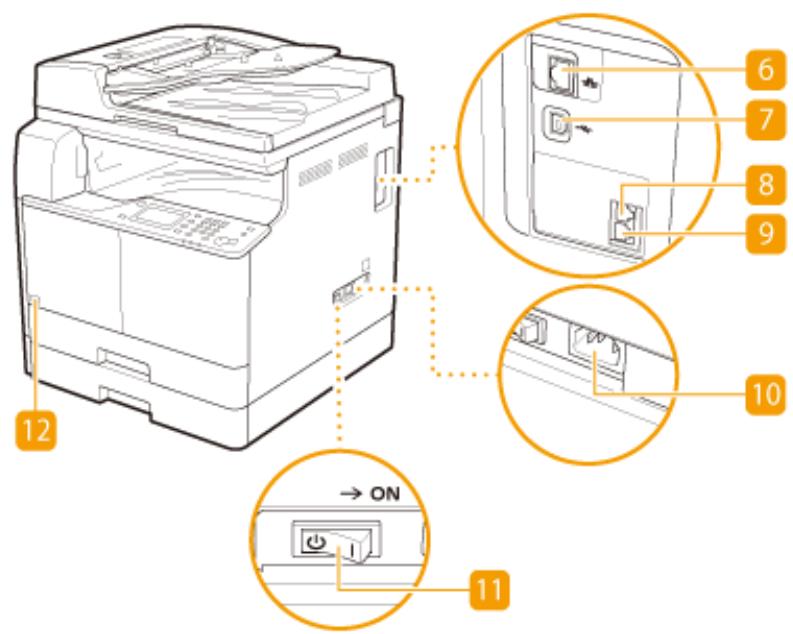
6 LAN port
Connect a LAN cable when connecting the machine to a wired LAN router, etc. Connecting to a Wired LAN (P. 258)
7 USB port
Connect a USB cable when connecting the machine and a computer.
External telephone jack *3
Connect an external telephone or the optional handset.
9 Telephone line jack *3
Connect a telephone cable when connecting the machine to a telephone line.
10 Power socket
Connect the power cord.
Power switch
Turns the power ON or OFF. To restart the machine, turn OFF the machine, wait for at least 10 seconds, and turn it back ON.
Toner Code
This code indicates the type of genuine toner that can be used with the machine. Use toner with a code that includes the same letters as the code on the front cover of the machine.
36WC-003
When the DADF-AY and Cassette Feeding Module-AD are attached:
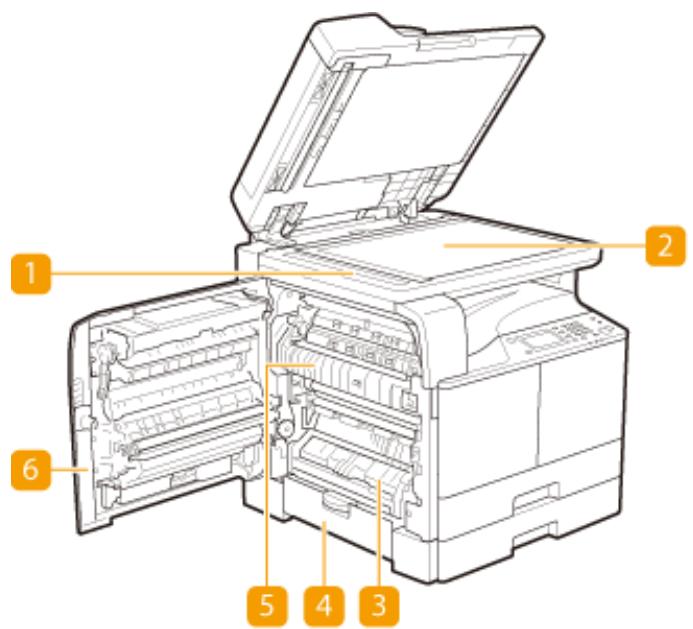
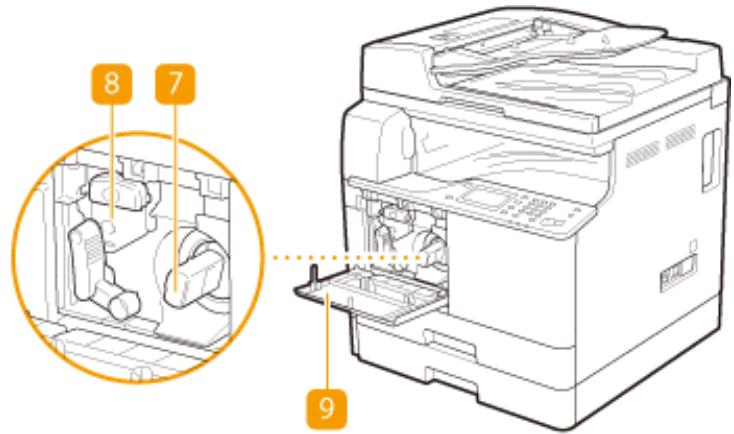
1 Document feed scanning area
Documents loaded in the feeder are automatically fed to the scanning area for scanning.
2 Platen glass
Place documents to scan on the platen glass. Also, use the platen glass to place thick or bound documents such as books when they cannot be loaded in the feeder. Placing Documents (P. 26)
3 Drawer 1 left cover
Open this cover when clearing a paper jam in paper drawer 1. Clearing Jams (P. 504)
4 Drawer 2 left cover (Cover of the Optional Cassette Feeding Module-AD)
Open this cover when clearing a paper jam in paper drawer 2. Clearing Jams (P. 504)
5 Fixing assembly
When a paper jam occurs around the fixing assembly, clear the paper jam from here. Clearing Jams (P. 504)
6 Left cover
Open this cover to clear a paper jam inside the main unit. Clearing Jams (P. 504)
7 Toner cartridge
Replace the toner cartridge when the toner runs out. How to Replace the Toner Cartridges (P. 578)
8 Drum unit
Replace the drum unit before the usage period expires. How to Replace the Drum Unit (P. 581)
9 Front cover
Open this cover to replace the toner cartridge or drum unit. For details, see "How to Replace the Toner Cartridges" (P. 578).
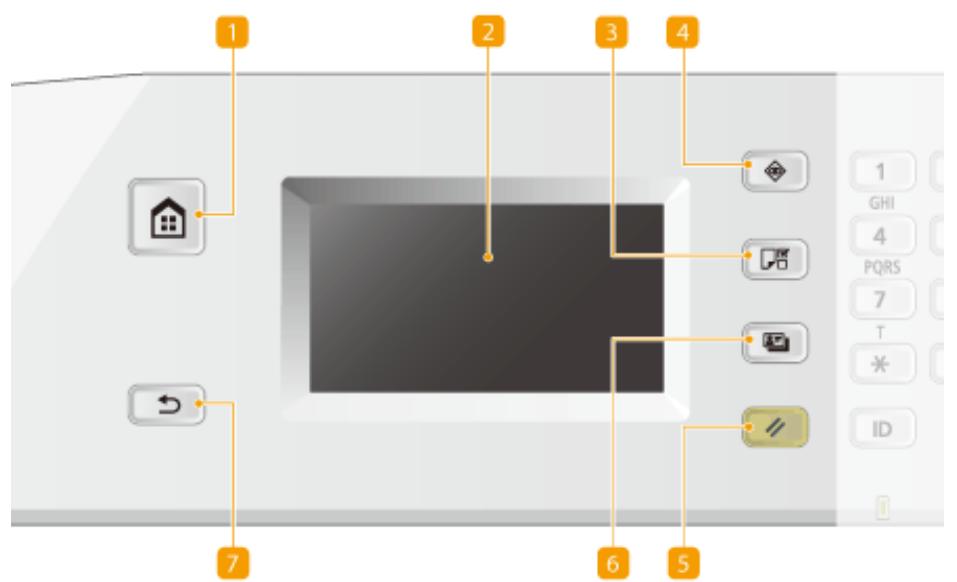
1 [Home] key
Press to display the screen. For details, see "Customizing the Screen" (P. 16).
2 Display
You can view the progress of copy and other jobs and error statuses. The display is a touch panel, allowing you to operate the screen by touch to specify settings. See "Display" (P. 12) and "Using the Display" (P. 21).
3 [Paper Settings] key
Press to select a paper source, such as a paper drawer or multi-purpose tray, and register paper size and type.
4 [Status Monitor] key
Press to check the status of printing, to view the usage history, or to view the network settings such as the IP address of the machine. You can also check the status of the machine, such as the remaining amounts of paper and toner, or whether any errors occurred. See "Display" (P. 12).
5 [Reset] key
Press to reset the settings.
6 [ID Card Copy] key
Press to copy a card-size original, such as an ID card and driver's license. See "Copying Both Sides of an ID Card onto One Page" (P. 86).
7 [Back] key
Press to return to the previous screen. If you press this key when specifying settings, for example, the settings are not applied and the display returns to the previous screen.
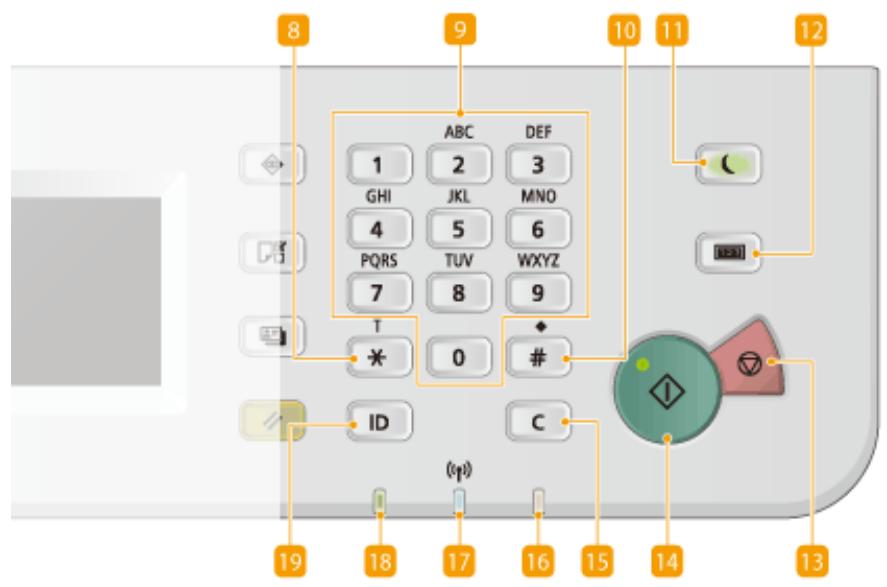
8 [*] key
Press to switch the type of text that is entered. - Press to use tone dialing such as when receiving fax information services. [O] Receiving Fax Information Services (P. 147)
9 Numeric keys ([0]-[9] keys)
Press to enter numbers and text. [>] Entering Text (P. 24)
10 [#] key
Press to enter symbols such as "@" or "/".
[Energy Saver] key
Press to put the machine into sleep mode. The key lights up green when the machine is in sleep mode. Press the key again to exit sleep mode. [>] Entering Sleep Mode (P. 66)
[Counter Check] key
Press to display the total number of pages used for operations such as copying or printing on the touch panel display. You can also check the serial number of the machine (three letters and five numbers).
[Stop] key
Press to cancel copying, faxing, and other operations.
14 [Start] key
Press to scan or copy documents.
15 [Clear] key
Press to delete the entered numbers and texts.
16 [Error] indicator
Blinks or lights up when an error such as a paper jam occurs.
Wi-Fi indicator
Lights up when the machine is connected to wireless LAN.
[Processing/Data] indicator
Blinks while operations such as sending or printing are being performed. Lights up when there are documents waiting to be processed.
19 [Log In/Out] key
Press to log in/out when Department ID Management has been set.
LINKS
Using the Display (P. 21)
The screen for initiating operations and screens for specifying settings appear in the display. You can also view job progress and messages here. Touch the display to operate it.
Screen
The screen is displayed when the power is turned ON or by pressing on the control panel. Use this screen to specify settings for and register functions.
NOTE
- For imageRUNNER 2206N, functions marked with ** can only be used when the optional Color Send Kit is attached.
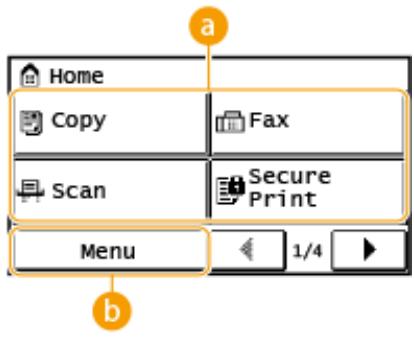
Toggle functions
Switch to copy, fax, secure print, or scan functions. Copying (P. 69) Faxing (imageRUNNER 2206iF) (P. 98) Printing a Document Secured by a PIN (Secure Print) (P. 163) Using the Machine as a Scanner (P. 173)
, , and many other machine settings start from this button. Setting Menu List (P. 431)
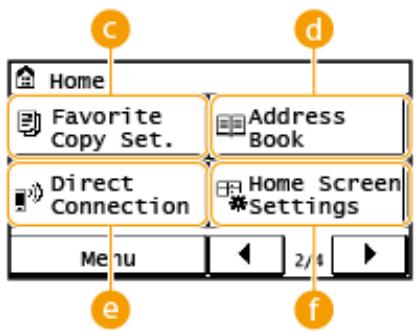
You can register frequently used combinations of copy settings, and recall them easily when needed. Registering Frequently Used Copy Settings (P. 96)
Address Book*
Display destinations registered in the Address Book. Also use when registering/editing destinations in the Address Book. Registering in the Address Book (P. 49)
e
Use this to establish a direct wireless connection to a mobile device. Connecting Directly (Access Point Mode) (P. 233)
Home Screen Settings>
Allows you to change the order that the screen buttons are displayed in. Customizing the Screen (P. 16)
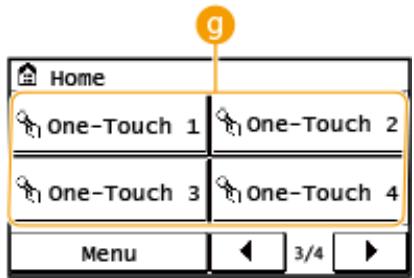
9 to
If you register destinations beforehand as One-Touch Dial numbers, they can be quickly displayed. Specifying Destinations with the One-Touch Buttons (P. 116)
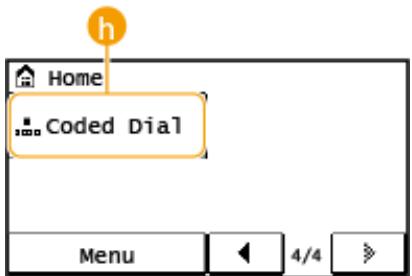
Coded Dial*
If you register destinations beforehand as coded dial numbers, they can be quickly displayed by simply entering a three-digit number. Registering in the Address Book (P. 49)
Screen
When you press , a screen is displayed that enables you to check the status of documents that are being printed, sent, or received, as well as the status of the machine such as the toner level or the network setting information such as the IP address of the machine.
NOTE
- For imageRUNNER 2206N, functions marked with " 1" can only be used when the optional Color Send Kit is attached.
- Functions marked with " 2" are available only for the imageRUNNER 2206iF.
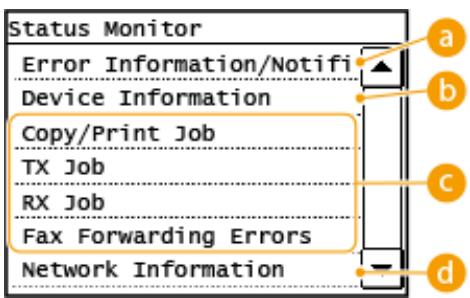
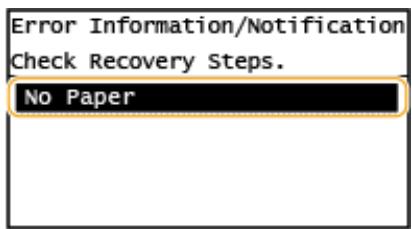
Displays the details of any errors that occurred. Countermeasures for Each Message (P. 519)
Displays the status of the machine, such as the amount of paper or toner remaining.
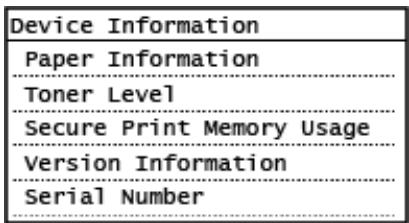
Displays whether paper is loaded in each paper source.
Displays the amount of toner remaining. Depending on the environment in which your machine is located, other internal parts may reach the end of their lifetime before the toner runs out.
< Secure Print Memory Usage>
Displays the amount of memory currently used for storing secured document data. Printing a Document Secured by a PIN (Secure Print) (P. 163)
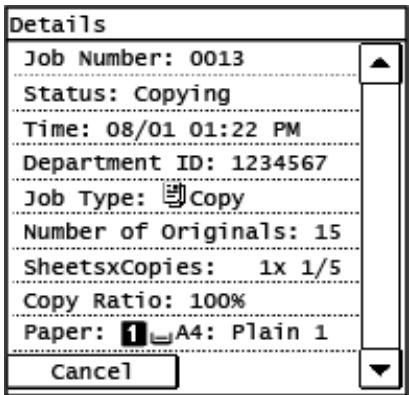
Status of copy/print/send*1/receive*2 jobs
Displays the current status of the selected item. The screen is shown below as an example.
Displays the network settings such as the IP address of the machine and status such as the condition of wireless LAN communications.
Viewing Network Settings (P. 282)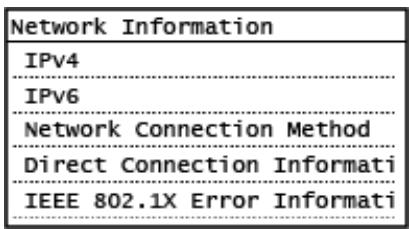
When a Message Is Displayed
Messages are displayed at the top of the screen in situations such as when toner level is low or when a cover is left open. The display alternates between showing the normal screen and the message.
Countermeasures for Each Message (P. 519)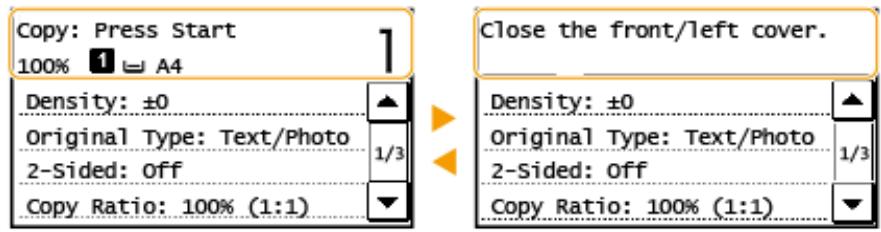
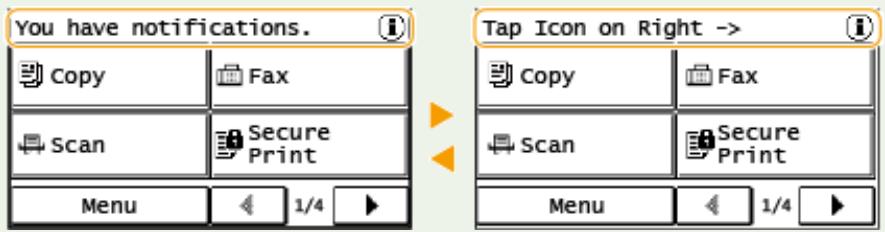
NOTE
When or Is Displayed Tap to view the notification.
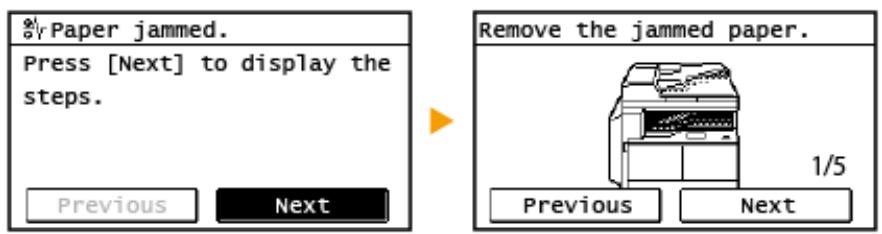
When an Error Occurs
In some cases when an error occurs, instructions on how to respond to the error are displayed. Follow the on-screen instructions to solve the problem. The screen displayed when a paper jam occurs is shown below as an example (Countermeasures for Each Message (P. 519)).
LINKS
Customizing the Screen (P. 16) Using the Display (P. 21)
Customizing the Screen
36WC-006
You can change the order that buttons in the screen are displayed in according to your application or a preferred arrangement.
1 Press and tap .
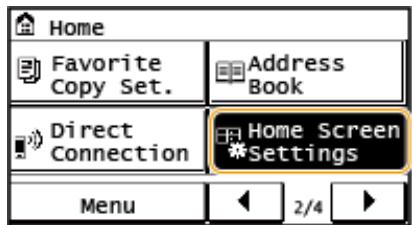
- If a screen for entering a System Manager ID and PIN is displayed, enter the System Manager ID and PIN, tap , and press (ID). Setting the System Manager ID(P. 343)
2 Tap .
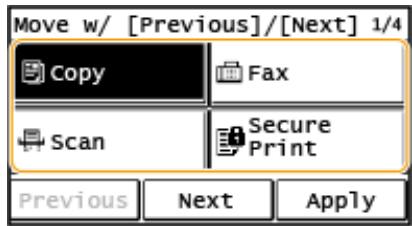
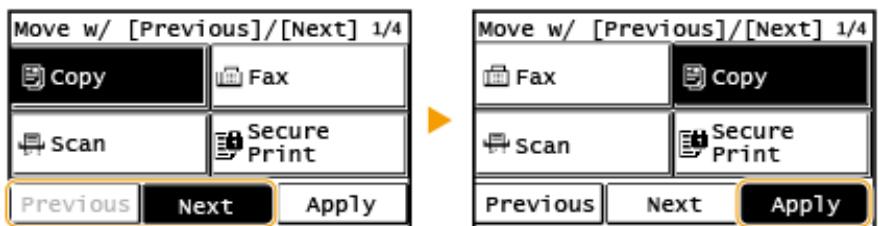
6 Tap .
To Insert Blanks in Screen
1 Press and tap .
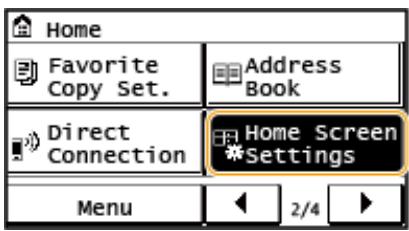
- If a screen for entering a System Manager ID and PIN is displayed, enter the System Manager ID and PIN, tap , and press (ID). Setting the System Manager ID(P. 343)
2 Tap .
To delete an inserted blank, select the blank, tap , and proceed to step 5.
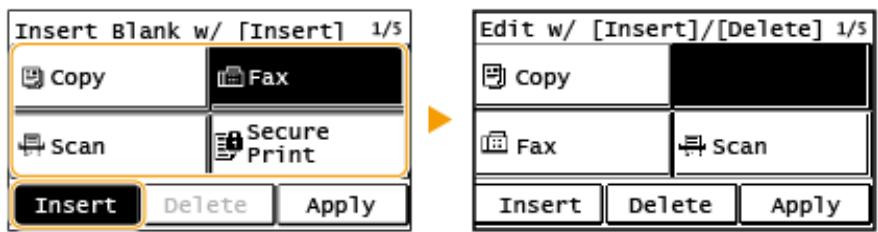
4 Tap .
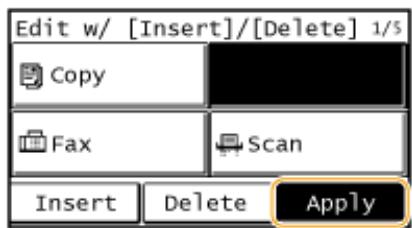
5 Tap .
LINKS
Display(P. 12)
Logging on to the Machine
36WC-007
If Department ID Management is enabled or System Manager IDs are enabled, you must log in before using the machine. You also need to log in if use of the fax and scan functions is restricted.
NOTE
The System Manager ID and PIN are set to "7654321" at the factory. It is recommended that you change this setting for higher security.
Department ID Management Login(P. 18) Logging in to Authorized Send (P. 19)
Department ID Management Login
When the login screen appears, use the procedure below to enter the Department ID and PIN.
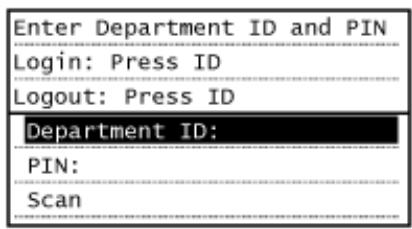
1 Tap (or ). 2 Enter a number of up to seven digits using the numeric keys, and tap .
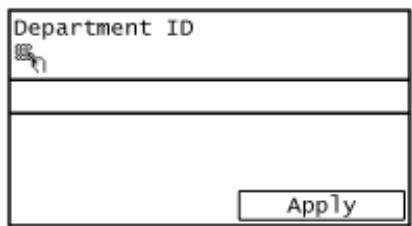
If no PIN is registered, proceed to step 5.
3 Select . 4 Enter a number of up to seven digits using the numeric keys, and tap .
- When <PIN(Confirm)> is displayed, enter the PIN once again to confirm.
5 Press ID. The logon screen will be changed to the main screen.
- After you finish using the machine, press ID again to display the logon screen.
Logging in to Authorized Send
If the Send function authorization setting (LDAP Server Authentication (P. 354)) is enabled, the Authorized Send login screen appears when the fax or scan function is used.
| Enter User Name, Password, and Server Name
Login/Logout: Press ID |
| User Name:
Password:
Server Name: |
NOTE
- For imageRUNNER 2206N, these functions can only be used when the optional Color Send Kit is attached.
1 Tap . 2 Enter your user name using the numeric keys, and tap .
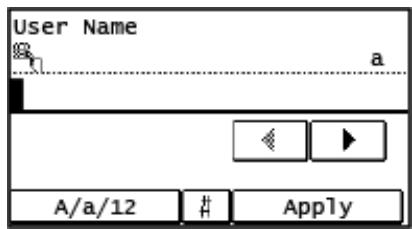
3 Tap . 4 Enter the password using the numeric keys, and tap . 5 Tap and select the server for your authentication.
6 Press ID
The logon screen will be changed to the main screen.
After you finish using the machine, press ID again to display the logon screen.
NOTE:
If the screen appears
- If you are logged in to both Authorized Send and Department ID Management, a dialog box appears in which you can select the items you want to log out of. In the case where you want to log out of Authorized
Send (fax or scan function) while remaining logged in to Department ID Management, select . In any other cases, select .
LINKS
Setting the Department ID Management (P. 345) Setting the System Manager ID (P. 343) LDAP Server Authentication (P. 354)
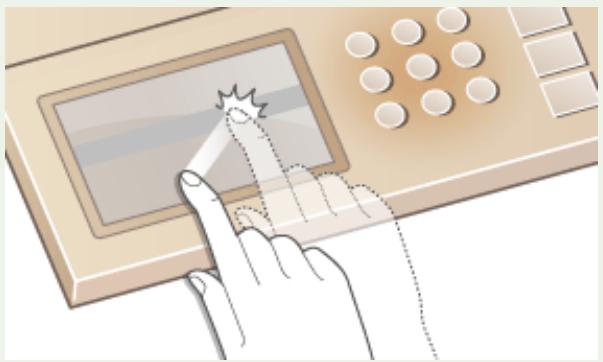
The display is a touch panel, allowing you to operate directly on the screen.
IMPORTANT
Avoid the following actions.
The display may malfunction or be damaged.
Pressing forcefully - Pressing with pointed objects (fingernails, ballpoint pen, pencil, etc.) - Operating with wet/soiled hands - Operating the display while an object is placed on it
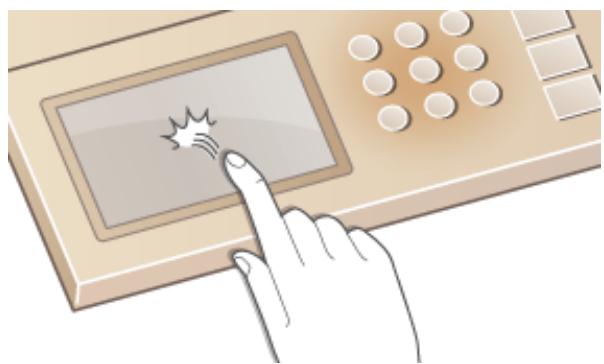
Tap
Touch the screen lightly and quickly. Use for selecting or finalizing items.
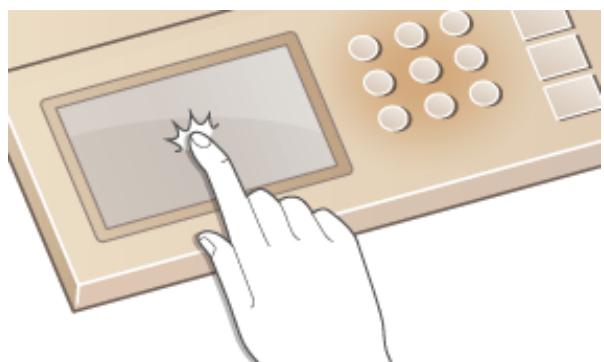
Long Touch
Keep finger held on the screen. When text cannot be completely displayed on one line ("..." appears), touch and hold the line to scroll all of the text. Also continuously increases/decreases the copy magnification.
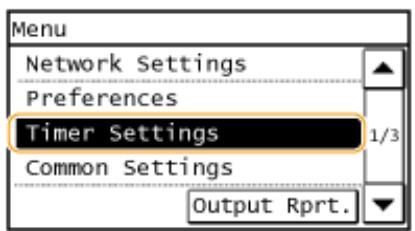
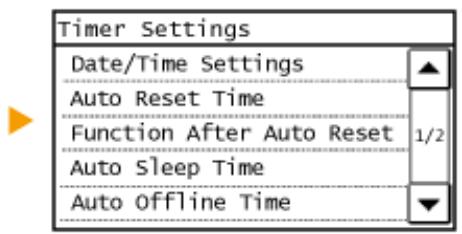
Selecting items
Tap an item name or button to make a selection.
NOTE
If an item is mistakenly touched
Slide your finger away then release it from the screen to cancel the selection.
To return to the previous screen
Press to return to the previous screen.
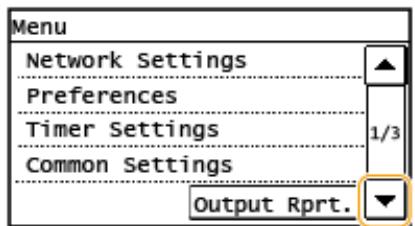
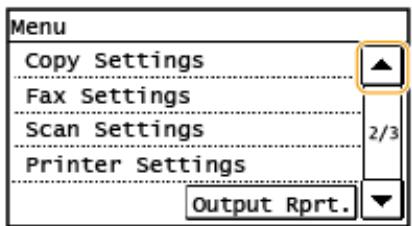
The scroll bar is displayed on the screen when there is still information that is undisplayed. If the scroll bar is displayed, tap / to scroll the screen. The screen changes page by page, and the page number is displayed in the scroll bar.

Changing values and settings
Changing values
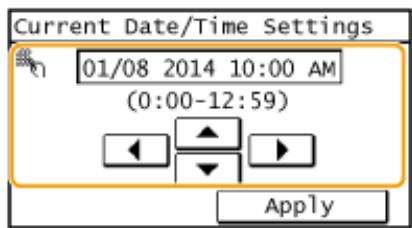
Tap / to enter values. If an icon such as below is displayed at the upper left of the screen, you can enter values directly using the numeric keys.
NOTE
To move the cursor
When / is displayed, tap to move the cursor.
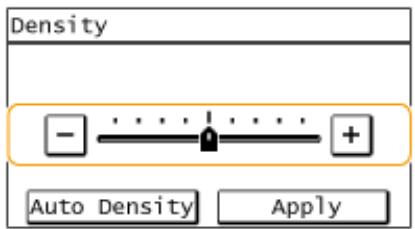
Changing setting values
To adjust a value on a scale, tap <-> / <+ .
TIPS
- You can change a variety of display-related settings, such as the scrolling speed or display language: Display Settings(P. 445)
- To change the screen that is automatically displayed when the machine remains idle for a specified length of time: Function After Auto Reset (P. 451)
Use the display and numeric keys to enter text and values.
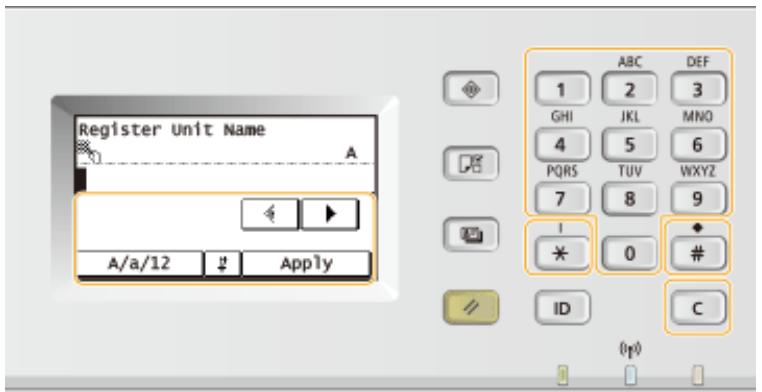
Switching the Type of Text
Tap <A / a / 12> to switch the type of text that is entered. The currently selected type of text is indicated by the "A", "a", or "12" displayed above and to the right of the text input field.
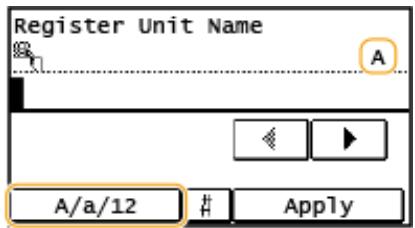
NOTE
You can also press * to switch the type of text.
Types of Text That Can Be Entered
Enter text with the numeric keys and the display. Text that can be entered is listed below.
| Key | A | a | 12 |
| 1 | @ . - _/ | 1 |
| 2 | ABC | abc | 2 |
| 3 | DEF | def | 3 |
| 4 | GHI | ghi | 4 |
| 5 | JKL | jkl | 5 |
| 6 | MNO | mno | 6 |
| 7 | PQRS | pqrs | 7 |
| 8 | TUV | tuv | 8 |
| 9 | WXYZ | wxyz | 9 |
| 0 | (Not available) | 0 |
| # | (space) -. * # !",;;^ ` _ = / | '? $ @ % & +\~() [ ] { }<> | (Not available) |
NOTE
Press # or tap <#> when the type of text that is entered is or to display enterable symbols in the screen. Tap symbols to enter.
Deleting Text
One character is deleted each time is pressed. Press and hold to delete all of the entered text.
Moving the Cursor (Entering a Space)
Tap or to move the cursor. To enter a space, move the cursor to the end of the text, and tap ▷
Example of Entering Text and Numbers
Example: "Canon-1"
1 Tap (or press ) repeatedly until is selected. 2 Press 2 repeatedly until the letter "C" is selected. 3 Tap < A / a / 12> (or press 掌 ) repeatedly until < a> is selected. 4 Press 2 repeatedly until the letter "a" is selected. 5 Press 6 repeatedly until the letter "n" is selected. 6 Press 6 repeatedly until the letter "o" is selected. 7 Press 6 repeatedly until the letter "n" is selected. 8 Press 1 repeatedly until the symbol "-" is selected. 9 Tap < A / a / 12> (or press * ) repeatedly until < 12> is selected. 10 Press 1. 11 Tap .
Place documents on the platen glass or in the feeder. Use the platen glass when scanning thick or bound documents such as books. You can load two or more sheets of documents in the feeder so that they can be scanned continuously. For information about the types of documents that can be placed on the platen glass or in the feeder, and information about the scannable area of a document, see Main Unit(P. 623) or Feeder (DADF-AY)(P. 626).
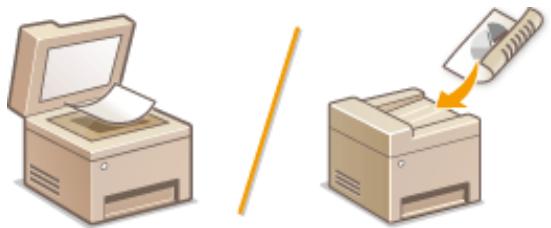
Placing Documents on the Platen Glass(P. 26)
Placing Documents in the Feeder (P. 27)
IMPORTANT
Use documents that are completely dry
When placing documents, make sure that any glue, ink, or correction fluid on the documents has completely dried.
To avoid paper jams
Do not place the following types of documents in the feeder as this may cause paper jams:
- Wrinkled or creased paper Carbon paper or carbon-backed paper Curled or rolled paper Coated paper Torn paper
- Onion skin or thin paper Stapled or clipped documents
- Paper printed by a thermal transfer printer Transparencies


NOTE
To scan documents more accurately
Documents placed in the feeder are scanned while being fed into the machine. On the other hand, documents placed on the platen glass remain in a fixed position while they are scanned. To ensure more accurate scanning results, placing documents on the platen glass is recommended.
To scan tracing paper or transparencies
To scan transparent documents (for example, tracing paper or transparencies), place them on the platen glass.
Placing Documents on the Platen Glass
1 Open the feeder/platen cover.
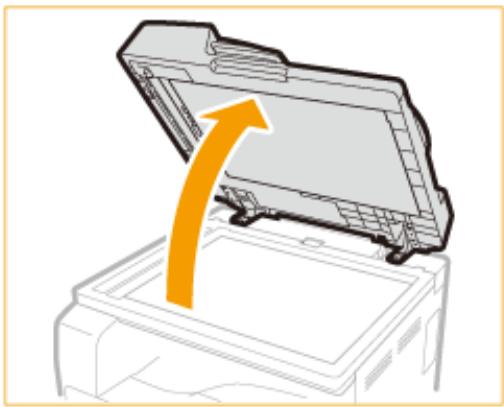
2 Place the document face down on the platen glass.
- Align the corner of the document with the top-left corner of the platen glass.
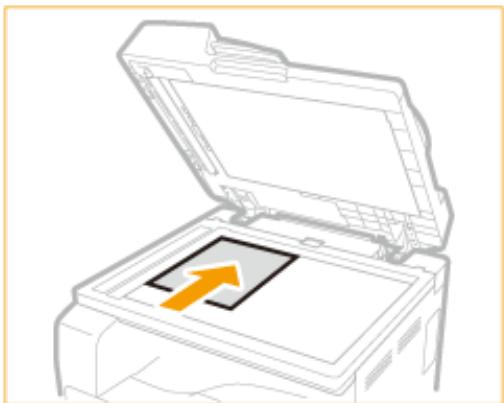
NOTE:
To scan transparent documents (for example, tracing paper or transparencies), cover them with plain white paper.
3 Gently close the feeder/platen cover.
The machine is ready to scan the document. - When scanning is complete, remove the document from the platen glass.
Placing Documents in the Feeder
NOTE
- For imageRUNNER 2206N, these functions can only be used when the optional DADF-AY is attached.
1 Spread the document guides apart.
- Slide the document guides outward until they are slightly farther apart than the actual document width.
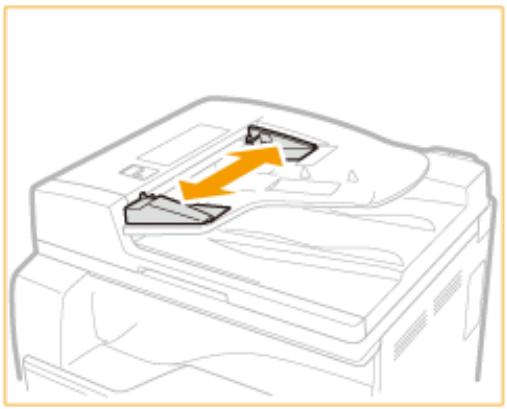
2 Fan the document stack and align the edges.
- Fan the document stack in small batches, and align the edges by lightly tapping the stack on a flat surface a few times.
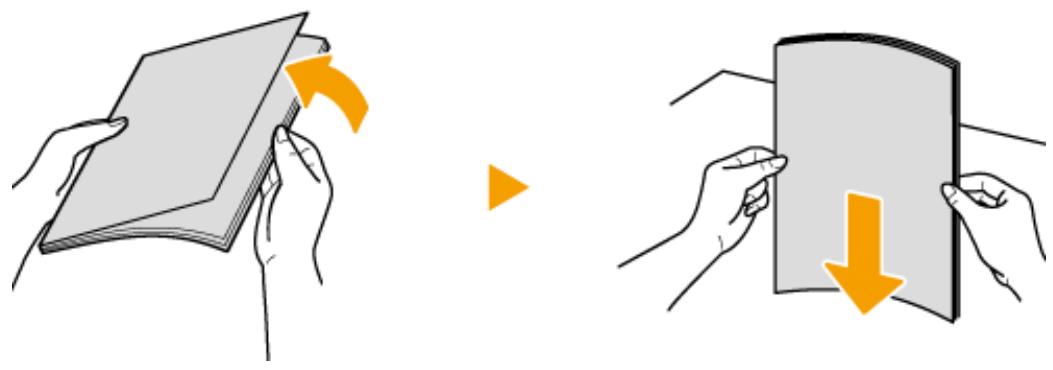
3 Place the document(s) face up in the feeder.
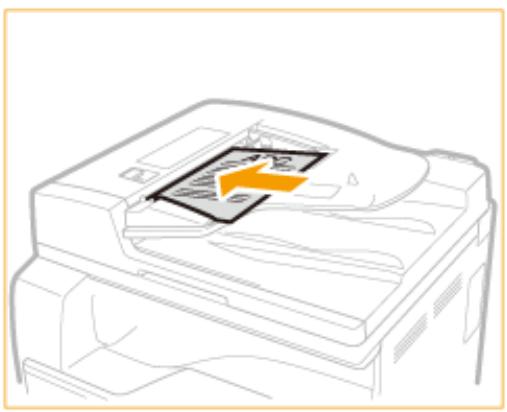
IMPORTANT:
- Up to 50 sheets can be loaded at a time. If 50 or more sheets are loaded, scanning may stop or a paper jam may occur.
4 Align the document guides against the edges of the document.
- Slide the document guides inward until they are aligned securely against the edges of the document.
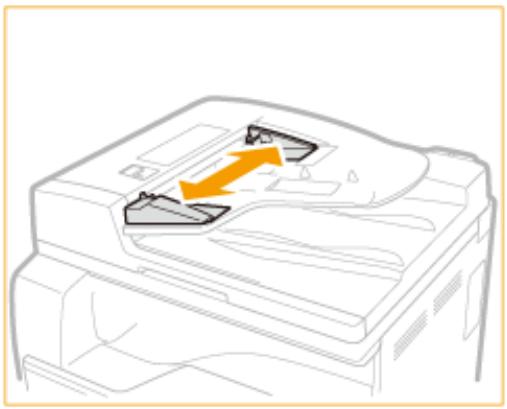
The machine is ready to scan the document.
IMPORTANT:
Align the document guides securely against the edges of the document
Document guides that are too loose or too tight can cause misfeeds or paper jam.
While documents are being scanned
Do not add or remove documents.
When scanning is complete
Remove the scanned documents from beneath the feeder to prevent paper jams.
Loading Paper
You can load the paper into the paper drawer or multi-purpose tray. Load the paper you usually use into the paper drawer. The paper drawer is convenient when using large amounts of paper. Use the multi-purpose tray when you temporarily use size or type of paper that is not loaded in the paper drawer. See Available Paper (P. 627) for available paper sizes.
Paper Type and Setting for the Machine
See the table below to specify the paper settings according to the type and weight of the paper to load into the paper source. For more information about how to specify the paper settings on the machine, see Specifying Paper Size and Type (P. 45). For the amount of paper that can be loaded in each paper source, see Available Paper (P. 627).
| Paper Type | Paper Weight | Paper Setting on the Machine |
| Plain paper | 64 to 75 g/m2 | <Plain 1 (64-75 g/m2)> |
| 76 to 90 g/m2 | <Plain 2 (76-90 g/m2)> |
| Recycled paper | 64 to 80 g/m2 | <Recycled (64-80 g/m2)> |
| Color paper | 64 to 80 g/m2 | <Color (64-80 g/m2)> |
| Heavy paper | 91 to 105 g/m2 | <Heavy 1 (91-105 g/m2)> |
| 106 to 128 g/m2 | <Heavy 2 (106-128 g/m2)> |
| Bond paper | 75 to 90 g/m2 | <Bond> |
| Envelope | — | <Envelope> |
| Pre-punched | 75 to 80 g/m2 | <Pre-Punched> |
| Transparency | — | <Transparency> |
| Label | — | <Labels> |
IMPORTANT
Do not use the following types of paper:
- Wrinkled or creased paper, curled or rolled paper, torn paper, damp paper, very thin paper.
- Paper printed by a thermal transfer printer.
Highly textured paper, glossy paper.
Paper handling and storage
- Store the paper on a flat surface.
- Keep the paper wrapped in its original package to protect the paper from moisture or dryness.
- Do not store the paper in such a way that may cause it to curl or fold.
- Do not store the paper vertically or stack too much paper.
- Do not store the paper in direct sunlight, or in a place subject to high humidity, dryness, or drastic changes in temperature or humidity.
NOTE
When printing on paper that has absorbed moisture
Steam may emit from the paper output area, or water droplets may form on the back side of the control panel or around the paper output area. There is nothing unusual about any of these occurrences, which occur when the heat generated from fixing toner on the paper causes moisture in the paper to evaporate (most likely to occur at low room temperatures).
LINKS
Registering a Custom Paper Size (P. 47)
Loading Paper in the Paper Printer
36WC-00E
Load the paper that you usually use in the paper drawer. When you want to print on paper that is not loaded in the paper drawer, load the paper in the multi-purpose tray. Loading Paper in the Multi-Purpose Tray (P. 36)
Hold the handle of the paper drawer and pull it out until it stops.
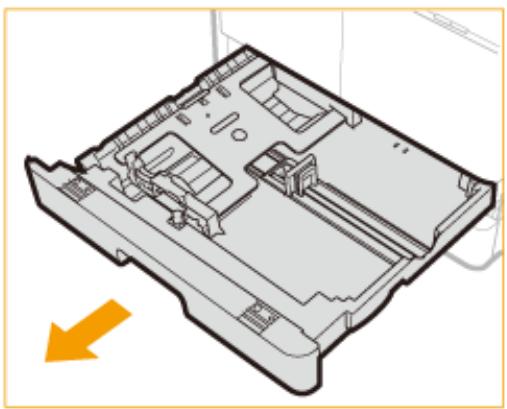
3 Adjust the position of the paper guides.
When loading paper in the paper drawer 1
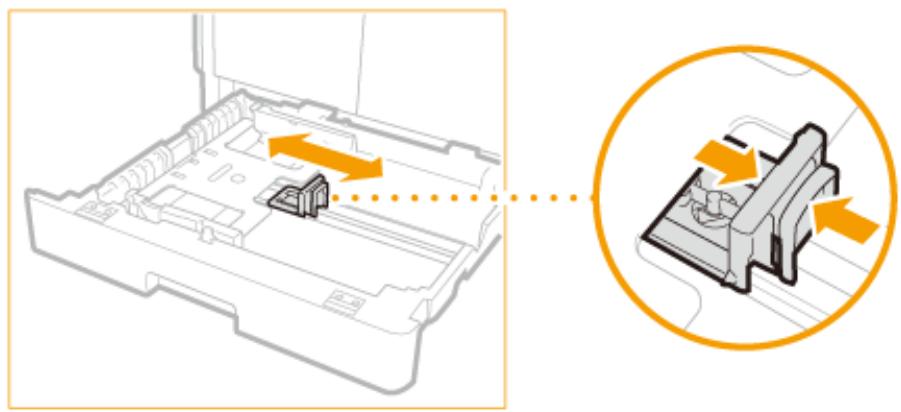
1 While squeezing the top part of the right guide, slide it to align with the size indicator for the paper to be loaded.
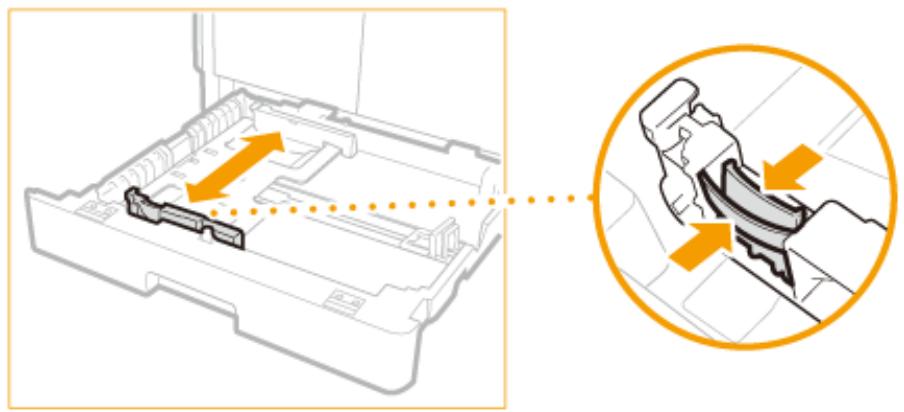
2 While squeezing the top part of the front guide, slide it to align with the size indicator for the paper to be loaded.
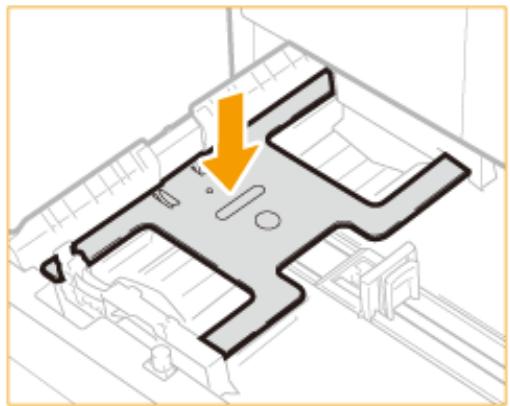
When loading paper in the paper drawer 2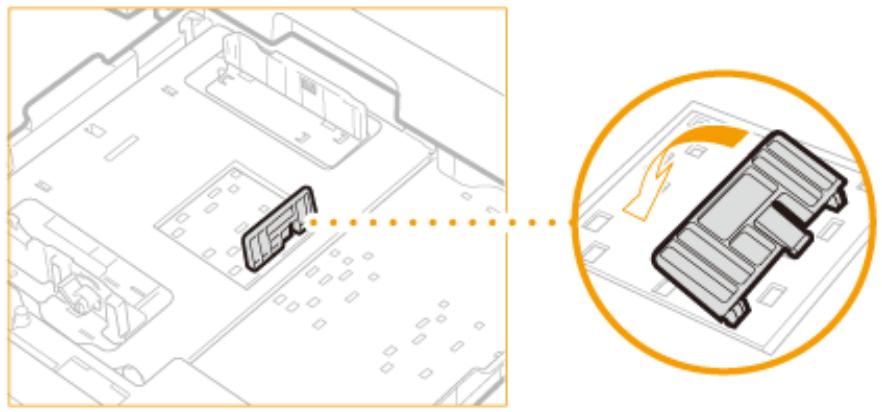
1 Detach the end guide and reattach it to the slots aligned with the mark indicating the desired paper size.
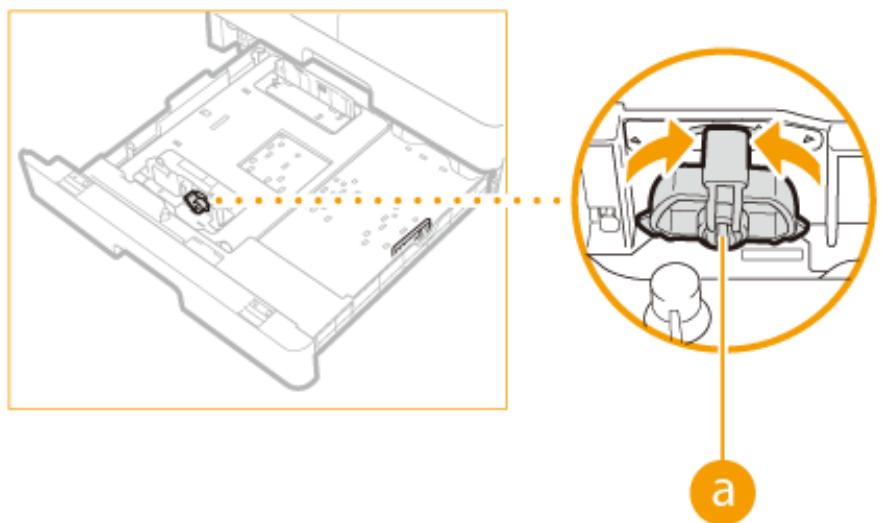
2 Lift up the lock lever on the front slide guide, and slide it backwards or forwards to align it with the groove marked with the desired paper size.
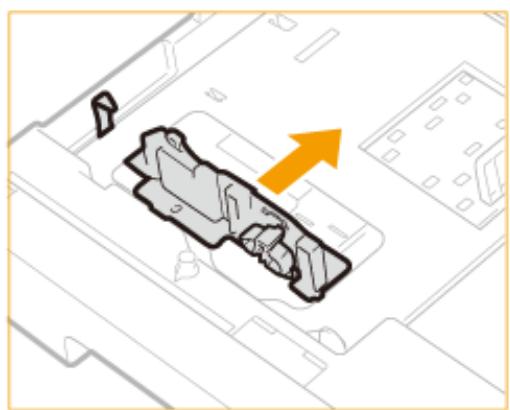
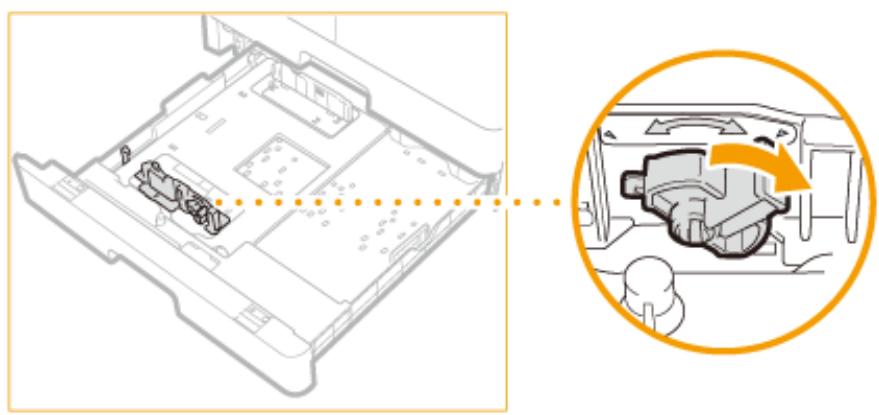
3 Lower the lock lever to lock the front slide guide into place.
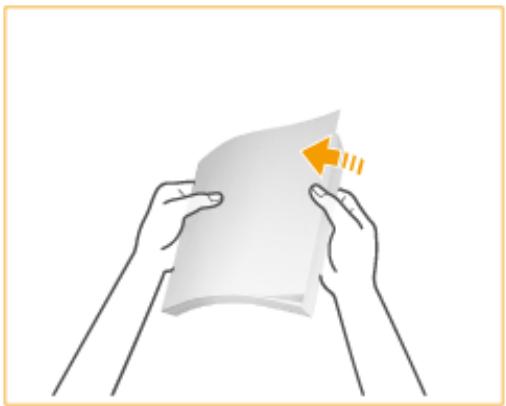
4 Prepare paper.
- Fan the paper stack well, and tap it on a flat surface to align the edges.
NOTE:
Size abbreviations on the paper guides
The abbreviations on the paper guides in the paper drawer indicate paper sizes as follows:
LGL: Legal LTR: Letter - STMT: Statement
5 Insert the paper into the paper drawer.
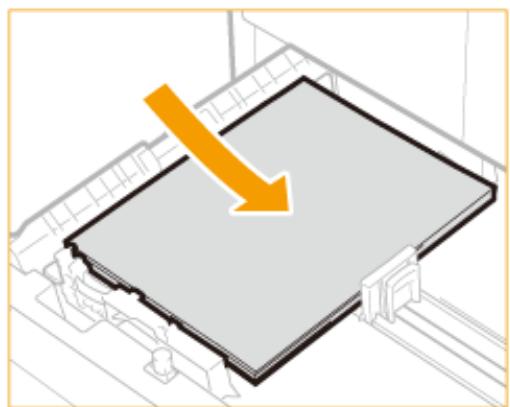
1 Make sure that the paper size setting of the paper drawer matches the size of the paper to load in the paper drawer. 2 Load the paper stack with the print side face up, and against the left guide of the paper drawer.
IMPORTANT:
Do not exceed the load limit mark when loading paper
Make sure that the paper stack does not exceed the load limit mark. Loading too much paper can cause paper jams.
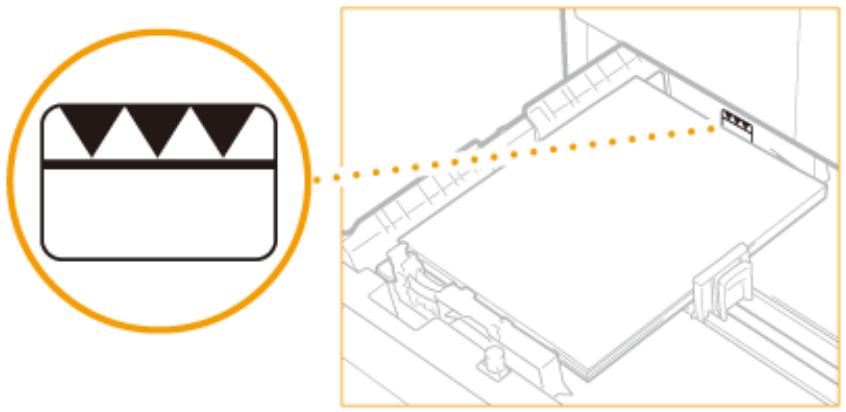
NOTE:
When loading envelopes or paper with a logo, see Loading Envelopes in the Multi-Purpose Tray (P. 39) or Loading Preprinted Paper (P. 42).
Gently insert the paper drawer into the machine.
Continue to Specifying Paper Size and Type (P. 45).
IMPORTANT:
When changing the paper size or type
If you load a different size or type of paper into the machine, make sure to change the settings. If you do not change the settings, the machine cannot print properly.
LINKS
Available Paper (P. 627)
Loading Paper in the Multi-Purpose Tray
36WC-00F
When you want to print on paper that is not loaded in the paper drawer, load the paper in the multi-purpose tray. Load the paper that you usually use in the paper drawer. Loading Paper in the Paper Drawer (P. 32)
1 Open the multi-purpose tray.
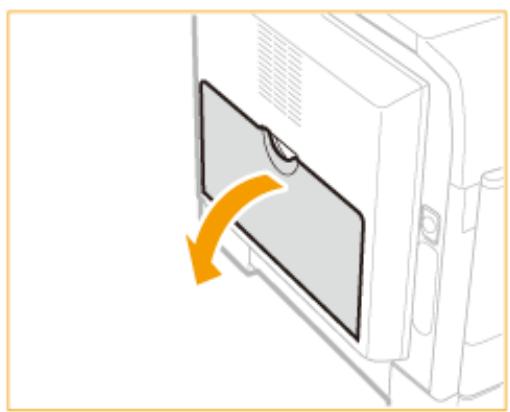
- Pull out the auxiliary tray (a), and extend the tray extension (b) when loading large-sized paper.
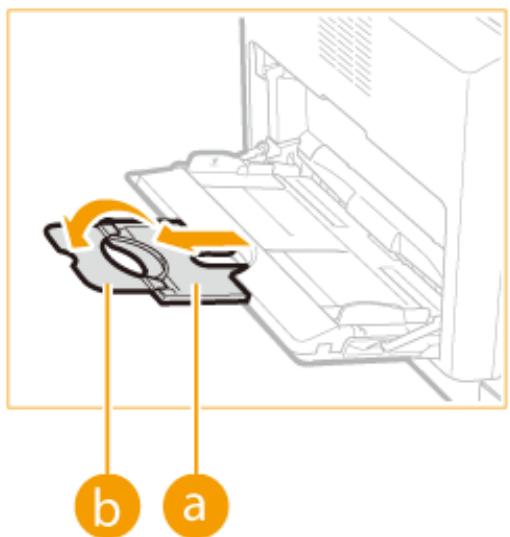
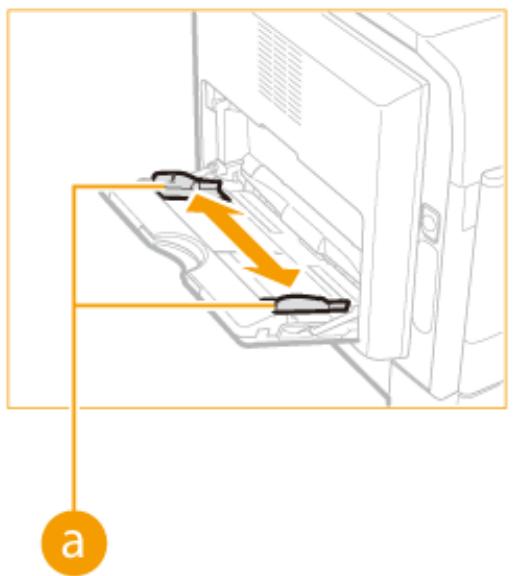
2 Adjust the slide guides ( ) to match the size of the paper.
3 Insert the paper into the multi-purpose tray until the paper stops.
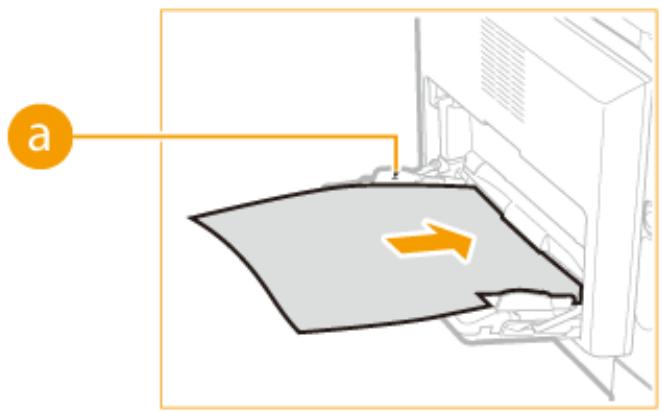
- Load the paper with the print side face down.
- Fan the paper stack well, and tap it on a flat surface to align the edges.
IMPORTANT:
Do not exceed the load limit mark when loading paper.
Make sure that the paper stack does not exceed the load limit mark (a). Loading too much paper can cause paper jams.
NOTE:
When loading envelopes or paper with a logo, see Loading Envelopes in the Multi-Purpose Tray (P. 39) or Loading Preprinted Paper (P. 42).
Continue to Specifying Paper Size and Type (P. 45).
Printing on the Back Side of Printed Paper (Manual 2-Sided Printing)
You can print on the back side of printed paper. Flatten any curls on the printed paper and insert it into the multi-purpose tray in the orientation indicated below (a), with the side to print face down (previously printed side face up).
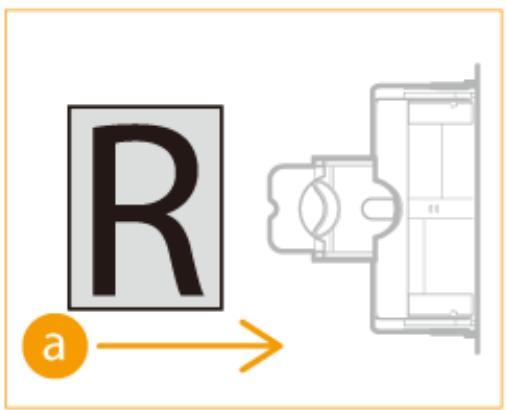
- You can use only the paper printed with this machine.
Loading Envelopes in the Multi-Purpose Tray
Make sure to flatten any curls on envelopes before loading them. Also pay attention to the orientation of envelopes and which side is face up.
Before Loading Envelopes (P. 39)
Loaded Orientation (P. 40)
NOTE
This section describes how to load envelopes in the orientation you want, as well as procedures that you need to complete before loading envelopes. For a description of the general procedure for loading paper in the paper drawer or multi-purpose tray, see Loading Paper in the Paper Drawer (P. 32) or Loading Paper in the Multi-Purpose Tray (P. 36).
Before Loading Envelopes
Follow the procedure below to prepare the envelopes before loading.
NOTE
10 envelopes at a time can be loaded in the multi-purpose tray. Follow steps 1 to 4 in the procedure below to prepare the envelope for loading.
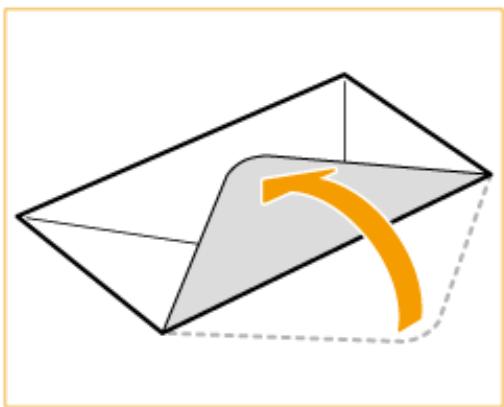
1 Close the flap of each envelope.
2 Flatten them to release any remaining air, and make sure that the edges are pressed tightly.
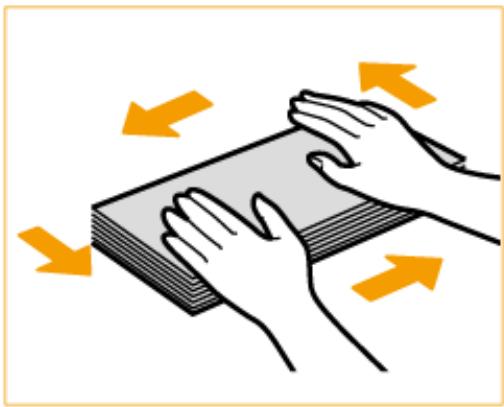
3 Loosen any stiff corners of the envelopes and flatten any curls.
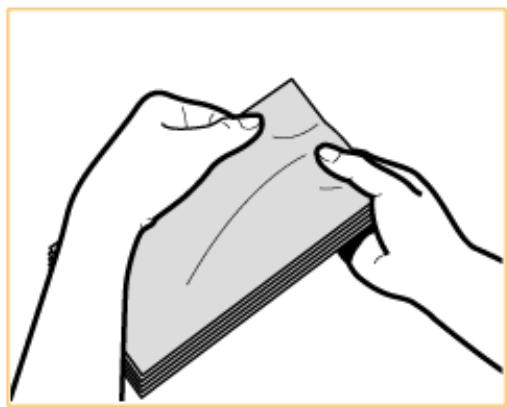
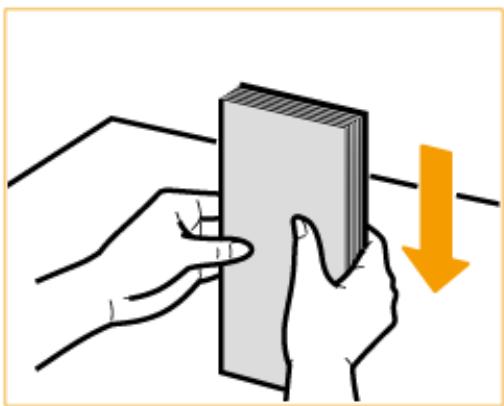
4 Align the edges of the envelope on a flat surface.
Loaded Orientation
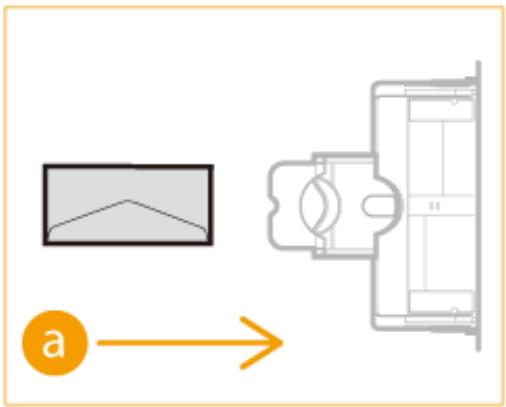
Load the envelopes in portrait orientation, short edge first, with the non-glued side (front side) face up.
Load the envelopes as shown in the illustration below (a: feeding direction).
Loading Preprinted Paper
36WC-00J
When using paper that has been preprinted with a logo, pay attention to the orientation of the paper when loading it in the paper source. Load the paper properly so that printing is performed on the same side as the logo.
Loading Paper with Logos in Portrait Orientation (P. 42)
Loading Paper with Logos in Landscape Orientation (P. 43)
NOTE
- This section describes how to load preprinted paper with the proper orientation. For a description of the general procedure for loading paper in the paper drawer or multi-purpose tray, see Loading Paper in the Paper Drawer (P. 32) or Loading Paper in the Multi-Purpose Tray (P. 36).
- The orientation of the paper may vary depending on the settings in .
Loading Paper with Logos in Portrait Orientation
The loading method varies depending on the size of the paper with the logo and the paper source that is used.

When Loading A4-size Paper with Logos
Load the paper so that the logo faces up in the paper drawer and faces down in the multi-purpose tray, as shown in the illustrations below.
Paper drawer Multi-purpose tray
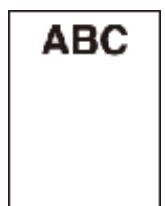
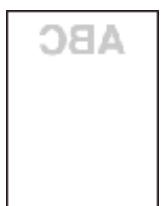
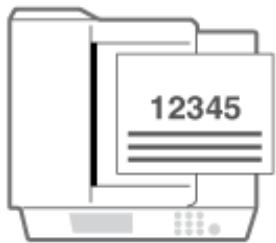
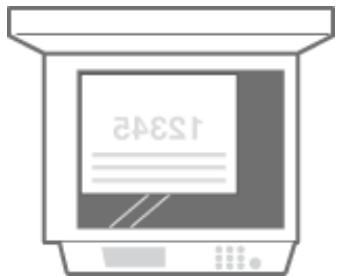
Pay attention to the orientation when placing a document. Place as follows, with the document facing up in the feeder and facing down on the platen glass.
Feeder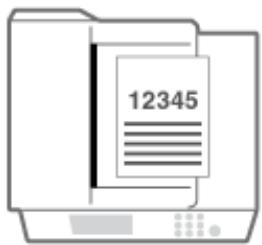
Platen glass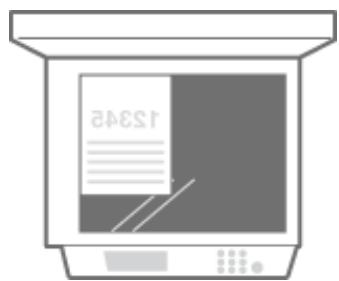
When Loading A3-size Paper with Logos
Load the paper so that the logo faces up in the paper drawer and faces down in the multi-purpose tray, as shown in the illustrations below.
Paper drawer Multi-purpose tray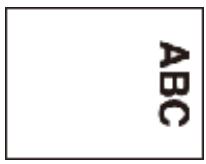
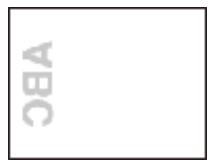
Pay attention to the orientation when placing a document. Place as follows, with the document facing up in the feeder and facing down on the platen glass.
Feeder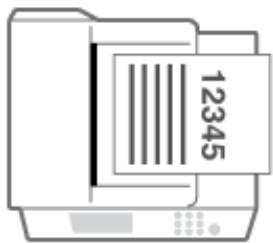
Platen glass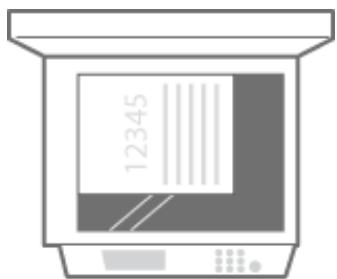
Loading Paper with Logos in Landscape Orientation
The loading method varies depending on the size of the paper with the logo and the paper source that is used.

When Loading A4-size Paper with Logos
Load the paper so that the logo faces up in the paper drawer and faces down in the multi-purpose tray, as shown in the illustrations below.
Paper drawer Multi-purpose tray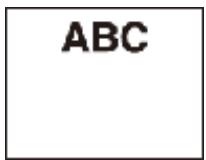
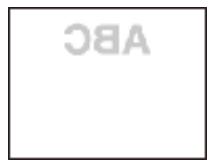
Pay attention to the orientation when placing a document. Place as follows, with the document facing up in the feeder and facing down on the platen glass.
Feeder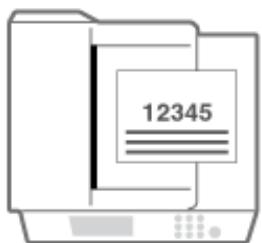
Platen glass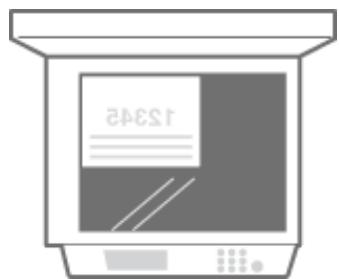
When Loading A3-size Paper with Logos
Load the paper so that the logo faces up in the paper drawer and faces down in the multi-purpose tray, as shown in the illustrations below.
Paper drawer
Multi-purpose tray
ABC
38A
Pay attention to the orientation when placing a document. Place as follows, with the document facing up in the feeder and facing down on the platen glass.
Feeder
Platen glass
Specifying Paper Size and Type
36WC-00K
You must specify the paper size and type settings to match the paper that is loaded. Make sure to change the paper settings when you load paper that is different from the previously loaded paper. You can also register a default paper size and paper type for the multi-purpose tray, which is convenient if you always load paper of the same size and type.
IMPORTANT
If the setting does not match the size and type of loaded paper, a paper jam or printing error may occur.
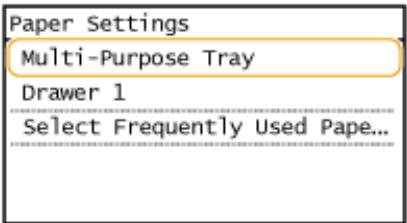
1 Press
2 Select the paper source.
If the same size/type of paper is always set in the Multi-Purpose Tray, tap .
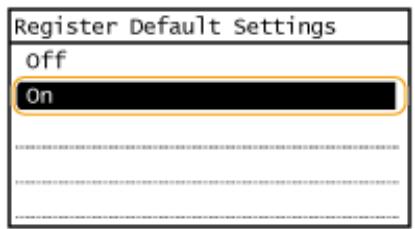
If you want to register the paper in paper drawer 1 or paper drawer 2, tap or .
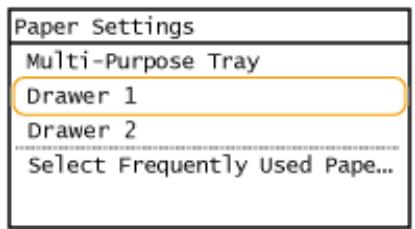
3 Select the loaded paper size.
- If the loaded paper size is not displayed, tap .
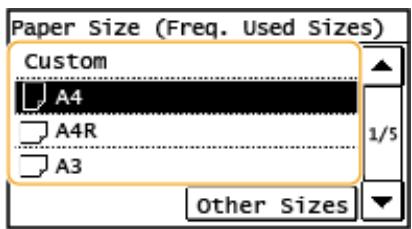
4 Select the loaded paper type.
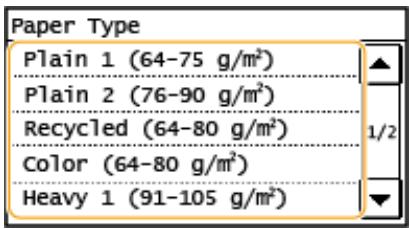
TIPS
When a frequently used paper size is known
You can set the machine to display only frequently used paper sizes in the selection screen.
1 Press 2 Tap . 3 Select the paper source. 4 Select the frequently used paper sizes.
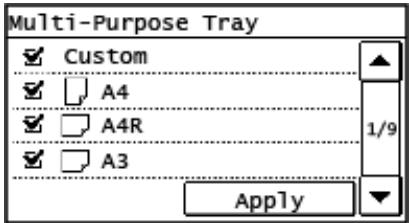
NOTE:
The paper sizes without check mark are displayed in the screen.
5 Tap .
LINKS
Loading Paper in the Paper Drawer (P. 32)
Available Paper (P. 627)
Registering a Custom Paper Size
36WC-00L
You can register a custom paper size and type to load in the multi-purpose tray.
1 Press
2 Tap .
3 Tap .
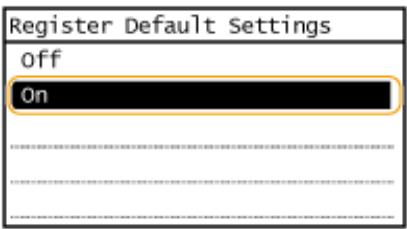
4 Tap .
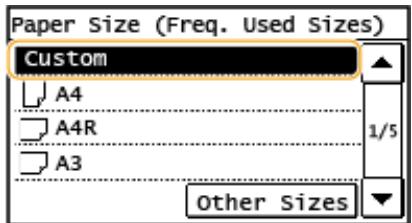
5 Specify the paper size.
1 Specify the length of the X side.
- Tap X.
- Input the length of the side using the up/down arrows, with the up/down arrows to move the cursor between the digits for inputting whole numbers and fractions, and tap .
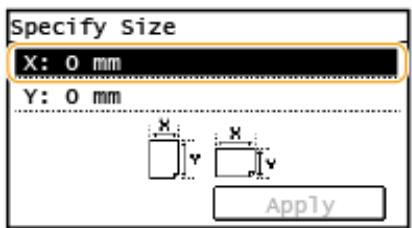

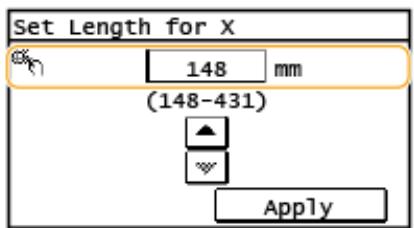
2 Specify the length of the side.
- Tap .
- Input the length of the side, and tap .
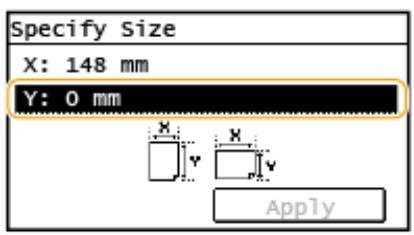

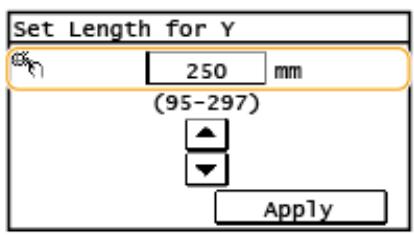
3 Tap .
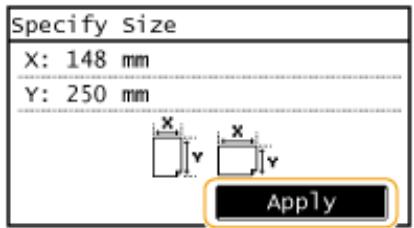
6 Select the paper type.
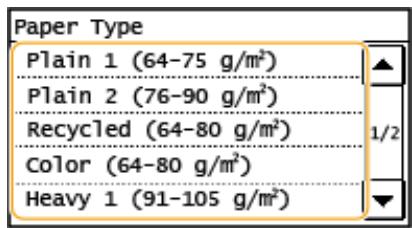
LINKS
Loading Paper in the Paper Printer (P. 32) Loading Paper in the Multi-Purpose Tray (P. 36)
Registering in the Address Book
36WC-00R
You can register destinations to the Address Book or One-Touch Dial. You can register frequently used fax/scan destinations in the Address Book and easily select them when needed. You can register up to 104 destinations in the Address Book. Destinations can be searched alphabetically, from lists in the Address Book, or by entering three-digit numbers (coded dial numbers) (Registering Destinations in the Address Book (P. 50)). You can also specify destinations more quickly by using the following features.
NOTE
- For imageRUNNER 2206N, this function can only be used when the optional Color Send Kit is attached.
- Fax numbers can be registered as destinations on the imageRUNNER 2206iF only.
One-Touch Dial
Registering a lot of addresses in the Address Book makes it difficult to find the destination you need. To avoid this situation, register frequently used destinations as One-Touch Dial numbers. This allows them to be displayed by the One-Touch buttons in the screen. You can register up to 4 destinations for One-Touch Dial. Registering Destinations for One-Touch Dial (P. 55)
Group Dial
You can select multiple destinations that have already been registered and register them together as a group. You can send faxes or e-mails to multiple destinations at the same time. You can register up to 50 destinations for a group. Groups can also be registered in One-Touch Dial. Registering Multiple Destinations for Group Dial (P. 60)
NOTE
- Use the computer to register a shared folder as the destination for scans.
- Setting a Shared Folder as a Save Location (P. 307)
- Registering Address Book from Remote UI (P. 426)
- You can save the Address Book as a file on your computer (although you cannot use the computer to edit the Address Book). You can also import a saved Address Book from the computer to the machine. Saving/Loading Address Book from Remote UI (P. 422)
- You can print a list of destinations registered in the Address Book.
- Address Book List (P. 593)
- If your office has an LDAP server installed, you can search to find user information on the server and register it in the Address Book. You need to specify the settings for connecting to an LDAP server beforehand. Registering LDAP Servers (P. 323)
LINKS
- Specifying from Address Book (P. 110)
Registering Destinations in the Address Book
36WC-00S
You can register up to 100 destinations for Coded Dial in the Address Book. You can edit or delete destinations that you have registered.
1. Press and tap .
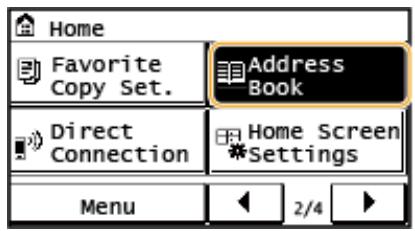
2. Tap .
- If a screen appears prompting you to enter a PIN, enter the correct PIN using the numeric keys, and tap . Setting a PIN for Address Book (P. 373)
3. Select the type of address to register.
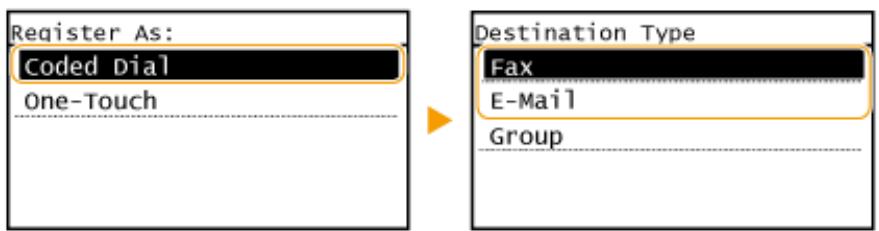
According to the address being registered, tap <Fax> / <E-Mail>.
Registering destinations with the LDAP server
If your office has an LDAP server installed, you can search for user information on the server and register it in the Address Book.
NOTE:
To register from the LDAP server, you need to specify the settings for connecting to the LDAP server beforehand. See "Registering LDAP Servers" (P. 323).
1. Tap . 2. Select the LDAP server you are using. 3. Select conditions for user information to be searched.
- Name, fax numbers, e-mail addresses, organization names, and organization unit are available criteria for searching destinations.
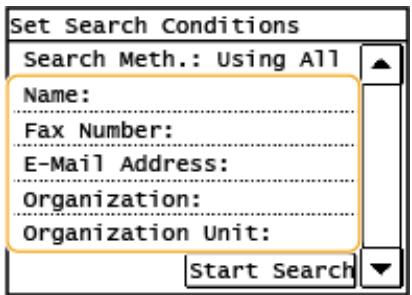
4. Enter the search target character string, and select .
For information on how to enter text, see "Entering Text" (P. 24). To specify multiple search criteria, repeat steps 3 and 4.
5. Tap . 6. Select conditions to display the search result.
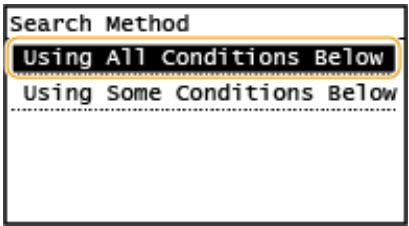
Searches and displays the users that meet all the search criteria specified in steps 3 and 4.
If users that meet even one of the criteria specified in steps 3 and 4 are found, displays all those users.
7. Tap .
The users meeting your search criteria are displayed.
NOTE:
- If the authentication screen appears when you tap , enter the user name of the machine and the password registered in the LDAP server, and tap . See "Registering LDAP Servers" (P. 323).
8 Select a user you want to register in the Address Book.
9 Tap .
The user name and the fax number or e-mail address registered on the LDAP server of the selected user are registered in the Address Book.
Tap .
- Registering is optional. If you register , the destination can be searched alphabetically.
5 Enter the name using the numeric keys, and tap . 6 Tap or .
7 Enter the destination using the numeric keys, and tap .
■Making detailed settings (only when registered for fax)
After tapping , a screen similar to the following is displayed.
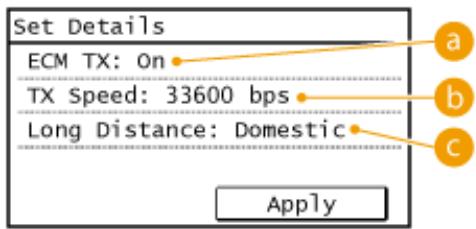
a
If an error occurs in an image that is being sent, the error is checked and corrected to prevent an improper image from being sent when setting <On> .
b
If it takes time for transmissions to start, such as when there is a poor telephone connection, you can adjust the transmission start speed downward incrementally starting from "33600 bps".
Specify to according to the transmission conditions when registering overseas fax numbers.
NOTE
You can also make detailed settings for destinations from


