USER MANUAL MDS7208 - MDS7208BK CATA
natural_image
Simple line drawing of a cabinet or oven with no text, numbers, or symbols
2. ábra
4. ábra
natural_image
Line drawing of a hand pressing down on a surface with a flat panel (no text or symbols)
6. ábra
natural_image
Isometric line drawing of a rectangular plate with horizontal slats (no text or symbols)
8. ábra
natural_image
Simple line drawing of a rectangular container with internal curved lines (no text or symbols)
9. ábra
natural_image
Technical line drawing of two mechanical components with mounting brackets (no text or symbols)
10. ábra
natural_image
Simple line drawing of a clock face with an arrow pointing to the left (no text or symbols)
- ábra: Inaktív kiugró gomb
natural_image
Simple line drawing of a cylindrical object with a central rod, no text or symbols present
16. ábra
natural_image
Technical line drawing of a mechanical assembly with no visible text or symbols
17. ábra
natural_image
Technical line drawing of a mechanical assembly with no visible text or symbols
18. ábra
- ábra
- ábra
natural_image
Technical line drawing of an oven with a close-up inset showing internal structure (no text or symbols)
21. ábra
natural_image
Technical line drawing of an industrial machine with internal components and a magnified inset showing internal structure (no text or symbols)
22. ábra
natural_image
Technical line drawing of an open oven or chamber with internal compartments and ventilation ducts (no text or symbols)
23. ábra
natural_image
Technical line drawing of a mechanical device with an inset close-up showing internal components (no text or symbols)
- ábra
26. ábra
natural_image
Technical line drawing of a mechanical component with no visible text or symbols
27. ábra
natural_image
Technical line drawing of a mechanical device with labeled component (no text or symbols present)
29. ábra
natural_image
Technical line drawing of an industrial machine with two circular insets showing close-ups of components (no text or symbols)
- ábra
natural_image
Technical line drawing of a mechanical device with internal components and a magnified circular detail (no text or symbols)
- ábra
natural_image
Simple line drawing of a cabinet or oven with no text, numbers, or symbols
EN Installation, use and maintenance instructions
1, en_US
Table of contents
1 PREFACE...... 4
2 IMPORTANT INFORMATION REGARDING SAFETY...... 5
3 SPECIFICATIONS OF THE OVEN.... 10
4 INSTALLATION OF APPLIANCE.... 13
5 INSTALLATION OF THE OVEN TO THE CABINET 15
6 POWER CONNECTION.... 18
6.1 Energy Efficiency of the Oven.... 21
7 INTRODUCTION OF APPLIANCE 23
7.1 Accessories of the Oven.... 24
8 BEFORE FIRST USE 25
9 SPECIFICATIONS AND OPERATION OF THE APPLIANCE.... 26
9.1 Specifications of the Oven.... 26
10 THE USE OF THE DEVICE.... 32
10.1 Temperature Setting of the Appliance.... 32
11 USING TELESCOPIC RAILS.... 33
12 CLEANING AND MAINTENANCE OF THE APPLIANCE.... 36
13 REPLACEMENT OF THE LAMP 42
14 MAIN FUNCTION DESCRIPTION.... 44
15 COOKING CHART 46
1 PREFACE
DEAR COSTUMER
We sincerely thank you for purchasing our product.
This product has been manufactured at modern facilities respectful to the environment without harming nature.
Please read all instructions and warnings in this user manual carefully. This manual includes important information for safe installation, use and maintenance of your product and necessary warnings to get the most out of your appliance. Keep this manual in a safe place where it can easily be reached to use it when required in the future. The manufacturer shall not be held responsible for damages to persons, environment or other materials that may occur due to the translation or printing errors of this manual, or improper operation of the appliance.
- Operating voltage of your oven is 220 to 240 Volts.
Connect your oven to a fuse with a rating of 16A. If the current value of the fuse in your house is less than 10A, have a qualified electrician install a 16A fuse.
Always use your oven with a grounded power outlet. Have an authorized electrician set grounding equipment. Our company shall not be held responsible for damages that might occur as a result of using the product with an ungrounded outlet.
This section includes the safety instructions necessary to prevent the risk of personal injury or material damage. Not observing these instructions may void any warranty and our company shall not be responsible for any damage that may occur.
If the electrical connections inside the appliance are taken out so that they may be accessible, cut off the power of the appliance against an electric shock and contact the authorized service.
Avoid contacting the heating elements inside the oven as it shall overheat during operation. Be careful as the oven surface may get very hot during the grilling function.
Flammable objects that are kept on the cooking compartment may get ignited. Do not keep the flammable flammable objects on the cooking compartment.
Use oven gloves when you are taking hot food or utensils such as trays, etc. from the oven or the grill. Components of the oven the utensils (tray, etc.) used shall be very hot during operation.
The appliance and its accessories becomes hot during operation. Avoid touching heated parts.
Do not open the door of the appliance if smoke is coming out of it. Turn off the appliance, unplug it or switch off the circuit breaker.
Cooking paper may come in contact with heating elements and catch fire. Do not randomly place cooking paper during pre-heating on the accessory. Always place a container or a cake tin on the cooking paper. Place the paper only on the required area. The cooking paper shall not be on the accessory.

CAUTION!
This appliance may be used by children above age of 8 and persons with limited physical, perceptual or mental abilities or persons with a inadequate of experience and knowledge only if they are supervised by an adult or when they comply with the instructions given on the operation of the appliance and understand the risks that may be encountered.
Children shall not play with the appliance.
■ Cleaning and maintenance of the appliance shall not be carried out by children without supervision.
The device may heat up during operation. Be careful while touching the heating elements inside the oven. Keep away from children.
Do not use harsh and abrasive cleaning agents or sharp metal scrapers to clean the door glass of the oven as this may cause breaking of the glass or scratching of the surface.
- Ovens shall be installed away from flammable environments.
■ Use the temperature probe recommended for this oven only.
- Do not use steam cleaners to clean the oven.

CAUTION!
Unplug the appliance or cut off power from the main switch to prevent electrocution before replacing the lamp.
In case of a damaged power cord, it shall be replaced with a specific cord or a cord that is approved by the manufacturer or the authorized service.
To prevent damages that may be caused by improper placement of the thermal circuit breaker, this device shall not be connected to external circuit devices such as timers or always-on or always-off circuits.
- Accessible parts may be hot. Keep away from children while grilling.
■ Spilt food stains shall be removed before cleaning.
WARNINGS BEFORE INSTALLATION AND DURING INSTALLATION
The appliance shall always be installed by a Silverline Authorized Service.
Your appliance features a high performance air circulation system for better cooking and cleaning. Follow the instructions on installation to ensure this.
■ Appliance shall be placed on the installation cabinet so that its rear faces the wall.
■ Ensure you remove all packaging material before starting to operate the appliance.
■ Use your appliance according to the intended use explained in the operation manual only.
This appliance has been designed for cooking at home kitchens only. It is not suitable for industrial or laboratory operation.
- Do not use or leave the appliance outdoors.
Do not use the appliance near water bodies, on a wet ground or in the vicinity of a pool.
This appliance is not designed to be operated with an external timer or with a remote control system.
This appliance is not suitable to be operated by children, persons with mental disabilities or by inexperienced persons without a competent adult who shall take responsibility.
Do not operate the appliance until it is repaired by an authorized service if the door or the gaskets on the door of the appliance are damaged.
Do not hang down the power cord from the edge of the table or the countertop.
All maintenance and repair shall be performed only by authorized service and only original spare parts shall be used.
■ Ensure you remove all packaging material before you use your product.
This appliance shall not be used for a purpose other than cooking. It is dangerous and inappropriate to use it for any other purpose (e.g. to heat the room it is in). Our company shall not be held responsible for damages that may occur on people, animals or objects due to improper, incorrect or impractical operations of the oven.
When you operate the oven for the first time, a smell caused by the insulation materials and heating elements may occur for once. In such a case, operate the oven without putting any food inside it for 30 minutes at maximum temperature with the upper and lower heater (and 3D, if applicable) function turned on.
■ Never cook or fry on the bottom of the oven.
- Do not cover the bottom of the oven with aluminium foil.
■ Unplug the appliance while moving, cleaning, or servicing the oven.
■ Never attempt to remove the plug by pulling it from the cord.
■ Never touch the appliance if your hands or feet are wet or damp.
- Do not allow children or minors to use the appliance without supervision.
In case of negligence, the oven door may hurt your hands if it is removed from its hinge.
In case of failure or improper operation of the oven, turn it off and unplug the oven.
- When the oven is not used, ensure that all functions are switched to the “OFF” position.
■ Always wear oven gloves while removing the tray from the oven.
■ Always keep the oven clean for your safety and to ensure the cleanliness of the oven. Oil residues left inside the oven after operation may damage the surface of the even in the course of time.
All maintenance and repair operations shall be performed by authorized service and original spare parts shall be used only.
- Our company shall be held responsible for any damages caused by hazardous or improper operation of the oven.
■ Damage to your oven may occur if you do not follow any warning given above.

CAUTION!
Do not use the oven handle on the front door to carry the oven or to remove it from its packaging.
If a power failure occurs, the product stops cooking. Depending on model of the product, you may continue to cook when power is restored or you may need to adjust the cooking time again.
Open the oven door at least 3 minutes after the end of cooking to avoid steam condensation in front of the watch.
The components of this appliance that may contact with food comply with the requirements of the EEC Directive no. 89/109.
CEWith the CEE marking, we declare that it is responsibility to ensure the compliance of this appliance to the European directives and meeting the legal requirements in terms of safety, health and environment.
Ensure that the oven is good condition and not damaged when you take it out of its package. Do not use the appliance in case of any doubt: contact a specialized professional.
Put packaging materials such as nylon packaging, polystyrene foam and nails away from the reach of children as these may pose a danger for children.
- Keep the original package of the appliance.
■ Use the original packaging to transport the appliance, follow the handling signs on the package.
If the original packaging is missing;
-
Avoid impacts to the outer surface of the appliance.
-
Do not place heavy loads on the appliance.
During transporting, place your appliance parallel to the ground (with the upper side facing up).
Packaging
All packaging materials are recyclable. Dispose of remains of packaging material in recycling containers to help protection of the environment.
Disposing of Old Appliances
Appliances that are too old or not in operable condition shall not be disposed of directly in the trash. Old electrical and electronic devices may contain components that may be reused and utilized. Otherwise, the appliances that include components that operate the appliance and the ones sent to the landfill may include materials that may be harmful to the environment.
Therefore, deliver your appliance to the certain collection centers by consulting your manufacturer to ensure that the electrical and electronic parts are re-used.
Keeping this user manual is recommended since this provides information regarding the operation of the appliance, if the appliance is provided to another user. You have to prevent the potential negative outcomes against human health and environment before scrapping and disposing of this appliance. Otherwise, the appliance will be an unsuitable waste.
This symbol on the product aims the appliance to be considered as domestic waste, and to warn for delivery to electrical and electronic waste collection centres. Appli-
ance disposal must be conducted in accordance with local environment regulations. You can obtain detailed information on disposing of the appliance, reusing and recycling it from authorities.
3 SPECIFICATIONS OF THE OVEN
These appliances are designed to operate with a single phase supply voltage of 220-240V at 50-60Hz.
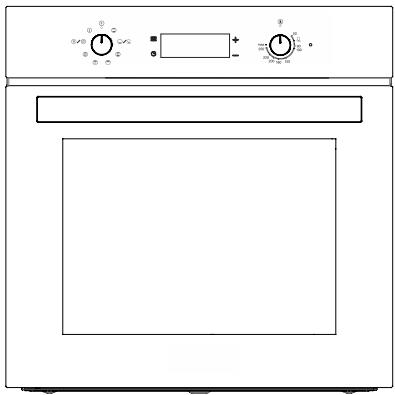
natural_image
Line drawing of a microwave oven with control knobs and indicator lights (no text or symbols)
Fig. 1
| MDS 7208 X - MDS 7208 WH - MDS 7208 BK |
| Function | 8 |
| Oven Lamp | 15 W |
| Product Dimensions (Width) | 595 mm |
| Product Dimensions (Depth) | 547 mm |
| Product Dimensions (Height) | 595 mm |
| Product Installation Cabinet Dimen-sions (Width) | 560 mm |
| Product Installation Cabinet Dimen-sions (Depth) | 550 mm |
| Product Installation Cabinet Dimen-sions (Height) | 600 mm |
| Capacity | 72 lt |
| Voltage | 220-240 V |
| Maximum Power | 2650 W |

The place measurement where the product will enter is taken according to
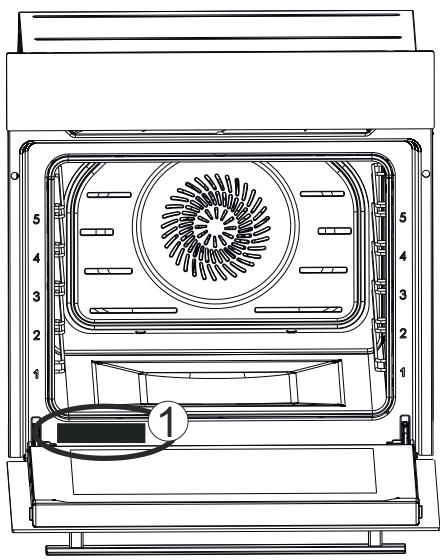
natural_image
Technical line drawing of an oven with numbered components and fan-shaped ventilation (no text or symbols)
Fig. 2
You may access the nameplate of the oven indicating technical specifications of the oven even after installing the oven in the kitchen. You may see this nameplate when you open the door the oven. Use the information provided in this nameplate to specify the model of your oven while ordering a spare part (Fig. 2/1).
4 INSTALLATION OF APPLIANCE
Installation of the appliance shall be performed by Silverline Authorized Service. Our company shall not be held responsible for damages that may occur on people, surroundings or other materials due to incorrect installation of the appliance.
Inspect the appliance after opening the packaging. Do not perform the connection of the appliance in case of a transport damage.
Carefully read the installation pages for the installation of the accessories.
Take off and remove all packaging materials and adhesive tapes from the cooking compartment and the door before operating the appliance.
The appliance may be installed in two different ways: under the counter or inside a wall cabinet. Installation dimensions to be used for these options are provided below.
Do not install the appliance behind a decoration or a furniture cover. This would pose a risk due to overheating.
Cutting operations on the furniture shall be performed before the installation of the appliance. Remove any burrs. They may have an adverse effect on the functioning of electrical units.
Use protective gloves to prevent injuries.
You shall provide the clearances shown in the drawings for ventilation and cooling inside the cabinet or cupboard to ensure correct operation of the appliance.
Walls of furniture where the appliance is installed shall be resistant to heat. Particularly if the side walls are made of coated particleboard, the coating shall resist up to 120 °C. Plastic or adhesive coating that are not resistant to the specified heat may get deformed and damaged.
A support that may handle the weight of the oven shall be put under it while placing the oven.
For safety reasons, direct contact of the appliance with electrical parts shall be prevented when the installation is complete.
Parts that provide insulation and protection shall be installed so that they cannot be removed by using any tool.
We recommended you to install the appliance in a wall cabinet to ensure a more efficient air circulation.
Rear compartment of the cabinet in the kitchen unit shall be removed to ensure a more efficient air circulation.
We recommended you to provide a minimum clearance of 70 mm from the rear of the kitchen unit where the appliance is installed.
We do not recommend installation of the appliance near a refrigerator or deep freezer. Otherwise, the performance of such appliances shall be affected adversely due to the dissipated heat.
To make your oven ready for operation, have the location it shall be placed in built with the electrical installation. Then, call the Silverline Authorized Service.

Dimensional information provided in the drawings are given in mm.
5 INSTALLATION OF THE OVEN TO THE CABINET
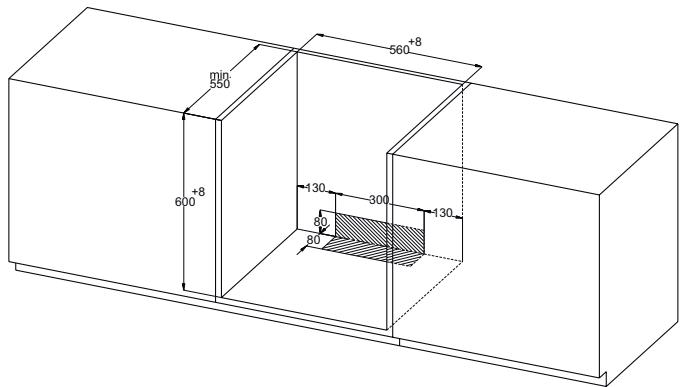
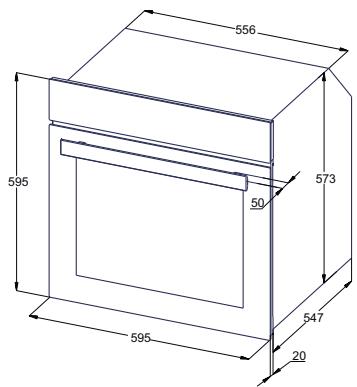
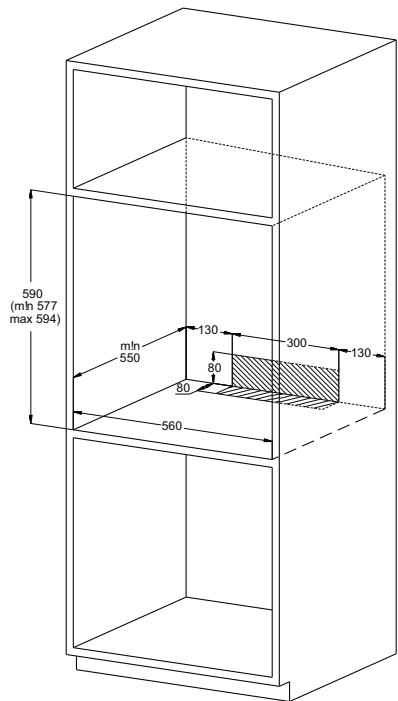
Fig. 3

Visuals in the manual are for reference
natural_image
Technical line drawing of a mechanical assembly with numbered components (no text or symbols)
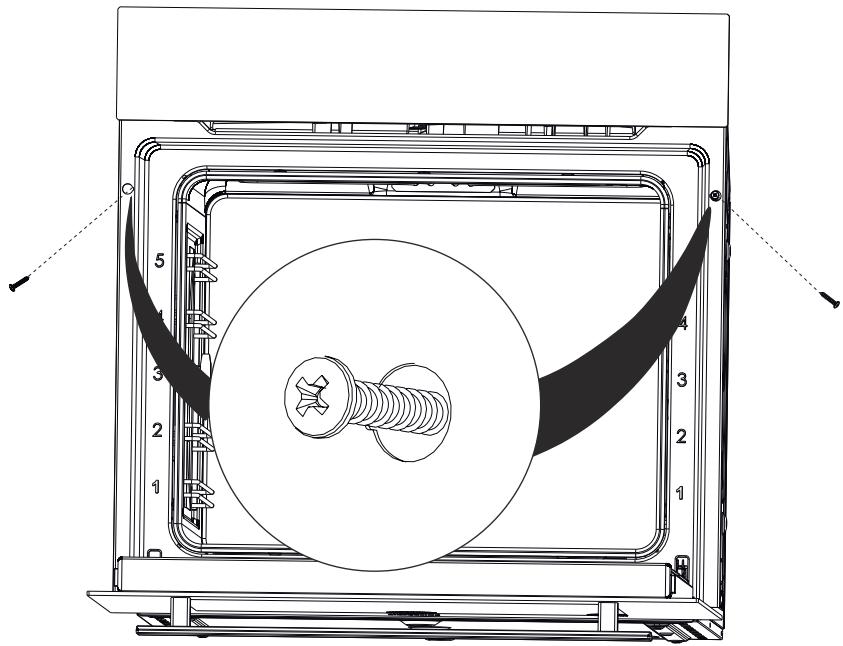
Fig. 4
Place the appliance by centering it inside the built-in appliance cabinet.
Open the door of the appliance and drill holes by aligning with the holes on the body of the oven using a drill with a screw diameter of 3.9x22, and install the screw.

Installing the screw without drilling a hole suitable for the screw diameter in the furniture may cause damage to your furniture.
- Be careful not to damage the installation holes by applying too much pressure on the screws during installation.
The appliance may be installed on a high-placed cabinet or under the counter as desired.
We recommended you to provide a minimum clearance of 70 mm from the rear of the kitchen unit where the oven is installed
Parts that provide insulation and protection shall be installed so that they cannot be removed by using any tool.
When a built-in stove is installed on the counter on top of the oven, power cords of the oven and the stove shall be separated for safety purposes and to ease the removal of the oven from this stove when required.
6 POWER CONNECTION
The appliance shall be connected to the main electrical installation as per the current rules and legislation and by an authorized service only.
■ Ensure that the power received from the mains meet the power specified in the nameplate placed on the bottom front of the appliance.
If the current value of the switch in your house is less than 16A, have a qualified electrician install an 16A fuse switch.
The appliance shall always be grounded. Have an authorized electrician set grounding equipment.
Power cable of your oven is fitted with a grounded plug. This plug must be used with a grounded line.
Place the appliance so that the outlet or double pole switch used for power connection may be reached easily.
Do not place the power cord in contact with hot surfaces and do not pinch it to the product cover.
The temperature of the power cord shall not reach a temperature that is 50 °C above the ambient temperature.
Please contact the nearest Authorized Service when the power cord gets damaged. Have the authorized service replace the cord with a new one with the same dimensions and plastic insulation and that may withstand the electrical current required by the appliance.
If the appliance shall be connected directly to the mains, a double pole switch suitable for carrying the desired load as per the current legislation and with a clearance of 3mm between its contact points shall be installed between the appliance and the mains. Grounding wire shall not be cut off by the double pole switch.
We do not recommend usage of adapters, multi sockets or extension cords. If it is absolutely required, you may use adaptors or extension cords by complying with the applicable safety legislation. However, you shall never exceed the maximum current capacity and the maximum power specified for the adaptor.
Test the heating elements for 3 minutes when the connection is complete.

Electrical safety of the appliance is guaranteed when it is correctly connected to a suitable source with proper grounding as per the applicable rules only. Our company shall not be held responsible for damages that may occur on people, animals or objects due to improper grounding of the appliance.
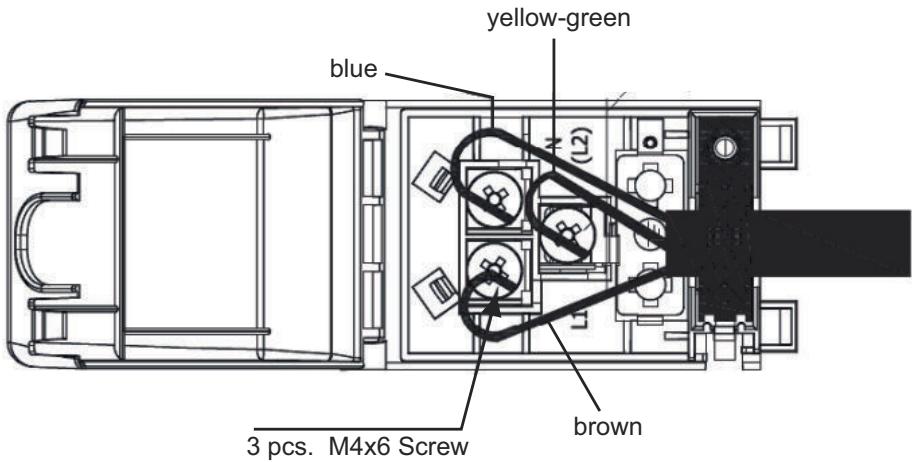
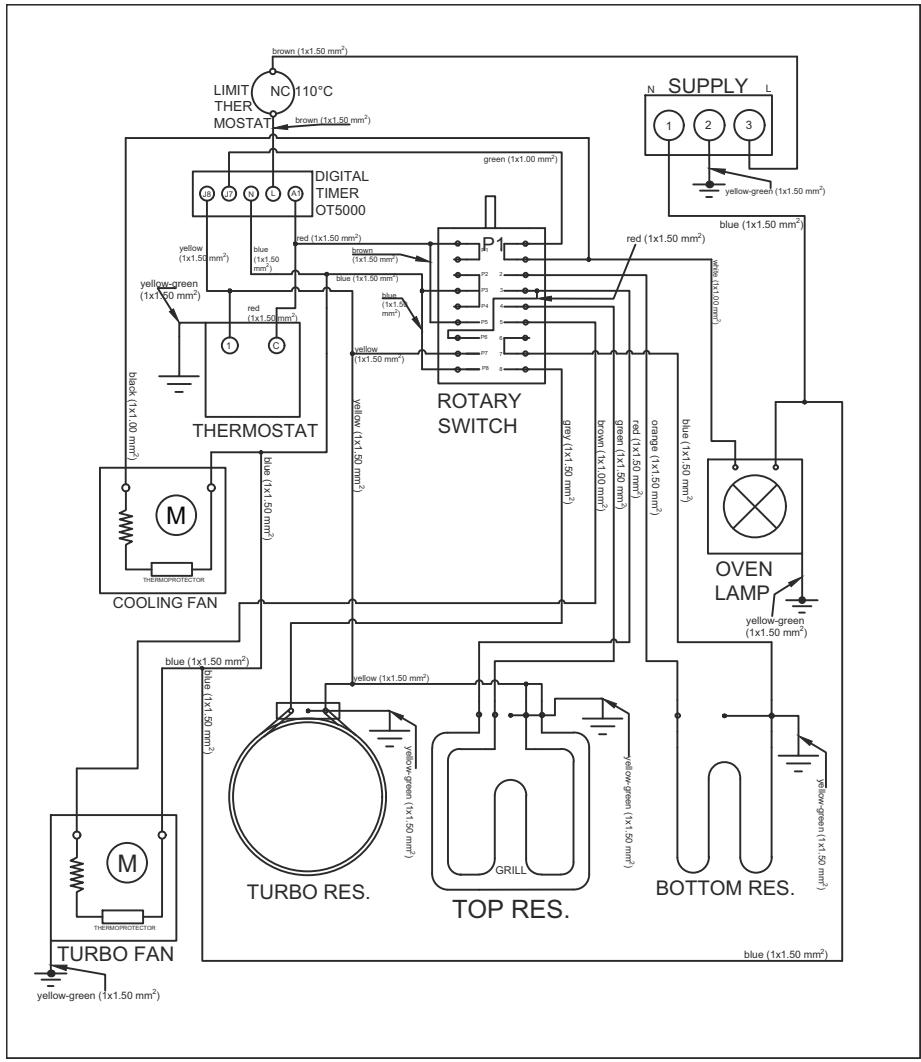
Fig. 5
THINGS TO DO FOR THE FIRST OPERATION OF THE APPLIANCE
■ Set the temperature to maximum level.
- Set the function button to lower and upper grill position (or 3D position, if applicable).
- Operate the oven in empty condition for 30 minutes in this way.
- Open the windows to ventilate your room.
At this time, a smell and smoke caused by the insulation materials and heating elements may occur for once. In such a case, wait until the smell and smoke wears off before putting any food inside the oven.
- Clean the inside of the oven using a soft cloth slightly dampened with soapy water.
natural_image
Line drawing of a hand pressing down on a surface with a rectangular object above (no text or symbols)
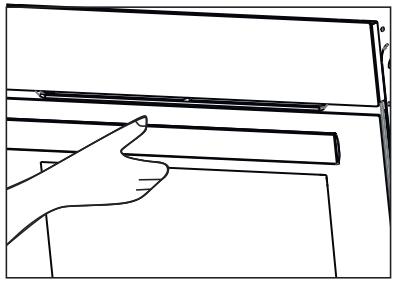
Fig. 6
Always grab the handle from its center to open the oven door.

CAUTION!
Wash the components such as tray or grill with alkaline (non-abrasive) cleaning agents before operating the oven for the first time.
6.1 Energy Efficiency of the Oven
■ Ovens with high efficiency of power and with heat insulation shall be preferred.
■ Opening the oven door frequently during cooking allows the cold air enter inside the oven each time, thus it causes loss of energy. Therefore, do not open the oven door more than required.
■ Try to cook multiple dishes simultaneously in the oven. Take the meal cooked with a lower temperature out first, and use less energy without changing the oven temperature.
Excess heat remaining after cooking a meal shall be used for the next meal, too. This shall save power.
■ Use the pre-heating function of the oven for a short time (10 minutes at maximum).
Energy Efficiency of the Oven
■ Frozen food shall be thawed before cooking in the oven.
The oven would continue cooking with the current temperature using less energy when it is turned off a few minutes before the cooking time.
7 INTRODUCTION OF APPLIANCE
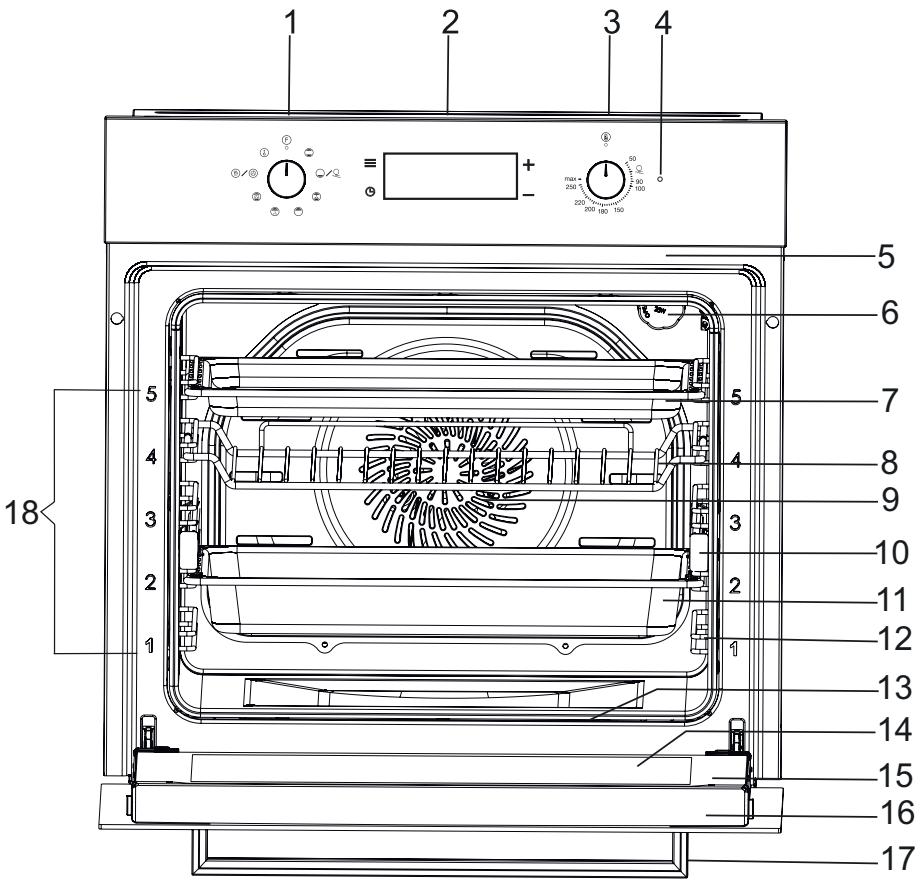
Fig. 7
1- Function Selection Button
2- Touchscreen Timer
3- Oven Temperature Setting Knob
4- Warning Lamp
5- Upper Resistance
6- Lamp
7- Shallow Tray (Option)
8- Oven Grill
9- Fan
10- Telescopic Rails
11- Deep Tray
12 Wire Rack
13- Lower Resistance
14- Internal Glass
15- Oven Door
16- Door Top Plastic
17- Oven Handle
18- Rack Level
7.1 Accessories of the Oven
Clean the accessories of the oven before first operation. After cleaning and washing with a sponge, wipe them dry.
Remove any accessories you do not need from the cooking compartment.
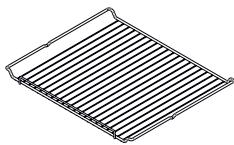
Oven Grill
natural_image
Isometric line drawing of a rectangular plate with horizontal slats (no text or symbols)
Fig. 8
Plate, for cake pans and ramekins For frying, frying pieces and frozen food.
Wire racks remain in horizontal position even when they are pulled out of the oven thanks to their special structure. There is risk of sliding the plate and spilling the food.
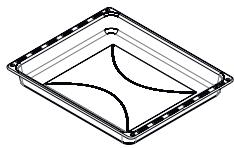
Deep Tray
natural_image
Simple line drawing of a rectangular container with internal curved lines (no text or symbols)
Fig. 9
Universal pan For cakes, soft cakes, frozen food and meat dishes with big pieces of meat.
It may be used as grease collecting plate when you grill directly on the wire grill.
Telescopic Rail
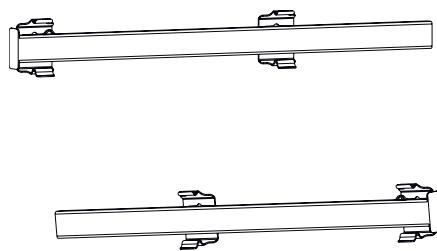
Fig. 10
For racks and trays.
Telescopic rails increase the oven rack level. When telescopic rail is used, there is no risk of slipping and spilling the food.
8 BEFORE FIRST USE
You shall make some settings first before using your new appliance.
Cleaning of the cooking compartment and the accessories
Clean the cooking compartment and the accessories first before cooking a meal for the first time.
Cleaning of the cooking compartment
Heat the cooking compartment while it is empty and closed to remove the smell of a new appliance.
Ensure that no packaging residues such as styrofoam are left inside the cooking compartment and remove adhesive tapes on or inside the appliance. Wipe the straight surfaces of the cooking compartment with a soft, damp cloth before heating. Ventilate the kitchen as long as the heating operation continues.
Clean the straight surfaces with detergent water and a dish cloth after cooling of the cooking compartment.
Cleaning of the accessories
Clean the accessories thoroughly with a soft brush or detergent water and a dish cloth.
9 SPECIFICATIONS AND OPERATION OF THE APPLIANCE
9.1 Specifications of the Oven
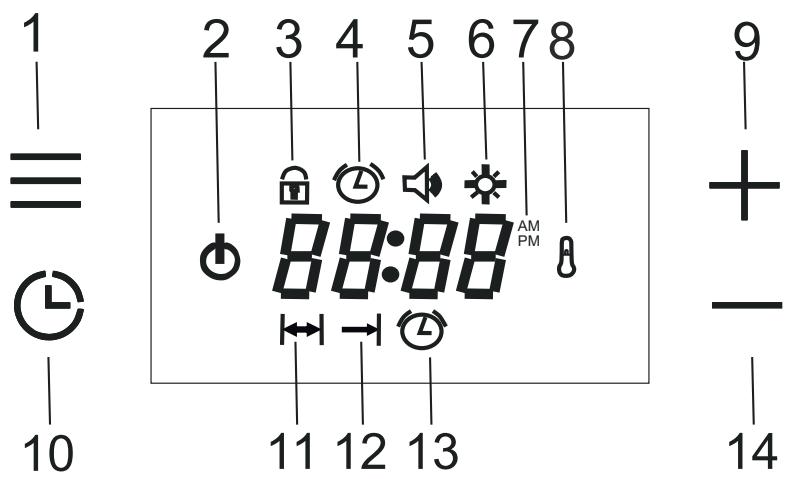
Fig. 11
1- Menu Button
2- Function Commutator
3- Child Lock
4- Day Time
5- Alarm Sound Volume
6- Screen Brightness Setting
7- AM/PM Time Display
8- Thermostat Icon
9- Plus Button
10- Program Button
11- Brewing Time
12- Cooking End Time
13- Alarm
14- Minus Button
Each time pressed on this button, the child lock, time setting (if cooking time is not set), alarm sound volume setting and screen brightness setting modes are activated in order and the relevant symbol is displayed during the setting.
Each time pressed on this button, cooking end time (if cooking time is set) and alarm sound volume setting modes are activated in order and the relevant symbol is displayed during the setting.
Child Lock
This function serves to prevent unintended changes of the settings made by the user on the oven clock.
If the child lock is activated when a cooking program is not running and the oven is turned off, the keys will be locked and the oven will be deactivated. All buttons except menu button will be deactivated The on the oven clock will flash.
The oven will not be operated until the child lock is deactivated.
If the key lock is activated while there is an active cooking program, only the keys are locked. All buttons except menu button will be deactivated
The lock symbol on the oven clock will illuminate. When the child lock is active, when the cookin gprocess is completed and the function controller is set as closed, the child lock function will be activated and the oven cannot be operated again.
The oven clock shall be available for operation when the key lock is cancelled.
To activate the key lock, when you are not in any menu, respectively;
When "Menu" button is touched once ⏻ Key Lock) icon flashes. 'OFF' text appears on the screen.
'+' by tapping this key, deactivate child lock. 'ON' appears on the screen, and the icon remains fixed on the screen.
I want to deactivate the child lock
When the 'Menu' key is tapped, the ⏻ icon flashes on the screen. 'ON' text appears on the screen.
'-by tapping this key, deactivate child lock. "OFF" appears on the screen and the icon disappears from the screen.
Clock Setting;
When the product is connected to the supply source, the time of day icon pops up on the display and the OFF text flashes.
To use the oven, press the menu button once, then clock is set by using "+" / "-" buttons. After the time has been set, you can end the setting mode by tapping the Menu key or waiting 5 seconds and the time of day disappears from the display.
To set the day time being previously set for your oven, when you are not in any menu, respectively:
When you tap the "Menu" key twice, Ⓛsymbol flashes.
press '+' / '-' keys to set the time of day.
After setting the time, end the setting mode by touching the "Menu" button or by waiting 5 seconds.

The day time cannot be set if any cooking setting is done.
Clock Setting Mode 24h/12h Option
The default setting is 24 hours. To switch to the 12-hour (AM/PM) mode, touch the "Plus (+) key for 5 seconds when you are not in any setting mode and there is time on the screen, a beep sound is heard when the mode changes. In 12-Hour Mode, The "AM" or "PM" icon is displayed on the screen. The same process is made to pass to the other mode.
Alarm Tone Setting
To change the alarm tone, when you are not in any menu, respectively:
When you tap the "Menu" key three times, 🔊 symbol flashes on the screen
press ' + ' and '-' to select the desired volume.
After adjusting the volume, touch the Menu key or wait 5 seconds to end the setting mode.
The factory default setting is "b-03", which is the highest volume.

NOTICE!
The adjusted sound volume is displayed as "b-01, b-02 or b-03" and the related icon disappears at the end of setting mode.
Screen Brightness Setting:
To change the screen brightness, when you are not in any menu, respectively:
When you tap the "Menu" key four times, ⚙ symbol flashes on the screen.
press ' + ' and '-' to select the desired brightness level.
After setting the brightness level, touch the Menu key or wait 5 seconds to end the setting mode.
The default setting is "d-03" and it is the brightest level.
3. TIMER FUNCTIONS
Auto-cooking means that in an oven where the cooking function is selected and the temperature is set, the timer will be set to end automatically.

If you want to operate the oven without a timer, you can set the function controller and the thermostat and start cooking.

When the oven is not in use, the function and thermostat switches must be in off position. If not, the cooking will continue for an indefinite time.
Semi-Automatic Cooking:
This method is used when it is desired that the cooking is started immediately, and the desired cooking time is entered.
The |↔| icon flashes when the Program key is touched once
adjust the cooking time by tapping the '+' and '-' keys. After setting the cooking time, the |↔| icon remains fixed on the display.

NOTICE!
In cooking programs set up in under an hour, the time appears on the screen in minutes and seconds.
Full Automatic Cooking
This method is used when the food is desired to be ready at a certain time in the future. Therefore, it is also called as the delayed cooking.
The |↔| icon flashes when the Program key is touched once
press ' + ' and '-' to adjust the cooking time and exit the cooking mode.
When you tap the Program key twice, symbol flashes.
tap ' + ' and '-' to adjust the cooking time you want. |↔| the light on the (cooking time) and →| (cooking end time) icons remains lit.
When the cooking start time is reached, the icon disappears on the display and the symbol remains on the display with the remaining cooking time.
When the cooking is completed;
The icon flashes in the display, End appears and the alarm signal starts to run for 7 minutes.
Press the Program key to cancel the Alarm. The End text disappears from the screen, and the time of day appears on the screen.

When the alarm sounds, End will not disappear when the alarm is silenced by touching any key other than the Program key. Only the alarm is silenced.
To Cancel the Automatic Cooking Time;
Cancel the cooking program and reminder timer if installed by pressing the Program key for about 3 seconds. The End caption and (Cooking Time) icon appear on the display.
Another option is;
When the Program key is touched, || (Cooking Time) icon flashes. touch ' -' the set cooking time is reduced to 00: 00. The "End" caption and || (Cooking Time) icon appears on the display.
Reminder Timer
You can use the oven clock as an alarm or reminder timer. To set the alarm, respectively:
The Ⓧ icon flashes when the Program key is touched 2 times (3 times if cooking time is set).
Set the desired alarm time by tapping the '+' and '-' buttons. Once the alarm is set, the corresponding icon remains lit on the display and is displayed until the alarm time is reset. The maximum time that may be set is 23 hours and 59 minutes.
When the alarm time is completed
The Ⓛ icon flashes on the display and the 7-minute alarm signal starts to sound.
Pressed to any button to cancel the alarm and then turns back to show the day time on the screen.
To cancel the set time;
Press the Program key for approximately 3 seconds to cancel the reminder timer and, if installed, the cooking program, or touch the Program key until the icon flashes. by tapping '-' , the alarm time is set to "00:00" and the reminder timer is cancelled.

If the alarm time and cooking time are set same, then the shorter one is displayed.
1 Function Commutator
When the function commutator is turned to any ON position, the ⏻icon appears on the display.
The ⏻ icon disappears when the function commutator is switched off.
2. Thermostat
If the oven temperature is lower than the set temperature, the 📄icon appears on the screen.
When the oven temperature reaches the set temperature, the icon disappears from the screen.

Thermostat symbol indicates the current temperature of the oven. It cannot utilize cooking in the oven alone. However when a function is selected with function controller, the cooking process can be utilized.

When the cooking time is set, the function commutator and thermostat icon disappears from the screen after delayed cooking is set, until cooking starts, and after power outages that require clock setting.
10 THE USE OF THE DEVICE
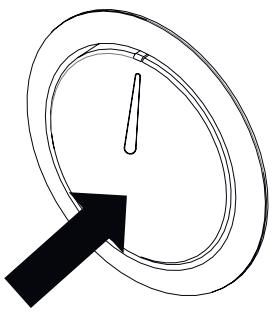
natural_image
Simple line drawing of a clock face with an arrow pointing to the left (no text or symbols)
Fig. 12: Pop out off
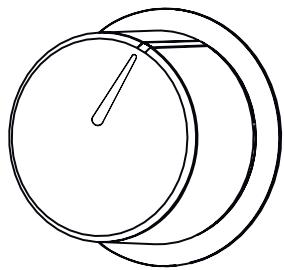
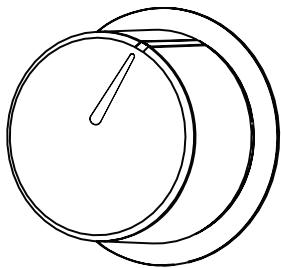
natural_image
Simple line drawing of a cylindrical object with a central rod, no text or symbols present
Fig. 13: Pop out on
The buttons of your oven are the type of pop-out buttons that pop out when pressed in.
■ Press inward to pop out the button and then adjust (Fig. 12).
When cooking is finished, turn the switch to the off (top) position and press it inwards (Fig. 13).
10.1 Temperature Setting of the Appliance
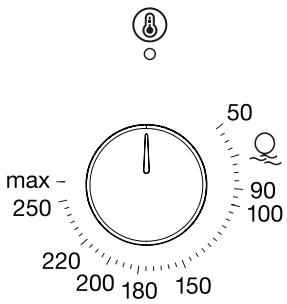
Fig. 14
Your appliance starts heating just a few seconds later when you set the temperature.
Turn off the appliance by bringing the function selection switch to zero position when your food is ready.
11 USING TELESCOPIC RAİLS
HOW TO USE TELESCOPIC RAIL
Removing Telescopic Rails
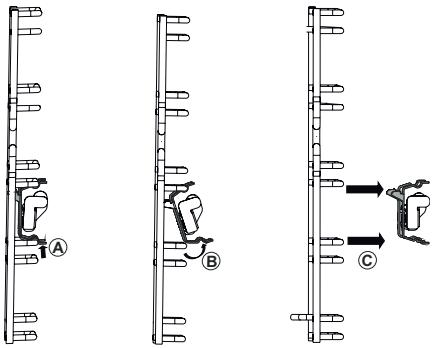
Fig. 15
To remove telescopic rail from the shelf, hold the telescopic rail handle as seen in Fig. 15/A and then lift it up as seen in Fig. 15/B. (Fig. 15/C).

Repeat this process for all telescopic rails on both sides of the oven.

When you remove Telescopic rails, hold it with one hand in order to prevent it falling in the oven and causing damage.

To remove the telescopic rails, wait for the oven to cool down.
Inserting Telescopic Rails
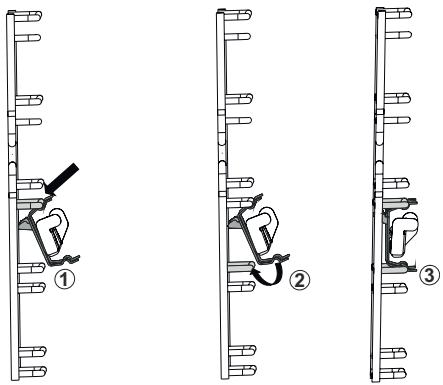
Fig. 16
To insert the telescopic rails to the grill shelf, hold the handle on the rail and insert as seen in Fig. 16/1. Then place the handle on the rail to the grill shelf seen in Fig. 16/2 to achieve the image seen in Fig. 16/3.
Using Telescopic Rails
By using telescopic rails, you can use the trays and grills with ease.

Do not wash telescopic rails in the dishwasher.

Do not oil telescopic rails

Prior to closing the oven door, ensure the telescopic rails are fully inserted in the device.
Using the Wire Grill
natural_image
Technical line drawing of a mechanical assembly with internal components and no visible text or symbols
Fig. 17
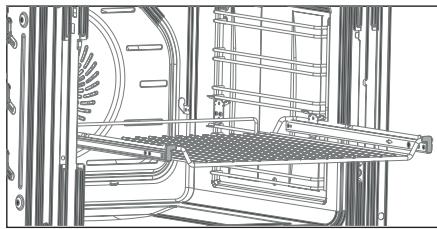
Place the wire grill to the telescopic rails with their legs looking down (Fig. 17).
Using Cooker
natural_image
Technical line drawing of a mechanical assembly with no visible text or symbols
Fig. 18
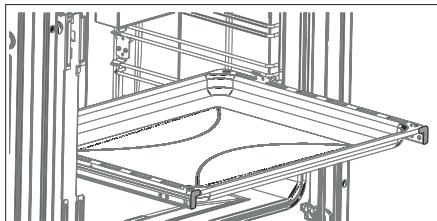
Place the cooker on the telescopic rails (Fig. 18).

The high edges around the telescopic rail is a special design to prevent the cooker to slip.
12 CLEANING AND MAINTENANCE OF THE APPLIANCE
General Cleaning
Always allow the appliance to cool after operating it. Ensure that no residues are left on the door at this time. The kitchen furniture around the appliance may be affected in the long term even if the door is left ajar.
Failure to maintain the appliance regularly and to keep it clean may cause deterioration of the surface and reduce the service life of the appliance, and thus cause risks as a result of these.
■ Unplug the appliance or switch off the power of the appliance by bringing the On/off button on the appliance to off position before any cleaning operation.
- Wait for the appliance to cool down before starting cleaning.
■ Ensure that the cleaning agents you use when cleaning your product does not have particles that can scratch enamelled or painted surfaces.
When cleaning the control panel and the knobs, avoid using liquid cleaners with abrasive particles and wire wool to prevent erasing of the symbols.
Do not clean the oven with materials such as bleachers, nitric acid or hydrochloric acid.
- Do not clean your oven using steam cleaners.
Do not try to remove the buttons from the control panel as these are not removable in some models.
Do not use cleaning agents that contain abrasives (wire wool, cleaning powder, oven sprays, abrasive hard sponges), acids (bleachers) or chlorine.
You can obtain Silverline's oven cleaner from our authorised services and use it to remove spilled, dried waste oil stains and for perfect cleaning. Spray the oven cleaning spray on stained surface, close the lid and wait for 10 minutes.
Do not leave abrasive and acidic stains (lemon juice, vinegar etc.) on enamelled, painted and stainless steel surfaces.
Before using the steam cleaning function, remove all accessories from the oven;
Put 100 ml of water to the base of your oven and another 400 ml of water inside the shallow tray placed on the 2nd level (we recommend you to use soft water) and close the door of the oven.
■ Bring the function selection switch to bottom heater 🔊 🔒 position.
■ Set the oven temperature to ℼ and operate the oven for 30 minutes.
■ To end steam cleaning process, switch the button to Off.
AquaSmart
- Clean the interior surface of the oven with a soft and damp cloth when the oven reaches a temperature that shall not burn your hands, i.e. before it is completely cooled down.
■ After cleaning, keep the door ajar at 15^ to completely dry the enamel interiors.

DANGER!
Ensure that the appliance cooled down prior to coming to contact with it.
Risk of burns.
■ Cleaning of the Interior of the Oven
- Be sure to clean your oven after each operation.
The best time to clean the enamelled surface inside the oven is when the oven is warm.
■ Remove the trays and the grill. Clean the interior by wiping with a cloth dampened with warm, soapy water. Then, wipe once more with a damp cloth and dry.
Do not use abrasive materials such as sandpaper, steel wool or bleachers. Otherwise, the enamelled part of the oven may get damaged.
- Clean the oven thoroughly using a proper oven cleaning agent in regular intervals.
You may use cleaning agents used for stainless steel or some vinegar in case of harsh stains.
The stains left by such fluids may harm the brightness of the oven, but does not affect its performance in any way.
- Do not use the appliance for storage purposes by putting food such as bread, cakes, cookies, etc. inside the oven.
- Cleaning the side walls of the oven
natural_image
Line drawing of an open oven with three labeled compartments (1, 2, 3), showing internal structure without any text or symbols.
Fig. 19
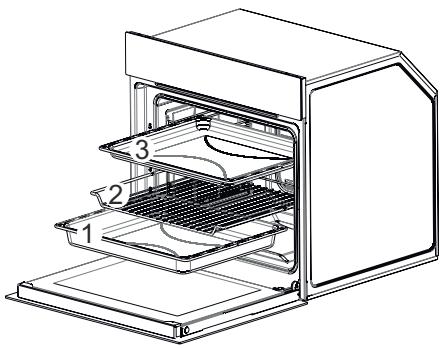
■ Remove the trays and the grill respectively (1-2-3 / Fig. 19).
Removing Telescopic Rails
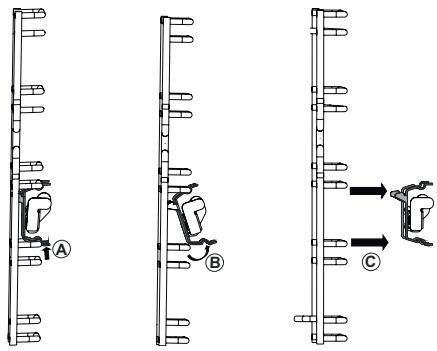
Fig. 20
To remove telescopic rail from the shelf, hold the telescopic rail handle as seen in Fig. 20/A and then lift it up as seen in Fig. 20/B. (Fig. 20/C).

Repeat this process for all telescopic rails on both sides of the oven.

When you remove Telescopic rails, hold it with one hand in order to prevent it falling in the oven and causing damage.

To remove the telescopic rails, wait for the oven to cool down.
natural_image
Technical line drawing of an oven with internal compartments and a magnified inset showing internal structure (no text or symbols)
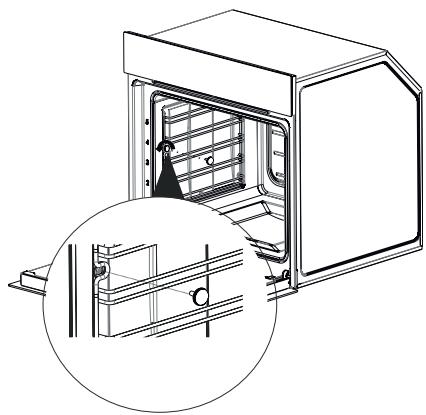
Fig. 21
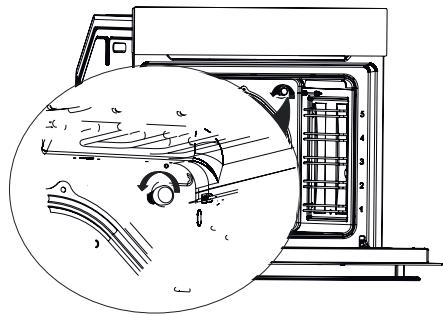
Remove the serrated screw inside the oven by rotating it counter-clockwise to clean the wire rack inside the oven (Fig. 21).
natural_image
Technical line drawing of an oven with internal grid structure and a magnified inset showing internal components (no text or symbols)
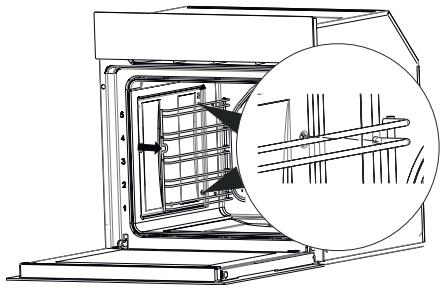
Fig. 22
Pull the wire rack towards the inside of the oven and remove the legs of the wire rack from their seats (Fig. 22).
natural_image
Technical line drawing of an open industrial oven or chamber with internal compartments and mounting base (no text or symbols)
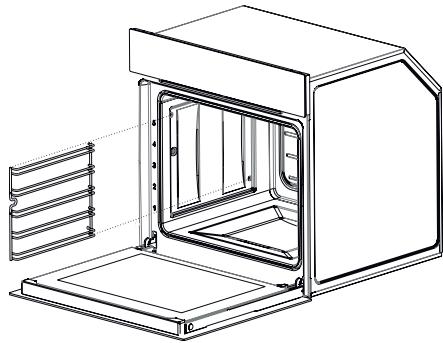
Fig. 23
Remove the wire rack from the oven after releasing the wire rack from its legs (Fig. 23).
Removal of the Oven Door
natural_image
Technical line drawing of a mechanical assembly with a circular inset showing a component labeled 'A' (no text or symbols beyond label)
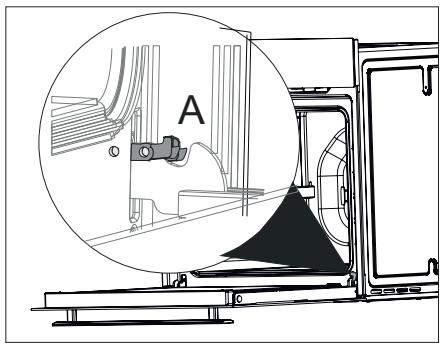
Fig. 24
Open the door completely by pulling the oven door toward you (Fig. 24).
Then, bring the hinge lock to the widest angle as shown in (Fig. 24/A). Bring both hinges that connect the oven door to the oven to the same position.
natural_image
Technical line drawing of a refrigerator interior with a magnified inset showing internal components (no text or symbols)
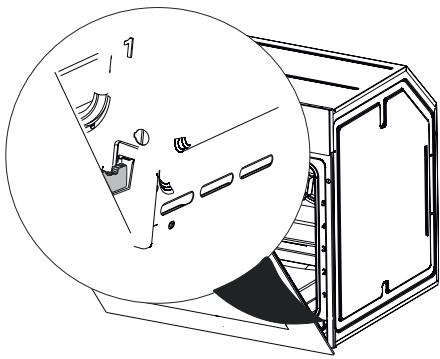
Fig. 25
Close the oven door so that it contacts the hinge lock as shown in (Fig. 25).
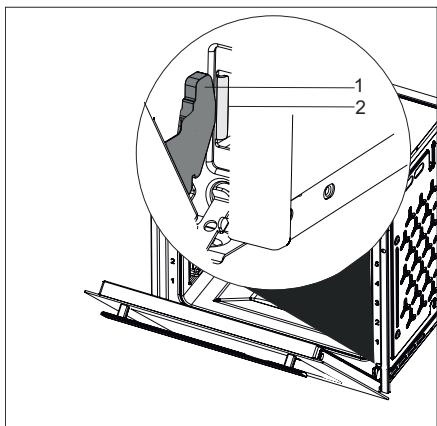
Fig. 26
1 Hinge
2 Hinge Housing
Remove the hinges from the hinge housing by holding the door with both hands to remove the oven door (Fig. 26).

Reverse the removal procedure for installation procedure of the door. Remember to the close the clips on the hinge housing while installing the door.
Cleaning of the Oven Glass
natural_image
Technical line drawing of a mechanical component with no visible text or symbols
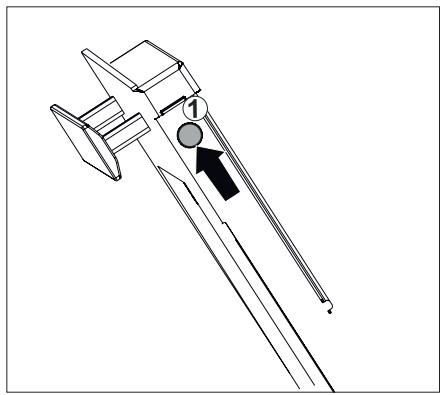
Fig. 27
Open the door of the appliance slightly.
Push on the left and right-hand sides of the door top plastic (Fig. 27).
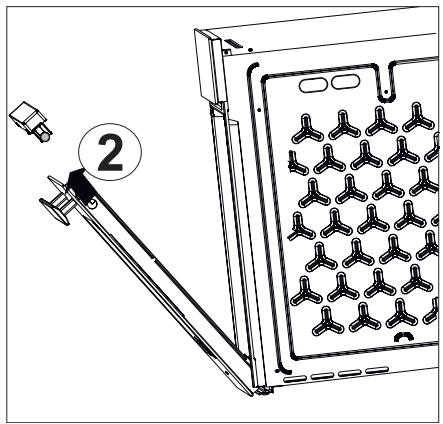
Fig. 28
Remove the door top plastic (Fig. 28).
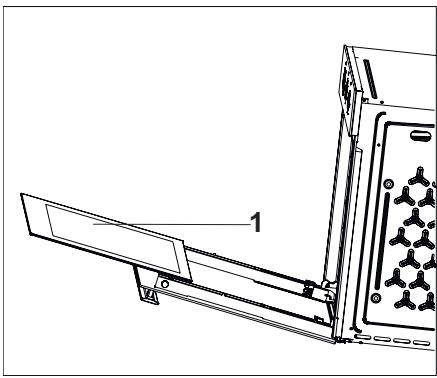
natural_image
Technical line drawing of a device with labeled component (no text or symbols present)
Fig. 29
1 - Internal Glass of the Oven
■ Remove the internal glass of the appliance to clean it (Fig. 29).
■ Wipe the glass cover with soft sponges and clothes cleaning and drying.
Do not use harsh abrasive cleaning agents and sharp metal scrapers to clean the oven glass. Cleaning in such a way may scratch the surface of the glass and may cause the glass to break.
- Do not lean over and apply weight on the oven door.

CAUTION!
As the door loses weight when the glasses are removed, it may close abruptly and cause injuries.

Reverse the same procedure to install the oven glass.
Oven Door Gasket
Condensation may occur inside the front door and on the door gasket when the oven is operated for a long period. Remove the possible condensation using a dry cloth or sponge.
- Inspect the condition of this gasket in regular intervals. Clean without using abrasive cleaning agents when required.
■ Door may not be closed properly when dirt is collected on the door gasket after some time.
Please contact the nearest Silver-line Authorized Service when the gasket gets damaged. Do not use the oven until it is repaired.
13 REPLACEMENT OF THE LAMP

Disconnect power supply and wait for the oven to cool down to eliminate the risk of electrocution before replacing the oven lamp.
Hot surfaces may cause burns.
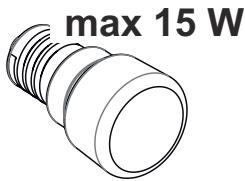
Fig. 30
2A/250V AC
Screw size E14
It indicates the maximum power consumption of the lamp. A lamp with same power rating should be used when replacing the lamp.

To find out the power rating used in the product, see the declaration label in the product.
The bulb used in this product is not suitable for illumination of households. The purpose of this lamp is to help the user to see the food.
natural_image
Technical line drawing of an oven with a magnified inset showing internal components (no text or symbols)
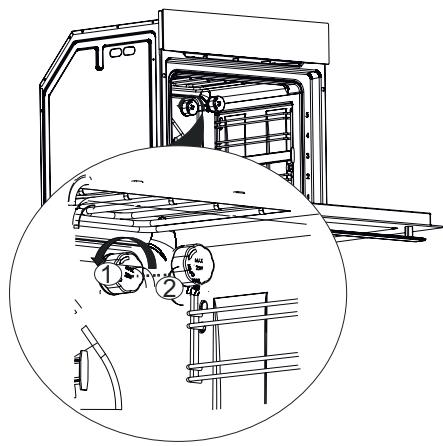
Fig. 31
Unplug the appliance.
Remove the lamp cover (Fig. 31/1) by rotating it counter-clockwise (Fig. 31/2).
natural_image
Technical line drawing of a mechanical device with a magnified circular detail showing internal components (no text or symbols)
Fig. 32
Remove and replace the oven lamp by rotating it counter-clockwise (Fig. 32).
Reverse the procedure provided in
(Fig. 31) for the installation of the lamp
cover.
14 MAIN FUNCTION DESCRIPTION
The main function descriptions are below.
| Function | Explanation of function |
 | No program is selected in your appli-ance. |
 | Upper and lower heaters are on. Food is heated from the bottom and top simultaneously. This is suitable for cakes, patties or cakes and stews cooked in pans. Cook using a single tray. |
 | Ony the lower heater is on. This is applicable for instance to bake pizza or food that requires to be browned on the lower section.Aquasmart Cleaning function |
 | Lower and upper heaters and the fan (on the rear wall) are on Hot air is dis-tributed equally and rapidly inside the oven thanks to the fan. Use a single tray for cooking. |
* | Larger grill on the oven roof is on. This is suitable for grilling more meat. Place the large or medium sized portions on the correct rack position under the grill heater to grill. Set the temperature to maximum level. Turn the food upside down halfway through the cooking process. |
* | Hot air heated with the bigger grill is distributed rapidly inside the oven thanks to the fan. This is suitable grilling more meat. Place the large or medium sized portions on the correct rack position under the grill heater to grill. Set the temperature to maximum level. Turn the food upside down halfway through the cooking process. |
 | Upper heating, lower heating and fan heating are open. Each side of the product to be cooked is cooked equally and quickly. Use a single tray for cooking. With this function, you can also preheat quickly. |
 | Each side of the product to be cooked is cooked equally and quickly.For cooking and frying at one or more levels. The fan distributes the heat of the round heater on the rear panel evenly in the cooking zone. Cook using a single tray.With this function, you can also preheat quickly. |
 | The oven is not heated, only the fan works. Grained frozen food dissolves slowly at room temperature, cooked food dissolves. |

* Shall be used at Max. 230°C'
15 COOKING CHART
Place your food in the oven.
- Select the operation mode and the temperature.
The oven is heated up to the pre-set temperature and preserves this temperature until the end of selected cooking time.
Turning off the oven before the expected time
■ Turn the oven off with the function and/or temperature buttons.
Cooking Times Chart

Values specified are determined under laboratory conditions. Your values may differ from these values.

1st rack of the oven is the bottom rack.

CAUTION!
Do not place an aluminium foil on the bottom of the oven while cooking. This may cause fire and damage to your appliance and furniture.
Pre-heating is recommended for all kinds of food.
| Food | Operating Function | Tray to be Used | Rack Position | Temperature (°C) | Cooking time (min.)approx. |
| Cake in tray | [42564] | Single level | 3 | 175 | 25...30 |
| Cake in pan |  | Single level | 2 | 180 | 40...50 |
| Cake in sheet | [ASZC] | Single level | 3 | 175 | 25...30 |
| Sponge cake | [BCTT] | Single level | 3 | 200 | 5...10 |
| Cookie | [BTK6] | Single level | 3 | 175 | 25...30 |
| Filo pastry |  | Single level | 2 | 200 | 30...40 |
| Buns |  | Single level | 2 | 200 | 25...35 |
| Leaven dough |  | Single level | 2 | 200 | 35...45 |
| Lasagne | [7G34] | Single level | 2 | 200 | 30...40 |
| Pizza | [SWX0] | Single level | 2 | 200...220 | 15...20 |
| Beaf (full) / Roast |  | Single level | 3 | 25 minutes 250, then 180...190 | 100,120 |
| Leg of lamb (stew) | [BXCY] | Single level | 3 | 25 minutes 250after 190 | 70...90 |
| Roasted chicken | [HH40] | Single level | 2 | 15 minutes 250, then 180...190 | 55...65 |
| Turkey (5.5 kg) | [KKCZ] | Single level | 1 | 25 minutes 250, then 180...190 | 150...210 |
| Fish |  | Single level | 3 | 200 | 20...30 |

For cooking operations which require pre-heating, perform the pre-heating until the oven reaches the desired temperature at the start of the cooking.
Hints for cakes
If the cake is too dry, increase the temperature about 10 °C and decrease the cooking time.
If the cake is wet, use less liquid or decrease the temperature about 10 °C .
If the top of the cake is burnt, place it on a lower rack, decrease the temperature and increase the cooking time.
If the inside of the cake is cooked well, but outside is sticky, use less liquid, decrease the temperature and increase the cooking time.
Hints for pastry
If the pastry is too dry, increase the temperature about 10 °C and decrease the cooking time. Dampen the sheets of dough with a sauce made of milk, butter, egg and yoghurt.
If the cooking time of your pastry is too long, ensure that the thickness of the pastry does not exceed the tray.
If the top of the pastry is cooked, but the bottom is not cooked, ensure that the amount of the sauce you use for the pastry is less on the bottom side of the pastry. Try to spread a frying sauce evenly between the sheets of dough and on the pastry.

Cook your pastry with the position and temperature specified in the cooking chart. If the bottom part is fried less again, place it at a lower rack on the next time.
Hints for vegetable dishes
If the vegetable dish loses its juice and gets dry, cook inside a closed pot instead of the tray. Closed pots contain the juice of the dish.
If the vegetable dish is undercooked, boil the vegetables or prepare them as preserved food first, and then put them inside the oven.
cata
CNA
group
CATA ELECTRODOMÉSTICOS, S.L.