
T8DBG861 - Tumble dryer AEG-ELECTROLUX - Free user manual and instructions
Find the device manual for free T8DBG861 AEG-ELECTROLUX in PDF.
| Brand | AEG-ELECTROLUX |
| Model | T8DBG861 |
| Product type | Condenser tumble dryer |
| Maximum capacity | 8.0 kg |
| Drum volume | 118 L |
| Dimensions (H x W x D) | 850 x 596 x 638 mm (max 663 mm) |
| Weight | Not specified in the manual, estimated ~50 kg |
| Power supply | 230 V, 50 Hz, 700 W |
| Energy class | A+++ |
| Annual energy consumption | 176.50 kWh |
| Programs | Cotton, Synthetics, Mix, Wool, Silk, Bedding, Easy Iron, Outdoor, Duvet |
| Options | Drying level, Silent, Anti-crease, Timed drying, Delayed start |
| Child lock | Yes (key lock) |
| Filter cleaning | After each cycle, by hand or with a vacuum cleaner |
| Water tank emptying | After each cycle (drain kit available) |
| Condenser cleaning | Every 6 months minimum |
| Moisture sensor | Yes, clean regularly |
| Noise level | 65 dB |
| Permitted ambient temperature | +5 °C to +35 °C |
| Protection rating | IPX4 |
| Available accessories | Stacking kit, drain kit, pedestal with drawer |
| Warranty | Refer to after-sales service |
Frequently Asked Questions - T8DBG861 AEG-ELECTROLUX
User questions about T8DBG861 AEG-ELECTROLUX
0 question about this device. Answer the ones you know or ask your own.
Ask a new question about this device
Download the instructions for your Tumble dryer in PDF format for free! Find your manual T8DBG861 - AEG-ELECTROLUX and take your electronic device back in hand. On this page are published all the documents necessary for the use of your device. T8DBG861 by AEG-ELECTROLUX.
USER MANUAL T8DBG861 AEG-ELECTROLUX
natural_image
Simple line drawing of a washing machine with no text or symbolsCONTENTS
- SAFETY INFORMATION......3
- SAFETY INSTRUCTIONS....5
- PRODUCT DESCRIPTION....7
- CONTROL PANEL....8
- PROGRAMA....9
- OPTIONS....12
- BEFORE FIRST USE....13
- DAILY USE....14
- HINTS AND TIPS....17
- CARE AND CLEANING.... 18
- TROUBLESHOOTING....21
- TECHNICAL DATA....23
- ACCESSORIES....24
- QUICK GUIDE......25
- PRODUCT INFORMATION SHEET IN REFERENCE TO E.U. REGULATION 1369/2017....27
FOR PERFECT RESULTS
Thank you for choosing this AEG product. We have created it to give you impeccable performance for many years, with innovative technologies that help make life simpler – features you might not find on ordinary appliances. Please spend a few minutes reading to get the very best from it.
Visit our website for:

Get usage advice, brochures, trouble shooter, service and repair information: www.aeg.com/support

Register your product for better service: www.registeraeg.com

Buy Accessories, Consumables and Original spare parts for your appliance: www.aeg.com/shop
CUSTOMER CARE AND SERVICE
Always use original spare parts.
When contacting our Authorised Service Centre, ensure that you have the following data available: Model, PNC, Serial Number.
The information can be found on the rating plate.
⚠ Warning / Caution-Safety information
i General information and tips
Environmental information
Subject to change without notice.
1. ⚠️ SAFETY INFORMATION
Before beginning the installation and use of this appliance, carefully read the supplied instructions. The manufacturer is not responsible for any injuries or damage that are the result of incorrect installation or usage. Always keep the instructions in a safe and accessible location for future reference.

Read the supplied instructions.
1.1 Children and vulnerable people safety

WARNING!
Risk of suffocation, injury or permanent disability.
- This appliance can be used by children aged from 8 years and above and persons with reduced physical, sensory or mental capabilities or lack of experience and knowledge if they have been given supervision or instruction concerning the use of the appliance in a safe way and understand the hazards involved.
- Children between 3 and 8 years of age and persons with very extensive and complex disabilities shall be kept away from the appliance unless continuously supervised.
- Children of less than 3 years of age should be kept away from the appliance unless continuously supervised.
- Do not let children play with the appliance.
- Keep all packaging away from children and dispose of it appropriately.
- Keep detergents away from children.
- Keep children and pets away from the appliance when the door is open.
- If the appliance has a child safety device, it should be activated.
- Children shall not carry out cleaning and user maintenance of the appliance without supervision.
1.2 General Safety
- Do not change the specification of this appliance.
- If the tumble dryer is put on top of a washing machine, use the stacking kit. The stacking kit, available from your authorized vendor, can be used only with the appliance specified in the instructions supplied with the accessory. Read it carefully before installation (refer to the Installation leaflet).
- The appliance can be installed as freestanding or below a kitchen counter with correct space (refer to the Installation leaflet).
- Do not install the appliance behind a lockable door, a sliding door or a door with a hinge on the opposite side, that would prevent the appliance door from being fully open.
- The ventilation opening in the base must not be covered by a carpet, mat, or any floor covering.
- CAUTION: The appliance must not be supplied through an external switching device, such as a timer, or connected to a circuit that is regularly switched on and off by a utility.
- Connect the mains plug to the mains socket only at the end of the installation process. Make sure that the mains plug is accessible after installation.
- If the mains power supply cable is damaged, it must be replaced by the manufacturer, its Authorised Service Centre or similarly qualified persons to avoid an electrical hazard.
- Do not exceed the maximum load of 8,0 kg (refer to the "Programme chart" chapter).
- Do not use the appliance if items have been soiled with industrial chemicals.
- Wipe away lint or packaging debris that has accumulated around the appliance.
- Do not run the appliance without a filter. Clean the lint filter before or after each use.
-
Do not dry unwashed items in the tumble dryer.
-
Items that have been soiled with substances such as cooking oil, acetone, alcohol, petrol, kerosene, spot removers, turpentine, waxes and wax removers should be washed in hot water with an extra amount of detergent before being dried in the tumble dryer.
- Items such as foam rubber (latex foam), shower caps, waterproof textiles, rubber backed articles and clothes or pillows fitted with foam rubber pads should not be dried in the tumble dryer.
- Fabric softeners, or similar products, should only be used as specified by the product manufacturer's instructions.
- Remove all objects from items that could be a source of fire ignition such as lighters or matches.
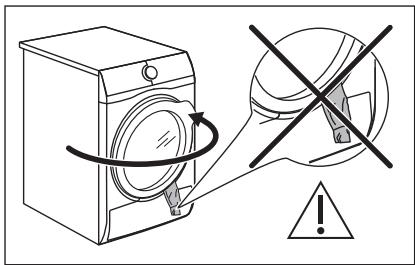
- WARNING: Never stop a tumble dryer before the end of the drying cycle unless all items are quickly removed and spread out so that the heat is dissipated.
- Before any maintenance operation, deactivate the appliance and disconnect the mains plug from the socket.
2. SAFETY INSTRUCTIONS
2.1 Installation
- Remove all the packaging.
- Do not install or use a damaged appliance.
- Follow the installation instructions supplied with the appliance.
- Always take care when moving the appliance as it is heavy. Always use safety gloves and enclosed footwear.
- Do not install or use the appliance where the temperature can be lower than 5°C or higher than 35°C.
- The floor area on which the appliance is to be installed must be flat, stable, heat resistant and clean.
- Make sure that there is air circulation between the appliance and the floor.
- Always keep the appliance vertical when it is being moved.
- The rear surface of the appliance must be put against a wall.
- When the appliance is in its permanent position, check if it is levelled correctly with the aid of a spirit level. If it is not, adjust the feet accordingly.
2.2 Electrical connection

WARNING!
Risk of fire and electric shock.
- Connect the mains plug to the mains socket only at the end of the installation. Make sure that there is access to the mains plug after the installation.
• The appliance must be earthed. - Make sure that the parameters on the rating plate are compatible with the electrical ratings of the mains power supply.
• Always use a correctly installed shockproof socket.
- Do not use multi-plug adapters and extension cables.
- Do not pull the mains cable to disconnect the appliance. Always pull the mains plug.
- Do not touch the mains cable or the mains plug with wet hands.
2.3 Use

WARNING!
Risk of injury, electric shock, fire, burns or damage to the appliance.
- This appliance is for household use only.
- Do not dry damaged (torn, frayed) items that contain padding or fillings.
- If laundry has been washed with a stain remover, carry out an additional rinse cycle before starting a drying cycle.
- Dry only fabrics that are suitable to dry in the appliance. Follow the cleaning instruction on the item label.
- Do not drink or prepare food with the condensed water/distilled water. It can cause health problems to people and pets.
- Do not sit or stand on the open door of the appliance.
- Do not dry dripping wet clothes in the appliance.
2.4 Care and cleaning

WARNING!
Risk of injury or damage to the appliance.
- Do not use water spray and steam to clean the appliance.
- Clean the appliance with a moist soft cloth. Use only neutral detergents. Do not use abrasive products, abrasive cleaning pads, solvents or metal objects.
- Be careful when you clean the appliance to prevent damage to the cooling system.
2.5 Compressor

WARNING!
Risk of damage to the appliance.
- The compressor and its system in the tumble dryer is filled with a special agent which is free from fluoro-chlorohydrocarbons. This system must stay tight. The damage of the system can cause a leakage.
2.6 Service
- To repair the appliance contact the Authorised Service Centre.
- Use original spare parts only.
2.7 Disposal

WARNING!
Risk of injury or suffocation.
- Disconnect the appliance from the mains electrical and water supplies.
- Cut off the mains electrical cable close to the appliance and dispose of it.
- Remove the door catch to prevent children or pets from becoming trapped in the drum.
- Dispose of the appliance in accordance with local requirements for the disposal of Waste Electrical and Electronic Equipment (WEEE).
3. PRODUCT DESCRIPTION
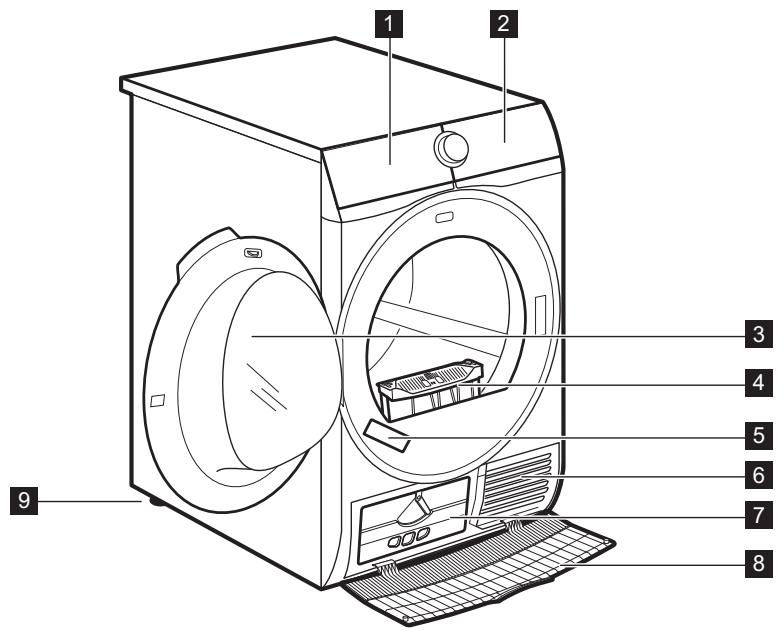
1 Water container
2 Control panel
3 Appliance door
4 Filter
5 Rating plate
6 Airflow slots
7 Condenser lid
8 Condenser cover
9 Adjustable feet

For ease of loading laundry or ease of installation the door is reversible. (see separate leaflet).
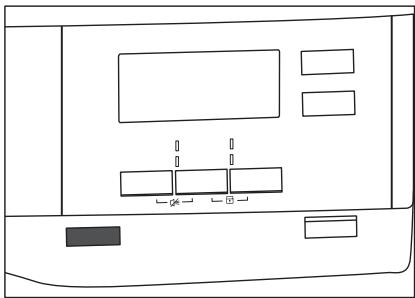
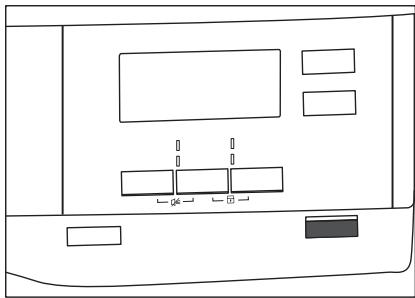
4. CONTROL PANEL
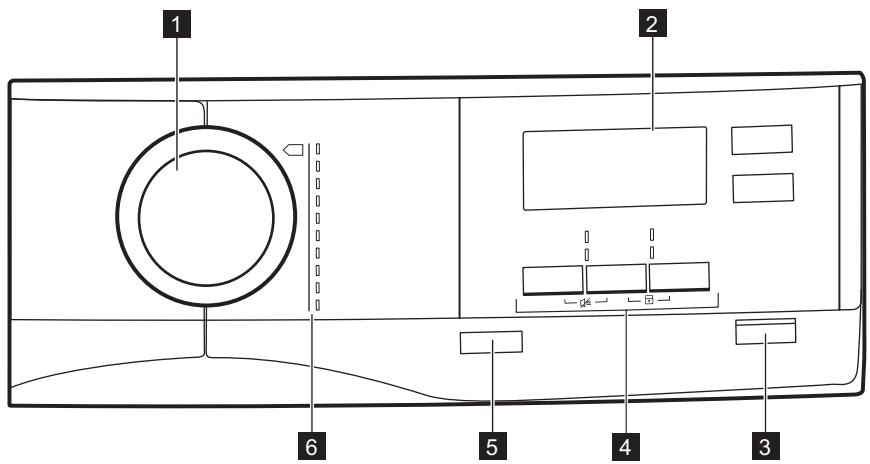
1 Program dial
2 Display
3 Inicio/Pausa button
4 Options
5 On/Off button with Auto Off function
6 Programs
4.1 Display
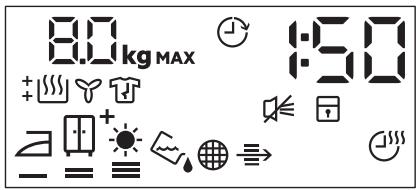
| Symbol on the display | Symbol description |
| 3.0_kg MAX | laundry maximum load |
| delay start option on | |
| 30' -20h | delay start selection (30min-20h) |
| 1:50 | cycle time indication |
| a | buzzer offchild lock on |
| laundry dryness: iron dry, cupboard dry, cupboard dry +, extra dry | |
| indicator: drain the water container | |
| indicator: clean the filter | |
| indicator: check the condenser | |
| time dry option on | |
| time programme selection (10min-2h) | |
| indicator: drying phase | |
| indicator: crease guard phase | |
| indicator: cooling phase |
5. PROGRAMA
| Programa | Load 1) | Properties / Fabric mark 2) | |
 3)Algod. Eco 3)Algod. Eco | 8,0 kg | Cycle to be used to dry cotton with "cotton cupboard" dryness level, / with maximum energy saving. | [20CS]  |
| Algod. | 8,0 kg | Cycle defined to dry cottons items of different size / different weaving altogether. | [007H]  |
| Sintéticos | 3,5 kg | Synthetic and mixed fabrics. | [KSXA] [CBYW] |
| Mix | 3 kg | Cotton and synthetic fabrics. | [77CT] [70X3] |
Lana/Lãs  | 1 kg |  The wool drying cycle of this machine has been approved by The Woolmark Company for the drying of wool garments labelled as "hand wash" provided that the garments are dried according to the instructions issued by the manufacturer of this machine. Follow the garment care label for other laundry instructions. M1641 The Woolmark symbol is a Certification mark in many countries. The wool drying cycle of this machine has been approved by The Woolmark Company for the drying of wool garments labelled as "hand wash" provided that the garments are dried according to the instructions issued by the manufacturer of this machine. Follow the garment care label for other laundry instructions. M1641 The Woolmark symbol is a Certification mark in many countries. | |
Seda  | 1 kg | Gentle drying of hand-washable silks. / [IMAGE] | |
| Ropa de cama/Lençóis | 3 kg | Bed linen such as single and double sheets, pillowcases, duvet cover. / [IMAGE] | |
| Fácil Plancha/Engomar | 1 kg (or 5 shirts) | Easy care fabrics for which a minimum of ironing is necessary. The drying results can be different from one type of fabric to another. Shake the items before putting them in the appliance. When the programme has ended, immediately remove the items and put them on a hanger. /  | |
| Outdoor [253H] | 2 kg | Outdoor clothing, technical, sports fabrics, waterproof and breathable jackets, shell jackets with a removable fleece or inner insulation. Suitable for drying in tumble dryer. / [IMAGE] | |
| Programa | Load 1) | Properties / Fabric mark 2) | |
| Edred. | 3 kg | Single or double duvets and pillows (with feather, down or synthetic fillings). |  |
1) The maximum weight refers to dry items.
2) For fabric mark meaning see chapter DAILY USE: Preparing the laundry.
3) The Algod. Eco programme is the "Standard cotton programme" according to Commission Regulation EU No. 392/2012. It is suitable for drying normal wet cotton laundry and it is the most efficient programme in terms of energy consumption for drying wet cotton laundry.
5.1 Programmes and options selection
| Programmes 1) | Options | |||
| Nivel de Sec. | Silencioso | Anti-arrugas/rugas | Tiempo/Tempo | |
| Algod. Eco | ■ | |||
| Algod. | ■ | ■ | ■ | ■ |
| Sintéticos | ■ 2) | ■ | ■ | ■ |
| Mix | ■ | ■ | ||
| Lana/Lãs 📄️ 📋 | ■ 3) | |||
| Seda 📋 | ■ | |||
| Ropa de cama/Lençois | ■ | |||
| Fácil Plancha/Engomar | ■ | |||
| Outdoor 🌐 | ||||
| Edred. | ||||
1) Together with the programme you can set 1 or more options.
2) 1^+ - cupboard dry+ of Nivel de Sec. level is not available with Sintéticos.
3) See chapter OPTIONS: Tiempo/Tempo on Lana/Lãs programme
1) For partial loads, the cycle time is shorter and appliance uses less energy.
2) Improper ambient temperature and/or poorly centrifuged laundry can prolong cycle time and increase the energy consumption.
5.2 Consumption data
| Program | Spun at / residual humidity | Drying time1) | Energy consumption2) |
| Algod. Eco 8,0 kg | |||
| seco armario | 1400 rpm / 50% | 156 min | 1,31 kWh |
| 1000 rpm / 60% | 173 min | 1,47 kWh | |
| Algod. 8,0 kg | |||
| seco plancha/engomar | 1400 rpm / 50% | 120 min | 0,94 kWh |
| 1000 rpm / 60% | 137 min | 1,12 kWh | |
| Algod. Eco 4,0 kg | |||
| seco armario | 1400 rpm / 50% | 93 min | 0,72 kWh |
| 1000 rpm / 60% | 105 min | 0,83 kWh | |
| Sintéticos 3,5 kg | |||
| seco armario | 1200 rpm / 40% | 65 min | 0,47 kWh |
| 800 rpm / 50% | 80 min | 0,60 kWh | |
6. OPTIONS
6.1 Nivel de Sec.
This option helps to achieve requested laundry dryness. Possible selections:
$$ \frac {\partial}{\partial t} = \equiv - \text { ready to iron - iron dry level. } $$
$$ \begin{array}{l} \text { - } \equiv \equiv \text {- ready to store - cupboard dry } \ \text { level - default selection which is related } \ \text { to the programme. } \end{array} $$
$$ \begin{array}{l} \text {- - } \stackrel {{\text { 回}}} {{=}} ^ {+} \equiv - \text { ready to store- cupboard dry } \ + \text { level. } \end{array} $$
$$ _ = \underset {\text {level.}} {\overset {\circledcirc} {\equiv}} - \text {ready to store - extra dry} $$
6.2 Silencioso
The appliance operates with low noise without effect on the drying quality. The appliance operates slowly with longer cycle time.
6.3 ECO
This option is on by default with all programs.
The power consumption is at the minimum level.
6.4 Anti-arrugas/rugas
Extends up to 120 minutes the anti-crease phase (30 minutes) at the end of the drying cycle. After drying phase drum rotates from time to time to prevent creases. Laundry can be removed during the anti-crease phase.
6.5 Tiempo/Tempo
For cottons, synthetics and mixed. Lets the user to set drying time from minimum 10 min to maximum of 2 hours (in 10 min steps). When this option is maximum, load indicator disappears.
6.6 Tiempo/Tempo on Lana/Lãs program
Option applicable to Lana/Lãs program to adjust final dryness level to more dry or less dry.
6.7 Inicio Diferido

Lets to delay the start of a drying program from minimum of 30 minutes to maximum of 20 hours.
7. BEFORE FIRST USE

Rear drum locks are removed automatically when dryer is activated for the first time. Possible to hear some noise.
To unlock the rear drum locks:
- Switch on the appliance.
- Set any programme.
- Press the Start/Pause button.
Drum starts to rotate. Rear drum locks are automatically deactivated.
Before you use the appliance to dry items:
- Clean the tumble dryer drum with a moist cloth.
- Start a 1 hour programme with moist laundry.

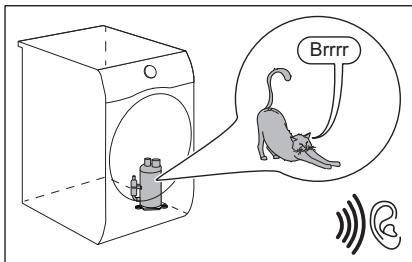
At the beginning of the drying cycle (first 3-5 min) there could be a slightly higher sound level. This is due to the compressor starting up. This is normal for compressor powered appliances such as refrigerators and freezers.
- Set the drying program and options.
- Touch Inicio Diferido button again and again.
Time of delay is on the display (e.g. 12
H if the program has to start after 12 hours.)
Time to start decreases on the display.
6.8 Alarm. — 咱 —
The sound is heard at the:
- cycle end
- start and end of crease guard phase The buzzer option is by default always on. You can use this option to activate or deactivate the sound.
7.1 Unusual smell
The appliance is tightly packed.
After product unpacking you can feel an unusual smell. This is normal for brand new products.
Appliance is built of several different types of material which all together can generate unusual smell.
Over usage time, after few drying cycles unusual smell gradually disappears.
7.2 Noises

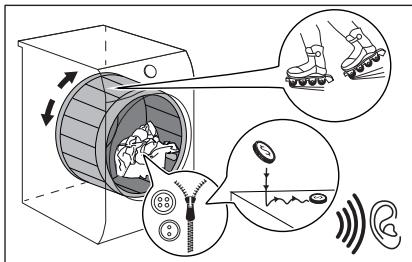
Different noises may be heard at different times during the drying cycle. They are perfectly normal operating sounds.
Working compressor.
Rotating drum.
Working pump and transferring condensation to the tank.
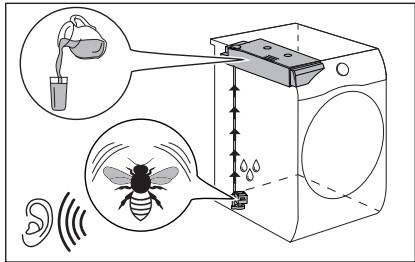
Working fans.
natural_image
Diagram of a hair dryer emitting sound waves from a fan, with no text or symbols present.8. DAILY USE
8.1 Preparing the laundry

Very often the clothes after washing cycle are kneaded and tangled altogether.
Drying kneaded and tangled clothes is inefficient.
To assure proper air flow and even drying it is recommended to shake and load one by one the clothes to the tumble dryer.
To assure proper drying process:
- Close the zips.
-
Close the fasteners of duvet covers.
-
Do not dry ties or ribbons loose (e.g. apron ribbons). Tie them before you start a programme.
- Remove all items from pockets.
- Turn items with the internal layer made of cotton inside out. Cotton layer must be faced outwards.
- Always set the programme suitable for the type of laundry.
- Do not put light and dark colours together.
- Use suitable programme for cottons, jersey and knitwear to reduce shrinkage.
-
Do not exceed the maximum load stated in the programmes chapter or shown on the display.
-
Dry only the laundry that is suitable for tumble drying. Refer to the fabric label on the items.
- Do not dry large and small items together. Small items can be trapped inside the large items and remain wet.
- Shake the large clothes, fabrics before placing in the tumble dryer. It is to avoid moist places inside the fabric after the drying cycle.
| Fabric label | Description |
| Laundry is suitable for tumble drying. | |
| Laundry is suitable for tumble drying at higher temperatures. | |
| Laundry is suitable for tumble drying at low temperatures only. | |
| Laundry is not suitable for tumble drying. |
8.2 Loading the laundry

CAUTION!
Ensure the laundry is not trapped between the appliance door and the rubber seal.
- Pull open the appliance door.
- Load the laundry one item at a time.
- Close the appliance door.
8.3 Turning on the appliance
natural_image
Line drawing of a device front panel with buttons and display (no text or symbols)To turn on the appliance:
Push the On/Off button.
If the appliance is on, some indicators appear on the display.
8.4 Auto Off function
To decrease the energy consumption, the Auto Off function turns the appliance off automatically:
- if the Inicio/Pausa touch button is not touched within 5 minutes.
- 5 minutes after a cycle ends.
Push the On/Off button to turn on the appliance.
If the appliance is on, some indications appear on the display.
8.5 Setting a programme
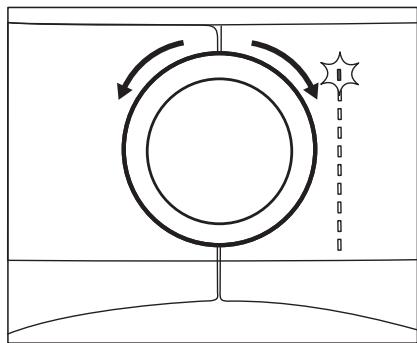
natural_image
Pure diagram of a circular object with arrows indicating rotation and a star symbol, no text or labels presentUse the programme dial to set the programme.
The approximate programme duration appears on the display.

Real drying time will depend on type of the load (quantity and composition), the room temperature and the humidity of your laundry after spin drying phase.
8.6 Options
Together with the programme you can set 1 or more special options.

natural_image
Line drawing of a device front panel with buttons and display (no text or symbols)To activate or deactivate an option touch the relevant button or a two button combination.
its symbol appears on the display or the led above the corresponding button lights up.
8.7 Child lock option
The child lock can be set to prevent children from playing with the appliance. The child lock option locks all touch buttons and the program dial (this option does not lock the On/Off button).
You can activate the child lock option:
- before you touch the Inicio/Pausa button - the appliance cannot start
- after you touch the Inicio/Pausa button - programs and option selection is unavailable.
Child lock option activation:
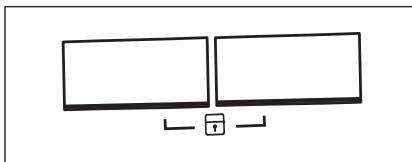
natural_image
Simple line drawing of two rectangular screens with a lock icon below (no text or symbols)- Turn the dryer on.
- Select 1 of the available programs.
- Touch and hold down 2 buttons at the same time.
The symbol 🔒 appears on the display.
- To deactivate the child lock, touch the above buttons again until the symbol disappears.
8.8 Starting a program
natural_image
Line drawing of a device front panel with buttons and display areas (no text or symbols)To start the program:
The appliance starts and the LED above the button stops flashing and stays on.
8.9 Program change
To change a program:
- Push the On/Off button to turn the appliance off.
- Push the On/Off button again to turn on the appliance.
- Set a new program.
8.10 Programme end

Clean the filter and drain the water container after each drying cycle. (See chapter CARE AND CLEANING.)
If the drying cycle is finished, the symbol
☐ appears on the display. If the Alarm option is activated, the acoustic signal sounds intermittently for 1 minute.

If you do not turn off the appliance, the anti-crease phase starts (not active with all programmes). Flashing symbol signals the execution of the anti-crease phase. Laundry can be removed during this phase.
To remove the laundry:
- Push the On/Off button for 2 seconds to turn the appliance off.
9. HINTS AND TIPS
9.1 Ecological hints
- Spin the laundry well before drying.
- Do not exceed the load sizes which are specified in the programmes chapter.
- Clean the filter after each drying cycle.
- Do not use fabric softener to wash and then dry. In the tumble dryer laundry becomes soft automatically.
- The water from the water container can be used to iron the clothes. You must first filter the water to eliminate remaining textile fibres (simple coffee filter is suitable).
- Always keep the airflow slots at the bottom of the appliance clear.
- Make sure there is good airflow where the appliance is to be installed.
9.2 Adjustment of default dryness level
To change the default dryness level:
- Turn the appliance on.
- Wait approximately 8 seconds.
- Select 1 of the available programmes.
- Touch and hold down the Nivel de Sec. and Anti-arrugas/rugas buttons at the same time.
One of the symbols appears on the display:
CO- - Maximum dryness
[0= - Extra dryness
COE - Standard dryness
- Open the appliance door.
- Remove the laundry.
- Close the appliance door.
Possible causes of unsatisfactory drying results: - Inadequate default dryness level settings. See chapter Adjustment of default dryness level
-
Room temperature is too low or too high. Optimal room temperature is between 19°-24°C.
-
Touch the Inicio/Pausa button repeatedly until you reach the desired dryness level.
| Dryness level | Display symbol | |
| Maximum dryness | +### | [0- |
| Extra dryness | +### | [0= |
| Standard dryness | ### | [0= |
- To memorise the setting touch and hold down the Nivel de Sec. and Anti-arrugas/rugas buttons at the same time for approximately 2 seconds.
9.3 Deactivating the tank indicator
The water container indicator is activated by default. It illuminates at the end of the drying cycle or during the cycle if the water reservoir is full. If the draining kit is installed the water container is drained automatically and the indicator can be deactivated.
To deactivate the indicator:
- Turn the appliance on.
- Wait approximately 8 seconds.
-
Select 1 of the available programmes.
-
Touch and hold down Anti-arrugas/rugas and Tiempo/Tempo buttons at the same time.
One of 2 configurations is possible:
- the tanque/depósito indicator: 📋 is on if the symbol ____ appears - the water container
10. CARE AND CLEANING
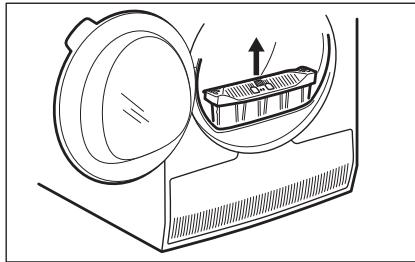
10.1 Cleaning the filter
At the end of each cycle the ⚙ filtro symbol comes on the display and you must clean the filter.

The filter collects the lint during the drying cycle.

To achieve the best drying performances clean the filter regularly, clogged filter lead to longer cycles and energy consumption increase. Use your hand to clean the filter, and if necessary, a vacuum cleaner.

CAUTION!
Avoid the use of water to clean the filter. Instead throw away lint in the dustbin ( avoid dispersion of plastic fiber in water ambient).
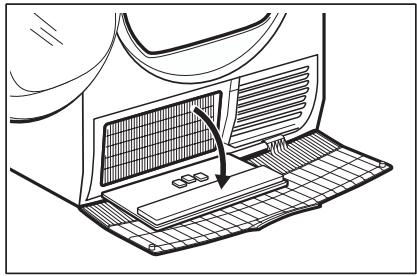
- Open the door. Pull the filter up.
natural_image
Line drawing of a mechanical device with a lid and internal component, no text or symbols present- Push the hook to open the filter.
indicator is permanently activated
- the tanque/depósito indicator: 📋, is off if the symbol ____☐ appears - the water container indicator is permanently deactivated
natural_image
Line drawing of a hand inserting a grid into an open device (no text or symbols)- Gather lint with hand from both internal parts of the filter.
natural_image
Line drawing of a hand using a griddle to clean or store items (no text or symbols)Throw the lint in the dustbin.
- If necessary, clean the filter with a vacuum cleaner. Close the filter.
- If necessary, remove lint from the filter socket and gasket. You can use a vacuum cleaner. Place the filter back inside the filter socket.
natural_image
Line drawing of a hand holding a tool interacting with a car wheel (no text or symbols)10.2 Emptying the water container
Empty the condensed water container after each drying cycle.
If the condensed water container is full, the programme stops automatically. The
tanque/depósito symbol comes on the display and you must empty the water container.
To empty the water container:
- Pull the water container out keeping it in a horizontal position.

natural_image
Line drawing of hands inserting a device into a cabinet (no text or symbols)- Pull the plastic connection out and drain the water into a basin or equivalent receptacle.
natural_image
Line drawing of a hand using a tool to cut or mark a component on a surface (no text or symbols)-
Push the plastic connection back in and place the water container back into position.
-
To continue the programme press the Inicio/Pausa button.
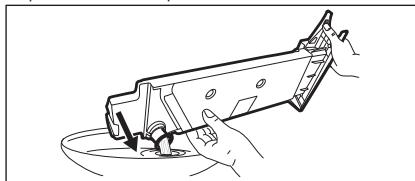
10.3 Cleaning the condenser
If the symbol condensador flashes on the display, inspect the condenser and its compartment. If it is dirty, clean it. Do the check not less than once a 6 months.

WARNING!
Do not touch the metal surface with bare hands. Risk of injury. Wear protective gloves. Clean carefully to avoid damaging the metal surface.
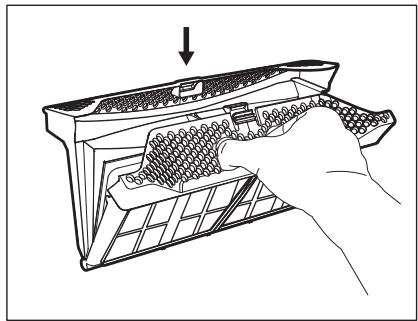
To inspect:
- Open the door. Pull the filter up.

natural_image
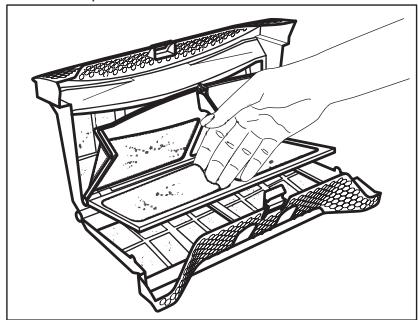
Diagram of a mechanical device with a lid and internal component, showing motion direction (no text or symbols)- Open the condenser cover.
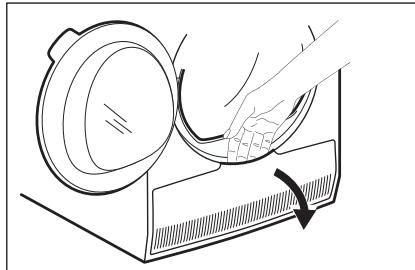
natural_image
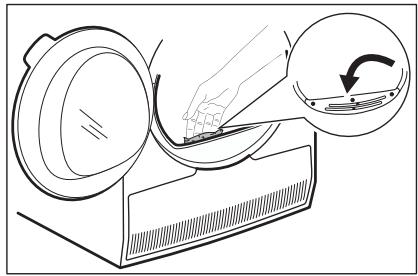
Line drawing of a hand cleaning a small object on a device (no text or symbols)- Turn the lever to unlock the condenser lid.
natural_image
Line drawing of a laptop with a screen showing a directional arrow and grid base (no text or symbols)- Lower the condenser lid.
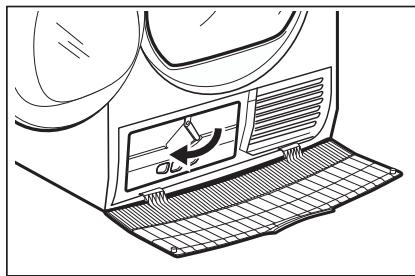
natural_image
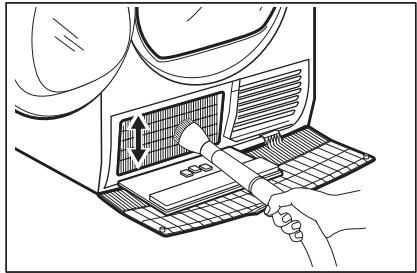
Line drawing of a computer ventilation system with airflow path and grid base (no text or symbols)- If necessary, remove the fluff from the condenser and its compartment. You can use a wet cloth and/or a vacuum cleaner with a brush attachment.
natural_image
Line drawing of a hand inserting a device into a rack with a mesh panel (no text or symbols)-
Close the condenser lid.
-
Turn the lever until it clicks into position.
-
Put the filter back.
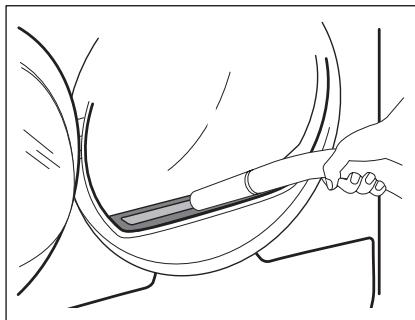
10.4 Cleaning the humidity sensor

CAUTION!
Risk of humidity sensor damage. Do not use abrasive materials or steel wool to clean the sensor.
To assure best drying results the appliance is equipped with metal humidity sensor. It is placed on the inner side of the door area.
Over usage time the surface of the sensor may get dirty what deteriorates the drying performance.
We recommend to clean the sensor at least 3 or 4 times or if you observe the drop of drying performance.
To clean you can use harder side of dish-washing sponge and bit of vinegar or dish soap.
To clean the sensor:
- Open the loading door.
- Clean the surfaces of the humidity sensor wiping off the metal surface several times.
natural_image
Diagram showing a hand pressing down on a device with a magnified inset illustrating the process (no text or symbols present)10.5 Cleaning the drum

WARNING!
Disconnect the appliance before you clean it.
Use a standard neutral soap detergent to clean the inner surface of the drum and drum lifters. Dry the cleaned surfaces with a soft cloth.

CAUTION!
Do not use abrasive materials or steel wool to clean the drum.
10.6 Cleaning the control panel and housing
Use a standard neutral soap detergent to clean the control panel and housing.
Use a moist cloth to clean. Dry the cleaned surfaces with a soft cloth.

CAUTION!
Do not use furniture cleaning agents or cleaning agents which can cause corrosion.
10.7 Cleaning the airflow slots
Use a vacuum cleaner to remove fluff from the airflow slots.
- TROUBLESHOOTING
| Problem 1) | Possible cause | Remedy |
| The tumble dry-er does not operate. | The tumble dryer is not connected to the mains supply. | Connect it to the mains socket.Check the fuse in the fuse box (domestic installation). |
| The door is open. | Close the door. | |
| The On/Off button was not pushed. | Push the On/Off button. | |
| The Inicio/Pausa button was not touched. | Touch the Inicio/Pausa button. | |
| The appliance is in standby mode. | Push the On/Off button. | |
| Unsatisfactory drying result. | Incorrect programme selection. | Select a suitable programme.2) |
| The filter is clogged. | Clean the filter.3) | |
| Nivel de Sec. option was set to seco plancha/engomar.4) | Change Nivel de Sec. option to a higher level. | |
| The load was too large. | Do not exceed the maximum load size. | |
| The airflow slots are clogged. | Clean the airflow slots at the bottom of the appliance. | |
| There is some dirt on the humidity sensor in the drum. | Clean the front surface of the drum. | |
| The dryness level was not set to the desired level. | Adjust the dryness level.5) | |
| The condenser is clogged. | Clean the condenser.3) | |
| The loading door does not close | The filter is not locked into position. | Put the filter in the correct position. |
| Laundry is trapped between the door and the seal. | Remove trapped items and close the door. | |
| It is not possible to change the programme or option. | After a cycle starts it is not possible to change the programme or option. | Turn the tumble dryer off and on.Change the programme or option as required. |
| It is not possible to select an option. An acoustic signal is emitted. | The option you tried to select is not available for the selected programme. | Turn the tumble dryer off and on.Change the programme or option as required. |
| Unexpected duration time appears on the display. | The drying duration is calculated according to load size and dampness. | This is automated - the appliance is working correctly. |
| A programme is inactive. | The water container is full. | Drain the water container, push the Inicio/Pausa button. 3) |
| The drying cycle is too short. | The load size is small. | Select a time programme. The time value must be related to the load. To dry one item or a small amount of laundry we recommend short drying times. |
| The laundry is too dry. | Select an appropriate time programme or a higher dryness level (e.g. extra seco) | |
| Drying cycle too long 6) | The filter is clogged. | Clean the filter. |
| The load is too large. | Do not exceed the maximum load size. | |
| The laundry was not spun sufficiently. | Spin the laundry well in the washing machine. | |
| Too low or too high room temperature - this is not the appliance malfunction. | Ensure a room temperature higher than +5°C and lower than +35°C. Optimal room temperature to achieve best drying results is between 19°-24°C. |
1) If there is an error message on the display (e.g. E51): Turn the tumble dryer off and on. Select a new programme. Touch the Start/Pause button. If the appliance does not operate contact the service centre and provide the error code.
2) Follow the programme description — see the PROGRAMMES chapter.
3) See the CARE AND CLEANING chapter.
4) Only dryers with the Nivel de Sec. option.
5) See the HINTS AND TIPS chapter.
6) Note: After a maximum of 5 hours the drying cycle ends automatically.
11.1 Possible causes of unsatisfactory drying results:
- The filter is clogged. Clogged filter makes drying inefficient.
• The airflow slots are clogged.
• The humidity sensor is dirty. -
The drum is dirty.
-
Inadequate default dryness level settings. See chapter Adjustment of default dryness level
-
Room temperature is too low or too high. Optimal room temperature is between 19^-24^ .
-
TECHNICAL DATA
| Height x Width x Depth | 850 x 596 x 638 mm (maximal 663 mm) |
| Max. depth with the appliance door open | 1108 mm |
| Max. width with the appliance door open | 958 mm |
| Adjustable height | 850 mm (+ 15 mm - feet regulation) |
| Drum volume | 118 l |
| Maximum load volume | 8,0 kg |
| Voltage | 230 V |
| Frequency | 50 Hz |
| Sound power level | 65 dB |
| Total power | 700 W |
| Energy efficiency class | A+++ |
| Energy consumption on the standard cotton programme with the full load. 1) | 1,47 kWh |
| Energy consumption on the standard cotton programme with the partial load. 2) | 0,83 kWh |
| Annual energy consumption 3) | 176,50 kWh |
| Left-on mode power absorption 4) | 0,05 W |
| Off mode power absorption 4) | 0,05 W |
| Type of use | Household |
| Allowed ambient temperature | + 5°C to + 35°C |
| Level of protection against ingress of solid particles and moisture ensured by the protective cover, except where the low voltage equipment has no protection against moisture | IPX4 |
| This product contains fluorinated greenhouse gases, hermetically sealed | |
| Gas designation | R134a |
| Weight | 0,28 kg |
Global-warming potential (GWP)
1430
1) With reference to EN 61121. 8,0 kg of cotton centrifuged at 1000 rpm.
2) With reference to EN 61121. 4,0 kg of cotton centrifuged at 1000 rpm.
3) Energy consumption per year in kWh, based on 160 drying cycles of the standard cotton programme at full and partial load, and the consumption of the low-power modes. Actual energy consumption per cycle will depend on how the appliance is used (REGULATION (EU) No. 392/2012).
4) With reference to EN 61121.
The information given in the chart above is compliant with the EU Commission regulation 392/2012 implementing directive 2009/125/EC.
13. ACCESSORIES
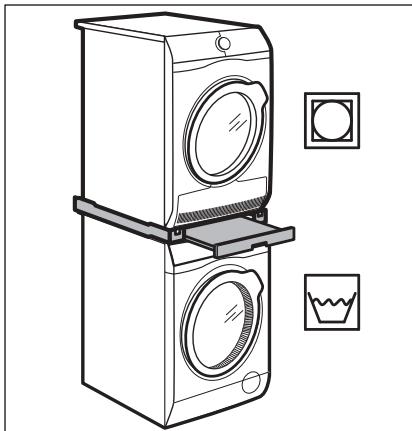
13.1 Stacking kit
natural_image
Line drawing of a two-tier washing machine with front-mounted screens and side-mounted washers, accompanied by decorative icons (no text or symbols)Accessory name: SKP11GW, STA9GW
Available from your authorised vendor.
Stacking kit can be used only between washing machines and tumble dryers specified in the leaflet. See the leaflet attached.
Read carefully the instructions supplied with the accessory.
13.2 Draining kit
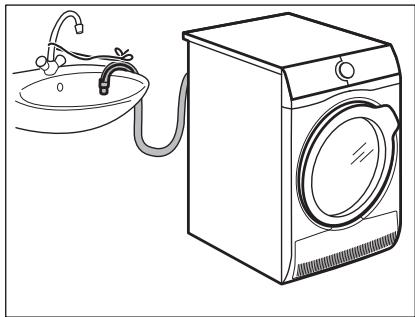
natural_image
Line drawing of a washing machine with a sink and pipe, no text or symbols presentAccessory name: DK11.
Available from your authorised vendor (can be attached to some types of tumble dryer)
For thorough draining of the condensed water into a basin, siphon, gully, etc. After installation, the water container is drained automatically. The water container must stay in the appliance.
The installed hose must be minimum 50 cm to maximum 100 cm from floor level. The hose cannot be in a loop. Decrease the length of the hose if necessary.
Read carefully the instructions supplied with the accessory.
13.3 Pedestal with drawer
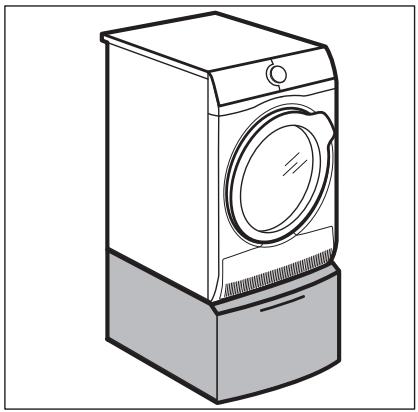
natural_image
Line drawing of a washing machine with front panel and side base (no text or symbols)Accessory name: PDSTP10, E6WHPED2.
Available from your authorised vendor.
For increasing the height of the appliance in order to ease loading and unloading of laundry.
The drawer can be used for laundry storage e.g. : towels, cleaning products etc.
Read carefully the instructions supplied with the accessory.
14. QUICK GUIDE
14.1 Daily use
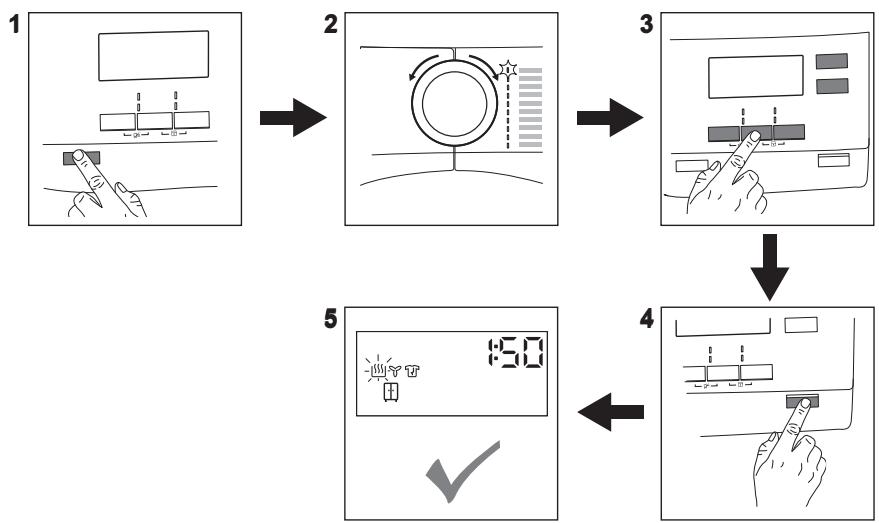
flowchart
graph TD
    A["Step 1: Hand gesture with blocks"] --> B["Step 2: Circular adjustment icon"]
    B --> C["Step 3: Screen display with buttons"]
    C --> D["Step 4: Button press with scroll"]
    D --> E["Step 5: Display screen reading '50'"]
    E --> F["Next Step: Check ✓"]
- Push the On/Off button to turn on the appliance.
- Use the programme dial to set the programme.
-
To activate or deactivate an option touch the relevant button or 2 buttons combination.
-
Touch the Inicio/Pausa button.
-
The appliance starts.
14.2 Cleaning the filter
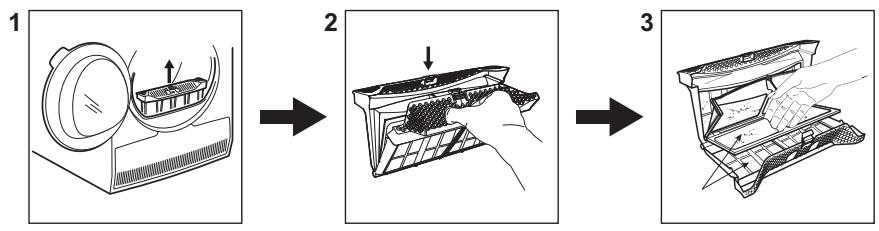
At the end of each cycle the Ⓗ filtro symbol comes on the display and you must clean the filter.
-
Open the door. Pull the filter up.
-
Push the hook to open the filter.
- Gather lint with hand from both internal parts of the filter. Throw the lint in the dustbin.
14.3 Programa
1) The maximum weight refers to dry items.
| Programa | Load 1) | Properties / Fabric mark [IMAGE] |
 Algod. Eco Algod. Eco | 8,0 kg | Cycle to be used to dry cotton with "cotton cup-board" dryness level, with maximum energy saving. |
| Algod. | 8,0 kg | Cycle defined to dry cottons items of different size / different weaving altogether. |
| Sintéticos | 3,5 kg | Synthetic and mixed fabrics. |
| Mix | 3 kg | Cotton and synthetic fabrics. |
Lana/Lãs   | 1 kg | Woollen fabrics. Gentle drying for hand-washable woollens. Remove items immediately when the programme is completed. |
Seda  | 1 kg | Gentle drying of hand-washable silks. |
| Ropa de cama/Lençóis | 3 kg | Bed linen such as single and double sheets, pillow-cases, duvet cover. |
| Fácil Plancha/Engomar |  |  |
Outdoor  | 2 kg | Outdoor clothing, technical, sports fabrics, water-proof and breathable jackets, shell jackets with a removable fleece or inner insulation. Suitable for drying in tumble dryer. |
| Programa | Load 1) | Properties / Fabric mark ☐ ☐ ☐ |
| Edred. | 3 kg | Single or double duvets and pillows (with feather, down or synthetic fillings). |
Algod. Eco
Seda
Fácil Plancha/Engomar
Outdoor
2 kg
Outdoor clothing, technical, sports fabrics, waterproof and breathable jackets, shell jackets with a removable fleece or inner insulation. Suitable for drying in tumble dryer.
15. PRODUCT INFORMATION SHEET IN REFERENCE TO E.U. REGULATION 1369/2017
| Product Information Sheet | |
| Trade Mark | AEG |
| Model | T8DBG861PNC916098850 |
| Rated capacity in kg | 8,0 |
| Air vented or condenser tumble dryer | Condenser |
| Energy efficiency class | A+++ |
| Energy consumption in kWh per year, based on 160 drying cycles of the standard cotton programme at full and partial load, and the consumption of the low-power modes. Actual energy consumption per cycle will depend on how the appliance is used. | 176,50 |
| Automatic tumble drier or non-automatic tumble drier | Automatic |
| Energy consumption of the standard cotton programme at full load in kWh | 1,47 |
| Energy consumption of the standard cotton programme at partial load in kWh | 0,83 |
| Power consumption of the off-mode in W | 0,05 |
| Power consumption in left-on mode in W | 0,05 |
| Duration of the left on mode in minutes | 10 |
| The 'standard cotton programme' used at full and partial load is the standard drying programme to which the information in the label and the fiche relates, this programme is suitable for drying normal wet cotton laundry and it is the most efficient programme in terms of energy consumption for cotton. | |
| Weighted programme time of the 'standard cotton programme at full and partial load' in minutes | 134 |
| Programme time of the 'standard cotton programme at full load' in minutes | 173 |
| Programme time of the 'standard cotton programme at partial load' in minutes | 105 |
| Condensation efficiency class on a scale from G (least efficient) to A (most efficient) | B |
| Average condensation efficiency of the standard cotton programme at full load as a percentage | 86 |
| Average condensation efficiency of the standard cotton programme at partial load as a percentage | 86 |
| Weighted condensation efficiency for the 'standard cotton programme at full and partial load' | 86 |
| Sound power level in dB | 65 |
| Built in appliance Y/N | No |
The information given in the chart above is compliant with the EU Commission regulation 392/2012 implementing directive 2009/125/EC.
16. ENVIRONMENTAL CONCERNS
Recycle materials with the symbol 📊. Put the packaging in relevant containers to recycle it. Help protect the environment and human health by recycling waste of electrical and electronic appliances. Do not dispose of
appliances marked with the symbol 📄 with the household waste. Return the product to your local recycling facility or contact your municipal office.
CE

- CONTENTS
- FOR PERFECT RESULTS
- CUSTOMER CARE AND SERVICE
- ⚠️ SAFETY INFORMATION
- Children and vulnerable people safety
- WARNING!
- General Safety
- SAFETY INSTRUCTIONS
- Installation
- Electrical connection
- Use
- Care and cleaning
- Compressor
- Service
- Disposal
- PRODUCT DESCRIPTION
- CONTROL PANEL
- Display
- PROGRAMA
- OPTIONS
- Nivel de Sec.
- Silencioso
- ECO
- Anti-arrugas/rugas
- Tiempo/Tempo
- Tiempo/Tempo on Lana/Lãs program
- Inicio Diferido
- BEFORE FIRST USE
- To unlock the rear drum locks:
- Before you use the appliance to dry items:
- Alarm. — 咱 —
- Unusual smell
- Noises
- Working compressor.
- DAILY USE
- Preparing the laundry
- Loading the laundry
- CAUTION!
- Turning on the appliance
- Auto Off function
- Setting a programme
- Options
- Child lock option
- Starting a program
- Program change
- Programme end
- HINTS AND TIPS
- Ecological hints
- Adjustment of default dryness level
- Deactivating the tank indicator
- CARE AND CLEANING
- Cleaning the filter
- Emptying the water container
- Cleaning the condenser
- Cleaning the humidity sensor
- Cleaning the drum
- Cleaning the control panel and housing
- Cleaning the airflow slots
- Possible causes of unsatisfactory drying results:
- Global-warming potential (GWP)
- ACCESSORIES
- Stacking kit
- Draining kit
- QUICK GUIDE
- Cleaning the filter
- Programa
- PRODUCT INFORMATION SHEET IN REFERENCE TO E.U. REGULATION 1369/2017
- ENVIRONMENTAL CONCERNS
Brand : AEG-ELECTROLUX
Model : T8DBG861
Category : Tumble dryer