USER MANUAL OPTI-SILENCE - OPTI-SILENCE VALBERG

natural_image
Line drawing of a vacuum cleaner with a black arrow indicating motion (no text or symbols)
| FR | CONDITION DE GARANTIE
Ce produit est garanti pour une période de 2 ans à partir de la date d'achat*, contre toute défaillance résultant d'un vice de fabrication ou de matériau. Cette garantie ne couvre pas les vices ou les dommages résultant d'une mauvaise installation, d'une utilisation incorrecte ou de l'usure anormale du produit.
*sur présentation du ticket de caisse. | 2/2 |
| EN | WARRANTY CONDITIONS
This product is guaranteed against faults caused by defects in manufacturing or the materials used for a period of two years, starting from the date of purchase.* This warranty does not cover defects or damage caused by failure to install the device correctly, incorrect use of the product, or excessive wear and tear.
*proof of purchase required. | Aspirateur
Vacuum Cleaner
Stofzuiger
Aspirador |
| NL | GARANTIEVOORWAARDEN
Dit product wordt gegarandeerd voor een periode van 2 jaar vanaf de aankoopdatum*, voor elke storing die het gevolg is van een fabricagefout of het materiaal. Gebreken of schade door slechte installatie, onjuist gebruik of abnormale slijtage van het product worden niet gedekt door deze garantie.
*op vertoon van kassabon. |
| ES | CONDICIONES DE GARANTÍA
El certificado de garantía de este producto tiene una duración de 2 años a partir de la fecha de compra* que se limita a los defectos de fabricación y averías del material. Se excluyen de la garantía deficiencias o daños originados por una mala instalación, errores en la manipulación o por un uso inadecuado.
*previa presentación del comprobante de compra. | 970398 - OPTISILENCE |
04/2021-01
CONSIGNES D'UTILISATION 02
INSTRUCTIONS FOR USE 12
VALBERG

natural_image
Line drawing of a circular mechanical device with a handle and sensor port (no text or symbols)

natural_image
Line drawing of a cylindrical device with a handle and internal component (no text or symbols)
natural_image
Technical line drawing of a car interior with labeled components (R, S, T), showing exploded and assembled views (no text or symbols beyond labels)

natural_image
Pure diagram of a cylindrical object with internal parallel lines, no text or symbols present
natural_image
Technical line drawing of a mechanical component with no visible text or symbols
natural_image
Technical line drawings of a medical or laboratory device, showing a pin-like structure and a mechanical component (no text or symbols)
Merci !
Thank you for choosing this VALBERG product.
VALBERG products are chosen, tested, and recommended by ELECTRO DEPOT, so you can be sure you are getting a top-quality, easy-to-use product that won't let you down.
We're confident your new device will be a pleasure to use every day!
Welcome to ELECTRO DEPOT.
Table of Contents

Product overview
Parts
Product overview
Intended use
Specifications

Product usage
Assembly/Disassembly
Operation

Cleaning and maintenance
Cleaning and maintenance
Troubleshooting
Storage
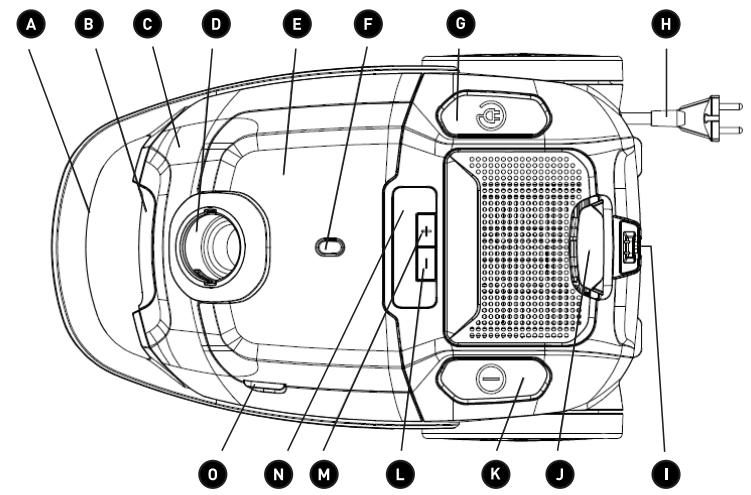
Parts
A Handle
B Dust cup release latch
C Front cover (houses the dust cup).
D Hose-connecting inlet
E Attachment storage area
Full dust cup indicator
G Power cable rewind button
H Power cable and plug
Floor brush storage slot
Air outlet release latch
K ON/OFF button
“-” button to reduce the suction power
“+” button to increase the suction power
N Suction levels for various surfaces
Access to the attachment storage area
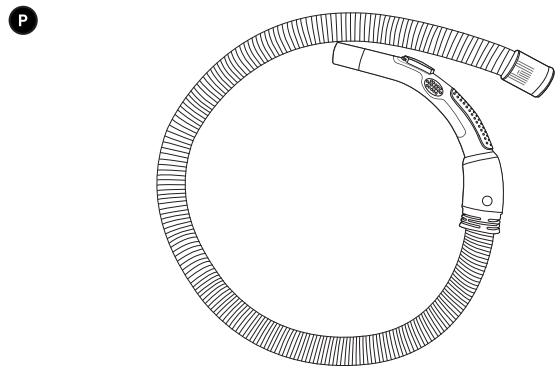
P Flexible hose
Q Metal extension tube (telescopic)
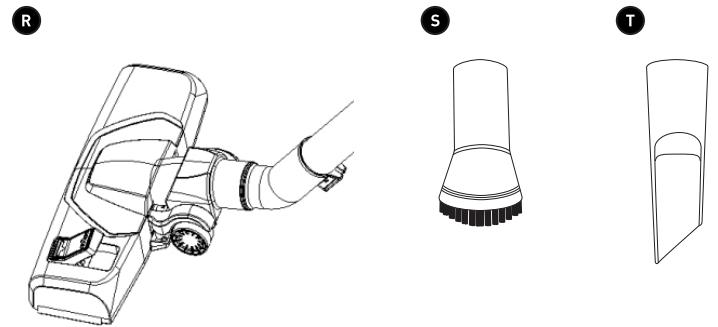
R Floor brush (smooth floors and carpets)
Round brush (for animal hair on rugs and cushions)
T Crevice tool (for crevices and recesses)
Long crevice tool (for hard-to-reach places)
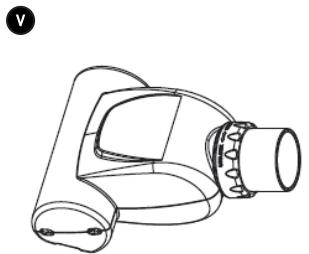
Mini turbo brush (to remove stubborn dirt from furniture, smooth floors and carpets)
Product overview
- Unpack and remove all labels from the unit. Please check that all of the unit's parts are included and intact. If the unit is damaged or faulty, do not use it and take it to your retailer or after-sales service centre.
- Keep all packaging out of the reach of children. There is a risk of accidents if children play with packaging materials.
Intended use
- This vacuum cleaner is for household use only. It has not been designed for industrial or professional use by cleaning companies.
• Any other use may damage the unit or cause injury.
Specifications
| Model: | 970398 - OPTISILENCE |
| Vacuum cleaner |
| Power: | 800 W max. |
| Dust cup capacity: | 2.1 L |
| Noise level: | 66 dB |
| Suction power: | 190 W |
| Pressure: | 22.5 kPa |
| Operating voltage: | 220-240 V ~, 50/60 Hz |
| Protection class: | Class II |
Assembly/Disassembly
To assemble
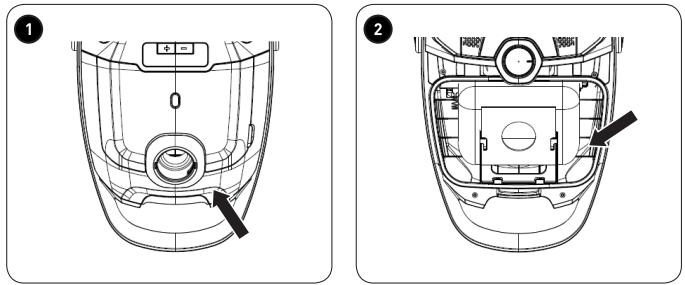
1 To install a dust bag, press the dust cup release latch and lift up the front cover.
2 Insert the dust bag into the corresponding housing, then slide the cardboard top into the slot holder.
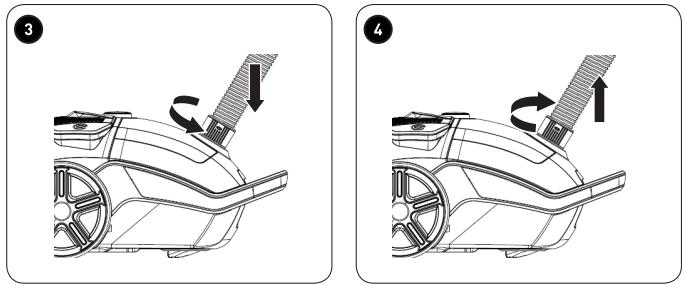
3 Insert the flexible hose into the hose-connecting inlet on the unit's body and then turn it clockwise to secure it in place.
4 To disassemble the hose, turn it anticlockwise to release and remove it.
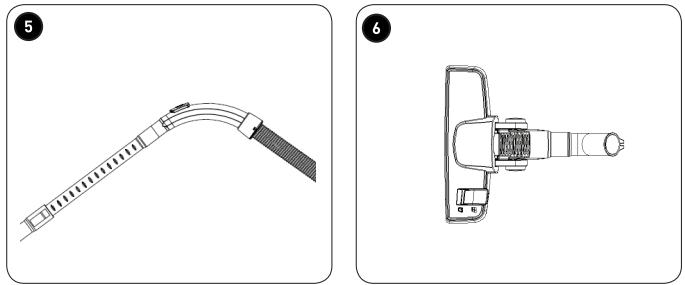
5 Insert the metal tube into the flexible hose. To adjust the length of the metal tube, push the pushbutton backwards and extend the tube.
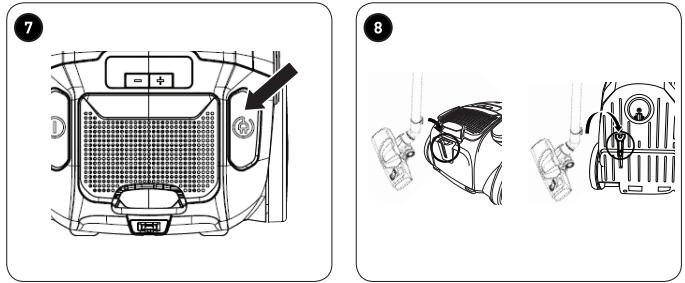
6 Fit one of the following attachments by inserting it into the metal tube or flexible hose.
• Floor brush for various types of flooring.
- Press the pedal to retract the brush (for carpets) or extend it (for smooth floors).
- Mini turbo brush for furniture
• Round brush for animal hair
• Crevice tool for crevices, recesses and edges
• Long crevice tool for hard-to-reach places
- The round brush and crevice tool are stored in the attachment compartment.
- Lift the attachment compartment lid (0) to open it.
Insert the plug into the mains socket.
- The power cable can be extended up to the yellow mark. If the red mark is visible, then you have pulled the cable out too far.
To disassemble
• Make sure the unit is turned off and disconnect the plug from the mains socket.
- Detach the brush, crevice tools and tubes by twisting to pull them apart.
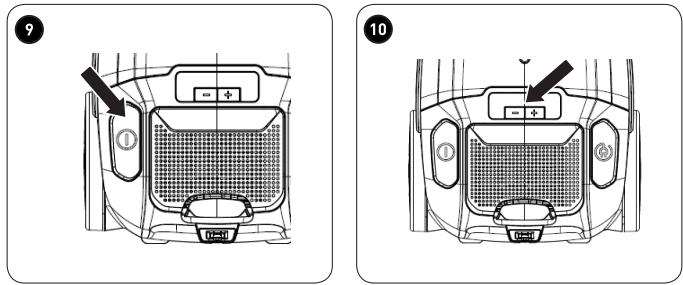
7 Press the cable rewind button to store the cable away.
8 Insert the floor brush into the back of the unit for easy storage.
Operation
- Once the unit has been assembled and plugged in, it is ready for use.
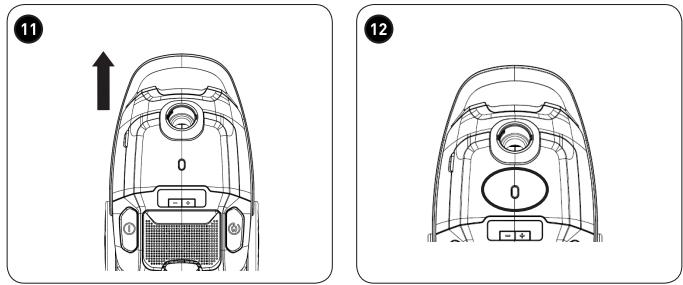
9 Press the ON/OFF button to turn the unit on or off.
10 Press the + or - button to increase or decrease the level of suction.
The symbols indicated on the vacuum cleaner are as follows:
| Curtains, textiles (lowest setting) |
| Sofas, cushions |
| Normal carpet |
| Thick carpet |
| Wooden, stone or other flooring (highest setting) |
11 Use the handle to carry the vacuum.
Cleaning and maintenance

WARNING!
Cleaning the dust cup and filters
12 The dust bag is full when the red dust bag indicator is lit, or the suction power decreases.
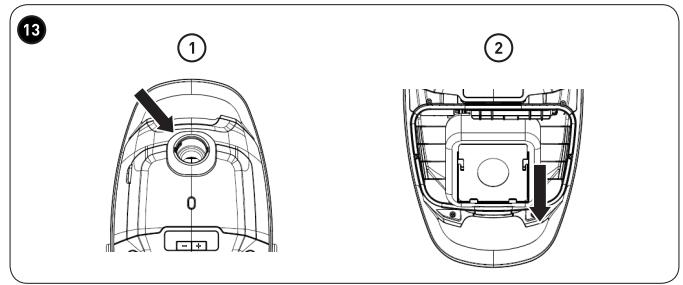
13 ① Press the dust cup release latch and lift up the front cover.
② Remove the dust bag by sliding it out of the slot holder, then dispose of it in a bin.

NOTE:
The front cover will not close if a dust bag hasn't been fitted.
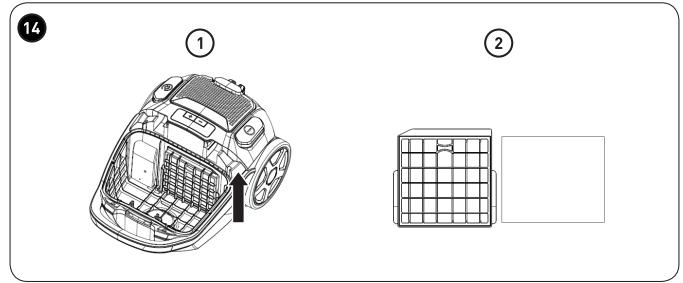
14 ① Remove the filter holder.
② Remove the filter located inside the holder.
C
Cleaning and maintenance
- Wipe the dust cup and filter with a dry cloth.
- The filter can be cleaned under running water.
Cleaning the air outlet filter
15 ① Lift up the air outlet lid to open it.
② Press the pushbutton backwards to remove the HEPA filter.
- The HEPA filter can be cleaned under running water.
- Let all the parts dry.

WARNING!
To avoid damaging the unit, only use and insert dry filters!
- Reassemble all the parts in reverse order.
Disassembling and cleaning the brushes Floor brush:
16 Detach the brush from the tube.
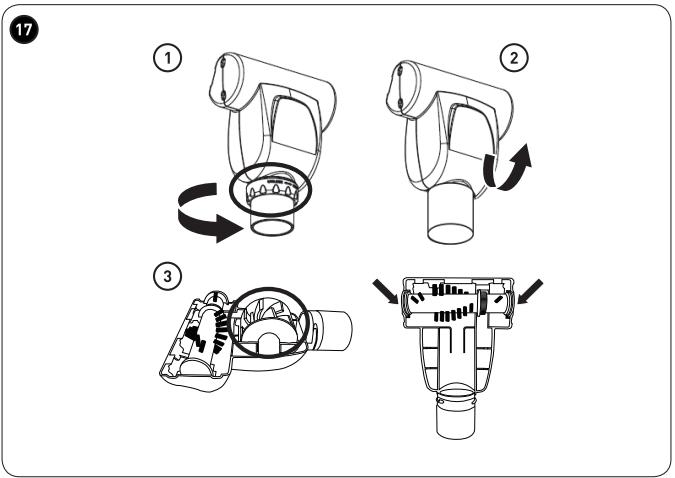
Mini turbo brush:
17 ① Detach the brush from the tube and remove the locking system.
② Lift up the transparent cover.
③ Remove the roller and gently pull the brush out.
- Clean the brush bristles. Let them dry completely.
- Reposition the brush and re-attach the locking system.
Troubleshooting
| Problem | Possible Cause | Solution |
| The unit does not work. | The unit is not connected to the mains socket. | Securely insert the plug into the mains socket. Press the power button. If the unit is still not working, get it checked by a qualified vendor. |
| The dust cup is full. | Empty the dust cup. |
| The suction power is weak, there is no suction or the motor vibrates. | The nozzle is blocked. | Remove the blockage. |
| The filter is blocked, dirty or broken. | Clean the filter.If necessary, replace the filter with a new one. |
Storage
• Always unplug the unit before storing it.
- Store the unit in a fresh, dry and dust-free place, out of the reach of children and pets.
- Please retain the packaging and use it to store your unit when it is not in use for an extended period of time.
Bedankt!