
MAGENTA PLUS - Coffee machine GAGGIA - Free user manual and instructions
Find the device manual for free MAGENTA PLUS GAGGIA in PDF.



| Brand | Gaggia |
| Model | Magenta Plus (RI8700) |
| Product type | Automatic coffee machine with grinder |
| Dimensions (W x D x H) | 224 x 357 x 435 mm |
| Weight | 7.6 kg |
| Power supply | See rating plate (230 V, 50 Hz) |
| Rated power | See rating plate |
| Water tank capacity | 1.8 L |
| Bean hopper capacity | 250 g |
| Grounds container capacity | 15 pucks |
| Pump pressure | 15 bars |
| Boiler type | Stainless steel |
| Main functions | 5 beverages (Espresso, Lungo, Coffee, Americano, Hot water), milk frother (steam or Pannarello), ceramic burr grinder, grind adjustment, temperature and length adjustment, INTENZA+ filter |
| Maintenance | Weekly cleaning of the brewing unit (washable with clear water), emptying the grounds container and drip tray, descaling with Gaggia solution, cleaning the frother |
| Safety | Thermal fuse, automatic shut-off |
| Available spare parts | Brewing unit, frother, INTENZA+ filter, lubricant, cleaning tablets |
| Repairability | Removable brewing unit, user maintenance (cleaning, descaling) |
| General information | Professional quality automatic coffee maker, intuitive interface, 5 customizable beverages, warranty under conditions |
Frequently Asked Questions - MAGENTA PLUS GAGGIA
User questions about MAGENTA PLUS GAGGIA
0 question about this device. Answer the ones you know or ask your own.
Ask a new question about this device
Download the instructions for your Coffee machine in PDF format for free! Find your manual MAGENTA PLUS - GAGGIA and take your electronic device back in hand. On this page are published all the documents necessary for the use of your device. MAGENTA PLUS by GAGGIA.
USER MANUAL MAGENTA PLUS GAGGIA
Operating instructions
Gebruiksaanwijzing
Instrukcja obstugi
CE
02
ENGLISH
Congratulations on your purchase of Gaggia Magenta!
This easy-to-use machine guarantees excellent results every day.
Thanks to the intuitive interface, you can choose among 5 beverages and customise them according to your preferences.
Before being packed, each of our high-quality machines undergoes rigorous testing in our laboratories in order to ensure its correct operation. Some coffee residue might be found in your machine, since real coffee is normally used during testing. However, this does not compromise the integrity of the product. Please be assured that this is a brand new machine.
In this user manual you will find all the information you need to install, use, clean and descale your machine. Before using it for the first time, please read carefully the safety manual provided separately and store it for future use.
NEDERLANDS
Machine overview (Fig.2) 6
Steam wand version 6
Classic pannarello version 6
Control panel and display 7
Control panel overview (Fig. 1) 7
Multifunction buttons 7
First installation 8
Manual rinse cycle 8
Measuring water hardness 9
INTENZA+ water filter 9
Installing the INTENZA+ water filter 10
Replacing the INTENZA+ water filter 10
Types of beverage 11
Espresso tray 12
Coffee Brewing 12
Brewing coffee using coffee beans 12
Brewing coffee using pre-ground coffee 13
How to Froth Milk 14
Model with the classic pannarello 14
Model whith steam wand 14
Dispensing hot water 15
Customising beverages and saving settings (MEMO) 16
Beverage Customisation 16
Coffee grind settings 17
Cleaning and maintenance 18
Cleaning table 18
Cleaning the steam system 19
Cleaning the brew group 20
Lubricating the brew group 22
23
23
What to do if the descending process is interrupted 24
Other settings 25
Language 25
Water filter 25
Stand-by Time 25
Units 26
Water hardness 26
Beverage counter 26
Button sound 26
Factory settings 26
Error code key 27
Troubleshooting 28
GAGGIA accessories 31
Technical specifications 31

6 English
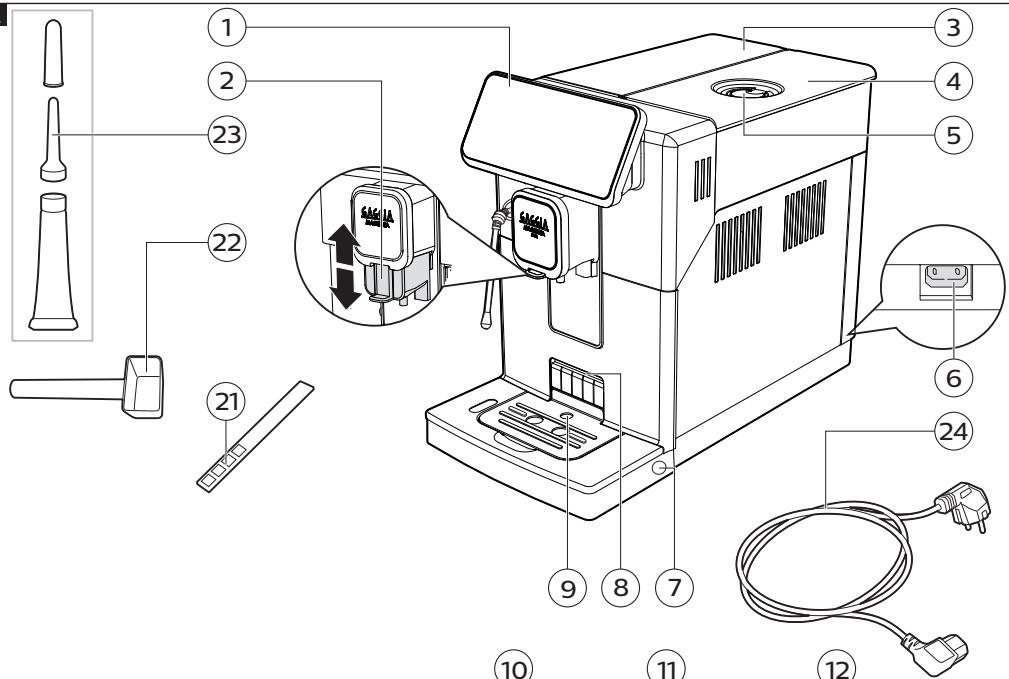
Machine overview (Fig.2)
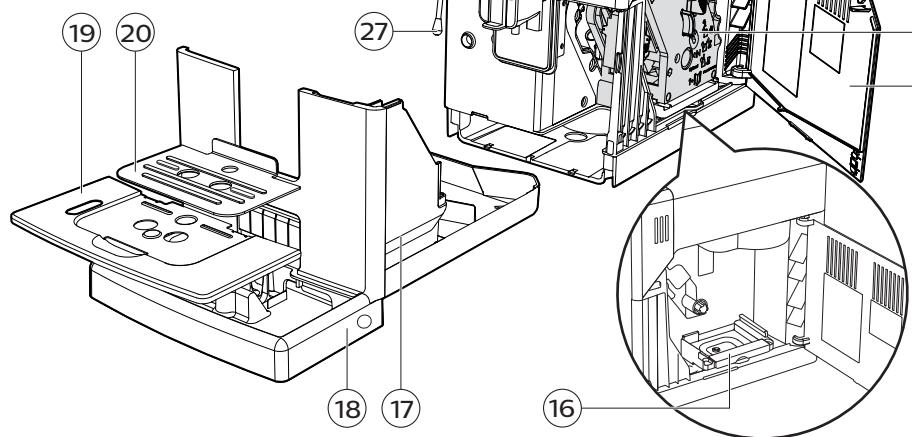
| 1 | Control panel | 13 | Coffee bean container |
| 2 | Adjustable coffee dispensing spout | 14 | Brew group |
| 3 | Water tank lid | 15 | Service door |
| 4 | Coffee bean container lid | 16 | Coffee residues drawer |
| 5 | Pre-ground coffee compartment | 17 | Coffee pucks container |
| 6 | Power cord socket | 18 | Drip tray |
| 7 | Drip tray release buttons | 19 | Drip tray grid |
| 8 | Espresso tray insertion slot | 20 | Espresso tray |
| 9 | Full drip tray indicator | 21 | Water hardness tester |
| 10 | Water tank | 22 | Pre-ground coffee measuring scoop |
| 11 | Aroma lid | 23 | Lubricant |
| 12 | Coffee grinder adjustment knob | 24 | Power cord |
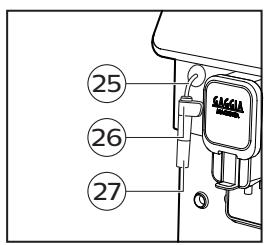
Steam wand version
| 25 | Steam wand handle | 27 | Steam wand nozzle |
| 26 | Steam wand |
Classic pannarello version
| 25 | Steam tube | 27 | Classic pannarello |
| 26 | Classic pannarello handle |
Control panel and display
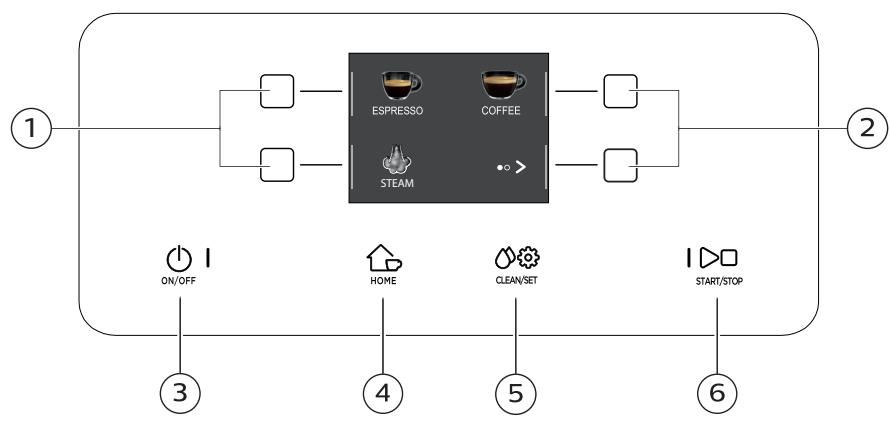
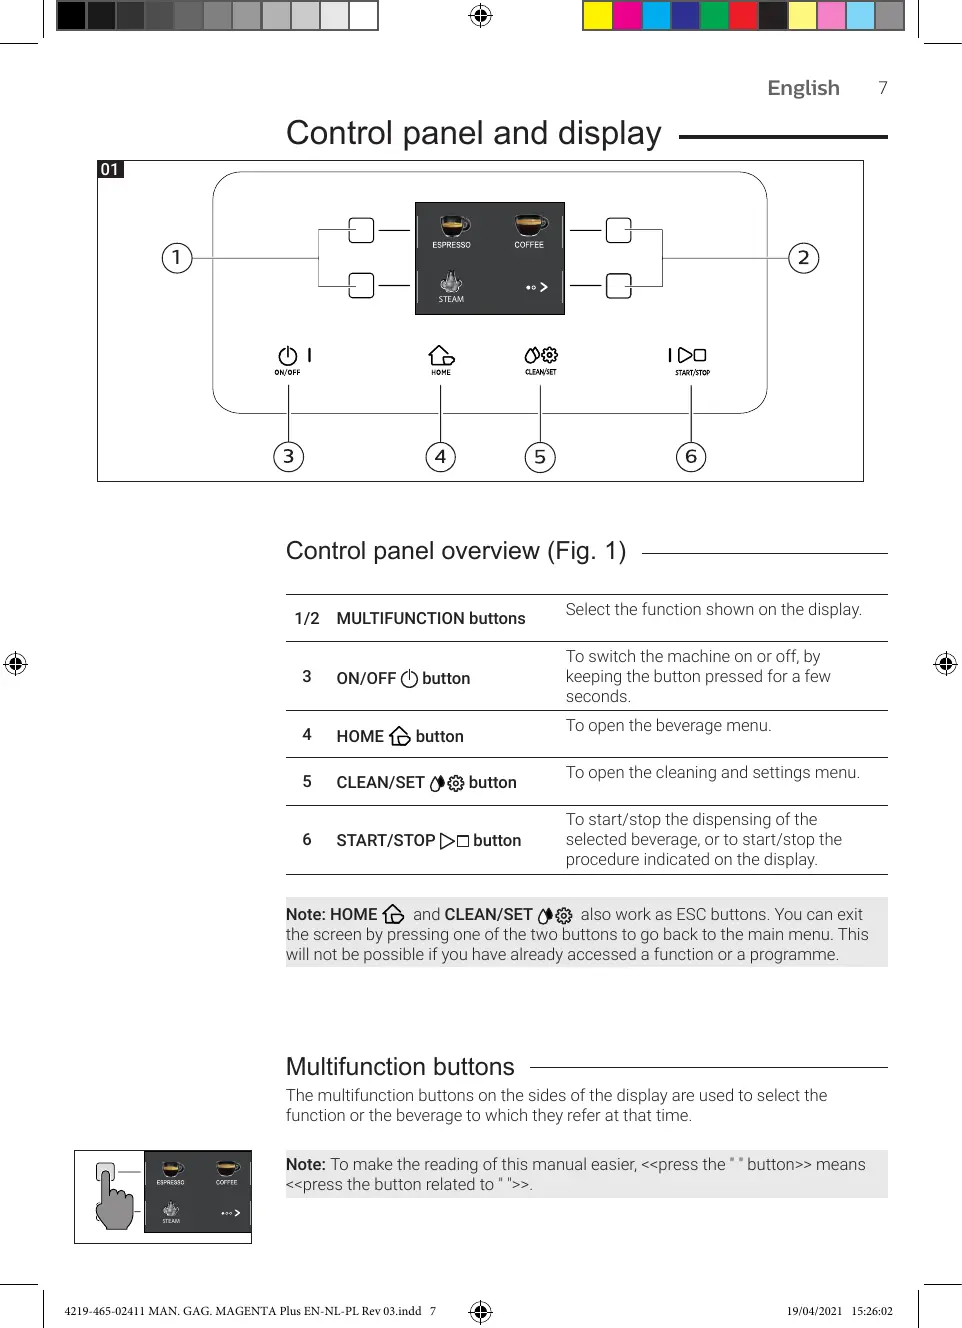
01
Control panel overview (Fig. 1)
| 1/2 | MULTIFUNCTION buttons | Select the function shown on the display. |
| 3 | ON/OFF button | To switch the machine on or off, by keeping the button pressed for a few seconds. |
| 4 | HOME button | To open the beverage menu. |
| 5 | CLEAN/SET button | To open the cleaning and settings menu. |
| 6 | START/STOP button | To start/stop the dispensing of the selected beverage, or to start/stop the procedure indicated on the display. |
Note: HOME and CLEAN/SET also work as ESC buttons. You can exit the screen by pressing one of the two buttons to go back to the main menu. This will not be possible if you have already accessed a function or a programme.
Multifunction buttons
The multifunction buttons on the sides of the display are used to select the function or the beverage to which they refer at that time.
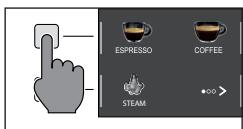
Note: To make the reading of this manual easier,<
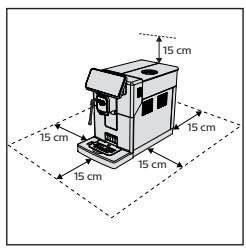
First installation
Before using the machine, it is essential to follow a few simple steps, clearly described in the explanatory drawings you found in the quick guide at the beginning of this instruction manual.
Note: for even tastier coffee, we recommend that you initially prepare 5 cups of coffee to allow the machine to self-adjust.
Manual rinse cycle
During the first installation or after a long period of machine inactivity, a manual rinse cycle must be carried out.
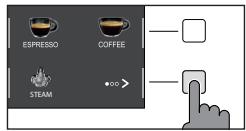
1 Place a container under the coffee dispensing spout, scroll through the different pages and select a "ESPRESSO LUNG".
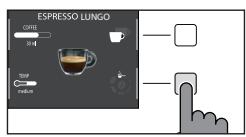
2 Press the " ) button until " ^+ " is selected, without adding pre-ground coffee.
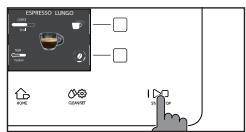
3 Press the START/STOP button to start dispensing. The machine will dispense hot water.
4 Empty the container and if present remove the classic pannarello from the steam tube.
5 Place the container under the steam wand and select " HOT WATER".
6 Press the START/STOP button to start dispensing.
7 Empty the container and repeat steps 5 to 7 until the water tank is empty.
8 When finished, refill the water tank to the MAX level. The machine is now ready for use.
Measuring water hardness
You will need to set the water hardness when you install your machine.
Take the water hardness measuring strip contained in the packaging and follow the steps shown on the display during the installation phase. To change the water hardness later, press the CLEAN/SET button, then select " SETTINGS", and once in the settings menu, please select "WATER HARDNESS".
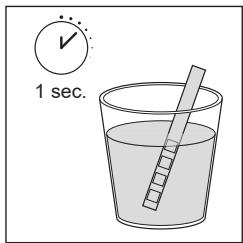
1 Immerse the water hardness measuring strip in a glass of water for 1 second. Remove the strip from the water and wait 1 minute.
2 Note how many squares turn red.
3 Use the green "✔" and "▲" buttons to select the water hardness according to the table below. Confirm the setting by pressing "✔".
| Small red squares | Value to set | Water hardness | INTENZA+ |
| ■□□□ | 1 | very soft water | A |
| ■□□□ | 2 | soft water | A |
| ■□□□ | 3 | hard water | B |
| ■□□□ | 4 | very hard water | C |
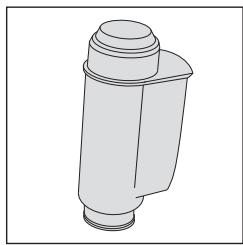
INTENZA+ water filter
We recommend using the INTENZA+ water filter to limit limescale formation. This ensures a longer operating life of your machine and a better coffee aroma over time.
Water is an essential element in brewing coffee. Therefore, it is extremely important that water is always filtered adequately.
The INTENZA+ water filter prevents the formation of mineral deposits, improving the quality of the water.
10 English
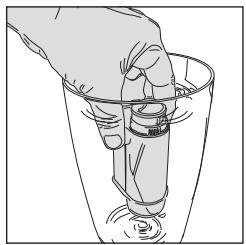
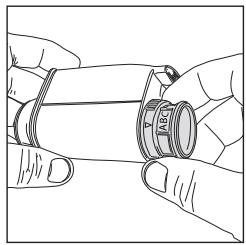
Installing the INTENZA+ water filter
Immerse the INTENZA+ water filter in cold water, in a vertical position and with the opening facing upwards. Press both sides of the filter gently to let air bubbles out.
Remove the INTENZA+ water filter from the water. Set the machine according to the detected water hardness - see the "Measuring water hardness" chapter. On the filter base, please set one of the following:
A = soft water - 1 or 2 small squares
B = hard water (standard) - 3 small squares
C = very hard water - 4 small squares
Place the INTENZA+ filter in the water tank, ensuring it is correctly positioned. Refill the water tank and place it back in its housing.
1 Press the CLEAN/SET button and then the " SETTINGS" button.
2 Select "WATER FILTER" and press the "√" button.
3 Select "ACTIVATE" and follow the instructions on the display to activate the filter correctly.
Note: you can pause the filter activation procedure by pressing the START/STOP button. To resume the filter activation procedure, press the START/STOP button again.
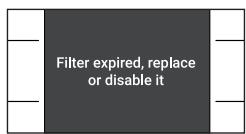
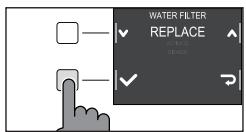
Replacing the INTENZA+ water filter
When the INTENZA+ water filter expires, the warning message appears on the display.
1 Replacement or deactivation can be executed by pressing the CLEAN/SET button and then the " SETTINGS" button.
2 Select "WATER FILTER" then press the "√" button.
3 Select "REPLACE" to change the filter or " DISABLE" if you do not intend to use the filter. Confirm with the "√" button.
Follow the instructions shown on the display to activate the filter.
Types of beverage
| Original recipe | Description | |
| Espresso | Coffee | The espresso is known around the globe as true Italian coffee. Served in a small cup, its unmistakable features are a full and intense aroma and a top layer of compact, natural "crema". It is the result of the pressurized hot water extraction process invented by Achille Gaggia in 1938. |
| Espresso lungo | Coffee | The long espresso is an espresso with a longer extraction time. It is more diluted, with a different aromatic intensity and a higher caffeine content. It is served in a medium-sized cup. |
| Coffee | Coffee | Coffee is a beverage prepared with more water than espresso. It has a lighter aroma and is served in a medium-large cup. |
| Americano | Coffee | The americano is a less intense long coffee, prepared with an espresso to which hot water is added. |
| Water | Hot water can be used to prepare hot teas, infusions and instant beverages. | |
Note: In the original recipes the beverages are all set to an average temperature and aroma intensity.
12 English
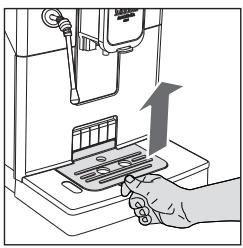

Espresso tray
This machine was designed to guarantee flawless results, from a traditional espresso to a number of different beverages. If you want to enjoy an Italian espresso with a delicious layer of its natural "crema" on top and as tradition dictates, we suggest your using of the "Espresso Tray" which is specifically designed for this purpose. This tray allows the use of traditional espresso cups, ensuring the perfect height for a compact, homogeneous "crema" and a splash-free brewing.
Lift the espresso tray off the grid of the drip tray and place it into the dedicated slot as shown in the drawing.
Coffee Brewing
Brewing coffee using coffee beans
Warning: only use coffee beans when making espresso. Do not put any pre-ground, unroasted, freeze-dried or instant coffee in the coffee bean container, as they may damage the machine.
Tip: Preheat the cups with hot water to enjoy a warmer coffee.
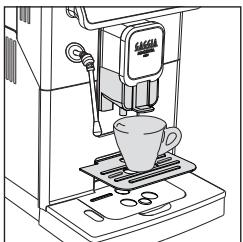
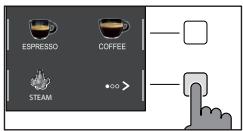
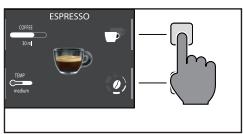
1 Upon positioning the espresso tray, place a cup under the coffee dispensing spout, raise or lower the coffee dispensing spout according to the size of the cup you are using.
Press the HOME button to access the beverage menu.
2 Browse the various pages to find and select the desired coffee.
3 Upon selection of your desired coffee, it is possible to prepare two cups at the same time- besides AMERICANO, using the " " button.
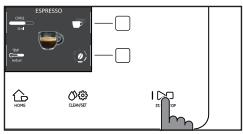
4 Finally, press the START/STOP button to start brewing.
Note: you can interrupt the brewing at any time by pressing the START/STOP button.
If you wish to customise the settings of a specific beverage, please refer to the "Beverage customisation" chapter.
Brewing coffee using pre-ground coffee
Use the measuring scoop provided to insert the correct dose in the pre-ground coffee compartment.
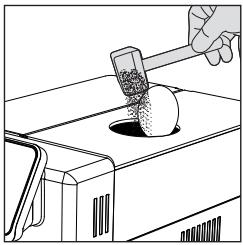
1 Lift the lid of the pre-ground coffee compartment and add a little less than one level scoop of pre-ground coffee.
Warning: do not insert anything other than pre-ground coffee, as it may damage the machine.
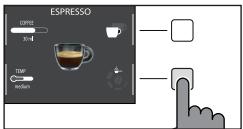
2 Place a cup under the coffee dispensing spout and select the desired beverage.
3 Press the " " button until " " is selected.
Note: The "pre-ground coffee" function excludes the possibility of brewing two cups of coffee at the same time, as well as the aroma setting. In fact, these are only possible with coffee beans.
4 Press the START/STOP button to start brewing the coffee.
If you wish to customise the settings of a specific beverage, please refer to the "Beverage customisation" chapter.
Note: you can interrupt the brewing at any time by pressing the START/STOP button.
14 English
How to Froth Milk
Tip: use cold milk (at a temperature of around 5^ ) with a protein content of at least 3% to ensure optimum results for the froth. You can use either whole milk or semi-skimmed milk. You can also use skimmed milk, soy milk or lactose-free milk.
Model with the classic pannarello
1 Fill 1/3 of a jug with milk
2 Press the HOME button to open the beverage menu.
3 Insert the classic pannarello into the milk. From the beverage selection menu, select STEAM " and press the START/STOP button to start frothing.
4 Froth the milk by gently swirling the carafe and moving it up and down.
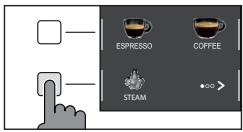
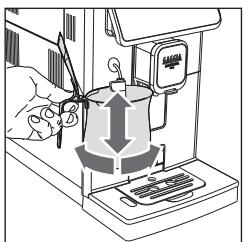
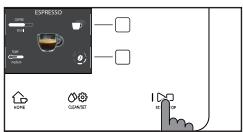
5 When the milk froth comes to the desired consistency. Press the START/STOP button to stop steam dispensing. Wait until dispensing stops completely before removing the carafe.
Note: After frothing milk, clean the circuit by dispensing a small quantity of hot water.
Model whith the steam wand
1 Fill 1/3 of a jug with milk.
2 Place the steam nozzle just below the surface of the milk; if it has been inserted too deep, the milk will not be frothed; if it has not been inserted deep enough, big bubbles will be produced.
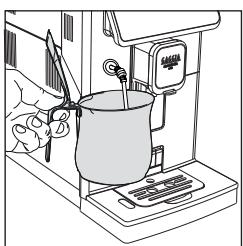
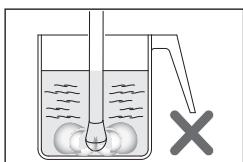
3 It is important to keep the nozzle not at the centre but close to the edge of the jug, with an appropriate angle to produce a stronger vortex.
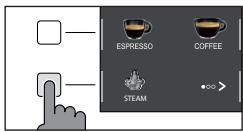
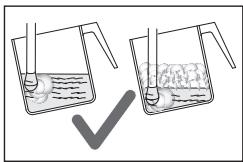
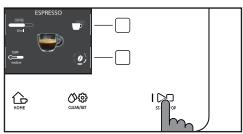
4 Press the HOME button to open the beverage menu. Select "STEAM" and press the START/STOP button to start frothing
5 To froth the milk correctly, the steam nozzle must always be in contact with the milk and not with the froth.
Therefore, as the layer of froth increases, the jug must be slightly raised trying to keep the nozzle in contact with the milk, without touching the bottom of the jug.
Once the desired frothing has been achieved, the steam nozzle must be pushed further to heat the milk well.
6 When the milk froth comes to the desired consistency. Press the START/STOP
□ button to stop steam dispensing. Wait until dispensing stops completely before removing the jug.
Note: It is advisable to always keep a hand on the rounded part of the jug to feel the temperature increase of the milk.
Note: After frothing the milk, to make the froth more compact, it is advisable to lightly tap the jug on a flat surface and leave it to rest for at least 30 seconds. The milk will become more homogeneous.
Note: After frothing milk, clean the circuit by dispensing a small quantity of hot water. Be careful as hot water or steam sprays might be present.

Dispensing hot water
Warning: when the machine starts preparing hot water, the classic pannarello or steam wand (depending on the model) spout may spray steam and hot water.
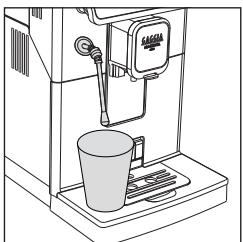

1 Place a container under the classic pannarello or steam wand (depending on the model).
2 Press the HOME button and using the " " button browse the various pages.
3 Press the "HOT WATER" button. Finally, press the START/STOP button to commence dispensing.
Note: you can interrupt dispensing at any time by pressing the START/STOP button.
If you wish to customise the settings of a specific beverage, please refer to the "Beverage Customisation" chapter.
Customising beverages and saving settings (MEMO)
This machine allows you to change the settings of a beverage according to your preferences and save them (MEMO), by overwriting the previous settings.
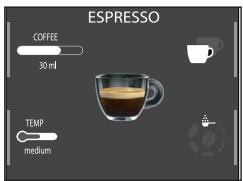
Beverage Customisation
1 Press the HOME button.
2 Select your beverage.
3 All the settings that can be adjusted and/or selected are displayed on the screen. Based on the type of beverage, you can adjust and/or select:
- coffee amount;
- coffee temperature;
- pre-ground coffee use;
- aroma intensity (only when using coffee beans);
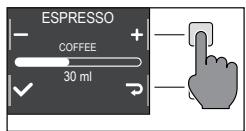
4 Once the "COFFEE" button has been pressed, use the green "+" and "--" buttons to select the desired amount.

Press "√" to confirm and return to the previous screen, where the new quantity will be displayed.
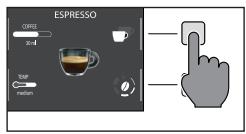
5 Press the "TEMP" button repeatedly to adjust the temperature of the beverage among the following options:
low;
medium;
- high;
6 Press " " button to brew two cups, or " " for a single cup. The picture of the beverage in the centre of the display will indicate the number of cups selected.
Note: this function is not available for beverages with milk, AMERICANO and HOT WATER.
8 To change the intensity of the aroma or select the pre-ground, press the "O" button. You can choose among 5 different degrees of intensity. Every time you press the "O" button, the aroma strength changes by one degree. The display shows the selected intensity or the selection of the pre-ground.
1 Very light
2 Light
3 Normal
4 Strong
5 Very strong
6 Pre-ground.
Note: the function Pre-ground allows the brewing of just one coffee at a time.

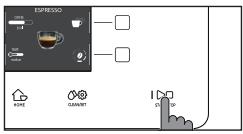
9 Once the beverage has been customised according to your preferences, you can proceed with dispensing it by pressing START/STOP button.
10 If you have changed any of the parameters listed above, you will be asked at the end of dispensing if you would like to save the recipe with the changes made.
Note: the new saved settings will overwrite those of the previous recipe.
Note: to return to the factory settings of the single recipes, you must re-enter and save the settings indicated in the "Beverage type" section.
Coffee grind settings
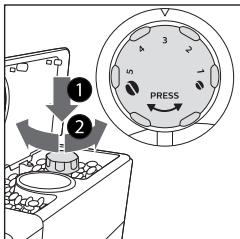
You can adjust the grind setting using the grinder adjustment knob on the coffee bean container. The ceramic coffee grinder guarantees a perfect and homogeneous grinding for the preparation of every cup of coffee. The aroma is thus preserved, ensuring the perfect flavour every time.
Note: you can only adjust the grind setting while the machine is grinding the coffee beans. The difference in taste will be perceived after brewing 2-3 cups of coffee.
Warning: to avoid damaging the coffee grinder, do not rotate the grinder adjustment knob more than one notch at a time.
1 Place a cup under the coffee dispensing spout.
2 Open the lid of the coffee bean container.
3 Prepare an espresso as described in the chapter "Brewing coffee with coffee beans".
4 While the machine is grinding coffee, press the grind settings adjustment knob in the bean container and turn it one notch at a time, to the left or right.
5 You can select from 5 different grinding settings. The smaller the notch, the stronger and richer the coffee.
Note:
- Coarse grind: lighter taste, for dark roasted coffee blends (3-5);
- Fine grind: stronger taste, for light roasted coffee blends (1-3);
Cleaning and maintenance
Regular cleaning and maintenance keep the machine in perfect condition and ensure perfect coffee flavour, a constant coffee flow and an excellent milk froth. Please refer to the following table to know when and how to clean the removable parts of the machine. Please read the specific chapter for further information.
Cleaning table
| Part description | When to clean | How to clean |
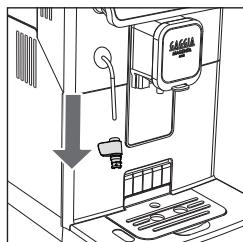
| Classic pannarello | After use | Remove the classic pannarello and rinse it under running water. |
| Weekly | Disassemble the classic pannarello and the rubber handle. Clean them under running water. | |
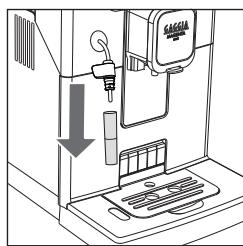
| Steam wand | After use | Clean the steam wand with a damp cloth. To clean it more thoroughly, you can unscrew the nozzle and wash it with running water. |
| Brew group | Weekly | Remove the brew group and clean it under running water. |
| Depending on usage | See the "Cleaning and lubricating the brew group" chapter. | |
| Monthly | Clean the brew group with the Gaggia coffee oil remover to remove any oily coffee residue | |
| Drip tray full | When the red mark appears from the drip tray grid. | Empty the drip tray and clean it under running water. |
| Coffee pucks container | Whenever the machine requires it | Empty the coffee pucks container and clean it under running water. Ensure that the machine is switched on during this procedure, otherwise the coffee pucks container will not reset. |
| Water tank | Weekly | Clean it under running water. |
| Pre-ground coffee compartment/coffee outlet duct | Weekly | Clean the upper part using the handle of a spoon, as shown below. |
| Espresso tray | Depending on usage | Remove the espresso tray and clean it with running water. You can also dishwasher it in the upper tray. |
Cleaning the steam system
Cleaning the classic pannarello
1 Remove the classic pannarello and the rubber handle from the steam tube and rinse them under running water.
2 Clean the steam tube with a damp cloth.
3 Reassemble the parts.
Cleaning the steam wand
1 Clean the steam wand with a damp cloth. To clean it more thoroughly, you can unscrew the nozzle and wash it with running water.
2 Press the HOME button. Select "STEAM" and press the START/STOP button.
Allowing the steam to escape for one or two seconds to clean the nozzle hole.

Cleaning the brew group
Warning: do not wash the brew group in the dishwasher and do not use dishwashing detergents, since they may cause the malfunctioning of the brew group and alter the coffee flavour.
Removing the brew group
1 Turn off the machine and disconnect the power cord.
2 Remove the drip tray and the coffee pucks container.
3 Open the service door.
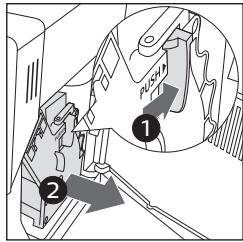
4 Press the PUSH lever (1) and pull the handle of the brew group (2) to remove it from the machine.
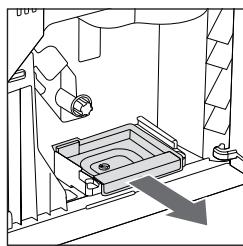
5 Remove the coffee residues drawer.
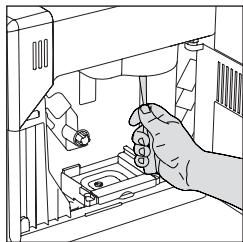
Cleaning the brew group under running water
1 Clean the coffee outlet duct thoroughly with a spoon handle or with another round-tipped kitchen utensil.
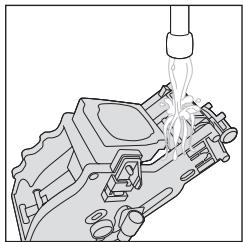
2 Rinse the brew group and the coffee residues drawer thoroughly with lukewarm water. Carefully wash the upper filter.
3 Let the brew group air dry.
Note: to avoid the build-up of fibres in its interior, do not dry the brew group with cloth.
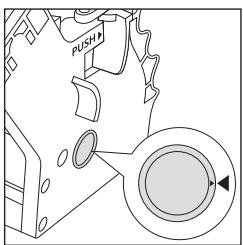
Reinserting the brew group
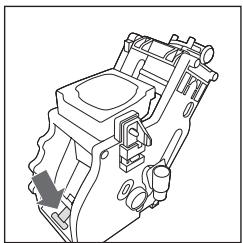
1 Before placing the brew group back into the machine, make sure that the two yellow reference marks on the side match. If this is not the case, perform the following step:
Make sure that the lever is in contact with the base of the brew group.
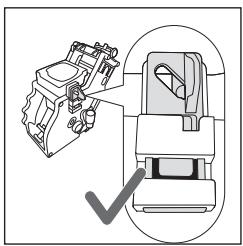
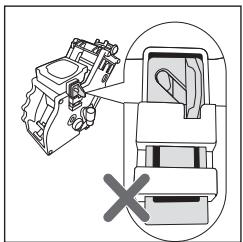
2 Make sure that the yellow locking hook of the brew group is in the right position.
To position the hook correctly, push it upwards to the highest possible position.
If the hook is still in the lower position, it means that it is not positioned correctly.
3 Reinsert the coffee residues drawer.
4 Reinsert the brew group into the machine along the side guides until it locks in the right position with a click.
Warning: do not press the PUSH lever.
5 Close the service door.
22 English
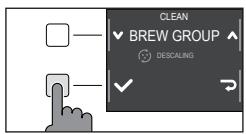
Cleaning the brew group with cleaning tablets for the removal of oily coffee residues
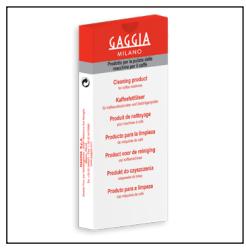
Warning: use only Gaggia cleaning tablets to remove oily coffee residues.
1 Place a container under the coffee dispensing spout.
2 Press the CLEAN/SET button and select the "CLEAN" button shown on the display.
3 Select "BREW GROUP CLEANING" and press the "√" button, then press START/STOP to start the cleaning procedure.
4 Follow the instructions shown on the display to clean the brew group correctly.
5 The procedure will take approximately 5 minutes. START/STOP can be used to pause and resume the procedure.
Lubricating the brew group
In order to ensure the perfect performance of the machine, it is necessary to lubricate the brew group. Refer to the following table for the frequency of lubrication.
| Frequency of use | Number of beverages prepared daily | Lubrication frequency |
| Low | 1-5 | Every 4 months |
| Regular | 6-10 | Every 2 months |
| High | >10 | Every month |
1 Turn off the appliance and disconnect the power cord.
2 Remove the brew group and rinse it using lukewarm water - see the "Cleaning the brew group under running water" chapter.
3 Apply a thin layer of the lubricant provided around the insertion pin on the lower part of the brew group.

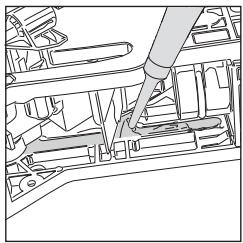
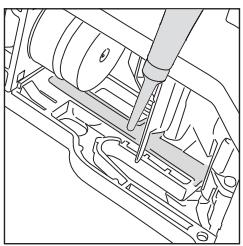
4 Apply a thin layer of lubricant to the guides, on both sides (see figure).
5 Reinsert the brew group - see the "Reinserting the brew group" chapter.
Note: you can use the lubricant tube multiple times.
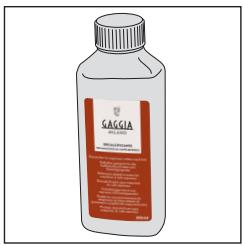
Dscaling
Dscaling procedure
Dscaling needs to be carried out when the machine requires it.
Use only Gaggia descending solution designed to guarantee the machine's excellent performance. The use of different products could damage the machine and leave residue in the water. Failure to descale the machine will void the warranty.
1 If present remove the classic pannarello.
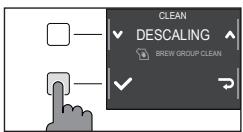
2 Press CLEAN/SET and select the "CLEAN" button shown on the display.
- Select "DESCALING" and after confirming with "✔" press the START/STOP button to start.
3 Remove the drip tray and the coffee pucks container, empty and place them all back into the machine.
4 Remove the water tank and empty it. Remove the INTENZA+ filter, if in place.
24 English
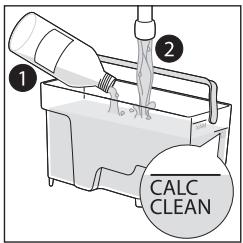
Pour the entire bottle of Gaggia descending solution into the water tank and fill the tank with water up to the CALC CLEAN level. Reinsert it into the machine.
6 Place a large recipient (1.5l) under the steam tube and the coffee dispensing spout.
7 Follow the instructions shown on the display to launch the descending procedure. This procedure lasts approximately 25 minutes and consists of a descending cycle and a rinse cycle, carried out with dispensing at regular intervals.
8 Once the descending cycle is complete, rinse the water circuit and tank by following the instructions shown on the display.
9 Position the INTENZA+ filter back into the water tank.
Note: it is possible to pause and resume the procedure at any time by pressing the START/STOP button.
Warning: when the descending procedure is active, the brew group cannot be removed. Wait for the descending process to end, then remove the brew group.
What to do if the descending process is interrupted
You can exit the descending procedure by keeping the ON/OFF button on the control panel, pressed for a few seconds. If the descending procedure is interrupted before its completion, proceed as follows:
1 Empty the water tank and wash it thoroughly.
2 Fill the water tank with running water up to the CALC CLEAN level mark, then switch the machine back on. The machine will warm up and perform an automatic rinse cycle.
3 Before preparing any beverages, carry out a manual rinse cycle as described in the dedicated chapter.
Note: if the procedure has not been completed, it will be necessary to carry out another descaling procedure as soon as possible.
Other settings
By pressing the CLEAN/SET button and selecting " SETTINGS" on the display, you can reset or modify some of the machine parameters including:
- Language.
Water filter. - Stand-by Time.
- Units.
Water hardness. - Beverage counter.
- Button sound
Factory settings.
Language
When the language setting icon is selected, the list of available languages will be displayed.
Available languages
| ITALIAN | DANISH | CZECH |
| ENGLISH | GREEK | SLOVAKE |
| GERMAN | POLISH | LITHUANIAN |
| FRENCH | RUSSIAN | JAPANESE |
| SPANISH | ROMANIAN | KOREAN |
| PORTUGUESE | HUNGARIAN | CHINESE (TRADITIONAL) |
| DUTCH | BULGARIAN | CHINESE (SIMPLIFIED) |
Water filter
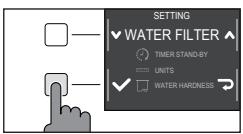
When "WATER FILTER" is selected, follow the instructions on the display and those described under the "Installing the INTENZA+ water filter" and "Replacing the INTENZA+ water filter" chapters.
Stand-by Time
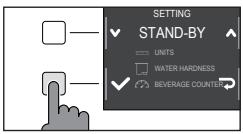
When "STAND-BY TIME" is selected, the timer can be set to:
- 15 min
- 30 min
- 60 min
- 180 min
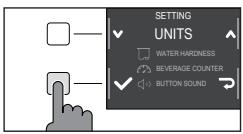
Units
By selecting "UNITS".
you can set the unit of measurement in "ml" or "oz".
Water hardness
With "WATER HARDNESS" selected, follow the instructions on the display and those described under the "Measuring water hardness" chapter.
Beverage counter
It is possible to display the number of cups of each beverage that have been dispensed since the first operation of the machine. These data cannot be reset.
Button sound
You can turn the button sound off by selecting " OFF " so as not to be disturbed.
Factory settings
You can reset the machine to factory default values. The machine will require a double confirmation before proceeding.
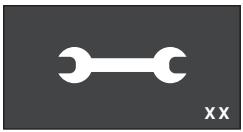
Error code key
The list below reports the error codes that the display can show, their meanings and how to solve the problem. If the indicated solutions are ineffective because the display continues to show the error code icon and the machine does not return to normal operation, or if other error codes are displayed, you must contact an authorized service center or distributors in your country.
The contact info is listed on www.gaggia.com and www.gaggia.it.
| Error code | Problem | Cause | Possible solution |
| 01 | The coffee grinder is clogged. | The coffee outlet duct is clogged. | Remove the power cord and remove the brew group. Clean the coffee outlet duct thoroughly using a spoon handle. Switch the appliance back on again. |
| 03 - 04 | A problem occurred in the brew group. | The brew group is dirty or not well lubricated. | Switch off the machine. Remove the brew group and clean it thoroughly. (Refer to the "Cleaning the Brew Group" chapter) |
| The brew group is not positioned correctly. | Switch off the machine. Remove the brew group and reinsert it. Ensure that the brew group is in the correct position before inserting it. Refer to the "Reinserting the brew group" chapter. | ||
| 05 | A problem occurred in the water circuit. | There is air in the water circuit. | Remove and reinsert the tank in the machine a couple of times. Make sure you insert the tank correctly in the machine. Check that the water tank seat is clean. |
| If you use an "INTENZA+" filter: pull out the filter from the water tank and shake it to remove the air from the filter. Then place the "INTENZA+" filter back into the water tank. | |||
| 14 | The machine is overheated. | There may be multiple causes. | Switch off the machine and switch it back on again after 30 minutes. Perform this operation 2 or 3 times. |
Troubleshooting
This chapter outlines the most common problems you may encounter while using the machine. If you are unable to solve the problem using the information provided below, visit the FAQ sections on www.gaggia.com or www.gaggia.it or contact the either the Customer Service Centre or the local distributors in your country.
| Problem | Cause | Solution |
| The machine does not switch on. | The machine is not connected. | Check that the power cord has been inserted correctly. |
| The on / off button was not pressed and held down long enough | Keep the on / off button pressed for a few seconds. | |
| The drip tray fills up quickly. | It is a normal phenomenon. The machine uses water to rinse the internal circuit and the brew group. Part of the water flows through the internal system directly into the drip tray. | Empty the drip tray when the red mark appears through the grid. We recommend your placing a cup under the dispensing spout to collect rinse water |
| The display continuously shows the "coffee pucks container full" icon. | The coffee pucks container has been emptied when the machine was off. | Always empty the coffee pucks container when the machine is on. If you empty the coffee pucks container when the machine is off, the coffee cycle counter does not reset. In this case, the display shows the icon even if the container is not full. |
| The coffee pucks container has been placed back too quickly. | Always wait about 5 seconds when you replace the coffee pucks container. This way, the counter will reset to zero. | |
| The machine requests to empty the coffee pucks container even if it is not full. | The machine has not reset the counter last time the coffee pucks container has been emptied. | Always wait about 5 seconds when you replace the coffee pucks container. This way, the coffee grounds counter will reset to zero. |
| Always empty the coffee pucks container when the machine is on. If you empty the coffee pucks container when the machine is off, the coffee cycle counter does not reset. | ||
| The coffee pucks container is too full and the "coffee pucks container full" icon, did not display. | The drip tray has been removed without emptying the coffee pucks container. | When you remove the drip tray, also empty the coffee pucks container even if it contains only a few coffee pucks. In this way the coffee grounds counter will be reset to zero, re-starting to correctly count the coffee pucks. |
| Impossible to remove the brew group. | The brew group is not in the correct position. | Close the service door. Switch the machine off and then back on. Wait for the display to show the ready message, then remove the brew group. |
| The brew group cannot be inserted. | The brew group is not in the correct position. | The brew group has not been positioned correctly before being placed back. Ensure that the lever is in contact with the base of the brew group and that the hook of the brew group is in its correct position. See the “Reinserting the brew group” chapter. |
| To reset the machine put the drip tray with the coffee pucks container back in place. Do not insert the brew group. Close the service door, then unplug the power cord and plug it back in. Then try to reinsert the brew group and switch on the machine. | ||
| The espresso is not creamy enough or it is watery. | The coffee grinder is set to a coarse grinding. | Adjust the coffee grinder to a finer setting. |
| The machine is performing its self-adjustment. | Dispense several cups of coffee so that the machine adjusts itself automatically. | |
| The coffee outlet duct is clogged. | Clean the coffee outlet duct with a spoon as described in the “Cleaning the brew group under running water” chapter. | |
| The brewed coffee is not hot enough. | The set temperature is too low. Check the menu settings. | Set the menu temperature to “MAX”. |
| The machine grinds the coffee beans, but no brewing happens. | The coffee grinder is set to a too fine grinding. | Adjust the coffee grinder to a coarser grinding. |
| The coffee dispensing spout is blocked. | Dispense a long coffee from pre-ground coffee but without actually adding pre-ground coffee. | |
| The nozzles of the coffee dispensing spout are blocked. | Clean the nozzles of the coffee dispensing spout with a small bottlebrush. | |
| The coffee comes out slowly or in drops. | The coffee grinder is set to a too fine grinding. | Adjust the coffee grinder to a coarser grinding. |
| The nozzles of the coffee dispensing spout are blocked. | Clean the nozzles of the coffee dispensing spout with a small bottlebrush. | |
| The machine circuit is clogged by limescale. | Descale the machine. |
30 English
| Problem | Cause | Solution |
| The milk does not froth. | The classic pannarello may be dirty.(model with classic pannarello) | Clean the classic pannarello as described in the chapter "Cleaning the classic pannarello". |
| Make sure that all the classic pannarello components have been correctly assembled | ||
| The steam wand nozzle is clogged.(model with steam wand) | Wash the steam nozzle with running water and clean the circuit by dispensing a small quantity of hot water | |
| The type of milk used is not suitable for foaming. | The amount and the quality of froth vary depending on the type of milk. | |
| The "INTENZA+" filter cannot be inserted. | Remove the air from the filter. | Let the air bubbles out of the filter. |
| The tank still contains some water. | Empty the water tank before installing the filter. | |
| The rubber seal is not inserted onto the "INTENZA+" filter. | Check the packaging and insert the seal onto the "INTENZA+" filter. | |
| You can not activate the "INTENZA+" filter. | Another filter is already active | The machine indicates the filter usage in percentage.However, if you want to activate a new filter before the one currently in use has expired, the latter must be disabled first as described in the section "Replacing INTENZA+ water filter" |
| There is some water under the machine. | The drip tray is too full and has spilled over. | Empty the drip tray when the mark appears though the tray. Always empty the drip tray before starting the descaling procedure. |
| The machine is in DEMO mode. | While switching on the machine, you pressed a combination of buttons (HOME - CLEAN/SET - HOME - CLEAN/SET). | Switch the machine off and on again, with the ON/OFF button on the control panel. |
GAGGIA accessories
Coffee and accessories are available through authorised centres (Italy), or distributors in your country.
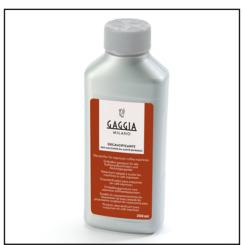
Dscaling product
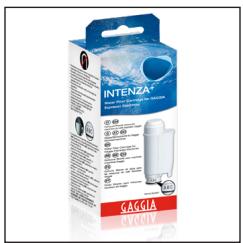
INTENZA+ water filter
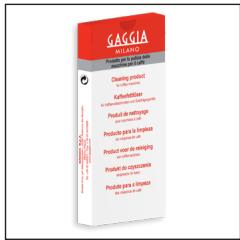
Coffee oil remover




Coffee range available in beans and powder: 100% Arabica / Intense / Decaffeinated
Technical specifications
| Nominal voltage - Power rating - Power supply | See data plate on the inside of the service door |
| Housing material | Thermoplastic type |
| Dimensions | 224 x 357 x 435 mm |
| Weight | 7,6 kg |
| Power cord length | 1200 mm |
| Control panel | Front panel |
| Water tank | 1.8 litres - Removable type |
| Coffee bean container capacity | 250 g |
| Coffee pucks container capacity | 15 |
| Pump pressure | 15 bar |
| Boiler | Stainless steel boiler |
| Safety devices | Thermal Fuse |

32 Netherlands
Inhoudsopgave
Type drank 38
Espresso tray 39
Koffieafgiffe 39
GAGGIA S.p.A. reserves the right to make any necessary modification.


- ENGLISH
- NEDERLANDS
- English
- Machine overview (Fig.2)
- Steam wand version
- Classic pannarello version
- Control panel and display
- Control panel overview (Fig. 1)
- Multifunction buttons
- First installation
- Manual rinse cycle
- Measuring water hardness
- INTENZA+ water filter
- English
- Installing the INTENZA+ water filter
- Replacing the INTENZA+ water filter
- Types of beverage
- English
- Espresso tray
- Coffee Brewing
- Brewing coffee using coffee beans
- Brewing coffee using pre-ground coffee
- English
- How to Froth Milk
- Model with the classic pannarello
- Model whith the steam wand
- Dispensing hot water
- Customising beverages and saving settings (MEMO)
- Beverage Customisation
- Coffee grind settings
- Note:
- Cleaning and maintenance
- Cleaning the steam system
- Cleaning the classic pannarello
- Cleaning the steam wand
- Cleaning the brew group
- Removing the brew group
- Cleaning the brew group under running water
- Reinserting the brew group
- English
- Cleaning the brew group with cleaning tablets for the removal of oily coffee residues
- Lubricating the brew group
- Dscaling
- Dscaling procedure
- English
- What to do if the descending process is interrupted
- Other settings
- Language
- Water filter
- Stand-by Time
- Units
- Water hardness
- Beverage counter
- Button sound
- Factory settings
- Error code key
- Troubleshooting
- GAGGIA accessories
- Technical specifications
- Netherlands
- Inhoudsopgave
Brand : GAGGIA
Model : MAGENTA PLUS
Category : Coffee machine