
DO2425G - Microwave DOMO - Free user manual and instructions
Find the device manual for free DO2425G DOMO in PDF.
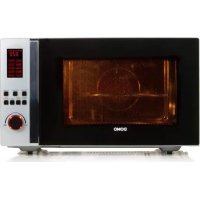
| Product type | Microwave grill |
| Brand | DOMO |
| Model | DO2425G |
| Power supply voltage | 230 V ~ 50 Hz |
| Microwave power | 900 W |
| Grill power | 1000 W |
| Capacity | 25 liters |
| Turntable diameter | 31.5 cm |
| External dimensions (W x D x H) | 513 x 430 x 305 mm |
| Net weight | 14.65 kg |
| Functions | Microwave, Grill, Combination (C-1, C-2), Defrost by weight/time, Auto menu (8 programs), Quick cooking 30s, Step cooking, Clock, Timer, Child lock |
| Microwave power levels | 100%, 80%, 50%, 30%, 10% |
| Control type | Rotary knob and buttons |
| Display | Digital LED |
| Interior coating materials | Enamel (mica protection) |
| Supplied accessories | Glass turntable, turntable support, metal rack, manual |
| Cleaning and maintenance | Clean with a damp cloth; do not use steam cleaner or abrasive products; turntable and rack can be washed in hot water |
| Safety | Child lock, automatic stop if door opened, microwave protection |
| Warranty | 2 years |
| Spare parts and accessories | Available online at webshop.domo-elektro.be |
Frequently Asked Questions - DO2425G DOMO
User questions about DO2425G DOMO
0 question about this device. Answer the ones you know or ask your own.
Ask a new question about this device
Download the instructions for your Microwave in PDF format for free! Find your manual DO2425G - DOMO and take your electronic device back in hand. On this page are published all the documents necessary for the use of your device. DO2425G by DOMO.
USER MANUAL DO2425G DOMO
CONDITIONS DE GARANTIE
This appliance has a two year warranty period. During this period the manufacturer is responsible for any failures that are the direct result of construction failure. When these failures occur the appliance will be repaired or replaced if necessary. The warranty will not be valid when the damage to the appliance is caused by wrong use, not following the instructions or repairs executed by a third party. The guarantee is issued with the original till receipt. All parts, which are subject to wear, are excluded from the warranty.
If your device breaks down within the 2-year warranty period, you can return the device together with your receipt to the shop where you purchased it.
CONDICIONES DE GARANTÍA
RECYCLAGE-INFORMATIE
RECYCLING INFORMATIONEN
RECYCLING INFORMATION
This symbol on the product or on its packaging indicates that this product may not
be treated as household waste. Instead it must be brought to the applicable collection point for recycling of electrical and electronic equipment. By ensuring this product is disposed of correctly, you will help prevent potential negative consequences for the environment and human health, which could otherwise be caused by inappropriate waste handling of this product. For more detailed information about recycling of this product, please contact your local city office, your household waste disposal service or the shop where you purchased the product.
The packaging is recyclable. Please treat package ecologically.

INFORMACION DE RECICLaje
From now on, accessories and parts of Domo appliances can also be ordered online from the Domo webshop*:
http://webshop.domo-elektro.be
You can reach the webshop through the Domo website as well: www.domo-elektro.be. The accessories and parts can also still be obtained at the store where you bought the appliance.
- Enkel in Belgie, Nederland, Luxemburg, Frankrijk en Duitsland.
- Seulement dans la Belgique, le Pays-Bas, le Luxembourg, la France et l'Allemagne.
- Nur in Belgien, die Niederlande, Luxemburg, Frankreich und Deutschland.
- Only in Belgium, the Netherlands, Luxemburg, France and Germany.

If the supply cord is damaged, it must be replaced by the manufacturer, its service agent or a similarly qualified person in order to avoid a hazard.
| Display | Microgolf | Grill |
| G | 0% | 100% |
| C-1 | 55% | 45% |
| C-2 | 36% | 64% |
SNEL KOKEN MET MICROGOLF
INSTALLATION DU FOUR
| Affichage | Micro-ondes | Grill |
| G | 0% | 100% |
| C-1 | 55% | 45% |
| C-2 | 36% | 64% |
This appliance may be used by children from the age of 8 and up, and also by persons with a physical or sensorly limitation, as well as mentally limited persons or persons with a lack of experience and knowledge. But only on the condition that these persons have received the necessary instructions on how to use this appliance in a safe way and know the dangers that can occur by using this appliance.
Children cannot be allowed to play with the appliance. Maintenance and cleaning of the appliance may not be done by children, unless they are older than 8 years old and are under supervision. Keep the appliance out of reach of children younger than 8 years old.
This appliance is suitable to be used in a household environment and in similar surroundings such as:
- Kitchen for personnel of shops, offices or other similar professional surroundings
Farms - Hotel or motel rooms and other surroundings with a residential character
Guest rooms or similar
Attention: This appliance cannot be used with an external timer or a separate remote control.
The appliance can become hot during use. Keep the power cord away from hot parts and don't cover the appliance.
PRECAUTIONS TO PREVENT EXPOSURE TO MICROWAVE ENERGY
Do not attempt to operate the oven with the door open as this can result in harmful exposure to microwave energy. Do not damage or tamper with the safety latch.
Do not place objects between the door and the oven.
Ensure dirt and cleaning materials do not accumulate between the door and the oven.
WARNING: if the door or the latch is damaged, the oven may not be used until it has been properly repaired by a qualified technician.
Failure to sufficiently and properly maintain the oven can lead to damage, cause malfunction or result in hazardous situations.
IMPORTANT SAFETY PRECAUTIONS
To reduce the risk of fire, electrocution, injury or exposure to microwave energy, the following safety measures must be taken:
-
Liquids or other foods should not be heated in closed containers due to the risk of explosion.
-
Components intended to protect against microwave energy should not be removed except by a qualified technician.
- Only use cooking utensils that are safe for microwave ovens.
- Clean the oven regularly and remove any leftover food residue.
- When heating food in plastic containers, keep an eye on the oven as the container could ignite.
- If smoke is noticed in the microwave oven, immediately remove the plug from the socket and leave the door closed to extinguish any flames.
CAUTION
- Do not overcook food.
- Do not store items in the oven. Do not store bread, cookies, etc. in the oven.
- Do not use the oven when it is empty. This is hazardous.
- Remove metal closures and handles from food packaging before placing the food in the oven.
- Always install the oven according to the installation instructions.
- Eggs in their shells, or whole hard-cooked eggs, may not be heated in the microwave oven. These may explode even after microwave cooking has ended.
- Use the appliance only as described in the manual. Do not use harmful chemicals or vapours in this appliance. This oven is only intended for heating
purposes. It is not suitable for industrial or laboratory use.
- Do not use or store this appliance outdoors or near water, in a damp area or near a swimming pool.
- The oven may become hot during use. Keep the electrical cord away from hot components and do not cover the oven.
- Do not allow the cord to hang over the edge of a table.
- The contents of baby bottles and baby food should always be shaken or stirred after heating and before use. To prevent burns, the temperature of the food should be checked before use.
- Heating liquids in the oven can result in a delayed cooking reaction. Therefore always be careful when removing the container from the oven.
- This unit may not be placed in a cabinet.
- Do not use a steam cleaner to clean your oven.
- Do not use abrasive cleaners or sharp objects to clean the glass on the door. This can damage the glass and cause it to break.
- The door of the unit may become warm during use.
- Do not try to disassemble the appliance.
Always connect the appliance to an earthed socket.
TO REDUCE THE RISK OF INJURY, KEEP THESE SAFETY WARNINGS FOR FUTURE REFERENCE
Your unit is equipped with a short electric cord to prevent tripping or becoming entangled in the cord. When an
extension cord is used, the capacity of the cord must be equal to or greater than the oven power. The extension cord must be placed in such a way that no one can trip over it or become entangled in it.
SPECIFICATIONS
Model: DO2425G
Voltage: 230V 50Hz
Input power - Microwave: 1450W
Output power - Microwave: 900W
Input power - Grill: 1000W
Oven capacity: 25L
Turntable diameter: 31.5cm
External dimensions: 513 × 320 × 306.2 ~mm
Net. Weight: 14.65 kg
CLEANING
Always remove the plug from the socket before cleaning the oven.
Use a damp cloth to clean the inside of the oven after every use.
- Clean components such as the grill, glass turntable, etc. in warm water using a mild detergent.
The door, latch and control panel can be cleaned using a damp cloth.
SUITABLE MATERIALS FOR THE MICROWAVE OVEN
Below is a list of items that can or cannot be used in the oven. If the object you wish to use is not included in this list, you can determine if the item is suitable for use in the microwave oven as follows:
Fill a microwave-safe container with 250ml cold water. Place this in the microwave oven together with the object to be tested. Switch the microwave oven on at maximum power for 1 minute. Carefully touch the object. If it is warm, it is not suitable for use in the microwave oven.
ATTENTION: never heat the object in the microwave oven for more than 1 minute.
SUITABLE MATERIALS
Aluminium foil: Only for covering food. Small pieces of foil can be placed over food to prevent it from overcooking. Sparking can occur if the foil is too close to the oven wall. The foil must therefore be at least 2.5cm from the oven wall.
- Grill rack: in accordance with the instructions in this manual. Improper use may cause the glass turntable to break.
Tableware: Only microwave-safe dishes. Do not use cracked or flaking dishes.
- Glass jars: always remove lid. May only be used to warm slightly. Most glass jars are not heat-resistant and may crack.
Glassware: heat-resistant oven glassware may be used. Ensure the glass does not contain any metal ornamentation or parts. Do not use cracked or damaged glass. - Oven cooking bags: in accordance with the instructions from the manufacturer. Do not use a metal clasp to close the bag. Make holes in the bag to allow the steam to escape.
- Plastic: only plastic suitable for use in microwave ovens. Follow the manufacturer's instructions. The plastic must be indicated as "microwave-safe". Some plastic containers become soft when the food inside is heated. Cooking bags and sealed bags must be pierced to allow the steam to escape.
- Plastic packaging: Only plastic that is allowed to be used in the microwave oven. May be used to cover the food to prevent the food from drying out. Always ensure the plastic does not come in contact with the food.
- Thermometer: only microwave-safe thermometers.
UNSUITABLE MATERIALS
Aluminium dishes: May cause sparks. Place the food in a microwave-safe dish.
- Food containers with metal handles: may cause sparks. Place the food in a microwave-safe dish.
- Metal kitchen utensils or with metal decoration: Metal shields the food from microwave energy. Metal decoration on the material may lead to sparking.
Metal twist-ties or closures: may lead to sparking and can cause a fire in the oven.
- Paper bags: may cause a fire in the oven
Styrofoam: can melt or contaminate the food contained in the styrofoam.
- Wood: wood dries out in the microwave oven and may crack or split.
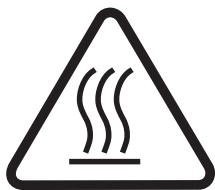
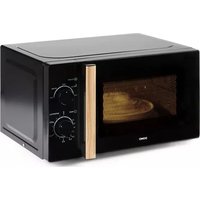
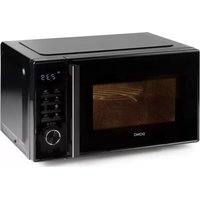
COMPONENTS
Remove all packaging materials in and around your oven. The following accessories are included with your oven: Glass turntable, turntable ring, grill rack and manual.
A. Control panel
B. Turntable drive
C. Turntable ring
D. Glass turntable
E. Viewing window
F. Door
G. Safety lock
H. Grill rack (only for grill, to be placed onto the glass turntable)
INSTALLING THE TURNTABLE
- The turntable and ring should always be used during cooking. Place the turntable ring in the centre of the microwave oven.
- Place the turntable on the ring ensuring that the centre of the turntable fits properly into the turntable drive.
- Never install the turntable upside down. Always ensure the turntable can turn freely.
- Food and containers should always be placed on the glass turntable for cooking.
- If the glass turntable or the ring is cracked, contact your service centre.
INSTALLING THE OVEN
Remove all packaging materials and accessories. Check the oven for any damage such as dents and ensure the door closes properly. Do not use the oven if any damage is found. Remove the plastic film surrounding the appliance. This film prevents scratches during manufacture and transport. However, do not remove the light brown mica
protection on the inside of your oven.
- Choose a location to install your microwave oven where there is plenty of open space to allow air movement to and from the appliance. The minimum height for installing the oven is 85cm . Place the back of the oven against the wall. A minimum space of 30cm above the appliance
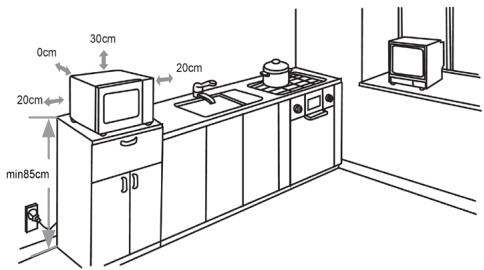
should be left open. Between the oven and other walls, a minimum space of 20cm should be left open.
- Never remove the feet on the bottom of the microwave oven.
- A blocked air inlet or outlet may result in damage to the oven.
- Place the oven as far away from radio and TV as possible, to avoid interference.
- Insert the microwave oven plug into the socket. Ensure the voltage in your home corresponds to the voltage indicated on your oven.
- Warning: Do not install the oven above a stove or other heat-producing device.
- The accessible portion of the oven may become warm during use.
SETTING THE CLOCK
When you plug the oven into the socket, the display shows 0:00 and one beep is heard.
- Press the CLOCK/KITCHEN TIMER button. The display shows 00:00 and the hour indicator flashes.
- Turn the knob to adjust the hour.
- Press the CLOCK/KITCHEN TIMER button again and the minute indicator flashes.
- Turn the knob to adjust the minutes.
- Confirm the set time by pressing the CLOCK/KITCHEN TIMER button again.
Pressing the STOP/CLEAR button will cancel the setting of the time.

MICROWAVE
Press the MICROWAVE button once and the display indicates: P100.
- You can adjust the power incrementally by pressing MICROWAVE or turning the knob. You can select between P100, P80, P50, P30 or P10. The numbers are the percentages of the total power.
To confirm, press the START/+30SEC./CONFIRM button.
- Turn the knob to adjust the cooking time from between 5 sec. and 95 min .
- Press the START/+30SEC./CONFIRM button to start cooking.
Power summary
| Press/turn | Once | Twice | Three times | Four times | Five times |
| Power | 100% | 80% | 50% | 30% | 10% |
The time intervals for setting the cooking time are as follows:
Between: Interval:
0-1 min. 5 sec.
1-5 min. 10 sec.
5-10 min. 30 sec.
10-30 min. 1 min.
30-95 min. 5 min.

GRILL
Press the GRILL/COMBI button once and G appears on the display.
To confirm, press the START/+30SEC./CONFIRM button.
- Turn the knob to adjust the cooking time from between 5 sec. and 95 min .
- Press the START/+30SEC./CONFIRM button to start grilling.
When half of the grilling time has expired, the oven will beep twice to indicate the food should be turned over. You can ignore this signal and continue grilling. It is better to turn the food over, close the door again and press the START/+30SEC./CONFIRM to continue.
COMBINATION
Press the GRILL/COMBI button once and G appears on the display.
- Press GRILL/COMBI or turn the knob to change the selection. For combination cooking you can choose between: G, C-1 or C-2.
DESIRED COMBINATION FUNCTION SELECTIONS:
| Display | Microwave | Grill |
| G | 0% | 100% |
| C-1 | 55% | 45% |
| C-2 | 36% | 64% |
To confirm, press the START/+30SEC./CONFIRM button.
- Turn the knob to adjust the cooking/grilling time from between 5 sec. and 95 min .
- Press the START/+30SEC./CONFIRM button to start cooking/grilling.
KITCHEN TIMER
Press the CLOCK/KITCHEN TIMER button twice and the display indicates: 00:00.
- Turn the knob to set the timer to a maximum of 95 minutes.
- Press the START/+30SEC./CONFIRM button to confirm the setting.
- When the time has expired, the clock display will switch off and the oven will beep five times. The display will then show the current time.
The kitchen timer will continue to count down even if you open the door.
You can not, however, enter any other program when the kitchen timer is operating.

DEFROST BY WEIGHT
- Press the WEIGHT DEFROST button once and dEF1 will be shown on the display.
- Turn the knob to set the desired weight of the food to be defrosted. You can select from 100 till 2,000 grams.
- Press the START/+30SEC./CONFIRM button to start defrosting. You can pause defrosting at any time by pressing the STOP/CLEAR button. To continue defrosting, simply press the START/+30SEC./CONFIRM button. If, however, you press the STOP/CLEAR button twice, the oven will go into stand-by mode.

DEFROST BY TIME
- Pressing the TIME DEFROST button twice causes dEF2 to appear on the display.
- Turn the knob to adjust the desired defrosting time.
- Press the START/+30SEC./CONFIRM button to start defrosting. You can pause defrosting at any time by pressing the STOP/CLEAR button. To continue defrosting, simply press the START/+30SEC./CONFIRM button. If, however, you press the STOP/CLEAR button twice, the oven will go into stand-by mode.

AUTO MENU
- Before pressing any menu button, turn the knob to the right. This selects the auto menu options. You can select from 8 preset function (A-1 to A-8). The display indicates the type of food corresponding to each function (see photo).
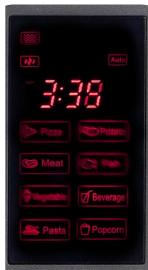
- Press the START/+30SEC./CONFIRM button to confirm your selection.
- Turn the knob to enter the weight (g).
- Press the START/+30SEC./CONFIRM button to start the oven.
TABLE
| Menu | Weight (g) | Display | Power |
| Pizza (A-1) | 200 | 200 | 100% microwave |
| 400 | 400 | ||
| Meat (A-2) | 250 | 250 | 100% microwave |
| 350 | 350 | ||
| 450 | 450 | ||
| Vegetables (A-3) | 200 | 200 | 100% microwave |
| 300 | 300 | ||
| 400 | 400 | ||
| Pasta (A-4) | 50g (with 450ml water) | 50 | 80% microwave |
| 100g (with 800ml water) | 100 | ||
| Potatoes (A-5) | 200 | 200 | 100% microwave |
| 400 | 400 | ||
| 600 | 600 | ||
| Fish (A-6) | 250 | 250 | 80% microwave |
| 350 | 350 | ||
| 450 | 450 | ||
| Beverages (A-7) | 1 (120ml) | 1 | 100% microwave |
| 2 (240ml) | 2 | ||
| 3 (360ml) | 3 | ||
| Popcorn (A-8) | 50 | 50 | 100% microwave |
| 100 | 100 |
QUICK COOKING
Press the START/+30SEC./CONFIRM button before pressing any other button to use your microwave oven for 30 seconds at 100% power. Repeatedly pressing the button will increase cooking each time by 30 seconds, up to a maximum of 95 minutes.
Pressing the START/+30SEC./CONFIRM button when grill or combination is selected will also increase the cooking time at full power by 30 seconds. This button has no effect only when defrosting by weight or when the auto menu has been selected.
Turn the knob left to immediately set the cooking time and press the START/+30SEC./CONFIRM button to cook at 100% microwave power.
COOKING IN STAGES
You can set your oven so that it cooks in 2 stages. If you want to defrost and then cook, of course you have to set the defrost function first. You will hear a signal when the first stage has finished and the next stage begins. Only auto programs can not be set as a stage.
For example: If you want to defrost food for 5 minutes and then cook at 80% microwave power for 7 minutes, then follow these steps:
Press TIME DEFROST once. The display will say dEF2.
Turn the knob to set the time to 5 minutes.
Press MICROWAVE once. Turn the knob to set the power to 80% (P80).
Press START/+30SEC./CONFIRM to confirm.
Turn the knob to set 7 minutes.
Press START/+30SEC./CONFIRM to start cooking.

LOCKING/CHILD LOCK
Press and hold the STOP/CLEAR button for 3 seconds. A long beep is heard and the display shows a key. To unlock the oven, press and hold the STOP/CLEAR button again for 3 seconds.
You again hear a long beep and the key symbol disappears from the display.
NOTES
- When the oven operates at low power, the oven light will illuminate less brightly.
It is normal that condensation can accumulate on the oven door. - Press CLOCK/KITCHEN TIMER during cooking to display the time for 2-3 seconds.
- Press MICROWAVE or GRILL/COMBI during cooking to display the set power for 2-3 seconds.
- Press START/+30SEC./CONFIRM to continue cooking after the door has been opened.
After setting a program for cooking, press START/+30SEC./CONFIRM within a minute. Otherwise the time will be displayed and the setting will be cancelled.
PRECAUCIONES IMPORTANTES
Out of dust bags? Need an anti-scale cartridge?
You can now also order our accessories and parts in the
Domo Webshop
Webshop Domo
Domo-Webshop
Domo Webshop
Surfhaar:
Rendez-vous sur:
Einfach unter:
Surf to:
webshop.domo-elektro.be
of scan hier:
ou scannez ici:
oder hier scannen:
or scan here:


- CONDITIONS DE GARANTIE
- CONDICIONES DE GARANTÍA
- RECYCLAGE-INFORMATIE
- RECYCLING INFORMATIONEN
- RECYCLING INFORMATION
- INFORMACION DE RECICLaje
- SNEL KOKEN MET MICROGOLF
- INSTALLATION DU FOUR
- PRECAUTIONS TO PREVENT EXPOSURE TO MICROWAVE ENERGY
- IMPORTANT SAFETY PRECAUTIONS
- CAUTION
- TO REDUCE THE RISK OF INJURY, KEEP THESE SAFETY WARNINGS FOR FUTURE REFERENCE
- SPECIFICATIONS
- CLEANING
- SUITABLE MATERIALS FOR THE MICROWAVE OVEN
- SUITABLE MATERIALS
- UNSUITABLE MATERIALS
- COMPONENTS
- INSTALLING THE TURNTABLE
- INSTALLING THE OVEN
- SETTING THE CLOCK
- MICROWAVE
- GRILL
- COMBINATION
- KITCHEN TIMER
- DEFROST BY WEIGHT
- DEFROST BY TIME
- AUTO MENU
- QUICK COOKING
- COOKING IN STAGES
- LOCKING/CHILD LOCK
- NOTES
- PRECAUCIONES IMPORTANTES
Brand : DOMO
Model : DO2425G
Category : Microwave