
BBS71BLAG - Vacuum Cleaner BOSCH - Free user manual and instructions
Find the device manual for free BBS71BLAG BOSCH in PDF.
User questions about BBS71BLAG BOSCH
0 question about this device. Answer the ones you know or ask your own.
Ask a new question about this device
Download the instructions for your Vacuum Cleaner in PDF format for free! Find your manual BBS71BLAG - BOSCH and take your electronic device back in hand. On this page are published all the documents necessary for the use of your device. BBS71BLAG by BOSCH.
USER MANUAL BBS71BLAG BOSCH
Cordless handstick vacuum cleaner
| BBS71 | BCS71 | BKS71 | BSS71 |
[de] Gebrauchsanleitung 10
[en] Information for Use 15
[fr] Manuel d'utilisation 20
[it] Manuale utente 26
[nl] Gebruikershandleiding 32
[da] Betjeningsvejledning 38
[no] Bruksanvisning 43
[sv] Bruksanvisning 48
[fi] Käyttöohje 53
[es] Manual de usuario 58
[pt] Manual do utilizador 64
[el] Εγχειρίδιο χρήστη 70
[tr] Kullanım kılavuzu 76
[pl] Instrukcja obsługi 82
[hu] Használati útmutató 88
[ru] Руководство пользователя 94
[ro] Manual de utilizare 100
[cs] Návod k obsluze 106
[ar] دليل المستخدم 111

text_image
QR code image containing encoded data, no visible human-readable text
| [de] | Scannen Sie den QR-Code oder besuchen Sie die Webseite, um die erweiterten Hinweise zur Benutzung zu öffnen. Dort finden Sie zusätzliche Informationen zu Ihrem Gerät oder Zubehör. |
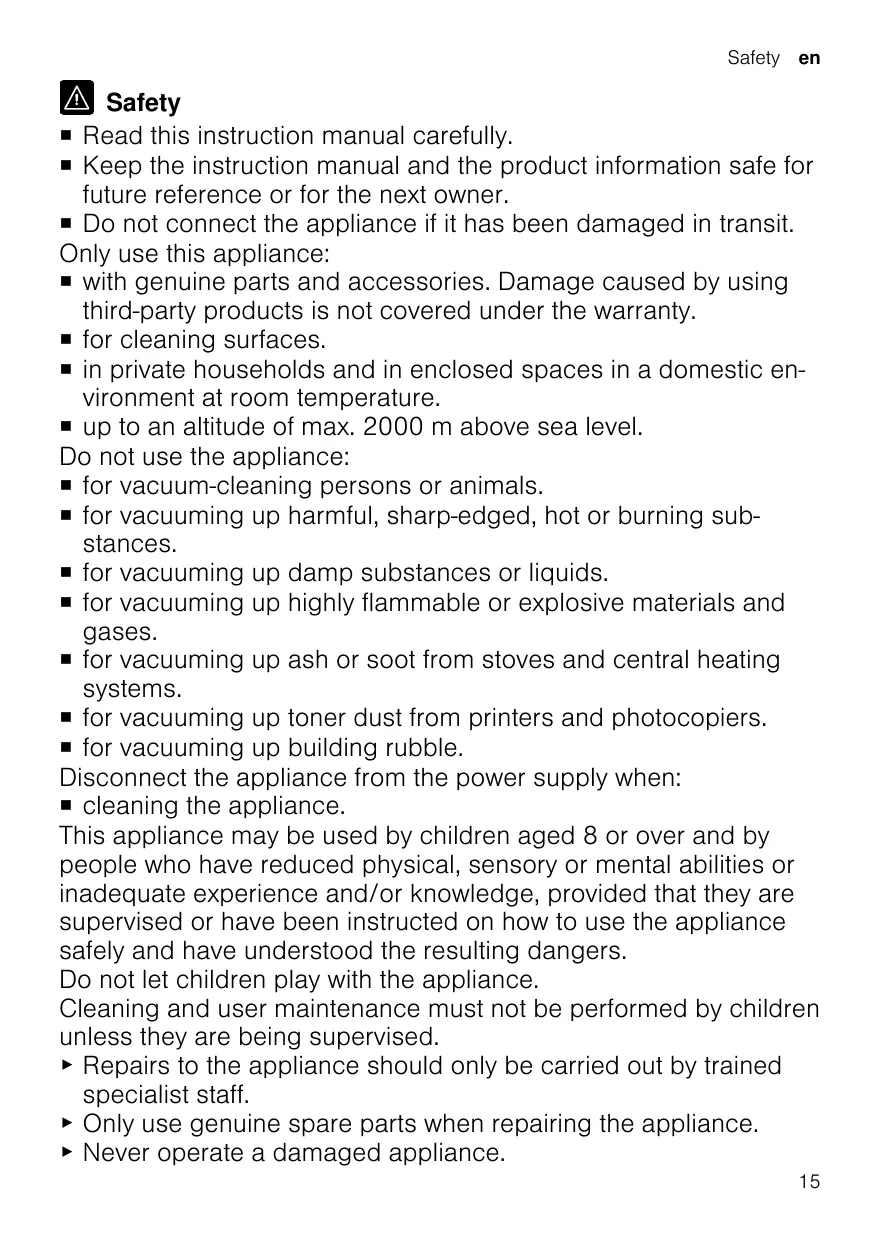
| [en] | Scan the QR code or visit the website to open the Further Notices for Use. You can find additional information about your appliance or accessory here. |
| [fr] | Scanner le code QR ou visiter le site Web pour ouvrir les informations d'utilisation complémentaires. Vous y trouverez des informations supplémentaires concernant votre appareil ou accessoire. |
| [it] | Scansionare il codice QR oppure visitare il sito Web per indicazioni dettagliate sull'uso. Si trovano informazioni aggiuntive sull'apparecchio o gli accessori. |
| [nl] | Scan de QR-code of bezoek de website om de uitgebreide gebruiksinstructies te openen. Hierin vindt u meer informatie over het apparaat of toebehoren. |
| [da] | Scan QR-koden, eller besøg hjemmesiden, for at åbne de udvidede anvisninger om anvendelse. Der kan der findes yderligere oplysninger om apparatet eller tilbehøret. |
| [no] | Skann QR-koden eller besøk nettstedet for å åpne mer informasjon om bruken. Der finner du mer informasjon om apparatet eller tilbehøret. |
| [sv] | Scanna QR-koden eller gå till webbplatsen och öppna de utökade användningsanvisningarna. Där finns mer information om din apparat eller dina tillbehör. |
| [fi] | Skannaa QR-koodi tai vieraile internet-sivustollamme, jotta voit avata laajennetut käyttötiedot. Sieltä löydät laitetta tai varustetta koskevia lisätietoja. |
| [es] | Para abrir las indicaciones ampliadas sobre el uso, visite la página web o escanee el código QR. Allí encontrará más información sobre el aparato o los accesorios. |
| [pt] | Leia o código QR ou visite a página web para abrir as indicações avançadas relativas à utilização. Aí encontra informações adicionais sobre o seu aparelho ou acessório. |
| [el] | Σαρώστε τον κωδικό QR ή επισκεφτείτε την ιστοσελίδα, για να ανοίξετε τις διευρυμένες υποδείξεις για τη χρήση. Εκεί θα βρείτε πρόσθετες πληροφορίες για τη συσκευή σας ή τα εξαρτήματα. |
| [tr] | Ayrıntılı kullanım bilgilerine ulaşmak için QR kodu taratin veya web sayfasını ziyaret ediniz. Cihaz ve aksesuarlar ile ilgili ayrıntılı bilgileri bu şekilde edinebilirsiniz. |
| [pl] | Aby uzyskać rozszerzone informacje na temat zastosowań urządzenia, należy zeskanować kod QR albo wejść na stronę internetową. Można tam znaleźć dodatkowe informacje na temat posiadanego urządzenia i akcesoriów. |
| [hu] | Olvassa be a QR-kódot vagy keresse fel a weboldalt a kibővített használati utasítás megnyitásához. Ott ki-egészítő információkat talál a készülékkel vagy tartozékkal kapcsolatban. |
| [ru] | Чтобы узнать больше о пользовании, отсканируйте QR-код или зайдите на сайт. Там вы найдете более подробные сведения о приборе и принадлежностях. |
| [ro] | Scanați codul QR sau accesăți site-ul web pentru a obține mai mult recomandări privind utilizarea. Acolo veți găsi mai multe informații privind aparatul dumneavoastră sau accesoriiile. |
| [cs] | Pro další informace k používání načtěte QR kód nebo navštivte webovou stránku. Tam najdete další informace ke spotřebiči nebo příslušenství. |
text_image
QR code image containing encoded data, no visible human-readable text
text_image
Diagram of a vacuum cleaner with numbered parts and exploded view, showing internal components and assembly steps.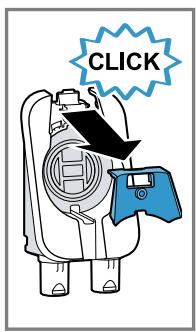
text_image
CLICK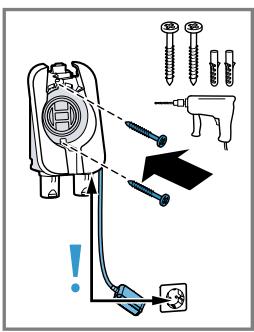
text_image
Diagram illustrating the installation of a mechanical component with screws, a drill, and warning symbols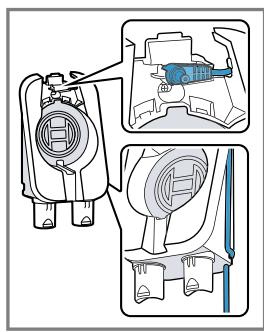
natural_image
Technical line drawing of a mechanical component with multiple views and mounting features (no text or symbols)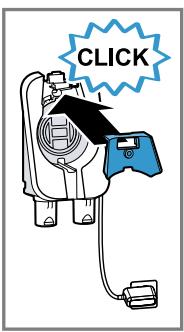
text_image
CLICK2
natural_image
Diagram of a car interior with a blue plastic container and directional arrow indicating movement (no text or symbols)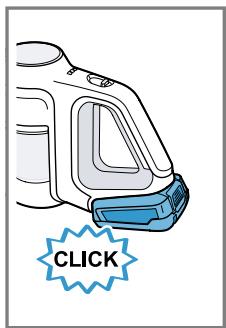
text_image
CLICK3
text_image
CLICK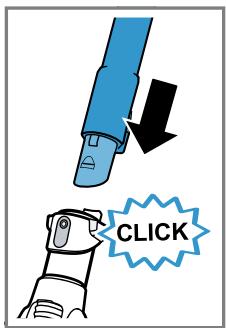
text_image
CLICK4
natural_image
Illustration of a blue handheld device with a black arrow pointing to a mechanical component (no text or symbols)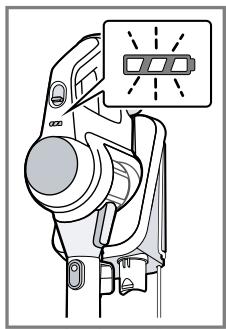
natural_image
Technical diagram of a mechanical device with a highlighted component (no text or symbols)5
text_image
Diagram showing installation steps of a washing machine, including plug-in and electrical socket installation with numbered instructions.6

natural_image
Diagram of a car interior showing a blue plastic container and a numbered label (1), with no readable text or symbols.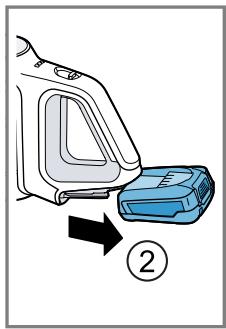
text_image
Diagram showing a hand holding a water dispenser with an arrow indicating process step 27
natural_image
Illustration of a blue battery being inserted into a charging station (no text or symbols)8
9
text_image
CLICK10

text_image
0 % 1-30 % 30-60 % 60-100 %11
text_image
Diagram showing a car interior with a highlighted LED indicator and an arrow pointing to the LED screen.12
text_image
0 Eco Turbo Auto ①13
text_image
Diagram showing a hand using a blue tool to adjust a component, labeled with step ① and step ②.14
text_image
CLICK CLICK15
text_image
CLICK16
text_image
Diagram illustrating a device operation step with labeled parts and a 'CLICK' button indicating action.17
text_image
CLICK18
natural_image
Diagram showing a blue tool with directional arrows indicating movement or force (no text or symbols)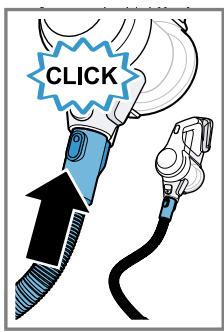
text_image
CLICK19
text_image
CLICK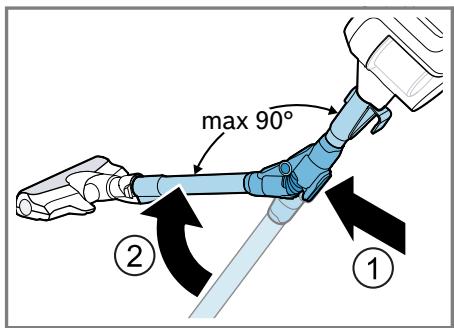
text_image
max 90° ② ①20
natural_image
Line drawing of a person interacting with a robotic arm near a TV set (no text or symbols)21

text_image
CLICK22
text_image
Diagram showing two robotic arm states with numbered annotations indicating movement or positioning steps.23
text_image
CLICK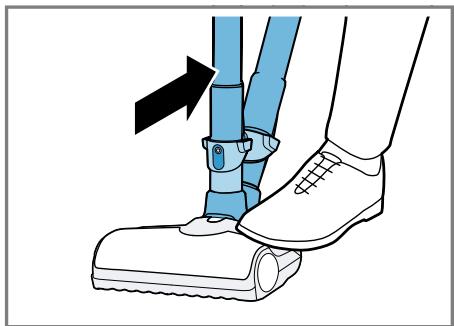
natural_image
Illustration of a person's foot wearing a blue ergonomic device and a white sneaker, with an arrow indicating motion (no text or symbols)24
text_image
Diagram illustrating a mechanical assembly process with labeled parts and directional arrows indicating motion or movement.25

text_image
CLICK26

text_image
Diagram showing a mechanical device with labeled parts and directional arrows, likely illustrating a step or motion process.[Non-Text]
text_image
Diagram showing a hand holding a blue medical device with labeled parts ① and ②, indicating step-by-step instructions for device manipulation.27
natural_image
Diagram of a car interior showing a blue plastic container and a numbered label (1), with no readable text or symbols.28
text_image
Diagram showing a car interior with a blue device and directional arrow labeled '②', likely illustrating a vehicle or cleaning process.[Non-Text]
text_image
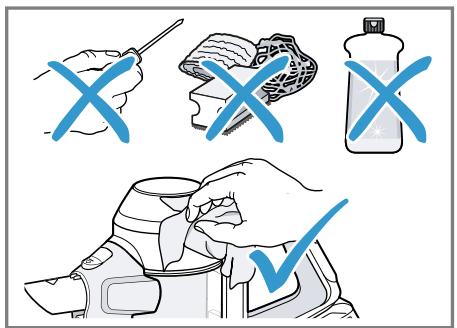
Illustration showing a hand holding a container with checkmarks and crossed-out X marks, alongside food items including a plate and a water bottle.29
text_image
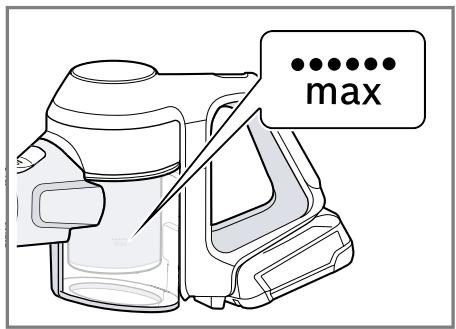
max30
text_image
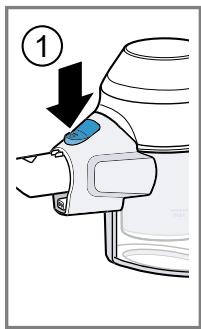
①31
text_image
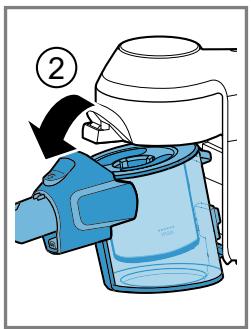
Diagram showing a device being processed with a blue container, labeled with step 2 indicating the process.[Non-Text]
text_image
①32
natural_image
Illustration of a blue mechanical device emitting particles, with a black arrow indicating direction (no text or symbols)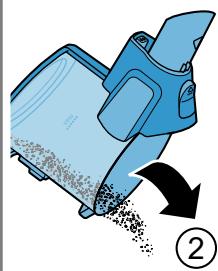
natural_image
Illustration of a blue mechanical device emitting particles, with a black arrow indicating particle flow (no text or symbols)
text_image
①33
text_image
③ ② CLICK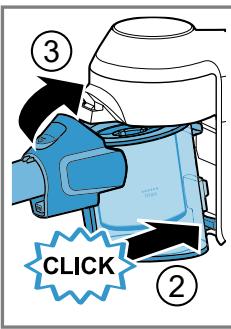
text_image
③ CLICK ②
text_image
Diagram showing two labeled parts of a device with arrows indicating direction, likely illustrating a process or assembly.34
text_image
3x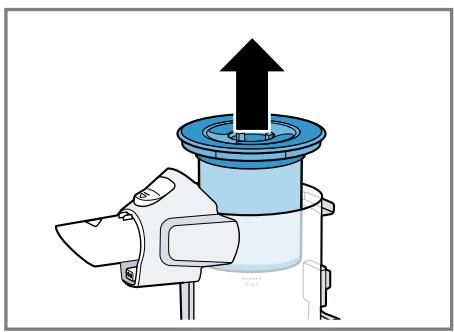
natural_image
Diagram of a mechanical device with an upward arrow indicating force or movement (no text or symbols present)35
text_image
Diagram illustrating a lock mechanism with labeled arrows and a numbered step indicator36
text_image
Diagram showing a mechanical assembly with labeled step 2, indicating a step in a process.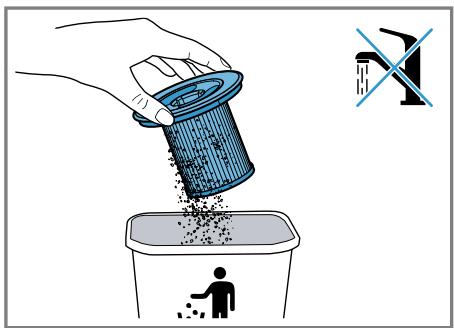
text_image
Illustration showing a hand pouring granular material into a trash bin with a 'no drain' symbol, indicating no waste or discharge.37
natural_image
Illustration of a hand pouring granular material into a trash bin with a person silhouette below (no text or symbols)38
natural_image
Illustration of hands holding a blue container with scattered particles, no text or symbols present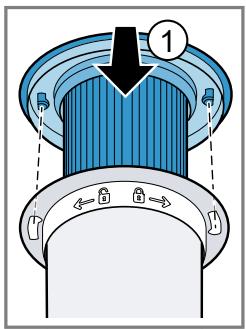
text_image
Diagram of a mechanical component with labeled parts and directional arrows indicating movement or force39
text_image
Diagram illustrating a lock mechanism with labeled arrows and a numbered step indicator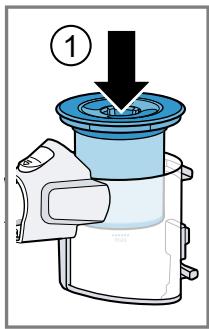
text_image
①40
text_image
③ CLICK ②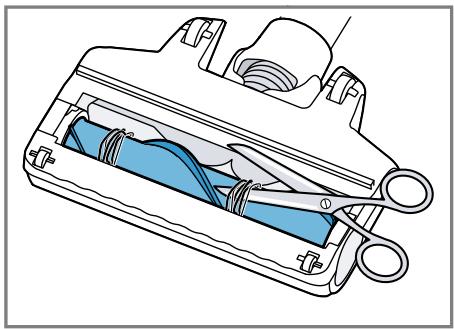
natural_image
Cross-sectional diagram of a mechanical device with blue internal components and black handle (no text or symbols)41

Sicherheit
- Read this instruction manual carefully.
- Keep the instruction manual and the product information safe for future reference or for the next owner.
■ Do not connect the appliance if it has been damaged in transit.
Only use this appliance:
■ with genuine parts and accessories. Damage caused by using third-party products is not covered under the warranty.
■ for cleaning surfaces.
■ in private households and in enclosed spaces in a domestic environment at room temperature.
■ up to an altitude of max. 2000 m above sea level.
Do not use the appliance:
■ for vacuum-cleaning persons or animals.
■ for vacuuming up harmful, sharp-edged, hot or burning substances.
■ for vacuuming up damp substances or liquids.
■ for vacuuming up highly flammable or explosive materials and gases.
■ for vacuuming up ash or soot from stoves and central heating systems.
■ for vacuuming up toner dust from printers and photocopiers.
■ for vacuuming up building rubble.
Disconnect the appliance from the power supply when:
■ cleaning the appliance.
This appliance may be used by children aged 8 or over and by people who have reduced physical, sensory or mental abilities or inadequate experience and/or knowledge, provided that they are supervised or have been instructed on how to use the appliance safely and have understood the resulting dangers.
Do not let children play with the appliance.
Cleaning and user maintenance must not be performed by children unless they are being supervised.
▶ Repairs to the appliance should only be carried out by trained specialist staff.
▶ Only use genuine spare parts when repairing the appliance.
▶ Never operate a damaged appliance.
en Safety
▶ Never operate an appliance with a cracked or fractured surface.
▶ Call customer services. → Page 19
▶ Only use the appliance in enclosed spaces.
▶ Never expose the appliance to intense heat or humidity.
- Do not use steam- or high-pressure cleaners to clean the appliance.
▶ Never let the power cord come into contact with hot appliance parts or heat sources.
▶ Never let the power cord come into contact with sharp points or edges.
▶ Never kink, crush or modify the power cord.
- Connect and operate the charging cable ^1 and the quick charger ^1 only in accordance with the specifications on the rating plate.
- Connect the charging cable ^1 and the quick charger ^1 to a power supply with alternating current only via a properly installed socket with earthing.
- When cleaning the appliance, do not use flammable substances or substances that contain alcohol.
- Keep clothing, hair, fingers and other body parts away from the openings on the appliance and the moving parts.
▶ Never point the pipe or the nozzles towards eyes, hair, ears or mouths.
- Ensure that children do not play with the appliance, even when it is in the base station ^1 .
▶ Persons with electronic implants must stand at least 10 cm away from the appliance.
- Keep packaging material away from children.
▶ Do not let children play with packaging material.
▶ Protect the battery against fire, heat and constant sunlight.
▶ Protect the battery against water and penetrating moisture.
▶ Never open the battery.
- When not in use, keep the battery away from metal objects, e.g. paper clips, coins, keys, nails or screws.
▶ Supply fresh air.
▶ If there are any problems, seek medical advice from a doctor.
▶ If these come into contact with the skin, wash immediately with cold water.
▶ If these come into contact with the eyes, seek medical help.
Preventing material damage
▶ Check and clean any wet objects.
▶ Replace damaged objects.
▶ Regularly check the running surfaces of the nozzles for wear.
▶ Replace worn nozzles.
▶ Never use the nozzle without the brush roller in place.
▶ Never operate the appliance without the filter unit.
Overview
You can find an overview of the parts of your appliance here.
→ Fig. 1
| 1 | Dust container |
| 2 | Fluff filter |
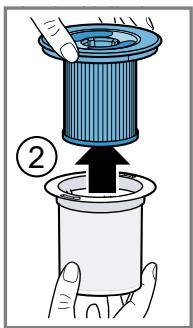
| 3 | Cartridge filter |
| 4 | Power control and on/off switch |
| 5 | Status display |
| 6 | Dust container release button |
| 7 | Storage hook |
| 8 | Flexible suction pipe |
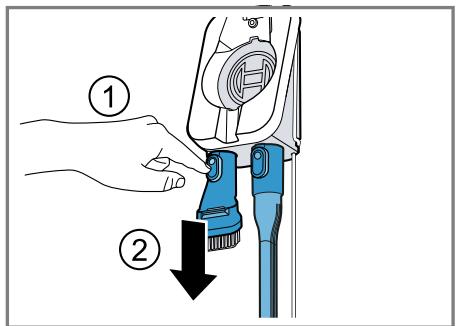
| 9 | Foot release |
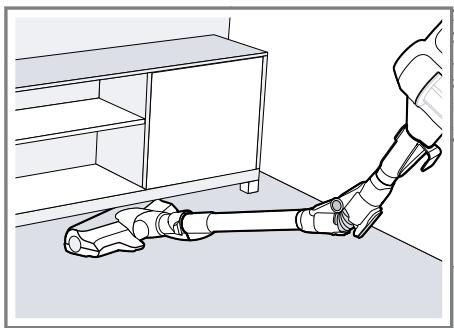
| 10 | Universal floor nozzle with freestanding function |
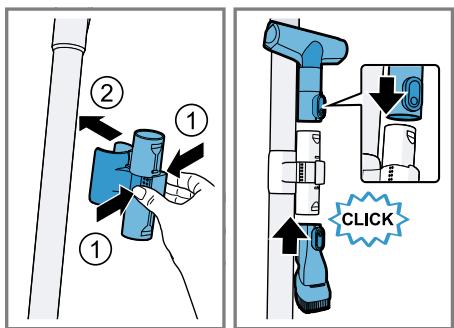
Installing the base station
▶ Check whether any household wiring could be damaged in the installation area.
- Do not install the base station horizontally or vertically above, below or next to a socket.
→ Fig. 2 - 3
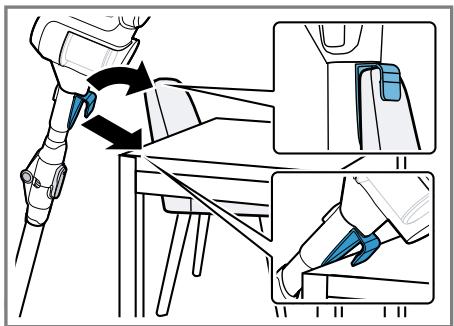
Operation
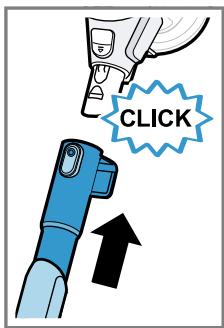
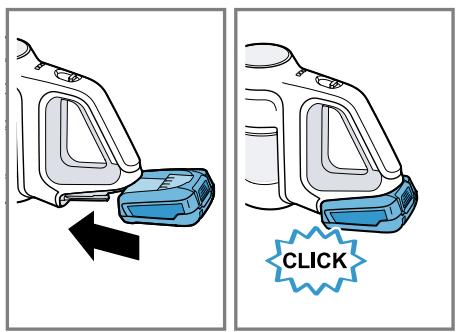
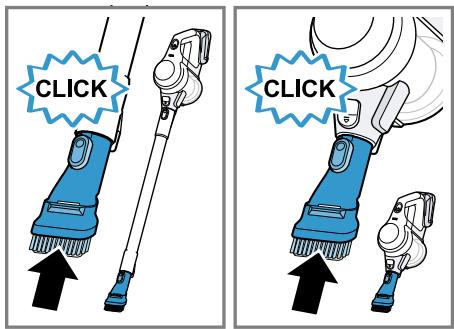
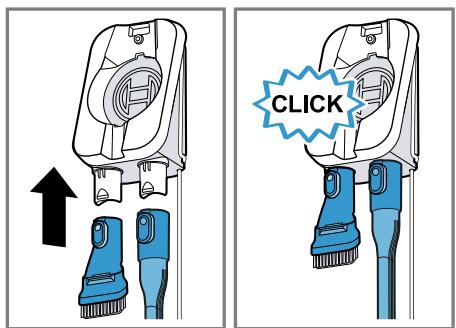
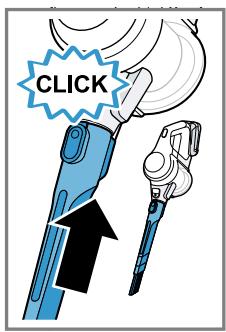
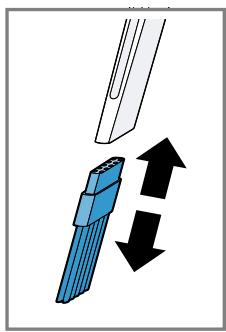
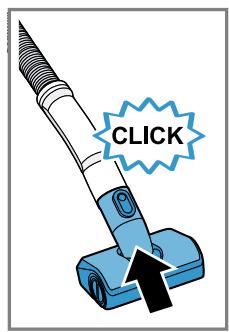
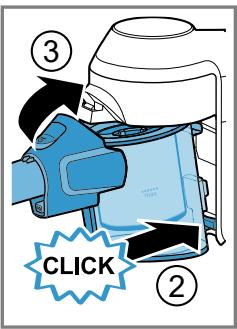
Installing the appliance
→ Fig. 4 - 5
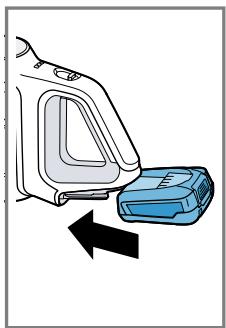
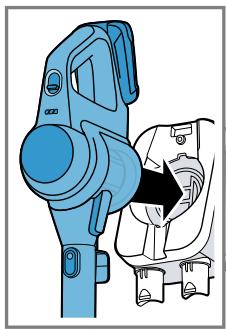
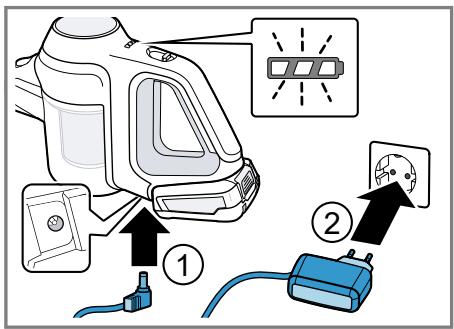
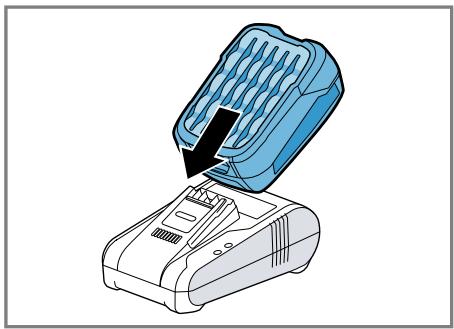
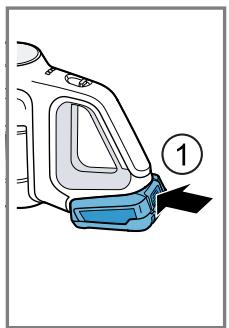
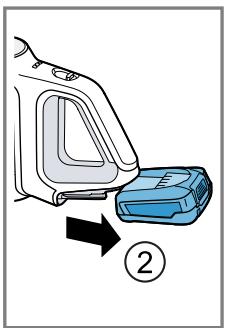
Charging the appliance
▶ Only charge the battery in chargers that are recommended by the manufacturer.
▶ Only use the battery in connection with the Bosch appliance.
- Charge the battery using the original charging cable ^1 or the original quick charger ^1 .
▶ Only use batteries from the Power for ALL 18 V series.
- Ensure that children do not play with the appliance, even when it is in the base station ^1 .
→ Fig. 6 - 10
Battery runtimes
You can find an overview of the battery runtimes, depending on the battery that is used, here.
Notes
-
The appliance features intelligent battery detection. With 2.50 Ah and 3.0 Ah batteries from the Power for ALL 18 V series, the appliance is designed for everyday cleaning tasks. The 4.0 Ah Power + battery from the Power for ALL 18 V series optimises the appliance for the runtime. With the 5.0 Ah battery in the Power for ALL 18 V series, the appliance is designed for particularly difficult cleaning tasks.
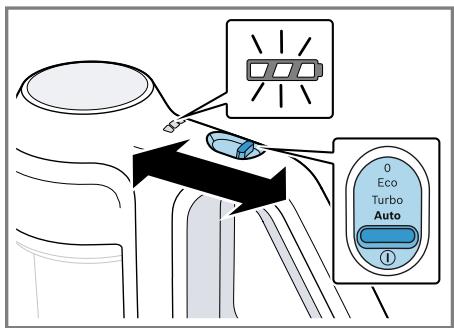
■ The following modes affect the battery runtime: -
Mode 1: Eco mode with non-electrical accessory
- Mode 2: Eco mode with electrical floor nozzle
- Mode 3: Auto mode with electrical floor nozzle
- Mode 4: Turbo mode with electrical floor nozzle
| Runtime | 2,5 Ah | 3,0 Ah | 4,0 Ah Power+ | 5,0 Ah |
| Mode 1 up to min. | 35 | 40 | 45 | 35 |
| Mode 2 up to min. | 25 | 30 | 35 | 30 |
| Mode 3 up to min. | 12 | 15 | 20 | 25 |
| Mode 4 up to min. | 8 | 10 | 10 | 12 |
Notes
■ Like every Li-ion battery, the batteries from the Power for ALL 18 V series wear out over time, meaning that the battery capacity and the runtime decrease. This is a natural aging process and not the result of a material error, manufacturing error or material defect.
■ You can delay the natural wear by using the following measures:
- Only charge the battery in the temperature range between 0 °C and 45 °C.
- Only store the battery in the temperature range between -20 °C and 50 °C.
- Do not store the battery for an extended period of time if it is fully charged or fully discharged.
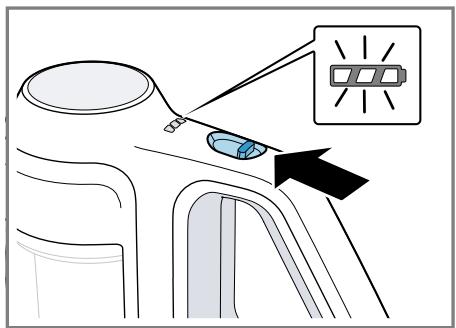
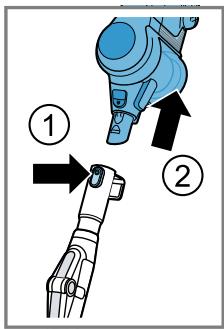
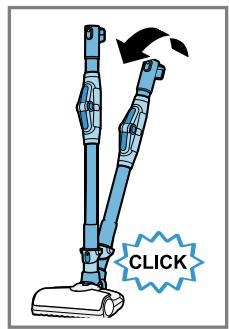
Operating the appliance
→ Fig. 11 - 25
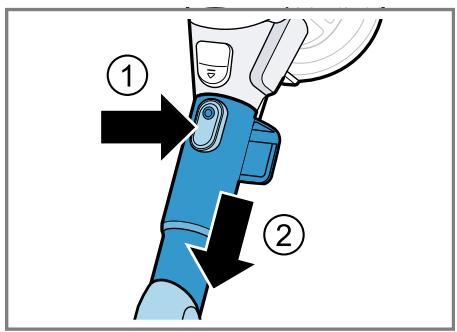
Removing the appliance
→ Fig. 26 - 28
Cleaning and servicing
To keep your appliance working efficiently for a long time, it is important to clean and maintain it carefully.
Cleaning the appliance
→ Fig. 29 - 29
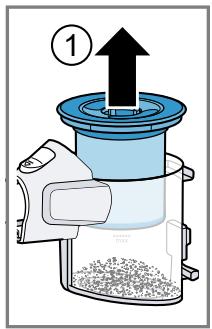
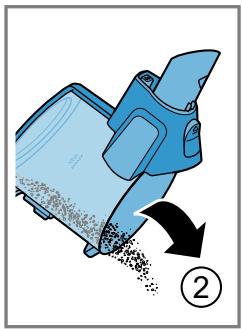
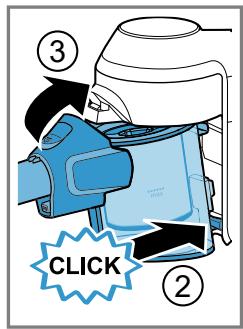
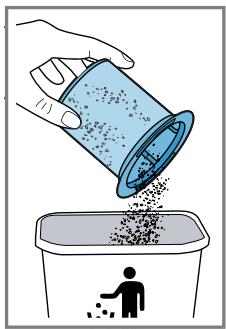
Emptying the dust container
→ Fig. 30 - 33
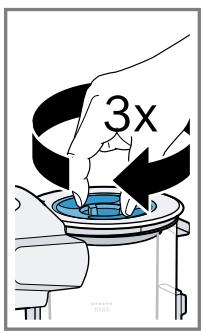
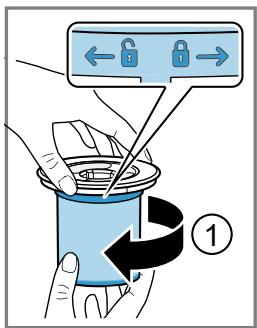
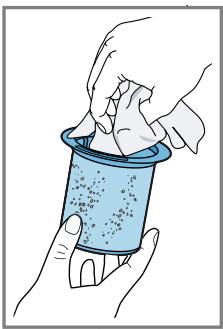
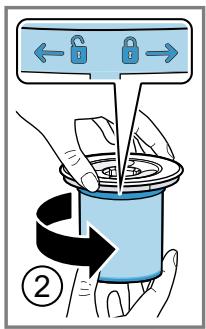
Cleaning the filter unit
▶ Never allow the filters to come into contact with liquids.
→ Fig. 34 - 40
Cleaning the floor nozzle
→ Fig. 41 - 41
Troubleshooting
▶ Repairs to the appliance should only be carried out by trained specialist staff.
▶ Only use genuine spare parts when repairing the appliance.
The appliance is not working.
The battery status display does not show any status.
The battery has not been inserted correctly.
- Insert the battery correctly.
The battery has not been charged.
▶ Charge the battery.
The red fault indicator lights up for 10 seconds.
The battery has overheated or overcooled.
- Switch off the appliance and disconnect the appliance from the power supply.
2 Wait until battery has reached room temperature.
The appliance has overheated or overcooled.
- Switch off the appliance and disconnect the appliance from the power supply.
- Wait until the appliance has reached room temperature.
No charging function.
Incorrect charger was used.
▶ Only use the charger that is included.
The dust container cannot be inserted.
The filter unit is not complete.
- Check whether the filter unit is complete.
The filter unit or dust container is not positioned correctly.
- Check whether the filter unit and dust container are inserted correctly.
Suction is reduced.
The filter is blocked.
- Switch off the appliance and disconnect the appliance from the power supply.
- Clean the filter unit.
The nozzle is blocked.
- Switch off the appliance and disconnect the appliance from the power supply.
-
Check whether the air channel from the nozzle to the appliance is blocked.
-
Empty the dust container.
- Clean the filter unit.
- Once the appliance has cooled down, switch the appliance back on.
Disposing of old appliance
- Dispose of the appliance in an environmentally friendly manner. Information about current disposal methods are available from your specialist dealer or local authority.
This appliance is labelled in accordance with European Directive 2012/19/EU concerning used electrical and electronic appliances (waste electrical and electronic equipment - WEEE). The guideline determines the framework for the return and recycling of used appliances as applicable throughout the EU.
Disposing of batteries
Batteries should be recycled in an environmentally friendly manner. Do not dispose of the batteries in the household rubbish.
- Dispose of batteries in an environmentally friendly manner.
According to the European Guideline 2006/66/EC, defective or used battery packs/batteries, must be collected separately and disposed of in an environmentally correct manner.
Customer Service
Detailed information on the warranty period and terms of warranty in your country is available from our after-sales service, your retailer or on our website.
The contact details for Customer Service can be found in the enclosed Customer Service directory or on our website.

Sécurité
Accu is oververhit of onderkoeld.
Apparaat is oververhit of onderkoeld.
text_image
QR code image with no surrounding text or symbols
Siguranța
- Introduceti corect accumulatorul.
Thank you for buying a Bosch Home Appliance!
Register your new device on MyBosch now and profit directly from:
- Expert tips & tricks for your appliance
- Warranty extension options
• Discounts for accessories & spare-parts
• Digital manual and all appliance data at hand - Easy access to Bosch Home Appliances Service
Free and easy registration – also on mobile phones:
www.bosch-home.com/welcome
BOSCH HOME APPLIANCES SERVICE
Looking for help? You'll find it here.
Expert advice for your Bosch home appliances, help with problems or a repair from Bosch experts.
Find out everything about the many ways Bosch can support you: www.bosch-home.com/service
Contact data of all countries are listed in the attached service directory.
BSH Hausgeräte GmbH
Carl-Wery-Straße 34
81739 München, GERMANY
www.bosch-home.com
A Bosch Company

8001287416 (030426)
Valid within Great Britain:
Imported to Great Britain by
BSH Home Appliances Ltd.
Grand Union House
Old Wolverton Road
Wolverton, Milton Keynes
MK12 5PT
United Kingdom
