USER MANUAL BI CS 249 F W742C VALBERG
natural_image
Technical line drawing showing a mechanical assembly with an arrow indicating direction (no text or symbols present)
WARRANTY CONDITION
EN
This product is guaranteed for a period of 2 years from the date of purchase* against any failure resulting from a manufacturing or material defect. This warranty does not cover defects or damage resulting from incorrect installation, improper use or abnormal wear of the product.
*as shown on the sales receipt.
CONDITION DE GARANTIE
FR

natural_image
Diagram of a mechanical setup with a cylindrical component and rotating motion, no text or symbols present
natural_image
Diagram of a 3D printer or scanner with two arrows indicating flow direction (no text or symbols present)
natural_image
Technical line drawing of a door hinge assembly with two circular components (no text or symbols)

natural_image
Technical line drawing of a structural frame with mounting brackets and a central support (no text or symbols)
natural_image
Simple line drawing of a frame structure with supports and a hanging weight (no text or symbols)
Thanks!
Thank you for choosing this VALBERG product.
Chosen, tested and recommended by ELECTRO DEPOT,
VALBERG branded products are easy to use, reliable,
and of an impeccable standard.
With every use of this appliance, you can be sure of complete satisfaction.
Welcome to ELECTRO DEPOT.
Visit our website: www.electrodepot.fr

Overview of the appliance
Ambient temperature of use
Temperature control adjustment
Components

Using the appliance
Reversed door
Installation
First use
Control panel
Operation
Useful tips

Practical information
Cleaning and maintenance Repair
Ambient temperature of use
Respect the climate classes indicated in the product information on the appliance's rating plate. You can use this to check the recommended temperature range of the room where the appliance is located:
- SN: Between 10 and 32°C
- N: Between 16 and 32°C
- ST: Between 16 and 38°C
- T: Between 16 and 43°C
A multi-class appliance can handle the lowest and highest temperature of all classes covered. Using the appliance outside the recommended temperature range will lead to inferior performance and premature ageing.
Temperature control adjustment
For optimal use and to save energy, adjust the temperature control(s) of the appliance according to the ambient temperature of the room, in which it is being used, and respect the climate class.
Refer to the product sheet to find out the climatic class associated with the minimum and maximum recommended ambient temperatures for the appliance as well as the temperature setting recommended for storing food under optimal conditions.
The ambient temperature degrees T °C are given only as a guide.
The set positions can be affected by the location of the appliance in the room, how often the door is opened or the amount of food inside.
The temperature control may need to be changed to compensate for these factors.
Examples of locations:
- Unheated room in winter like a garage in a cold region.
- Kitchen/lounge area with normal heating.
- Room that is not air-conditioned in summer in a hot region.
Components
1 Control panel and light
2 Glass shelves
3 Vegetable drawer lid
4 Vegetable drawer
5 Drawers
6 Bottle racks
Reversed door
Tools needed: Phillips screwdriver, flat blade screwdriver, hex key.
- Ensure the appliance is unplugged and empty.
- To remove the door, tilt the appliance backwards. You need to the rest the appliance on a solid object so that it does not slip during the door opening reversing process.
- All parts removed should be kept with care when reinstalling the door.
- Do not lay the appliance flat, as this may damage the refrigeration system.
• We recommend that the appliance is handled by 2 people during assembly.
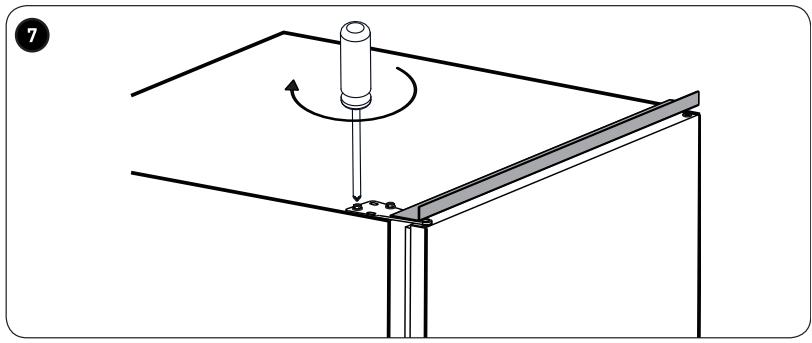
1 Unscrew the top hinge. Lift the door, then place it on a padded surface to prevent scratches.
② Unscrew the middle hinge, then lift the door and lay it on a padded surface to prevent scratches.
③ Remove the pin from the lower hinge from right to left.
4 Move the middle hinge from left to right. Then replace the door.
⑤ Reassemble the middle hinge on the left Make sure that the door is aligned horizontally and vertically and that the seals are closed on all sides before tightening the middle hinge.
6 Unscrew the top hinge pin from the hinge. Then reverse the hinge and screw in the hinge pin.
⑦ Reassemble the door, then the upper hinge on the left. Make sure that the door is aligned horizontally and vertically and that the seals are closed on all sides before tightening the lower hinge. If necessary, tighten the hinge with a wrench.
Installation
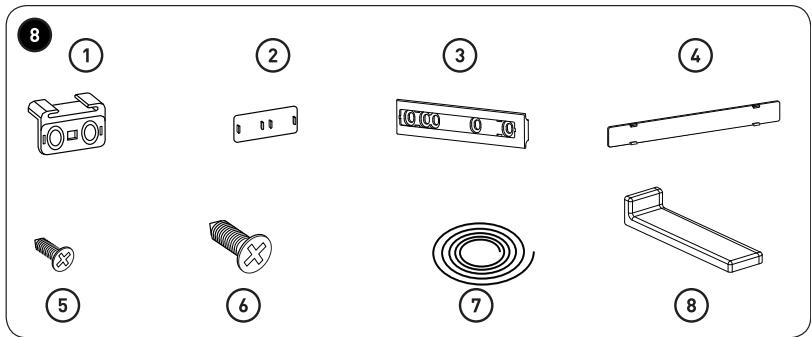
8 Installation kits
| 1Guide | x 4 |
| 2Guide cover | x 4 |
| 3Slider | x 4 |
| 4Slider cover | x 4 |
| 5Short screw | x 2 |
| 6Long screw | x 2 |
| 7Rubber seal | x 1 |
| 8Middle support cover | x 2 |
Installation of the appliance
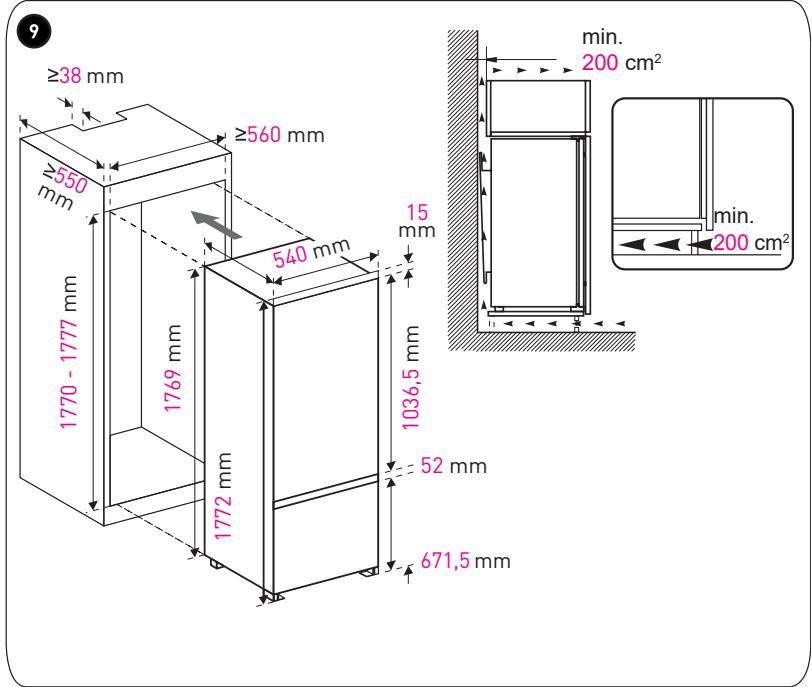
⑨ Make sure that the dimensions of the unit as well as the ventilation are adequate.
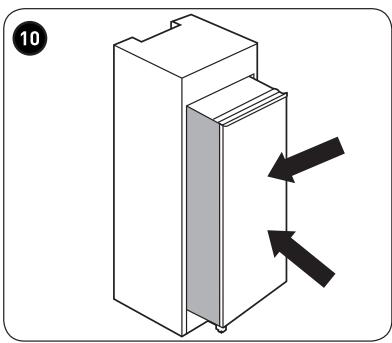
10 Push the appliance into the unit slowly and carefully. Make sure that the opening side is as close as possible to the unit wall.
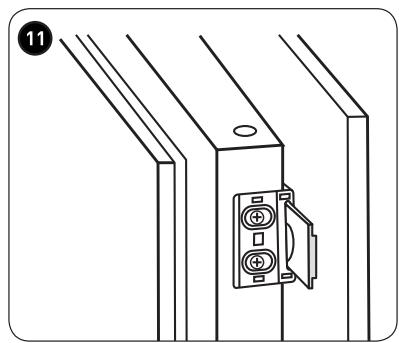
11 Screw a guide into the holes on the side of the appliance door using the short screws. Insert the slider into the guide, then fully open and close the appliance door and the wooden door to make sure that the wooden door can close fully and smoothly.
① Slider
② Screw
③ Guide
⑫ Open the appliance door and the wooden door at the same time, then mark the position in which the slider can work well from all angles while the door is closing or opening. Remove the slider from the guide, then secure the slider to the wooden door using 2 short screws. Then attach the slider cover to the slider.
Unscrew the guide from the appliance door.
Repeat steps 2 through 5 to attach another slider and another slider cover.
① Slider
② Screw
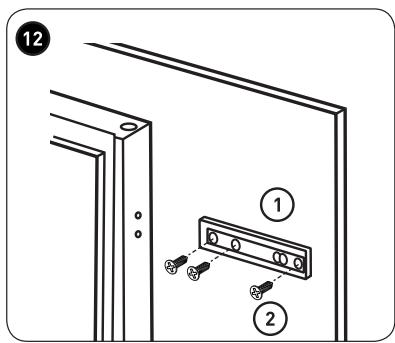
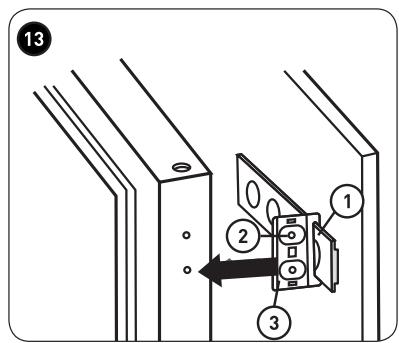
⑬ Fit 2 guides on the sliders, then fix them using short screws. Then fix the slider cover to the guides.
Make sure that the door opens and closes easily and check the correct airtightness of the appliance. If this is not the case, adjust the appliance. Then, fix the lower bracket on the wooden unit using 2 long screws.
15 Fix the upper bracket on the wooden unit using short screws.
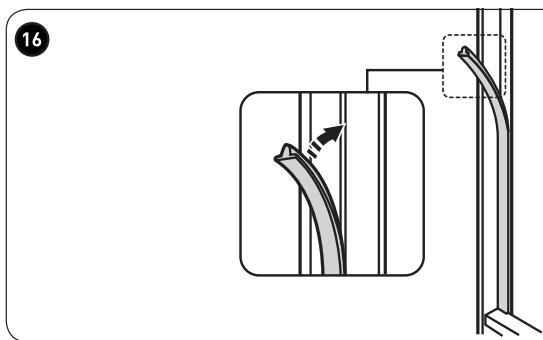
Fix the rubber seal on the empty space between the appliance and the wooden unit on the door opening side.
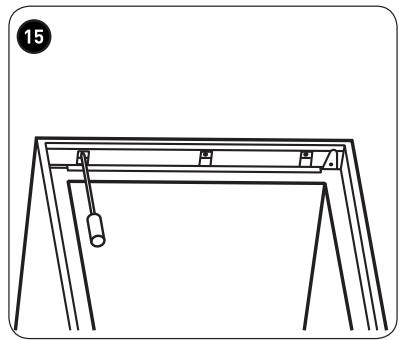
⑰ Screw the 2 middle brackets on the wooden unit using short screws. Then fix the bracket covers on the brackets located on both sides.
Positioning
Install this appliance at a location where the ambient temperature corresponds to the climate class indicated on its rating plate:
Site
The appliance should be installed away from heat sources such as radiators, boilers, direct sunlight, etc. Make sure that air can circulate freely around the back of the appliance. To ensure optimum performance, if the appliance is positioned under a protruding unit, the minimum distance between the top of the appliance and the wall unit must be at least 100 mm. In the best case scenario, the appliance should not be placed beneath wall units. Correct levelling of the equipment may be guaranteed by adjusting the feet at the base of the appliance.
WARNING
It must be possible to disconnect the appliance from the power supply; The plug must therefore be easily accessible after installation.
Electrical connection
Before plugging in, ensure that the voltage and frequency shown on the rating plate correspond to your domestic power supply. This appliance must be earthed. The power cable socket includes a pin for this purpose. If the domestic power socket is not earthed, contact a qualified electrician to connect the appliance to a separate earth in accordance with power supply regulations. The manufacturer declines all responsibility if the above safety precautions are not observed. This
First use
Cleaning the interior
- Before using the appliance for the first time, wash the inside of the appliance and all internal accessories with lukewarm water and a little neutral soap to remove the odour typical of a new product. Then dry them completely.
WARNING
Do not use detergents or abrasive powders, as these will damage the finish.
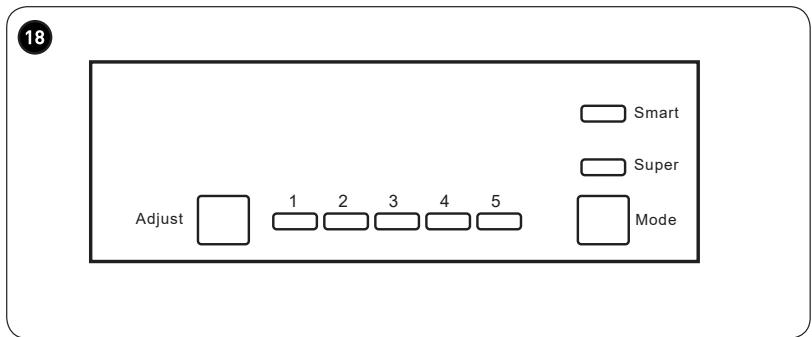
Control panel
- B1 – Press this button to adjust the refrigeration compartment cycle setting from 1, 2, 3, 4 to 5.
- B2 – Press this button to select a mode between Smart, Super and user settings.
Indicators
- L1 – indicates the refrigerator compartment setting
- L2 – lights up after selection of the Smart mode.
- L3 – lights up after selection of the Super mode.
Operation
Temperature setting
- Press the Mode (B2) button to select the user settings.
- Press the Adjust (B1) button to adjust the refrigerator settings. A lower setting is equal to a lower temperature. The freezer temperature is automatically set to around -18 °C.
Smart mode
- Select the Mode (B2) button to select the Smart mode.
- The appliance works automatically depending on the ambient temperature around it.
Super mode
- Select the Mode (B2) button to select the Super mode.
- The appliance works to lower the temperature of the freezer compartment as much as possible. After 54 hours, the set initial temperature is restored.
Switching off the appliance.
- Push the Adjust (B1) button and hold it down for 5 seconds, the appliance stops. Press again for 5 seconds to switch on the appliance.
Refrigerator door opening alarm
- The alarm sounds when the door is left open for 90 seconds and does not stop until the door is closed.
Freezing fresh food
- The freezer compartment is suitable for freezing fresh food and storing frozen and deep-frozen food for a long time.
- Place the fresh food to be frozen in the freezer compartment.
- The maximum amount of food that can be frozen in 24 hours is specified on the rating plate.
- The freezing process takes 24 hours; during this time do not add any other food to the freezer.
Storage of frozen food
When you use the appliance for the first time or after a period of non-operation, make sure, before putting any products in the compartment, to let the appliance run for at least 2 hours on the highest settings.
WARNING
In the event of accidental defrosting, for example a power cut for longer than the value indicated in the table of technical characteristics under the “Rise time” heading, the defrosted food must be eaten quickly or cooked immediately, then refrozen (after cooking).
Thawing
Before use, frozen or deep-frozen foods can be thawed in the refrigerator compartment or at room temperature depending on the time available for this operation.
Small pieces of food can be cooked while still frozen and coming straight from the freezer. In this case, cooking will take longer.
Ice cubes
This appliance may be equipped with one or more ice cube trays to make ice.
Accessories

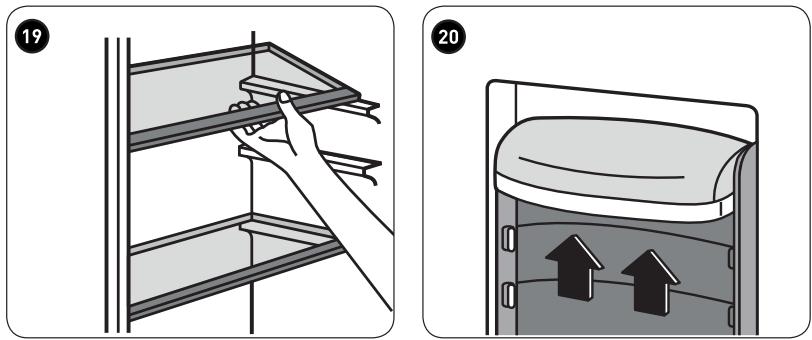
Removable shelves
The walls of the refrigerator are equipped with a set of guides so that the shelves can be placed as you wish.

Positioning of the door bottle racks
To allow storage of food packages of various sizes, the door bottle racks can be removed. To perform these adjustments, please proceed as follows: pull the shelf gradually in the direction of the arrows until it comes out.
Useful tips
Tips for freezing
To help you freeze food properly, here are some important tips.
- the maximum amount of food that can be frozen in 24 hours is specified on the rating plate.
- the freezing process takes 24 hours. No other food to be frozen should be added during this period.
- Only freeze good quality, fresh and completely cleaned food.
- Prepare food in small quantities to allow it to freeze quickly and completely; you will then be able to thaw the quantity you require.
- Wrap food in aluminium foil or place it in a polythene bag and make sure the packages are airtight.
- In order to avoid a rise in temperature of already frozen products, do not place fresh food in contact with food that is already frozen.
- Foods without fat and lean meats keep better and longer than fatty foods; salt reduces the storage time of food.
- Water turns to ice. If consumed immediately after being removed from the freezer compartment, there is a risk of cold burn to the skin.
- It is recommended to indicate the date of freezing on each individual package to allow you to track its storage time.
Tips for storing frozen foods
To obtain the best performance from this appliance you should:
• Make sure that the marketed and frozen food product has been properly stored by the retailer;
- Make sure that the frozen food product has been transferred from the shop to the freezer in the shortest possible time;
- Do not open the door frequently or leave it open longer than absolutely necessary.
- Once thawed, foods deteriorate rapidly and must not be re-frozen.
- Do not exceed the storage time indicated by the food manufacturer.
Tips for fresh food refrigeration
For optimum performance:
• To obtain optimum performance:
- Do not store hot food or evaporating liquids in the refrigerator.
- Cover or wrap foods, especially if they have strong aromas or smells.
- Foods (all types): wrap in polythene bags and place on the glass shelves above the vegetable drawer.
- For your safety, store in this way for only 1 or 2 days at most.
• Cooked meals, cold meals, etc.: they must be covered and can be placed on any shelf.
- Fruit and vegetables: they should be properly cleaned and placed in the special drawers provided.
- Butter and cheese: this food should be placed in special airtight containers or wrapped in aluminium foil or polythene bags to exclude as much air as possible.
- Milk bottles: these must be fitted with a cap and stored in the door bottle racks.
- Bananas, potatoes, onions, garlic: if not wrapped, must not be stored in the refrigerator.
Cleaning and maintenance
For hygiene reasons, the interior of the appliance, including internal accessories, must be cleaned regularly.
WARNING
The appliance should not be plugged into an electrical outlet while cleaning. Risk of electric shock! Before cleaning, switch the appliance off and unplug it from the outlet, or disconnect the fuse or circuit breaker. Never clean the appliance with a steam cleaner!
Moisture can accumulate in electronic components, danger of electric shock! Hot steam can cause damage to plastic parts. The appliance must be dry before it is switched back on.
WARNING
Essential oils and organic solvents can damage basic parts, for example lemon juice, juice from orange peels, butyric acid, or cleaners containing acetic acid.
- Do not allow such substances to come into contact with parts of the appliance.
- Do not use abrasive cleaners.
- Remove the food from the freezer. Keep it covered in a cool place.
- Switch the appliance off and unplug it from the outlet, or switch it off and disconnect the fuse or circuit breaker.
- Clean the appliance and the interior accessories with a cloth and lukewarm water. After washing, rinse with cold water and wipe dry until completely dry.
- The accumulation of dust on the condenser increases energy consumption. For this reason, carefully clean the condenser on the back of the appliance once a year with a soft brush or vacuum cleaner.
- Once all the parts are dry, switch the appliance back on.
Cleaning of the drain hole
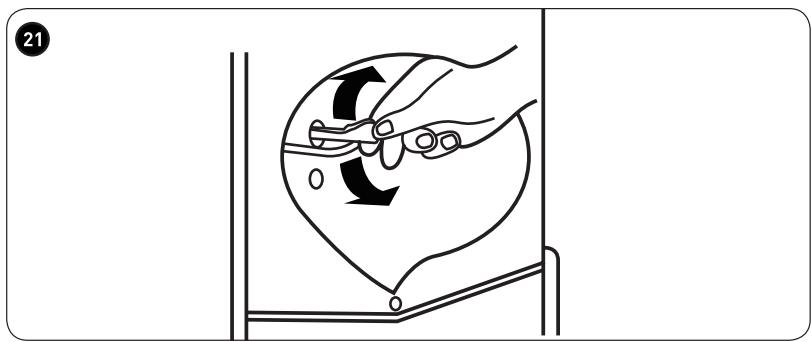
21 To prevent defrost water from running into the refrigerator, regularly clean the drain hole on the back of the refrigerator compartment. Use a cleaning product to clean the hole.
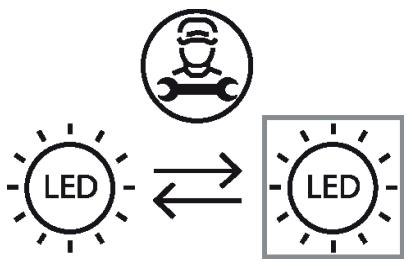
Lamp replacement
Internal lighting is provided by an LED lamp. To replace the lamp, please contact a qualified technician.
Defrosting the freezer
The freezer compartment will gradually become covered with ice. This needs to be removed. Never use sharp metal tools to scratch the evaporator glass as you may damage it. However, when the ice becomes too thick on the interior surface, a complete defrost should be performed as follows:
- Disconnect the plug from the outlet;
- Remove all stored food, wrap it in several layers of newspaper and put it in a cool place;
- Keep the door open and place a container under the appliance to collect the defrost water;
- At the end of defrosting, dry the interior completely;
- Reconnect the plug to the outlet to operate the appliance again.
Changing the Light
This product contains a light source of energy efficiency class G.
Light source in this product can only be replaced by qualified professionals.
Please contact after-sales service if the light source fails.
The light source shall be removed at the end of the product's useful life, with sorting and recycling done separately.
flowchart
graph LR
    A["LED"] <--> B["LED"]
Repair
| Anomaly | Possible cause | Solution |
| The appliance does not work. | The appliance is switched off. | Press the Adjust button for 5 seconds to turn on the appliance. |
| The power outlet is not plugged in or is loose. | Connect the plug. |
| The fuse has blown or is defective | Check the fuse and replace it if necessary. |
| The plug is defective. | Operating malfunctions are to be corrected by an electrician. |
| Food is too hot. | The temperature is not properly adjusted. | Please see the Initial temperature setting section. |
| The door was open for an extended period. | Open the door only for the necessary time. |
| A large quantity of warm food has been placed in the appliance within the last 24 hours. | Turn the temperature controller temporarily to a cooler setting. |
| The appliance is near a heat source. | Please see the Installation location |
| Excessive cooling of the appliance. | The temperature is set too cold. | Turn the temperature control knob temporarily to a cooler setting. |
| Unusual noises | The appliance is not level | Adjust the wooden unit if it is not level. |
| The appliance is touching the wall or other objects. | Move the appliance slightly. |
| A component, for example a pipe, on the back of the appliance is touching another part of the appliance or the wall. | If necessary, carefully bend the component to leave more space. |
| There is water on the floor. | The water drainage hole is clogged. | See the Cleaning section. |
If the malfunction continues, contact the repair centre.
Merci !
flowchart
graph TD
    A["LED"] <--> B["LED"]
Dépannage