USER MANUAL BFP7554W BRANDT
Chere Cients, Cher Client
- Plat multi usages lèche-frites 45mm
CONNEXION WIFI:QUESTIONS ET RÉPONSES
CONNEXION WIFI:QUESTIONS ET RÉPONSES
RELATIONS CONSOMMATEURS FRANCE
RELATIONS CONSOMMATEURS
formation for domestic ovens (UE n° 66/2014)
formation for domestic ovens (UE n° 66/2014)
You have just purchased a BRANDT product and we thank you for the trust you have placed in us.
We designed and manufactured this product with you, your lifestyle, your needs in mind, so that it best meets your expectations. We put our know-how, our spirit of innovation and all the passion that has driven us for over 60 years.
In a permanent concern to always better satisfy your requirements, our consumer service is at your disposal and at your disposal to answer all your questions or suggestions.
Also log on to our website www.brandt.com where you will find our latest innovations, as well as useful and complementary information.
BRANDT is happy to support you on a daily basis and wishes you to fully enjoy your purchase.

BVCert1825
The label "Origine France Garantie" assures the consumer the traceability of a product by giving a clear and objective indication of source. The BRANDT brand is proud to affix this label on products from our French factories based in Orléans and Vendôme.
https://brandt.com/


Important:
Before switching on your appliance, please read this guide carefully in order to familiarize yourself more quickly with its operation.
SAFETY INSTRUCTIONS 4
ENVIRONMENT AND ENERGY SAVING 7
Environment 7
Energy saving advice 7
INSTALLATION OF YOUR DEVICE 7
Choice of location and installation 8
Electrical connection 10
DESCRIPTION OF YOUR DEVICE 11
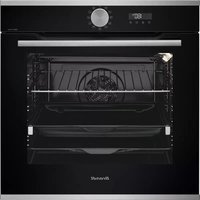
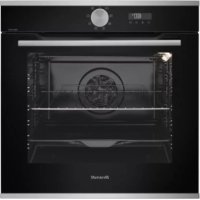
Presentation of the oven 11
Display and control keys 12
Accessories 13
USING YOUR DEVICE 14
Settings 14
Settings menu. 15
Cooking methods 17
Start cooking 18
The Flavor Guide function 20
Auto Cook function 21
Wifi connection 27
Google home 29
CARING FOR YOUR DEVICE 30
Interior - exterior cleaning 30
Faults and solutions 34
AFTER SALES SERVICE 35
Interventions 35
COOKING AIDS 36
Baking charts 36
Recipes with yeast 38
Functionality tests 39
IMPORTANT SAFETY INSTRUCTIONS - READ CAREFULLY AND RETAIN FOR FUTURE USE.
This user guide is available for download on the brand's website.
Important:
When you receive the appliance, unpack it immediately. Give it an overall inspection. Make note of any concerns or reservations on the delivery slip and make sure to keep a copy of this form. Before starting your appliance, please read this installation guide carefully to familiarise yourself quickly with its operation. Keep this user guide with your appliance. If the appliance is ever sold or transferred to another person, ensure that the new owner receives this user guide.
Please become familiar with these recommendations before installing and using your oven.
They were written for your safety and the safety of others.
-
This oven was designed for use by private persons in their homes. This oven does not contain any asbestos-based components.
-
Your appliance is intended for standard household use. Do not use it for commercial or industrial purposes or for any other purpose than that for which it was designed.
-
Do not modify or attempt to modify any of the characteristics of this appliance. This would be dangerous to your safety.
-
Never place tin foil directly in contact with the oven floor as the build up of heat may damage the enamel.
-
Do not place heavy weights on the open oven door, and make sure that children are able neither to climb nor sit on it.
-
Do not use your oven as a larder or to store any items after use.
After using your oven, make sure that all the controls are in their stop position.
- The oven must be turned off when cleaning inside the oven.
Before removing the glass window, allow the appliance to cool down.

This appliance may be used by children aged 8 years and
older, and by persons with impaired physical sensorial or mental capacities, or without experience or knowledge, if they are supervised or have received prior instructions
on how to use the appliance safely and have understood the risks involved. Children must not be allowed to play with the appliance. Cleaning and maintenance operations must not be carried out by children without supervision.
- Children must be supervised to prevent them from playing with the appliance.
WARNING: The appliance and its accessible parts become hot during use. Be careful not to touch the heating elements inside the oven. Children under 8 years old must not be allowed near it unless they are supervised at all times.
-
This appliance is designed to cook with the door closed.
Before pyrolytic cleaning of your oven, remove all accessories and any thick deposits.
During cleaning, the surfaces may become warmer than under normal conditions of use. It is advisable to keep children away from the appliance.
— Do not use a steam cleaner.
Before removing the back wall, the appliance must be powered off. After cleaning, the back wall must be put back in place in accordance with the instructions.
-
Do not use abrasive cleaning products or hard metal scrapers for cleaning the oven's glass door, as they could scratch the surface and cause the glass to shatter.
WARNING: Make sure the appliance is disconnected from the power before replacing the lamp in order to avoid the risk of electric shock. Change the lamp only when the appliance has cooled down. To unscrew the view port and the light, use a rubber glove, which will make disassembly easier.
The electrical plug must remain accessible after installation.
It must be possible to disconnect the appliance from the power supply, either using a plug or by fitting a switch on the fixed wiring system in accordance with installation rules. If the power cable is damaged, it should be replaced by the manufacturer, its after-sales service department or by a similarly qualified person in order to avoid danger.
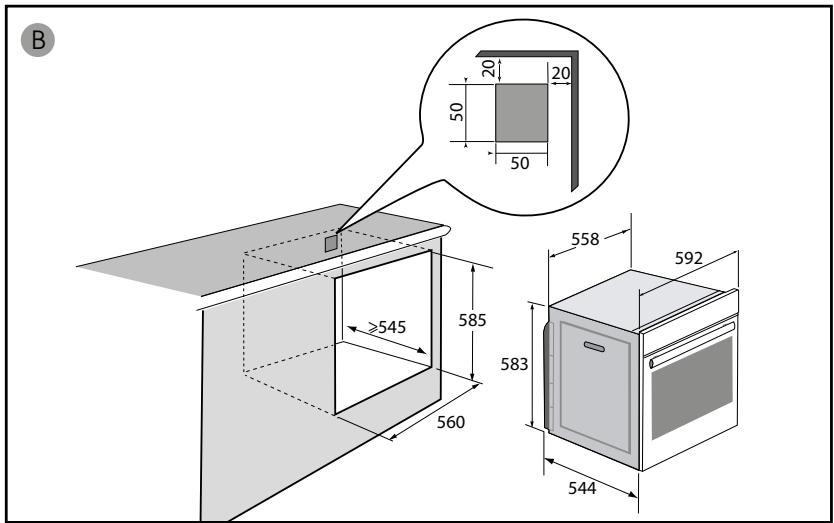
- This appliance may be installed either under a worktop or in a cabinet column, as indicated on the installation diagram.
- Centre the oven in the unit so as to ensure a minimum distance of
10 mm between the appliance and the surrounding unit.
The material of the unit supporting the appliance must be heat-resistant (or covered with a heat-resistant material). For greater stability, attach the oven to the unit with 2 screws through the holes provided on the side panels.
In order to avoid overheating, the appliance must not be installed behind a decorative door.
ENVIRONMENT
The packaging materials for this device are recyclable. Participate in their recycling and thus contribute to the protection of the environment by depositing them in the municipal containers provided for this purpose.

Your device also contains many recyclable materials. It is therefore marked with this logo to indicate that used devices must not be mixed with other waste.

The recycling of the devices organized by your manufacturer will therefore
be carried out under the best conditions, in accordance with the European directive in force on waste electrical and electronic equipment.
Contact your town hall or your retailer to find the collection points for used appliances closest to your home.
Thank you for your cooperation in protecting the environment.
ENERGY SAVING ADVICE
Keep the oven door closed during cooking.
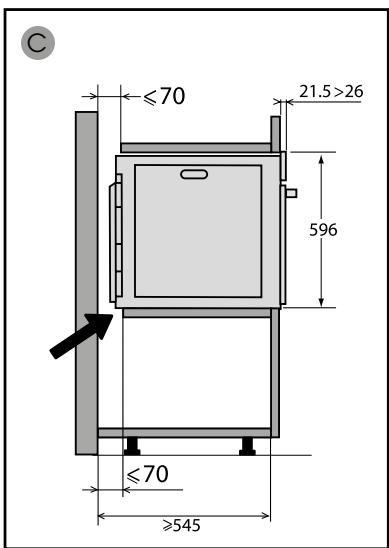
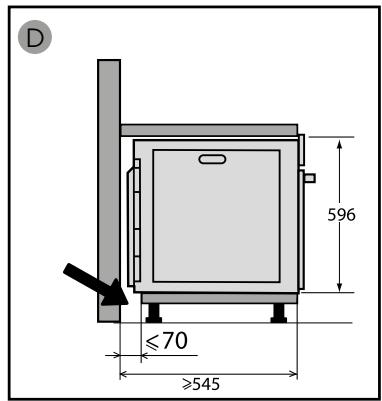
CHOICE OF LOCATION AND FITTING
The diagrams determine the dimensions of a piece of furniture that will accommodate your oven. This device can be installed either in column (A) or under plan (B). If the cabinet is open, its opening must be 70mm maximum at the back (C and D). Secure the oven in the cabinet. To do this, remove the rubber stops and pre-drill a 2mm hole in the wall of the furniture to prevent the wood from splintering. Secure the oven with the 2 screws. Replace the rubber stops.

Tip
To be certain that you have properly installed your appliance, do not hesitate to call on a household appliance specialist.

Warning :
If the electrical installation in your residence requires any changes in order to hook up your appliance, contact a professional electrician. If the oven malfunctions in any way, unplug the appliance or remove the fuse corresponding to the sector where the oven is hooked up.

ELECTRICAL CONNECTION
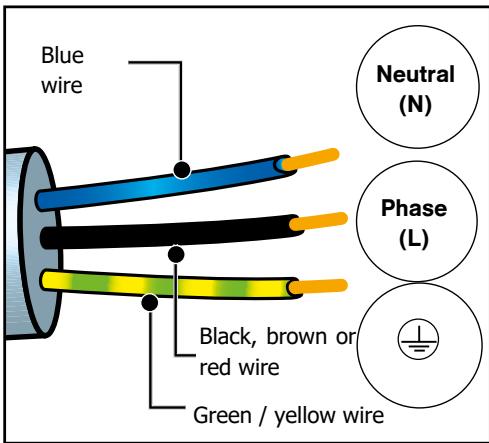
Your oven must be connected with a (standard) power cable with 3 conductors of 1.5mm2 (1 live + 1 neutral + earth) which must be connected to a 220 - 240V single-phase grid by means of a 1 live + 1 neutral + earth CEI 60083 standard power socket or via an all-poles cut-off device in compliance with the installation rules.
WARNING
The safety wire (green-yellow) is connected to the appliance's terminal and must be connected to the earth terminal of the electrical set-up.
The fuse in your set-up must be 16 amperes.
We cannot be held responsible for any accident resulting from inexistent, defective or incorrect earthing.
- Before first use
Before using your oven for the first time, heat it empty with the door closed for about 15 minutes on the highest temperature. in order to break in the device. The mineral wool that surrounds the oven cavity can initially give off a particular odor due to its composition. Likewise, you may notice smoke. All this is normal.
This oven has 6 shelf positions for accessories: shelves from 1 to 6.
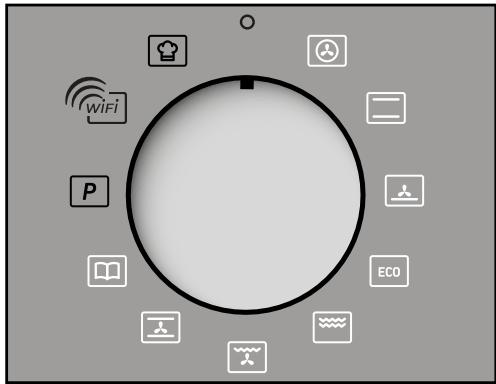
DISPLAY AND CONTROL KEYS
Control panel


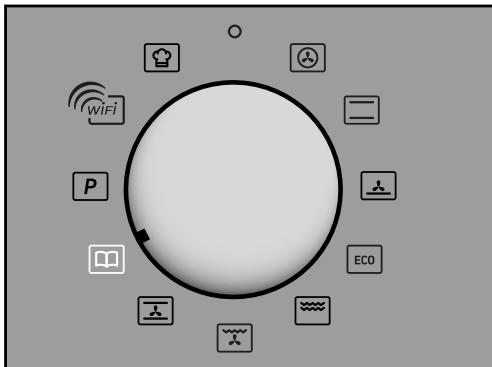
COOKING MODE SELECTOR

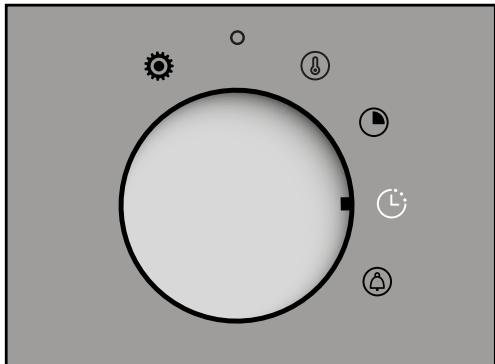
SETTING SELECTOR
- Display
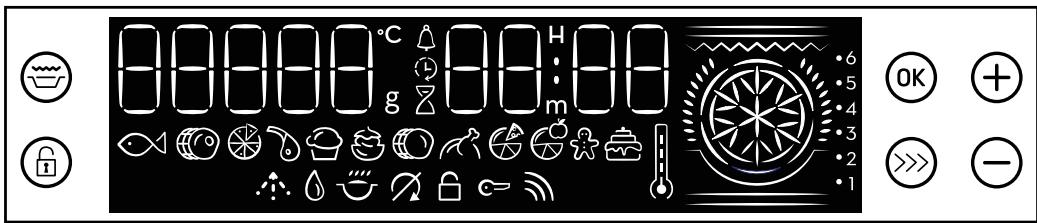

TIMER

WEIGHT

END OF COOKING

KEYPAD LOCK

COOKING TIME

DOOR LOCK

TEMPERATURE INDICATOR

TEMPERATURE RISE INDICATOR

WIFI INDICATOR

FLAVOR GRILL INDICATOR
keys

Flavor Grill

Validation

key +

Keypad lock

Booster (accelerates the rise in temperature)

Key -
ACCESSORIES
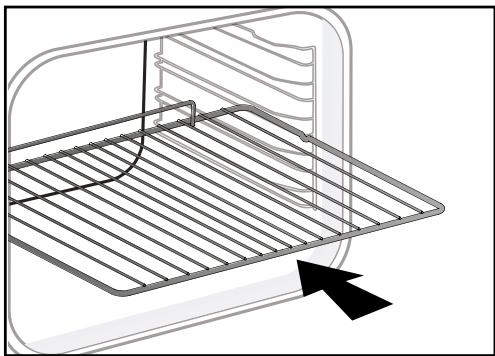
- Anti-tip safety grid
The grid can be used to support all dishes and moulds containing food to be cooked or gratinated. It will be used for grilling (to be placed directly on top).
Insert the grid, anti-tilt safety device towards the bottom of the oven.
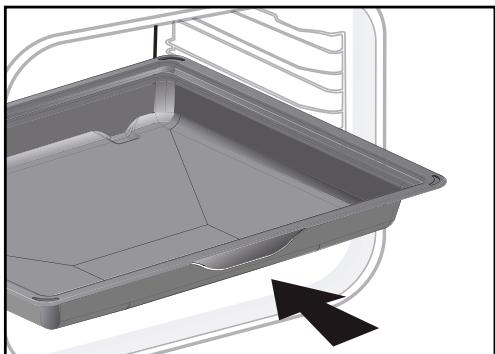
- Multi-purpose drip tray 45mm
To be inserted in the tiers under the rack, handle towards the oven door. It collects juices and fats from the grills, it can be used half-filled with water for cooking in a bain-marie.
! Warnig:
Remove accessories and bleachers from the oven before starting a pyrolysis cleaning.
Tip:
In order to avoid the release of smoke during the cooking of fatty meats, we recommend adding a small amount of water or oil to the bottom of the drip pan.
Cautionary note:
Under the effect of heat, the accessories may deform without affecting their function. They will return to their original shape when cooled.
SETTINGS
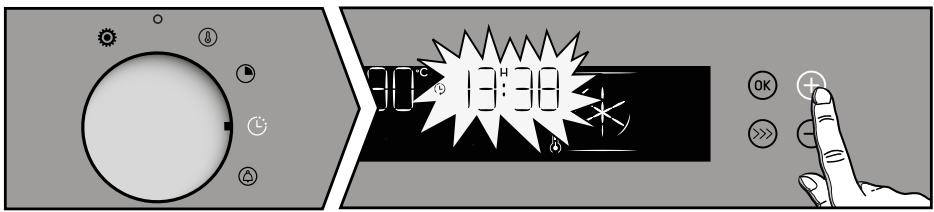
- Setting the time
When the power is turned on, the display flashes at 12:00.

Set the time using the + and - buttons. Confirm with the OK key.
In the event of a power failure, the time flashes. Make the same adjustment.
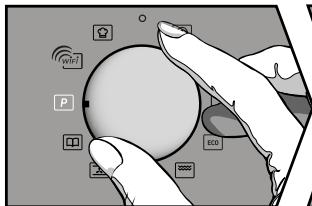
Changing the time
The function lever must be in position 0
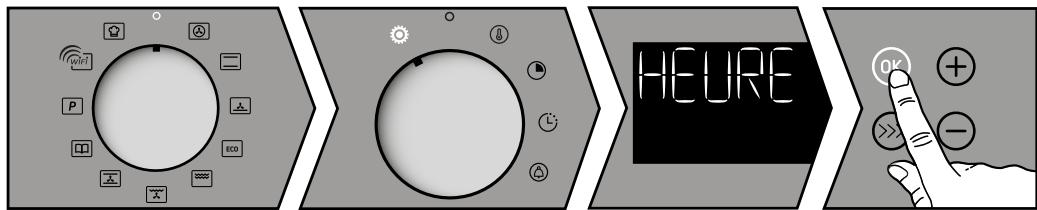
Turn the adjustment lever to the "SETTINGS" position.
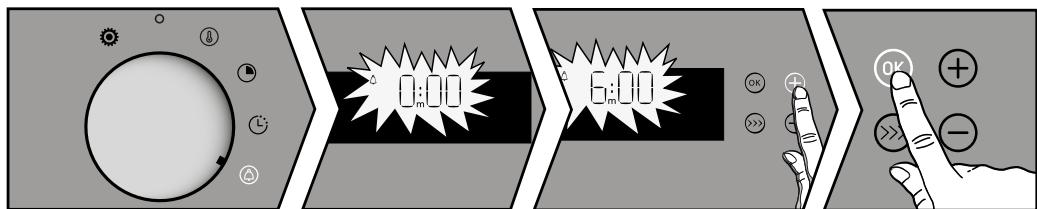
Using the + and - keys navigate through the different parameters, select "TIME" and confirm with the OK key. Change the time and confirm with the OK button.
Return the lever to the zero position.
- Timer
Turn the adjustment lever to the "TIMER" position. The timer flashes.
Set the timer with the + or - buttons. Validate with the OK key the countdown starts. Once the time has elapsed, an audible signal sounds. To stop it, press any key.
- Keypad lock (child lock)
Press the key until the symbol is displayed on the screen.
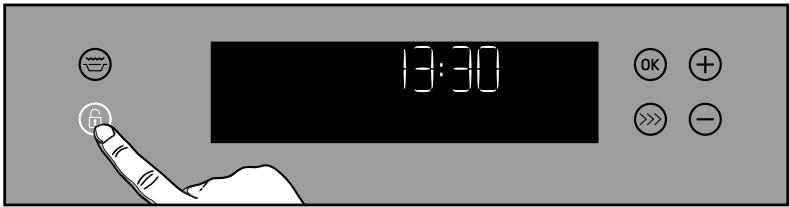
To unlock it, press the button again ⑤ until the symbol disappears from the screen.
You can intervene on different parameters of your oven for this:
Turn the adjustment lever to the "ADJUSTMENTS" position. Using the + and - keys navigate through the different parameters scrolling on the screen.
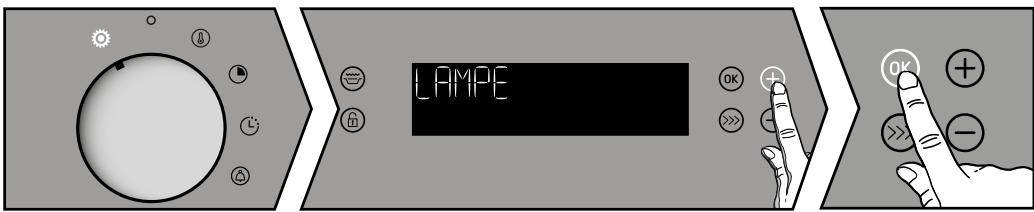
Press the OK key to confirm your choice. Using the + and - keys activate or deactivate the various parameters, see table.
| HEURE | CLOCK :
Allows setting or modification of the time. |
| WIFI | WIRELESS :
ON position, Wifi connection active.
Position OFF, no Wifi connection.
Reset, resetting the parameters of the Wifi connection. |
| LAMPE | LAMP STANDBY:
ON position, in cooking mode, the lamp always remains on (except ECO mode)
AUTO position, in cooking mode, the cavity lamp goes out after 90 seconds. |
| BIP | SOUNDS - BEEPS - KEYS:
ON position, active sounds.
OFF position, no sounds. |
| DEMO | DEMO MODE: ON position, function activated, demonstration mode used in exhibition. OFF position, function deactivated, your oven is operational. |
| LUM | BRIGHTNESS: Adjusts the brightness of the display. |
| VEILL | DISPLAY STANDBY: ON position, display off after few minutes. OFF position, reduction of display brightness after few minutes. |
| LANG | LANGUE : FR/EN/OFF(no text displayed) |
| DIAG | Diagnosis: In case of problem and call of the SAV, note the different values given by your oven (Wifi, power, version, ...). This information will be used to identify the origin of the defect. |
To exit the "Settings menu" put the joystick in position 0.

Important :
After 90 seconds of inactivity, the display turns off and the Wifi connection is still active.
- AUTO-STOP Function
This safety function stops the oven cooking when you have not programmed a cooking time and your oven has been operating at more than 100 ^ C for more than 4 hours or less than 100 ^ C for more than 10 hours.
"AUTO-STOP" is then displayed on the screen.
COOKING MODES:

Advice
Preheat your oven before putting your dishes in the oven.

CIRCULATING HEAT*
(Min temperature 35^ max 250^
Recommended for keeping white meat, fish and vegetables moist. For cooking multiple items on up to three levels.

TRADITIONNEL*
(temperature mini 35^ maxi 275^)
"Smart Assist" system
Your oven is equipped with the "Smart Assist" function which, when programming a time, will recommend a cooking time that can be modified according to the cooking mode chosen.

PULSED BOTTOM
(Min temperature 75^ max 250^)
Recommended for moist dishes (quiches, tarts with juicy fruits, etc.). The pastry will be thoroughly cooked on the bottom. Recommended for recipes which rise (cake, brioche, kugelhopf, etc.) and for souffles which will not be stopped by a crust on the top.

ECO*
Min temperature 35^ max 275^)
(This setting saves energy while maintaining the quality of the cooking.
All types of cooking are done without preheating.

GRIL
(position 1 to 4)

PULSED GRILL
(min temperature 100^ max 250^ )
Roasts and poultry are juicy and crisp all over.
Slide the drip tray on to the bottom shelf support. Recommended for all spit-roasted poultry or meat, for sealing and thoroughly cooking a leg or a rib of beef. To retain the moist texture of fish steaks.

TRADI-VENTILE
(min temperature 35^ max 275^)
*Sequence(s) used to obtain the results indicated on the energy label in compliance with European standard EN 50304 and in accordance with European Directive 2002/40/CE
START COOKING
The display should not flash.
Turn the function knob to the cooking mode of your choice.
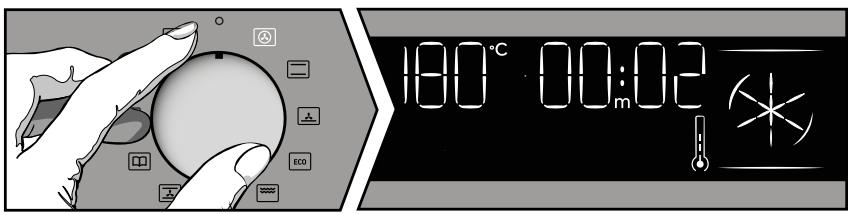
The temperature rise starts immediately. The time indicator tells you how long the oven has been running. The oven heats up and the temperature indicator flashes. A series of beeps will sound when the oven reaches the programmed temperature.
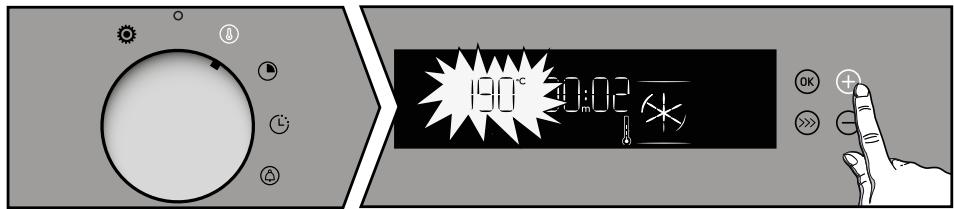
- Changing the temperature
Turn the temperature control knob. The temperature display flashes, adjust the temperature with the + or - keys. Confirm by pressing OK.
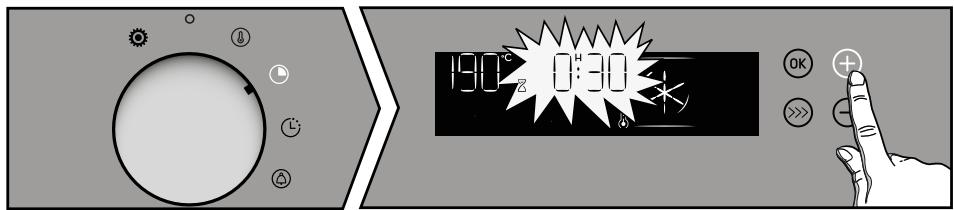
- Changing the duration
Turn the adjustment knob to duration.
The duration display flashes, setting is then possible. Adjust with the + or - buttons to adjust the cooking time, confirm with the OK button.
- Changing the end of cooking time
Turn the adjusting knob to the end time. The end time display flashes, setting is then possible. Adjust with the + or - keys to set the end of cooking time, confirm with the OK key.
- Using the boost function
You can quickly preheat your oven with the "BOOSTER" function
Start cooking and press the button. The oven heats up quickly and the BOOST symbol alternates with the temperature on the display.
NOTE: The "Booster" function is available for the functions: "Red meat, Vegetables, Pie, Pizza, Biscuits, Fish, White meat, Cakes and Brioche.
- Using the Flavor Grill function
You can brown a dish at the end of cooking with the "FLAVOR Grill" function.
Select a cooking function, adjust the temperature and program a cooking time.
Then select the "TASTE Grill" function by pressing the button. Your cooking starts. The symbol is displayed.
NB: "GRILL SAVEUR" is not available in Eco cooking modes.

THE FLAVOR GUIDE FUNCTION
- Changing the end of cooking time
The "Flavor Guide" function selects the appropriate cooking parameters for you according to the food to be prepared and its weight.
Turn the function selector to Flavor guide. You must choose a preprogrammed food from the following list using the - and + keys:
Turn the adjusting knob to the end time.
Set the desired end of cooking time using the + / - buttons and confirm by pressing OK. The programmed cooking is displayed, your cooking will end at the selected time.
P01: Salmon
P02: Beef medium
P03: Pizza
P04: Lamb shoulder
P05: Blown
P06: Stuffed tomatoes
P07: Roast pork
P08: Chicken
P09: Quiche
P10: Fruit pie
P11: Cookies
P12: Cake
Confirm by pressing the OK key. A proposed weight flashes on the screen. Enter the actual weight of the food with the + keys and then confirm by pressing OK. The ideal cooking time is displayed and is calculated automatically. The oven recommends the shelf height at which you should put your dish. Bake your dish at the recommended shelf level (from 1 at the bottom to 6 at the top)
The oven starts.
AUTO COOK FUNCTION

The Auto Cook function will make your task completely easier since the oven will automatically calculate all the cooking parameters according to the selected dish (temperature, cooking time, type of cooking) thanks to electronic sensors placed in the oven which constantly measure the humidity level and temperature variation.
- Turn the knob to the Auto Cook function. The oven offers a choice of 12 dishes:
Fish
Roast beef
Pizza
Pink lamb
Breath
Stuffed vegetables
Roast pork
Chicken
Salty Tart
Sweet pie
Cookies
Cake
Select your dish using the + and - keys.
Once the dish has been selected, confirm with OK. You can change the end time of
cook before baking your dish at the required shelf level.
- Confirm by pressing the OK button to start cooking.

Advice :
No preheating is necessary to use the Auto Cook function. Cooking MUST start cold oven. It is necessary to wait for complete cooling before performing a second cooking.
This cooking method is carried out in 2 phases:
- A research phase during which the
oven begins to heat and will determine the ideal cooking time. This phase lasts
between 5 and 40 minutes depending on the dish.

Important:
Do not open the door during this phase so as not to disturb the calculation and data recording. This search phase is represented by the symbol next to the cooking time.
- A second cooking phase:
the oven has determined the time required, the symbol disappears. The remaining time indicated takes into account the cooking time of the first phase. You can now open the door, for example to water the roast.
- The oven switches off when the cooking time is finished and your screen indicates that the dish is ready.
End of cooking time:
- Select the End time function and change the end of cooking time.

Note :
If you want to chain a second cooking with the Auto Cook function, wait for the oven to cool down completely. However, use of the other functions is possible even with a hot oven.
- List of Auto Cook dishes

Pisces
from 400g to 1kg
Whole fish (sea bream, hake, trout, mackerel) roasted with fish. Place the fish in the broiler pan. Reserve this function for whole fish.

Roast beef
rare beef
from 500g to 1.4kg
Remove the maximum of bard: it causes fumes.
Place the roast on the grill of the grill + drip pan.
At the end of cooking, observe a rest time of 7 to 10min

Pizza
catering pizza - fresh pastaready-made pasta pizza
"homemade" pasta pizza
Place it on the grid to obtain a crispy dough (you can insert a sheet of baking paper between the grid and the pizza to protect the oven from overflowing cheese).

Lamb
leg of 600 g to 1.3 kg pink lamb
Choose the round, plump leg rather than the long, skinny one. Place the roast on the grill of the grill + drip pan.
Let stand after cooking.

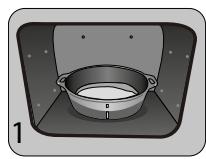
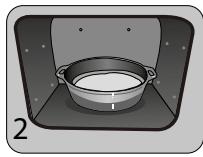
Breath
Use a high mold with straight edges, diameter 21 cm.
Butter the mold and do not touch the inside with your fingers or the souffle will not rise.

Stuffed vegetables
stuffed tomatoes, brandade stuffed peppers
Correctly adapt the dimensions of your dish to the quantity to be cooked to avoid overflowing the juice.

Roast pork
(700 g to 1.4 kg)
loin, net
Place the roast on the grill of the grill ^+ drip pan. At the end of cooking, observe a rest time of 7 to 10 min meat before slicing it. Salt at the end of cooking.

Chicken
chickens from 1.4 kg to 2.5 kg can, guinea fowl
Place the chicken on the grill of the grill ^+ drip pan.
Pierce the skin of poultry before cooking to avoid splashing.

Salty Tart
fresh quiches
frozen quiches
Use a non-adhesive aluminum mold: the dough will be crispy underneath.
Remove the tray from the frozen quiches before placing them on the rack.

Sweet pie
fresh pies
frozen pies
Use a non-adhesive aluminum mold, the dough will be crispier below.

Cookies
individual cupcakes: cookies, financiers, croissants, rolls, raisin rolls, croque-monsieur
Place the individual cupcakes on the baking sheet, which is itself placed on the grid.
Attention: The choux pastry should be cooked in the "GATEAU" position to obtain good results.

Cake
from 500g to 1kg
family cakes: cake (savory, sweet), four quarters,
ready-made preparations available in sachets.
Cakes prepared in a cake pan, a round, square pan and always placed on the grid.
Possibility of baking 2 cakes, mussels side by side.
- Auto Cook Tips
Pizza:
To prevent cheese or tomato sauce from dripping into the oven, you can place a sheet baking paper between the grill and the pizza.
Pies / Quiches:
Avoid glass, porcelain dishes: too thick they prolong the cooking time and the bottom of the dough is not crisp. With fruit, the bottom of the pie is likely to get soggy: it is enough to place a few spoonfuls of fine semolina, crushed cookies in breadcrumbs, powder
almonds or tapioca, which when cooked will absorb the juice. With wet or frozen vegetables (leeks, spinach, broccoli or tomatoes) you can sprinkle a tablespoon of cornflower.
Beef / Pork / Lamb:
Take all meat out of the refrigerator 1 hour before cooking: the cold-hot shock hardens the meat, so you will get a roast of beef golden around, red inside and hot at heart. Do not salt before cooking: the salt absorbs the blood and dries the flesh.
Turn the meat over with the help of spatulas: if you prick it the blood escapes. Always let the meat rest after cooking for 5 to 10 minutes: wrap it in aluminum foil and place it at the entrance of the hot oven: thus the blood drawn to the outside during cooking will flow back and irrigate the roast.
Use earth roasting dishes: the glass favors splashes of fat.
Avoid biting the leg of lamb with garlic cloves, otherwise it will lose its blood; instead, slide the garlic between
flesh and bone, or cook the unpeeled cloves of garlic next to the leg and mash them at the end cooking to flavor the sauce; strain and serve very hot in a gravy boat.
- Some recipes of the "Auto Cook" mode
Pizza
Base: 1 pizza dough
*vegetables :
6 tablespoons of tomato sauce + 100 g of diced zucchini + 50 g of diced peppers + 50 g of eggplant in rings + 2 small tomatoes in rings + 50 g of grated Gruyère cheese + oregano + salt + pepper.
* with Roquefort, smoked breast:
6 tablespoons of tomato sauce + 100 g of breast + 100 g of diced Roquefort + 50 g of walnuts + 60 g of grated cheese.
* with sausages, cottage cheese:
200 g of drained fromage blanc spread on the dough + 4 sausages in slices + 150 g of ham in strips + 5 olives + 50 g of grated Gruyère cheese + oregano + salt + pepper.
Quiches
Base: 1 aluminum mold (diameter 27 to 30~cm )
1 shortcrust pastry ready to use
3 beaten eggs + 50 cl of heavy cream
Salt, pepper, nutmeg.
Various toppings:
200 g pre-cooked bacon,
or 1kg of cooked endive +200g of grated gouda,
or 200g of broccoli +100g of bacon bits +50g of blue cheese,
or 200g of salmon +100g of drained cooked spinach.
Roast beef
ROASTED SAUTERNES sauce with ROQUEFORT:
Sweat 2 tablespoons of chopped shallots in butter. Add 10 cl of Sauternes, let evaporate. Add 100 g Roquefort, gently melt. Add 20 cl of liquid cream, salt, pepper. Boil.
Roast pork - Pork with prunes
Ask the butcher to make a hole along the entire length of the roast, put about 20 prunes inside. Serve sliced with juice or cold with endive salad.
- Some recipes of the "Auto Cook" mode
Chicken
Stuff it with a nice bunch of fresh tarragon or coat it with a mixture of 6 cloves of garlic, crushed with a pinch of coarse salt and a few peppercorns.
Lamb
Anchovy sauce:
Mix 100 g of black olives with 50g of capers and 3 anchovies, 1/2 clove of garlic and 10 cl of olive oil. Add 10 cl of fresh cream. Serve with the sliced leg.
Citrus pound cake
Caramel: 20 sugar cubes (200g)
Cake: 4 eggs
200g caster sugar
200g flour
200g good butter
2 teaspoons of yeast
Fruits: 1 small box of citrus fruits in syrup.
Drain the fruit. Prepare a caramel. When it has taken color, pour it into the pan; tilt it so that the caramel is evenly distributed. Let cool. In the bowl of an electric robot, mix the softened butter with the sugar. Stir in whole eggs, one at a time, then sifted flour. Finish with yeast. Arrange the citrus wedges in a rosette on the caramel. Pour the batter. Bake on "GATEAU". Unmold in a nice dish, and serve cold. Fruits can be apples, pears, apricots.
WIFI CONNECTION
Your oven can be "connected" at any time through your box via Wi-Fi using the "Smart Control" Mobile Application which must be installed on your smartphone to benefit from the connectivity function. Thanks to this application you can not only control your oven remotely with the "Smart Control" application but also with the voice assistant "Google Home". You will also be informed by notification messages and events related to your oven, as if you were next door. You no longer need to be at home to start or preheat your kiln, change programs or simply adjust settings during firing. For more information, visit www.Brandt.com.
WIFI CONNECTION: QUESTIONS AND ANSWERS
| Questions | Answers & Solutions |
| Je n'arrive pas à connecter mon produit | - The connectivity of the product works with Wifi 2.4 Ghz check that your box is well parramétré with a Wifi 2.4Ghz.
- Try to re-enter the parameters of the wifi network via the application
- If the oven still cannot connect to your wifi box, maybe the signal is weak, try to move the box closer or install a wifi repeater. |
| Where can I find the application "Smart Control"? | - For Android phones
Go to : Playstore | - For IOS phones
Go to : Apple Store |
| With which version of the system is the application compatible? | - Apple >> IOS 11 or higher.
- Android >> Android 8 or higher. |
| Can I order several devices with the application? | The application allows you to control various connected household appliances of the Brandt brand. |

Advice :
In order to keep your device up to date it is necessary to connect your product once a month.
WIFI CONNECTION: QUESTIONS AND ANSWERS
| Questions | Answers & Solutions |
| I'm moving or changing my Wifi network settings | - Re-pairing the product.
1- Reset the product, Oven settings menu then Wifi then Reset:( see Settings Menu).
2- Smartphone application, see Menu then Product management then Reconnect the product. |
| I sell my product | - From the application menu go to "Product management" then "Delete my product".
- If you have only one product you can delete your customer account via the application in My Account and then delete the account. |
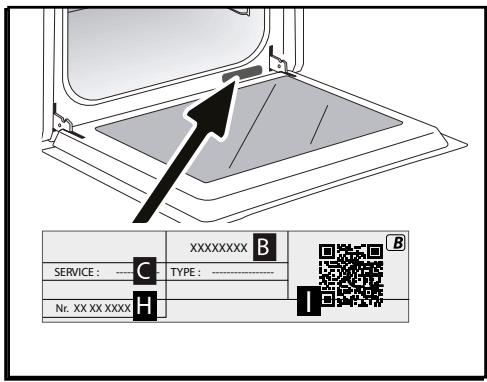
| I don't know where the QR product code is | - To establish the connection with your oven, the application will ask you to scan its QR-code or enter its serial number. This information can be found on the type plate similar to the one below, which is visible when you open the oven door..
B: Commercial reference
C: Service reference
H: Serial number
I: QR Code |
Declaration of conformity
We, Brandt France, declare that the device equipped with the Smart Control function complies with Directive 2014/53/EU.
The full EU Declaration of Conformity is available at www.sauter-electromenager.com.
2.4 GHz frequency band : Max power 100 mW (20 dbm)
Brandt cannot be held responsible:
In case of failure, loss, delay or error in the transmission of data that are beyond its control, if data did not reach it, for any reason, or if the data it receives were illegible or impossible to
process; in case the user was unable to access or use the application and associated services for any reason, the connection should be suspended or interrupted.
Furthermore, Brandt declines all responsibility in case of misuse of the terminal and/or any incident related to the use of the terminal during the application.
Brandt can in no way be held responsible for any damage of any kind whatsoever caused to your terminal and the data stored on it, nor for the consequences that may result from it.
- For security reasons, each appliance can only be connected to one user account. Consequently, in the case of a change of user of the device (transfer of the device for example) the former user must delete his user account from his mobile application. The new user must ensure that the deletion has been completed before he can create his own account by following the same installation and registration steps described in this manual.
However, the same user account can be used on multiple mobile phones or tablets. Therefore, in the case of a change of user of the device (e.g. transfer of the device) the former user must delete his user account from his mobile or tablet application.

Note :
The previous day's display (see Settings menu P.16): After 90 seconds of inactivity the display goes off, the Wifi connection is still active.

Council
If wifi is enabled you can use the Skip Smart Control function.
In standby mode with maintained network connection the device consumes at most 2W.
GOOGLE HOME

The association procedure is the same as for other voice-assisted products. Simply link your Brandt account to your Google account in the Home application
Lexicon of phrases to be pronounced :
- Start command: "Ok Google, start the oven" or "Ok Google, start the oven" (starting a rotating heat mode).
- Stop oven command : "Ok Google, stop the oven" or "Ok Google, stop the oven".
- Changing the oven temperature : "Ok Google, change the temperature of my oven to X degrees" from 35^ to 250^ .
- Changing the oven temperature : "Ok Google, lower my oven temperature by 10^ ".
INTERIOR - EXTERIOR CLEANING
- Self cleaning of the cavity by pyrolysis
Warning
Remove the accessories and the wire shelves from the oven before starting a pyrolysis cleaning. Before proceeding with a pyrolysis cleaning of your oven, remove any significant overflows that may have occurred. Remove excess grease from the door with a damp sponge.
As a safety measure, the pyrolysis cleaning operation is only carried out after automatic door locking, it is impossible to unlock the door.
Self-cleaning cycles:
-
Pyro Max, a classic cleaning in 2 hours for a dirty (or very dirty) oven.
-
Pyro Express quick cleaning in 59 minutes for a lightly soiled oven, available when the oven is already hot!
- Pyro Eco only intervenes to replace the Pyro Express if your oven is not hot enough. The duration of the cleaning is then 1.5 hours.

advice
Start a pyro Express just after cooking to take advantage of the heat accumulated in the cavity. The oven then determines whether the residual heat is sufficient to obtain a good cleaning result. Otherwise, a Pyro Eco starts automatically.
Starting a pyrolysis
The programmer must display the time of day, without flashing. To activate the pyrolysis, turn the function selector to Cleaning Pyrolysis. Select with the + and - keys the desired pyrolysis program then confirm with the OK key, the pyrolysis starts.
As a safety measure, the cleaning operation is only carried out after the door has been automatically locked, the symbol appears in the display, the door cannot be unlocked. At the end of cleaning, the display shows 0:00 and the door unlocks after the oven has cooled down. Return the function selector to 0.


When the oven is cold, use a damp cloth to remove the white ash deposited inside.
- Deferred pyrolysis
Follow the instructions described in the "immediate pyrolysis" paragraph and refer to the "cooking end time" chapter to set the pyrolysis end time.
After these actions, the start of the pyrolysis is deferred so that it ends at the scheduled time. When your pyrolysis is complete, reset the function selector to 0.
- Cleaning the exterior surface
Use a soft cloth dampened with window cleaner. Do not use scouring creams or scraper sponges.
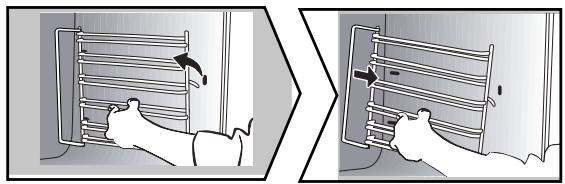
- Cleaning of bleachers
Disassemble the bleachers to clean them. Lift the front part of the tier up; push the entire shelf and take the front hook out of its housing. Then pull the entire shelf slightly towards you to remove the rear hooks from their housing. Remove the 2 steps.
- Cleaning the door windows
Warning :
Do not use scouring cleaners, abrasive sponges, or metal scrapers to clean the oven glass door, as it may scratch the surface and cause the glass to shatter.
Beforehand remove with a soft cloth and dishwashing liquid the excess grease on the interior glass.
To clean the various interior windows, disassemble them as follows:
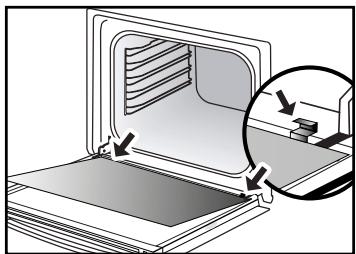
- Cleaning the door windows
Open the door completely and block it using the plastic cable provided in the plastic pouch of your device.
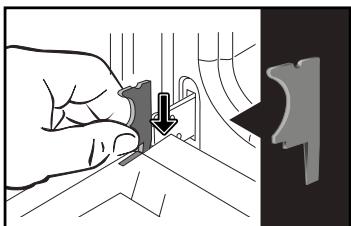
Remove the first clipped window: use a tool (screwdriver) in the slots (A) to unclip the window and then remove it.

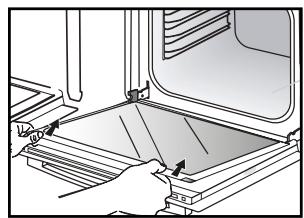
Important: Important:
Be sure to mark the mounting direction of this 1st window (glossy side towards you).
Depending on the model, the door is made up of two additional panes with a black rubber spacer at each corner. If necessary, remove them for cleaning.
Do not immerse the windows in water. Rinse with clean water and wipe with a lint-free cloth.

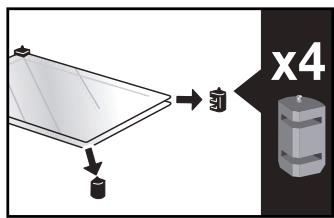
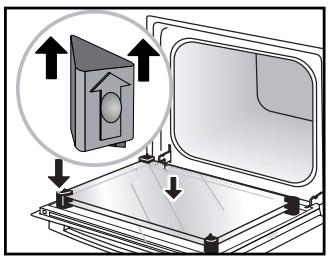
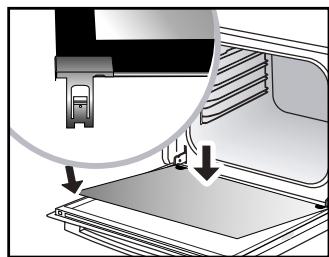
- Reassembly of the door windows
After cleaning, reposition the four rubber stops arrow up and reposition all of the windows.
Engage the last window in the metal stops, then clip it, shiny side towards you. Remove the plastic cover. Your device is operational again.
- Lamp replacement

Important:
Make sure the device is disconnected from the power before replacing the lamp to avoid the risk of electric shock. Intervene when the device has cooled down.
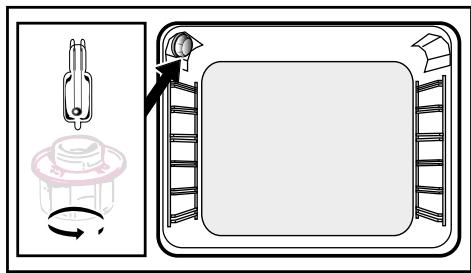
Bulb characteristics:
25 W, 220-240 V , 300 °C, G9 base.
You can replace the lamp yourself when it no longer works. Unscrew the window then take out the lamp (use a rubber glove which will facilitate disassembly). Insert the new lamp and replace the door.
ANOMALIES AND SOLUTIONS
"Auto Stop" is displayed (Auto Stop system).
This function cuts the heating of the oven in case of forgetting. Put your oven on OFF.
Fault code starting with an "F".
Your oven has detected a disturbance. Turn the oven off for 30 minutes. If the fault is still present, cut off the power supply for at least one minute. If the fault persists, contact the After-sales Service.
The oven does not heat up.
Check if the oven is properly connected or if the fuse in your installation is not out of order. Increase the selected temperature.
The oven light does not work.
Replace the bulb or fuse. Check if the oven is properly connected.
The cooling fan continues to run when the oven stops.
This is normal, the ventilation can operate up to one hour after cooking to lower the interior and exterior temperature of the oven. Beyond one hour, contact the After Sales Service.
Cleaning by pyrolysis is not done.
Check that the door is closed. It could be a door lock fault or the temperature sensor. If the fault persists, contact the After-Sales Service.
The symbol flashes in the display.
Failure to lock the door, call the After-Sales Service.
Vibration noise.
Check that the power cord is not in contact with the rear wall.
This has no impact on the proper functioning of your device but can nevertheless generate a vibration noise during ventilation. Remove your device and move the cord. Replace your oven.
SERVICE CALLS
Any repairs made to your appliance must be carried out by a qualified professional authorised to work on the brand. When calling, please provide the complete references of your appliance (commercial reference, service reference, serial number), so that we can handle your call better. This information appears on the manufacturer's nameplate attached to your equipment.
A:Serial number
B : Commercial reference
C:Service reference
D:QR-Code
ORIGINAL PARTS
During an intervention, ask for the exclusive use of certified original spare parts.

| DISHES | | | | | | | | | | | | |
| min |
| Meat |
| Roast pork (1kg) | 200 | 2 | | | | 180 | 2 | | | | | 60 |
| Roast veal (1kg) | 200 | 2 | | | | 180 | 2 | | | | | 60-70 |
| Roast beef | 240 | 2 | | | | | | | | | | 30-40 |
| Lamb (leg, shoulder, 2.5kg) | 220 | 1 | | | 220 | | | | 200 | 2 | | 60 |
| Poultry (1kg) | 200 | 2 | | | 220 | 180 | 2 | | 210 | 3 | | 60 |
| Large pieces of poultry | 180 | 1 | | | | | | | | | | 60-90 |
| Chicken thighs | | | | | 220 | 3 | | | 210 | 3 | | 20-30 |
| Pork/veal chops | | | | | 210 | 3 | | | | | | 20-30 |
| Beef ribs (1kg) | | | | | 210 | 3 | | | 210 | 3 | | 20-30 |
| Lamb chops | | | | | 210 | 3 | | | | | | 20-30 |
| Fish |
| Grilled fish | | | | | 275 | 4 | | | | | | 15-20 |
| Cooked fish (bream) | 200 | 3 | | | | 180 | 3 | | | | | 30-35 |
| Fish in papillotte | 220 | 3 | | | | 200 | 3 | | | | | 15-20 |
| Vegetables |
| Gratins (cooked foods) | | | | | 275 | 2 | | | | | | 30 |
| Potato gratin | 200 | 2 | | | | 180 | 2 | | | | | 45 |
| Lasagne | 200 | 3 | | | | 180 | 3 | | | | | 45 |
| Stuffed tomatoes | 170 | 3 | | | | 160 | 2 | | | | | 30 |
| Patries |
| Sponge cake | | | 180 | 2 | | | | | | | 180 | 2 |
| Swiss roll | 220 | 3 | | | | | | | | | 180 | 2 |
| Buns | 180 | 1 | 210 | | | | | | | | 180 | 2 |
| Brownies | 180 | 2 | | | | 175 | 3 | | | | | 20-25 |
| Cake - Pound cake | 180 | 1 | 180 | 1 | | | | | | | 180 | 2 |
| Clafoutis | 200 | 2 | | | | 180 | 3 | | | | | 30-35 |
| Baked custards | 165 | 2 | | | | | | | | | 150 | 2 |
| Cookies - Shortbread | 175 | 3 | | | | | | | | | | 15-20 |
| Pastries |
| Madeleines | 220 | 3 | | | | 200 | 3 | | | | | 5-10 |
| Choux pastry | 200 | 3 | | | | 180 | 3 | | | | 180 | 3 |
| Flaky pastry hors d'oeuvres | 220 | 3 | | | | 200 | 3 | | | | | 5-10 |
| Savarin cake | 180 | 3 | | | | | | | | | 175 | 3 |
| Shortcrust tart | 200 | 1 | | | | 195 | 1 | | | | | 30-40 |
| Thin flaky crust tart | 215 | 1 | | | | 200 | 1 | | | | | 20-25 |
| Tart made with yeast-based pastry | 210 | 1 | | | | 200 | 1 | | | | | 10-30 |
| Other |
| Skewers | 220 | 3 | | | 210 | 4 | | | | | | 10-15 |
| Terrine pâté | 200 | 2 | | | | 190 | 2 | | | | | 80-100 |
| Shortcrust pizza | 200 | 2 | | | | | | | | | | 30-40 |
| Dough-based pizza | | | | | | | | | | | | 15-18 |
| Quiches | | | | | | | | | | | | 35-40 |
| Soufflé | | | | | | | | | | | 180 | 2 |
| Pies | 200 | 2 | | | | | | | | | | 40-45 |
| Bread | 220 | | | | | 200 | | 220 | | | | 30-40 |

All T°C and cooking times are given for pre-heated ovens.
N.B: Before being placed in the oven, all meat must remain at least 1 hour at room temperature.
| RELATIONSHIP OF SETTINGS TO TEMPERATURE T °F /°C |
| Setting | 1 | 2 | 3 | 4 | 5 | 6 | 7 | 8 | 9 maxi |
| ° Fahrenheit | 85 | 140 | 195 | 250 | 300 | 355 | 410 | 465 | 525 |
| | | | | | | | | |
Recipe with yeast (depending on model)
Ingredients:
- Flour 2 kg - Water 1240 ml - Salt 40 g - 4 packets of dehydrated baker's yeast
Mix the dough in a mixer and allow to rise in the oven.
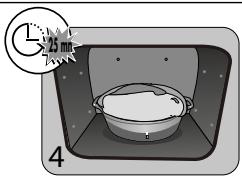
Method: For yeast-based pastry recipes. Pour the dough into a heat-resistant dish. Remove the wire shelf supports and put the dish on the bottom.
Pre-heat the oven to 40 - 50^ with the circulating heat function for five minutes. Stop the oven and allow the dough to rise for 25-30 minutes thanks to the residual heat.
| PERFORMANCE TESTING ACCORDING TO STANDARD CEI 60350 |
| FOOD | * Cooking modes | SHELF | ACCESSORIES | °C | TIME min. | PREHEAT |
| Shortbread (8.4.1) | | 5 | Deep Tray 45mn | 150 | 30-40 | yes |
| Shortbread (8.4.1) | | 5 | Deep Tray 45mn | 150 | 25-35 | yes |
| Shortbread (8.4.1) | | 2 + 5 | Deep Tray 45mn + grill | 150 | 25-45 | yes |
| Shortbread (8.4.1) | | 3 | Deep Tray 45mn | 175 | 25-35 | yes |
| Shortbread (8.4.1) | | s | Deep Tray 45mn + grill | 160 | 30-40 | yes |
| Small cakes (8.4.2) | | 5 | Deep Tray 45mn | 170 | 25-35 | yes |
| Small cakes (8.4.2) | | 5 | Deep Tray 45mn | 170 | 25-35 | yes |
| Small cakes (8.4.2) | | 2 + 5 | Deep Tray 45mn + grill | 170 | 20-40 | yes |
| Small cakes (8.4.2) | | 3 | Deep Tray 45mn | 170 | 25-35 | yes |
| Small cakes (8.4.2) | | 2 + 5 | Deep Tray 45mn + grill | 170 | 25-35 | yes |
| Fatless sponge cake (8.5.1) | | 4 | Grill | 150 | 30-40 | yes |
| Fatless sponge cake (8.5.1) | | 4 | Grill | 150 | 30-40 | yes |
| Fatless sponge cake (8.5.1) | | 2 + 5 | Deep Tray 45mn + grill | 150 | 30-40 | yes |
| Fatless sponge cake (8.5.1) | | 3 | Grill | 150 | 30-40 | yes |
| Fatless sponge cake (8.5.1) | | 2 + 5 | Deep Tray 45mn + grill | 150 | 30-40 | yes |
| Apple pie (8.5.2) | | 1 | Grill | 170 | 90-120 | yes |
| Apple pie (8.5.2) | | 1 | Grill | 170 | 90-120 | yes |
| Apple pie (8.5.2) | | 3 | Grill | 180 | 90-120 | yes |
| Surface browning (9.2.2) | | 5 | Grill | 275 | 3-6 | yes |
*Depending on the model
N.B.: To cook on 2 levels, dishes can be taken out at different times.
FR
EN
ES

Brandt
Select your dish using the + and - keys.
Once the dish has been selected, confirm with OK.
You can change the end time of
cook before baking your dish at the required shelf level.
- Confirm by pressing the OK button to start cooking.

-
Pyro Max, 2 horas para una limpieza más profunda del interior delorno.
-
Pyro Express quick cleaning in 59 minutes for a lightly soiled oven, available when the oven is already hot!
- Pyro Eco only intervenes to replace the Pyro Express if your oven is not hot enough. The duration of the cleaning is then 1.5 hours.

Consejo
The programmer must display the time of day, without flashing. To activate the pyrolysis, turn the function selector to Cleaning Pyrolysis. Select with the + and - keys the desired pyrolysis program then confirm with the OK key, the pyrolysis starts.
Follow the instructions described in the "immediate pyrolysis" paragraph and refer to the "cooking end time" chapter to set the pyrolysis end time.
After these actions, the start of the pyrolysis is deferred so that it ends at the scheduled time. When your pyrolysis is complete, reset the function selector to 0.