CFE735CSJ - Fridge HAIER - Free user manual and instructions
Find the device manual for free CFE735CSJ HAIER in PDF.


| Product Type | Combined fridge-freezer, freestanding, ventilated cooling (No Frost) |
| Brand | Haier |
| Model | CFE735CSJ (equivalent CFE735C*J) |
| Dimensions (H x W x D) | 1905 x 595 x 657 mm |
| Total net volume | 336 L (fridge 228 L, freezer 108 L) |
| Electrical supply | 220-240 V ~ 50 Hz, 1.4 A, fuse 10 A |
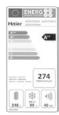
| Energy class | A++ |
| Annual consumption | 273 kWh/year |
| Freezing capacity | 12 kg/24 h |
| Power failure autonomy | 13 h |
| Noise level | 40 dB(A) |
| Refrigerant | R600a (isobutane) – flammable |
| Main functions | Super Freeze, Holiday, MyZone (adjustable drawer Chiller / Fruits & Vegetables), water dispenser (2.5 L), LED lighting, OK indicator, door open alarm, panel lock |
| Defrosting | Automatic (No Frost) |
| Climate class | SN/N/ST/T (10 °C to 43 °C) |
| Door reversibility | Yes, supplied right opening, reversible to left (requires 2 people) |
| Maintenance and cleaning | Clean every 4 weeks with a mild detergent; do not use steam, hard brushes or solvents; automatic defrosting; replace LED lamps only by customer service |
| Safety | Panel child lock, door alarm, automatic stop after 7 min of opening, flammable refrigerant (R600a) – handling by professional |
| Spare parts and repairability | LED lamp not replaceable by user; original parts available from Haier customer service |
| General information | Adjustable feet, adjustable shelves, removable door bins, MyZone drawer, removable water tank, power cable with earth plug (United Kingdom: 3-wire plug) |
Frequently Asked Questions - CFE735CSJ HAIER
User questions about CFE735CSJ HAIER
0 question about this device. Answer the ones you know or ask your own.
Ask a new question about this device
Download the instructions for your Fridge in PDF format for free! Find your manual CFE735CSJ - HAIER and take your electronic device back in hand. On this page are published all the documents necessary for the use of your device. CFE735CSJ by HAIER.
USER MANUAL CFE735CSJ HAIER
Refrigerator-Freezer
CFE635C*J
CFE735C*J
CFE635C*J (UK)
CFE735C*JW
CFE735C*JW(UK)
*= Colour code
Thank you for purchasing a Haier Product.
Please read these instructions carefully before using this appliance. The instructions contain important information which will help you get the best out of the appliance and ensure safe and proper installation, use and maintenance.
Keep this manual in a convenient place so you can always refer to it for the safe and proper use of the appliance.
If you sell the appliance, give it away, or leave it behind when you move house, make sure you also pass this manual so that the new owner can become familiar with the appliance and safety warnings.

Legend
Warning – Important Safety information

General information and tips

Environmental information
natural_image
Symbol of a trash bin crossed with no text or labelsDisposal
Help protect the environment and human health. Put the packaging in applicable containers to recycle it. Help to recycle waste of electrical and electronic appliances. Do not dispose appliances marked with this symbol with the household waste. Return the product to your local recycling facility or contact your municipal office.

WARNING!
Risk of injury or suffocation!
Refrigerants and gases must be disposed of professionally. Ensure that the tubing of the refrigerant circuit is not damaged before being properly disposed of. Disconnect the appliance from the mains supply. Cut off the mains cable and dispose of it. Remove the trays and drawers as well as the door catch and seals, to prevent children and pets to get closed in the appliance.
1 - Safety information....4
2- Intended use 8
3- Product description 9
4 - Control panel....10
5- Use....11
6- Energy saving tips....18
7 - Equipment 19
8- Care and Cleaning....22
9- Troubleshooting....24
10- Installation....27
11- Technical Data....31
12- Customer Service ....33
1- Safety information
Before switching on the appliance for the first time read the following safety hints!:

WARNING!
Before first use
▶ Make sure there is no transport damage.
Remove all packaging and keep out of children's reach.
▶ Wait at least two hours before installing the appliance in order to ensure the refrigerant circuit is fully efficient.
▶ Handle the appliance always with at least two persons because it is heavy.
Installation
The appliance should be placed in a well-ventilated place. Ensure a space of at least 20 cm above and 10 cm around the appliance.
▶ Never place the appliance in a damp area or location where it might be splashed with water. Clean and dry water splashes and stains with a soft clean cloth.
▶ Do not install the appliance in direct sunlight or in the near of heat sources(e.g. stoves, heaters).
▶ Install and level the appliance in an area suitable for its size and use.
- Keep ventilation openings in the appliance or in the in-built structure clear of obstruction.
▶ Make sure that the electrical information on the rating plate agrees with the power supply. If it does not, contact an electrician.
The appliance is operated by a 220-240 VAC/50 Hz power supply. Abnormal voltage fluctuation may cause the appliance to fail to start, or damage to the temperature control or compressor, or there may be an abnormal noise when operating. In such case, an automatic regulator shall be mounted.
▶ Use a separate earthed socket for the power supply which is easy accessible. The appliance must be earthed.
- Only for UK: The appliance's power cable is fitted with 3-cord (grounding) plug that fits a standard 3-cord (grounded) socket. Never cut off or dismount the third pin (grounding). After the appliance is installed, the plug should be accessible.
▶ Do not use multi-plug adapters and extension cables.
▶ Ensure that the power cable is not trapped by the refrigerator. Do not step on the power cable.
▶ Do not damage the refrigerant circuit.

WARNING!
Daily use
This appliance can be used by children aged from 8 years and above and persons with reduced physical, sensory or mental capabilities or lack of experience and knowledge if they have been given supervision or instruction concerning use of the appliance in a safe way and understand the hazards involved.
- Keep away children under 3 years of age from the appliance unless they are constantly supervised.
▶ Children shall not play with the appliance.
▶ If cool gas or other inflammable gas is leaking in the vicinity of the appliance, turn off the valve of the leaking gas, open the doors and windows and do not unplug a plug in the power cable of the refrigerator or any other appliance.
▶ Notice that the appliance is set for operation at a specific ambient range between 10 and 43°C. The appliance may not work properly if it is left for a long period at a temperature above or below the indicated range.
▶ Do not place unstable articles (heavy objects, containers filled with water) on top of the refrigerator, to ovoid personal injury caused by falling or electric shock caused by contact with water.
▶ Do not pull on the door shelves. The door may be pulled slant, the bottle rack, may be pulled away, or the appliance may topple.
▶ Open and close the doors only with the handles. The gap between the doors and between the doors and the cabinet is very narrow. Do not extend your hands in these areas to avoid pinching your fingers. Open or close the refrigerator doors only when there are no children standing within the range of door movement.
▶ Do not store or use inflammable, explosive or corrosive materials in the appliance or in the vicinity.
▶ Do not store medicines, bacteria or chemical agents in the appliance. This appliance is a household appliance. It is not recommended to store materials that require strict temperatures.
▶ Never store liquids in bottles or cans (besides high percentage spirits) especially carbonated beverages in the freezer, as these will burst during freezing.
▶ Check the condition of food if a warming in the freezer has taken place.

WARNING!
Daily use
▶ Do not set unnecessarily low temperature in the refrigerator compartment. Minus temperatures may occur at high settings. Attention: Bottles can burst.
▶ Do not touch frozen goods with wet hands (wear gloves). Especially do not eat ice lollies immediately after removal from the freezer compartment. There is the risk to freeze or the formation of frost blisters. FIRST aid: keep immediately under running cold water. Do not pull away!
▶ Do not touch the inside surface of the freezer storage compartment when in operation, especially with wet hands, as your hands may freeze onto the surface.
▶ Unplug the appliance in the event of a power interruption or before cleaning. Allow at least 5 minutes before restarting the appliance, as frequent starting may damage the compressor.
▶ Do not use electrical devices inside the food storage compartments of the appliance, unless they are of the type recommended by the manufacturer.
Maintenance / cleaning
▶ Make sure children are supervised if they carry out cleaning and maintenance.
▶ Disconnect the appliance from the electrical supply before undertaking any routine maintenance. Allow at least 5 minutes before restarting the appliance, as frequent starting may damage the compressor.
▶ Hold the plug, not the cable, when unplugging the appliance.
▶ Do not scrape off frost and ice with sharp objects. Do not use sprays, electric heaters like heater, hair dryer, steam cleaners or other sources of heat in order to avoid damage to the plastic parts.
▶ Do not use mechanical devices or other means to accelerate the defrosting process, other than those recommended by the manufacturer.
▶ If the supply cord is damaged, it must be replaced by the manufacturer, its service agent or similarly qualified persons in order to avoid a hazard.

WARNING!
Maintenance / cleaning
▶ Do not try to repair, disassemble or modify the appliance by yourself. In case of repair please contact our customer service.
▶ Eliminate the dust on the back of the unit at least once in the year to avoid hazard by fire, as well as increased energy consumption.
▶ Do not spray or flush the appliance during cleaning.
▶ Do not use water spray or steam to clean the appliance.
▶ Do not clean the cold glass shelves with hot water. Sudden temperature change may cause the glass to break.
Refrigerant gas information

WARNING!
The appliance contains the flammable refrigerant ISOBUTANE (R600a). Make sure the refrigerant circuit is not damaged during transportation or installation. Leaking refrigerant may cause eye injuries or ignite. If a damage has occurred, keep away open fire sources, thoroughly ventilate the room, do not plug or unplug the power cords of the appliance or any other appliance. Inform the customer service.
In case of eyes get into contact with the refrigerant, rinse immediately it under running water and call immediately the eye specialist.

WARNING!
▶ Taking care to avoid causing a fire by igniting flammable material.
▶ WARNING: When positioning the appliance, ensure the supply cord is not trapped or damaged.
▶ WARNING: Do not locate multiple portable socket-outlets or portable power supplies at the rear of the appliance.
2- Intended use
2.1 Intended use
This appliance is intended for cooling and freezing food. It has been designed exclusively for use in dry-interior house-holds. It is not intended for commercial or industrial use.
Changes or modifications to the device are not allowed. Unintended use may cause hazards and loss of warranty claims.
2.2 Accessories
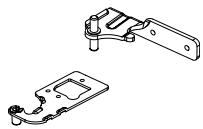
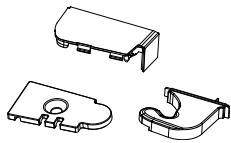
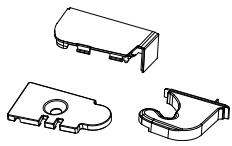
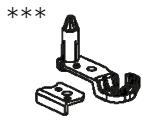
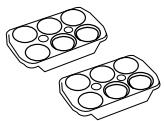
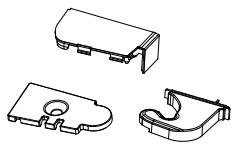
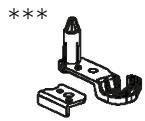
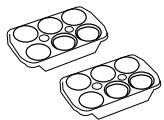
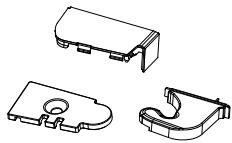
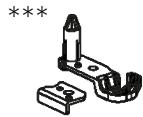
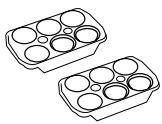
Check the accessories and literature in accordance with this list (Fig.:2.2):
Please keep the accessories and literature for installation and maintenance.
2.2
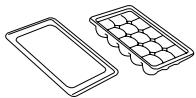
Ice cube tray
with cover
natural_image
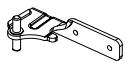
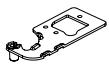
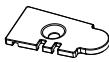
Technical line drawing of two mechanical components: a bracket and a separate housing (no text or symbols)Door hinges
natural_image
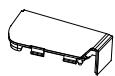
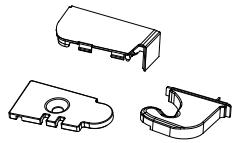
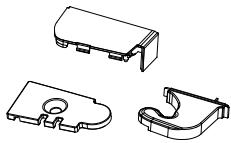
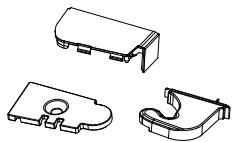
Three technical line drawings of mechanical components (no text or symbols)Covers
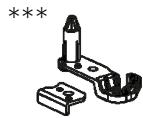
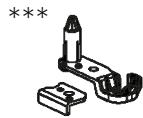
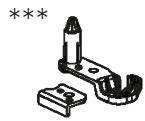
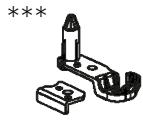
Door stopper
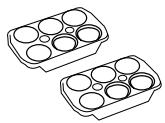
natural_image
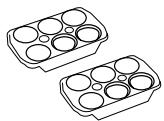
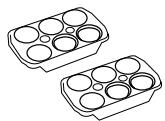
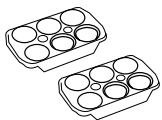
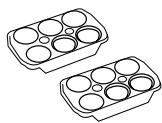
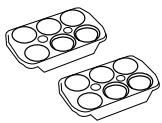
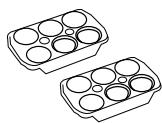
Two identical line drawings of a tray with multiple circular cavities, no text or symbols present.Egg trays
Energy-lable
Warranty card

User manual

Notice
Due to technical changes and different models, some of the illustrations in this manual may differ from your model.
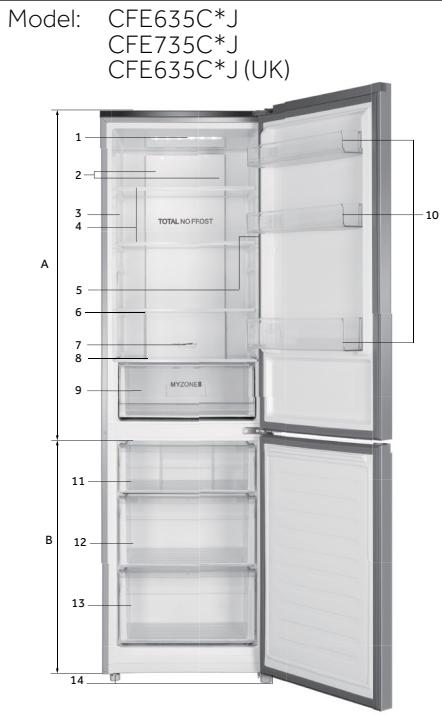
Pictures of appliances (Fig. 3)
text_image
Model: CFE635C*J CFE735C*J CFE635C*J (UK) 1 2 3 4 TOTAL NO FFOST A 5 6 7 8 9 MYZONE B 10 B 11 12 13 14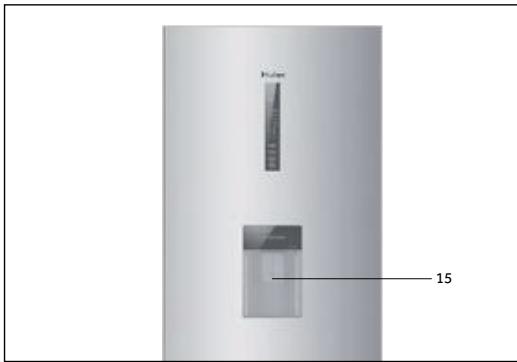
text_image
Pulter 15Model: CFE735C*JW
CFE735C*JW(UK)
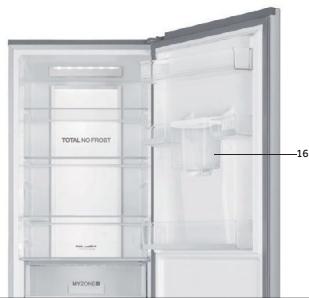
text_image
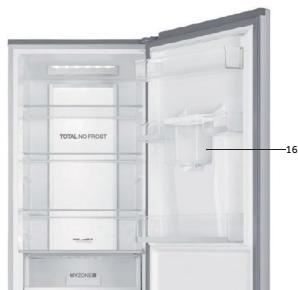
TOTAL NO FRONT 16 M702458*= Colour code
A: Refrigerator compartment
1 Refrigerator LED lamp
2 Air duct and sensor (behind panel)
3 Rating plate
4 Glass shelves
5 O.K.-temperature indicator
6 Gass Shelve
7 Air Duct
8 My Zone box cover
9 My Zone box
10 Door rack
B: Freezer compartment
11 Upper Freezer Box
12 Middle Freezer Box
13 Lower Freezer Box
14 Adjustable feet
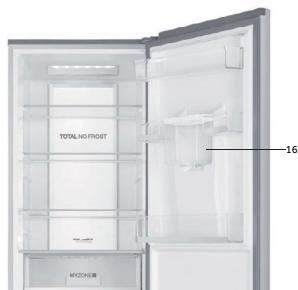
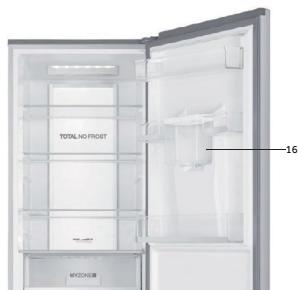
15 Water dispenser
16 Watertank
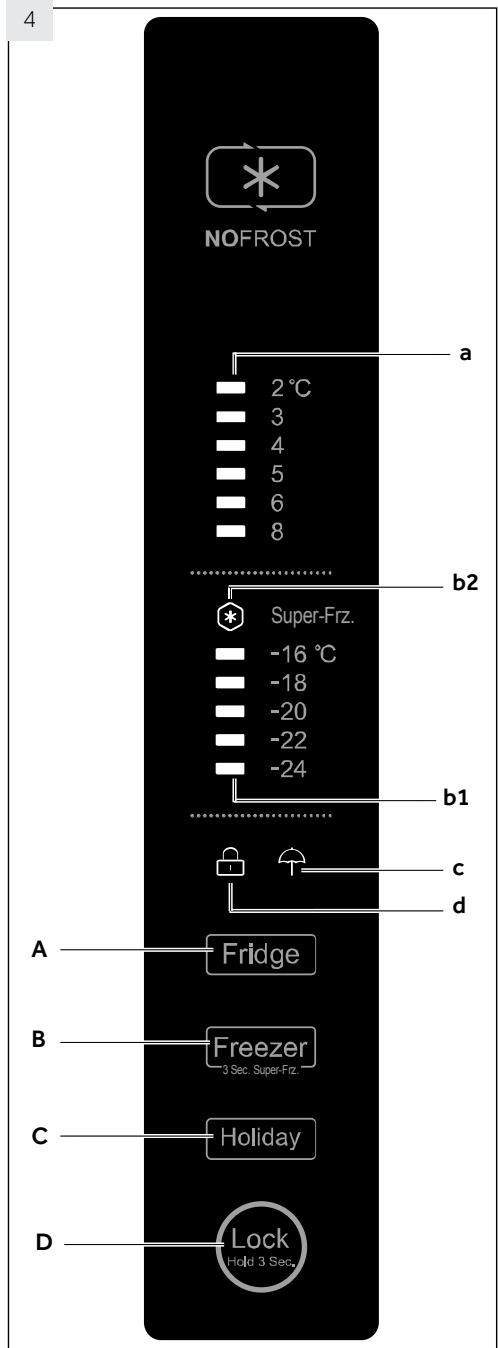
Control panel (Fig. 4)
text_image
NOFROST a 2 °C 3 4 5 6 8 b2 Super-Frz. -16 °C -18 -20 -22 -24 b1 c d A Fridge B Freezer 3 Sec. Super-Frz.. C Holiday D Lock Hold 3 Sec.Keys:
A Refrigerator temperature setting
B Freezer temperature setting and Super-Frz. function on/off
C Holiday function on/off
D Panel lock/unlock
Indicators:
a Temperature refrigerator compartment
b1 Temperature freezer compartment
b2 Super-Freeze function ("Super-Frz.")
c Holiday function
d Panellock
5.1 Before first use
Remove all packaging materials, keep them out of children's reach and dispose them in an environmentally friendly manner.
▶ Clean the inside and outside of the appliance with water and a mild detergent before putting any food in it.
▶ After the appliance has been levelled and cleaned, wait for at least 2 hours before connecting it to the power supply. See Section INSTALLATION.
▶ Precool the compartments at high settings before loading with food. The function Super-Freeze helps to cool down the freezer compartment quickly.
The refrigerator temperature and freezer temperature are automatically set to 5^ C and -18^ C respectively. These are the recommended settings. If desired, you can change these temperatures manually. Please see ADJUST THE TEMPERATURE.
5.2 Sensor keys
The buttons on the control panel are sensor keys, which already respond when lightly touched with the finger.
5.3 Switch on /off the appliance
The appliance is in operation as soon as it is connected to the power supply.
When the appliance is powered on for the first time, temperature indicators "a" and "b1" show the presetting values (refer to NOTICE).

Notice: Presettings
The appliance is preset to the recommended temperature of 5^ C (refrigerator) and -18°C (freezer). Under normal ambient condition you need not to set a temperature.
When the appliance is switched on after disconnection from the main power supply, it may take up to 12 hours for the correct temperatures to be reached.
Empty the appliance before switching off. To switch off the appliance, pull the power cord out off the power socket.
5.4 Standby-mode
The display screen turns off automatically 30 seconds after pressing a key. The display will be automatically locked. It lights up automatically by touching any key or opening the door.
5.5 Lock/unlock panel

Notice: Panel lock
The control panel is automatically blocked against activation if 30 seconds no key is touched. For any settings the control panel must be unlocked.
▶ Touch key "D" for 3 seconds to block all panel elements against activation (Fig. 5.5.1).
The related indicator "d" is now displayed (Fig. 5.5.2).
▶ For unlocking touch again the key.
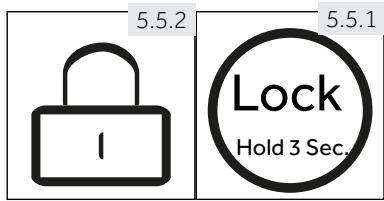
text_image
5.5.2 5.5.1 Lock Hold 3 Sec.5.6
natural_image
Line drawing of an refrigerator with a door and side shelves, showing sound waves (no text or symbols)5.6 Door opening alarm
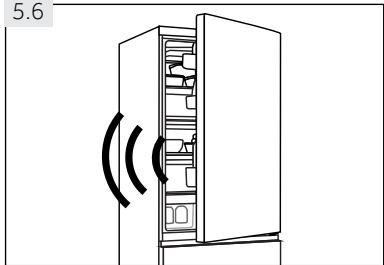
When the refrigerator door is opened for more than 1 minute, the door opening alarm will sound (Fig. 5.6). The alarm can be silenced by closing the door. If the door is left open for more than 7 minutes, the light inside the refrigerator and control panel illumination will automatically switch off.
5.7 Adjust the temperature
The indoor temperatures are influenced by the following factors:
▶ Ambient temperature
▶ Frequency of door opening
▶ Amount of stored foods
▶ Installation of the appliance
text_image
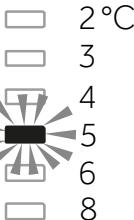
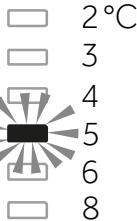
5.7.1 2°C 3 4 5 6 8 Fridge5.7.1 Adjust the temperature for fridge
- Unlock the panel by touching key "D" if it is locked (Fig. 5.5.1).
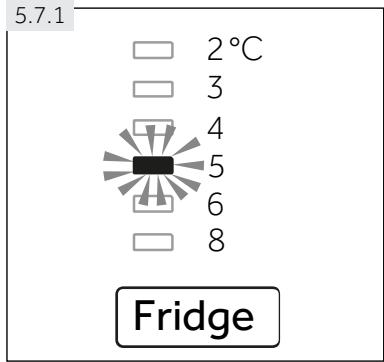
- Touch sequentially key "A" (Fridge) until the desired value of temperature indicator "a" is flashing (Fig. 5.7.1).
The optimum temperature in the refrigerator is 5^ C. Colder temperatures mean unnecessary energy consumption. - After a few seconds temperature indicator "a" will shine permanently and the setting is confirmed.
text_image
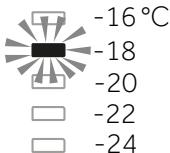
5.7.2 -16 °C -18 -20 -22 -24 Freezer 3 Sec. Super-Frz.5.7.2 Adjust the temperature for freezer
- Unlock the panel by touching key "D" if it is locked (Fig. 5.5.1).
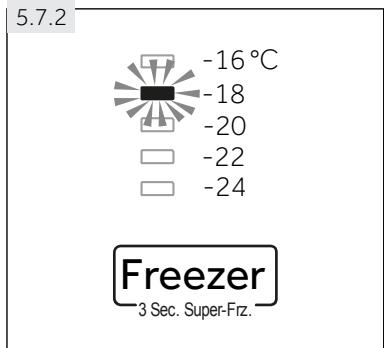
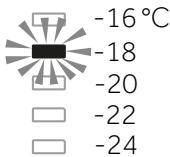
- Touch sequentially key "B" (Freezer) until the desired value of temperature indicator "b1" is flashing. (Fig. 5.7.2).
The optimum temperature in the freezer is -18^ . Colder temperatures mean unnecessary energy consumption. - After a few seconds temperature indicator "b1" will shine permanently and the setting is confirmed.

Notice: Conflict with other functions
The temperature in the corresponding compartment cannot be adjusted if any other function (Super-Freeze or Holiday) is activated or the display is locked. The corresponding indicator will flash accompanying.
5.8 Super-Freeze function
Fresh food should be frozen as quickly as possible to the core. This preserved the best nutritional value, appearance and taste. The Super-Freeze function accelerates the freezing of fresh food and protects the goods already stored from undesirable warming. If you need to freeze a large amount of food once, it is recommended to set the Super-Freeze function on ahead for 24h before the usage of frozen room.
- Unlock the panel by touching key "D" if it is locked (Fig. 5.5.1).
- Touch key „B“ (Freezer) for 3 seconds; indicator „b2“ illuminates and the function is activated (Fig. 5.8).
- The same operation can exit Super-Freeze function.
5.8

Super-Frz.

Super-Frz.

Notice: Automatically switch off
The Super-Freeze function will automatically switch off after 56 hours. The appliance is then operated at the previously set temperature.
5.9 Holiday function
This function sets the refrigerator temperature permanently to 17^ C.
This allows to keep the door of the empty refrigerator closed without causing an odour or mold - during a long absence (e.g. during holiday). The freezer compartment is free for your setting.
- Unlock the panel by touching key "D" if it is locked (Fig. 5.5.1).
- Touch key "C" (Holiday); indicator "c" illuminates and the function is activated (Fig. 5.9).
- The same operation can exit Holiday function.
5.9

Holiday

WARNING!
During the Holiday function no goods must be stored in the refrigerator compartment. The temperature of + 17 °C is too high for storing food.
5.10
text_image
MYZONE5.10 MyZone box
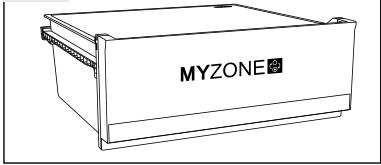
The fridge compartment is equipped with a MyZone box (Fig.5.10). In accordance with the food's storage demands, the most suitable temperature can be selected to get the optimal nutritional value of the food from Chiller to Fruit&Vegetable.(Fig.5.11.)
5.11

5.11 Adjusting MyZone box function
This Myzone box can be used as Chill compartment and Fresh-food storage compartment and also can be preserved for different kinds of food which achieved by the control of the fridge air duct pick.

Notice: MyZone box
The temperature in this box is from Chill compartment to Fresh-food storage compartment.
- When the fridge air duct pick locates in the right Chiller position, the box will get the lowest temperature. While the fridge air duct pick locates in the left Fruit&Vegetable position, the box will get the highest temperature.
It may be slightly changed due to the different ambient is higher temperature or refrigerator working style.
When temperature of ambient is higher or refrigerator is lower, the fridge air duct pick can be adjusted toward to the direction of Fruit&Vegetable.
When temperature of ambient is lower or refrigerator is higher, the fridge air duct pick can be adjusted toward to the direction of Chiller.
▶ Sometime the temperature in this box may dip below zero, so before you put fruit & vegetable into it, please make right setting.
5.12 Water dispenser
With the water dispenser cool drinking water can be tapped.
The water tank should be cleaned before first use (see CARE AND CLEANING)
5.12.1 Filling the water tank

WARNING!
Use drinking water only.
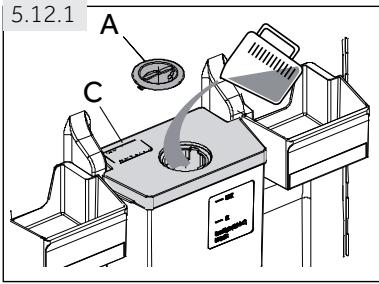
Ensure that the water tank is properly inserted (see EQUIPMENT) Rotate and lift the round lid (A) and pour fresh drinking water into the water tank (Fig.5.12.1).
Fill water only up to the mark (2.5 l); as it could over flow when the door opens and closes.
Close the round lid (A) until it clicks into place.
text_image
5.12.1 A C
Notice: Water dispenser
Before refilling dispose residual water and clean the water tank.
- When you don't need water for a long time, please empty the water tank and insert the cleaned tank.
The cover (C) on the water tank (Fig.5.12.1) is additionally used to save energy. If you do not want to get water from the water dispenser for a long period, please still install the cover because of better insulating and saving energy.
5.13 Tips on storing fresh food
5.13.1 Storing into the refrigerator compartment
▶ Keep your fridge temperature below 5^ C.
▶ Hot food must be cooled to room temperature before storing in the appliance.
▶ Foods stored in the refrigerator should be washed and dried before storing
▶ Food to be stored should be properly sealed to avoid odour or taste alterations.
▶ Do not store excessive quantities of food. Leave spaces between foods to allow cold air flowing around them, for a better and more homogeneous cooling.
▶ Foods eaten daily should be stored at the front of the shelf.
Leave a gap between foods and the inner walls, allowing air flowing. In special way don't store foods against the rear wall: foods could freeze against rear wall. Avoid direct contact of food (especially oily or acidic food) with the inner liner, as oil/acid can erode the inner liner. Clean away oily/acid dirt whenever it is found.
▶ Frozen food can be gently defreezed in the refrigerator compartmentor with defrost function in the MyZone box. This saves energy.
The ageing process of fruit and vegetables such as courgettes, melons, papaya, banana, pineapple, etc. can be accelerated in the refrigerator. Therefore, it is not advisable to store them in the refrigerator. However, the ripening of strongly green fruits can be promoted for a certain period. Onions, garlic, ginger and other root vegetables should also be stored at room temperature.
▶ Unpleasant odours inside the fridge are a sign that something has spilled and cleaning is required. See CARE AND CLEANING.
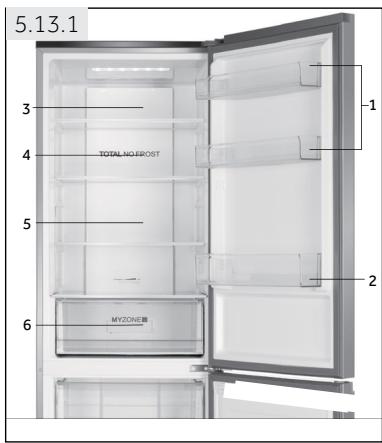
▶ Different foods should be placed in different areas according to their properties (Fig.: 5.13.1).
text_image
5.13.1 3 4 TOTAL NO FROST 5 6 MYZONE B 1 21 Butter, cheese, eggs, spices, etc.
2 Jam, cheese, tomato sauce, etc
3 Drinks and bottled foods.
4 Pickled foods, canned food, etc.
5 Meat products, snack foods, pasta, milk, tofu, dairy, etc.
6 Cooked meat, sausages, etc.
7 MyZone box: Fruit, vegetables, salad, etc.
5.13.2 Storage into the freezer compartment
▶ Keep the freezer temperature at- 18°C.
24 hours before freezing switch on the Super-Freeze function; -for small quantities of food 4-6 hours are sufficient.
Hot food must be cooled to room temperature before storing in the freezer compartment.
▶ Food cut into small portions will freeze faster and be easier to defrost and cook. The recommended weight for each portion is less than 2.5 kg
It is better to pack food before putting it into the freezer. The outside of the packaging must be dry to avoid bags sticking together. Packaging materials should be odour-free, airtight, non-poisonous and nontoxic.
In order to avoid expiration of storage periods, please note the freezing date, time limit and name of the food on the packaging according to the storage periods of different foods.
▶ WARNING!: Acid, alkali and salt etc. could erode the internal surface of the freezer. Do not place the food having these substances (e.g. sea fish) directly on the internal surface. Salt water in the freezer should be cleaned up immediately.
▶ Do not exceed the food storage times recommended by the manufacturers. Only take the required amount of food out of the freezer.
▶ Consume defrosted food quickly. Defrosted food cannot be re-frozen unless it is first cooked, otherwise it may bless edible.
- Do not load excessive quantities of fresh food in the freezer compartment. Refer to the freezing capacity of the freezer – See TECHNICAL DATA or data at the type plate.
▶ Food can be stored in the freezer at a temperature of at least -18^ for 2 to 12 months, depending on its properties (e.g., meat: 3-12 months, vegetables: 6-12 months)
When freezing fresh food, avoid bringing it in contact with already frozen food. Risk of thawing!
When storing commercially frozen foods, please follow these guidelines:
▶ Always follow manufacturers' guidelines for the length of time you should store food for. Do not exceed these guidelines!
▶ Try to keep the length of time between purchase and storage as short as possible to preserve food quality.
▶ Buy frozen foods, which have been stored at a temperature of -18^ or below.
- Avoid buying food which has ice or frost on the packaging – This indicates that the products might have been partially defrosted and refrozen at some point – temperature rises affect the quality of food.

Energy saving tips
▶ Make sure the appliance is properly ventilated (see INSTALLATION).
▶ Do not install the appliance in direct sunlight or in the near of heat sources(e.g. stoves, heaters).
- Avoid unnecessarily low temperature in the appliance. The energy consumption increases the lower the temperature in the appliance is set.
▶ Functions like SUPER-FREEZE consume more energy.
▶ Allow warm food to cool down before placing it in the appliance.
▶ Open the appliance door as little and as briefly as possible.
▶ Do not overfill the appliance to avoid obstructing the air flow.
▶ Avoid air within the food packaging.
- Keep door seals clean so that the door always closes correctly.
▶ Defreeze frozen food in the fridge storage compartment

Notice: Differences depending on model
Due to different models, your product may not have all of the following features. Please refer to chapter PRODUCT DESCRIPTION.
7.1 Multi-air-flow
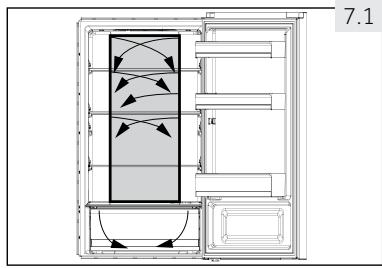
The refrigerator is equipped with a multi-air-flow system, with which cool air flows are located on every shelf level (Fig. 7.1). This helps to maintain a uniform temperature to ensure that your food is kept fresher for longer.
7.2 Adjustable shelves
The height of the shelves can be adjusted to fit your storage needs.
- To relocate a shelf, remove it first by uplifting its hind edge (1) and pulling it out (2) (Fig. 7.2).
- To reinstall it, put it on the lugs on both sides and push it to the most rearward position until the rear of the shelf is fixed inside the slots in the sides
natural_image
Architectural floor plan of a refrigerator with directional arrows indicating airflow or movement (no text or symbols)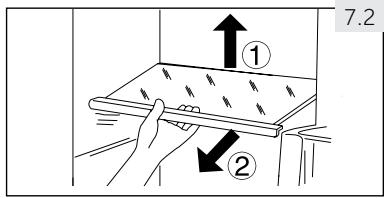
text_image
7.2 ① ②
Notice: Shelves
Ensure that all ends of a shelf are level.
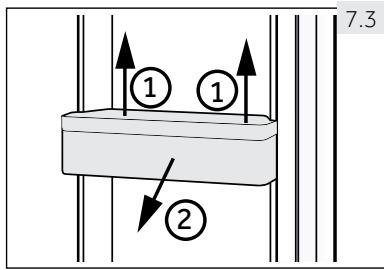
7.3 Removable door racks
The door racks can be removed for cleaning:
Place hands on each side of the rack, lift it upwards (1) and pull it out (2) (Fig. 7.3).
In order to insert the door rack, the above steps are carried out in reverse order.
text_image
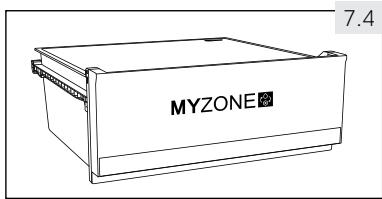
7.3 ① ① ②7.4 MyZone box
For use and setting of the Myzone compartment (Fig.7.4) please check section USE (Myzone box).
text_image
MYZONE 7.4
WARNING!
Do not store things that need precision storage temperature such as medicine and food therapy articles, to prevent them deteriorating
text_image
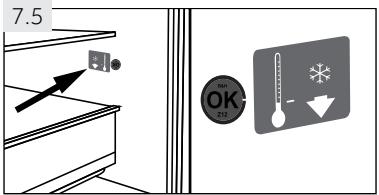
7.5 OK -7.5 OK-temperature indicator
The OK-temperature (Fig. 7.5) indicator can be used to determine temperatures below +4°C. Gradually reduce the temperature if the sign does not indicate "OK".

Notice:OK-sticker
When the appliance is switched on, it may take up to 12 hours for the correct temperatures to be reached.
7.6 The Light
The LED interior light comes on when the door is opened. The performance of the lights is not affected by any of the appliances other settings.
text_image
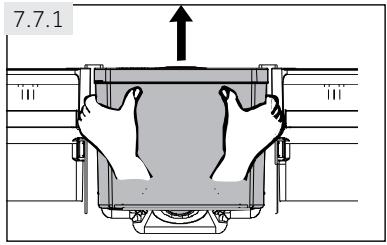
7.7.1 III III7.7 The Water tank
7.7.1 Remove water tank
The water tank can be removed and reinstalled for cleaning in the same way as the door racks (Fig.7.7.1)
text_image
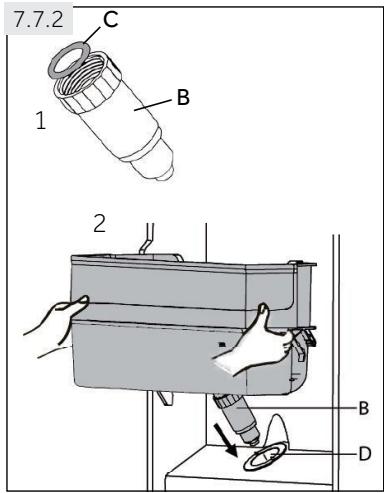
7.7.2 1 C B 2 B D7.7.2 Insert water tank
- Make sure the dispenser spout (B) is firmly screwed to the water tank and the white O-ring (C) is in position (Fig.7.7.2-1).
- Place the water tank in the position that the dispenser spout (B) fits into the opening of the door (D) (Fig.7.7.2-2)

Notice: Water tank
▶ Make sure the spout is firmly screwed to the water tank
▶ and the white O-ring (C) is in position. If the water tank is not properly inserted, water can drip from the connection.
▶ Do not use excessive force when removing or installing the water tank. to avoid damaging the tank.

WARNING!
Disconnect the appliance from the power supply before cleaning.
8.1 General
Clean the appliance when only little or no food is stored.
The appliance should be cleaned every four weeks for good maintenance and to prevent bad stored food odours.

WARNING!
▶ Do not clean the appliance with hard brushes, wire brushes, detergent powder, petrol, amyl acetate, acetone and similar organic solutions, acid or alkaline solutions. Please clean with special refrigerator detergent to avoid damage.
▶ Do not spray or flush the appliance during cleaning.
▶ Do not use water spray or steam to clean the appliance.
▶ Do not clean the cold glass shelves with hot water. Sudden temperature change may cause the glass to break.
▶ Do not touch the inside surface of the freezer storage compartment, especially with wet hands, as your hands may freeze onto the surface.
▶ In case of heating check the condition of frozen goods.
natural_image
Illustration of a kitchen sink with a cloth and a basin, no text or symbols present8.2 Defrosting
▶ Always keep the door gasket clean.
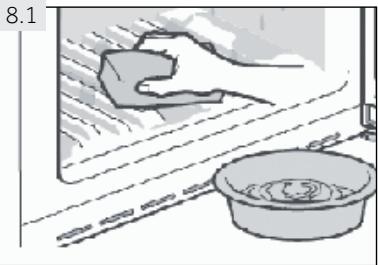
▶ Clean the inside and housing of the appliance with a sponge dampened in warm water and neutral detergent (Fig. 8.1).
▶ Rinse and dry with soft cloth.
- Do not clean any of the parts of the appliance in a dishwasher.
- Allow at least 5 minutes before restarting the appliance as frequent starting may damage the compressor.
The defrosting of the refrigerator and the freezer compartment are done automatically; no manual operation is needed.
8.3 Replacing the LED-lamps

WARNING!
Do not replace the LED lamp yourself, it must only be replaced by either the manufacturer or the authorised service agent.
The lamp adopts LED as its light source, featuring low energy consumption and long service life. If there is any abnormality, please contact the customer service. See CUSTOMER SERVICE.
| Parameter | CFE635 C*J CFE635C*J(UK) | CFE735 C*J CFE735C*JW CFE735C*JW(UK) |
| Voltage in V | 13.2 | |
| Max power in W | 2 | |
| LED Spec | WHITE-5050 | |
| Usage temperature | -30 °C TO +85 °C | |
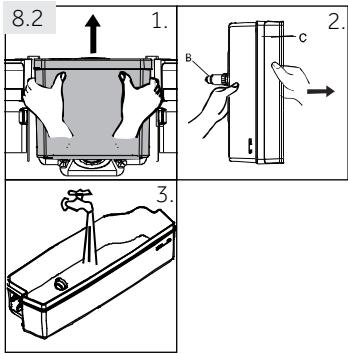
8.4 Cleaning the water tank (Fig.8.2)
- Take off the water tank out of the appliance.
- Removethe cover (C) and unscrew the dispenper spout (B) gently.
- Clean the water tank and the dispenser spout with warm running water and liquid dishwashing detergent. Make sure all soap is rinsed off.
text_image
8.2 1. B c 3.8.5 Non-use for a longer period
If the appliance is not used for an extended period of time, and you will not use the Holiday-function for the refrigerator:
▶ Take out the food.
▶ Unplug the power cord.
▶ Clean the appliance as described above.
- Keep the door and freezer drawers/door open to prevent the creation of bad odours inside.

Notice: Switch off
Turn the appliance off only if strictly necessary.
8.6 Moving the appliance
- Remove all food and unplug the appliance.
- Secure shelves and other moveable parts in the fridge and the freezer with adhesive tape.
- Do not tilt the refrigerator more than 45^ to avoid damaging the refrigerating system.

WARNING!
▶ Do not lift the appliance by its handles.
▶ Never place the appliance horizontally on the ground.
9- Troubleshooting
Many occurring problems could be solved by yourself without specific expertise. In case of a problem please check all shown possibilities and follow below instructions before you contact an after sales service. See CUSTOMER SERVICE.

WARNING!
▶ Before maintenance, deactivate the appliance and disconnect the mains plug from the mains socket.
Electrical equipment should be serviced only by qualified electrical experts, because improper repairs can cause considerable consequential damages.
▶ A damaged supply should only be replaced by the manufacturer, its service agent or similarly qualified persons in order to avoid a hazard.
9.1 Troubleshooting table
| Problem | Possible Cause | Possible Solution |
| The compressor does not work. | Mains plug is not connected in the mains socket.The appliance is in the defrosting cycle. | Connect the mains plug.This is normal for an automatic defrosting. |
| The appliance runs frequently or runs for a too long period of time. | The indoor or outdoor temperature is too high.The appliance has been off power for a period of time.A door/drawer of the appliance is not tightly closed.The door/drawer has been opened too frequently or for too long.The temperature setting for the freezer compartment is too low.The door/drawer gasket is dirty, worn, cracked or mismatched.The required air circulation is not guaranteed. | In this case, it is normal for the appliance to run longer.Normally, it takes 8 to 12 hours for the appliance to cool down completely.Close the door/drawer and ensure the appliance is located on a level ground and there is no food or container jarring the door.Do not open the door/drawer too frequently.Set the temperature higher until a satisfactory refrigerator temperature is obtained. It takes 24 hours for the refrigerator temperature to become stable.Clean the door/drawer gasket or replace them by the customer service.Ensure adequate ventilation. |
| The inside of the refrigerator is dirty and/or smells. | The inside of the refrigerator needs cleaning.Food of strong odour is stored in the refrigerator. | Clean the inside of the refrigerator.Wrap the food thoroughly. |
| It is not cold enough inside the appliance. | The temperature is set too high.Too warm goods has been stored.Too much food has been stored at one time.The goods are too close to each other.A door/drawer of the appliance is not tightly closed.The door/drawer has been opened too frequently or for too long. | Reset the temperature.Always cool down goods before storing them.Always store small quantities of food.Leave a gap between several foods allowing air flowing.Close the door/drawer.Do not open the door/drawer too frequently. |
| It is too cold inside the appliance. | The temperature is set too low.The Power-Freezer function is activated or is running too long. | Reset the temperature.Switch off the Power-Freezer function. |
| Moisture formation on the inside of the refrigerator compartment. | The climate is too warm and too damp.A door/drawer of the appliance is not tightly closed.The door/drawer has been opened too frequently or for too long.Food containers or liquids are left open. | Increase the temperature.Close the door/drawer.Do not open the door/drawer too frequently.Let hot foods cool to room temperature and cover foods and liquids. |
| Moisture accumulates on the refrigerators outside surface or between the doors/door and drawer. | The climate is too warm and too damp.The door/drawer is not closed tightly. The cold air in the appliance and the warm air outside it condensates. | This is normal in damp climate and will change when the humidity decreases.Ensure that he door/drawer is tightly shut. |
| Strong ice and frost in the freezer compartment. | The goods were not adequately packaged.A door/drawer of the appliance is not tightly closed.The door/drawer has been opened too frequently or for too long.The door/drawer gasket is dirty, worn, cracked or mismatched.Something on the inside prevents the door/drawer to close properly. | Always pack the goods well.Close the door/drawer.Do not open the door/drawer too frequently.Clean the door/drawer gasket or replace them by new ones.Reposition the shelves, door racks, or internal containers to allow the door/drawer to close. |
| The appliance makes abnormal sounds. | The appliance is not located on level ground.The appliance touches some object around it. | Adjust the feet to level the appliance.Remove objects around the appliance. |
9- Troubleshooting
| Problem | Possible Cause | Possible Solution |
| A slight sound is to be heard similar to that of flowing water. | This is normal. | - |
| You will hear an alarm beep. | The fridge storage compartment door is open. | Close the door or silence the alarm manually. |
| You will hear a faint hum. | The anti-condensation system is working. | This prevents condensation and is normal. |
| The interior lighting or cooling system does not work. | Mains plug is not connected in the mains socket.The power supply is not intact.The LED-lamp is out of order. | Connect the mains plug.Check the electrical supply to the room. Call the local electricity company!Please call the service for changing the lamp. |
| The sides of the cabinet and door strip get warm. | This is normal. | - |
9.2 Power interruption
In the event of a power cut, food should remain safely cold for about 16 hours. Follow these tips during a prolonged power interruption, especially in summer:
▶ Open the door/drawer as few times as possible.
▶ Do not put additional food into the appliance during a power interruption.
If prior notice of a power interruption is given and the interruption duration is longer than 16 hours, make some ice and put it in a container in the top of the refrigerator compartment.
▶ An inspection of the goods is required immediately after the interruption.
As temperature in the refrigerator will rise during a power interruption or other failure, the storage period and edible quality of food will be reduced. Any food that defrosts should be either consumed, or cooked and refrozen (where suitable) soon afterwards in order to prevent health risks.

Notice: Memory function during power interruption
After restoration of power the appliance continues with the settings that were set before the power failure.
10.1 Unpacking

WARNING!
The appliance is heavy. Always handle with at least two persons.
- Keep all packaging materials out of children’s reach and dispose them in an environmentally friendly manner.
▶ Take the appliance out of the packaging.
▶ Remove all packaging materials.
10.2 Environmental conditions
The room temperature should always be between 10^ C and 43^ C, since it can influence the temperature inside the appliance and its energy consumption. Do not install the appliance near other heat-emitting appliances (ovens, refrigerators) without isolation.
10.3 Door reversibility
Before the appliance is permanently installed, check the correct position of the door hinge. If necessary see section the DOOR REVERSIBILITY.
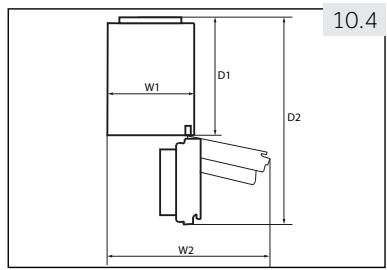
10.4 Space requirement
Required space when door is opened (Fig. 10.4):
| Appliance width in mm | Appliance depth in mm | ||
| W1 | W2 | D1 | D2 |
| 595 | 925 | 580 | 1200 |
10.5 Ventilaton cross-section
To achieve sufficient ventilation of the appliance for safety reasons, the information of the required ventilation cross sections must be observed (Fig. 10.5).
text_image
W1 D1 D2 W2 10.4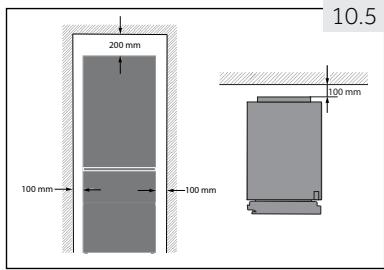
text_image
200 mm 100 mm 100 mm 100 mm 10.5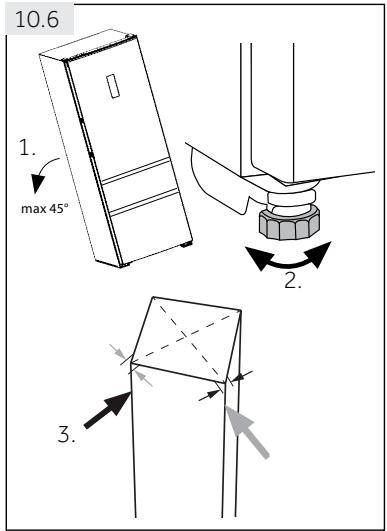
text_image
10.6 1. max 45° 2. 3.10.6 Aligning the appliance
The appliance should be placed on a flat and solid surface.
- Tilt the appliance slightly backwards (Fig. 10.6).
- Set the feet to the desired level.
- The stability can be checked by alternately bumping on the diagonals. The slightly swaying should be the same in both directions. Otherwise the frame can warp; possible leaking door seals are the result. A low tendency to the rear facilitates the closing of the door.
text_image
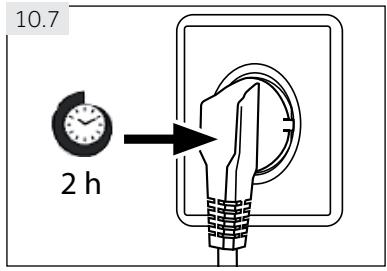
10.7 2 h10.7 Waiting time
To the maintenance-free lubrication oil is located in the capsule of the compressor. This oil can get through the closed pipe system during slanting transport. Before connecting the appliance to the power supply you have to wait 2 hours (Fig.10.7) so that the oil runs back into the capsule.
10.8 Electrical connection
Before each connection check if:
▶ power supply, socket and fusing are appropriate to the rating plate.
▶ the power socket is earthed and no multi-plug or extension.
▶ the power plug and socket are strictly according.
Connect the plug to a properly installed household socket.

WARNING!
To avoid risks a damaged power cord must be replaced by the customer service (see warranty card).
10.9 Door Reversibility
Before connecting the appliance to the power supply you should check, whether the door swing must changed from right (as delivered) to left, if this is required by the installation location and the usability.

WARNING!
The appliance is heavy. You need two persons to carry out the door reversibility.
Before any operation, first unplug the appliance from the mains.
▶ Do not tilt the appliance more than 45^ to prevent damage of the cooling system.
Assembly steps (Fig. 10.9):
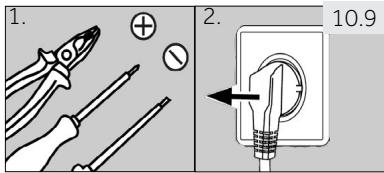
- Provide necessary tool.
-
Unplug the appliance.
-
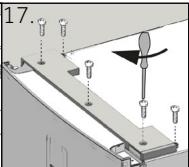
Remove the five screws which fix the front panel (1) and remove the panel (2).
-
Remove the small cover of the front panel from left to right side.
-
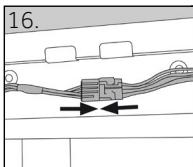
Unplug the connection cable
-
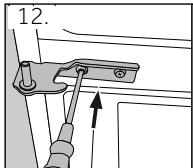
Remove the upper hinge cover (1) and unscrew the upper hinge (three screws) on right side (2).
-
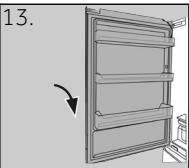
Lift the loose refrigerator door carefully off the lower hinge.
-
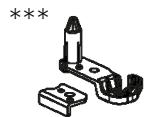
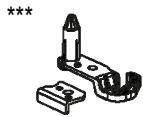
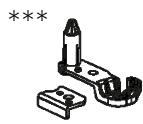
Turn the door upside down, unscrew the cover (1) and the door stop (2) with fixing part (3).
-
Take out new cover (1) and door stop (2) with fixing part (3) from the accessory bag and screw them to opposite side.
-
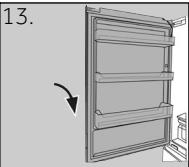
Remove the lower hinge of the upper door.
-
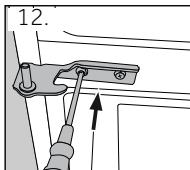
Change the positions of the blanking plugs and the screw on the side.
text_image
1. 2. 10.9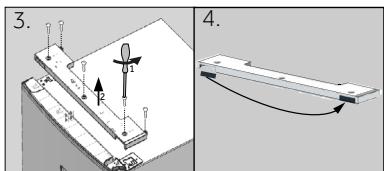
text_image
Technical diagram showing a mechanical assembly with labeled parts and directional arrows, including numbered annotations 3 and 4.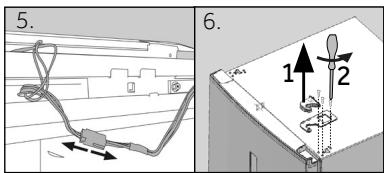
text_image
5. 6. 1 2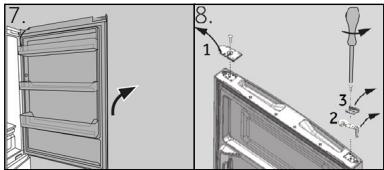
text_image
Technical diagram showing a door frame with labeled components and an arrow indicating direction, alongside a close-up of the interior panel.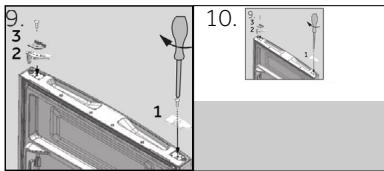
text_image
9. 3 2 1 10.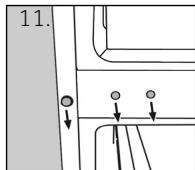
text_image
11.
text_image
12.
natural_image
Diagram of a refrigerator with an arrow indicating rotation (no text or symbols)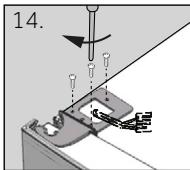
text_image
14.
text_image
15.
text_image
16.
natural_image
Technical diagram showing mechanical assembly with screws and a lever (no text or symbols)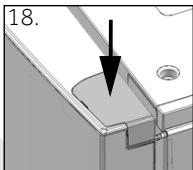
natural_image
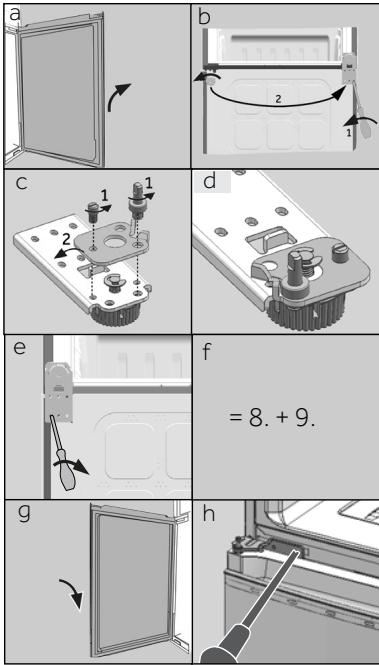
Technical diagram showing a mechanical component with a downward arrow and label '18.' (no readable text or symbols)Next steps (a-h) are only necessary for models with two doors:
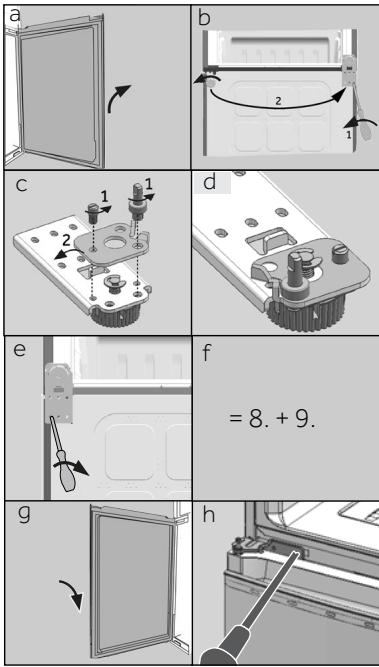
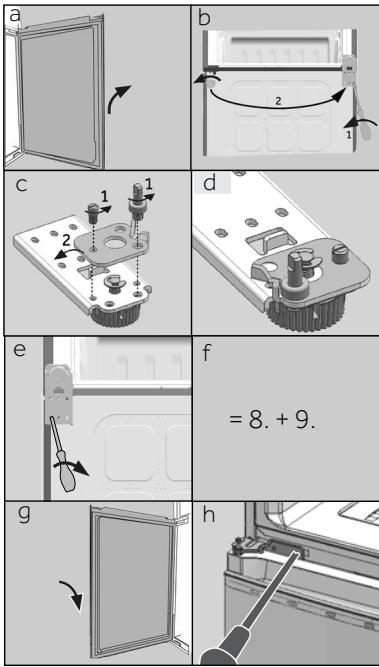
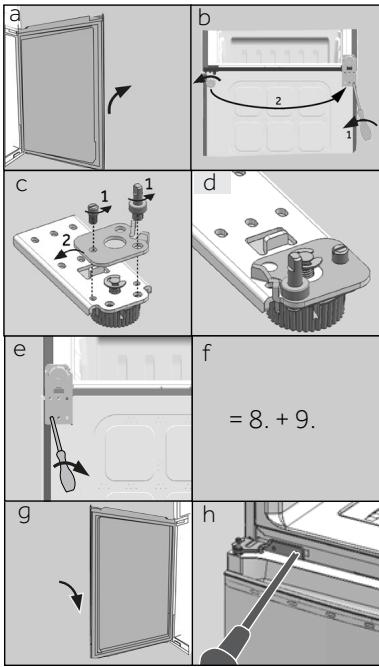
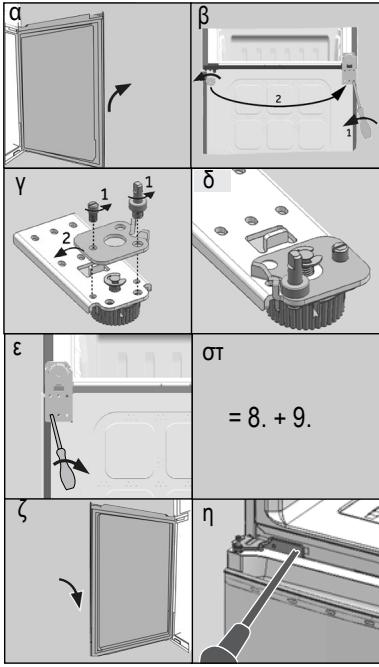
a Remove lower door
b This step needs two persons; one who holds the appliance in place and one who carries out the assembly steps!
Tilt the appliance slightly backwards and remove the lower hinge with the feet (1). Change also position of the other feet (2).
c Unscrew the two grub screws (1), remove the lower hinge, rotates through 180^ (2) and
d refix the lower hinge with the 2 grub screws
e Screw the lower hinge to the left side of the appliance.
f Follow steps 8 and 9.
g Lift the lower door carefully on to the lower hinge so that the pivot fits into the hinge barrel.
Be sure the pivot fits into the hinge barrel of lower door.
h Take out the new hinge from the accessory bag and screw it to the left side of the appliance.
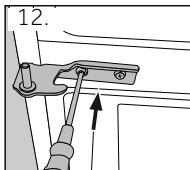
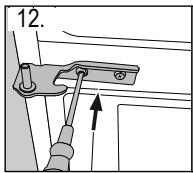
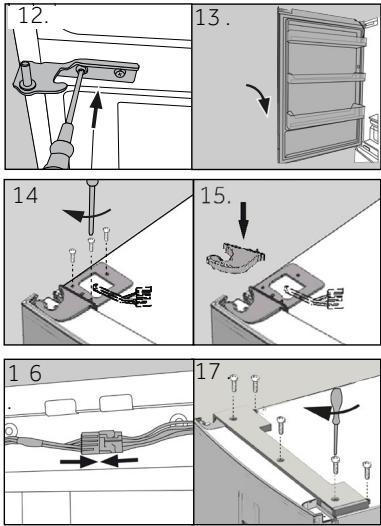
- Take out the new lower hinge of upper door from the accessory bag and screw it to the left side of the appliance.
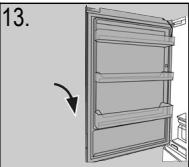
- Lift the upper door carefully on to the lower hinge so that the pivot fits into the hinge barrel.
Be sure the pivot fits into the hinge barrel of lower door.
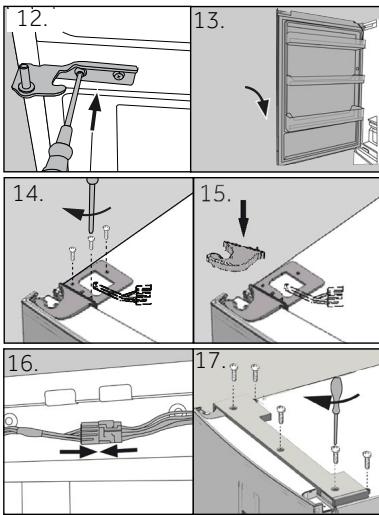
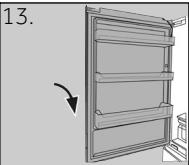
- Take out the upper hinge from the accessory bag. Put the connection cable through the upper hinge and fix the upper hinge with the three screws on left side of appliance.
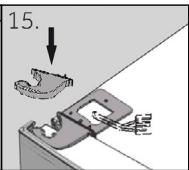
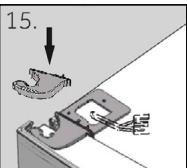
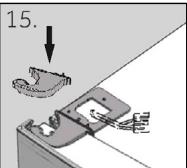
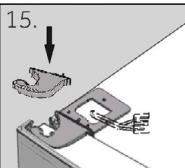
15 Put the hinge cover (delivered in the accessory bag) over the hinge.
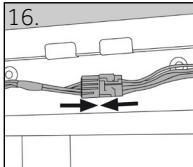
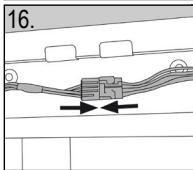
-
Plug in the connection cable and fit it into the opening.
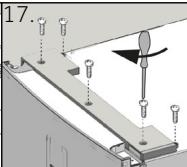
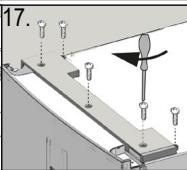
-
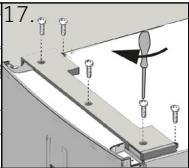
Replace front panel and fix it with the five screws.
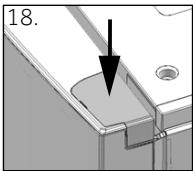
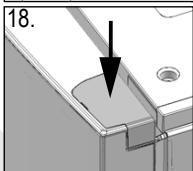
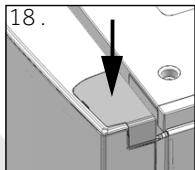
18 Take out the cover from the accessory bag and fix it to the right side of upper door.
After the change of the door check that the door seals are located properly on the housing and all screws are tightened well.
11.1 Product fiche according to regulation EU No. 1060/2010
| Trade mark | Haier | ||
| Model identifier | CFE635C*J CFE635C*J(UK) | CFE735C*J | CFE735C*JW CFE735C*JW(UK) |
| Category of the model | Refrigerator-freezer | ||
| Energy efficiency class | A+ | A++ | A++ |
| Annual energy consumption (kWh/year)1) | 350 | 275 | 273 |
| Storage volume cooling (L) | 233 | 233 | 228 |
| Storage volume freezing (L) 2)* | 108 | 108 | 108 |
| Star rating |  | ||
| Temperature of other compartments >14°C | Non applicable | ||
| Frostfree system | Yes | ||
| Power cut safe (h) | 13 | ||
| Freezing capacity (kg/24h) | 12 | ||
| Climate class This appliance is intended to be used at an ambient temperature between 10°C and 43°C. | SN/N/ST/T | ||
| Airborne acoustical noise emissions (db(A) re 1pW) | 40 | ||
| Construction type | Freestanding | ||
^1) based on standard test results for 24 hours. Actual energy consumption will depend on how the appliance is used and where it is located.
^2) the cover can be removed to increase the volume of the fridge compartment.
11- Technical data
11.2 Additional technical data
| Model | CFE635C*J CFE635C*J(UK) | CFE735C*J | CFE735C*JW CFE735C*JW(UK) |
| Voltage / Frequency | 220-240V ~/ 50Hz | ||
| Input current (A) | 1.2 | 1.4 | 1.4 |
| Main fuse (A) | 5.0 | 10 | |
| Coolant | R600a | R600a | |
| Total volume (L) | 375 | 370 | |
| Net volume (L) | 341 | 336 | |
| Dimensions (D/W/H in mm) | 657 | ||
| Depth | |||
| Width | 595 | ||
| Height | 1905 | ||
11.3 Standards and directives C€
This product meets the requirements of all applicable EC directives with the corresponding harmonised standards, which provide for CE marking.
We recommend our Haier Customer Service and the use of original spare parts.
If you have a problem with your appliance, please first check section TROUBLESHOOTING.
If you cannot find a solution there, please contact
▶ your local dealer or
▶ the Service & Support area at www.haier.com where you can find telephone numbers and FAQs and where you can activate the service claim.
To contact our Service, ensure that you have the following data available.
The information can be found on the rating plate.
Model ____
Serial No. ____
Also check the Warranty Card supplied with the product in case of warranty.
For general business enquiries please find below our addresses in Europe:
| European Haier addresses | |||
| Country* | Postal address | Country* | Postal address |
| Italy | Haier Europe Trading SRLVia De Cristoforis, 1221100 VareseITALY | France | Haier France SAS3-5 rue des Graviers92200 Neuilly sur SeineFRANCE |
| Spain Portugal | Haier Iberia SLPg. Garcia Faria, 49-5108019 BarcelonaSPAIN | Belgium-FRBelgium-NLNetherlandsLuxembourg | Haier Benelux SAAnderlechtRoute de Lennik 451BELGIUM |
| Germany Austria | Haier Deutschland GmbHHewlett-Packard-Str. 4D-61352 Bad HomburgGERMANY | PolandCzechiaHungaryGreeceRomaniaRussia | Haier Poland Sp. zo.o.Al. Jerozolimskie 181B02-222 WarszawaPOLAND |
| United Kingdom | Haier Appliances UK Co.Ltd.One Crown SquareChurch Street EastWoking, Surrey, GU21 6HRUK | ||
*For more information please refer to www.haier.com
Haier
Frigorifero-Congelatore
CFE635C*J
CFE735C*J
CFE635C*J (UK)
CFE735C*JW
CFE735C*JW(UK)
*= Codice colore
natural_image
Symbol of a trash bin crossed with no text or labels, representing waste sorting or disposal (no text present)natural_image
Line drawing of two rectangular containers with different internal patterns (no text or symbols)natural_image
Technical line drawing of two mechanical components: a bracket with mounting holes and a separate housing with a curved handle (no text or symbols)Cerniere porta
natural_image
Three technical line drawings of mechanical components (no text or symbols)Coper- chi
Fermaporta
natural_image
Two identical 3D-rendered plastic tray containers with circular cavities (no text or symbols)Portauova
natural_image
Line drawing of an open refrigerator with a speaker emitting sound waves (no text or symbols)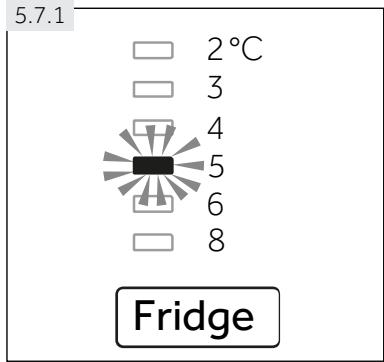
text_image
5.7.1 2°C 3 4 5 6 8 Fridge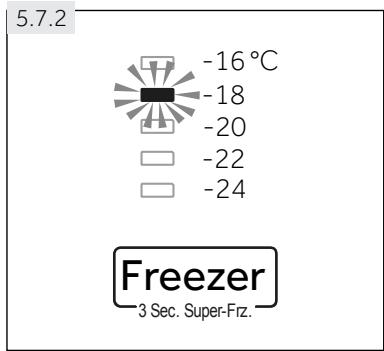
text_image
5.7.2 -16 °C -18 -20 -22 -24 Freezer 3 Sec. Super-Frz.natural_image
Line drawing of a MyZONE device with no visible text or symbols on the body
AVVERTENZA!
natural_image
Illustration of a hand cleaning a window with a basin nearby (no text or symbols)text_image
Technical diagram showing a door frame with labeled parts and an arrow indicating rotation directionnatural_image
Symbol of a trash bin crossed with no text or labels, representing waste sorting or disposal (no text present)Eliminação
natural_image
Line drawing of two rectangular containers, one open and one partially filled with honeycomb patterns (no text or symbols)Prateleira de cubos de gelo com tampa
Dobradiças
da porta

Tampas
Bloqueador da porta
natural_image
Two identical 3D-rendered plastic tray containers with circular cavities (no text or symbols)text_image
Hyster 15Model: CFE735C*JW
CFE735C*JW(UK)
text_image
TOTAL NO FROST 16 MAYCHEEnatural_image
Line drawing of an open refrigerator with visible doors and appliances, no text or symbols presentnatural_image
Architectural diagram of a refrigerator interior with directional arrows indicating flow or movement (no text or symbols)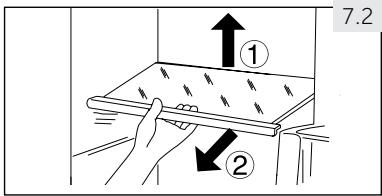
text_image
7.2 ① ②
text_image
MYZONE 7.4
ADVERTÊNCIA!
natural_image
Simple line drawing of a kitchen sink with a bag, no text or symbols present8.2 Descongelar
text_image
Technical diagram showing a mechanical assembly with labeled parts and directional arrows, including numbered annotations 3 and 4.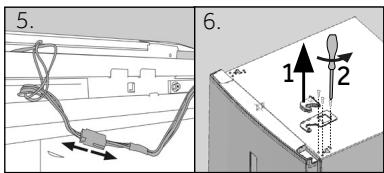
text_image
5. 6. 1 2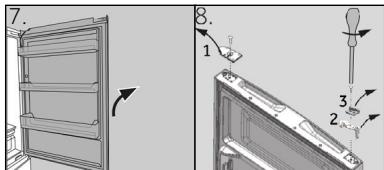
text_image
Technical diagram showing a door frame with labeled parts and directional arrows, including numbered annotations.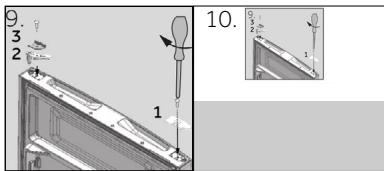
text_image
9. 3 2 1 10.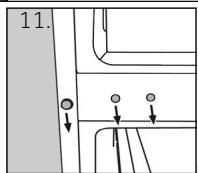
text_image
11.
text_image
12.
natural_image
Diagram of a refrigerator with an arrow indicating rotation (no text or symbols)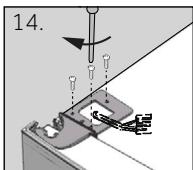
text_image
14.
text_image
15.
text_image
16.
natural_image
Technical diagram showing mechanical assembly with screws and a component, no visible text or symbols
natural_image
Close-up of a mechanical component with a black arrow pointing to a curved feature (no text or symbols visible)natural_image
Symbol of a trash bin crossed with no text or labels, representing waste sorting or disposal (no text present)Utylizacja
natural_image
Line drawing of two rectangular food containers with different internal patterns (no text or symbols)natural_image
Technical line drawing of two mechanical components: a bracket with mounting holes and a housing with a rectangular opening (no text or symbols)Zawiasy drzwiowe
natural_image
Three technical line drawings of mechanical components (no text or symbols)Pokrywy
Ogranicznik
drzwi
natural_image
Two identical 3D-rendered plastic tray enclosures with circular cavities (no text or symbols)Pojemniki najaja
text_image
Hyster 15Model: CFE735C*JW
CFE735C*JW(UK)
text_image
TOTAL NO FROST 16*= Kod koloru
A: Komora lodówki
natural_image
Line drawing of an open refrigerator with a speaker emitting sound waves (no text or symbols)natural_image
Architectural floor plan of a refrigerator showing internal compartments and ventilation ducts (no text or labels)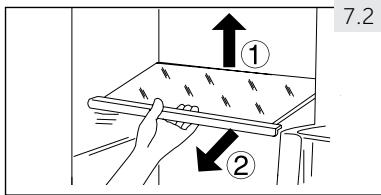
text_image
7.2 ① ②
Uwaga: Półki
text_image
MYZONE 7.4
OSTRZEŻENIE!
natural_image
Illustration of a hand cleaning a window with a soap block and a basin (no text or symbols)8.2 Rozmrażanie
natural_image
Close-up of a mechanical component with a black arrow pointing to a curved cutout (no text or symbols visible)natural_image
Symbol of a trash bin crossed with no text or labels, representing waste sorting or disposal (no text present)Hulladékkezelés
natural_image
Line drawing of two plastic containers: a rectangular lid and a grid-patterned tray (no text or symbols)natural_image
Technical line drawing of two mechanical components with no visible text or symbolsAjtópántok
natural_image
Three technical line drawings of mechanical components (no text or symbols)Fedelek
Ajtómegállító
natural_image
Two identical line drawings of a tray with circular cavities, no text or symbols present.Tojástartó
Energia címke
Jótállási jegy
text_image
Hyster 15Model: CFE735C*JW
CFE735C*JW(UK)
text_image
TOTAL NO FROST 16*= Színkód
A: Hűtőtér
natural_image
Line drawing of an open refrigerator with a speaker emitting sound waves (no text or symbols)5.7.1
text_image
2°C 3 4 5 6 8Fridge
5.7.2
text_image
-16°C -18 -20 -22 -24Freezer
3 Sec. Super-Frz.
natural_image
Architectural floor plan of a refrigerator with directional arrows indicating flow or movement (no text or symbols)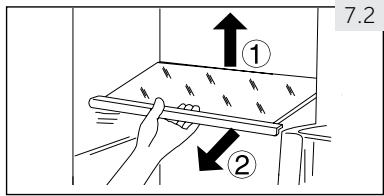
text_image
7.2 ① ②
Megjegyzés: Polcok
natural_image
Simple line drawing of a kitchen sink with a bag, no text or symbols present8.2 Leolvasztás
natural_image
Symbol of a trash bin crossed with no text or numbers, representing waste sorting or restriction (no text present)Mise au rebut
natural_image
Technical line drawing of two mechanical components (no text or symbols)Charnières de porte
natural_image
Three technical line drawings of mechanical components (no text or symbols)Cou-vercles
Arrêt de porte
natural_image
Two identical 3D isometric diagrams of a tray with circular cavities, no text or symbols present.Plateaux à œufs
5.2 Touches sensitives
natural_image
Line drawing of an open refrigerator with a sound wave indicator (no text or symbols)natural_image
Architectural diagram of a refrigerator interior showing airflow patterns and door compartments (no text or symbols)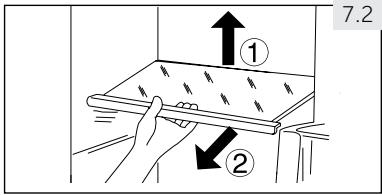
text_image
7.2 ① ②
Remarque : Etagères
natural_image
Simple line drawing of a kitchen sink with a bag, no text or symbols present8.2 Dégivrage
natural_image
Symbol of a trash bin crossed with no text or labelsDesecho
natural_image
Line drawing of two rectangular containers with different internal compartments (no text or symbols)natural_image
Technical line drawing of two mechanical components: a bracket and a separate housing (no text or symbols)natural_image
Three technical line drawings of mechanical components (no text or symbols)tapas
Tope de puerta
natural_image
Two identical 3D isometric diagrams of a tray with circular cavities, no text or symbols present.Huevera
Etiqueta de energía
Tarjeta de garantía

Manual del
usuario

Aviso
natural_image
Line drawing of an open refrigerator with a sound wave icon indicating sound or vibration (no text or symbols)natural_image
Architectural diagram of a refrigerator interior showing airflow patterns and door placement (no text or symbols)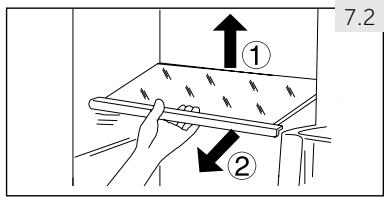
text_image
7.2 ① ②
Aviso: Estantes
natural_image
Line drawing of a MyZONE device with no visible text or symbols on the body
¡ADVERTENCIA!:
natural_image
Illustration of a kitchen sink with a hand placing food into a bowl, no text or symbols present8.2 Descongelación
text_image
Technical diagram showing a mechanical assembly with labeled parts and directional arrows, including numbered annotations.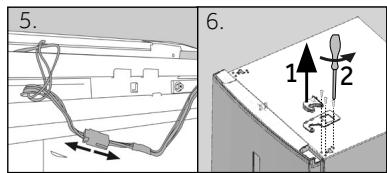
text_image
5. 6. 1 2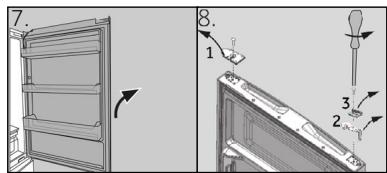
text_image
Technical diagram showing a door frame with labeled parts and a magnified view of the lid assembly.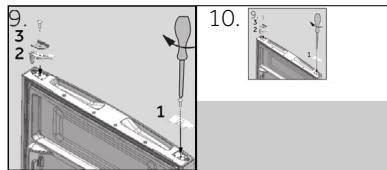
text_image
9. 3 2 1 10.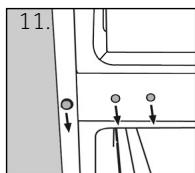
text_image
11.
text_image
12.
natural_image
Diagram of a refrigerator with an arrow indicating rotation (no text or symbols)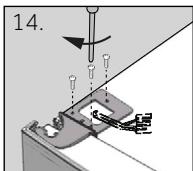
text_image
14.
text_image
15.
text_image
16.
natural_image
Technical diagram showing mechanical assembly with screws and a component, no visible text or symbols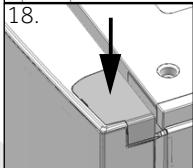
natural_image
Close-up of a mechanical component with a black arrow pointing to a curved surface (no text or symbols visible)natural_image
Symbol of a trash bin crossed out by two diagonal lines (no text or numbers present)Τελική διάθεση
natural_image
Line drawing of two plastic containers, one rectangular and one with a grid pattern (no text or symbols)natural_image
Technical line drawing of two mechanical components: a bracket with mounting holes and a housing with a cutout (no text or symbols)Μεντεσέδες πόρτας

natural_image
Three technical line drawings of mechanical components, no text or symbols presentΚαλύμματα
Στοπ πόρτας
natural_image
Two identical 3D-rendered plastic tray containers with circular cavities (no text or symbols)Αυγοθήκες
Ενεργειακή ετικέτα
Κάρτα εγγύησης

Οδηγίες χρήσης

Ειδοποίηση
natural_image
Line drawing of an open refrigerator with a sound wave symbol inside (no text or labels)5.7.1
text_image
2°C 3 4 5 6 8Fridge
5.7.2
text_image
-16°C -18 -20 -22 -24Freezer
3 Sec. Super-Frz.
natural_image
Architectural diagram of a refrigerator interior showing airflow direction and door placement (no text or symbols)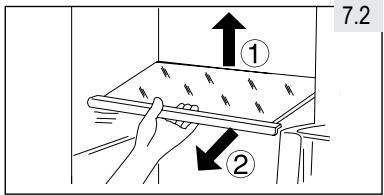
text_image
7.2 ① ②
Ειδοποίηση: Ράφια
text_image
MYZONE 7.4
ΠΡΟΕΙΔΟΠΟΙΗΣΗ!
text_image
7.5 OK 2021natural_image
Illustration of a hand cleaning a window with a soap film and a basin (no text or symbols)8.2 Απόψυξη
text_image
Technical diagram showing mechanical assembly steps with labeled components and directional arrows
text_image
5. 6. 1 2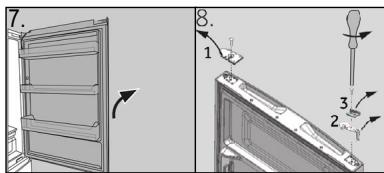
text_image
Technical diagram showing a door frame assembly with numbered components and directional arrows indicating motion or assembly.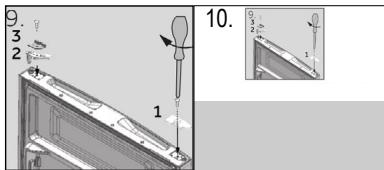
text_image
9. 3 2 1 10.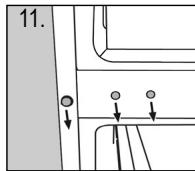
text_image
11.
text_image
12.
natural_image
Diagram of a refrigerator with an arrow indicating rotation (no text or symbols present)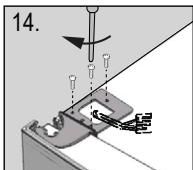
text_image
14.
text_image
15.
text_image
16.
text_image
17.
natural_image
Technical diagram showing a mechanical component with an arrow pointing to a curved feature (no text or symbols present)natural_image
Symbol of a trash bin crossed with no text or numbers, representing waste sorting or restriction (no text present)Entsorgung
natural_image
Line drawing of two plastic containers: a rectangular lid and a grid-patterned tray (no text or symbols)natural_image
Technical line drawing of two mechanical components: a bracket and a housing (no text or symbols)Türscharniere
natural_image
Three technical line drawings of mechanical components (no text or symbols)Abdeckungen
Türstopper
natural_image
Two identical line drawings of a tray with six circular cavities, no text or symbols present.Eierablagen
Energie Lable
natural_image
Line drawing of an open refrigerator with visible doors and shelves, no text or symbols present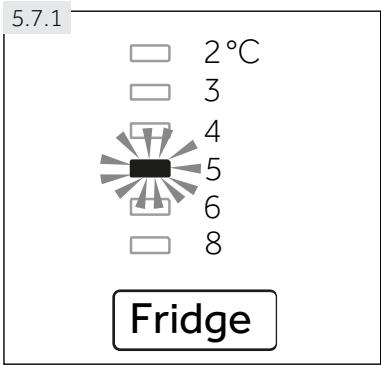
text_image
5.7.1 2°C 3 4 5 6 8 Fridge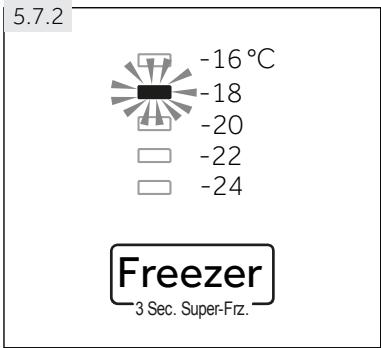
text_image
5.7.2 -16 °C -18 -20 -22 -24 Freezer 3 Sec. Super-Frz.natural_image
Architectural diagram of a refrigerator interior with directional arrows indicating flow or movement (no text or symbols)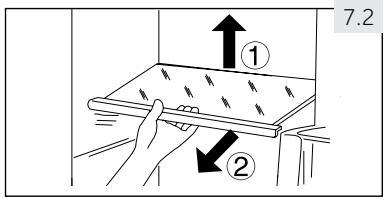
text_image
7.2 ① ②
text_image
7.5 OK 2021natural_image
Illustration of a hand cleaning a window with a soap block and a basin (no text or symbols)text_image
Technical diagram showing a door frame with labeled components and directional arrows, including parts numbered 1, 2, 3, and 8.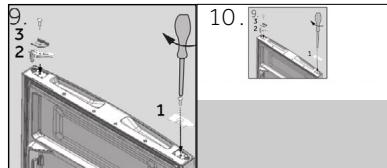
text_image
9. 3 2 1 10.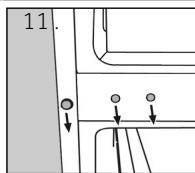
text_image
11.
natural_image
Close-up of a mechanical component with a black arrow pointing to a curved bracket (no text or symbols visible)natural_image
Symbol of a trash bin crossed with no text or labelsnatural_image
Line drawing of two plastic containers: a rectangular lid and a grid-patterned tray (no text or symbols)natural_image
Technical line drawing of two mechanical components (no text or symbols)Dveřní panty
natural_image
Three technical line drawings of mechanical components (no text or symbols)Víka
Dveřní doraz
natural_image
Two identical line drawings of a tray with circular cavities, no text or symbols present.natural_image
Line drawing of an open refrigerator with a speaker emitting sound waves (no text or symbols)natural_image
Architectural floor plan of a refrigerator with directional arrows indicating airflow or movement (no text or symbols)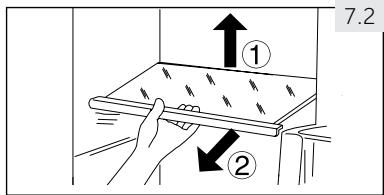
text_image
7.2 ① ②
Poznámka: Poličky
text_image
MYZONE 7.4
UPOZORNĚNÍ!
text_image
7.5 OK 2021natural_image
Illustration of a hand cleaning a window with a cloth and a basin (no text or symbols)8.2 Rozmrazování
text_image
Technical diagram showing a mechanical assembly with labeled parts and directional arrows, including numbered annotations 3 and 4.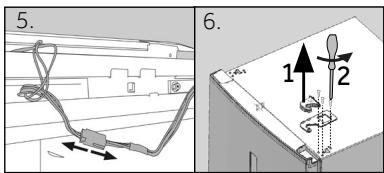
text_image
5. 6. 1 2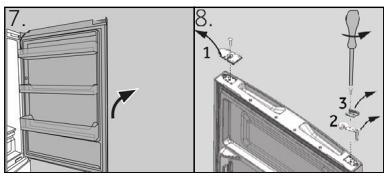
text_image
Technical diagram showing a door frame with labeled components and directional arrows, including parts numbered 1, 2, and 3.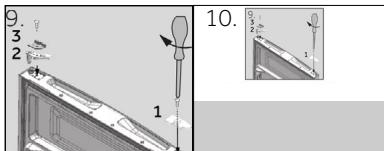
text_image
9. 3 2 1 10.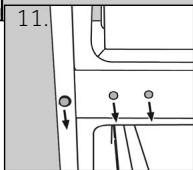
text_image
11.