
TC5500 - Fitness Equipment BOWFLEX - Free user manual and instructions
Find the device manual for free TC5500 BOWFLEX in PDF.
| Product Type | TreadClimber with TreadClimber and treadmill modes |
| Brand | Bowflex |
| Model | TC5500 |
| Dimensions (L × W × H) | 139.7 × 80 × 140.3 cm |
| Machine Weight | 98.9 kg |
| Maximum User Weight | 136 kg (300 lb) |
| Power Supply | 120 V AC, 60 Hz, 10 A max |
| Resistance Levels | 12 levels |
| Display View | Console with heart rate, programs, user profiles |
| Heart Rate Monitor | Chest strap included, display in BPM |
| Safety | Safety key with cord, emergency stop |
| Usage | Home use only |
| Main Functions | Walking, interval training, beginner/intermediate/advanced programs, custom profiles |
| Frame Material | Steel |
| Pedal Lock | Lockable treadmill mode for flat walking |
| Maintenance | Periodic silicone belt lubrication, gentle cleaning |
| Moving | On front transport wheels |
| Total Shipping Weight | Box 1: 19.5 kg; Box 2: 66.6 kg; Box 3: 32.5 kg |
| Warranty | 100% satisfaction guaranteed within 6 weeks – see terms |
| Customer Service | Tel: (800) 605-3369 (USA) |
Frequently Asked Questions - TC5500 BOWFLEX
User questions about TC5500 BOWFLEX
0 question about this device. Answer the ones you know or ask your own.
Ask a new question about this device
Download the instructions for your Fitness Equipment in PDF format for free! Find your manual TC5500 - BOWFLEX and take your electronic device back in hand. On this page are published all the documents necessary for the use of your device. TC5500 by BOWFLEX.
USER MANUAL TC5500 BOWFLEX
Bowflex® TreadClimber® TC5500

Owner's Manual
a brand of NAUTILUS Inc.
Table of Contents
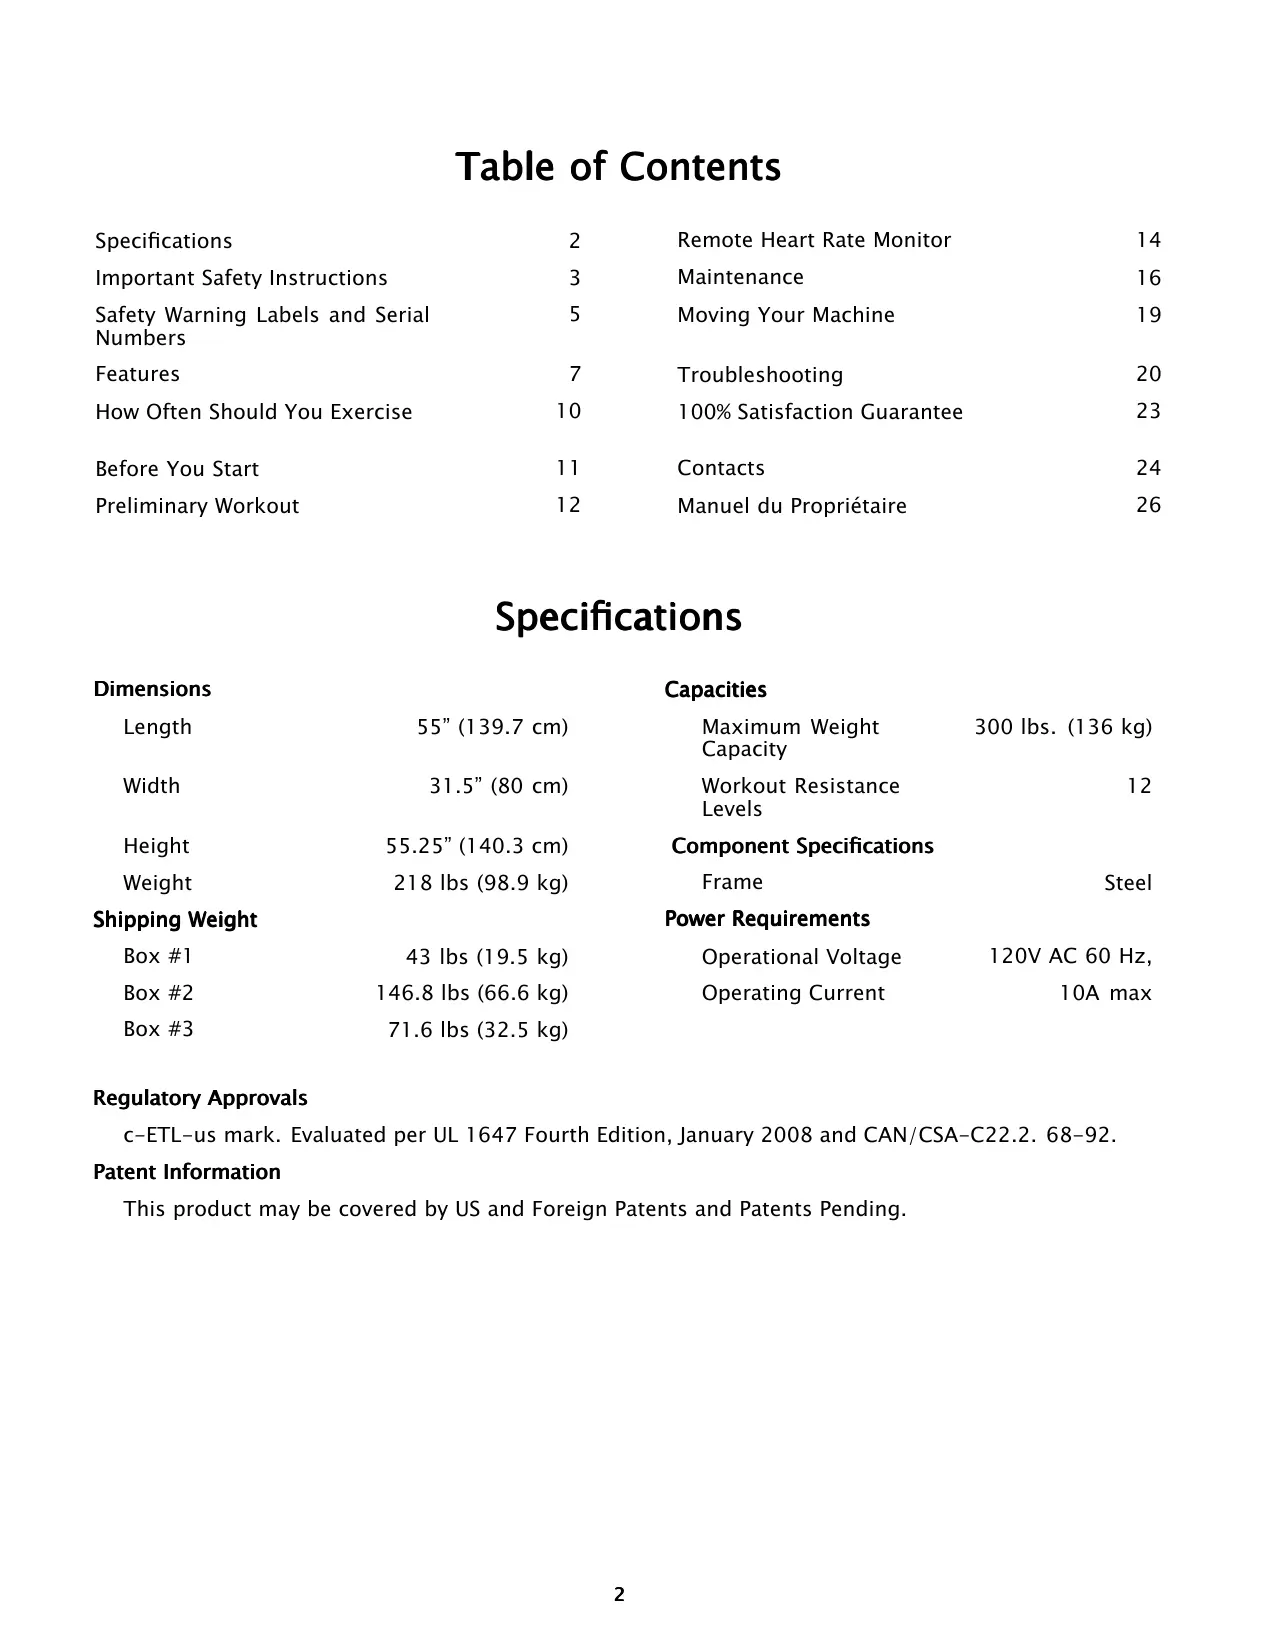
| Specifications | 2 | Remote Heart Rate Monitor | 14 |
| Important Safety Instructions | 3 | Maintenance | 16 |
| Safety Warning Labels and Serial Numbers | 5 | Moving Your Machine | 19 |
| Features | 7 | Troubleshooting | 20 |
| How Often Should You Exercise | 10 | 100% Satisfaction Guarantee | 23 |
| Before You Start | 11 | Contacts | 24 |
| Preliminary Workout | 12 | Manuel du Propriétaire | 26 |
Specifications
| Dimensions | Capacities | ||
| Length | 55" (139.7 cm) | Maximum Weight Capacity | 300 lbs. (136 kg) |
| Width | 31.5" (80 cm) | Workout Resistance Levels | 12 |
| Height | 55.25" (140.3 cm) | Component Specifications | |
| Weight | 218 lbs (98.9 kg) | Frame | Steel |
| Shipping Weight | Power Requirements | ||
| Box #1 | 43 lbs (19.5 kg) | Operational Voltage | 120V AC 60 Hz, |
| Box #2 | 146.8 lbs (66.6 kg) | Operating Current | 10A max |
| Box #3 | 71.6 lbs (32.5 kg) | ||
Regulatory Approvals
c-ETL-us mark. Evaluated per UL 1647 Fourth Edition, January 2008 and CAN/CSA-C22.2. 68-92.
Patent Information
This product may be covered by US and Foreign Patents and Patents Pending.
Important Safety Instructions

This icon means a potentially hazardous situation which, if not avoided, could result in death or serious injury.
Before using this equipment, obey the following warnings:

To decrease the risk of burns, electric shock, or injury to persons, read and understand the complete Owner's Manual. Failure to follow these guidelines can cause a serious or possibly fatal electrical shock or other serious injury.
Read and understand the complete Owner's Manual. Keep Owner's Manual for future reference
Read and understand all warnings on this machine. If at any time the Warning stickers become loose, unreadable or dislodged, contact Nautilus® Customer Service for replacement stickers.
- Keep children away from this machine. Monitor them closely when near the machine. Parts that move and appear dangerous to adults can appear safe to children.
- Consult a physician before you start an exercise program. Stop exercising if you feel pain or tightness in your chest, become short of breath, or feel faint. Contact your doctor before you use the machine again. Use the values calculated or measured by the machine's computer for reference purposes only.
- Before each use, examine this machine for damage to power cord, power receptacle, loose parts or signs of wear. Do not use if found in this condition. Contact Nautilus® Customer Service for repair information.
Maximum user weight limit: 300 lbs. (136 kg). Do not use if you are over this weight.
This machine is for home use only. - Do not wear loose clothing or jewelry. This machine contains moving parts.
Always wear rubber soled athletic shoes when you use this machine. Do not use the machine with bare feet or only wearing socks. - Set up and operate this machine on a solid, level, horizontal surface.
- Use caution when you step on and off the machine. Use the supplied foot support platforms for stability before walking on the moving belt.
ADANGER
To reduce the risk of electrical shock, always unplug the power cord and wait 5 sec before closing, maintaining or repairing this machine.
- Do not operate this machine outdoors or in moist or wet locations.
- Keep a minimum clearance behind the machine of 79'' (2 m) and 39'' (1 m) on each side. This is the recommended safe distance for access, movement and emergency dismounts from the machine. Keep third parties out of this space when the machine is in operation.
- Do not over exert yourself during exercise. Operate the machine in the manner described in this manual.
- Read, understand, and test the Emergency Stop Procedure before use.
- Keep the walking belt clean and dry.
- Keep power cord away from heat source and hot surfaces.
- Do not drop or put objects into any opening of the machine.
- This machine must be connected to an appropriate, dedicated electrical circuit. Nothing else must be connected to the circuit
- Always connect the power cord to a circuit capable of handling 10 amperes with no other loads applied.
- Do not operate where aerosol products are being used.
- Do not let liquids touch the electronic controller. If it does, the controller must be inspected and tested for safety by an approved technician before it can be used again.
This machine is designed for walking. Do not try to run on this machine.
Emergency Stop Procedures
The TreadClimber® machine is equipped with a Safety Key that can prevent serious injury, as well as prevent children from playing with and/or being injured on the machine. If the Safety Key is not fully put into the Safety Keyhole, the belts will not operate.

To prevent unsupervised operation of the machine always remove the Safety Key and disconnect the power cord from the wall outlet or machine AC input.
Always attach the Safety Key Clip to your clothing during your workout.
When you use the machine, only remove the Safety Key in an emergency. When the key is removed while the machine is in operation, it will stop quickly, which could cause the loss of balance and possible injury.
Instructional DVD
Your manual kit includes an instructional DVD that shows how to adjust the resistance cylinders and get started using your TreadClimber® machine.
Note: The information shown is for reference only and will be different from your TreadClimber® machine.
Consult the Console and the TC5500 Owner's Manuals for information specific to your machine.
Safety Warning Labels and Serial Number
Locate and read all the safety warnings before operation. Replace any warning label if it is damaged, illegible, or missing. For replacement labels, call a Nautilus® representative (refer to the Contacts page of this manual).
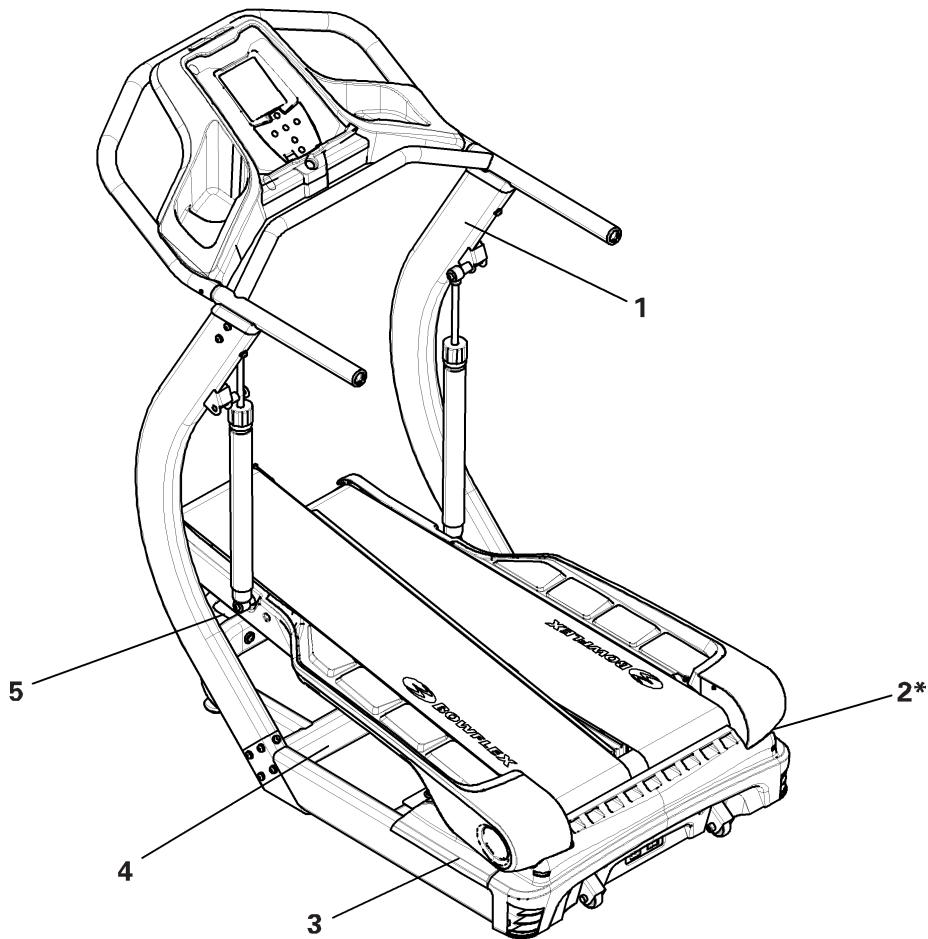
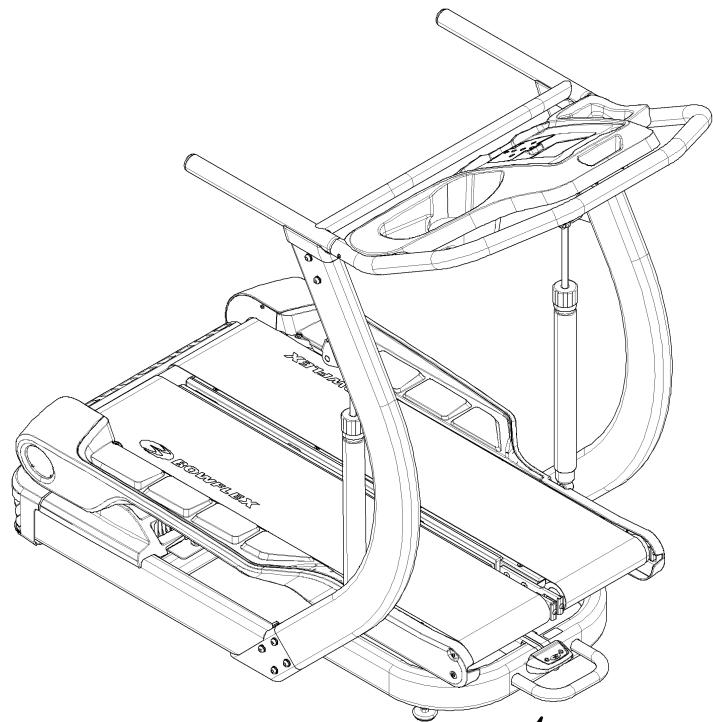
| A | Console | F | Transport Wheels |
| B | Workout Setting Cylinders | G | Main Power Switch |
| C | Belt Adjustment Bolts (on front) | H | Transport Handle (on front) |
| D | Treadles | I | Treadle Locking Lever (on front) |
| E | Side Foot Support Platform | J | Safety Key Port |
Console
Your Console has been created specifically to help you achieve your exercise goals. Starting with "Lady Liberty", you will work your way up world famous landmarks.
The Console allows you to create personal profiles to record workouts, results, and even compare your goals with other users. As you achieve your goals, you earn additional landmarks to climb. There are nine landmarks programmed into the Console, six of which need to be earned.
Note: The number of steps represented to climb a landmark is based on the landmark's height. This number has no relation to the actual physical number of steps needed to achieve the peak of the landmark.
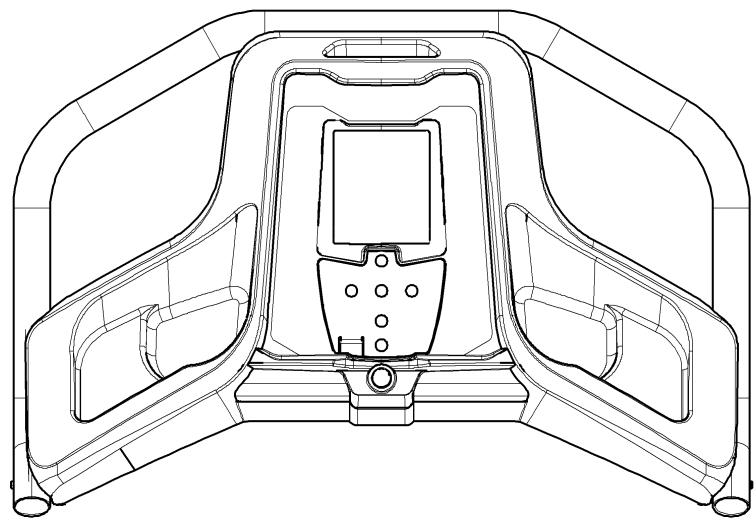
Please read the TC5500 Console Owner's Manual. It will take you through the steps to make your TreadClimber® machine operational.
Treadles
Each TreadClimber® Treadle is a separate treadmill with its own belt. The Treadles are driven by the same axle and motor. This makes sure that each belt travels at the same speed. The Treadles are interconnected, which gives a balanced relationship between the left and right sides during the workout.

Keep your foot in the center of each Treadle, do not let your feet cross in front of your body as you increase the speed.
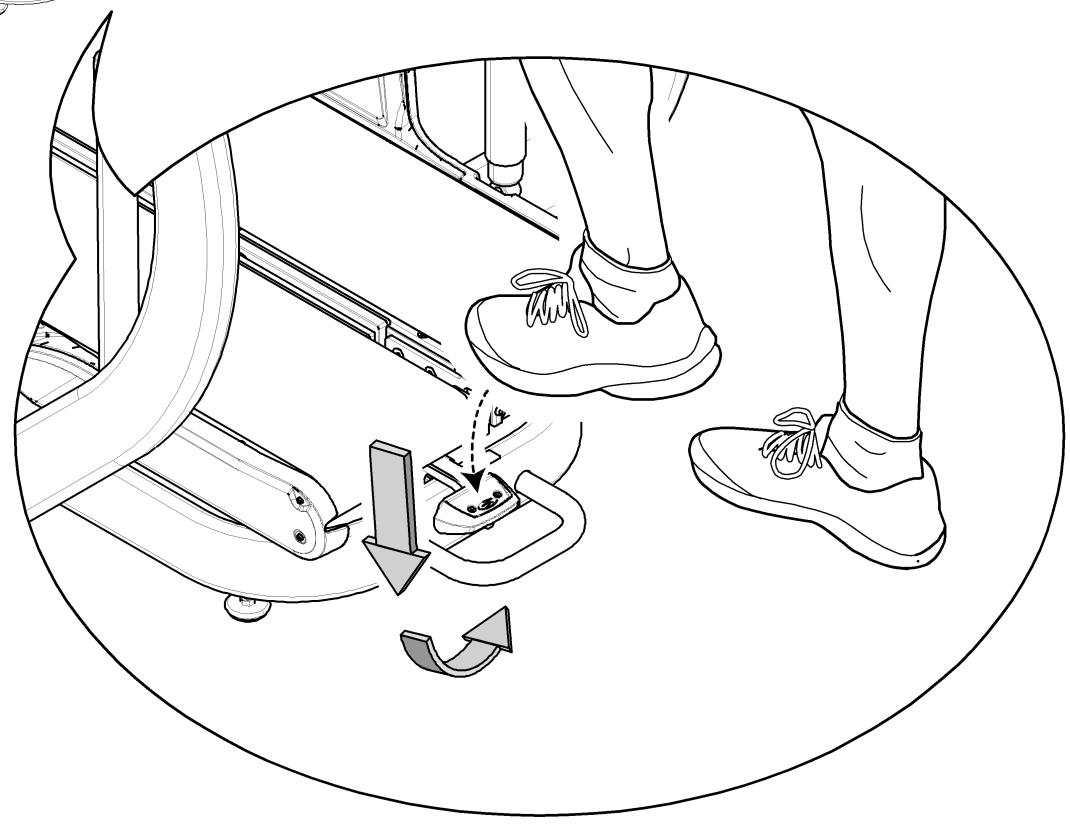
Lock the Treadles for Treadmill Workout
The right and left Treadles can be locked together for a treadmill workout.

Do not change from or into treadmill mode while the belts are in movement or the machine is powered up. To change the modes, stop the power. Unplug the cord from the wall outlet, line up the Treadles, and then lock or release the Treadle Locking Lever.
The TreadClimber® machine is equipped with a Treadle Locking Lever that can be moved with your foot.
- Turn off all power to the TreadClimber® machine and unplug the power cord from the wall outlet.
- Move the Locking Lever down and to the right and then up into the locked position with your foot. Stand on each Treadle individually until they fall to the horizontal position. There will be a click when they lock into position.
- Plug the power cord into the wall outlet and turn on the Main Power Switch.
- To release the Treadles, turn off the Main Power switch and push the Lever down and to the left with your foot. The Treadles will return to the inclined position.
Applying the Treadle Locking Lever
Exercise Cylinders
Your TreadClimber® machine uses Hydraulic Resistance Cylinders to absorb your steps and cushion your joints, decreasing your overall fatigue and removing muscle strain. The intensity of a workout can be subtly adjusted through the Workout Intensity Settings. These add a slight level of control to the resistance of the cylinders.
The Workout Intensity Settings dial is found at the top of the Hydraulic Cylinders. Use the dials to line up the setting with the white arrow. Be sure the settings match for both cylinders.

Do not try to change the resistance level on the Resistance Cylinders during a workout. Stop the workout and step off the machine before you adjust the resistance level.
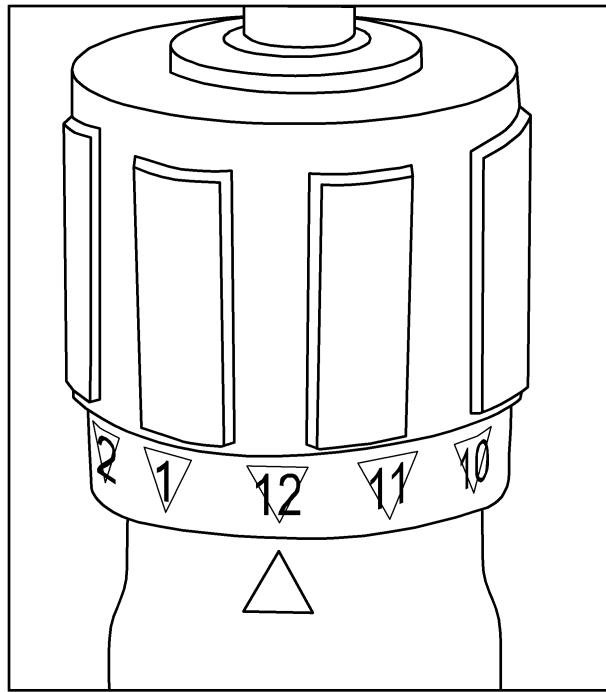
The higher the Workout Intensity Setting, the more the Treadle travels. A setting of 12 is more intense than a setting of 1. Although the Workout Intensity Settings dial can move continuously in either direction, it is recommended that you only turn the dial clockwise to setting 12 and counterclockwise to setting 1.
Note: "Bottoming out" occurs when the Treadle travels through too great a range of motion. When this occurs, the Treadles hit against the base on the down step. To reduce treadle travel, decrease the Workout Intensity Setting or increase belt speed.
How Often Should You Exercise

Consult a physician before you start an exercise program. Stop exercising if you feel pain or tightness in your chest, become short of breath, or feel faint. Contact your doctor before you use the machine again. Use the values calculated or measured by the machine's computer for reference purposes only.
- 3 times a week for 30 minutes each day.
- Schedule workouts in advance. Try to work out even when you do not want to.
What to Wear
Wear rubber-soled athletic shoes. You will need the appropriate clothes for exercise that allow you to move freely.
Stretching
Stretch before you start your exercise session. Warm muscles respond better to exercise.
-
Achilles Tendon and Calf - With both hands against a wall, place one foot behind you. Lean in toward the wall while keeping the rear leg straight and your heel on the ground. Repeat for the other leg.
-
Quadiceps - Put your left hand on a wall or table for balance. Reach your right hand behind your back and grasp your right ankle. Pull it gently toward your buttocks until you feel tension along the front of your thigh. Repeat on the other side.
- Hamstring - Stand on one leg and prop the other leg parallel to the ground on a stable cabinet or table top. Slide both hands toward the propped up ankle as far as is comfortable. Repeat on other side.
Before You Start
- Situate your machine in the desired space of your workout area.
Place the machine on a clean, hard, level surface, free from unwanted material or other objects that may hamper your ability to move freely. A rubber mat should be used below the machine to prevent the release of static electricity and protect your flooring.
The machine can be moved by one or more persons. Make sure that your own physical strength is capable of moving the machine.
- Decide on your workout mode (treadmill or TreadClimber® mode).
Note: Lock the Treadles if in treadmill mode.
- Adjust the workout intensity settings on the Hydraulic Cylinders.
Note: Be sure the settings match on each cylinder.
- If you use the Heart Rate Monitor, follow the heart rate transmitter chest strap directions.
- Connect the power cord to the machine and into a grounded AC Wall Outlet.
Note: The machine can be equipped with an external circuit breaker.
Put the power cord alongside the machine, out of your way when you dismount the machine. Prevent stepping on the power cord and plug.
-
Primary Power Switch.
-
Power is switched on using the Primary Power Switch near the incoming power cord plug.
- Power is supplied to the motor and Console when the unit is connected and the Main Power Switch is turned on.
-
Keep the power cord along the side of the machine and out of your way. Attach the power plug to prevent stepping on it. Always make sure of the location of the cord and plug before your workout.
-
Straddle the belts and stand on the Side Foot Support Platforms. Put the Safety Key into the Safety Keyhole and clip the Safety Key cord to your clothing.
Keep your hands on the support Handlebars and stay as near the front of the machine as is comfortable in order to stay in balance on the Treadles.
- To energize the Drive Belt Motor, the Safety Key must be correctly put into the Safety Keyhole.
- In the event of an emergency while the machine is in motion, pull the Safety Key. This will cut all power to the belts and will stop them quickly (brace yourself—this is an abrupt stop).
Always attach the Safety Key clip to your clothing during workouts. - Start your workout when the belts are up to speed.
Note: The Treadles may not be at the same resting level. Step onto the lower treadle with your first step once the belt is moving.
Your machine calculates how many calories you burn based on your weight settings you tell it. When your weight changes, be sure to update your profile in the Console. This will ensure an accurate calculation of the calories you burn during the workout.
Pausing or Stopping
- Step off of the belts and onto the Side Foot Support Platforms on either side of the Treadles.
- Push STOP to pause the workout. The belts will slow to a complete stop.
- To restart your workout, push the ENTER button. To end your workout, press STOP again. The Console will display your results and record them if you are a registered user.
Note: If there is an emergency, pull out the Safety Key to shut off the power to the belts. This will abruptly stop them.
If there are no footfalls after 1 minute, the Console will request if you wish to continue. The belts will stop if there is no response after 30 seconds. The machine will shut down after 5 minutes unless the START button is pushed.

Be sure to lock the Treadles and remove the Safety Key for safe storage when not in operation.
Preliminary Workout

Consult a physician before you start an exercise program. Stop exercising if you feel pain or tightness in your chest, become short of breath, or feel faint. Contact your doctor before you use the machine again. Use the values calculated or measured by the machine's computer for reference purposes only.
First 4 Weeks
Follow these guidelines to ease yourself into a weekly exercise regimen. This weekly regimen can include combinations of treadmill and TreadClimber® modes.
Use your judgment and/or the advice of your physician or health care professional to find the intensity and level of your workouts.
Warming Up
Before you start any workout, you should prepare your body for increased activity by slowly raising your heart rate.
Starting Your Workout
Interval Training and Steady State are 2 types of workouts that you can do on your machine while in TreadClimber® mode (stepping and using the belts at the same time). You can also wish to combine Interval Training with Steady State Training to get a varied workout.
Interval Training involves adjusting your speed for specific lengths of time to raise and lower your heart rate and calorie burn. Interval training changes the intensity of your workout during one exercise session. Alternating high-intensity training with low-intensity rest periods will boost your metabolism and help you burn calories after your workout is completed.
Interval training also helps prevent the injuries frequently associated with repetitive endurance exercise, and lets you increase your training intensity without over training or burning out. To develop a personal Interval Training regimen, change your belt speed or rate of stepping from fast speeds to slower recovery speeds.
The Steady State workout involves doing one exercise at the same speed and intensity for a long period of time. While there are risks to repetitive workouts, the TreadClimber® machine is designed to cushion your joints and muscles from those stress injuries. Further, repetitive workouts can help you build your endurance, stamina and strength while you continue to hone and improve the tone and lean muscle mass in your long muscles.
| Beginner | Intermediate | Advanced | |
| Week 1 | ·3 X per week, do a TreadClimber® workout at stable, constant pace - 30 minutes If this feels easier by the end of the week, move on to Week 2. If not, feel free to repeat the week. | ·3 X per week, do a TreadClimber® workout at stable, constant pace for 30 minutes | ·2 days interval training - 30 minutes ·1 day steady pace - 30 minutes Increase the workout level adjustment during training weeks, if necessary, to maximize your TreadClimber® fitness benefits. |
| Week 2 | ·3 X per week, do a TreadClimber® workout at stable, constant pace - 30 minutes ·If this feels easier by the end of the week, continue to Week 3. If not, feel free to repeat the week. | ·2 days steady pace - 30 minutes ·1 day interval training - 30 minutes Increase the workout level adjustment during training weeks, if necessary, to maximize your TreadClimber® fitness benefits. | Use Week 1 as a guide to help you start building your own long- term fitness routine, adjusting your interval speeds, resistance, step depth, etc., in order to maximize your TreadClimber® benefits. |
| Week 3 | ·2 days steady pace - 30 minutes ·1 day interval training - 30 minutes | Use Weeks 1 and 2 as a guide to help you start building your own long-term fitness routine, adjusting your interval speeds, resistance, step depth, etc., in order to maximize your TreadClimber® benefits. | |
| Week 4 | ·2 days interval training - 30 minutes ·1 day steady pace - 30 minutes Increase the workout level adjustment during training weeks, if necessary, to maximize your TreadClimber® fitness benefits. | ||
| Week 5 | Use Weeks 1, 2, 3 and 4 as a guide to help you start building your own long-term fitness routine, adjusting your interval speeds, resistance, step depth, etc., in order to maximize your TreadClimber® benefit | ||
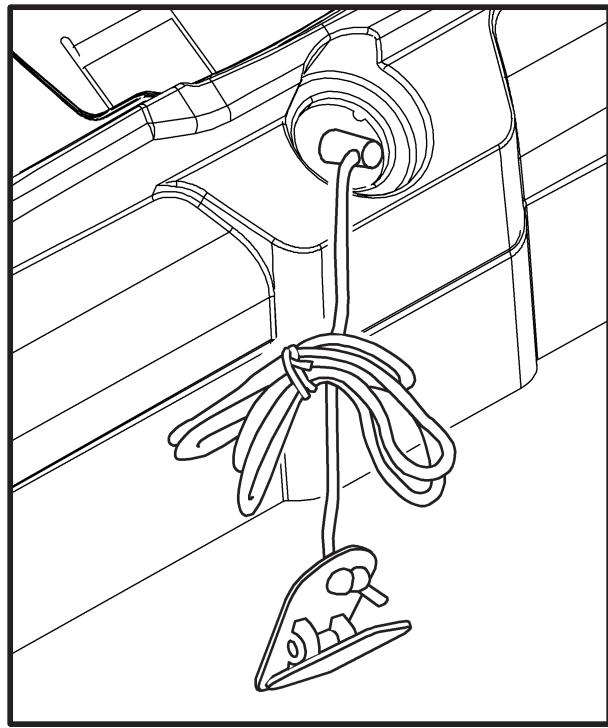
Remote Heart Rate Monitor
Monitoring your Heart Rate is one of the best procedures to control the intensity of your exercise.
A Heart Rate Chest Strap Transmitter is included to send your Heart Rate signals to the Console. The Console displays your Heart Rate in Beats Per Minute (BPM).
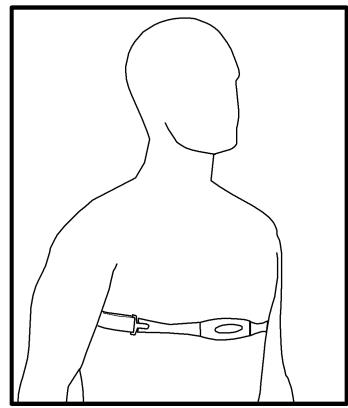
Chest Strap
Using the heart rate transmitter chest strap lets you monitor your heart rate at any time during your workout.
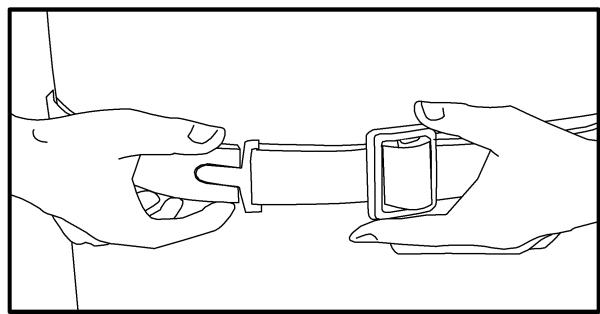
The heart rate transmitter is attached to a chest strap to keep your hands free during your workout. Attach the transmitter to the elastic chest strap.
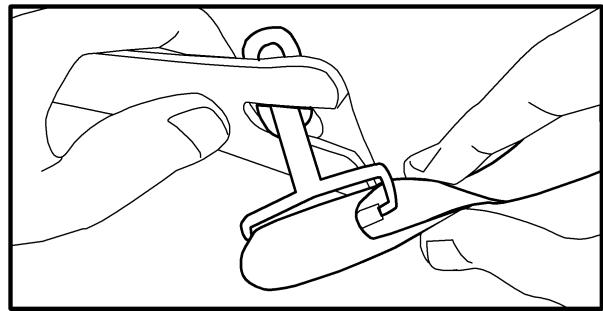
Adjust the strap length to fit snugly and comfortably against your skin. Secure the strap around your chest, just below the chest muscles, and buckle it.
Lift the transmitter off your chest and moisten the two Grooved Electrode Areas on the back.
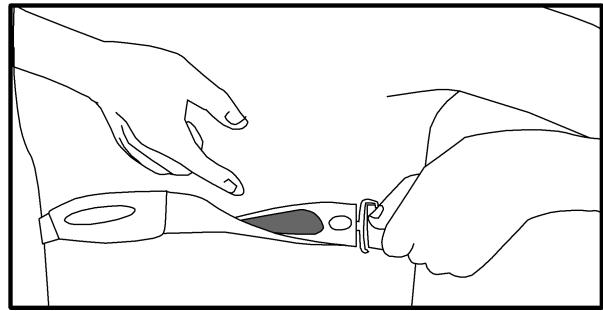
Check that the wet electrode areas are firmly against your skin.
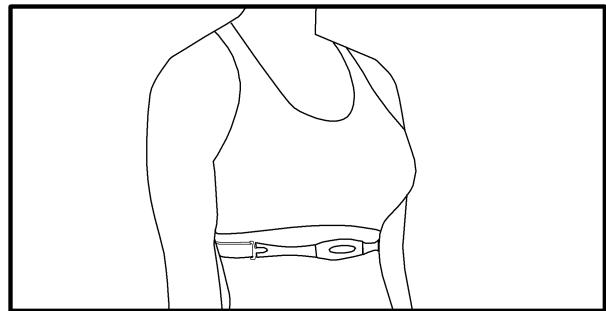
The transmitter will send your heart rate to the machine's receiver and display your Beats Per Minute (BPM).
Always remove the transmitter before you clean the chest strap. Clean the chest strap regularly with mild soap and water, and thoroughly dry it. Residual sweat and moisture keep the transmitter active and drain the battery in the transmitter.
Note: Do not use abrasives or chemicals such as steel wool or alcohol when you clean the chest strap, as they can damage the electrodes permanently.
If the Console displays a heart rate value of "0", then the transmitter is not sending a signal. Check that the textured contact areas on the chest strap are contacting with your skin. You may need to lightly wet the contact areas. If no signal appears or you need further assistance, call your Nautilus® Representative.
Heart Rate Calculations
Your maximum heart rate usually decreases from 220 Beats Per Minute (BPM) in childhood to approximately 160 BPM by age 60. This fall in heart rate is usually linear, decreasing by approximately one BPM for each year. There is no indication that training influences the decrease in maximum heart rate. Individuals of the same age could have different maximum heart rates. It is more accurate to find this value by getting a stress test than by using an age related formula.
Your at rest heart rate is influenced by endurance training. The typical adult has an at rest heart rate of approximately 72 BPM, where as highly trained runners may have readings of 40 BPM or lower.
The Heart Rate table is an estimate of what Heart Rate Zone (HRZ) is effective to burn fat and better your cardiovascular system. Physical conditions vary, therefore your individual HRZ could be several beats higher or lower than what is shown.
The most efficient procedure to burn fat during exercise is to start at a slow pace and gradually increase your intensity until your heart rate reaches between 60 - 85% of your maximum heart rate. Continue at that pace, keeping your heart rate in that target zone for over 20 minutes. The longer you maintain your target heart rate, the more fat your body will burn.
The graph is a brief guideline, describing the generally suggested target heart rates based on age. As noted above, your optimal target rate may be higher or lower. Consult your physician for your individual
target heart rate zone.
Note: As with all exercises and fitness regimens, always use your best judgment when you increase your exercise time or intensity.
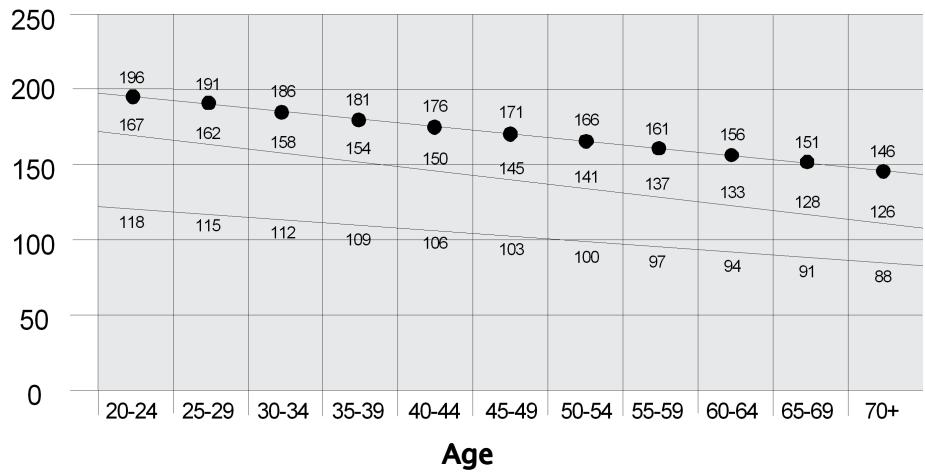
Fat Burning Target Heart Rate
Heart Rate BPM (beats per minute)
Maximum Heart Rate
Target Heart Rate Zone (keep within this range for optimum fat burning)
Maintenance
DANGER
To decrease the risk of electrical shock, always unplug the power cord and wait for cleaning, maintaining or repairing this machine.
Read all maintenance instructions fully before you start any repair work. In some conditions, an assistant is necessary to do the necessary tasks.
Inspection
Visually inspect your machine after use for wear, damage, or loose parts.

The safety and integrity designed into a machine can only be kept when the equipment is regularly examined for damage and repaired. It is the sole responsibility of the owner to make sure that regular maintenance is done. Worn or damaged components must be replaced immediately or the equipment removed from service until the repair is made. Only manufacturer supplied components must be used to maintain/repair the equipment.
Schedule
Before each use, inspect for loose, broken, damaged, or worn parts. Do not use the machine if any of these conditions exist.
Weekly: Check for smooth roller operation. Clean the machine to remove dust, dirt, or grime. Do not use an automotive cleaner.
Monthly: Make sure all bolts and screws and tighten if necessary.
NOTICE: To prevent damage to the finish of the machine or Console, do not clean with a petroleum based solvent when you clean. Prevent getting too much moisture on the Console.
Walking Belt and Deck Lubrication
The TreadClimber® machine is equipped with a low maintenance deck and belt system. Belt friction can affect the function and life of the machine. For the best results lubricate the Treadles periodically with a silicone lubricant, using the following instructions:
- Unplug the machine fully from the wall outlet, and remove the power cord from the machine.
- Apply a very thin layer of silicone lubricant on the Treadle deck below each belt. Carefully lift each belt and apply a few drops of the lubricant the entire width of the belt.
NOTICE: Always use a silicone-based lubricant. Do not use a degreaser like WD-40 as this could seriously impact performance.
- Connect the power cord back into the machine and then into the wall outlet.
- Stay to one side of your machine.
- Switch on your machine and start the belts at the slowest speed. Let the belts operate for approximately 15 seconds.
- Switch off your machine.
- Take care to clean up any excess lubricant from the Treadles. We also recommend a periodic inspection of the Treadle surfaces below the belts. If the decks appear worn, contact a TreadClimber® Representative (refer to the Contacts page of this manual).

To decrease the possibility of slipping, be sure the Treadle area is free from grease or oil. Clean off any excess oil from the machine surfaces.
Use the following timetable as a guide to lubricate the decks:
Light user (fewer than 3 hours / week): every 3 months
- Moderate user (3-5 hours / week): every 2 months
- Heavy user (more than 5 hours / week): every month
We recommend that you use the following:
8300 Silicone Spray, available at most Hardware and Auto Parts stores.
- Lube-N-Walk® Treadmill Lubrication Kit, available from your local specialty fitness dealer or Nautilus, Inc.
Walking Belt Adjustment
If either of the walking belts track too much to one side, adjustments can be made at the Front Roller of each Treadle.
Belt Alignment Check - Stand adjacent to the unit and set the speed to 1.5 MPH. The alignment adjustment bolts are on the front end of each Roller. If the belt is tracking too far to the right, use the provided Hex Key to turn the right adjustment bolt clockwise on that belt in full turn increments. If the belt tracks too far to the left, do the same thing on the left adjustment bolt.
Note: Do not turn the bolts counterclockwise when you adjust the belt alignment.
Belt Tension Check - Correct belt tension should only allow a finger to fit snugly below the belt's midpoint. Carefully slide a finger under the belt to test it when the machine is unplugged. If the belt is loose, turn both bolts clockwise one full turn and check tension again. Repeat this step if necessary.
Note: Bolts are turned counterclockwise to decrease belt tension.
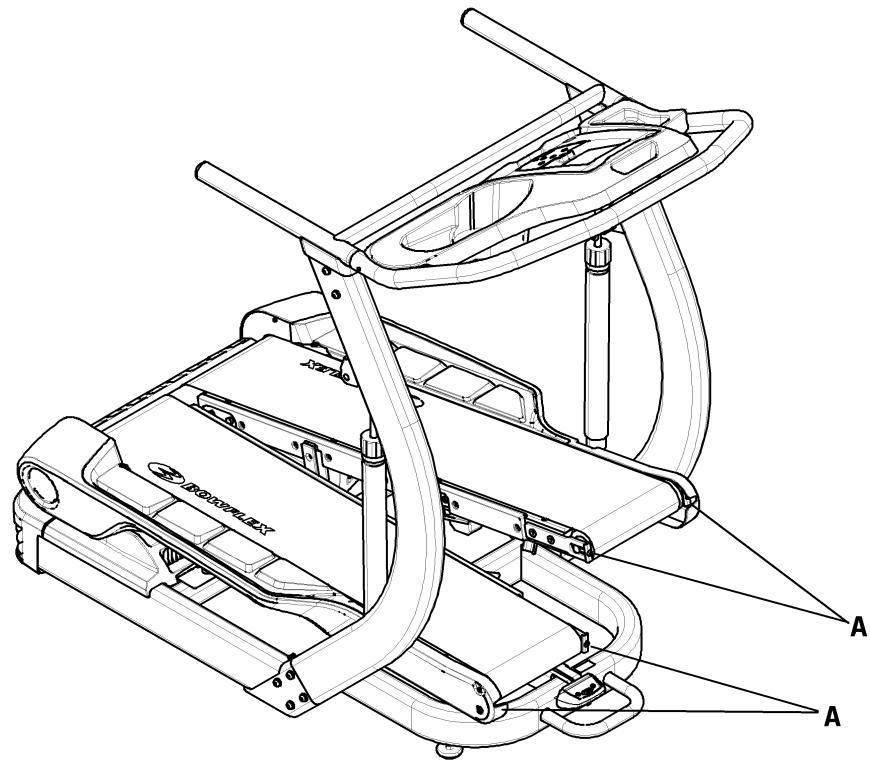
| A | Adjustment Bolts |
Moving Your Machine
The TreadClimber® machine weighs 218 lbs (98.9 kg) when fully assembled and requires caution when being moved.
Your machine can be rolled on the transport wheels to a new location. The transport handle is found on the front of the machine below the Console Assembly. Be aware of the proximity of the Console Assembly and your head when moving the machine. Lower your machine slowly into its new location without injury to your head.

Do not use the uprights, arms, or the Console to lift or move the machine. Injury to you or damage to the machine can occur.
The machine can be moved by one or more persons. Make sure that your own physical strength is capable of moving the machine.
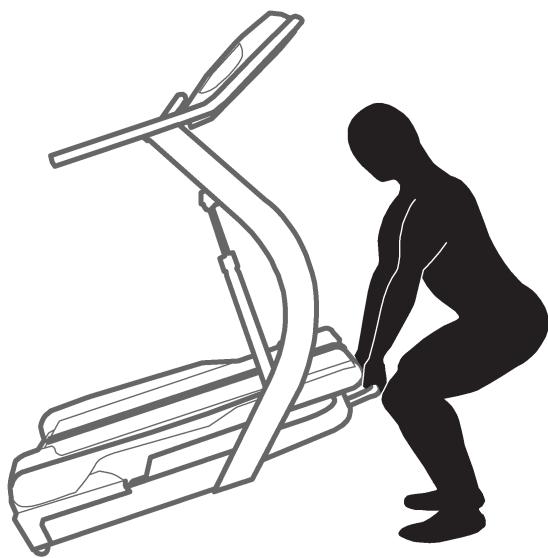
Place the machine on a clean, hard, level surface, free from unwanted material or other objects that may hamper your ability to move freely. A rubber mat should be used below the machine to prevent the release of static electricity and protect your flooring.
Troubleshooting
| Condition/Problem | Things to Check | Solution |
| Unit will not power up/turn on/start | Outlet | Make sure outlet is functioning correctly. Verify this by plugging another object (ex: lamp) into the outlet. If outlet is connected to a light switch, check to make sure it is on. If outlet is not functioning find a working outlet. |
| Power cord not plugged in | Make sure the power cord is firmly secured to A/C inlet on the unit and firmly inserted into a non-GFI wall socket. | |
| Power switch turned off | Make sure the power switch at the rear of the unit is in the “ON” position. Switch will light up red to indicate power is present. | |
| Safety key not plugged in | Plug Safety Key into Console (See Emergency Stop Procedure within the Important Safety Precautions section). | |
| Fuse on motor control board blown | Contact Customer Care for further assistance. | |
| Speed displayed is not accurate | Display set to wrong unit of measure. (English/Metric) | Change display units (See Console Owner's Manual). |
| Heart rate not displayed while using chest strap | Transmitter not making good contact with skin | Moisten skin contact area on the chest strap. |
| Electromagnetic interference | Turn off any television, AM radio, microwave, or computer within 6 feet (2 meters) of the TreadClimber® fitness machine. | |
| Chest strap transmitter | Test chest strap with another HR monitoring device such as HR watch or a machine at a gym. If transmitter has good skin contact and still is not found to be emitting HR signal, replace chest strap transmitter. | |
| HR receiver | If chest strap is known to work with other devices and no sources of interference are present, or console has been tested with a Pulse Simulator and is not receiving the signal, contact Customer Care for replacement HR receiver. | |
| Walking belt misalignment | Rear belt guides | Belts should ride on top of triangular black belt guides at rear of treadles. |
| Tracking adjustment | Belts are not required to be perfectly centered and are typically farther out in the rear than they are in the front. This may vary depending on user's stride. If belt is tracking to one side far enough to cause rubbing of belt, follow belt alignment procedure in Owner's Manual. | |
| Hesitation or belt slipping when walking on unit | Belt tension | If belt hesitates or slips when walking on unit it may be caused by either a loose walking belt or a loose drive belt. To determine the cause perform the following test: Stand beside TreadClimber® fitness machine and set speed to 2 MPH. Step on one treadle and attempt to stop movement. If one belt stops but roller at rear and other belt continue to turn, walking belt tension should be adjusted. If both belts stop but motor is still turning, the drive belt tension should be adjusted. |
| Walking belt tension | Adjust walking belt tension at the front of the unit using the provided hex wrench on the exposed adjustment bolts located on each side of each front roller. Be sure to adjust both bolts on each roller the same amount as to not disrupt belt alignment. Tighten (turn clockwise) each adjustment bolt in full turn increments. After each adjustment, restart unit and check to see if belt slippage has been eliminated. Repeat if necessary. If slipping feel persists after several adjustments, stop and refer to drive belt checklist. | |
| Drive belt | Unplug power from unit. Wait 5 minutes to ensure no residual power remains. Remove plastic cover under treadles to expose “v” belt drive line and motor. Tighten nut on the motor tension bolt located on front side of motor in 1/2 turn increments until drive belt slippage is eliminated - DO | |
| NOT OVER TIGHTEN. Replace cover when finished. | ||
| Knocking noises when unit is operating in TreadClimber® mode, but not in treadmill mode | Drive pulley and flywheel pulley | Unplug power from Unit. Wait at least 5 minutes. Remove plastic cover under treadles to expose "v" belt drive line. Using a 1/2" wrench, tighten the bolt that attaches the 4 1/2" drive pulley to the drive shaft while holding the drive rollers still. Also, using a 5/32" hex wrench, tighten the set screw on the flywheel motor pulley. Reinstall plastic drive cover. |
| Igus bushing | If knocking sound seems to be coming directly from the rear roller, check igus bushings and replace if cracked. | |
| Hydraulic cylinder bolts | Check and tighten both upper and lower bolts that connect the hydraulic cylinders to the unit. | |
| Speed dependent grinding or scraping noise in all modes | Belt alignment | Check walking belt alignment. Belt contact with metal guides under Treadle can make loud grinding sound. If belts are misaligned follow belt alignment procedure in Owner's Manual. |
| Rollers or motor | Contact Customer Care for further assistance. | |
| "Tick" sound once per revolution or scraping noise from under Treadle | Belt alignment | Belt seam may be contacting metal belt guide under treadle. Slight adjustment of belt should alleviate noise. Follow belt alignment procedure in Owner's Manual. |
| Belts stop turning while in use | Safety key | Plug Safety Key into Console (See Emergency Stop Procedure within the Important Safety Precautions section). |
| Motor overload | Unit may be overloaded and drawing too much current, causing unit to shut power down to protect motor. Consult belt lubrication schedule to determine if belts need lubrication, check walking belt tension, and restart unit. |
100% Satisfaction Guarantee
We want you to know that your TreadClimber® machine is a superior product. Your satisfaction is guaranteed. If, for any reason, you are not 100% satisfied with your TreadClimber® machine, please follow the instructions below to return your merchandise and receive a refund of the purchase price, less shipping and handling.
This TreadClimber® Satisfaction Guarantee applies only to merchandise purchased by consumers directly from Nautilus, Inc. This guarantee does not apply to sales made by dealers or distributors.
- Call a TreadClimber® Representative at 1-800-NAUTILUS (1-800-628-8458) for a Return Authorization Number (RMA). An RMA will be granted if:
a. The Bowflex® TreadClimber® exercise machine was purchased directly from Nautilus, Inc.
b. The request to return the product is within 6 weeks of the delivery date of your merchandise.
- If an RMA is granted, the following instructions will prevent delays in the processing of your refund.
a. The merchandise must be returned to the address given to you at the time of the Return Authorization Call.
b. All returned merchandise must be properly packaged in good condition, preferably in the original boxes.
c. The exterior of the boxes should be marked clearly with:
- Return Authorization Number
- Your Name
- Your Address
- Your Phone Number
d. Additionally, a piece of paper with your name, address and phone number or copies of your original invoice should be placed in each box of merchandise.
e. Your RMA number is time sensitive. Your shipment must be post marked within two weeks from the date the TreadClimber® Representative issued the Return Authorization Number.
Note: You are responsible for return shipping and for any damage or loss to merchandise that occur during return shipment. Nautilus recommends that you obtain tracking numbers and insure your shipment.
Unauthorized Returns
Nautilus, Inc. defines an unauthorized return as any merchandise returned to our facilities without a valid and current Return Merchandise Authorization (RMA) number issued by Nautilus. Failure to properly mark packages with a valid RMA number, or allowing an RMA number to expire, will cause Nautilus, Inc. to consider a return unauthorized. Any merchandise returned without a RMA number will not be subject to a refund or credit and Nautilus will discard the product. The customer assumes all shipping and handling charges for any unauthorized return.
Contacts
NORTH AMERICA, CANADA, ASIA PACIFIC & LATIN AMERICA
TECHNICAL/CUSTOMER SERVICE
Tel: (800) 605-3369
E-mail: tcinquiry@nautilus.com
CORPORATE HEADQUARTERS
Nautilus, Inc.
World Headquarters
16400 SE Nautilus Drive
Vancouver, Washington, USA 98683
Tel: (800) NAUTILUS (800) 628-8458
EUROPE, MIDDLE EAST & AFRICA
INTERNATIONAL CUSTOMER SERVICE
Nautilus International GmbH
Albin-Kobis-Str. 4
51147 Köln
Tel: +49 02203 2020 0
Fax: +49 02203 2020 45 45
E-mail: technics@nautilus.com
GERMANY and AUSTRIA
Nautilus Germany/Austria GmbH
Albin-Kobis-Str. 4
51147 Köln
Tel: +49 02203 2020 0
Fax: +49 02203 2020 45 45
ITALY
Nautilus Switzerland SA
Rue Jean Prouve 6
CH-1762 Givisiez
Tel: +41 26 460 77 66
Fax: +41264607760
UNITED KINGDOM
Nautilus UK Ltd
4 Vincent Avenue
Crownhill, Milton Keynes, Bucks, MK8 0AB
Tel: +44 1908 267 345
Fax: +44 1908 267 345
CHINA
Nautilus (Shanghai) Fitness Co., Ltd.
7A No. 728, Yan'an Road (West)
200050 Shanghai, China
Tel: +86 21 523 707 00
Fax: +86 21 523 707 09
Serial Number
Date of Purchase

BOWFLEX
Printed in China
©2009. Nautilus, Inc. All rights reserved. Nautilus, the Nautilus Logo, Universal, Bowflex, the Bowflex Logo, StairMaster, Nautilus Institute, TreadClimber and Schwinn Fitness are either registered trademarks or trademarks in the USA of Nautilus, Inc. Schwinn is a registered trademark. All other trademarks are owned by their respective companies. Nautilus, Inc., World Headquarters, 16400 SE Nautilus Drive, Vancouver, WA 98683 1-800-NAUTILUS www.nautilus.com
Bowflex® TreadClimber® TC5500
Owner's Manual
a brand of NAUTILUS Inc.
Table des matieres
Nautilus Germany/Austria GmbH
Albin-Kobis-Str. 4
51147 Köln
Tel: +49 02203 2020 0
Fax: +49 02203 2020 45 45
ITALY
Nautilus Switzerland SA
Rue Jean Prouve 6
CH-1762 Givisiez
Tel: +41 26 460 77 66
Fax: +41264607760
UNITED KINGDOM
Nautilus UK Ltd
4 Vincent Avenue
Crownhill, Milton Keynes, Bucks, MK8 0AB
Tel: +44 1908 267 345
Fax: +44 1908 267 345
CHINA
Nautilus (Shanghai) Fitness Co., Ltd.
7A No. 728, Yan'an Road (West)
200050 Shanghai, China
Tel: +86 21 523 707 00
Fax: +86 21 523 707 09
Numéro de série
Date d'achat

BOWFLEX
Imprimé en Chine

- Bowflex® TreadClimber® TC5500
- Owner's Manual
- Table of Contents
- Specifications
- Regulatory Approvals
- Patent Information
- Important Safety Instructions
- Before using this equipment, obey the following warnings:
- ADANGER
- Emergency Stop Procedures
- Instructional DVD
- Safety Warning Labels and Serial Number
- Console
- Treadles
- Lock the Treadles for Treadmill Workout
- Applying the Treadle Locking Lever
- Exercise Cylinders
- How Often Should You Exercise
- What to Wear
- Stretching
- Before You Start
- Pausing or Stopping
- Preliminary Workout
- First 4 Weeks
- Warming Up
- Starting Your Workout
- Remote Heart Rate Monitor
- Chest Strap
- Heart Rate Calculations
- Maximum Heart Rate
- Maintenance
- DANGER
- Inspection
- Schedule
- Walking Belt and Deck Lubrication
- Walking Belt Adjustment
- Moving Your Machine
- Troubleshooting
- 100% Satisfaction Guarantee
- Unauthorized Returns
- Contacts
- NORTH AMERICA, CANADA, ASIA PACIFIC & LATIN AMERICA
- EUROPE, MIDDLE EAST & AFRICA
- BOWFLEX
- Printed in China
- Table des matieres
- Imprimé en Chine
Brand : BOWFLEX
Model : TC5500
Category : Fitness Equipment