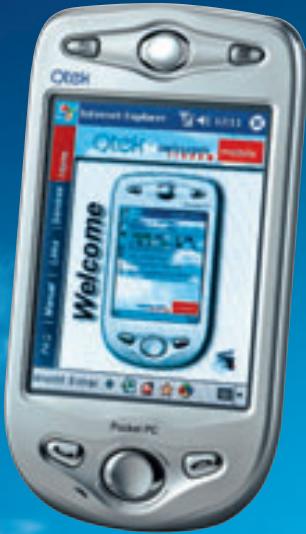
QTEK 2020 - Mobile Phone SWISSCOM - Free user manual and instructions
Find the device manual for free QTEK 2020 SWISSCOM in PDF.

User questions about QTEK 2020 SWISSCOM
0 question about this device. Answer the ones you know or ask your own.
Ask a new question about this device
Download the instructions for your Mobile Phone in PDF format for free! Find your manual QTEK 2020 - SWISSCOM and take your electronic device back in hand. On this page are published all the documents necessary for the use of your device. QTEK 2020 by SWISSCOM.
USER MANUAL QTEK 2020 SWISSCOM
d/f/e 06.04 1000 MC-CEB-MCO
www.swisscom-mobile.ch
swisscom mobile
Go far. Come close.
Qtek 2020
Quick User Guide
swisscom mobile
Go far. Come close.
Inhalt
Contenu
Contents
1. E-Mail
- E-mail 38
1.1 Setting up an e-mail account 38
1.2 Creating a new e-mail account 39
2. Verbindungen
2.1 GPRS
2.2 MMS
2.3 Bluetooth
7 2. Connexions
7 2.1 GPRS 24
10 2.2 MMS 27
14 2.3 Bluetooth 31
- Connections 41
2.1 GPRS 41
2.2 MMS 44
2.3 Bluetooth 48
3. Synchronisierung
3.1 With your PC (ActiveSync) 50
3.2 With your corporate network (ConnectAnywhere) 51
4.1 On a memory card 52
4.2 On your PC 53
natural_image
Two men outdoors, one reading a newspaper while the other looks on under a satellite dish (no visible text or symbols)Configurer le programme MMS Composer
natural_image
Two young women outdoors near a modern building with a clear blue sky (no visible text or symbols)Congratulations on purchasing your new Qtek 2020, the perfect solution for mobile data and voice communication when you're on the move. To start using it straight away, just read through this short guide with information on the various settings and data backup. We at Swisscom Mobile hope you enjoy using your Qtek 2020.
1. E-mail
1.1 Setting up an e-mail account
- Open the inbox. Select Account from the Accounts menu. Select Bluewin.
- Enter your e-mail address e.g.:
![E-mail Setup (1/4) E-mail address Enter e-mail address: peter.muster@bluewin.ch Cancel Back Next 121 1 2 3 4 5 6 7 8 9 0 - = + Tab q w e r t y u i o p [ ] CAP a s d f g h j k l ; * Shift z x c v b n m , . / + - Ctrl A0 * \ ↓ ↑ ← Edit ✗](/content/2020/05/21021/images/62492d1d07ca67225a13a0e4b49564c28dea6e3e3e218d6babbbc854137d503d.jpg)
- Tap Next.
![E-mail Setup (2/4) User information Your name: Peter Muster User name: petro-muster Password: ***** ✓ Save password Cancel Back Next LTI 1 2 3 4 5 6 7 8 9 0 - = + Tabl q w e r t y u i o p [ ] CAP a s d f g h j k l ; * Shift z x c v b n m , . / + - Ctrl A0 * \ ↓ + - - Edit ✗](/content/2020/05/21021/images/75c311743a942600b1df748d11dfba65e014d1976a344bce0c6397acc1d5951f.jpg)
- Enter the password and click on Save password.
- Tap twice more to complete the setup.
1.2 Creating a new e-mail account
- Open the inbox. Select Account from the Accounts menu. Select New account.
- Enter your e-mail address.
![E-mail Setup (1/5) E-mail address Enter e-mail address: sonya/muster@bluewin.ch Cancel Back Next L21 1 2 3 4 5 6 7 8 9 0 - = + Tabi q w e r t y u i o p [ ] CAP a s d f g h j k l ; * Shift z x c v b n m , . / + - Ctrl +0 * \ ↓ + - → Edit ✗](/content/2020/05/21021/images/5c1f2355120eabad0c5e49e5e2f10a573f874d886915a3d44e6d39cf17eb5245.jpg)
- Tap Next.
![E-mail Setup (2/5) Auto configuration Attempting to automatically configure your e-mail settings. To slip this step, tap Skip. Status: Connecting Cancel Back Skip L01 1 2 3 4 5 6 7 8 9 0 - = + Tabi q w e r t y u i o p [ ] CAP a s d f g h j k l ; * Shift z x c v b n m , . / + - Ctrl A0 * \ ↓ ↑ ← Edit ✗](/content/2020/05/21021/images/8218617a806e0cde068b59191e2cbf6c2463e2db65175deb92cf9394331bb8f3.jpg)
- Tap Skip.
![E-mail Setup (3/5) User information Your name: Sonya Muster User name: sonya.muster Password: ***** ✓ Save password Cancel Back Next L21 1 2 3 4 5 6 7 8 9 0 - = + Tabi q w e r t y u i o p [ ] CAP a s d f g h j k l ; * Shift z x c v b n m , . / + - Ctrl A0 * \ ↓ + - - Edit ✗](/content/2020/05/21021/images/d28f0fdd0fd0efd6938ad32018d7ce431bd63ea8d8d4742c55c124d00febe608.jpg)
- Enter your name, user ID and password and tap Save password, followed by Next.
![E-mail Setup (4/5) Account information Account type: POP3 Name: POP3 Cancel Back Next L0 1 2 3 4 5 6 7 8 9 0 - = + Tabl q w e r t y u i o p [ ] CAP a s d f g h j k l ; * Shift z x c v b n m , . / + - Ctrl A0 * \ ↓ + - - Edit ✗](/content/2020/05/21021/images/79dde0ee6e5551b936d560050aa48c4bc2b705230db88c705f70543be30eb05e.jpg)
- Enter the account name and tap Next.
![E-mail Setup (S/S) Server information Incoming mail: pop.bluewin.ch Outgoing mail: mail.bluewin.ch Domain: Options Cancel Back Finish LTI 1 2 3 4 5 6 7 8 9 0 - = + Tabl q w e r t y u i o p [ ] CAP a s d f g h j k l ; * Shift z x c v b n m , . / + - Ctrl +0 * \ ↓ + ← - Edit X](/content/2020/05/21021/images/85144f021e18fc0dd7ca502b39a1f24c9df9882d1b37092a9149dbe36ca29cec.jpg)
- Enter the server data e.g. as above for Bluewin.
- Tap Finish to complete the setup.
2. Connections
2.1 GPRS
You need this connection to download e-mails or browse the Web with Internet Explorer.
- Tap followed by Settings → Connections.
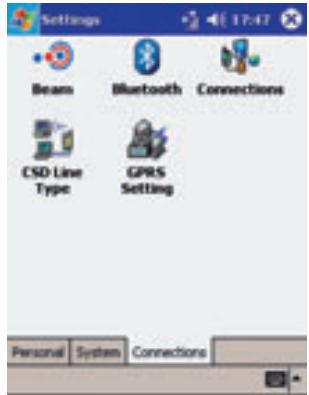
- Tap Connections.
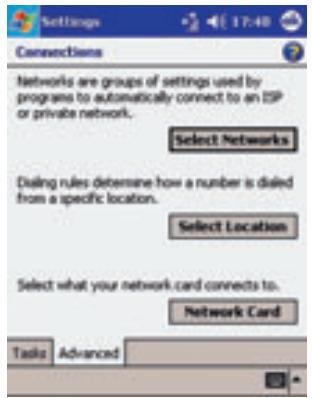
- Tap Select Networks followed by Advanced.
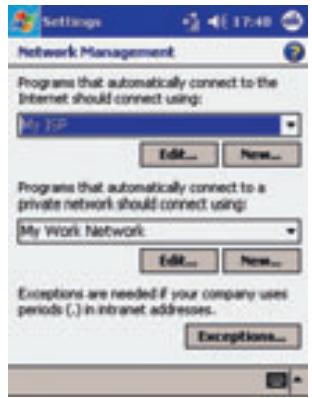
- Select New.
![Settings My ISP name: Enter a name for these settings: gpr Delete Settings General Modem Proxy Settings LTI 1 2 3 4 5 6 7 8 9 0 - = + Tabl q w e r t y u i o p [ ] CAP a s d f g h j k l ; * Shift z x c v b n m , . / + - C# #0 ^ \ ↓ ↑ ← →](/content/2020/05/21021/images/8a6659811692446c6d3ecd8e30549cbd8705ee0dd5521ed42e781e38155307df.jpg)
- Enter the name as shown above and select Modem.
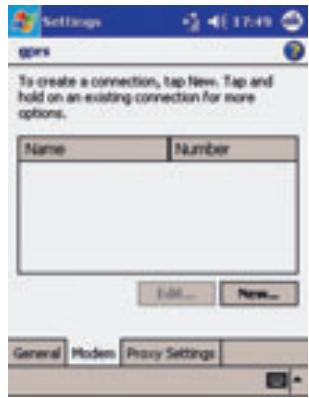
- Tap New.
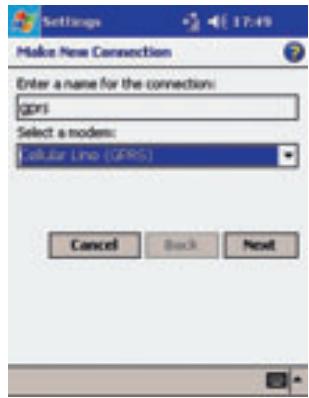
- Enter the settings as shown above and tap Next.
![gprs Access point name: gprs.swiss.com.ch Cancel Back Next LTI 1 2 3 4 5 6 7 8 9 0 - = + Tabl q w e r t y u i o p [ ] CAP a s d f g h j k l ; * Shift z x c v b n m , - / + - C# #0 * \ ↓ + -](/content/2020/05/21021/images/17ef875bd26099062794ada78871a7da3bdf17c48f59f5b36bba4368402a0e1d.jpg)
- Enter the settings as shown above and tap Next.
![Settings 17:49 gprs User name: Password: Domain:* * If provided by ISP or network administrator. Advanced... Cancel Back Finish L21 1 2 3 4 5 6 7 8 9 0 - = + Tabl q w e r t y u i o p [ ] CAP a s d f g h j k l ; * Shift z x c v b n m , . / + - C# AG * \u ↓ ↑ ←](/content/2020/05/21021/images/152e6d9259b2c552d3b76aadcb639f6eda7b3c4d0784c1f5769362602af246e2.jpg)
- Do not enter a user ID or password. Tap Finish followed by OK. The settings are now saved.
2.2 MMS
You need this connection to send and receive MMS messages.
You must also define the MMS
Composer settings.
- Tap followed by Settings → Connections.
- Select Connections

- Select Select Networks followed by Advanced.
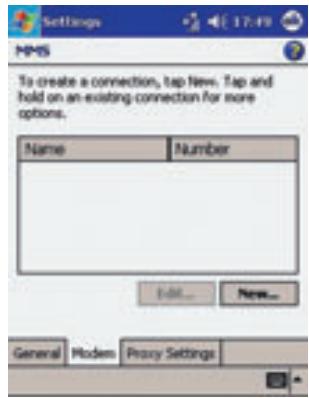
- Tap New.
![Enter a name for these settings: #M#5 Delete Settings General Modem Proxy Settings L#1 1 2 3 4 5 6 7 8 9 0 - = + Tab: q w e r t y u i o p [ ] CAP a s d f g h j k l ; * Shift z x c v b n m , . / + - C# #0 ^ \n↓ ↑ ← →](/content/2020/05/21021/images/3b5f0a1f949888aeaebc63a26b5a58c8297cbcd4a88c0ee46353ba79f7c8a3bc.jpg)
- Enter the name as shown above and tap Modem.
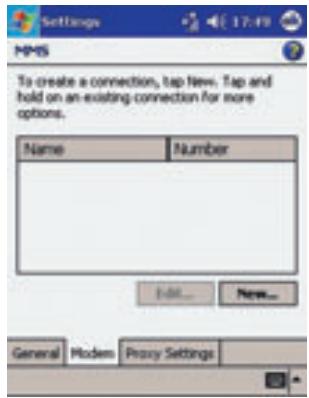
- Tap New.

- Define the settings as shown above and tap Next.
![HMS Access point name: event.swisscom.ch Cancel Back Next LTI 1 2 3 4 5 6 7 8 9 0 - = + Tabl q w e r t y u i o p [ ] CAP a s d f g h j k l ; * Shift z x c v b n m , . / + - C# #0 * \ ↓ + -](/content/2020/05/21021/images/2b2adbcec6021a825baa6096c2716c0fec184711d0dc875781178aa26d716e54.jpg)
- Define the settings as shown above and tap Next.
![Settings HPMS User name: Password: Domain:* * If provided by ISP or network administrator. Advanced... Cancel Back Finish L21 1 2 3 4 5 6 7 8 9 0 - = + Tab: q w e r t y u i o p [ ] CAP a s d f g h j k l : * Shift z x c v b n m , . / + - C# AG * \ ↓ ↑ ←](/content/2020/05/21021/images/1475fd7e8bc8342b36483dd5b84b2785730c92c9d30d0cf7956bb60ca39b5133.jpg)
- Do not enter a user ID or password. Tap Finish followed by OK. The settings are now saved.
Setting up MMS Composer
You need this connection to send and receive MMS messages. You must also define the Configure
MMS connection settings
- Start MMS Composer.
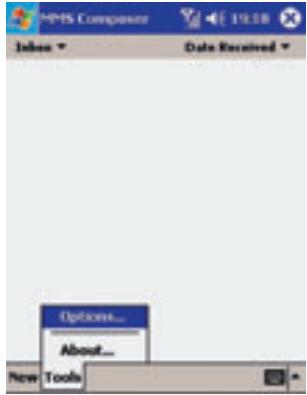
- Select Tools → Options.
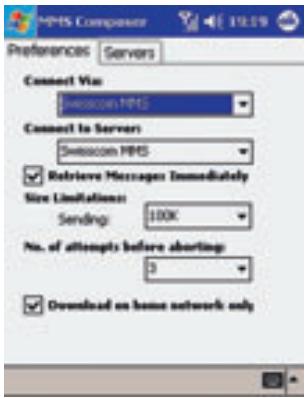
- Select the MMS connection followed by Server → Swisscom MMS.
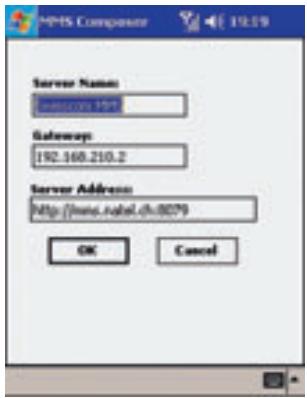
- Enter the settings as shown above and select OK. In the next window, select OK again. The settings are now saved.
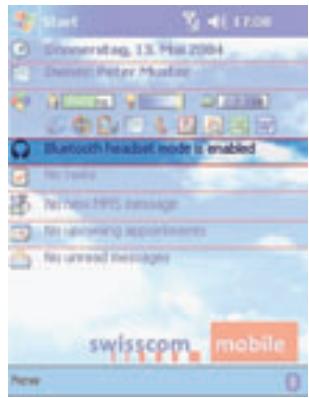
2.3 Bluetooth
- Select ☐ from the lower right-hand corner of the Today window.
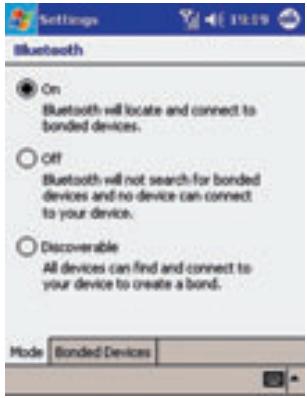
- Select On followed by Bonded Devices.
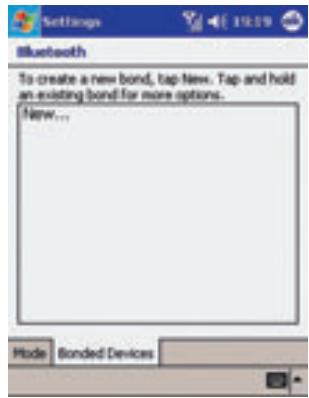
- Prepare your Bluetooth headset for pairing and select New. A search is started, and after some time the following window is displayed:
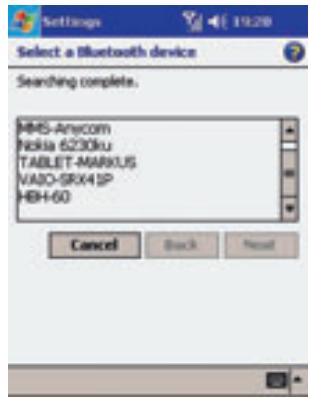
- The result of the search is shown. Select the displayed device and tap Next.
![Name the Bluetooth Device Enter a name for the bonded device. Name: BH-60 Cancel Back Finish L21 1 2 3 4 5 6 7 8 9 0 - = + Tab: q w e r t y u i o p [ ] CAP a s d f g h j k l : * Shift z x c v b n m , / + - C# #0 * \ ↓ + -](/content/2020/05/21021/images/bf57eb8be1b489ef662a4d5fb848efc00926f0c01bc8984971d6d8c6040003a1.jpg)
- Tap Finish.
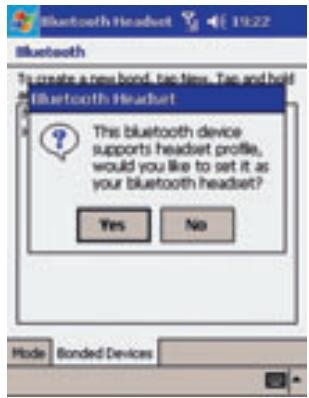
- Tap Yes and close the next window. The settings are now saved.
3. Synchronisation
3.1 With your PC (ActiveSync)
Installing ActiveSync
Microsoft ActiveSync allows you to synchronise your PC data with those stored in the Pocket PC phone.
During synchronisation the data in the Pocket PC phone are checked against PC data, and both are updated.
Before starting synchronisation, install ActiveSync on your desktop computer using the Pocket PC
Phone 2003 CD. ActiveSync is already installed on your Pocket PC phone.
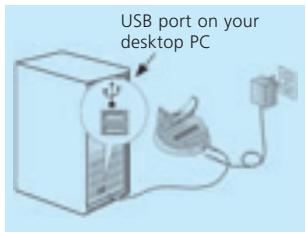
Hardware Connection
Place your Pocket PC phone in its docking station and connect the USB or serial cable to your PC for synchronisation.
Software Installation
- Insert the Pocket PC Phone 2003 CD in the CD-ROM drive of your desktop PC or laptop.
- Click on the yellow arrow, then on Start, and follow the instructions on the screen.
Setting up a connection
Once installation is completed, the ActiveSync Setup assistant guides you through setting up a connection between your Pocket PC phone and computer, so that you can start synchronising data and customise synchronisation settings. The first synchronisation starts automatically as soon as the ActiveSync Setup assistant dialogue has ended. After this first synchronisation you will notice that your Outlook data are now stored in your Pocket PC.
To avoid synchronisation problems, it is important to select Use this computer for Sync under Assistant options for new connections.
3.2 With your corporate network (ConnectAnywhere)
ConnectAnywhere combines the expertise of three market leaders: Swisscom Mobile, Microsoft and HP. With these professional partners, it's easy to synchronise your Qtek 2020 with your corporate network at any time. For further information, see www.connectanywhere.ch
ConnectAnywhere
Since all new programs and data are stored in the RAM and can be deleted or lost during a hard reset or loss of power, it is extremely important to make backup copies of files on your computer or, even better, on a memory card.
4.1 On a memory card (xBackup)
Your Pocket PC phone has an expansion slot for SD and MMC memory cards, primarily for backup and data transfer applications.
- Insert a memory card in the slot until it clicks into place.
- Tap the symbol, →
Programs → xBackup
→ then the Backup Tab or Restore.

- Tap the Open menu and select Storage card.
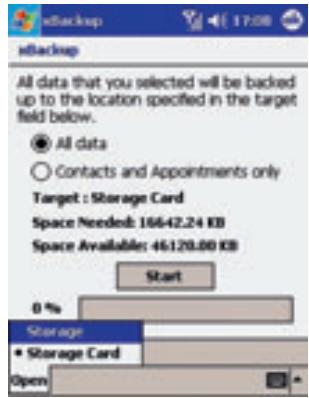
- Make sure there are no programs running in the background. Then tap Start.
4.2 On your PC
- Double-click on ActiveSync in your PC task list.
- Select Backup/Restore from the Extras drop-down menu in ActiveSync.
- Select the Backup tab if you wish to make a system backup. Select the Restore tab if you wish to restore your system.