
VIAGGIO DUO-FIX - Car seat PEG PEREGO - Free user manual and instructions
Find the device manual for free VIAGGIO DUO-FIX PEG PEREGO in PDF.

| Product Type | Car seat group 2/3 |
| Brand | PEG PEREGO |
| Model | VIAGGIO DUO-FIX |
| Child weight | 15 to 36 kg (approx. 3 to 12 years) |
| Dimensions (L x W x H) | 44 x 48 x 66 cm |
| Seat weight | 5.2 kg |
| Attachment | Isofix + Top Tether or 3-point seat belt |
| Installation | Forward-facing only |
| Headrest adjustment | 7 height positions |
| Side protection | Integrated side protectors (SIP) |
| Harness | 5-point harness up to 18 kg, then seat belt |
| Shell material | Reinforced polypropylene |
| Cover | Removable and machine washable fabric (30°C) |
| Safety standard | ECE R44/04 or R129 (depending on version) |
| Maintenance and cleaning | Removable cover, wash at 30°C, air dry |
| Spare parts and repairability | Covers, foams, plastic parts available on request |
| Warranty | 2 years (parts and labor) |
| Use | Vehicles equipped with Isofix anchors or 3-point belt |
| Included accessories | Isofix connectors, belt guide, user manual |
Frequently Asked Questions - VIAGGIO DUO-FIX PEG PEREGO
User questions about VIAGGIO DUO-FIX PEG PEREGO
0 question about this device. Answer the ones you know or ask your own.
Ask a new question about this device
Download the instructions for your Car seat in PDF format for free! Find your manual VIAGGIO DUO-FIX - PEG PEREGO and take your electronic device back in hand. On this page are published all the documents necessary for the use of your device. VIAGGIO DUO-FIX by PEG PEREGO.
USER MANUAL VIAGGIO DUO-FIX PEG PEREGO
EN Instructions for use
FR Notice d'emploi
natural_image
Diagram of a mechanical component with a downward arrow indicating force or movement (no text or symbols present)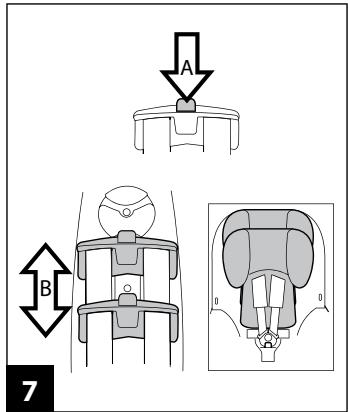
natural_image
Three-step illustration of a baby seat with a curved line indicating the angle (no text or symbols)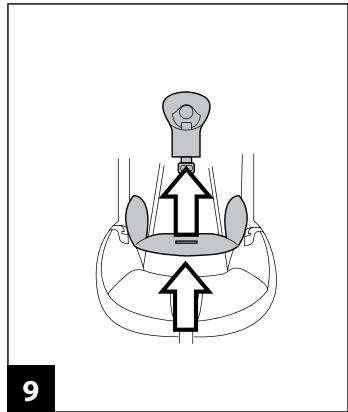
natural_image
Diagram of a mechanical device with two upward arrows indicating motion or force direction (no text or symbols)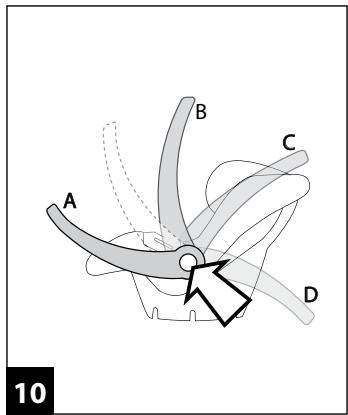
natural_image
Diagram of a car head with two views showing different seat positions (no text or symbols present)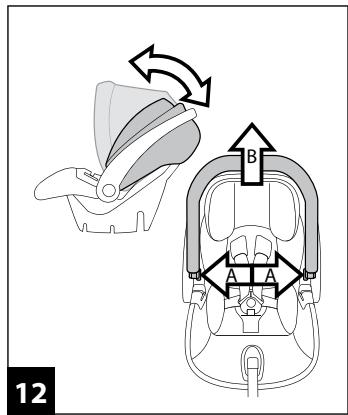
natural_image
Mechanical diagram showing a belt switch mechanism with arrows indicating motion (no text or labels)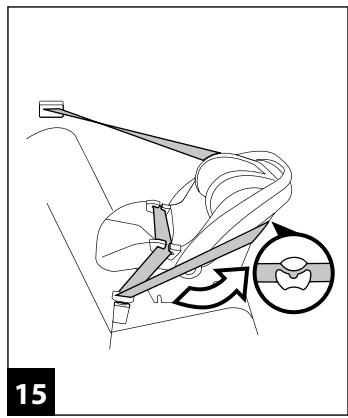
natural_image
Diagram of a car seatbelt mechanism showing seatbelt placement and rotation arrow (no text or symbols)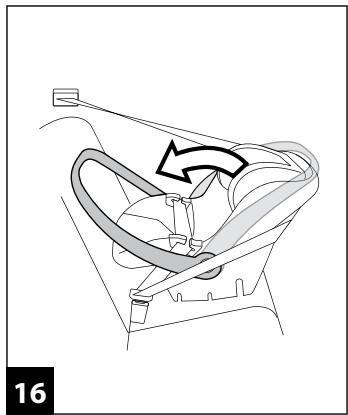
natural_image
Diagram of a car gear shift lever mechanism (no text or labels)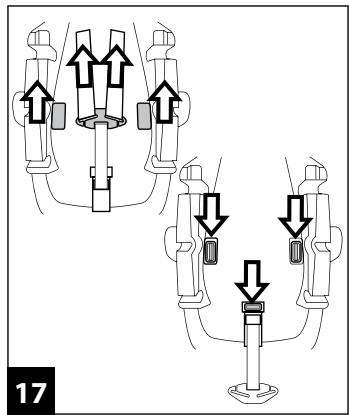
natural_image
Two-step diagram showing a device with a head and torso, connected by directional arrows indicating motion (no text or symbols)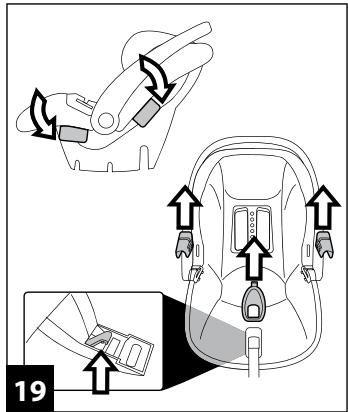
natural_image
Line drawing of a car seat with a clip and two arrows indicating movement or force (no text or symbols)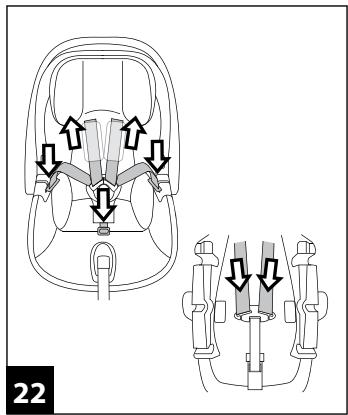
natural_image
Diagram of a car seatbelt seat with a highlighted seatbelt component (no text or symbols)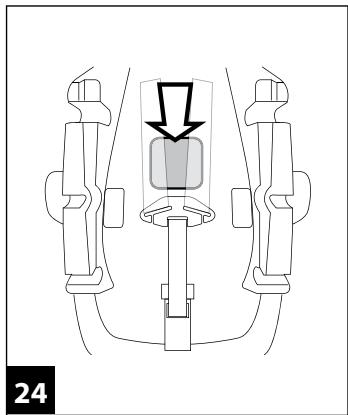
natural_image
Diagram of a vehicle seatbelt mechanism with a highlighted central component and directional arrows (no text or symbols)
natural_image
Diagram showing a mechanical assembly with a pin and a close-up of a component (no text or symbols)EN• Spare parts available in different colours to be specified when ordering.
 primo viaggio tri-fix primo viaggio tri-fix |  primo viaggio tri-fix + adjustable base primo viaggio tri-fix + adjustable base |  primo viaggio tri-fix + isofix base primo viaggio tri-fix + isofix base |
| "Universal" category.The "Primo Viaggio tri-fix" car safety seat is attached to the car using a three-point seat belt. | "Universal" category.The "Adjustable Base" is installed in the car using the three-point seat belt and remains in the car ready for use.The "Primo Viaggio tri-fix" safety seat attaches to the "Adjustable Base" and is secured with the car seat belt.See the "Adjustable Base" instruction manual for the car installation procedure. | "Semi-Universal" category class E.The "Isofix Base" with Isofix fixing system is installed in the car using the Isofix attachments located between the car seat and backrest.The "Primo Viaggio tri-fix" car safety seat attaches to the base.See the "Isofix Base" instruction manual for the car installation procedure. |
EN\_English
Thank you for choosing a Peg-Pérego product.

• Peg-Pérego S.p.A. is ISO 9001 certified.
- This certification offers customers and consumers a guarantee of transparency and confidence in the company's mode of operation.
Product characteristics
- The "Primo Viaggio tri-fix" group 0+ car safety seat has been subjected to all safety tests and is approved under European standard ECE R44/04, for children of weight from 0 to 13 kg (0 to 12-14 months).
- ▲ IMPORTANT: "Primo Viaggio tri-fix", group 0+, must be installed facing opposite to the normal forward movement of the car, on seats without airbags. Do not install "Primo Viaggio tri-fix" on seats that face backwards or sideways.
- "Primo Viaggio tri-fix" has an "Adjustable Side Impact Protection System": this offers improved protection against side impacts with the "simultaneous system" for headrest-harness adjustment.
- "Primo Viaggio tri-fix" is approved for installation in cars without a base support or with two types of base as required (the use of a seat base offers improved safety): "Adjustable Base" or "Isofix Base" (check that the vehicle is fitted with the Isofix system -a list of car models fitted with the system is provided with the product).
▲ WARNING
- Read the instructions carefully before use and keep them in the holder provided for future reference. Failure to closely follow the installation instructions for the car safety seat will put your child at risk.
- The assembly and installation operations must be conducted by adults.
- Avoid inserting fingers into the mechanisms.
• Install this group 0+ car safety seat facing opposite to the normal forward movement of the vehicle. - Death or serious injury can result if this car safety seat is installed on seats with airbags.
- Eliminate danger by disabling airbags surrounding the position of the car safety seat.
- In the case of rotating or movable seats it is important to install this safety seat facing opposite to the normal forward movement of the vehicle.
- When travelling take special care to make sure that luggage or other objects do not injure the child in the safety seat in the case of accidents.
- Do not use installation methods different from those indicated. This would result in the risk of detachment from the seat.
- Car safety seat, group 0+, "Universal" approved under European standard ECE R44/04 for children of weight from 0 to 13 kg (0 to 12/14 months). Suitable for installation on the majority of vehicle seats, but not all.
- Group 0+ child car seat with class E semi-universal Isofix base.
- The car safety seat can be correctly installed if the vehicle's use and maintenance manual indicates compatibility with "Universal" group 0+ restraint systems.
- This safety seat is classed as "Universal" in compliance with stricter approval criteria than previous models that do not have approval labels.
- The safety seat can only be used in approved vehicles, fitted with static or inertia-reel three-point seat belts, approved under regulation UN/ECE no. 16 or equivalent standards. It must not be used with two-point or lap seat belts.
- To install the car safety seat, pass the three-point seat belt through the slots in the safety seat indicated with light blue markings. Do not use installation methods different from those indicated. This would result in the risk of detachment from the seat.
- Ensure that the three-point car seat belt fixing the safety seat is always taut and not twisted. It should be replaced in the case of heavy stress as a result of an accident.
- Never leave the child unattended in the safety seat: observe him/her even when sleeping.
- Never remove the child from the seat while the vehicle is in
motion.
- Make sure that the safety seat is protected from any mobile parts of the car seat or doors.
• To avoid the risk of falling always use the safety seat harness even for transport outside the vehicle. Adjust the height and tension of the straps ensuring that they are snug to the child's body without constricting him/her too much. Check that the harness is not twisted and that the child does not release it. - This car safety seat is not designed for extended periods of sleep. The safety seat is not a substitute for a cot and if the child needs to sleep it is important to lie him/her down.
- Do not leave the car safety seat in the car exposed to the sun. Some parts might heat up and be harmful to the delicate skin of the child -check before placing the child in the seat.
- Do not use the safety seat without its fabric covering, which cannot be replaced with one not approved by the manufacturer since it is an integral part of the safety seat and the safety system.
- If in doubt refer to the manufacturer or retailer of the safety seat.
- Do not remove the adhesive and stitched labels since this might make the product non compliant with legal requirements.
- Do not use the safety seat if it has signs of breakage or missing parts, is second hand, or if it has been subjected to violent stress in an accident, because it might have suffered extremely dangerous structural damage.
- Do not modify the product.
- For any repairs, replacement parts and information about the product, contact the after-sales assistance service. Contact information is provided on the last page of this manual.
- Do not use this car safety seat after five years from the date of production indicated on the structure. The natural ageing of the materials may mean that it is no longer compliant with standards.
- The use of the safety seat for premature infants born at less than 37 weeks could cause respiration problems for the infant seated in the safety seat. It is advisable to seek medical advice before leaving the hospital.
- Do not use accessories not approved by the manufacturer or by the competent authorities.
- To avoid the risk of falling, never place the safety seat on raised surfaces (tables, work surfaces) soft surfaces (beds,
sofas) or sloping surfaces.
- In the home do not use the car safety seat if the child is able to remain seated alone.
Instructions for use
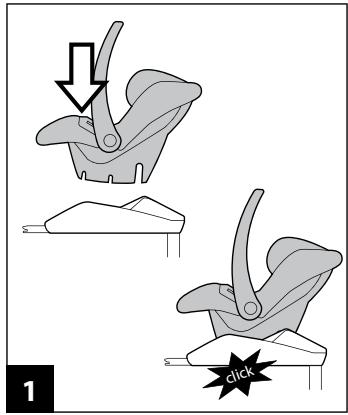
1• "Primo Viaggio tri-fix" is provided with the Ganciomatic System for in-car attachment and detachment from an "Isofix Base" or "Adjustable Base" and outside the vehicle to Peg-Pérego strollers and chassis. To attach "Primo Viaggio tri-fix" (to an "Isofix Base", "Adjustable Base", or Peg-Pérego stroller or chassis) align it with the attachment points and push down with both hands until it clicks into place.
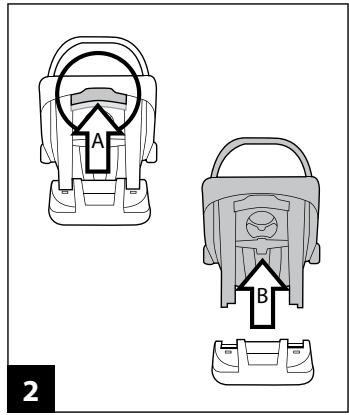
2• To release "Primo Viaggio tri-fix" (from an "Isofix Base", "Adjustable Base", or Peg-Pérego stroller or chassis) raise the handle to the transport position, push the lever on the backrest upwards and at the same time raise the safety seat.
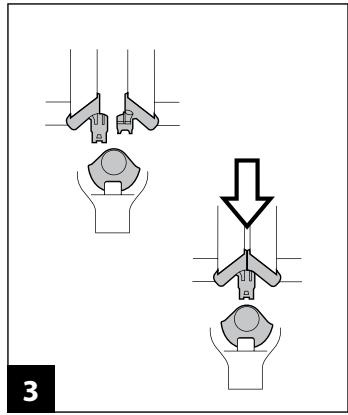
3. To engage the safety harness, put the two shoulder straps on and insert them into the buckle of the crotch strap until they click into place.
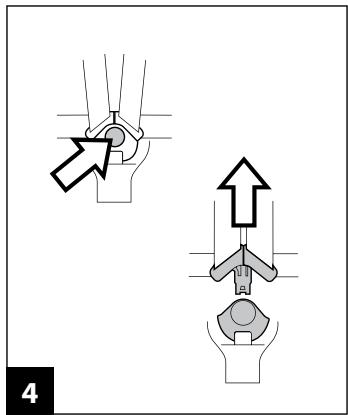
4• To release the safety harness press the red button on the crotch strap buckle.
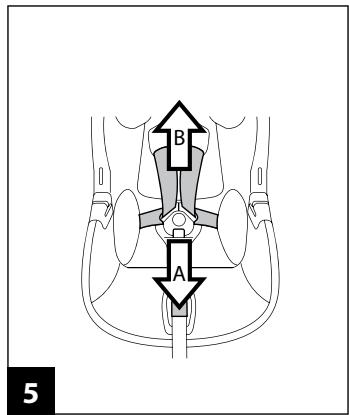
5• To slacken the harness shoulder straps press the metal button in the centre of the safety seat and simultaneously pull the shoulder straps towards you.
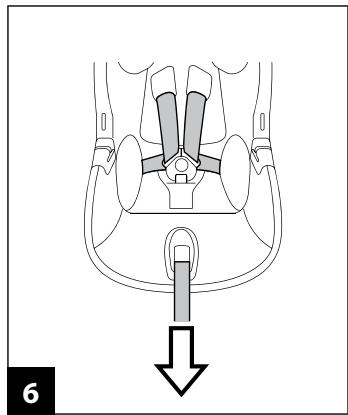
6• To tighten the shoulder straps on the child, pull the central adjustment strap towards you as shown in the figure, taking care not to over-tighten the straps and leaving minimal room to manoeuvre.
7. The shoulder straps of the safety harness and the "Side Impact Protection" headrest can be adjusted simultaneously to 5 different heights so as to follow the growth of the child. To adjust the height, press the rear height adjustment button (on the safety seat backrest) and at the same time raise or lower to the required position, ensuring that it clicks into place. Slacken the shoulder straps before adjusting the height of the safety harness and the headrest.
8. The correct position of the headrest is defined by the correct position of the shoulder straps. The child's shoulders must be just above the point of passage of the shoulder straps.
9• The safety seat is provided with a padded cushion for newborn infants. This should be removed once the child has grown. To
remove the padded cushion, unthread the crotch strap.
10• The safety seat handle has four fixed positions. To rotate it press the two round buttons on the handle and simultaneously move it to the required angle. Ensure it clicks into position.
- Position A: the in-car position; Position B: the position for transport by hand and for attachment to a base, stroller or chassis; Position C: allows the safety seat to rock; Position D: stops the safety seat from rocking.
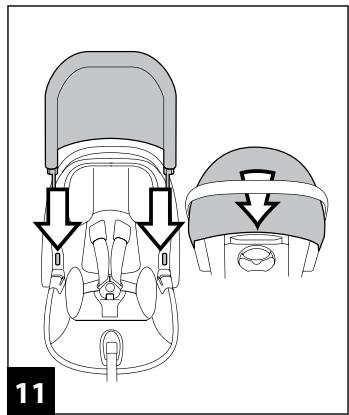
11• To fit the hood, insert the hood attachments into the slots on the safety seat and arrange the rear part of the hood behind the backrest.
12• The hood has two positions. To raise or lower the hood push it back or pull it forward. To remove the hood, press the buttons on its attachment points and at the same time lift it upwards.
- A IMPORTANT: the hood must not be used to lift the safety seat because it might detach.
Instructions for in-car use
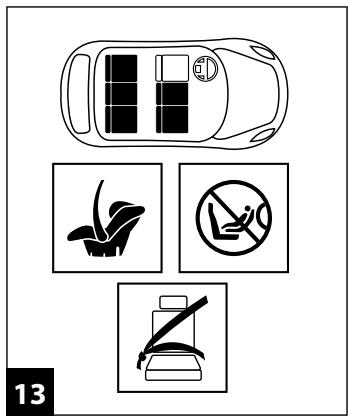
13• Fit the car safety seat with the child on the car seat, remembering to secure the child with the safety harness.
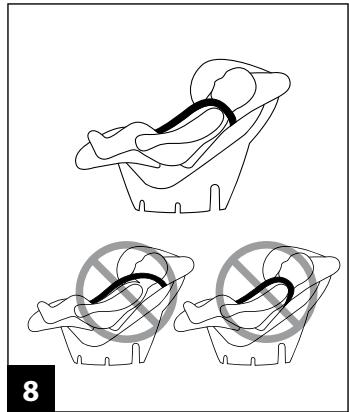
- The correct position of the safety seat in the car is parallel with the ground, and so if necessary used rolled towels under the safety seat to adjust the position.
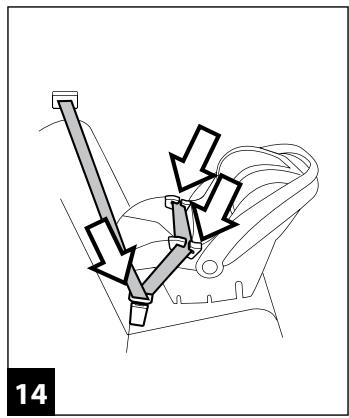
14• Insert the webbing of the car seat belt into the two lateral guides on the safety seat, ensuring that it is taut, and engage the buckle of the car seat belt as shown in the figure.
15• Take hold of the car seat belt again and pass it behind the backrest of the safety seat, inserting it into the rear guide as shown in the figure.
16• In the car the handle must be fully lowered forward towards the car seat backrest as shown in the figure. The correct forward position is reached when it clicks into position. Check that the seat belt is taut and locked to ensure adequate safety.
Cover removal
17• To remove the safety seat harness:
- press the metal button in the centre of the seat to extend the safety harness braces;
- press the red button on the crotch strap buckle to release the harness;
- release the harness braces from the metal buckle on
the back of the safety seat and unthread them from the headrest and shoulder covers;
- remove the two plastic covers on the back of the safety seat by levering with a standard tip screwdriver, and unthread the two side buckles and the central crotch strap buckle.
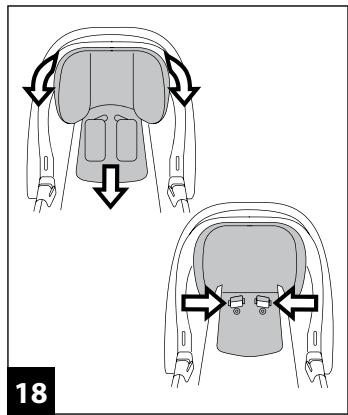
18• To remove and uncover the headrest:
- remove the cover pulling it downwards and slide it carefully off the two side tabs;
- unscrew the two headrest screws with a screwdriver, press the teeth on the slots and pull the headrest to release it.
19• To remove the padding:
- slide off the four padding fixing tabs from the edge of the safety seat;
- remove the two side guide covers for the car seat belt;
- remove the metal button cover in the centre of the safety seat, releasing it from under the seat;
- remove the padding.
Padding cleaning instructions
- Brush the fabric parts to remove dust and hand wash at a maximum temperature of 30^ without wringing.
- Do not use chlorine bleach.
- Do not iron.
- Do not dry clean.
- Do not remove stains with solvents and do not tumble dry.


Refitting
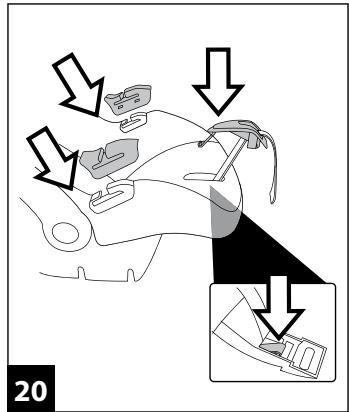
20• To refit the padding:
- slide on the padding;
- insert the four padding fixing wings on the edge of the safety seat;
- reposition the metal button cover in the centre of the safety chair and engage it from under the chair;
- position the two side guide covers for the car seat belt with the slots facing the inside of the safety seat and check that they are correctly engaged in position.
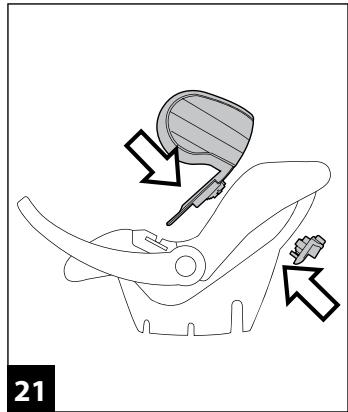
21• To refit the headrest and cover:
• from the back of the safety seat insert the headrest height
adjuster in the lowest hole and from the front align and engage the headrest with this, ensuring that the teeth are correctly engaged with the headrest.
- screw on the headrest and replace the cover.
22• To refit the safety harness:
- IMPORTANT: make sure the straps are not twisted.
- insert the harness braces from the front of the safety seat, first through the shoulder covers and then through the headrest slots, attaching them to the metal buckle at the back of the safety seat; - insert the two safety harness side buckles and the central crotch strap buckle into their seats and refit the two plastic covers.
Serial numbers
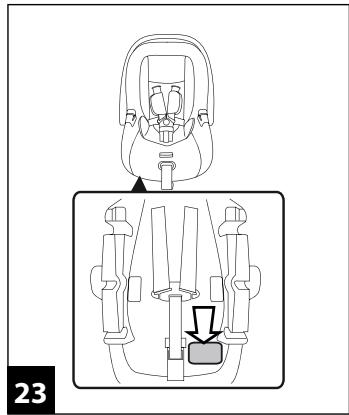
23• The following information can be found under the front of the seat of the Primo Viaggio tri-fix : product name, production date and serial number.
24• The approval label can be found under the back of the seat of the Primo Viaggio tri-fix.
25• Harness production date. In the event of problems with the product, these details will be of use to customers.
Product cleaning
- This product requires a small amount of maintenance. Cleaning and maintenance must only be carried out by adults.
- Keep all moving parts clean and if necessary lubricate them with light oil.
- Clean the plastic parts periodically with a damp cloth. Do not use solvents or similar substances.
- Brush the fabric parts to remove dust.
- Do not clean the polystyrene shock absorbing device with solvents or other similar products.
- Protect the product from atmospheric agents: humidity, rain or snow. Extended exposure to sunshine can cause colour changes in many materials.
- Store the product in a dry environment.
How to read the approval label
This paragraph explains how to interpret the approval label (orange label).
- The label is double because this car safety seat is approved for two types of installation in cars:
- three-point seat belt with inertia reel (the term UNIVERSAL indicates compatibility of the safety seat with vehicles fitted with this type of belt);
- ISOFIX attachment systems (the term SEMI-UNIVERSAL class E indicates compatibility of the safety seat with vehicles fitted with this system).
- The top of the label displays the trademark of the manufacturing company and the name of the product.
- The letter E in a circle indicates the European approval mark and the number indicates the country that issued the approval (1: Germany, 2: France, 3: Italy, 4: The Netherlands, 11: Great Britain, and 24: Ireland).
- Approval number: if it starts with 04 this indicates the fourth amendment (the one currently in force) of Regulation R44.
• Reference standard: ECE R44/04. - Production serial number: on issue of approval each safety seat is personalized with its own number.
Assistance service
If parts of the product are lost or damaged, replace only with original Peg-Pérego spare parts. For any repairs, replacements, product information and the sale of original spare parts and accessories contact the Peg-Pérego Assistance Service:
• tel.: 0039 039 60 88 213
• fax: 0039 039 33 09 992
• e-mail: assistenza@pegperego.it
• web site: www.pegperego.com
Peg-Pérego may modify the products described in this publication at any time for technical or commercial reasons.
What do you think of us?
Peg-Pérego makes itself available to all its customers in order to best satisfy their various needs. Knowing the opinion of our customers is extremely important and valuable to us. We would therefore be very grateful if, after using our product, you would fill in the CONSUMER SATISFACTION QUESTIONNAIRE, adding any observations or suggestions, on our web site: www.pegperego.com
- EN\_English
- Thank you for choosing a Peg-Pérego product.
- Product characteristics
- ▲ WARNING
- Instructions for use
- Instructions for in-car use
- Cover removal
- Padding cleaning instructions
- Refitting
- Serial numbers
- Product cleaning
- How to read the approval label
- Assistance service
- What do you think of us?
Brand : PEG PEREGO
Model : VIAGGIO DUO-FIX
Category : Car seat