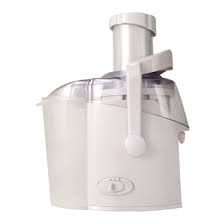
JM300CAN - Juicer JUICEMAN - Free user manual and instructions
Find the device manual for free JM300CAN JUICEMAN in PDF.


| Product Type | Centrifugal Juicer |
| Brand | JUICEMAN |
| Model | JM300CAN |
| Power Supply | 700 W, 120 V~, 60 Hz |
| Speeds | 2 speeds: Low (1) and High (2) |
| Juice Pitcher Capacity | Approximately 1 L |
| Pulp Container Capacity | Approximately 1.5 L |
| Filter Basket Material | Stainless Steel |
| Dimensions (approx.) | 35 cm x 25 cm x 40 cm |
| Weight (approx.) | 4.5 kg |
| Power Cord Length | Approximately 60 cm |
| Plug Type | Polarized (wide blade) |
| Main Functions | Juicing fruits and vegetables |
| Care and Cleaning | Removable parts dishwasher safe (top rack) or wash with soapy water. Wipe motor base with a damp cloth. |
| Safety | Safety lock on cover with lever and button. CTP overheating protection. Only works if assembled correctly. |
| Spare Parts and Repairability | User-replaceable parts: pusher, funnel, cover, filter basket, juice bowl, foam separator, pitcher, pulp container, cleaning brush. Customer service: 1-800-231-9786. |
| Usage | Household use only |
| Warranty | 1 year, defects in workmanship or materials |
Frequently Asked Questions - JM300CAN JUICEMAN
User questions about JM300CAN JUICEMAN
0 question about this device. Answer the ones you know or ask your own.
Ask a new question about this device
Download the instructions for your Juicer in PDF format for free! Find your manual JM300CAN - JUICEMAN and take your electronic device back in hand. On this page are published all the documents necessary for the use of your device. JM300CAN by JUICEMAN.
USER MANUAL JM300CAN JUICEMAN
Accessories/Parts (USA)
1-800-738-0245
For online customer service and to register your product, go to www.prodprotect.com/applica
When using electrical appliances, basic safety precautions should always be followed, including the following:
Read all instructions.
To protect against risk of electrical shock do not put cord, plugs or appliance in water or other liquid.
- Close supervision is necessary when any appliance is used by or near children.
- Unplug from outlet when not in use, before putting on or taking off parts, or before cleaning.
- Avoid contacting moving parts.
- Do not operate any appliance with a damaged cord or plug or after the appliance malfunctions, or is dropped or damaged in any manner. Return appliance to the nearest authorized service facility for examination, repair or electrical or mechanical adjustment. Or, call the appropriate toll-free number on the cover of this manual.
The use of attachments not recommended or sold by the manufacturer may cause fire, electric shock or injury.
Do not use outdoors.
Do not let cord hang over edge of table or counter.
Always make sure juicer cover is clamped securely in place before motor is turned on. Do not unfasten clamps while juicer is in operation.
- Be sure to turn switch to OFF (0) position after each use of your juicer. Make sure the motor stops completely before disassembling.
- Do not put your fingers or other objects into the juicer opening while it is in operation. If food becomes lodged in opening, use food pusher or another piece of fruit or vegetable to push it down. When this method is not possible, turn the motor off and disassemble juicer to remove remaining food.
Do not use the appliance if the rotating sieve is damaged.
SAVE THESE INSTRUCTIONS.
This product is for household use only.
ADDITIONAL IMPORTANT SAFEGUARDS
□ All users of this appliance must read and understand this Instruction Manual before operating or cleaning this appliance.
Do not leave appliance unattended during use.
□ If appliance begins to malfunction during use, immediately turn the control dial to OFF (0) and unplug the cord. Do not use or attempt to repair the malfunctioning appliance.
□ If appliance falls or accidentally becomes immersed in water, unplug it immediately. Do not reach into the water! Do not use appliance after it has fallen into or becomes immersed in water.
To reduce risk of injury to persons or property, never use appliance in an unstable position.
Do not use appliance for other than its intended use.
POLARIZED PLUG (120V models only)
This appliance has a polarized plug (one blade is wider than the other). To reduce the risk of electric shock, this plug is intended to fit into a polarized outlet only one way. If plug does not fit fully into outlet, reverse the plug. If it still does not fit, contact a qualified electrician. Do not attempt to modify plug in any way.
SHORT CORD INSTRUCTIONS
A short power-supply cord is provided to reduce the risk resulting from becoming entangled in or tripping over a longer cord. Do not use an extension cord with this product.
PLASTICIZER WARNING
Caution: To prevent plasticizers from migrating from the finish of the countertop or tabletop or other furniture, place NON-PLASTIC coasters or place mats between appliance and the finish of countertop or tabletop.
Failure to do so may cause the finish to darken. Permanent blemishes may occur or stains can appear.
ELECTRIC POWER
If the electrical circuit is overloaded with other appliances, your appliance may not operate properly. It should be operated on a separate electrical circuit from other appliances.
Getting to know your juicer
Product may vary slightly from what is illustrated.
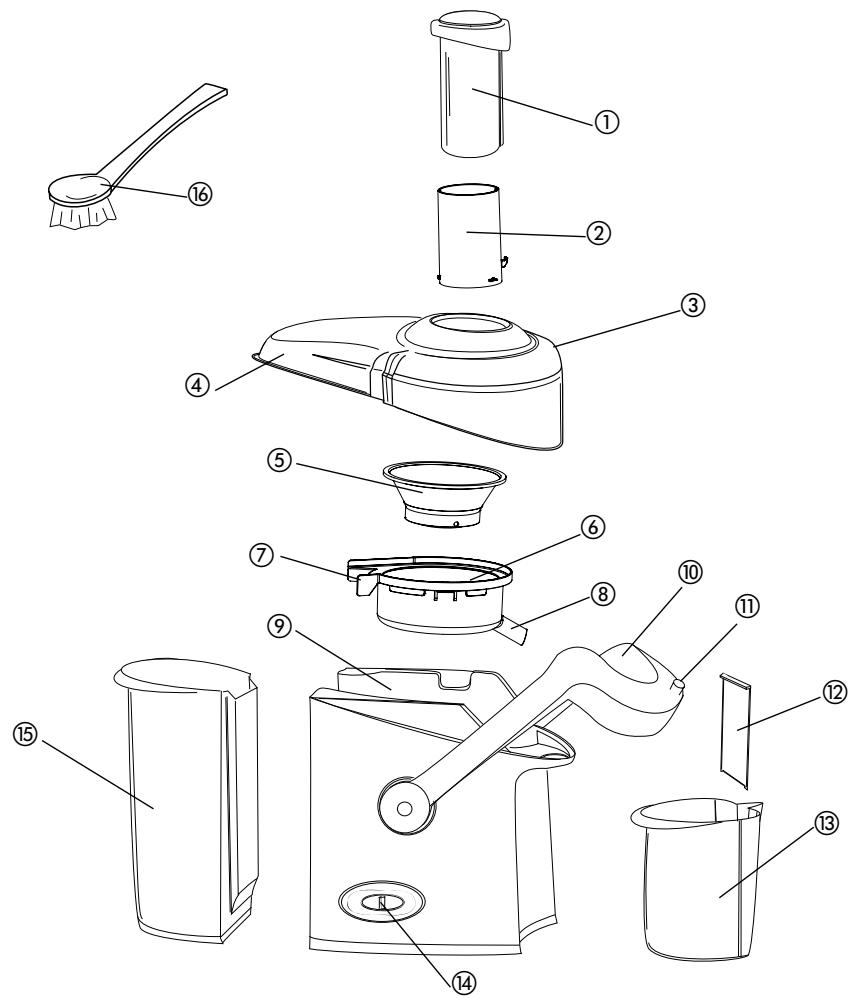
† 1. Food pusher (Part # JM300-01)
† 2. Feed tube (Part # JM300-02)
† 3. Lid (Part # JM300-03)
4. Pulp ejection opening
† 5. Stainless steel filter basket (Part # JM300-04)
† 6. Juice bowl (Part # JM300-05)
7. Pulp spout
8. Juice spout
9. Motor base
- Lid locking lever
- Safety lock button
† 12. Froth separator (Part # JM300-06)
† 13. Juice pitcher (Part # JM300-07) - Control switch
† 15. Pulp basket (Part # JM300-08)
† 16. Cleaning brush (Part # JM300-09)
Note: indicates consumer replaceable/ removable parts
SPEED SELECTION
This juicer has two speed options: LOW (1) and HI (2). These two speeds ensure optimal RPM level, for maximum juicing efficiency (efficiency describes amount of juice extracted from produce). Speeds are selected simply by turning the control dial to the desired setting.
HI (2)
Best for harder produce: carrots, gingerroot, beets and pineapple (with rind).
LOW (1)
Best for softer produce: citrus fruits, apples, grapes (with stems), melons, peaches (put removed) and tomatoes. This speed setting is also recommended for ripe produce that has become soft.
OFF (0)
Turns juicer off.
BEFORE FIRST USE
Your juicer comes partly assembled in the box. We suggest taking it apart and washing any removable parts in warm water with a biodegradable, nonabrasive liquid detergent before first use. This will eliminate any traces of dust or residue left from manufacturing and shipping.
Note: Be sure to remove all protective packaging before using your juicer.
Caution: Never rinse or immerse motor base in water or any other liquid.
Refer to ASSEMBLY and DISASSEMLBY INSTRUCTIONS. Make sure juicer is properly and completed assembled before use. Juicer will not turn on unless properly assembled.
PREPARATION
Preparing fruits and vegetables for juicing
- Clean all produce thoroughly, using a natural bristle brush. If you are not using organic produce, we recommend using a biodegradable cleaner to help remove pesticide residue.
- Remove and discard outer leaves of non-organic produce and peel away waxing.
- Trim away any discolored or bruised sections.
-
The skin may be left on all produce (including pineapples and melons) except for oranges, grapefruit and tangerines. Oil found in these skins tastes bitter and is difficult to digest.
-
Remove melon seeds, when possible, as they may escape through top of feed tube when juicing. Pits of fruits such as cherries, pears and peaches should also be removed.
- Your juicer is designed to make juicing easier with an oversized feed tube to accommodate larger produce, so you may feed most whole apples and oranges, tangerines, ginger, beets, pineapple or melons. Make sure produce can be fed comfortably into feed tube. Use food pusher to gently direct produce through feed tube.
Caution: Never push produce into feed tube with your fingers.
- Leafy greens, parsley, wheat grass and sprouts should be bunched up into a small, tight ball and pushed through with food pusher.
- Bananas are not suitable for juicing; clear juice cannot be obtained, and residue left in the machine can clog micromesh filter screen.
- Produce such as apricots, plums, pears, peaches and tomatoes should be firm, for best results when juicing.
OPERATING INSTRUCTIONS
- Make sure juicer is completely and properly assembled (see ASSEMBLY INSTRUCTIONS). Filter basket should be securely seated and pulp basket should be in place at the rear of juicer, ready to catch pulp.
Tip: To reduce cleaning time, line pulp basket with a plastic produce bag (the kind you put your produce in at the grocery store).
- Place juice pitcher underneath juice spout.
- Plug juicer into a standard electrical outlet.
- Turn control dial to the desired speed setting (1 or 2) and begin juicing.
Important: Juicer will not operate if lid locking lever is not properly engaged.
Note: You may alternate between speeds while juicing, depending on the appropriate settings for the various products being juiced (see SPEED SELECTION).
- Remove food pusher from feed tube.
- With motor running, place produce into feed tube.
- Reinsert food pusher into feed tube by aligning the groove on the food pusher with the ridge inside the feed tube.
- Use food pusher to gently direct food down feed tube.
Note: To extract the maximum amount of juice, press down gently on food pusher. Do not force down.
Tip: Try alternating types of produce being juiced to ensure maximum efficiency.
- Once you have finished juicing, turn control dial to OFF (0). Be sure to unplug juicer from the outlet, when not in use.
| TIPS FOR OPTIMUM JUICING | |
| To avoid excessive pulp buildup on the inside of the lid... | Try juicing slower, as wet produce is more likely to build up on the lid. To release pulp, lightly tap on side of lid. Always empty pulp basket when it becomes full. This will also help prevent pulp from leaking into juice. |
| If excessive noise or vibrations occur once juicer is turned on... | Pulp may have built up on filter basket. Clean filter basket and try alternating different types of produce while juicing. Note: Due to its powerful motor, a small amount of noise and/or vibration is normal when juicer is turned on, and as it comes to a complete stop. All juicers will sound slightly different. |
| To manage the amount of spray as juice pours out the juice spout... | Juice produce as slowly as possible to avoid excess pulp buildup inside the lid and juice bowl. Keep pulp basket emptied for good air flow through the machine. |
ASSEMBLY INSTRUCTIONS
Important: Always make sure juicer is unplugged before starting to assemble.
Step 1: Place juice bowl
Position the juice bowl over the motor base with the juice spout to the right. Lower juice bowl onto motor base so that juice spout slides through the oval ring on the motor base.
Step 2: Place filter basket
With both hands, grasp rim of filter basket and center it over motor base hub inside the juice bowl. Carefully lower filter basket onto hub, rotating slightly until it drops into place; press firmly down on rim of filter basket to secure (be sure to apply equal pressure to both sides of filter basket, to ensure proper seating). When seated properly, filter basket will spin freely and will not lift out of the juice bowl.
Step 3: Place lid
Place lid on juice bowl so that the pulp ejection opening is positioned over the pulp spout.
Step 4: Attach feed tube
Center feed tube over lid opening so that the safety lock hook on the feed tube is slightly right of the arrow on the lid. Insert the three tabs located around bottom of the feed tube into three corresponding slots in the lid opening. Rotate feed tube counterclockwise until safety lock tab on feed tube aligns with the arrow on lid.
Step 5: Secure lid locking lever
While pressing down on safety lock button, swing lid locking lever upward until safety lock hook on the feed tube is engaged. Once the lid locking lever is fastened in place, release the safety lock button.
Important: Juicer will not operate if the lid locking lever is not properly attached.
Step 6: Position pulp basket
Slightly tilt pulp basket and place it directly beneath the pulp ejection opening. Push the bottom of pulp basket inward so top edge slides up, behind the pulp spout. Continue to press firmly on the bottom of the pulp basket until it fits snugly against the motor base. When correctly positioned, pulp basket will be completely covered by the lid.
Important: Juicer will not operate if the pulp basket is not properly placed against the motor base.
Step 7: Place juice pitcher
Slide froth separator into juice pitcher, then position pitcher beneath the juice spout. Be sure that the juice spout empties into the larger opening in the pitcher lid.
Storing & inserting food pusher
Store food pusher in feed tube until you are ready to juice. To insert, rotate food pusher until the groove in the food pusher is properly aligned with the ridge in the feed tube.
DISASSEMBLY INSTRUCTIONS
Important: Always make sure the juicer is unplugged before starting to disassemble.
Step 1: Release lid locking lever
While pressing down on safety lock button, swing lid locking lever away from feed tube. Release safety lock button.
Step 2: Remove lid
Grasp lid by the feed tube and lift to remove from juice bowl. Make sure to hold food pusher in place if it is being stored inside the feed tube, or – for easier cleaning – unlock feed tube by rotating clockwise and remove from the lid.
Step 3: Remove pulp basket
Grasp bottom of the pulp basket and pull it away from juicer, tilting slightly to release it from behind the pulp ejection spout.
Step 4: Remove juice bowl
Grasp sides of juice bowl with both hands. With filter basket still inside, carefully lift juice bowl off motor base, rotating slightly if necessary. The filter basket can then be removed from the juice bowl for cleaning.
Caution: Cutting blades are extremely sharp! Use care when handling filter basket.
CARE AND CLEANING
Important: Always unplug juicer from the outlet before assembly or disassembly, and before cleaning.
This appliance requires little maintenance. It contains no user serviceable parts. Do not try to repair it yourself. Any servicing requiring disassembly must be performed by a qualified appliance repair technician.
CLEANING YOUR JUICER
Juicer should be cleaned after every use. Make sure juicer is unplugged from the outlet; follow DISASSEMBLY INSTRUCTIONS before following cleaning instructions below.
- Using a sponge or damp cloth, clean motor base, rubber feet and underside of juicer. Use a damp toothbrush or cloth to clean juice from the inside the motor base hub (on top of motor base).
Important: Do not immerse motor base in water, or spray with water. Clean only by wiping with a damp sponge, cloth or paper towel.
- All juicer parts – except motor base – are washable in warm, soapy water, using any mild liquid dishwashing detergent. Do not use any products containing ammonia or scouring powders, as these can dull, scratch or mar the surface.
- Use cleaning brush provided to scrub lid and juice bowl. Do not use metal brushes or pads.
- To properly clean food pusher, remove circular cap in the cover of the food pusher. To remove, grasp cap and lift directly out of food pusher, using the notch for leverage. Once parts are dry, replace cap.
- To clean filter basket, use cleaning brush provided to make sure tiny holes in mesh filter are not clogged. This can be accomplished by holding filter basket under a running faucet while brushing the mesh filter screen from both inside and outside of filter basket.
Note: Occasionally any removable parts may be washed in a dishwasher, ONLY if they are placed on the top shelf. Washing in warm, soapy water after each use, however, should be sufficient.
Tip: Pulp from pulp basket can be used in many different ways: making breads, muffins, cakes, soup stocks, compressed facial packs and garden compost material.
REMOVING TOUGH STAINS
Due to powerful staining properties of carotenoids found in many vegetables, particularly carrots, we suggest soaking any stained parts overnight in one of the following solutions:
- Biodegradable soap in enough warm water to cover juicer parts
- 14 cup bleach added to a sink full of warm water
- 1 part warm water to 1 part cider vinegar
- 12 small box of baking soda in enough warm water to cover juicer parts.
NEVER USE AMMONIA OR ABRASIVES!
After soaking overnight, lightly scrub with soft bristle brush and liquid detergent.
Important: Never submerge motor base in water or any other liquid! STORAGE
Store your juicer in its box, or in a clean, dry place. Never store juicer while it is still plugged in.
Never wrap cord tightly around the appliance. Do not put any stress on cord where it enters juicer, as this could cause cord to fray and break.
OVERHEAT PROTECTION SYSTEM
Important: This appliance contains a PTC overheat protection system. When the appliance is being operated for too long or with too much load, the PTC protector will shut down the power of the appliance to protect the unit. If the power shuts down, unplug for 15 minutes and plug in for normal operation.
INSTRUCTIONS RELATIVES AU CORDON
MISE EN GARDE RELATIVE AU PLASTIFIANT
For service, repair or any questions regarding your appliance, call the appropriate "800" number on the cover of this book. Do not return the product to the place of purchase. Do not mail the product back to the manufacturer nor bring it to a service center. You may also want to consult the website listed on the cover of this manual.
One-Year Limited Warranty
(Applies only in the United States and Canada)
What does it cover?
- Any defect in material or workmanship; provided; however, Applica's liability will not exceed the purchase price of the product.
For how long?
- One year after the date of original purchase.
What will we do to help you?
- Provide you with a reasonably similar replacement product that is either new or factory refurbished.
How do you get service?
- Save your receipt as proof of the date of sale.
- Check our on-line service site at www.prodprotect.com/applica, or call our toll-free number, 1-800-231-9786, for general warranty service.
- If you need parts or accessories, please call 1-800-738-0245.
What does your warranty not cover?
- Damage from commercial use
- Damage from misuse, abuse or neglect
- Products that have been modified in any way
- Products used or serviced outside the country of purchase
- Glass parts and other accessory items that are packed with the unit
- Shipping and handling costs associated with the replacement of the unit
- Consequential or incidental damages (Please note, however, that some states do not allow the exclusion or limitation of consequential or incidental damages, so this limitation may not apply to you.)
How does state law relate to this warranty?
- This warranty gives you specific legal rights, and you may also have other rights that vary from state to state or province to province.
BESOIN D'AIDE?

- SAVE THESE INSTRUCTIONS.
- ADDITIONAL IMPORTANT SAFEGUARDS
- POLARIZED PLUG (120V models only)
- SHORT CORD INSTRUCTIONS
- PLASTICIZER WARNING
- ELECTRIC POWER
- Getting to know your juicer
- SPEED SELECTION
- BEFORE FIRST USE
- PREPARATION
- OPERATING INSTRUCTIONS
- ASSEMBLY INSTRUCTIONS
- Step 1: Place juice bowl
- Step 2: Place filter basket
- Step 3: Place lid
- Step 4: Attach feed tube
- Step 5: Secure lid locking lever
- Step 6: Position pulp basket
- Step 7: Place juice pitcher
- Storing & inserting food pusher
- DISASSEMBLY INSTRUCTIONS
- Step 1: Release lid locking lever
- Step 2: Remove lid
- Step 3: Remove pulp basket
- Step 4: Remove juice bowl
- CARE AND CLEANING
- CLEANING YOUR JUICER
- REMOVING TOUGH STAINS
- NEVER USE AMMONIA OR ABRASIVES!
- Important: Never submerge motor base in water or any other liquid! STORAGE
- OVERHEAT PROTECTION SYSTEM
- INSTRUCTIONS RELATIVES AU CORDON
- MISE EN GARDE RELATIVE AU PLASTIFIANT
- One-Year Limited Warranty
- (Applies only in the United States and Canada)
- What does it cover?
- For how long?
- What will we do to help you?
- How do you get service?
- What does your warranty not cover?
- How does state law relate to this warranty?
- BESOIN D'AIDE?
Brand : JUICEMAN
Model : JM300CAN
Category : Juicer