
EMT25207OB - Built-in oven ELECTROLUX - Free user manual and instructions
Find the device manual for free EMT25207OB ELECTROLUX in PDF.
| Product type | Built-in microwave oven |
| Brand | Electrolux |
| Model | EMT25207OB |
| Category | Built-in oven |
| Country of origin | Not specified |
| Maximum microwave power | 800 W |
| Microwave power levels | 5 levels (100%, 80%, 50%, 30%, 10%) |
| Cooking functions | Microwave, Grill, Combination cooking (2 modes), Defrost (by weight or time), Auto cooking (8 menus), Quick start, Multi-stage cooking (up to 3), Delayed start |
| Interior capacity | Not specified (typical ~20-25 L) |
| Opening type | Hinged door |
| Control type | Rotary knobs and touch buttons |
| Display | Digital (clock, time, weight) |
| Turntable | Yes, with glass tray and roller support |
| Rack provided | Yes, for grill and combination cooking |
| Interior light | Yes |
| Child safety | Yes, key lock |
| Minimum built-in dimensions (W x H x D) | 300 x 200 x 0 mm (clearances) |
| Minimum installation height | 85 cm above floor |
| Estimated net weight | Approximately 20 kg |
| Power supply | 230 V, 50 Hz (earthed) |
| Total power | Not specified (max microwave 800W, grill and combined power not indicated) |
| Power cord length | Not specified |
| Recommended cleaning | Damp soft cloth, mild detergent; avoid abrasives and steam |
| Spare parts available | Original parts via after-sales service |
| Repairability | Intervention by qualified professional for internal components |
| Warranty | Not specified (contact after-sales service) |
| User manual available online | Yes, 100 pages, downloadable at notice-facile.com |
| Environmental information | Recycling at end of life, recyclable packaging |
Frequently Asked Questions - EMT25207OB ELECTROLUX
User questions about EMT25207OB ELECTROLUX
0 question about this device. Answer the ones you know or ask your own.
Ask a new question about this device
Download the instructions for your Built-in oven in PDF format for free! Find your manual EMT25207OB - ELECTROLUX and take your electronic device back in hand. On this page are published all the documents necessary for the use of your device. EMT25207OB by ELECTROLUX.
USER MANUAL EMT25207OB ELECTROLUX
WE'RE THINKING OF YOU
Thank you for purchasing an Electrolux appliance. You've chosen a product that brings with it decades of professional experience and innovation. Ingenious and stylish, it has been designed with you in mind. So whenever you use it, you can be safe in the knowledge that you'll get great results every time.
Welcome to Electrolux.
Visit our website for:

Get usage advice, brochures, trouble shooter, service information: www.electrolux.com/webselfservice

Register your product for better service: www.registerelectrolux.com

Buy Accessories, Consumables and Original spare parts for your appliance: www.electrolux.com/shop
CUSTOMER CARE AND SERVICE
Always use original spare parts.
When contacting our Authorised Service Centre, ensure that you have the following data available: Model, PNC, Serial Number.
The information can be found on the rating plate.
Warning / Caution-Safety information
① General information and tips
Environmental information
Subject to change without notice.
1. SAFETY INFORMATION
Before the installation and use of the appliance, carefully read the supplied instructions. The manufacturer is not
responsible if an incorrect installation and use causes injuries and damages. Always keep the instructions with the appliance for future reference.
1.1 Children and vulnerable people safety

WARNING!
Risk of suffocation, injury or permanent disability.
- This appliance can be used by children aged from 8 years and above and persons with reduced physical, sensory or mental capabilities or lack of experience and knowledge if they have been given supervision or instruction concerning use of the appliance in a safe way and understand the hazards involved.
- Do not let children play with the appliance. Children under 3 years must not be left unsupervised in the vicinity of the appliance.
- Keep all packaging away from children.
- Keep children and pets away from the appliance when it operates or when it cools down. Accessible parts are hot.
- If the appliance has a child safety device, we recommend you activate it.
- Cleaning and user maintenance shall not be made by children without supervision.
- Keep the appliance and its cord out of reach of children less than 8 years.
1.2 General Safety
-
This appliance is intended to be used in household and similar applications such as:
-
Farm houses; staff kitchen areas in shops, offices and other working environments;
-
By clients in hotels, motels, bed and breakfast and other residential type environments
-
Internally the appliance becomes hot when in operation. Do not touch the heating elements that are
in the appliance. Always use oven gloves to remove or put in accessories or ovenware.
-
Do not use a steam cleaner to clean the appliance.
-
Before maintenance, deactivate the appliance and disconnect the mains plug from the mains socket.
-
If the door or door seals are damaged, the appliance must not be operated until it has been repaired by a qualified person.
-
If the supply cord is damaged, it must be replaced by the manufacturer, its Authorised Service Centre or similarly qualified persons in order to avoid a hazard.
-
Only a qualified person can carry out any service or repair operation that involves the removal of a cover which gives protection against exposure to microwave energy.
-
Do not operate the appliance by means of an external timer or separate remote-control system.
-
Do not heat liquids and other foods in sealed containers. They are liable to explode.
-
Only use utensils that are suitable for use in microwave ovens.
-
When heating food in plastic or paper containers, keep an eye on the appliance due to the possibility of ignition.
-
The appliance is intended for heating food and beverages. Drying of food or clothing and heating of warming pads, slippers, sponges, damp cloth and similar may lead to risk of injury, ignition or fire.
-
If smoke is emitted, switch off or unplug the appliance and keep the door closed in order to stifle any flames.
-
Microwave heating of beverages can result in delayed eruptive boiling. Care must be taken when handling the container.
-
The contents of feeding bottles and baby food jars shall be stirred or shaken and the temperature checked before consumption, in order to avoid burns.
-
Eggs in their shell and whole hard-boiled eggs should not be heated in the appliance since they may explode, even after microwave heating has ended.
- The appliance should be cleaned regularly and any food deposits removed.
- Failure to maintain the appliance in a clean condition could lead to deterioration of the surface that could adversely affect the life of the appliance and possibly result in a hazardous situation.
- The temperature of accessible surfaces may be high when the appliance is operating.
- The microwave oven shall not be placed in a cabinet unless it has been tested in a Cabinet.
- The rear surface of appliances shall be placed against a wall.
- Do not use harsh abrasive cleaners or sharp metal scrapers to clean the glass door since they can scratch the surface, which may result in shattering of the glass.
2. SAFETY INSTRUCTIONS
2.1 Installation

WARNING!
Only a qualified person must install this appliance.
- Do not install or use a damaged appliance.
- Obey the installation instruction supplied with the appliance.
- The appliance can be placed almost anywhere in the kitchen. Make sure the oven is placed on a flat, level surface and that vents as well as the surface underneath the appliance are not blocked (for sufficient ventilation).
2.2 Electrical Connection

WARNING!
Risk of fire and electrical shock.
- All electrical connections should be made by a qualified electrician.
The appliance must be earthed.
Make sure that the electrical information on the rating plate agrees with the power supply. If not, contact an electrician.
- If the appliance is connected to the socket via an extension cord, make sure the cord is earthed.
- Make sure not to cause damage to the mains plug and to the mains cable. Contact the Service or an electrician to change a damaged mains cable.
- Do not pull the mains cable to disconnect the appliance. Always pull the mains plug.
2.3 Use

WARNING!
Risk of injury, burns and electrical shock or explosion.
- Do not change the specification of this appliance.
- Do not let the appliance stay unattended during operation.
- Do not apply pressure on the open door.
Make sure that the ventilation openings are not blocked. - Do not use the appliance as a work surface and do not use the cavity for storage purposes.
2.4 Care and Cleaning

WARNING!
Risk of injury, fire, or damage to the appliance.
- Before maintenance, deactivate the appliance and disconnect the mains plug from the mains socket.
- Clean regularly the appliance to prevent the deterioration of the surface material.
3. PRODUCT DESCRIPTION
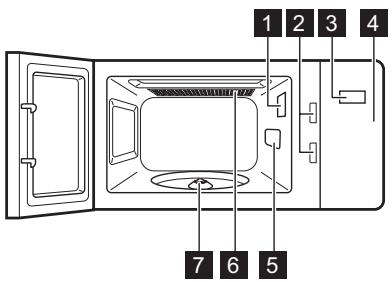
3.1 General overview
- Do not allow food spills or cleaner residue to accumulate on door sealing surfaces.
- Remaining fat or food in the appliance can cause fire.
- Clean the appliance with a moist soft cloth. Only use neutral detergents. Do not use abrasive products, abrasive cleaning pads, solvents or metal objects.
If you use an oven spray, obey the safety instructions on the packaging.
2.5 Disposal

WARNING!
Risk of injury or suffocation.
- Disconnect the appliance from the mains supply.
Cut off the mains cable and discard it.
1 Lamp
2 Safety interlock system
3 Display
4 Control panel
5 Waveguide cover
6 Grill
7 Turntable shaft
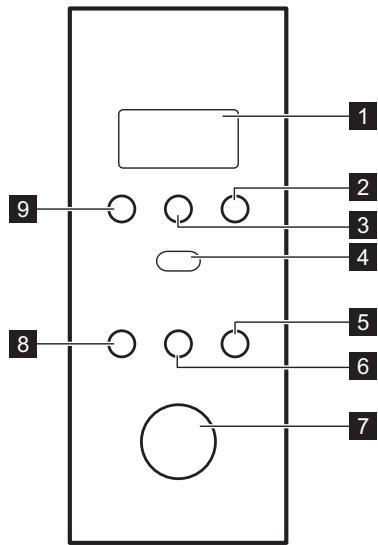
3.2 Control Panel
| Symbol | Function | Description | |
| 1 | — | Display | Shows the settings and current time. |
| 2 | Time defrosting button | To defrost food by time. | |
| 3 | Clock button | To set the clock. | |
| 4 | Auto cook button | To use Auto cooking. | |
| 5 | Clear button | To deactivate the microwave or to delete the cooking settings. | |
| 6 | Function button | To set the microwave / grill / combi cooking function. | |
| 7 | +,- | Setting knob | To set the cooking time or weight or function. |
| 8 | +60 | Start button | To start the appliance or increase the cooking time for 60 seconds at full power. |
| 9 | AUTO | Weight defrosting button | To defrost food by weight. |
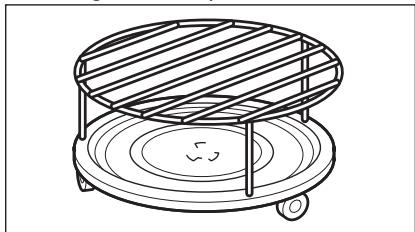
3.3 Accessories
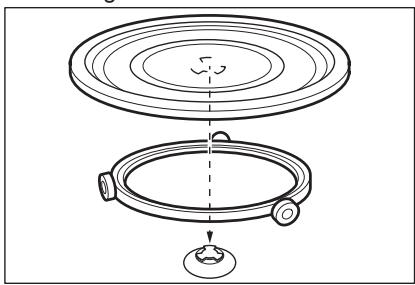
Turntable set
Always use the turntable set to prepare food in the microwave.
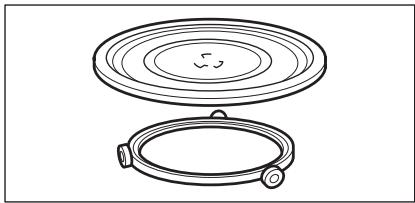
Glass cooking tray and roller guide.
Grill Rack
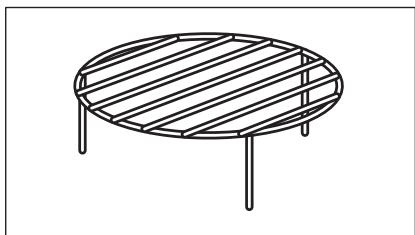
Use for:
grilling food
- combi cooking
4. BEFORE FIRST USE

WARNING!
Refer to Safety chapters.
4.1 Initial Cleaning

CAUTION!
Refer to chapter "Care and Cleaning".
- Remove all the parts and additional packaging from the microwave.
Clean the appliance before first use.
4.2 Setting the time
If the clock is not set, it does not operate when the microwave is in use.
When you connect the appliance to the electrical supply or after a power cut, the display shows 0:00 and an acoustic signal sounds.

You can set the time in a 24 hour clock system.
- Press ①.
- Turn the Setting knob to set the hours.
- Press to confirm.
- Turn the Time Setting knob to enter the amount of minutes.
- Press to confirm.
5. DAILY USE

WARNING!
Refer to Safety chapters.
5.1 General information about using the appliance
After you deactivate the appliance, let the food stand for some minutes.
- Remove the aluminium foil packaging, metal containers, etc. before you prepare the food.
Cooking
If possible, cook food covered with material suitable for use in the
microwave. Only cook food without a cover if you want to keep it crusty
- Do not overcook the dishes by setting the power and time too high. The food can dry out, burn or catch fire in some places.
- Do not use the appliance to cook eggs or snails in their shells, because they can explode. With fried eggs, pierce the yolks first.
-
Prick food with "skin" or "peel", such as potatoes, tomatoes, sausages, with a fork several times before cooking so that the food does not explode.
-
For chilled or frozen food, set a longer cooking time.
- Dishes which contain sauce must be stirred from time to time.
Vegetables that have a firm structure, such as carrots, peas or cauliflower, must be cooked in water. - Turn larger pieces after half of the cooking time.
If possible, cut vegetables into similar-sized pieces.
Use flat, wide dishes. - Do not use cookware made of porcelain, ceramic or earthenware with small holes, e. g. on handles or unglazed bottoms. Moisture going into the holes can cause the cookware to crack when it is heated.
- The glass cooking tray is a work space for heating food or liquids. It is necessary for the operation of the microwave.
Defrosting meat, poultry, fish
- Put the frozen, unwrapped food on a small upturned plate with a container below it so that the defrosting liquid collects in the container.
- Turn the food after half of the defrosting time. If possible, divide and
then remove the pieces that started to defrost.
Defrosting butter, portions of gateau, quark
- Do not fully defrost the food in the appliance, but let it defrost at room temperature. This gives a more even result. Fully remove all metal or aluminium packaging before defrosting.
Defrosting fruit, vegetables
- Do not fully defrost fruit and vegetables, which are to be further prepared while raw, in the appliance. Let them defrost at room temperature.
- You can use a higher microwave power to cook fruit and vegetables without defrosting them first.
Ready meals
- You can prepare ready meals in the appliance only if their packaging is suitable for microwave use.
- You must follow the manufacturer's instructions printed on the packaging (e.g. remove the metal cover and pierce the plastic film).
Suitable cookware and materials
| Cookware / Material | Microwave | Grilling | ||
| Defrosting | Heating | Cooking | ||
| Ovenproof glass and porcelain (with no metal components, e. g. Pyrex, heat-proof glass) | X | X | X | X |
| Non-ovenproof glass and porcelain 1) | X | -- | -- | -- |
| Glass and glass ceramic made of ovenproof/frost-proof material (e. g. Arcoflam), grill shelf | X | X | X | X |
| Ceramic 2), earthenware 2). | X | X | X | -- |
| Heat-resistant plastic up to 200 °C 3) | X | X | X | -- |
| Cardboard, paper | X | -- | -- | -- |
| Clingfilm | X | -- | -- | -- |
| Roasting film with microwave safe closure 3) | X | X | X | -- |
| Roasting dishes made of metal, e. g. enamel, cast iron | -- | -- | -- | X |
| Baking tins, black lacquer or silicon-coated 3) | -- | -- | -- | X |
| Baking tray | -- | -- | -- | X |
| Browning cookware, e. g. Crisp pan or Crunch plate | -- | X | X | -- |
| Ready meals in packaging 3) | X | X | X | X |
1) With no silver, gold, platinum or metal plating / decorations
2) Without quartz or metal components, or glazes which contain metals
3) You must follow the manufacturer's instructions about the maximum temperatures.
X suitable
-- not suitable
5.2 Activating and deactivating the microwave

CAUTION!
Do not let the microwave operate if there is no food in it.
- Press the Function button.
- Turn the Setting knob to set the desired function.
- Press the Function button to confirm.
-
Turn the Setting knob to set the time.
-
Press ^+60 to confirm and activate the microwave.
To deactivate the microwave:
-
wait until the microwave deactivates automatically, when the time comes to an end.
open the door. The microwave stops automatically. Close the door and press ^+0 to continue to cook. Use this option to inspect food. -
press .

When the microwave deactivates automatically, an acoustic signal sounds.
5.3 Power setting table
| Power setting | Approximate Percentage of Power | Power |
| P100 | 100 % | 800 Watt |
| P80 | 80 % | 640 Watt |
| P50 | 50 % | 400 Watt |
| P30 | 30 % | 240 Watt |
| P10 | 10 % | 80 Watt |
Other functions
| Power setting | Function mode |
| Grill | |
| G | Full Grill |
| Combi Cooking | |
| C-1 | 55 % Microwaves, 45 % Grill |
| C-2 | 36 % Microwaves, 64 % Grill |
5.4 Quick Start
The maximum cooking time is 99 minutes.
Press ^+60 to activate the microwave for 60 seconds at full power.
The cooking time increases by 60 seconds with each additional press of the button.
- In standby mode, turn the Setting knob counterclockwise to set the cooking time, then press ^+60 to activate the microwave at full power.
5.5 Defrosting
You can choose between 2 defrosting modes:
Weight defrosting
Time defrosting
Do not use weight defrosting on food that is left out of the freezer for more than 20 minutes, or for frozen ready-made food.
To activate weight defrosting you must use more than 100 g of food and less than 2000 g.
To defrost less than 200g of food place it on the edge of the turntable.
-
Press for weight defrosting or for time defrosting.
-
Turn the Setting knob to set the weight or time.
For weight defrosting the time is set automatically. - Press ^+60 to confirm and activate the microwave.
5.6 Multistage cooking
i If one stage is defrosting, set it as the first stage.
You can cook food in maximum 3 stages.
- Press for weight defrosting or for time defrosting.
- Turn the Setting knob to set the defrosting time or weight.
- Press to confirm.
- Turn the setting knob to set the power level.
- Press to confirm.
- Turn the Setting knob to set the time.
- Press ^+60 to confirm and activate the microwave. After each step an acoustic signal sounds.
5.7 Grilling and Combi Cooking
- Press
- Turn the Setting knob to set the desired function
- Press ^+60 to confirm.
- Turn the Setting knob to set the time.
- Press ^+60 to confirm and activate the microwave. You can change the power setting or time, while the Grilling or Combi cooking mode is active.
6. AUTOMATIC PROGRAMMES

WARNING!
Refer to Safety chapters.
6.1 Auto cooking
Use this function to easily cook favourite food. The microwave automatically sets the optimum settings.
- Press [u]
- Turn the Setting knob to set the desired menu.
- Press to confirm.
- Turn the Setting knob to set the weight of the menu.
- Press ^+60 to confirm and activate the microwave.
| Symbols | Menu | Amount |
| A-1 | Reheat | 200 g |
| 400 g | ||
| 600 g | ||
| A-2 | Vegetable | 200 g |
| 300 g | ||
| 400 g | ||
| A-3 | Fish | 250 g |
| 350 g | ||
| 450 g | ||
| A-4 | Meat | 250 g |
| 350 g | ||
| 450 g | ||
| A-5 | Pasta | 50 g (add 450 ml of water) |
| 100 g (add 800 ml of water) | ||
| A-6 | Potato | 200 g |
| 400 g | ||
| 600 g | ||
| A-7 | Pizza | 200 g |
| 400 g | ||
| A-8 | Soup | 200 ml |
| 400 ml |
6.2 Delayed Start

You can programme the microwave for maximum 3 stages.
- Press
- Turn the Setting knob to set the power level
-
Press to confirm.
-
Turn the Setting knob to set the cooking time.
- Press to programme the activation of the microwave.
- Turn the Setting knob to set the hours.
- Press to confirm.
- Turn the Setting knob to set the minutes.
- Press ^60 to end the settings.
The microwave activates automatically when the set time is reached.
7. USING THE ACCESSORIES

WARNING!
Refer to Safety chapters.
7.1 Inserting the turntable set

CAUTION!
Do not cook food without the turntable set. Use only the turntable set provided with the microwave.

Never cook food directly on the glass cooking tray.
- Place the roller guide around the turntable shaft.
- Place the glass cooking tray on the roller guide
8. ADDITIONAL FUNCTIONS
8.1 Child Safety Lock
The Child Safety Lock prevents an accidental operation of the microwave.
Press and hold for 3 second.
9. HINTS AND TIPS

WARNING!
Refer to Safety chapters.
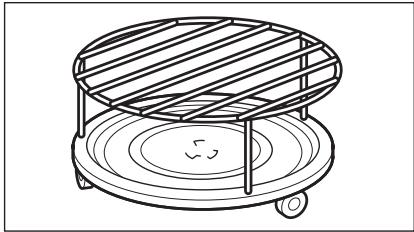
7.2 Inserting the grill rack
Place the grill rack on the turntable set.
An acoustic signal sounds.
When the Child Safety Lock is active the display shows 7 .
9.1 Tips for the microwave
| Problem | Remedy |
| You cannot find details for the amount of food prepared. | Look for a similar food. Increase or shorten the length of the cooking times according to the following rule: Double the amount = almost double the time, Half the amount = half the time |
| The food got too dry. | Set shorter cooking time or select lower microwave power. |
| The food is not defrosted, hot or cooked after the time came to an end. | Set longer cooking time or set higher power. Note that large dishes need longer time. |
| After the cooking time comes to an end, the food is overheated at the edge but is still not ready in the middle. | Next time set a lower power and a longer time. Stir liquids halfway through, e.g. soup. |
To get better results for rice use a flat, wide dish.
9.2 Defrosting
Always defrost roast with the fat side down.
Do not defrost covered meat because this may cause cooking instead of defrosting.
Always defrost whole poultry breast side down.
9.3 Cooking
Always remove chilled meat and poultry from the refrigerator at least 30 minutes before cooking.
Let the meat, poultry, fish and vegetables stay covered after cooking.
Brush a little oil or melted butter over the fish.
All vegetables should be cooked at full microwave power.
Add 30 - 45 ml of cold water for every 250 g of vegetables.
Cut the fresh vegetables into even size pieces before cooking. Cook all vegetables with a cover on the container.
9.4 Reheating
When you reheat packed ready meals always follow the instruction written on the packaging.
9.5 Grilling
Grill flat food items in the middle of the grill rack.
Turn the food over halfway through the set time and continue grilling.
9.6 Combi Cooking
Use the Combi Cooking to keep the crispness of certain foods.
At the half of the cooking time, turn over the foods then continue.
There are 2 modes for Combi Cooking. Each mode combines the microwave and the grill functions at different time periods and power levels.
10. CARE AND CLEANING
10.1 Notes and tips on cleaning
- Clean the front of the appliance with a soft cloth with warm water and a cleaning agent.
To clean metal surfaces, use a usual cleaning agent. - Clean the appliance interior after each use. Then you can remove dirt more easily and it does not burn on.
-
Clean stubborn dirt with a special cleaner.
-
Clean all accessories regularly and let them dry. Use a soft cloth with warm water and a cleaning agent.
- To soften the hard to remove remains, boil a glass of water at full microwave power for 2 to 3 minutes.
- To remove odours, mix a glass of water with 2 tsp of lemon juice and boil at full microwave power for 5 minutes.
11. TROUBLESHOOTING

WARNING!
Refer to Safety chapters.
11.1 What to do if...
| Problem | Possible cause | Remedy |
| The appliance does not operate. | The appliance is deactivated. | Activate the appliance. |
| The appliance does not operate. | The appliance is not plugged in. | Plug in the appliance. |
| The appliance does not operate. | The fuse in the fuse box is blown. | Check the fuse. If the fuse blows more than one time, contact a qualified electrician. |
| The appliance does not operate. | The door is not closed properly. | Make sure that nothing blocks the door. |
| The lamp does not operate. | The lamp is defective. | The lamp has to be replace. |
| There is sparking in the cavity. | There are metal dishes or dishes with metal trim. | Remove the dish from the appliance. |
| There is sparking in the cavity. | There are metal skewers or aluminium foil that touches the interior walls. | Make sure that the skewers and foil does not touch the interior walls. |
| The turntable set makes scratching or grinding noise. | There is an object or dirt below the glass cooking tray. | Clean the area below the glass cooking tray. |
| The appliance stop to operate without a clear reason. | There is a malfunction. | If this situation repeats call the Authorised Service Center. |
11.2 Service data
If you cannot find a solution to the problem yourself, contact your dealer or an Authorised Service Centre.
The necessary data for the service centre is on the rating plate. The rating plate is on the appliance. Do not remove the rating plate from the appliance.
We recommend that you write the data here:
Model (MOD.)
……
12. INSTALLATION

WARNING!
Refer to Safety chapters.
12.1 General Information

CAUTION!
Do not block the air vents. If you do that, the appliance can overheat.

CAUTION!
Do not connect the appliance to adapters or extension leads. This can cause overloading and risk of fire.

CAUTION!
The minimum installation height is 85 cm.
- The microwave is for a kitchen counter top use only. It must be placed on a stable and flat surface.
- Put the microwave far away from steam, hot air and water splashes.
If the microwave is to close to the TV and radio it may cause interference in the received signal.
If you transport the microwave in cold weather, do not activate it immediately after the installation. Let is stand in the room temperature and absorb the heat.
| We recommend that you write the data here: | |
| Product number (PNC) | ...... |
| Serial number (S.N.) | ...... |
12.2 Electrical installation

WARNING!
Only a qualified person must do the electrical installation.

The manufacturer is not responsible if you do not follow the safety precautions from the chapter "Safety Information".
This microwave is supplied with a main cable and main plug.
The cable has an earth wire with an earthing plug. The plug must be plugged into an outlet that is properly installed and earthed. In the event of an electrical short circuit, earthing reduces the risk of electric shock.
12.3 Minimal distances
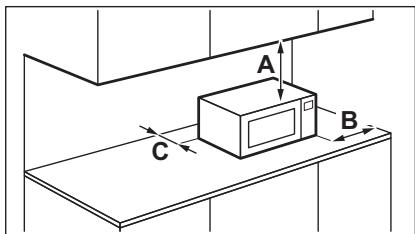
| Dimension | mm |
| A | 300 |
| B | 200 |
| Dimension | mm |
| C | 0 |
13. ENVIRONMENTAL CONCERNS
Recycle materials with the symbol. Put the packaging in relevant containers to recycle it. Help protect the environment and human health by recycling waste of electrical and electronic appliances. Do not dispose of
appliances marked with the symbol with the household waste. Return the product to your local recycling facility or contact your municipal office.
SISÄLTÖ
1.TURVALLISUUSTIEDOT 18
2.TURVALLISUUSOHJEET 21
3. TUOTEKUVAUS 22
4.KAYTTOONOTTO 24
5.PAIVITTAINEN KAYTTO 24
6.AUTOMAATTISET OHJELMAT 28
7. LIsAVARUSTEIDEN KAYTTAMINEN 29
8. LIsAToIMINNOT 30
9. VIHJEITA JA NEUVOJA 30
10.HOITO JA PUHDISTUS 31
11. VIANMAÄRITYS 31
12.ASENNUS. 32
SINUN PARHAAKSESI
4.2 Stille inn tiden
Hvis klokken er/DDke stilt inn, fungerer den icke narr mikrobolgeovnen er i bruk.
5. DAGLIG BRUK

ADVARSEL!
Se etter i
7.2 Sette inn grillstativet
Plasser grillstativet på dreieskiven.
Trykk og holdinne i 3 sekunder. Ovnen avgir et lydsignal. Nár barnesikringen er på viser displayet
9. RÄD OG TIPS

ADVARSEL!
Se etter i
Visite oulosso website para:

Resolver problemas e obter conselhos de'utilisation, catalogsos e informacoes sobre assistencia:
www.electrolux.com/webselfservice
