
BCI6657X - Dishwasher BRANDT - Free user manual and instructions
Find the device manual for free BCI6657X BRANDT in PDF.
User questions about BCI6657X BRANDT
0 question about this device. Answer the ones you know or ask your own.
Ask a new question about this device
Download the instructions for your Dishwasher in PDF format for free! Find your manual BCI6657X - BRANDT and take your electronic device back in hand. On this page are published all the documents necessary for the use of your device. BCI6657X by BRANDT.
USER MANUAL BCI6657X BRANDT
MANUAL DE INSTRUÇÕES

natural_image
Close-up of a woman's face with industrial control panel labeled 'Brandt' (no readable text beyond label)
natural_image
Simple line drawing of an eye with a lightning bolt and partial circular outline, no text or symbols present.
natural_image
Pure electrical circuit lines without any symbols
text_image
0 - - - + - 16 - b
text_image
Control panel interface with rotary buttons and a display screen, labeled 'C' at bottom right.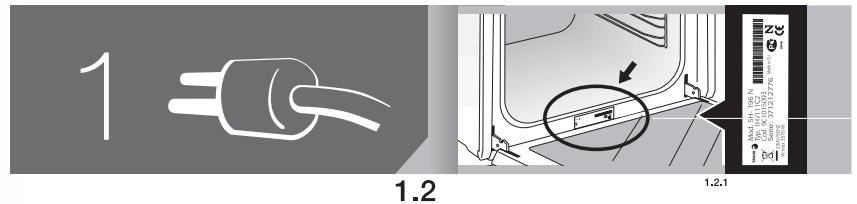
text_image
1 1.2 1.2.1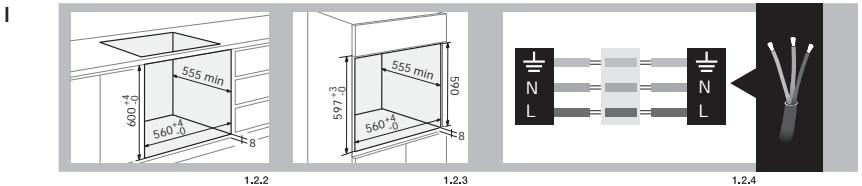
text_image
600-4 555 min 560+4 B 1.2.2 597-3 555 min 065 560+4 B 1.2.3 N L N L 1.2.4
text_image
1.2.5 1.2.6 1.2.7
text_image
2 0 2.1 a 2.1.1 b,c 2.1.2
text_image
12:30 Tc + - a 1.2,3 b,c 2.1,4 11:30 12:30 2.2 a 2.2,1 2° 1° 2.2,2
text_image
1:30 12:30 2° b,c 2,2,3 + - Tc - 1° 2,2,4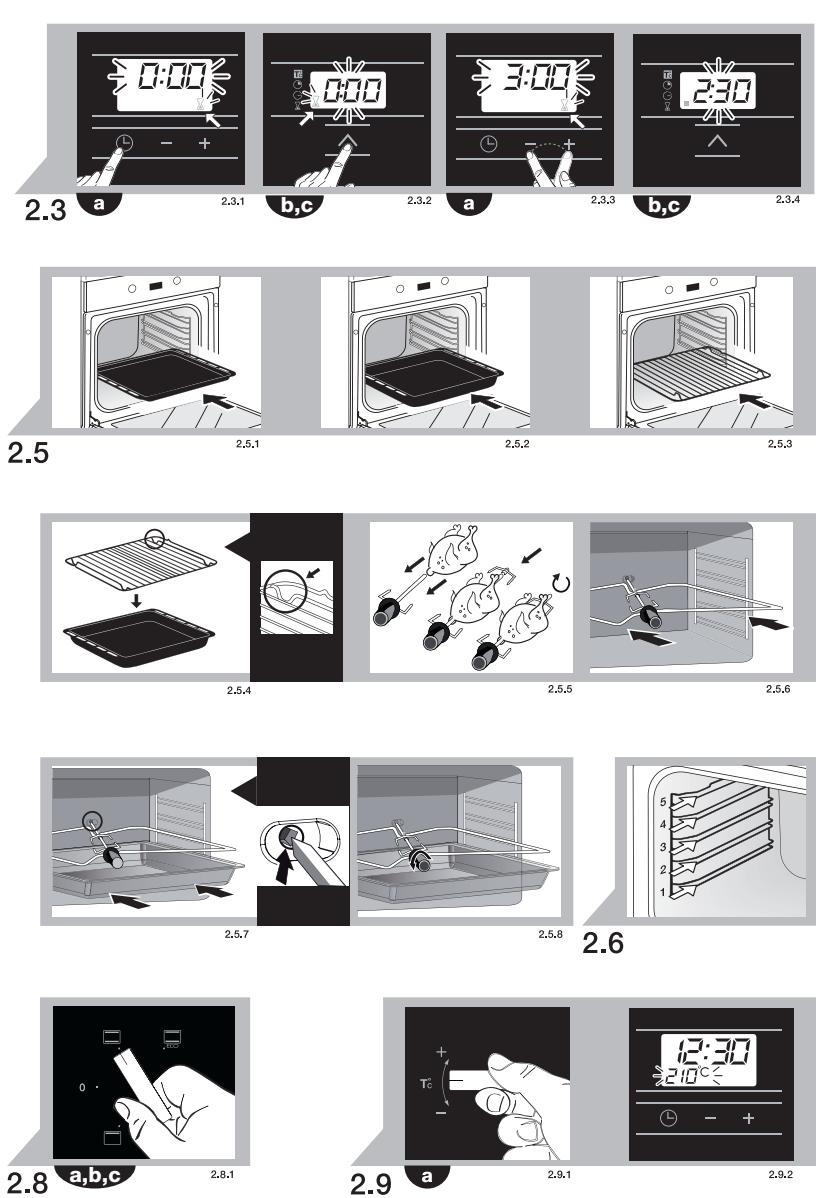
text_image
200°C Tc 2.10°C b,c 2.9.3 2.9.4 2.9.5 2.10 2.10.1
text_image
0:00 210°C 0:00 0:30 210°C a 2.11.1 b,c 2.11.2 a 2.11.3 b,c 2.11.4

text_image
0:00 210°C - + 12:00 13:10 210°C - + 13:00 a 2.12 b,c 2.12.1 a 2.12.2 b,c 2.12.3 b,c 2.12.4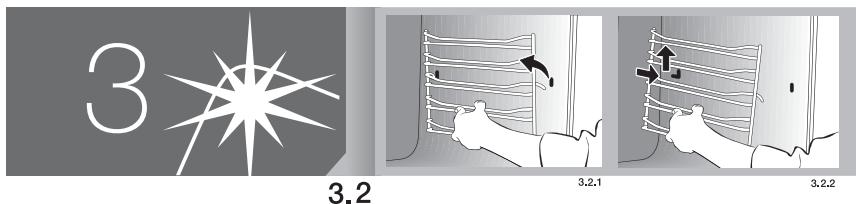
text_image
3 3.2 3.2.1 3.2.2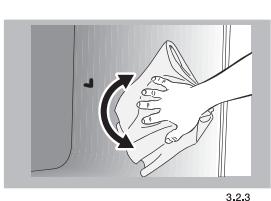
natural_image
Illustration of a hand pressing down on a surface with a curved arrow indicating rotation (no text or symbols)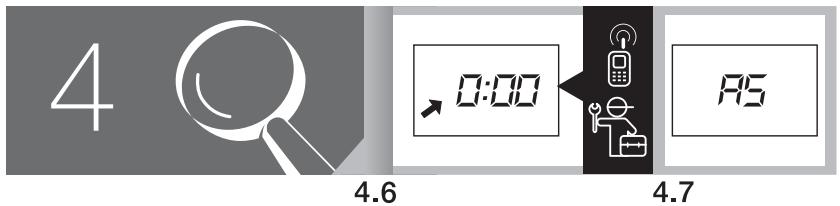
text_image
4 4.6 0:00 4.7 P5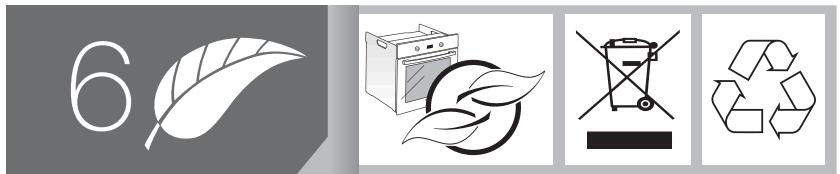
natural_image
Four-panel image showing a leaf symbol, an oven with leaf and waste, a no-smoking symbol, and a recycling symbol (no text or labels)
text_image
II I III IV V VIFR FRANÇAIS 1
EN ENGLISH 6
DE DEUTSCH 11
NL NEDERLANDS 16
PT PORTUGUÊS 21
Tabela de cozedura
Important! Read the entire manual before using the oven. The documentation and accessories are inside the oven.
The texts in the manual correspond to the numbered diagrams.

Identification

To find out which model your oven is ("a", "b", "c") compare its control panel with the control panels shown in the illustrations.
1
Installation

1.1 Unpacking. Remove all the protective packaging elements.
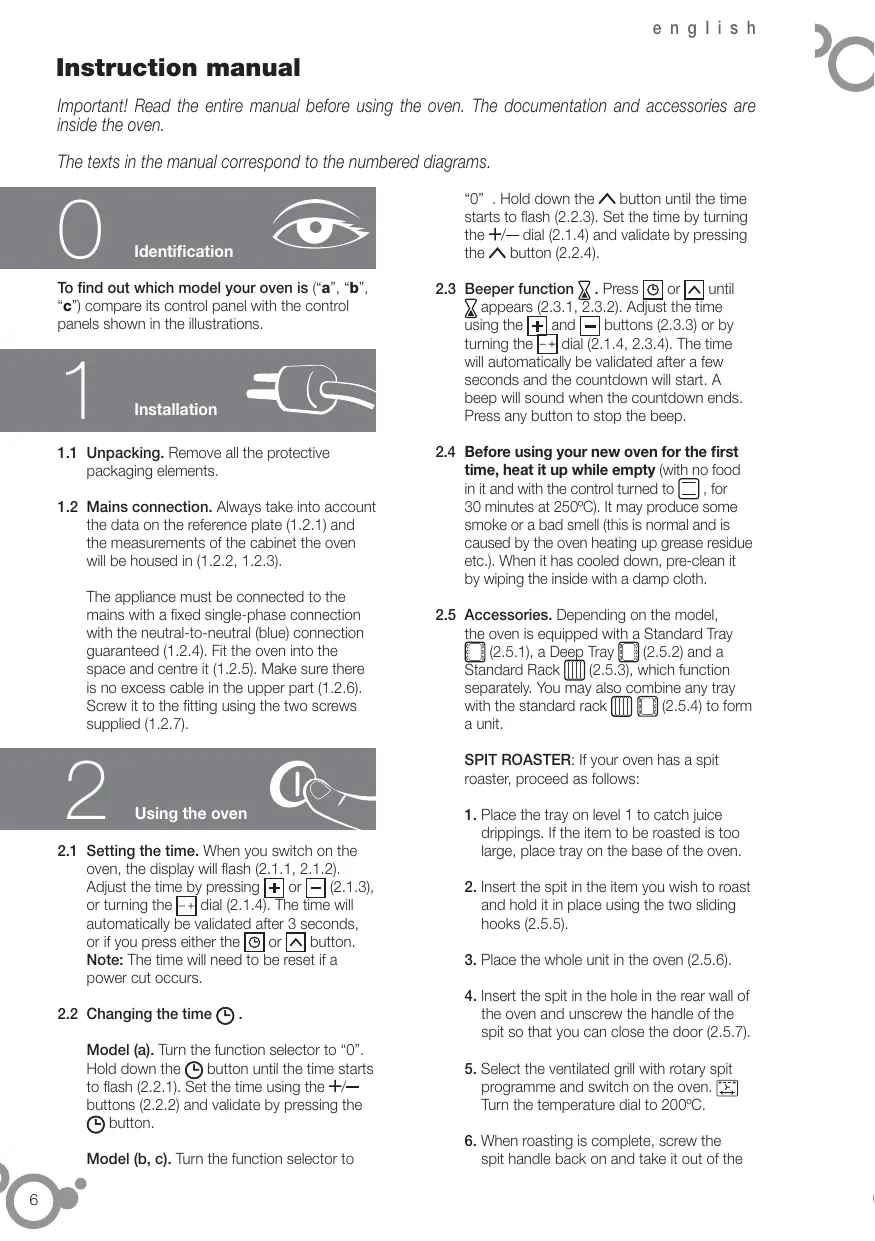
1.2 Mains connection. Always take into account the data on the reference plate (1.2.1) and the measurements of the cabinet the oven will be housed in (1.2.2, 1.2.3).
The appliance must be connected to the mains with a fixed single-phase connection with the neutral-to-neutral (blue) connection guaranteed (1.2.4). Fit the oven into the space and centre it (1.2.5). Make sure there is no excess cable in the upper part (1.2.6). Screw it to the fitting using the two screws supplied (1.2.7).
2
Using the oven

2.1 Setting the time. When you switch on the oven, the display will flash (2.1.1, 2.1.2). Adjust the time by pressing + or - (2.1.3), or turning the -+ dial (2.1.4). The time will automatically be validated after 3 seconds, or if you press either the ⏻ or ▲ button. Note: The time will need to be reset if a power cut occurs.
2.2 Changing the time Ⓛ.
Model (a). Turn the function selector to "0". Hold down the ⏻ button until the time starts to flash (2.2.1). Set the time using the +/— buttons (2.2.2) and validate by pressing the ⏻ button.
Model (b, c). Turn the function selector to
“0”. Hold down the ∧ button until the time starts to flash (2.2.3). Set the time by turning the +/− dial (2.1.4) and validate by pressing the ∧ button (2.2.4).
2.3 Beeper function △. Press Ⓑ or ▲ until △ appears (2.3.1, 2.3.2). Adjust the time using the + and - buttons (2.3.3) or by turning the -+ dial (2.1.4, 2.3.4). The time will automatically be validated after a few seconds and the countdown will start. A beep will sound when the countdown ends. Press any button to stop the beep.
2.4 Before using your new oven for the first time, heat it up while empty (with no food in it and with the control turned to ☐, for 30 minutes at 250°C). It may produce some smoke or a bad smell (this is normal and is caused by the oven heating up grease residue etc.). When it has cooled down, pre-clean it by wiping the inside with a damp cloth.
2.5 Accessories. Depending on the model, the oven is equipped with a Standard Tray (2.5.1), a Deep Tray (2.5.2) and a Standard Rack (2.5.3), which function separately. You may also combine any tray with the standard rack (2.5.4) to form a unit.
SPIT ROASTER: If your oven has a spit roaster, proceed as follows:
- Place the tray on level 1 to catch juice drippings. If the item to be roasted is too large, place tray on the base of the oven.
- Insert the spit in the item you wish to roast and hold it in place using the two sliding hooks (2.5.5).
- Place the whole unit in the oven (2.5.6).
- Insert the spit in the hole in the rear wall of the oven and unscrew the handle of the spit so that you can close the door (2.5.7).
- Select the ventilated grill with rotary spit programme and switch on the oven. Turn the temperature dial to 200°C.
- When roasting is complete, screw the spit handle back on and take it out of the
oven. Remove the sliding needles and remove the spit from the food.
2.6 Accessory positions. The accessories can be fitted in 5 different positions
1 2 3 4 5.
2.7 Cooking the food. Place the food in the oven. Choose the accessory or accessories to be used and their recommended position, or consult the cooking table. Close the oven door.
COOKING
2.8 Selecting the cooking function ☐. Turn the function selector and select the desired function according to the model (2.8.1).
Traditional fanned heat. For any kind of dish. Several dishes may be cooked at once without their flavours or smells mixing.
Turbo plus. The heat is produced by the central element.
Fanned high grill. This browns the food, distributing the heat evenly. Ideal for large-sized roasts.
High grill. For browning pasta, soufflés and bechamel sauce.
Low grill. For hamburgers, toast and food with a small surface area.
High base heat. The heat from the oven base is evenly distributed. Ideal for paellas or pizzas.
Fanned base heat. The fan distributes the base heat evenly. Suitable for paellas.
Traditional heat. For bread, cakes, cakes with filling and lean meat.
Ventilated grill + Spit roaster. Ideal for even, juicy, crunchy roasts.
Traditional eco. For bread, cakes and lean meat. This function provides power savings of 25% while maintaining the cooking properties.
Keep-warm function. Ideal for keeping food warm and for fermenting dough.
Defrost. Rapidly thaws any kind of food.
2.9 Selecting the temperature. When you select the cooking function, the oven will recommend the optimum temperature and cooking will begin immediately. You can change this temperature within an upper and lower limit according to the programme selected.
Model (a). Change the temperature using the “+−” dial (2.9.1) (2.9.2).
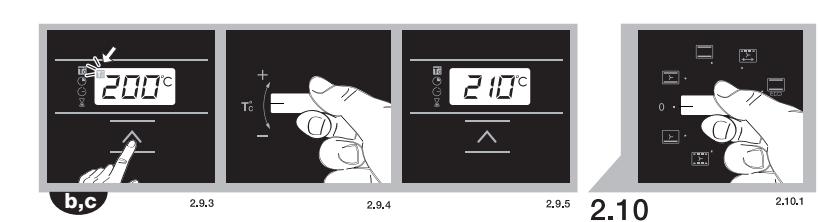
Model (b, c). Press the ∧ button until Tc appears (2.9.3). The temperature will
flash and can be changed using the “+−” control. (2.9.4) (2.9.5).
2.10 Switching off the oven. In all cases, when the cooking process is complete, turn the function selector dial ☐ to 0 (2.10.1).
TIME FUNCTIONS
2.11 Selecting the cooking time ⚙. Select the cooking function and the desired temperature. Press ⏻ or ⏱ until ⚙ starts to flash (2.11.1, 2.11.2). Adjust the cooking time by pressing + or − (2.11.3), or by turning the −+ dial (2.11.4, 2.11.5). After a few seconds the time will automatically be validated and the countdown will begin. When cooking is complete, a beep will sound. To stop the beep, press any button and switch off the oven.
2.12 Selecting the end time ⚙: Select the cooking function, the temperature and the cooking time. Press ⏻ or ∧ until ⚙ is flashing (2.12.1, 2.12.2). Adjust the cooking end time by pressing + or − (2.12.3), or by turning the −+ dial (2.11.4, 2.12.4). The start of cooking will be delayed so that it finishes at the time shown. When the end time is reached, the oven will beep. To stop the beep, press any button and switch off the oven.
2.13 Automatic switch-off. If you accidentally forget to switch off the oven, it will switch off automatically after a certain time has elapsed. "RS" will appear on the display.
3
Maintenance and cleaning

3.1 Cleaning the accessories. The accessories are dishwasher-safe. To wash them up by hand, use ordinary detergent. Leave them to soak for easier cleaning.
3.2 Cleaning the inside of the oven. Remove the side rails (3.2.1) (3.2.2). When the rails have been taken out, wet a cloth in hot soapy water and use it to clean the side walls of the oven (3.2.3). When you have cleaned them, replace the guides.
3.3 Rough-walled models. Catalytic enamel (self-degreasing). On these models, the rear plate and side panels are covered with a
self-cleaning enamel that removes the grease while the oven is functioning. The side panels are reversible, doubling the lifetime of the coating.
To remove the self-cleaning panels, firstly remove the side rails (3.2.1) (3.2.2).
If the panels are not performing the self-cleaning process sufficiently, they will need regenerating. To do this, remove all the accessories and utensils from the inside of the oven. Thoroughly clean the oven surfaces that are not self-cleaning. Select the function.
Set the temperature to 250^ C and set the time between 30 and 60 minutes, depending on how dirty the oven is.
When the cleaning programme ends and the oven has cooled down, wipe the self-cleaning elements with a damp sponge. They will then be totally functional again.
Note: Do not use specific oven cleaning products to clean the catalytic walls. Do not scrape the surface with metal scouring pads or sharp or pointed instruments.
3.4 Cleaning the outside of the oven. Use neutral cleaning products. Dry the oven well with a soft cloth.
Warnings:
- Make sure the oven is switched off.
- Allow the glass to cool down before removing it.
- Never use steam cleaning machines.

Troubleshooting

You can solve the following problems yourself:
4.1 4.1 The oven is not heating up. Check it is plugged in and switched on and that the fuse has not blown. Select a higher temperature setting.
4.2 The interior light is not working. Change the bulb or replace the fuse.
4.3 Smoke is coming out during cooking. Turn the temperature down and/or clean the oven.
4.4 A beep is sounding. The selected temperature setting has been reached. The cooking cycle is complete.
4.5 The oven makes a noise after cooking.
This is normal, as the fan keeps running until the temperature inside and outside the oven is reduced.
4.6 "0 00" appears on the display. The temperature sensor has failed. Call the Technical Service.
4.7 "RS" appears on the display. The oven has been functioning for several hours and has switched off automatically for safety reasons.
Do not try to repair the oven yourself. Call the technical assistance service.

Safety

- The oven must be installed by an authorised installer in accordance with the manufacturer's instructions and diagrams.
- The electrical installation must be dimensioned for the maximum power indicated on the reference plate and the electrical socket must have a regulatory earth connection.
- The mains circuit supplying the oven must have a single-pole cut-off switch with at least 3 mm between contacts.
- If the power cord is damaged, it must be replaced by the after-sales technical service or by similarly qualified staff, to avoid hazard.
- Ensure the appliance is unplugged from the mains before replacing the oven lamp, to avoid electric shock.
- Do not use abrasive cleaning products or metal scouring pads to clean the oven door, as they could scratch the surface and cause the glass to shatter.
- Keep small children away from the oven. It has accessible parts that can heat up during functioning.
-
Do not touch the heating elements inside the oven.
-
This appliance is not intended for use by people (including children) whose physical, sensory, or mental capacities are reduced or who lack experience or knowledge, except under supervision or after receiving instruction regarding use of the appliance from a person responsible for their safety. Use by children should be supervised to prevent them playing with the appliance.
- The oven must only be used with the door closed, for all programmes including the grill.

The Environment

This oven has been designed with environmental protection in mind.
Respect the environment. Only preheat the oven when necessary (see table). Use dark coloured cake tins whenever possible. For long cooking times, switch off the oven 5 or 10 minutes before the end of cooking time.
Management of waste electrical and electronic equipment.
The symbol 🖱️ indicates that the appliance must not be disposed of in traditional bins for domestic waste.
Take your oven to the a special collection centre. Recycling domestic appliances will prevent negative consequences for health and the environment and will allow savings on energy and resources.
For further information, contact the local authorities or the shop where you bought the oven.
Cooking Table
| Food | Programme and temperature | Time | Position | Preheat | Accessories | ||
| meat and poultry | beef1,5 Kg | 210°C | 50 - 60 min | no | |||
| pork1,5 Kg | 180°C | 85 - 95 min | no | ||||
| lamb1,2 Kg | 220°C | 40 - 50 min | no | ||||
| turkey4 Kg | 190°C | 115 - 125 min | no | ||||
| chicken1,25 Kg | 230°C | 50 - 60 min | no | ||||
| vegetables | roasted redpeppers1,25 Kg | 210°C | 30 - 40 min | no | |||
| stuffedtomatoes4 servings | 220°C | 15 - 19 min | no | ||||
| fish and seafood | bakedhake1,5 Kg | 230°C | 7 - 9 min | yes | |||
| roastedlobster1 Kg | 240°C | 4 - 5 min | yes | ||||
| bakedfish1 Kg | 220°C | 13 - 17 min | yes | ||||
| bakedcod1,5 Kg | 220°C | 7 - 9 min | yes | ||||
| sundry | pizza | 220°C | 18 - 22 min | yes | |||
| bread | 220°C | 18 - 22 min | no | ||||
| sponge cakes | 210°C | 15 - 19 min | yes | ||||
| Flan | 150°C | 30 - 40 min | no | ||||
| defrosting, all types of food | no | ||||||
| Fermenting dough for bread/cakes | 40°C-50°C | 25 - 30 min | no | ||||

