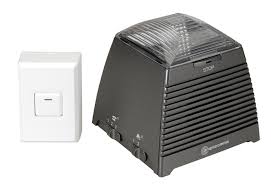
RINGFLASH 200 - Photography Lighting AUDIOLINE - Free user manual and instructions
Find the device manual for free RINGFLASH 200 AUDIOLINE in PDF.



| Brand | AUDIOLINE |
| Model | RINGFLASH 200 |
| Product type | Visual and audio indicator for telephone calls and doorbell |
| Main power supply | Provided mains adapter (230 V AC) |
| Doorbell power supply | 12 V battery included |
| Package contents | RingFlash device, adapter plug, telephone connection cable, Doorbell (1), 12 V battery (1), screws and wall plugs (4), user manual (1) |
| Telephone ring tones | 3 selectable ring tones via pull switch |
| Doorbell tones | 2 selectable tones |
| Alarm modes | 4 modes: off, light flash + loudspeaker, loudspeaker + external vibrator, light flash + external vibrator |
| Light flash | Yes, built-in |
| Vibrator output | Jack '(((o)))' for external vibrating accessory (not included) |
| STOP button | Stops ring or doorbell tone |
| Doorbell visual indicator | Red/green LED depending on setting (Bell 1 or Bell 2) |
| Compatibility with other devices | 8 DIP switches under the device and in the Doorbell for adjustment |
| Wall mounting | Possible via U-shaped slots on the base (screws not included) |
| Cleaning | Lint-free soft cloth, no solvents or cleaning agents |
| Safety | Do not open the device, use only the provided adapter |
| Warranty | 24 months from date of purchase |
| Hotline service | 0826 805 674 (non-premium rate number) |
| Certification | Compliant with directive 1999/5/EC, CE marking |
Frequently Asked Questions - RINGFLASH 200 AUDIOLINE
User questions about RINGFLASH 200 AUDIOLINE
0 question about this device. Answer the ones you know or ask your own.
Ask a new question about this device
Download the instructions for your Photography Lighting in PDF format for free! Find your manual RINGFLASH 200 - AUDIOLINE and take your electronic device back in hand. On this page are published all the documents necessary for the use of your device. RINGFLASH 200 by AUDIOLINE.
USER MANUAL RINGFLASH 200 AUDIOLINE
Operating Instructions
Gebruiksaanwijzing
RingFlash 100/200
D
F
GB
NL
@mplicom
RingFlash 100/200
Bedienungsanleitung 3
Mode d'emploi 14
Operating Instructions 25
Gebruiksaanwijzing 36
Please read this operating instruction manual thoroughly.
Under no circumstances open the device or complete any repair work yourself.
Installation location
Prevent excessive exposure to smoke, dust, vibration, chemicals, moisture, heat and direct sunlight.
Power supply

Caution: Only use the power adapter plug supplied because other power supplies could damage the product. Ensure access to the power adapter plug is not obstructed by furniture or such.
Disposal
You are obliged to dispose of consumable goods properly in accordance with the applicable legal regulations. The adjacent symbol on the product indicates that electrical and electronic apparatus no longer required must be disposed of separately from domestic waste.
Electrical and electronic devices must be disposed of at suitable collection points provided by the public waste authorities.
Packaging materials must be disposed of according to local regulations.


Starting Up
Check the contents of the package
| Contents | RF100 | RF200 |
| RingFlash unit | 1 | 1 |
| Power adaptor plug | 1 | 1 |
| Telephone connection cable | 1 | 1 |
| Doorbell unit | 0 | 1 |
| 12 Volt battery | 0 | 1 |
| Fixing screws and wall plugs | 0 | 4 |
| Operating Manual | 1 | 1 |
Connecting the base
Connect the base as illustrated in the diagram. For reasons of safety, only use the power adaptor plug and telephone connection cable supplied.
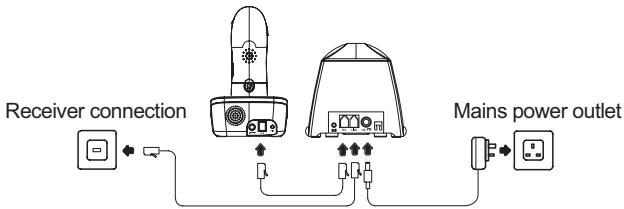
As soon as you switch the mains power on, the RingFlash unit will beep to confirm that it has been installed correctly. If you do not hear a beep, please unplug the power connection, wait for 1 minute and then plug in the power again.
Connecting the doorbell unit (RingFlash 200 only)
Remove the 4 screws from the back of the Doorbell.
The Doorbell has a default setting of Bell 1, if you wish to change this to Bell 2, please move the switches inside the Doorbell to the positions indicated below.
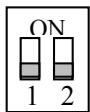
The stop indicator button on the RingFlash unit will be red when the Doorbell is pressed.
Bell 1
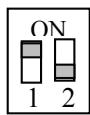
The stop indicator button on the RingFlash unit will be green when the Doorbell is pressed.
Bell 2
Insert the 12 Volt battery supplied, taking note to position the battery the correct way around. Replace the back cover, position and tighten the 4 screws.
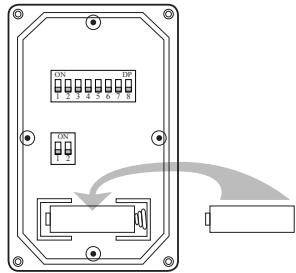
You only need to change the Bell setting if you have more than one Doorbell connected to your RingFlash unit. The two options are provided so that you will know from the colour of the light on the STOP button which Doorbell has been pressed and which Door to answer.
Unclip the front cover of the Doorbell by placing a small coin into the slot at either end of the doorbell and twisting. Using the 4 screws and wall plugs provided, attach the Doorbell outside your front door.
Shaker
You can plug a shaker accessory (not included) into the socket '((o))' on the back of the RingFlash unit. The shaker will then vibrate when you receive an incoming call.
For details of where to purchase a compatible Shaker, please go to www. amplicom.eu.
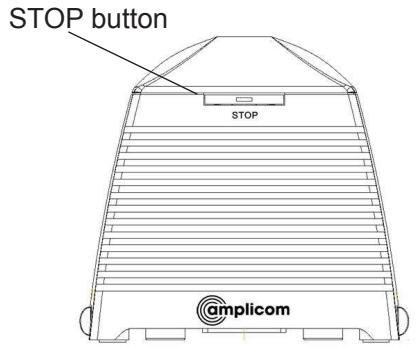
Front view
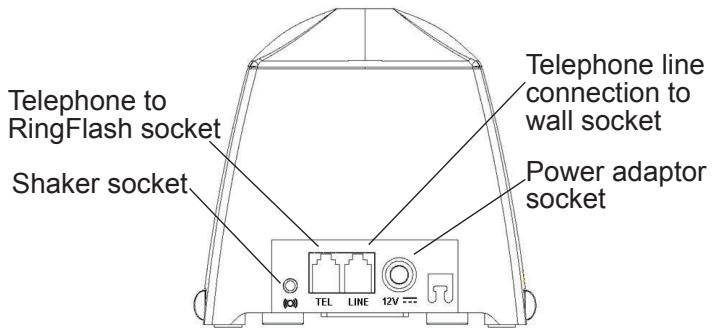
Rear view
Left side
Right side
Using your RingFlash 100/200
Set the ring tone
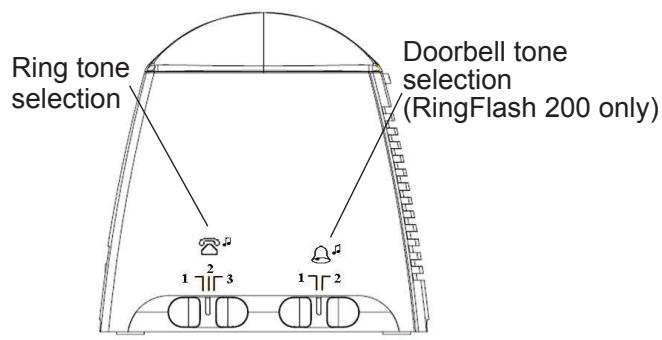
Your RingFlash unit has 3 ring tones to choose from. Just move the slider switch on the left hand side of your product to select ring tone 1, 2 or 3.
Set the Doorbell tone (RingFlash 200 only)
You can choose from two different Doorbell tones, just move the slider on the left hand side of your product to select Doorbell tone 1 or 2.
Set the alarm mode
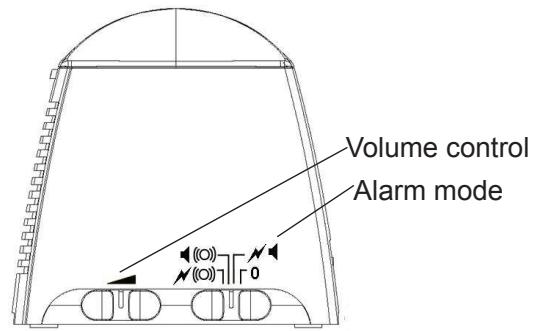
There are 4 alarm modes to choose from. Please use the slider on the right hand side of the product to select one of the following alarm modes.
| Mode | Ring alarm | Bell alarm |
| 0 | Off | Bell sound from the speaker |
| √ | Strobe light and speaker | Bell sound from speaker and strobe light |
| (○) | Speaker and external shaker | Bell sound from speaker and external shaker |
| √(○) | Strobe light and external shaker | Bell sound from speaker, strobe light and external shaker |
Stop the ring alarm
Press the STOP button on the front of the unit to stop the ring alarm for that call, even if the telephone line continues to ring. The ring alarm will return to its original setting for the next call.
Using the Doorbell (RingFlash 200 only)
Press the Doorbell button, the red light in the button will turn on. The RingFlash unit will sound the Doorbell tone that you have set (tone 1 or tone 2).
Press the STOP button on the RingFlash unit to stop the Doorbell tone. The red light on the Doorbell button will remain on for 1 minute and then turn off.
Compatibility with other local devices (RingFlash 200 only)
When using the RingFlash 200 and Doorbell there may occasionally be a compatibility problem with other local devices. You can change the code underneath the RingFlash unit and inside the doorbell to solve this problem.
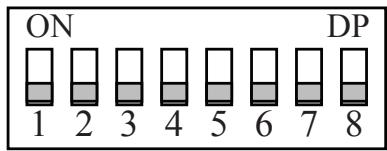
Underneath the RingFlash unit you will find 8 little switches underneath a cover. You can change the setting of these switches to overcome any local compatibility issues.
When you have changed the setting of the 8 switches on the RingFlash unit you will need to change the 8 switches inside the Doorbell to match.
Unscrew the Doorbell from outside the Front Door. Remove the 4 screws from the back of the Doorbell. Inside you will see 8 little switches, change the setting of these switches to match those on the RingFlash unit.
Using your RingFlash 100/200
Replace the back cover, position and tighten the 4 screws. Reflex the Doorbell outside your front door as before.
Wallmounting
Using appropriate screws and wall plugs (not supplied), you can wallmount your RingFlash unit using the keyholes on the base.
Service Hotline
In the case of technical problems, you can contact our hotline service, UK Tel. 0844 800 6503 (cost via UK landline at time of going to print: 6p connection charge and 5p/ min, thereafter, different charges may apply if calling from a mobile phone). Hotline hours are Monday to Friday, 9am to 5pm, excluding public and national holidays. In the case of claims under the terms of the guarantee, contact your sales outlet. There is a 2 year period of guarantee.
Maintenance/Guarantee
Maintenance
- Clean the product surfaces with a soft, fluff-free cloth
- Never use cleaning agents or solvents
Guarantee
AMPLICOM equipment is produced and tested according to the latest production methods. The implementation of carefully chosen materials and highly developed technologies ensure trouble-free functioning and a long service life. The terms of the guarantee do not apply where the cause of the equipment malfunction is the fault of the telephone network operator or any interposed private branch extension system. The terms of guarantee do not apply to the rechargeable batteries or power packs used in the products. The period of guarantee is 24 months from the date of purchase.
All deficiencies resulting from material of production faults which occur during the period of guarantee will be eliminated free of charge. Rights to claims under the terms of guarantee are annulled following intervention by the purchaser or third parties. Damage caused as a result of improper handling or operation, incorrect positioning or storing, improper connection or installation, Acts of God or other external influence are not covered by the terms of guarantee. In the case of complaints, we reserve the right to repair or replace defect parts of provide a replacement device. Replacement parts or devices become our property.
Rights to compensation in the case of damage are excluded where there is no evidence or intent or gross negligence by the manufacturer.
If your equipment shows signs of defect during the period of guarantee, please return it to the sales outlet in which you
Maintenance/Guarantee
purchased the AMPLICOM equipment together with the purchase receipt. All rights to claims under the terms of the guarantee in accordance with this agreement must be asserted exclusively with regard to your sales outlet.
Two years after the purchase and transfer of our products, claims under the terms of guarantee can no longer be asserted.
Declaration of Conformity
This device fulfils the requirements stipulated in the EU directive:
1999/5 EU directive on radio equipment and telecommunications terminal equipment and the mutual recognition of their conformity.
Conformity with the above mentioned directive is confirmed by the CE symbol on the device.
To view the complete Declaration of Conformity, please refer to the free download available on our website www. amplicom.eu.

nphilicom

Distributed by: Audioline GmbH, D-41460 Neuss
Important Notes on the Guarantee
The period of guarantee for the AMPLICOM product begins on the date of purchase. Rights to claims under the terms of guarantee relate to deficiencies resulting from material or production faults. Rights to claims under the terms of guarantee are annulled following intervention by the purchaser or third parties. Damage caused as a result of improper handling or operation, normal wear and tear, incorrect positioning or storing, improper connection or installation, Acts of God or other external influence are not covered by the terms of guarantee.
CLAIMS UNDER THE TERMS OF GUARANTEE MAY ONLY BE ASSERTED TO THE RETAILER WHERE THE EQUIPMENT WAS PURCHASED, WHEREBY THE PURCHASE RECEIPT MUST ALSO BE SUBMITTED.
TO PREVENT UNNECESSARY LONG DELAYS, PLEASE DO NOT SEND EQUIPMENT UNDER COMPLAINT TO OUR OFFICE ADDRESS. IN THE CASE OF QUESTIONS CON CERNING OPERATION OR THE TERMS OF GUARANTEE, PLEASE RE- FER TO THE OPERATING MANUAL OR CONTACT OUR HOTLINE: 0844 800 6503
AUDIOLINE GmbH
Neuss
Internet: www.amplicom.eu
E-mail: info@audioline.de