
C57W40N3 - Built-in microwave oven NEFF - Free user manual and instructions
Find the device manual for free C57W40N3 NEFF in PDF.
| Product type | Built-in microwave oven |
| Brand | NEFF |
| Model | C57W40N3 |
| Dimensions (H x W x D) - appliance | 382 mm x 594 mm x 388 mm |
| Dimensions (H x W x D) - cooking compartment | 208 mm x 328 mm x 369 mm |
| Power supply | 220-230 V, 50 Hz |
| Power consumption | 1270 W |
| Maximum microwave power | 900 W |
| Microwave frequency | 2450 MHz |
| Required fuse | 10 A |
| Power levels | 5 levels: 90 W, 180 W, 360 W, 600 W, 900 W |
| Automatic programs | 7 programs: defrost (meat, poultry, bread) and cooking (rice, potatoes, vegetables) |
| Memory function | Yes, to save and recall a setting |
| Turntable | Yes, removable |
| Cooling fan | Yes, can continue after switch-off |
| Audible signal | Adjustable duration (3 or 30 beeps) |
| Safety | Child safety lock? (not specified); automatic shut-off; spark protection |
| Care and cleaning | Clean with hot water and mild detergent; do not use steam cleaners or abrasives |
| After-sales service | NEFF customer service: repairs by authorized technicians, original parts |
| Standards | EN 55011 / CISPR 11 (group 2, class B) |
Frequently Asked Questions - C57W40N3 NEFF
User questions about C57W40N3 NEFF
0 question about this device. Answer the ones you know or ask your own.
Ask a new question about this device
Download the instructions for your Built-in microwave oven in PDF format for free! Find your manual C57W40N3 - NEFF and take your electronic device back in hand. On this page are published all the documents necessary for the use of your device. C57W40N3 by NEFF.
USER MANUAL C57W40N3 NEFF
Eine Störung, was tun?
Important safety information. 15
Causes of damage 17
Installation and connection 17
Energy and environment tips 17
Saving energy. 17
Environmentally-friendly disposal. 17
The control panel 18
Rotary selector 18
Accessories 18
Before using the appliance for the first time 18
Setting the clock 18
The microwave. 19
Notes regarding ovenware. 19
Microwave power settings. 19
Setting the microwave. 19
Cooling fan. 20
Memory 20
Saving memory settings 20
Starting the memory 20
Changing the signal duration 20
Care and cleaning 20
Cleaning agents 21
Malfunction table 21
After-sales service 22
E number and FD number 22
Technical data 22
Automatic programmes 22
Setting a programme 22
Defrosting using the automatic programmes 23
Cooking with the automatic programmes 23
Tested for you in our cooking studio 24
Information regarding the tables. 24
Defrost. 24
Defrosting, heating up or cooking frozen food 24
Heating food 25
Cooking food 26
Microwave tips. 26
Test dishes in accordance with EN 60705 27
Cooking and defrosting with microwave 27
Additional information on products, accessories, replacement parts and services can be found at www.neff-international.com and in the online shop www.neff-eshop.com

Important safety information
Read these instructions carefully. Only then will you be able to operate your appliance safely and correctly. Retain the instruction manual and installation instructions for future use or for subsequent owners.
This appliance is only intended to be fully fitted in a kitchen. Observe the special installation instructions.
Check the appliance for damage after unpacking it. Do not connect the appliance if it has been damaged in transport.
Only a licensed professional may connect appliances without plugs. Damage caused by incorrect connection is not covered under warranty.
This appliance is intended for domestic use only. The appliance must only be used for the preparation of food and drink. The appliance must be supervised during operation. Only use this appliance indoors.
This appliance may be used by children over the age of 8 years old and by persons with reduced physical, sensory or mental capabilities or by persons with a lack of experience or knowledge if they are supervised or are instructed by a person responsible for their safety how to use the
appliance safely and have understood the associated hazards.
Children must not play with, on, or around the appliance. Children must not clean the appliance or carry out general maintenance unless they are at least 8 years old and are being supervised.
Keep children below the age of 8 years old at a safe distance from the appliance and power cable.
Always insert the accessories into the cooking compartment correctly. See "Description of accessories in the instruction manual.
Risk of fire!
- Combustible items stored in the cooking compartment may catch fire. Never store combustible items in the cooking compartment. Never open the appliance door if there is smoke inside. Switch off the appliance and unplug it from the mains or switch off the circuit breaker in the fuse box.
Using the appliance for anything other than its intended purpose is dangerous and may cause damage.
The following is not permitted: drying out food or clothing, heating slippers, grain or cereal pillows, sponges, damp cleaning cloths or similar. For example, heated slippers and grain or cereal pillows may catch fire, even several hours after they have been heated. The appliance must only be used for the preparation of food and drinks.
- Food may catch fire. Never heat food in heat-retaining packages.
Do not leave food heating unattended in containers made of plastic, paper or other combustible materials.
Do not select a microwave power or time setting that is higher than necessary.
Follow the information provided in this instruction manual.
Never use the microwave to dry food. Never defrost or heat food with a low water content, e.g. bread, at too high a microwave power or for too long. - Cooking oil may catch fire. Never use the microwave to heat cooking oil on its own.
Risk of explosion!
Liquids and other food may explode when in containers that have been tightly sealed. Never heat liquids or other food in containers that have been tightly sealed.
Risk of serious damage to health!
- The surface of the appliance may become damaged if it is not cleaned properly. Microwave energy may escape. Clean the appliance on a regular basis, and remove any food residue immediately. Always keep the cooking compartment, door seal, door and door stop clean; see also section Care and cleaning.
- Microwave energy may escape if the cooking compartment door or the door seal is damaged. Never use the appliance if the cooking compartment door or the door seal is damaged. Contact the after-sales service.
- Microwave energy will escape from appliances that do not have any casing. Never remove the casing. For any maintenance or repair work, contact the after-sales service.
Risk of electric shock!
Incorrect repairs are dangerous. Repairs may only be carried out and damaged power cables replaced by one of our trained after-sales technicians. If the appliance is defective, unplug the
appliance from the mains or switch off the circuit breaker in the fuse box. Contact the after-sales service.
- The cable insulation on electrical appliances may melt when touching hot parts of the appliance. Never bring electrical appliance cables into contact with hot parts of the appliance.
- Do not use any high-pressure cleaners or steam cleaners, which can result in an electric shock.
A defective appliance may cause electric shock. Never switch on a defective appliance. Unplug the appliance from the mains or switch off the circuit breaker in the fuse box. Contact the after-sales service. - The appliance is a high-voltage appliance. Never remove the casing.
Risk of serious burns!
- Accessories and ovenware become very hot. Always use oven gloves to remove accessories or ovenware from the cooking compartment.
- Alcoholic vapours may catch fire in the hot cooking compartment. Never prepare food containing large quantities of drinks with a high alcohol content. Only use small quantities of drinks with a high alcohol content. Open the appliance door with care.
- Foods with peel or skin may burst or explode during, or even after, heating. Never cook eggs in their shells or reheat hard-boiled eggs. Never cook shellfish or crustaceans. Always prick the yolk when baking or poaching eggs. The skin of foods that have a peel or skin, such as apples, tomatoes, potatoes and sausages, may burst. Before heating, prick the peel or skin.
- Heat is not distributed evenly through baby food. Never heat baby food in closed containers. Always remove the lid or teat. Stir or shake well after the food has been heated. Check the temperature of the food before it is given to the child.
- Heated food gives off heat. The ovenware may become hot. Always use oven gloves to remove ovenware or accessories from the cooking compartment.
- Airtight packaging may burst when food is heated. Always observe the instructions on the packaging. Always use oven gloves
to remove dishes from the cooking compartment.
Risk of scalding!
- When you open the appliance door, hot steam may escape. Open the appliance door with care. Keep children at a safe distance.
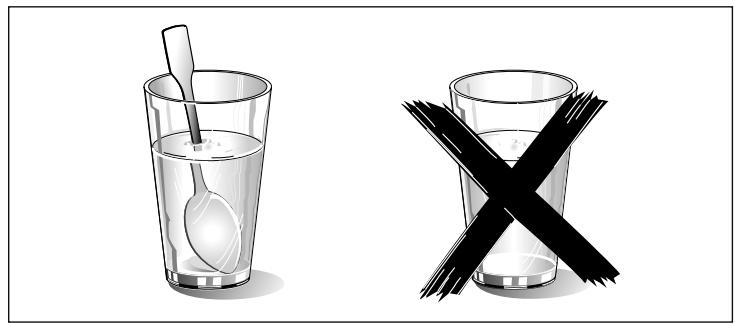
- There is a possibility of delayed boiling when a liquid is heated. This means that the liquid reaches boiling temperature without the usual steam bubbles rising to the surface. Even if the container only vibrates a little, the hot liquid may suddenly boil over and spatter. When heating, always place a spoon in the container. This will prevent delayed boiling.
Risk of injury!
- Scratched glass in the appliance door may develop into a crack. Do not use a glass scraper, sharp or abrasive cleaning aids or detergents.
- Unsuitable ovenware may crack. Porcelain or ceramic ovenware can have small
perforations in the handles or lids. These perforations conceal a cavity below. Any moisture that penetrates this cavity could cause the ovenware to crack. Only use microwave-safe ovenware.
Causes of damage
Caution!
Heavily soiled seal: If the seal is very dirty, the appliance door will no longer close properly during operation. The fronts of adjacent units could be damaged. Always keep the seal clean.
- Operating the microwave without food: Operating the appliance without food in the cooking compartment may lead to overloading. Never switch on the appliance unless there is food in the cooking compartment. An exception to this rule is a short crockery test (see the section "Microwave, suitable crockery").
- Microwave popcorn: Never set the microwave power too high. Use a power setting no higher than 600 watts. Always place the popcorn bag on a glass plate. The disc may jump if overloaded.
Liquid that has boiled over must not be allowed to run through the turntable drive into the interior of the appliance. Monitor the cooking process. Choose a shorter cooking time initially, and increase the cooking time as required.
Never use the microwave oven without the turntable.
Installation and connection
This appliance is intended for domestic use only.
This appliance is only intended to be fully fitted in a kitchen.
Please observe the special installation instructions.
The appliance is fitted with a plug and must only be connected to a properly-installed earthed socket. The fuse protection must be rated at 10 amperes (L or B circuit breakers). The mains voltage must correspond to the voltage specified on the rating plate.
The socket must be installed and the power cable replaced by a qualified electrician only. If the plug is no longer accessible following installation, an all-pin disconnecting device must be present on the installation side, with a contact gap of at least 3 mm.
Multiple plugs, plug bars and extension leads must not be used. Overloading can result in a risk of fire.
Energy and environment tips
Here you can find tips on how to save energy when baking and roasting and how to dispose of your appliance properly.
Saving energy
Only preheat the oven if this is specified in the recipe or in the operating instruction tables.
Use dark, black lacquered or enamelled baking tins. They absorb the heat particularly well.
Open the appliance door as little as possible during cooking, baking or roasting.
It is best to bake several cakes one after the other. The cooking compartment is still warm. This may reduce the baking time for the second cake.
For longer cooking times, you can switch the oven off 10 minutes before the end of the cooking time and use the residual heat to finish cooking.
Environmentally-friendly disposal
Dispose of packaging in an environmentally-friendly manner.
This appliance is labelled in accordance with European Directive 2012/19/EU concerning used electrical and electronic appliances (waste electrical and electronic equipment - WEEE). The guideline determines the framework for the return and recycling of used appliances as applicable throughout the EU.
The control panel
Here, you will see an overview of the control panel. Depending on the appliance model, individual details may differ.
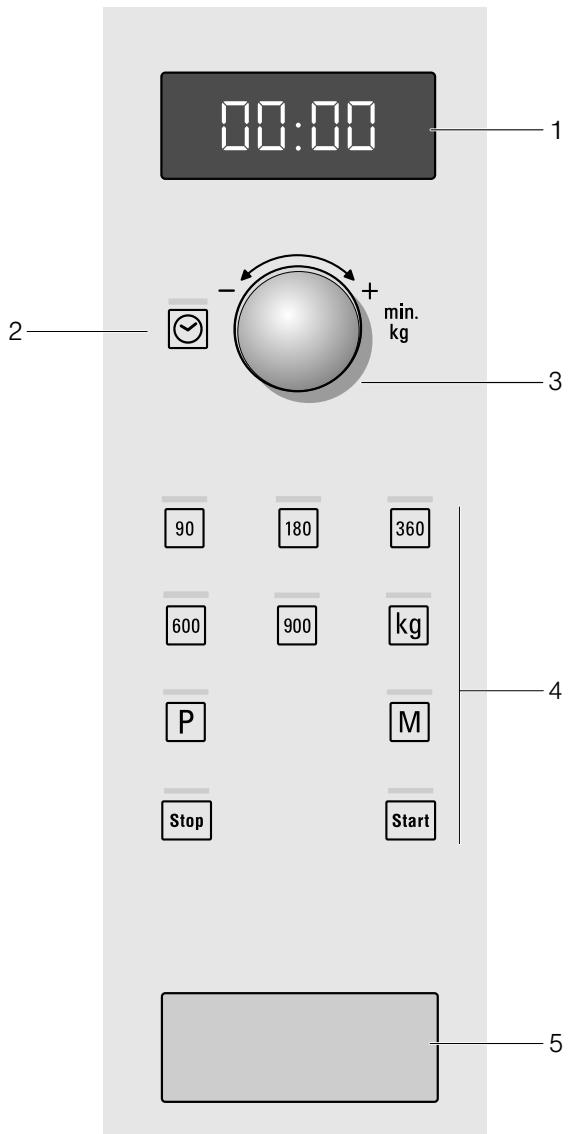
| 1 | Display for clock and cooking time |
| 2 | Clock button |
| 3 | Rotary selector for setting the time and cooking time or for setting automatic programmes |
| 4 | Buttons |
| 5 Door opener | |
| Buttons | Use |
| ◎ | Sets the clock |
| 90 | Selects 90 watt microwave power |
| 180 | Selects 180 watt microwave power |
| 360 | Selects 360 watt microwave power |
| 600 | Selects 600 watt microwave power |
| 900 | Selects 900 watt microwave power |
| kg | Selects the kilogramsmes for the programmes |
| P | Selects automatic programmes |
| M | Selects the memory |
| Start | Starts operation |
| Stop | Stops operation |
Rotary selector
The rotary selector is used to alter the default values and set values.
The rotary selector is retractable. Press on the rotary selector to lock it in or out.
Accessories
The turntable
How to fit the turntable:
- Place the turntable ring a in the recess in the cooking compartment.
- Let the turntable b slot in place in the drive c in the centre of the cooking compartment floor.
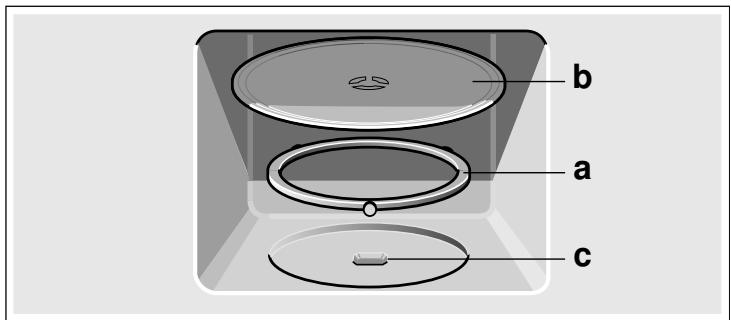
Note: Do not use the appliance if the turntable is not in place. Ensure that it is properly slotted into place. The turntable can turn clockwise or anti-clockwise.
Before using the appliance for the first time
Here you will find everything you need to do before using the microwave to prepare food for the first time. First read the section on Safety information.
Setting the clock
When the appliance is first connected or after a power cut, three zeros will appear in the display panel.
- Press the button.
12.00h appears in the display and the indicator lamp above the button lights up. - Set the clock using the rotary selector.
- Press the button again.
The current time is set.
Hiding the clock
Press the button and then press the Stop button.
The display is blank.
Resetting the clock
Press the button.
The time 12:00 appears in the display. Then make the settings as described in steps 2 and 3.
Change the clock, e.g. from summer to winter time
Set as described in point 1 to 3.
The microwave
Microwaves are converted to heat in foodstuffs. You will find information about ovenware and how to set the microwave.
Note: In the Tested for you in our cooking studio section, you will find examples for defrosting, heating and cooking with the microwave oven.
Try out the microwave straight away. You could heat up a cup of water for your tea, for example.
Use a large cup without any decorative gold or silver trim and place a teaspoon in it. Place the cup containing the water on the turntable.
- Press the 900 W button.
- Set 1:30 minutes using the rotary selector.
- Press the button.
After 1 minute 30 seconds, an audible signal sounds. The water for the tea is hot.
As you are drinking your tea, please take time to read again the safety precautions that can be found at the front of the instruction manual. This is very important.
Notes regarding ovenware
Suitable ovenware
Suitable dishes are heat-resistant ovenware made of glass, glass ceramic, porcelain, ceramic or heat-resistant plastic. These materials allow microwaves to pass through.
You can also use serving dishes. This saves you having to transfer food from one dish to another. You should only use ovenware with decorative gold or silver trim if the manufacturer guarantees that they are suitable for use in microwaves.
Unsuitable ovenware
Metal ovenware is unsuitable. Metal does not allow microwaves to pass through. Food in covered metal containers will remain cold.
Caution!
Creation of sparks: metal - e.g. a spoon in a glass - must be kept at least 2 cm from the oven walls and the inside of the door. Sparks could destroy the glass on the inside of the door.
Ovenware test
Do not switch on the microwave unless there is food inside. The following ovenware test is the only exception to this rule.
Perform the following test if you are unsure whether your ovenware is suitable for use in the microwave:
- Heat the empty ovenware at maximum power for 12 to 1 minute.
- Check the temperature occasionally during that time.
The ovenware should still be cold or warm to the touch.
The ovenware is unsuitable if it becomes hot or sparks are generated.
Microwave power settings
| Microwave power setting | Suitable for |
| 90 W | Defrosting delicate foods |
| 180 W | Defrosting and continued cooking |
| 360 W | Cooking meat and heating delicate foods |
| 600 W | Heating and cooking food |
| 900 W | Heating liquids |
Note: You can set the 900 W microwave power setting for 30 minutes, 600 W for 1 hour, the other power settings for 1 hour and 39 minutes respectively.
Setting the microwave
Example: microwave power 600 watts, 5 minutes
- Press the required microwave power setting.
The indicator light above the button lights up.
- Set a cooking time using the rotary selector.

- Press the button.
The cooking time counts down in the display.
The cooking time has elapsed
An audible signal sounds. Open the appliance door or press Stop. The clock reappears.
Changing the cooking time
This can be done at any time. Change the cooking time using the rotary selector.
Pausing
Press the Stop button once or open the appliance door.
Operation is suspended. The display above the Start button flashes. After closing the door, press the Start button again.
Cancelling operation
Press the button twice or open the door and press the button once.
Note: You can also adjust the cooking time first and then the microwave power setting.
Cooling fan
The appliance is equipped with a cooling fan. The fan may run on even if the oven has been switched off.
Notes
- The cooking compartment remains cold during microwave operation. The cooling fan will still switch on. The fan may run on even when microwave operation has ended.
- Condensation may appear on the door window, interior walls and floor. This is normal and does not adversely affect microwave operation. Wipe away the condensation after cooking.
Memory
You can save the settings for a dish in the memory and call it up again at any time.
The memory is useful for if you frequently prepare a specific dish.
Saving memory settings
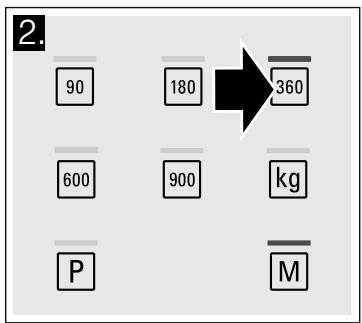
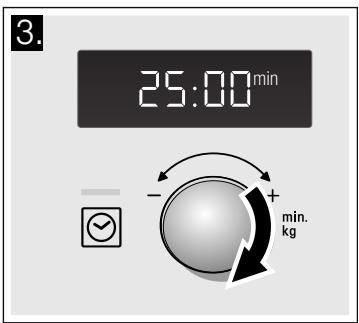
Example: 360 W, 25 minutes
- Press the M button.
The indicator light above the button lights up. - Press the required microwave power setting.
The indicator light above the button lights up and 1:00 min appears in the display. - Set the cooking time using the rotary selector.


- Confirm by pressing the button.
The clock reappears. The setting is saved.
Notes
- You can save the memory settings and start the appliance immediately. When finishing, instead of pressing M, press start.
- You cannot save several microwave power settings one after the other.
You cannot save automatic programmes. - Saving a new setting in the memory: press the button. The old settings appear. Save the new programme as described in steps 1 to 4.
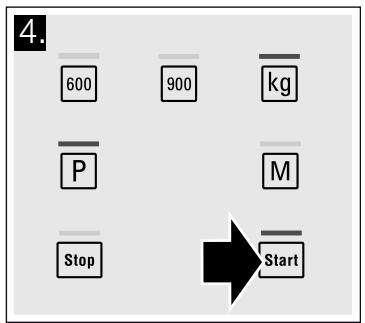
Starting the memory
It is very easy to start the saved programme. Place your meal into the appliance. Close the appliance door.
- Press the button.
The saved settings are displayed.
- Press the Bar button.
The cooking time counts down in the display.
The cooking time has elapsed
An audible signal sounds. Open the appliance door or press Stop. The clock reappears.
Pausing
Press the button once or open the appliance door.
Operation is suspended. The display above the Start button
flashes. After closing the door, press the Start button again.
Cancelling operation
Press the button twice or open the door and press the button once.
Changing the signal duration
You will hear an audible signal when the appliance is switched off. You can change the duration of the signal.
To do so, press the button for approx. 6 seconds.
The new signal duration is adopted.
The clock reappears.
The following are possible:
Short signal duration - 3 tones
Long signal duration - 30 tones.
Care and cleaning
With careful care and cleaning your microwave oven will retain its looks and remain good order. We will explain here how you should care for and clean your appliance correctly.
Risk of short circuit!
Never use high-pressure cleaners or steam cleaners to clean the oven.
! Risk of burns!
Never clean the appliance immediately after switching off. Let the appliance cool down.
Risk of electric shock!
Do not immerse the appliance in water or clean under a jet of water.
Surfaces are different, and damage caused by using the wrong cleaning agent can be avoided by observing the information in the table below.
Do not use
sharp or abrasive cleaning agents.
The surface could be damaged. If such a substance comes into contact with the front of the appliance, wash it off immediately with water.
metal or glass scrapers to clean the glass in the appliance door.
metal or glass scrapers for cleaning the seal.
- hard scouring pads or cleaning sponges.
Wash new sponge cloths thoroughly before use.
■ cleaning agents with high concentrations of alcohol.
Cleaning agents
Caution!
Before cleaning, unplug the appliance from the mains or switch off the circuit breaker in the fuse box. Clean the outside of the appliance and the cooking compartment with a damp cloth and mild detergent. Dry with a clean cloth.
| Area | Cleaning agents |
| Appliance front | Hot soapy water: Clean with a dish cloth and dry with a soft cloth. Do not use glass cleaners or metal or glass scrapers for cleaning. |
| Area | Cleaning agents |
| Appliance front with stainless steel | Hot soapy water: Clean with a dish cloth and dry with a soft cloth. Remove flecks of limescale, grease, starch and albumin (e.g. egg white) immediately. Corrosion can form under such residues. Special stainless steel cleaning agents can be obtained from the after-sales service or from specialist shops. Do not use glass cleaners or metal or glass scrapers for cleaning. |
| Cooking compartment made of stainless steel | Hot soapy water or a vinegar solution: Clean with a dish cloth and dry with a soft cloth. If the oven is very dirty: use oven cleaner, but only when cooking compartment is cold. It is best to use a stainless-steel sponge. Do not use oven spray or other aggressive oven cleaners or abrasive materials. Scouring pads, rough sponges and pan cleaners are also unsuitable. These items scratch the surface. Allow the interior surfaces to dry thoroughly. |
| Recess in cooking compartment | Damp cloth: Ensure that no water seeps through the turntable drive into the appliance interior. |
| Turntable and turntable ring | Hot soapy water: When putting the turntable back in place, make sure it slots in correctly. |
| Door panels | Glass cleaner: Clean with a dish cloth. Do not use a glass scraper. |
| Seal | Hot soapy water: Clean with a dish cloth, do not scour. Do not use a metal or glass scraper for cleaning. |
Malfunction table
Malfunctions often have simple explanations. Please refer to the malfunction table before calling the after-sales service.
If a meal does not turn out exactly as you wanted, refer to the Tested for you in our cooking studio section, where you will find plenty of cooking tips and tricks.
Troubleshooting
| Error message | Possible cause | Remedy/note |
| The appliance does not work | The plug is not plugged in. | Plug the plug in |
| Power failure | Check whether the kitchen light works. | |
| Faulty circuit breaker | Look in the fuse box to make sure that the circuit breaker for the appliance is in working order. | |
| Faulty operation | Switch off the circuit breaker in the fuse box. Switch it back on after approx. 10 seconds. | |
| Three zeros light up in the display. | Power failure | Reset the time. |
| The appliance is not in operation. A cooking time appears in the display. | The rotary selector was actuated accidentally. | Press the Stop button. |
| The Start button was not pressed after setting. | Press the Start button or cancel the setting with the Stop button. |
Risk of electric shock!
Incorrect repairs are dangerous. Repairs may only be carried out by one of our trained after-sales engineers.
You can take remedial action yourself for some error messages.
| Error message | Possible cause | Remedy/note |
| The microwave does not work. | The door was not fully closed. | Check whether food residue or debris is trapped in the door. |
| The Start button was not pressed. | Press the Start button. | |
| It takes longer than before for the food to heat up | The microwave power level setting was too low. | Select a higher microwave power setting. |
| A larger amount of food than usual has been placed in the appliance. | Double the amount - double the time. | |
| The food was colder than usual. | Stir or turn the food during cooking. | |
| The turntable makes a scratching or grinding noise. | Dirt or debris in the area around the turntable drive. | Clean the roller ring and the recess in the cooking compartment. |
| Microwave operation has been cancelled for no apparent reason. | The microwave has a fault. | If this fault occurs repeatedly, please call the after-sales service. |
| "M" appears in the display. | The appliance is in demo mode. | Press and hold the Start button and the Stop button for approx. 7 seconds. Demo mode is deactivated. |
After-sales service
Our after-sales service is there for you if your appliance needs to be repaired. We will always find the right solution in order to avoid unnecessary visits from a service technician.
E number and FD number
When calling us, please give the product number (E no.) and the production number (FD no.) so that we can provide you with the correct advice. The rating plate bearing these numbers can be found on the right-hand side when you open the appliance door. To save time, you can make a note of the number of your appliance and the telephone number of the after-sales service in the space below, should it be required.
| E no. | FD no. |
| After-sales service | |
Please note that there will be a fee for a visit by a service technician in the event of a malfunction, even during the warranty period.
Please find the contact data of all countries in the enclosed customer service list.
To book an engineer visit and product advice
GB 0844 8928989
Calls from a BT landline will be charged at up to
3 pence per minute. A call set-up fee of up to 6 pence may apply.
IE 014502655
0.03 € per minute at peak. Off peak 0.0088 € per minute.
Trust the expertise of the manufacturer, and rest assured that the repair will be carried out by trained service technicians using original spare parts for your domestic appliance.
This appliance corresponds to the standards EN 55011 and CISPR 11. It is a Group 2, Class B product.
Group 2 means that microwaves are produced for the purpose of heating food. Class B states that the appliance is suitable for private households.
Technical data
| Input voltage | AC 220 - 230 V, 50 Hz |
| Power consumption | 1270 W |
| Maximum output power | 900 W |
| Microwave frequency | 2450 MHz |
| Fuse | 10 A |
| Dimensions (HxWxD) | |
| - appliance | 382 mm x 594 mm x 388 mm |
| - cooking compartment | 208 mm x 328 mm x 369 mm |
VDE approved yes
CE mark yes
Automatic programmes
You can use the automatic programmes to defrost food with the greatest of ease and prepare dishes quickly and easily. You select the programme and enter the weight of your food. The automatic programme makes the optimum setting. You can select from 7 programmes.
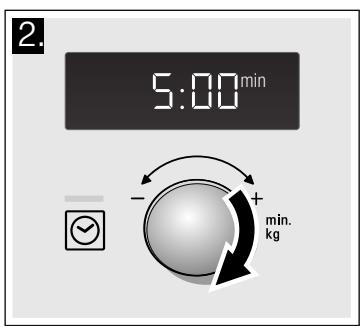
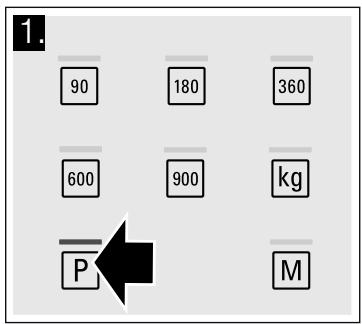
Setting a programme
Once you have selected a programme, make settings as follows:
- Press the button repeatedly until the required programme number appears.
The indicator light above the button lights up.
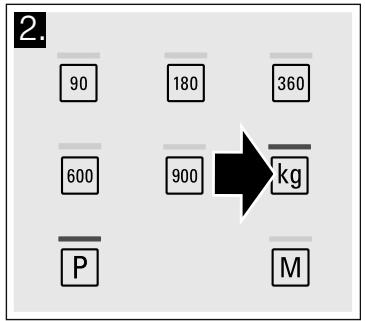
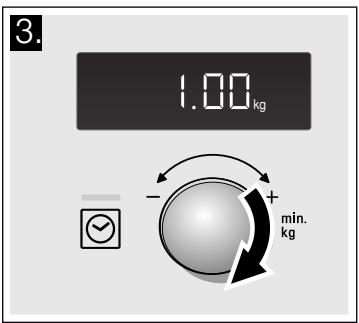
- Press the kg button.
The indicator light above the button lights up and a suggested weight appears.
- Turn the rotary selector to specify the weight of the dish.
- Press the button.
You will see the cooking time for the programme counting down.
The cooking time has elapsed
An audible signal sounds. Open the appliance door or press Stop. The clock reappears.
Correction
Press the Stop button twice and reset.
Pausing
Press the button once or open the appliance door. Operation is suspended. The display above the button flashes. After closing the door, press the button again.
Cancelling operation
Press the Stop button twice or open the door and press the Stop button once.
Notes
For some programmes, an audible signal sounds after a certain time. Open the appliance door and stir the food or turn the meat or poultry. After closing the door, press the [Start] button again.
- You can query the programme number and weight using "P" or "kg". The queried value is shown for 3 seconds in the display.
Defrosting using the automatic programmes
You can use the 4 defrosting programmes to defrost meat, poultry and bread.
Notes
Preparing food
Use food that has been frozen at -18^ and stored in portion-sized quantities that are as thin as possible.
Take the food to be defrosted out of all packaging and weigh it. You need to know the weight to set the programme.
Liquid will be produced when defrosting meat or poultry. Drain off this liquid when turning meat and poultry and under no circumstances use it for other purposes or allow it to come into contact with other foods.
Ovenware
Place the food in a microwaveable shallow dish, e.g. a china or glass plate, but do not cover.
Resting time
The defrosted food should be left to stand for an additional 10 to 30 minutes until it reaches an even temperature. Large pieces of meat require a longer standing time than smaller pieces. Flat pieces of meat and items made from minced meat should be separated from each other before leaving to stand.
After this time, you can continue to prepare the food, even though thick pieces of meat may still be frozen in the middle. The giblets can be removed from poultry at this point.
Signal
For some programmes, a signal sounds after a certain time. Open the appliance door and separate the food out or turn the meat or poultry. Close the door and press the Start button.
| Programme no. | Weight range in kg | |
| Defrost | ||
| P 01 | Minced meat | 0.20 - 1.00 |
| P 02 | Pieces of meat | 0.20 - 1.00 |
| P 03 | Chicken, chicken pieces | 0.40 - 1.80 |
| P 04 | Bread | 0.20 - 1.00 |
Cooking with the automatic programmes
With the 3 cooking programmes, you can cook rice, potatoes or vegetables.
Notes
Ovenware
The food must be cooked in microwaveable cookware with a lid. For rice, you should use a large, deep dish.
Preparing food
Weigh out the food. You need to know the weight to set the programme.
Rice:
Do not use boil-in-the-bag rice. Add the required amount of water, as specified on the packaging. This is usually two or three times the quantity of rice.
Potatoes:
For boiled potatoes, cut the fresh potatoes into small, even-sized pieces. Add one tablespoon of water for each 100g boiled potatoes, and a little salt.
Fresh vegetables:
Weigh out the fresh, trimmed vegetables. Cut the vegetables into small, even-sized pieces. Add a tbsp water for each 100 g vegetables.
Signal
While the programme is running, a signal sounds after some time. Stir the food.
Resting time
Once the programme has finished, stir the food again. You should leave it to stand for another 5 to 10 minutes until it reaches an even temperature.
The cooking result will depend on the quality and consistency of the food.
| Programme no. | Weight range in kg | |
| Cooking | ||
| P 05 | Rice | 0.05 - 0.2 |
| P 06 | Potatoes | 0.15 - 1.0 |
| P 07 | Vegetables | 0.15 - 1.0 |
Tested for you in our cooking studio
Here you will find a selection of recipes and the ideal settings for them. We show you which microwave power setting is best suited to your dish. There are also tips about ovenware and preparation methods.
Information regarding the tables
The following tables provide you with numerous options and settings for the microwave.
The times specified in the tables are only guidelines. They may vary according to the ovenware used, the quality, temperature and consistency of the food.
Time ranges are often specified in the tables. Set the shortest time first and then extend the time if necessary.
It may be that you have different quantities from those specified in the tables. A rule of thumb can be applied:
Double the amount - almost twice the cooking time
Half the amount - half the cooking time.
Always place the ovenware on the turntable.
Defrost
Notes
- Place the frozen food in an open container on the turntable.
- Delicate parts such as the legs and wings of chicken or fatty outer layers of roasts can be covered with small pieces of aluminium foil. The foil must not touch the oven walls. You can remove the foil half way through the defrosting time.
Liquid will be produced when defrosting meat or poultry. Drain off this liquid when turning meat and poultry and under no circumstances use it for other purposes or allow it to come into contact with other foods. - Turn or stir the food once or twice during the defrosting time. Large pieces of food should be turned several times.
- Leave defrosted items to stand at room temperature for a further 10 to 20 minutes so that the temperature is even throughout. The giblets can be removed from poultry at this point. The meat can still be further prepared, even if it has a small frozen core.
| Defrost | Weight | Microwave power setting in watts, cooking time in minutes | Notes |
| Whole pieces of meat (beef, veal or pork - on the bone or boned) | 800 g | 180 W, 15 mins + 90 W, 10-20 mins | - |
| 1 kg | 180 W, 20 mins + 90 W, 15-25 mins | ||
| 1.5 kg | 180 W, 30 mins + 90 W, 20-30 mins | ||
| Meat in pieces or slices of beef, veal or pork | 200 g | 180 W, 2 mins + 90 W, 4-6 mins | Separate any defrosted parts when turning |
| 500 g | 180 W, 5 mins + 90 W, 5-10 mins | ||
| 800 g | 180 W, 8 mins + 90 W, 10-15 mins | ||
| Minced meat, mixed | 200 g | 90 W, 10 mins | Freeze food flat if possible |
| 500 g | 180 W, 5 mins + 90 W, 10-15 mins | Turn several times, remove any defrosted meat | |
| 800 g | 180 W, 8 mins + 90 W, 10-20 mins | ||
| Poultry or poultry portions | 600 g | 180 W, 8 mins + 90 W, 10-15 mins | - |
| 1.2 kg | 180 W, 15 mins + 90 W, 20-25 mins | ||
| Fish fillet, fish steak or slices | 400 g | 180 W, 5 mins + 90 W, 10-15 mins | Separate any defrosted parts |
| Vegetables, e.g. peas | 300 g | 180 W, 10-15 mins | - |
| Fruit, e.g. raspberries | 300 g | 180 W, 7-10 mins | Stir carefully during defrosting and separate any defrosted parts |
| 500 g | 180 W, 8 mins + 90 W, 5-10 mins | ||
| Butter, defrosting | 125 g | 180 W, 1 min. + 90 W, 2-3 mins | Remove all packaging |
| 250 g | 180 W, 1 min + 90 W, 3-4 mins | ||
| Loaf of bread | 500 g | 180 W, 6 mins + 90 W, 5-10 mins | - |
| 1 kg | 180 W, 12 mins + 90 W, 10-20 mins | ||
| Cakes, dry, e.g. sponge cake | 500 g | 90 W, 10-15 mins | Only for cakes without icing, cream or crème pâtissière, separate the pieces of cake |
| 750 g | 180 W, 5 mins + 90 W, 10-15 mins | ||
| Cakes, moist, e.g. fruit flan, cheese-cake | 500 g | 180 W, 5 mins + 90 W, 15-20 mins | Only for cakes without icing, cream or gelatine |
| 750 g | 180 W, 7 mins + 90 W, 15-20 mins |
Defrosting, heating up or cooking frozen food
Notes
Take ready meals out of the packaging. They will heat up more quickly and evenly in microwaveable ovenware. The different components of the meal may not require the same amount of time to heat up.
- Food which lies flat will cook more quickly than food which is piled high. You should therefore distribute the food so that it is as flat as possible in the ovenware. Different foodstuffs should not be placed in layers on top of one another.
Always cover the food. If you do not have a suitable cover for your ovenware, use a plate or special microwave foil.
Stir or turn the food 2 or 3 times during cooking.
After heating, allow the food to stand for a further 2 to 5 minutes so that it can achieve an even temperature.
Always use an oven cloth or oven gloves when removing plates from the oven.
This will help the food retain its own distinct taste, so it will require less seasoning.
| Defrosting, heating up or cooking frozen food | Weight | Microwave power setting in watts, cooking time in minutes | Notes |
| Menu, plated meal, ready meal (2-3 components) | 300-400 g | 600 W, 8-11 mins | - |
| Soup | 400 g | 600 W, 8-10 mins | - |
| Stews | 500 g | 600 W, 10-13 mins | - |
| Slices or pieces of meat in sauce, e.g. goulash | 500 g | 600 W, 12-17 mins | Separate the pieces of meat when stirring |
| Fish, e.g. fillet steaks | 400 g | 600 W, 10-15 mins | Add water, lemon juice or wine as desired |
| Bakes, e.g. lasagne, cannelloni | 450 g | 600 W, 10-15 mins | - |
| Side dishes, e.g. rice, pasta | 250 g | 600 W, 2-5 mins | Add a little liquid |
| 500 g | 600 W, 8-10 mins | ||
| Vegetables, e.g. peas, broccoli, carrots | 300 g | 600 W, 8-10 mins | Pour water into the dish so that it covers the base |
| 600 g | 600 W, 14-17 mins | ||
| Creamed spinach | 450 g | 600 W, 11-16 mins | Cook without additional water |
Heating food
Risk of scalding!
There is a possibility of delayed boiling when a liquid is heated. This means that the liquid reaches boiling temperature without the usual steam bubbles rising to the surface. Even if the container only moves a little, the hot liquid can suddenly boil over and spatter. When heating liquids, always place a spoon in the container. This will prevent delayed boiling.
Caution!
Metal - e.g. a spoon in a glass - must be kept at least 2 cm from the oven walls and the inside of the door. Sparks could irreparably damage the glass on the inside of the door.
Notes
Take ready meals out of the packaging. They will heat up more quickly and evenly in microwaveable ovenware. The different components of the meal may not require the same amount of time to heat up.
Always cover the food. If you do not have a suitable cover for your container, use a plate or special microwave foil.
- Stir or turn the food several times during the heating time. Check the temperature.
After heating, allow the food to stand for a further 2 to 5 minutes so that it can achieve an even temperature.
Always use an oven cloth or oven gloves when removing plates from the oven.
| Heating food | Weight | Microwave power setting in watts, cooking time in minutes | Notes |
| Menu, plated meal, ready meal (2-3 components) | 350-500 g | 600 W, 4-8 mins | - |
| Drinks | 150 ml | 800 W, 1-2 mins | Place a spoon in the glass; do not overheat alcoholic drinks; check during heating |
| 300 ml | 800 W, 2-3 mins | ||
| 500 ml | 800 W, 3-4 mins | ||
| Baby food, e.g. baby bottle | 50 ml | 360 W, approx. 1/2 min | No teats or lids. Always shake well after heating. You must check the temperature. |
| 100 ml | 360 W, approx. 1 min. | ||
| 200 ml | 360 W, 11/2 min | ||
| Soup 1 cup | 200 g | 600 W, 2-3 mins | - |
| Soup, 2 cups | 400 g | 600 W, 4-5 mins | - |
| Meat in sauce | 500 g | 600 W, 8-11 mins | Separate the slices of meat |
| Stew | 400 g | 600 W, 6-8 mins | - |
| 800 g | 600 W, 8-11 mins | - | |
| Vegetables, 1 portion | 150 g | 600 W, 2-3 mins | Add a little liquid |
| Vegetables, 2 portions | 300 g | 600 W, 3-5 mins |
Cooking food
Notes
- Food which lies flat will cook more quickly than food which is piled high. You should therefore distribute the food so that it is as flat as possible in the ovenware. Different foodstuffs should not be placed in layers on top of one another.
Cook the food in ovenware with a lid. If you do not have a suitable lid for your ovenware, use a plate or special microwave foil.
This will help the food retain its own distinct taste, so it will require less seasoning.
After cooking, allow the food to stand for a further 2 to 5 minutes so that it can achieve an even temperature.
Always use an oven cloth or oven gloves when removing plates from the oven.
| Cooking food | Weight | Microwave power setting in watts, cooking time in minutes | Notes |
| Meat loaf | 750 g | 600 W, 20-25 mins | Cook uncovered |
| Whole chicken, fresh, no giblets | 1.2 kg | 600 W, 25-30 mins | Turn halfway through the cooking time |
| Fresh vegetables | 250 g | 600 W, 5-10 mins | Cut vegetables into pieces of equal size.Add 1 to 2 tbsp water per 100 g of vegetables.Stir during cooking |
| 500 g | 600 W, 10-15 mins | ||
| Potatoes | 250 g | 600 W, 8-10 mins | Cut potatoes into pieces of equal size;Add 1 to 2 tbsp water for every 100 g.Stir during cooking |
| 500 g | 600 W, 11-14 mins | ||
| 750 g | 600 W, 15-22 mins | ||
| Rice | 125 g | 600 W, 5-7 mins + 180 W, 12-15 mins | Add double the quantity of liquid. |
| 250 g | 600 W, 6-8 mins + 180 W, 15-18 mins | ||
| Sweet foods, e.g. blancmange (instant) | 500 ml | 600 W, 6-8 mins | Stir the custard pudding thoroughly 2 to 3 times during cooking using an egg whisk. |
| Fruit, compote | 500 g | 600 W, 9-12 mins | - |
Microwave tips
| You cannot find any information about the settings for the quantity of food you have prepared. | Increase or reduce the cooking times using the following rule of thumb:Double the amount = almost double the cooking timeHalf the amount = half the cooking time |
| The food has become too dry. | Next time, set a shorter cooking time or select a lower microwave power setting. Cover the food and add more liquid. |
| When the time has elapsed, the food is not defrosted, hot or cooked. | Set a longer time. Large quantities and food which is piled high require longer times. |
| When the time has elapsed, the food is overheated at the edge but not done in the middle. | Stir it during the cooking time and next time, select a lower microwave power setting and a longer cooking time. |
| After defrosting, the poultry or meat is defrosted on the outside but not defrosted in the middle. | Next time, select a lower microwave power setting. If you are defrosting a large quantity, turn it several times. |
Condensation
Condensation may appear on the door window, interior walls and floor. This is normal. This does not affect how the microwave operates. Wipe away the condensation after cooking.
Test dishes in accordance with EN 60705
The quality and correct operation of microwave appliances are tested by testing institutes using these dishes.
In accordance with EN 60705, IEC 60705, DIN 44547 and
EN 60350 (2009)
Cooking and defrosting with microwave
Microwave cooking
| Dish | Microwave setting (watts) nd cooking time in minutes | Notes |
| Custard, 565 g | 180 watts, 25-30 mins + 90 watts, 20-25 mins | Place the 20 x 17 cm Pyrex dish on the turntable. |
| Sponge | 600 watts, 8-10 mins | Place the Ø 22 cm Pyrex dish on the turntable. |
| Meatloaf | 600 watts, 20-25 mins | Place the Pyrex dish on the turntable. |
Microwave defrosting
| Dish | Microwave setting (watts) nd cooking time in minutes | Note |
| Meat | 180 watts, 5-7 mins + 90 watts, 10-15 mins | Place the Ø 22 cm Pyrex dish on the turntable. |
fr Table des matieres
IporpaMbl aBTOMaTHueCKOro npHroTOBneHn.. 62
YctaHOBka nporpaMMbl 62
Pa3MopaxuBaHnE C nOMOJIbIO npoPpAMMaBTOMaTnueCKOro npiroTOBJIeHnI. 62
IOBeHeHneIdoTOrOBHO C NOMOuBIO IpoIpaMM aBTOMaTnueCKoTO npIrTOToBJIeHnIA. 63
IpoTeCTnPoBaHO nIy BAC B HaSei KxHe-CTyDIn 63
Yka3aHnK Ta6JIuCaM. 63
Pa3mopaxuBaHne 63
Pa3mOpaxuBaHnne,pa3oRpeBaHnne nIIN DoBedeHne 3aMopoxeHHbIX IOnyΦa6pNkATOB Do rTOBHOCTN. 64
PazorpeBaHne 6IIOI 64
PpuroToBnHeHne 6JIOI. 65
Pekomehdaizn no nCnoIb3OBAHnIO MKNpOBOJHOBoI neu...66
KoHTpOJIbHbIe 6JIIOJa B COOTBeTCTBn c EN 60705... 66
IObeJeHne IDo rOtOBHOCTn I pa3MopaxINBaHne C NOMOuMoMKNPOBOH.. 66
Bolee noopboHyu INHOpMaUIO O npOdyKUn, pInHaIJIeXHOCTAx, 3aIacbIX qactx N cJyKBe cepBnca MoKHO HaITN Ha oMuaJIbHOM caTe www.neff-international.com n Ha caTe INHTepHET-MaRa3nHa www.neff-eshop.com
He donyckaTe deTeMnaIwe 8 let K npnbopy n erO ceTebomy npoBovdy.
Bcerda npabnIbHo BCTaBnaIte npHaJIeJXHOCTN B paOouyIO KaMepy. CM. OINcAHne npHaJIeJXHOCTeB pyKOBOdCTBe IO 3KcPnyatauIN.
Onachoctb BO3ropaHra!
CtoKeHHbIeBpaOoeyKaMepe IeKOBocPJIaMeHJIOUINecrPipeDMtblMOyT 3aOpeTbcra. He xpaHnTeBpaOoey KaMepe
JIeKOBOCnIaMeHJIOUWeScnpeDMeTbI.He OTKpbBaITe DBePcU np6Opa,ecIn BHyTpN np6Opa o6pa3OBAJcNdBIM.BbIKIoUHTe np6Op,BbIHbTe BNJKy CeTeBOrO npOBoJa N3 PO3ETKn IIN OTKJIHOuNTe
npEOxpaHITJIb B 6JIOKe
npEOxpaHITeJeN.
IcnoIb3OBAHne npnbopa He no Ha3HaueHIO ONaCHO N MOKeT pPnBeCTN K nolomke. He IOnyckaetc cyuKa npOdyKTOB nII OdeJdbI, HArpeBaHne DOMaShNei OByBn, KpypIbIX nII 3epHObIX POnUSeueK, rYbOK, BJIaXHBIX TprnOK N TOMy IOno6HOrO. HanpImep, DOMaSHnA OByBb, KpypIbIe nII 3epHObIe POnUSeueKn Prn HArpeBaHn MOryt BCnblxHyTb.IcNoIb3yIte npnbOp TOJbKO dIg PnIROTOBJeHnR OJIHoD n HAInTKOB.
-Проуктbl MOryT BOCnIaMeHHTbcr. HNkoTda
He pa3oRpeBaIte Проуктbl PNTaHnB V
TePmoCTaTuceckO uNaKOBKe.
Pa3oRpeBaTb PpOdyKTbl B KOHTeHepax n3
IIaCTMaCCbI, 6yMaI NII dpyrIX
BOcPnIaMeHЯUOuXcR PrEdmETOB MoJHO
ToIbKO NOHaBLOJeHNEm.
HeJIb3ra YcTaHaBJIbBaTb CInlShKom BoIbShyo
MOUHOCTb MInKPOBOJH NII OueHb
dIInTeJIbHoe BpeMra. BceIgA cIeDyIte
Yka3aHnIaM, PnINBeDEHHbIM B DaHHom
pyKOBODCTBe IIO 3KcPnLyatauIN.
He cyuHtTe PpOdyKTbl B MInKPOBOJHOBOM
peXmme.
He pa3MopaxnBaIte N He rOTOBbTe
PpOdyKTbl C Hn3KIM COdePjKaHnEM BOIbI,
HaNPmEp, XJIe6, PnI BbICOKO MoUHOCTN
MNKPOBOJH NII CInlShKom DOJfROe BpeMra.
MaCNo IaI npuROTOBHeHnI NnIe MoXeT 3aRopeTbCS. HnkOrDa He pa3oRpeBaIte pactiTeJIbHOe MaCNo B MmKpOBOJHOBOM peXkIMe.
OnachocTb B3pbIbA!
KndkocTn nI npyrgne npOdykTbI pNTaHnB PnLOTHO 3akpbIToI NOCyDe MOrY T B3OpBaTbcR. HnkOrda He pa3oRpeBaIte XnDKocTn nI IN dpyrge npOdykTbI pNTaHnB PnLOTHO 3akpbIToI NOCyDe.
BbICOKaOnachOcTbIJIy3OpOBbI!
HeIOCTaTOUHnO ONUCTKa MOXeT pINBecTn K NOBpeKdEHNIO NOBepxHocTn. Bo3MOxeH BbIXoD 3HeprN MKNpOBOJH HApJyK. OUnsaiTe np6Op CBOeBpeMeHNO n cpa3y JKe ydaJIaIte n3 HeRo OCTaTkN pOdyKTob. BcerJa coJePKeTe B uIncToTe pa6Ouyo KaMepy, yIpIoTHHeHne DBePzbl, DBePzU n
OrpaHnUHTeJIb OTKpbIBaHHaI DBepUbl; CM. rIaBv «YXoJ N OuNCTKa>.
Yepe3 NOBpejKdEHHyO DBepy pa6ooye KaMepbI NN eE yNIOHTHnTeJb MoKeT BbIXODITb 3HEprrMaMKPOBOH. He NcPOnb3yIte np6Op, cSIn IOBpejXDeHbI DBePca NN eE yNIOHTHnTeJb. BbI3OBtEcNeuaJIncTa cepBnCHoN cLyXbI.
Y npnbopOB 6e3 3aunTHoro KOpnyca 3HepnMnKpOBOJN MOKeT BbIXoJNTb HApuy. HnkOrda He cHmMaTe 3aunTHbI KOpync.ДЯ OcyuceCTBJeHnI npocnlaKTnKn n peMOHTa BblBaIte CepBnCHyU Clyx6y.
OnachocTB yapa TOKOM!
KhoIHKnHcNoJIb3OBaHne
HaK HONKo3aRopaetcHnDKaTOp.
- Haxmte KhoNkTypeBeyMoMouHocTN MInKpOBoJH.
HaKHOHko3aRopaetcHnDnKaTOp,aHaIncJIeeNORBnEeTc1:00MH.
3.YctaHOBnTe BpemI npuTOrOBJIeHnC NOMOuIO NOBOPOTHOI nepeKJIouaTeJI.
Yka3aHHe: MoXHO ChauJa yCTaHOBnTb BpEe npIroTOBJIeHn, a 3aTeM - MOnHOCTb MInKPOBOJH.
OxnaKaDaIOUsN BeHTnJIaTOp
Pnp6op ochaeh OxlaJdaHoum BeHTnIaTOpom. BeHTnIaTOp MoKeT pOdoJkaT ba6oTaT daKe nocLe BbIKNoUeHnepn6opa.
Yka3aHn
Bo Bpempa60tB MmKpOBOJHOBOMpeXIme np6Op He HarpeBaetc. TeM He MeHee, BKIOUaEcTcOxJaQaIOuN BeHTnIaTOp.BeHTnIaTOp MOKeT pOdoJXkaTb pa6oTaTb daKe Iocne BbIKIOUeHnMkPpOBOJHOBOrpeXIma.
Ha cTeKJIe DBePcUb, BHyTpEHHNX CTeHkax I nIhe pa6Oey KAmepbl MoKET O6pa3ObBbIbATbc KOHNHeCAt. 3TO HOpMaJIbHOe RAJIeHne, He OKa3bIbAIOoee OTPuCaTeJIbHOro BO3JeCTBnRA Ha fYHKUOHOHPOBaHne np6Oba. IIO OKOHuaHIn PpIroTOBLeHn npocTo ydaJInte KOHNHeCAt.
Yka3aHH
Mожно coхpaHTb yCTaHOBky B namrtnи cpa3y JKe aKTHBn3npoBaTb e.ДЯ 3aBepseHnHaKMNTe He Ha KHOJky M, aHa.
CoxpaHHeHbPnAMrTHHeCKoJIbKHX3HaueHm MOUHOCTM MKNpOBoHn He IpeDyCMOTpeHO.
CoxpaHeHne B nAMrTn aBTOMaTnuecknx IpOgpaMM TaKxe He npEynCMOTpeHo.
BBOJ HOBbIX 3aueHn B naTb: HAKMITE KHOIky M. Ha INCJIeE OTO6paKaHOTc npexKHe yCTaHOBKn. CoXpaHITe HOByIO npoRpAMMy, KaK ONICAHO B NYHKtax 1-4.
3anyck nporpaMM n3 namrTH
BbMOXeT BJIIO6oM MOMENT BbI3BaTb IpoRpaMMy, CoXpaHHeHHUO BnamATn. NocTabBe TocSyu B npi6Op. 3akpOte Dberpu npi6opa.
- HaxMMte KhoNkky M
OTo6paKaIOTcA coXpaHHeHHbI B nAmrIn yCTaHOBKn. - HaxMMTe KhoNk Ky [Start].
BpeMaI pIurOToBJIeHnHaUHHeT OTCuHTbBaTbCnHa IINcPJIee.
IIO nCTeueHn BpeMeHH npHroTOBneHn
Pa3daTc3 3bYkoBc nHnJ. OTKpoIe TdBepU np6opa nn HaxMNTe Sng. Ha nCnIee cHOBA NOBnEaTc BpeMa cyToK.
OctaHOBka
OДин pa3 NaЖмITE KHOПКу Stp ИЛN OТКpoIte DeBepU npIbopa. Pa6Ota npNoCTaHaBnBaETcR.NHДИkaTOp Hd KHOПКоM Start Mmraet. NocNe 3akpbIBaHnДeBepCu IOBTOpHOn HaЖмITE KHOПКу Stt.
I3MeHeHne npOJXHTeJIbHOCTn 3ByKOBOrO cnHaJa
PnBbIKIIOUeHn np6Opa pa3daETc8 3ByKOBOC nIHaI.
PpOJOnJIHTeJIbHOCTb 3BYKOBOrO cIHHaJa MOXHO n3MeHHTb.
ДяэTOHЯKMITEиУдрЖИВайTe KHOПКу [StaB TeueHne npIM. 6cekyHd.
HOBaI pOdoJXKeTbHOCtB CnHaI npHmAeTcHa. Ha nCnJIee CHoBA NOBJIeTcB BpeM CyToK.
Bo3MOxHbI: KopOTKm CnHaJ - 3 pa3a DInHHbCnHaJ - 30 pa3.
Yxod N Ounchka
YTo6bI He IOnyCTnTb NOBpeJdeHna pa3InuHbIX NOBepxHOCTe B pe3yIbTaTe npIMHeHNA HENoDxOJaUxN XuCTAunx CpeiCTB, CJeNyIte Yka3aHnAM, pINBeDEHHbIM Ba6LInce.
He nCnoB3yIe
eKne nn a6pa3nBbIe YNCTaIe CpeIcTba. OHmOryT NOBpeINt b NOBepxHocTb.EcNI TaKoe CpeIcTBO nnonaET Ha nepeNDIO NaHeJI, cpa3y CMOte erO BOIOJ.
MeTaalIueckneCKpe6KNIIINCKpe6KNДЯCTKJaDNYOuNCTKNCTeKJaDbepbl.
MeTaalIueckne Ckpe6Kn IJI NcKpe6Kn IJI CTeKJa IJI OUHCTKN yILOTHHTeJI.
JxctKHe MoaJIKN I y6Kn. HObIe ry6Kn dIy MbITbI NOCyDbI TtAteIbHO BbIMoITe IpeD INcNoJIb3OBAHnEM.
YnCTaIe CpeIcTbA, CoepJkaIe 60JIbIoI npOeHT cPiRtA.
UHCTaIe CpeIcTBa
BHHMaHHe!
Ipeed BbINOHeHnEM OunchKn BbIHbTe Bnky CteBOrKa6eJn3
po3eTKn nn OTKlOChTE npEdoxpaHntB 6Boke
npEdoxpaHnteJe. OunchTe pIn6op ChapyKn n BHyTpnc
POMoUbHO BnaJHoTpAnOuKn mMaKOrO cpeDCTBa DnA OunchTKN.
3aTeM Ipotpnte Hacyxo UcStOn TprnKoN.
UTo DeIaTb npH HeNcnpaBHOCTn?
IpoIroTOBka npOdyKTOB
IcnoJb3yIte NO BO3MOXHOCHTI pOdyKtbl, KOToPbIe 3aMopaxNBaJIncb TOHKIMN KYCKaMI NII INoPcIOHO XpaHNIINCb npn -18 ^ C
ПОЛНOCТьО BыньTe ПpoДуКТь IДЯ pa3MOPаЖИВАИЗ ИЗУпakOBКИ И B3BecБte Ix. 3HaHne Beca HeoOxOДIMо IДЯ YcTaHOBKIN npOrpamMbI.
Pn pa3mopaxkuaHm mca n ITnUcbl o6pa3yeTcKuIKoCTb. Hn B KOem cIyueae HeIb3r IcNIOb3ObaTb eE JIaJIbHeIseI rTOBKn, OHa TaKKe He DoJIxHa CoPnKacatbC C dpyTMM npOdyKTamn.
Pocya
IIOJXnTe npOyKtBHa npIrOndHyIO nJI MmKpOBJHOBOI neu IIOCKyIO NocUy, HAnPIMeP, Ha CTeKJIaHHyIO nIN φapΦopOBYIO TapeJIky, IN He 3aKpbBaIte IN KpbIJKoI.
BpeMBAeepK
Pa3MopOKeHHbIe npOyKbI ocTAbTe eue Ha 10-30 MInHyT dIa BblpaBHBaHnI TeMnepaTpyb.IIb6OJIbXkycKOB MCA 3TO BpMa MoKet 6bITb 6OJIee IPOJOnJXnTEJIbHbIM, cEm dIa MaJIeHbKnx. ToHKne KcCKn mChOH qapW CJIeNyET npeEd BbICTaINBaHNem OTdJIInTb Dpyr OT dpYra.
Iocne 3TOrO npOdykTB MoJHO o6pa6aTBiBaTb daJIbSe,JaXe
ecnToTCTbIE KcCKN B CpeEINHe He Io KOHca pa3MOpO3NJNCb.
PTNUy MOJHO Hauatb NOTPOuNTb.
3BykoBoCnHaI
B HeKoTOpbIX npoRpaMMax nocLe onpeJeHnOro BpeMeHH pa3daaTcraHnA. OTkpoIte DBePcy npuBopHa n pa3dJInte 6JIO IO nn IpeBepHNTe MRCO nn PtTuCy. NocLe 3akpbBaHnJ DBePcIy NOBTOpHO hAXMITE KHOJKy Start.
IpoIroTObHa npOdyKTOB
B3BeCbTe npOdykTbI. 3HaHHe BeCA Heo6xOdmo Iy yCTaHOBKn npOrpaMMbl.
Pnc:
He IcNoIb3yIte pnc 6bIcTpOro npriTOBLeHnB nakTeNKax. DObabTe HeoXoDnMoE KOJInueCTBO BOJIb COJIaCHO yka3aHnM
npoun3boDnTeHa ynaKOBKe.BoDbIdoJXHO 6bITb, KaK npaBnIO, B2-3 pa3a 60JIbSe, Yem pica.
KaptofJIb:
Pe3yIbTaT npnroTOBHeHn 3aBnCt OT KaueCTBa IpoDyKToB nIX COCTOHHN.
IpiHroTOBJIeHHe C MmKpOBoJHaMn