USER MANUAL C77V60N2 NEFF
NL Nederland, Netherlands
15th Road Randjiespark
Private Bag X36, Randjespark


Neff GmbH
9000656151
Included in delivery (see page 34)
www.neff-electromenager.com
GB Great Britain
BSH Home Appliances Ltd.
Grand Union House
Old Wolverton Road
Wolverton
Milton Keynes MK12 5PT
To arrange an engineer visit,
to order spare parts and
- accessories or for product a
please visit www.heff.co.uk or call
Tel.: 0844 892 8989
Calls from a BT landline will be charged
at up to 3 pence per minute . A call set-upof up to 6 pence may be
fee or up to 6 pence may app.
GR Greece, Eλας
BSH Ikiakes Siskeves A. B. E.
Central Branch Service
17 km E O Athinon-Lamjas &
Potamou 20
14564 Kifisia
Greece - Athens
Tel.: 2104 277 701
Fax:2104277669
North-Greece - Thessaloniki
Tel.: 2310 497 200
Fax: 2310 497 220
South-Greece - Heraklion/Kreta
Tel:2810325403
Fax:2810324585
Central-Greece - Patras
Tel.: 2610 330 478
Fax: 2610 331 832
mailto:cs_gr_helpdesk@
bshg.com
IT Italia, Italy
LT Lietuva, Lithuania
Senuku Prekybos Centras UAB.
Jonavos q. 62
44192 Kaunas
Tel.: 0372 12146
Fax: 0372 12165
www.senukai.lt
LU Luxembourg
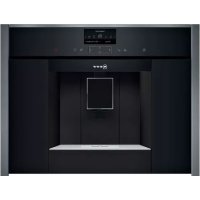
... on purchasing this product. With this deployable fully automatic espresso machine you have acquired a high-quality modern kitchen appliance of innovative design which combines a multitude of functions with easy operation.
It will enable you to prepare a variety of delicious hot drinks quickly and simply – whether you're in the mood for a traditional cup of coffee, a smooth milk coffee or latte macchiato, a creamy cappuccino or an invigorating espresso. At the same time the appliance offers you a wide range of options for adapting it to your individual taste.
To ensure that you can use this fully automatic espresso machine with all its functions and features reliably and safely, we would like you to familiarize yourself with its components, functions, displays and controls.
These instructions are designed to help you. So please take the time to read them before you switch on the appliance.
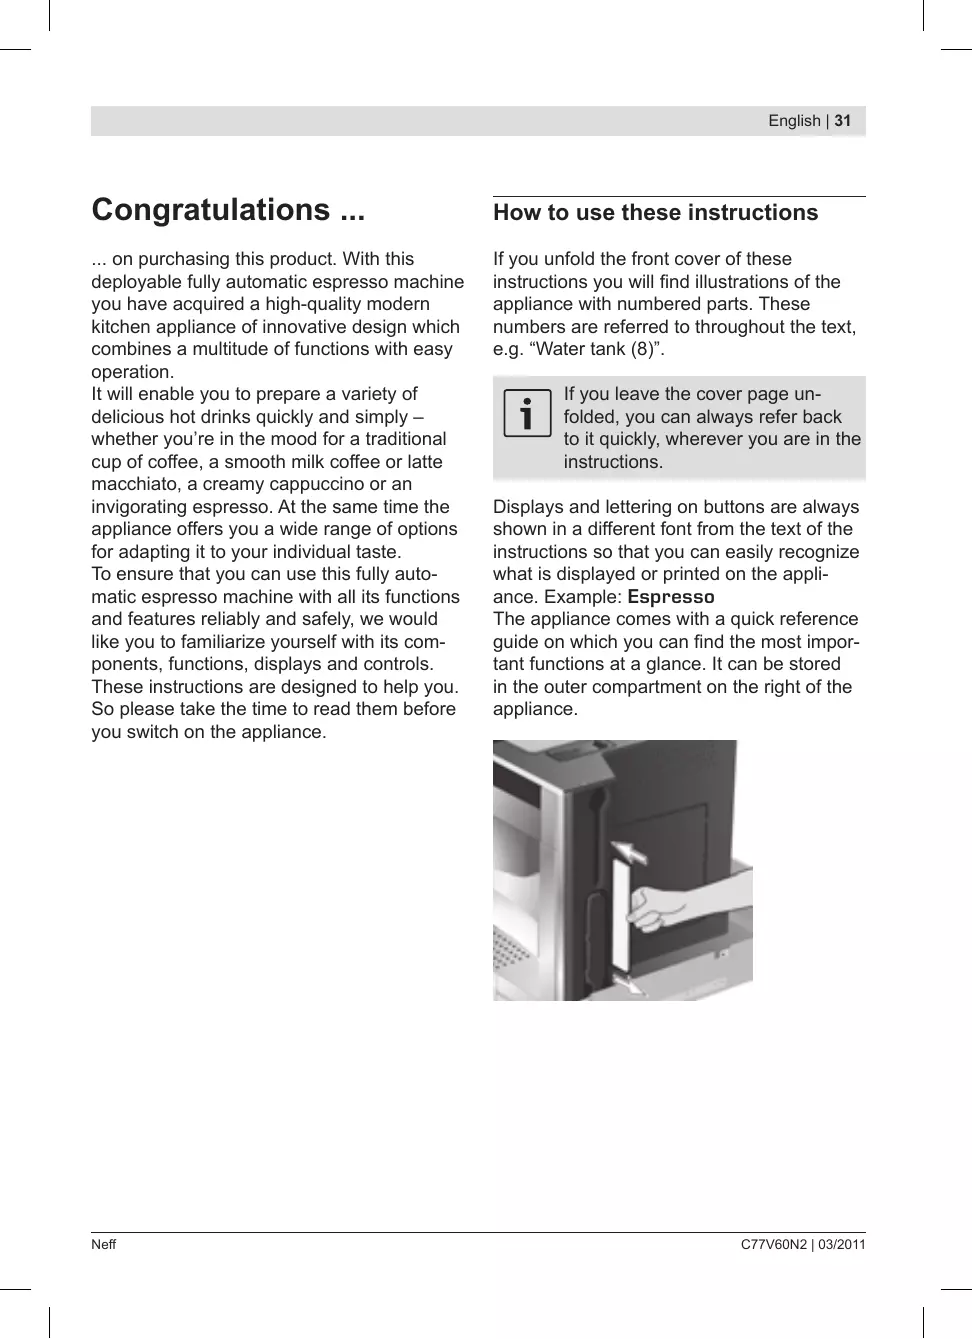
How to use these instructions
If you unfold the front cover of these instructions you will find illustrations of the appliance with numbered parts. These numbers are referred to throughout the text, e.g. "Water tank (8)".

If you leave the cover page unfolded, you can always refer back to it quickly, wherever you are in the instructions.
Displays and lettering on buttons are always shown in a different font from the text of the instructions so that you can easily recognize what is displayed or printed on the appliance. Example: Espresso
The appliance comes with a quick reference guide on which you can find the most important functions at a glance. It can be stored in the outer compartment on the right of the appliance.
Contents
33 Safety instructions
34 Included in delivery
34 The appliance and its parts
35 Controls and display
38 Operation
39 Preparing drinks
35 Power switch O/I
35 Menu and display
36 Deployment system
37 Accessories
37 Display messages
38 General
38 Energy saving mode
38 Setting up the appliance
39 Drink selection
40 Dual grind
40 Example
41 Preparation using pre-ground coffee
41 Preparation using milk
42 Two cups at once
43 My coffee
44 Preparing milk froth and warm milk
44 Dispensing hot water
45 Displaying information
45 Displaying settings
46 Set per-cup quantity
47 Adjusting the grinding unit
47 Checking the water hardness
47 Tips on energy saving
48 Daily maintenance and cleaning
48 Daily maintenance
48 Cleaning the milk system
49 Cleaning the brewing unit
51 Service programmes
51 Descaling
52 Cleaning
53 Calc'n'Clean
54 Accessories, storage, disposal, guarantee
54 Accessories
54 Storage
54 Disposal
54 Guarantee
55 Simple troubleshooting
57 Technical data
Safety instructions
Please read the operating instructions carefully before using the appliance and keep them for future reference. You should also note the enclosed quick reference guide. This fully automatic espresso machine is designed for preparation of small amounts of coffee for domestic use or for use in non-commercial, household-like environments, such as staff kitchens in shops, offices, agricultural and other small businesses or for use by guests at bed-and-breakfast establishments, small hotels and similar residential facilities.
It should only be filled with fresh water and the substances described in these instructions (coffee, cleaning/descaling agents). Use indoors and at room temperature only. Do not allow persons (including children) with reduced physical, sensory or mental capabilities, or lack of experience and knowledge, to use this appliance, unless they are being supervised or have been given instruction concerning use of the appliance by a person responsible for their safety. Keep children away from the appliance. Children should be supervised to ensure that they do not play with the appliance.
Risk of electric shock! Connect and operate the appliance only in accordance with the specifications on the rating label. Do not use if either the power cord or the appliance is damaged. In the event of a malfunction, switch off the appliance immediately by the power on/off switch. Then pull out the power plug. Do not open the appliance or dismantle it. Never immerse the power cord in water. To avoid potential hazards, repairs such as replacing a damaged power cord should only be performed by our service personnel.
Risk of injury! Do not reach into the grinding unit.
Risk of burns! The milk frother for milk and hot water gets very hot.
After use, allow to cool down first before touching.
Risk of injury! Be careful when pulling the appliance out of the built-in unit and pushing it back in, so that fingers are not trapped.
Included in delivery
See the illustration at the beginning of this instruction manual.
Fully automatic espresso machine C77V60N2
Instruction manual
Filter instructions
Installation instructions
Measuring spoon
Milk tube
Quick reference guide
Milk container
Water filter
Grease (tube)
Water hardness testing strip
Milk frother
The appliance and its parts
(See illustration on the fold-out front cover of these instructions)
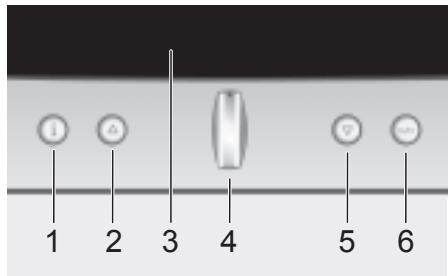
1 Button i (information/settings)
2 Selection button (up)
3 Display
4 Retractable navigation button
5 Selection button (down)
6 / Start/Stop button
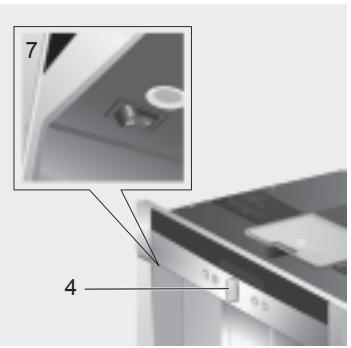
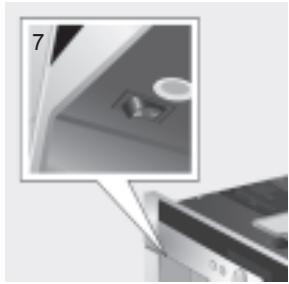
7 Power switch O/I
8 Removable water tank
9 Bean container with aroma cover
10.739 (for ground coffee/cleaning tablet)
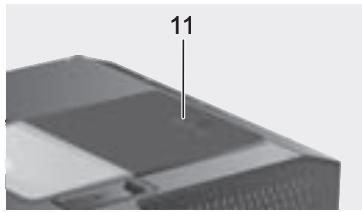
11 Selector for adjusting the grind
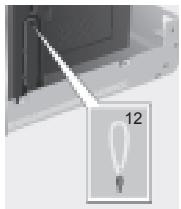
12 Milk tube
13 Measuring spoon
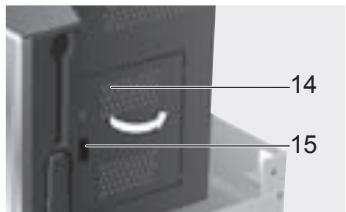
14 Door to brewing unit
15 Door opener to brewing unit
16 Deployment button
17 Milk container
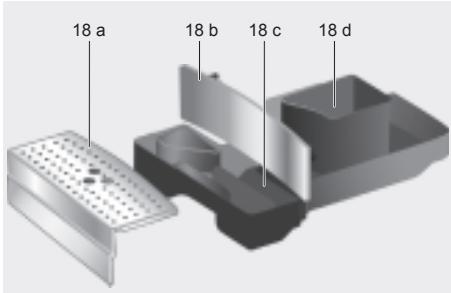
18 Drip tray unit
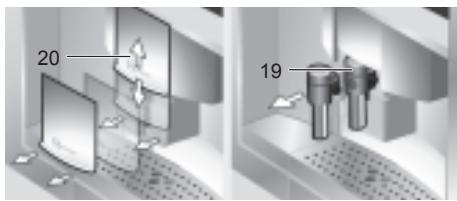
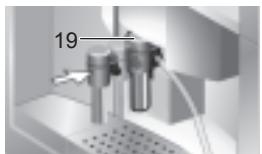
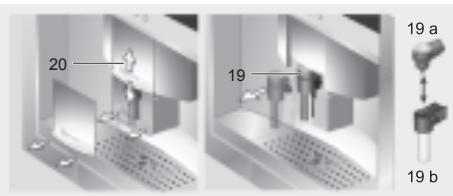
19 Removable milk frother (for milk/hot water)
20 Height-adjustable coffee outlet
Controls and display
Power switch O/I
The power switch O/I (7) is used to switch the appliance on or to switch it off fully (power supply off).
In "energy saving mode" an LED lights up in the display.

Important:
Do not press the power switch while the appliance is operating. You should only switch off the appliance after putting it into "energy saving mode" by retracting the navigation button. This initiates automatic rinsing of the appliance.
Menu and display
The appliance features user-friendly menu navigation to ensure that operation is as easy as possible while at the same time offering a wide range of functions. It allows you to select from a multitude of options in only a few steps once you know how. The display shows which programme you have selected and lets you know when you need to top up the appliance with water or coffee, or run one of the service programmes. Basic menu operation is described in the following pages.
1 i: If you press i briefly, information is shown on the display (see "Displaying information"). If you keep i pressed for at least three seconds, you open the settings menu (see "Displaying settings").
2 : This button is used to navigate upwards in the display (3). The currently active menu item is shown in a larger font.
3 Display: The display uses symbols and texts to indicate settings, ongoing processes and messages.
4 Retractable navigation button: Not retracted: The appliance is switched on. After it is switched on the appliance rinses, unless it is still warm from its last use.
Retracted: The appliance is in "energy saving mode". After the appliance has been switched to "energy saving mode" it rinses, unless coffee has not been dispensed. The appliance is ready for use when the drink selection menu is shown in the display (3). Press the navigation button in the required direction to enter or change settings (e.g. coffee strength or per-cup quantity).

Even when in "energy saving mode" the appliance recognizes when the drip tray unit (18) has been removed.
5 : This button is used to navigate downwards in the display (3). The currently active menu item is shown in a larger font.
6 Start/Stop / : This button is used to start drink preparation or to start a service programme. Press / (6) again during drink preparation to stop the dispensing process.
Deployment system
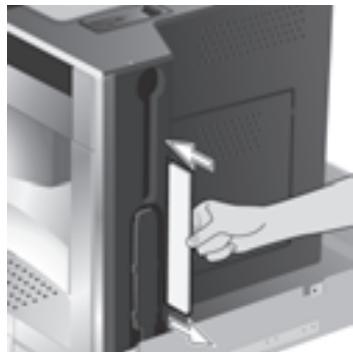
The appliance can be pulled out of the built-in unit automatically. To do this,
press deployment button (16) (appliance must be switched on for this) or
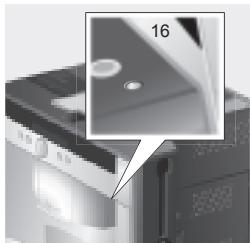
remove grate and pull on the handle underneath which is now accessible:
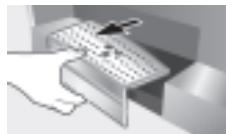

The appliance now moves automatically into deployment position 1. In this position it can be filled with water, coffee beans, ground coffee and cleaning/descaling tablets, and the accessories on the right of the appliance can be removed.
To pull the appliance out fully,
press deployment button (16) again and pull the appliance out by hand into position 2 or
- pull the appliance out fully by the handle. In deployment position 2 the brewing unit can be removed and the grinding unit adjusted.
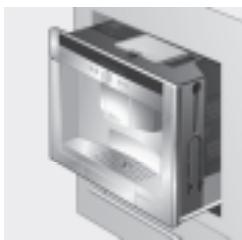
Deployment position 1
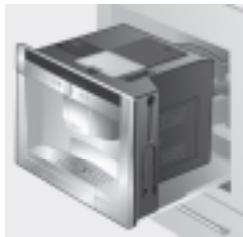
Deployment position 2
Then push the appliance back fully into the built-in unit.

During the brewing process, automatic deployment is prevented.
Accessories
The fully automatic espresso machine has special compartments for storing the accessories (12, 13) and quick reference guide with the appliance. These are located on the right side and are accessible when the appliance is pulled out into deployment position 1.
Display messages
The display shows not only the current operating status, but also various messages that give you status information or let you know when you need to take action. As soon as you have taken the necessary action, the message disappears and the menu for drink selection is displayed again.
Information:
| Display message | Meaning |
| Water tank almost empty | Water tank must be refilled soon |
| Bean container almost empty | Bean container must be refilled soon |
| Insufficient temperature Please wait | The machine is heating up. This will only take a moment. |
| You can now remove your drink | The drink can be removed |
Prompts:
| Display message | What you need to do |
| Refill water tank | Refill water tank |
| Replace water tank | Replace water tank |
| Check water tank | Remove water tank and replace correctly |
| Replace drip tray | Replace drip tray |
| Empty drip tray | Empty drip tray and clean |
| Refill bean container | Refill bean container |
| Set up milk frother | Set up milk frother |
| Replace brewing unit | Replace brewing unit and close door |
| Close door | |
| Clean brewing unit | Clean brewing unit |
| Service - change filter | Change water filter |
| Service - descale | Run “Descaling” service programme |
| Service - clean | Run “Cleaning” service programme |
| Service - Calc'n'Clean | Run “Calc'n'clean” service programme |
| Short rinse for milk system →◯/◯ | Rinse milk system |
Operation
General
Fill the water tank with fresh, uncarbonated water only, and preferably use only beans for fully automatic coffee and espresso machines. Do not use coffee beans that have been glazed, caramelised or treated with other additives containing sugar, since they will block the brewing unit.
If the appliance is being used for the first time or has not been operated for a long period, the first cup of coffee will not have the full aroma.
When using the espresso machine for the first time, you will achieve a suitably thick and stable "crema" only after the first few cups have been dispensed.
The factory settings of the fully automatic.
espresso machine are programmed for optimal performance. The appliance switches to "energy saving mode" automatically after one hour. This setting, like many others, can be changed (see "Auto off after" under "Displaying settings").
Energy saving mode
If the drip tray is not in place, the appliance cannot be switched on and no water flows out of the coffee outlet. The message "Replace drip tray" appears. This message also appears if the drip tray is removed while the appliance is in "energy saving mode". The message disappears when the drip tray is replaced. The appliance reverts to "energy saving mode".

Do not press the power switch while the appliance is operating. The appliance should only be switched off when it is in "energy saving mode", so that it can rinse automatically.
Setting up the appliance
- Press the power switch (7).
- The language selection is shown in the display:

- Press the retractable navigation button (4) to select the language in which you want the display texts to appear.
The following languages can be selected:
Deutsch Português
English Dansk
Pycckn Norsk
Nederlands Suomi
Français Cesky
Italiano Türkce
Svenska Magyar
Espanol Eληνικά
Polski BbIrapckn
- Press / (6). The language you selected is saved.
You can change the language setting at any time (see "Displaying settings").
- Deploy the appliance (see "Deployment system").
- Remove the water tank (8) by pulling it upward, rinse and fill it with fresh cold water. Do not fill above the "max" mark.
- Replace the water tank and push it firmly downward into place.
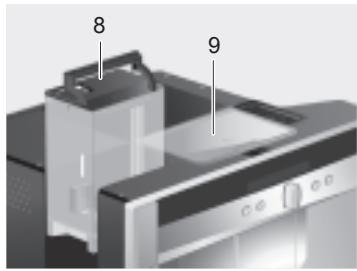

Fill the water tank with fresh water every day. The tank should always contain sufficient water for operating the appliance.
- Fill the bean container (9) with coffee beans (for preparation using ground coffee, see page 41).
- Push the appliance back into the built-in unit.
- The appliance now heats up and rinses. Some water will run out of the coffee outlet. The menu for drink selection is shown in the display:
| Espresso | Coffee | Latte Macchiato |
| regular | |
| medium cup | |
- Set the water hardness (see "Displaying settings").
Preparing drinks
Drink selection
You can use the navigation button () (4) to select your drink in the drink selection menu:
| Espresso | Coffee |
| regular | |
| medium cup | |
Espresso
equal quantities of espresso and milk froth; topped up with milk; best served in a tall glass;
Cappuccino
1/3 espresso + 1/3 milk + 1/3 milk froth; best served in a cup;
White coffee
1/2 coffee + 1/2 milk; best served in a wide cup;
My coffee
Milk froth
Warm milk
Hot water
Short rinse
For most types of drink you can use buttons (2) and (5) to select further options, e.g. coffee strength and per-cup quantity. The available options are always shown under the type of drink. Among the options you select with (2) and (5) you can then change other settings using the navigation button () (4).
Under coffee preparation you have the following options:
Strength:
mild
regular
strong
double strength
double strength extra
Size:
small
medium
large
Dual grind
The longer the coffee is brewed, the more bitter substances and undesired aromas are released. This has a negative effect on the taste and makes the coffee less easily digestible. That's why your fully automatic espresso machine includes a special dualgrind function for the double strength and double strength extra strength settings. When half the quantity has been prepared, coffee is ground and brewed again so that only the pleasant, aromatic scents are released.
This function is available for the following beverages:
Coffee (1 cup)
Cappuccino (1 cup)
White coffee (1 cup)
My coffee (1 cup)
Espresso (1 cup, medium and large)
Example
Let's assume you would like a large cup of mild coffee made from coffee beans.
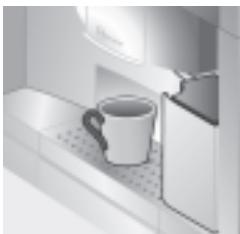
- Place the cup under the coffee outlet (20):

- Keep pressing the navigation button (4) until Coffee is displayed in the centre of the top line (the currently active setting is shown in a larger font):
| Espresso | Coffee | Latte Macchiato |
| regular medium cup | |
- Now press (5) once to get to the strength setting. The strength setting is highlighted:
| Coffee |
| mild | regular | strong |
| medium cup |
- Press the navigation button (4) to the left until mild appears in large letters in the centre:
| Coffee |
| mild | regular |
| medium cup | |
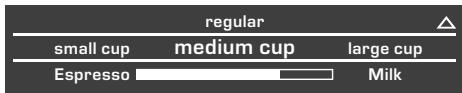
- Press (5) again to get to the per-cup quantity setting. The per-cup quantity setting is now highlighted:
| Coffee |
| mild |
| small cup | medium cup | large cup |
- Press the navigation button (4) to the right until large cup appears in the centre:
| Coffee |
| mild |
| medium cup | large cup |
| 2 small cups |
- Press /口 (6).
The coffee you have selected is prepared. Proceed in the same way to prepare other types of coffee in different strengths and per-cup quantities.

In the case of the strength settings double strength and double strength extra, the appliance brews twice in succession. Wait until the procedure is fully completed.
Preparation using pre-ground coffee
This fully automatic espresso machine also offers the option of making coffee with pre-ground coffee. A measuring spoon in included with the appliance.
- Deploy the appliance and remove the measuring spoon.
- Open the drawer (10).
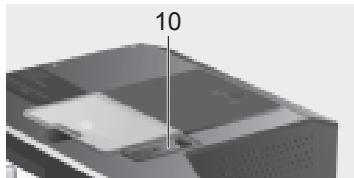
- Pour in no more than two level spoons of ground coffee.

Do not use whole beans or instant coffee.
-
Close the drawer again.
-
Push the appliance back in.
- Select the required drink and per-cup quantity with the navigation button (4):
| Espresso
Coffee powder |
| small cup | medium cup | large cup |
- Place a cup under the coffee outlet (20):

- Press / (6).
The coffee is brewed and then dispensed into the cup(s). For another cup of coffee, pour in more ground coffee and repeat the procedure. If no coffee is taken within 90 seconds, the brewing chamber empties automatically to avoid overfilling. The appliance rinses.
Preparation using milk

For optimal milk froth, use cold milk with a fat content of at least 1.5% if possible.
- Slide the coffee outlet (20) downwards. Remove the cover and pull out the milk frother (19):
-
Deploy the appliance (see "Deployment system").
-
Take the milk tube supplied with the appliance and connect it to the attachment point on the milk frother (19).
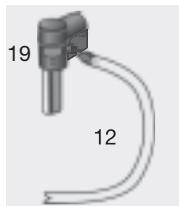
- Attach the milk frother (19) and push the milk tube (12) into the indentation.
- Close the cover.
- Push the appliance back in.
- Place container with milk next to the milk frother. Introduce the milk tube into the container. The notched end of the tube should be fully immersed in the milk.

- Place a cup or glass under the coffee outlet.
- Use the navigation button (4) to select Latte Macchiato, Cappuccino, White coffee or My coffee (your own special coffee/milk mix). The display shows the selected drink along with the setting for coffee strength and per-cup quantity for this drink:
Coffee
Latte Macchiato
Cappuccino
regular
medium glass
- Choose your settings for strength and per-cup quantity.
- Press /口 (6).
First milk is drawn in, prepared and dispensed into the cup or glass. Immediately after that the coffee is brewed and then runs into the cup or glass.

In the case of the strength settings double strength and double strength extra, the appliance brews twice in succession. Wait until the procedure is fully completed.

Dried milk residue is difficult to remove, so clean the milk system immediately after use (see "Cleaning the milk system").
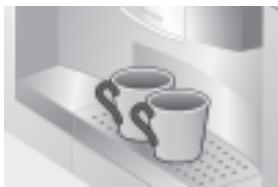
Two cups at once
- Place two cups under the two coffee outlets left and right:
- Select Espresso or Coffee with the navigation button (4). Press (5) and the navigation button to set the required strength.
- Press (5) to switch to the per-cup quantity menu. In the per-cup quantity menu, keep pressing the navigation button (4) to the right until the display shows 2 small cups:

- Set the required quantity for the two cups by turning the navigation button (4) (small, medium, large).
- Press / (6). Coffee is dispensed into the two cups.

The appliance brews twice in succession; wait for the complete process to finish.
My coffee
The My coffee setting allows you to define the exact mix of coffee and frothed milk that suits your own individual taste.
- Connect the milk tube (12) to the milk frother (19) (see "Preparation using milk").
- Place container with milk on the grate. Introduce the milk tube (12) into the container. The notched end of the tube should be fully immersed in the milk.
- Place a cup under the coffee outlet.
- Select My coffee with the navigation button (4):

- Press (5) to switch to the coffee strength selection. Set the required strength with the navigation button () (4):

- Press (5) to go on to the per-cup quantity selection. Set the required per-cup quantity with the navigation button (4):
- Press (5) to switch to selection of the coffee/milk ratio. Set the required mix in 20% steps with the navigation button (4):

- Press / (6); the drink is prepared in the required coffee/milk ratio.

The changes you have made are saved automatically. It is not necessary to confirm them additionally.
Preparing milk froth and warm milk

Risk of burns!
The milk frother (19) gets very hot.
After use, allow to cool down first
before touching.

For optimal milk froth, use cold milk with a fat content of at least 1.5% if possible.
- Take the milk tube (12) and connect it to the milk frother (19) (see "Preparation using milk").
- Place a cup or glass under the outlet of the milk frother.
- Select the required setting for Milk froth or Warm milk with the navigation button (4):
My coffee
Milk froth
Warm milk
- Press / (6); milk froth or warm milk runs out of the milk frother outlet (takes about 40 or 60 seconds respectively).
Press / (6) again to cut the process short.

The appliance may make a whistling noise when warm milk is being prepared. This is caused by the milk frother (19) for technical reasons

Dried milk residue is difficult to remove, so clean the milk frother immediately after use (see "Cleaning the milk system").
Dispensing hot water

Risk of burns!
The milk frother (19), from which the hot water flows, gets very hot.
After use, allow to cool down first before touching.
The appliance can also be used to dispense hot water, e.g. for tea.
- Place a cup or glass under the coffee outlet.
- Select Hot water with the navigation button (4):
| Warm milk | Hot water | Short rinse |
| ~ 85°C | |
- Press (5) to switch to the temperature selection. Set the required temperature with the navigation button () (4):
- Press / (6); hot water runs out of the milk frother outlet for about 40 seconds.
Press / (6) again to cut the process short.

Warm up cups before use, especially small, thick espresso cups, with the hot water.
Use i (1) to display information (press briefly) and adjust settings (hold down for at least three seconds).
In the Info menu (press i (1) briefly) you can call up the following information:
when it is necessary to descale the appliance
when it is necessary to clean the appliance
when it is necessary to change the filter
how much coffee has been dispensed since the appliance was first put into operation
how many milk drinks have been dispensed
how much hot water has been prepared
Displaying settings
Hold down i (1) for at least 3 seconds; the different setting options are then displayed:
| Settings |
| Language | Cup volume |
| English | |
Use (2) and (5) to switch between the different setting options. The currently active setting is always shown in a larger font. You can change the setting that is currently displayed using the navigation button () (4). To exit the menu, press i (1) again.

The changes you have made are saved automatically. It is not necessary to confirm them additionally.
The following setting options are available to you:
Language: Press the navigation button (4) to select the display language.
Cup volume: The per-cup quantity can be set separately for each type of drink and each cup size ("Set per-cup quantity" on page 46).
Water hardness: Press the navigation button () (4) to select the required water hardness (1, 2, 3 or 4) (refer also to "Checking and setting the water hardness").
Coffee temperature: Press the navigation button (4) to set the coffee temperature.
Auto off after: Press the navigation button (4) to enter the time span after which the appliance should automatically switch to "energy saving mode" following the last drink preparation. A time between 5 minutes and 8 hours can be set. The default time is one hour, but this can be shortened to save energy.
Contrast: The display contrast can be set from -4 to +4 with the navigation button (4). The default setting is 0.
Illumination: The lighting can be set to Off, On (factory setting) or Off after 5 min.
Water filter: Each time a new water filter is inserted in the water tank (8), it must be rinsed:
- Place the water filter in the water tank (8) and fill the tank with water up to the "max" mark.
- Use the navigation button (4) to select Press / and press / (6).
- Place a container with a capacity of 0.5 litres under the milk frother (19).
- Press / (6). Water will now run first through the filter to rinse it and then into the container.
Empty the container. The appliance is ready to use once more.
Rinsing the filter simultaneously activates the setting for the Service - change filter display.
The filter is no longer effective when the Service - change filter display appears, or at the latest after two months.
It needs to be replaced for reasons of hygiene and so that there is no build-up of limescale (this could damage the appliance).
Replacement filters can be obtained from retailers or customer service (see "Accessories").
After every filter change the filter must first be rinsed. Proceed as described at the beginning of this section.
If no new filter is used, turn the water filter setting to Off.

You can find detailed information about the water filter in the enclosed filter instructions.

If the appliance has not been used for a prolonged period (e.g. during your vacation) the filter should be rinsed before the appliance is used again. To do this, simply dispense a cup of hot water.
Descale: If you want to descale the appliance, press / (6) and run the descending programme (see "Dscaling").
Clean: If you want to clean the appliance, press / (6) and run the cleaning programme (see "Cleaning").
Calc'nClean: If you want to descale and clean the appliance at the same time, press D/□ (6) and run the Calc'nClean programme (see "Calc'nClean").
Factory settings: You can cancel your own settings and reset to the factory settings. To activate the factory settings, press / (6).

The appliance can also be reset to the factory settings as follows:
- Switch the appliance off fully at the power switch O/I (7).
- Press (2) and (5) at the same time, hold them down, and switch the appliance on again at the power switch O/I (7).
The factory settings are reactivated.
Set per-cup quantity
The per-cup quantity can be adjusted individually to suit your cups. It can be set separately for each type of drink and each cup size.
- To call up the default settings, keep i (1) depressed for at least 3 seconds.
- Select Cup volume with the retractable navigation button (4).
- Press (5).
- Select the type of beverage with the retractable navigation button (4).
- Press (5).
- Select the cup size with the retractable navigation button (4).
- Press (5).
- Adjust the beverage quantity with the retractable navigation button (4).
(2) returns you to cup size and drink selection. To quit the default settings, press i (1). The settings are stored.

Important:
The selected amount in ml is an approximate value and can vary significantly as a result of crema forming, the grind setting or the type of milk used, etc.
Adjusting the grinding unit
The rotary selector (11) on the top of the appliance adjusts the degree of grinding from coarse to fine as required.

Warning:
Adjust the grinding unit only while it is running. Otherwise the appliance may be damaged.
- Deploy the appliance fully (see "Deployment system").
- In the drink selection menu, select Espresso.
- Press / (6).
- While the grinding unit is running, adjust the rotary selector (11) from fine to coarse or back as required.

The new setting will not become apparent until after the second cup of coffee.
Tip: For dark roast coffee beans, choose a finer grind, for lighter beans a coarser grind.
Checking the water hardness
The water hardness setting can be adjusted on this appliance. It is important to set the water hardness correctly, so that the appliance indicates accurately when the descending programme should be run. The factory setting for the water hardness is 4.
You can check the water hardness using the enclosed test strip or by asking your local water supplier.
Dip the test strip briefly in water, gently shake off any drips, and check the result after one minute.
Water hardness levels and settings:
| Level | Water hardness |
| German (°dH) | French (°fH) |
| 1 | 1-7 | 1-13 |
| 2 | 8-14 | 14-25 |
| 3 | 15-21 | 26-38 |
| 4 | 22-30 | 39-54 |
Tips on energy saving
The fully automatic espresso machine switches to "energy saving mode" automatically after one hour (factory setting). The appliances use very little power when in "energy saving mode", but monitors all safety-relevant functions so as to avoid damage. The default time of one hour can be shortened (see "Auto off after" under "Displaying settings"). The appliance then uses even less power.
The appliance is put into "energy saving mode" by retracting the navigation button.
If the appliance is not being used, switch it off at the power switch.
If possible, do not interrupt coffee or milk froth dispensing. Stopping a process prematurely results in higher energy consumption and the drip tray fills up more quickly.
Always descale the appliance when Service - descale is displayed (see "Dscaling") to avoid a build-up of limescale. Limescale residue results in higher energy consumption.
Daily maintenance and cleaning

Risk of electric shock! Before cleaning the appliance, switch it off at the power switch.
Do not use a steam cleaner.
Daily maintenance
- Wipe the outside of the appliance daily with a soft, damp cloth. Do not use abrasive cloths or cleaning agents.
- Always remove any limescale, coffee, milk or descending fluid residue immediately. Such residue can cause corrosion.
- Do not use alcohol-based or spirit-based cleaning agents on the high-gloss surfaces.
- Rinse out the water tank (8) with water only.
- Take off the grate (18a). Pull out the drip tray (18c). Take off the drip tray panel (18b). Empty out any water and coffee grinds (18d). Clean the drip tray or put it in the dishwasher. Do not put the grate (18a) or the drip tray panel (18b) in the dish washer.
-
The lid and the insulating cover of the milk container should only be wiped gently with a damp cloth. Do not put them in the dish washer.
-
Wipe out the inside of the tray holders.
- Clean the milk system (procedure described below).
- Replace all the parts again.

Drip tray for coffee outlet (18c) and coffee grounds container (18d) should be emptied and cleaned daily to prevent mould from developing.

If the appliance is cold when switched on, or if it is set to "energy saving mode" after dispensing coffee, it rinses automatically. In other words the pipework inside the appliance is cleaned by the machine itself.

If the appliance has not been used for a prolonged period of time (e.g. after a vacation), clean the entire appliance thoroughly, including the milk system and brewing unit.
Cleaning the milk system

Risk of burns! The milk frother (19) gets very hot. After use, allow to cool down first
before touching.
The message
Short rinse for milk system D/□ appears
if cleaning has not been performed after use
- shortly before the appliance automatically switches to "energy saving mode" without first having been cleaned.
If this message appears, start with Step 2 under "Short rinse for milk system".
Clean the milk system immediately after use.

All the parts can also be put in the dishwasher.
Short rinse for milk system:
- In the menu for drink selection, select Short rinse and press / (6).
- Place a cup under the milk frother (19) and the end of the milk tube in the cup.
- Press / (6). The appliance now fills the cup automatically with water and draws it in again through the milk tube for rinsing. The rinse procedure takes about 1 minute.
- Empty the cup and clean the milk tube.
Cleaning the milk system:
- Dismantle the milk frother for cleaning. Slide the coffee outlet (20) downwards. Remove the cover and take out the milk frother (19):
- Clean the holder of the milk frother (19) with a soft cloth.
- Dismantle the milk frother (19a and 19b).
- Clean the components either by hand or in the dish washer (put them in the cutlery basket).
- Reassemble the individual parts and replace them in the appliance. Press back in fully.
Cleaning the brewing unit
In addition to the automatic cleaning programme, the brewing unit should be removed regularly for cleaning.

Warning: Clean the brewing unit without detergent and do not put it in the dishwasher.
- Deploy the appliance fully (see "Deployment system").
- Switch the appliance to "energy saving mode" with (4).
- Switch the appliance off completely at the power switch O/I (7); there should no longer be any symbols lit.
- Grasp the door opener (15) and open the door (14) to the brewing unit:
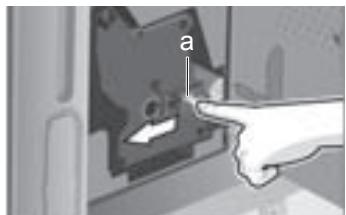
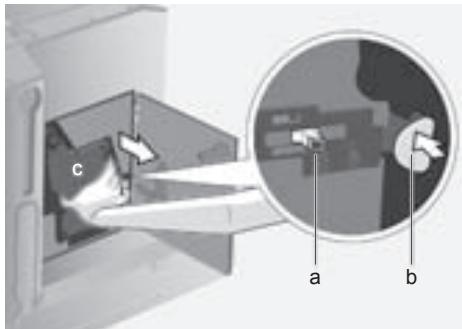
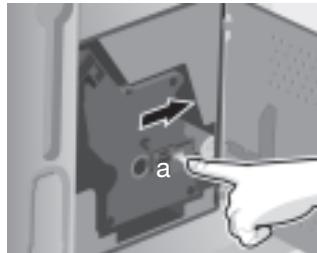
- Slide the red lock (a) on the brewing unit completely forward:
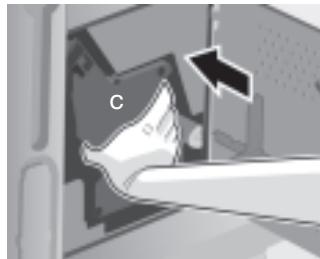
- Press the red button (b), grasp the brewing unit (c) by the recessed grips and remove carefully.
- Rinse the brewing unit thoroughly under running water.

- Wipe out the inside of the appliance thoroughly with a damp cloth and remove any coffee residues.
- Allow the brewing unit and the inside of the appliance to dry.
-
Reinsert the brewing unit (c) fully into the appliance.
-
Slide the red lock (a) back fully and close the door (14).
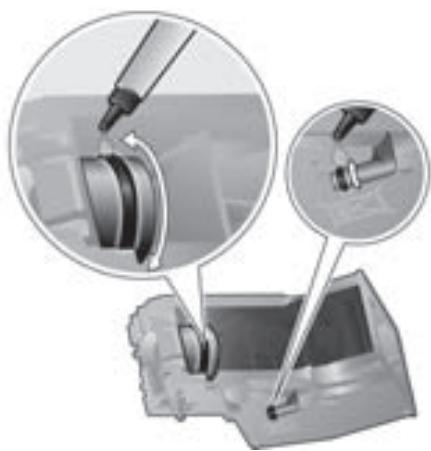
N.B.: After cleaning thoroughly, the seals of the brewing unit should be greased regularly for optimal care.
Apply a thin layer of the special grease intended for this purpose (Order No. 311368) all around the seals.
Service programmes
At certain intervals, depending on how the appliance is used, the display will show one of the following texts instead of the coffee selection:
Service - change filter
i - button 3 sec.
Service - clean
i - button 3 sec.
Service - descale
i-button 3 sec.
Service - Calc'nClean
i-button 3 sec.
Then the water filter should be changed immediately or the appliance cleaned or descaled using the corresponding programme (described on the next pages). Otherwise the appliance may be damaged.

The service programmes can also be started manually in the settings menu (see "Displaying settings").
Do not drink the liquids. Never use vinegar, vinegar-based products, citric acid or citric acid-based products for descaling. For cleaning and descaling only use the tablets intended for such. They were specially developed for this fully automatic espresso machine, and replacements are available from retailers or customer service (see "Accessories").
Never put descending tablets or any other descending agents in the drawer (10) for ground coffee.

If there is a filter in the water tank (8), it needs to be removed before the service programme is run and should only be replaced once the programme is finished.
Never interrupt the service programme. If one of the service programmes is interrupted, e.g. by a power outage, proceed as follows:
- Rinse the water tank (8) and refill it with fresh water up to the "max" mark.
- Press / (6). The cleaning programme will now run for about 3 minutes:
Cleaning
The appliance is ready for use again.
Dscaling
If the prompt Service - descale is displayed, press and hold down i (1) for at least three seconds. The display shows:
Descale Press D/
or
To start without the prompt (see "Displaying Settings") press and hold down i (1) for at least three seconds and select
Descale Press D/
Press / (6). The display will guide you through the programme.
Empty drip tray
Empty the drip tray (18).
Replace drip tray
Replace the drip tray.

If the milk frother is not inserted, the following message is displayed:
Set up milk frother
Insert the milk frother (19).
Place container under milk frother
→0/□
Place a container with a capacity of 0.5 litres under the milk frother (19).
Press /□ (6).

If the water filter is activated, the following message is displayed:
Remove filter 0 / 0
Remove the water filter and press / (6).
Add 0.5 I water and descaler D/□
Pour lukewarm water into the empty water tank (8) up to the "0.5 l" mark and dissolve two descending tablets in it. Press D / (6). The descending programme now runs for about 20 minutes:
Dscaling

If there is not enough descending fluid in the water tank, the following message is displayed:
Not enough descending fluid Refill fluid
Pour lukewarm water into the empty water tank (8) up to the "0.5 l" mark and dissolve two descending tablets in it. Press / (6).
The descending programme will continue.
Clean and refill water tank D/
Rinse the water tank and refill it with fresh water up to the "max" mark.
Press / (6). The descending programme will now run for about 1 minute:
Dscaling
Empty drip tray
Empty the drip tray (18).
Replace drip tray
Replace the drip tray.
Replace the filter if one is being used.
The appliance is ready for use again.
Cleaning
If the prompt Service - clean is displayed, press and hold down i (1) for at least three seconds. The display shows:
Clean Press D/
or
To start without the prompt (see „Displaying Settings") press and hold down i (1) for at least three seconds and select
Clean Press D/
Press / (6). The display will guide you through the programme.
Empty drip tray
Empty the drip tray (18).
Replace drip tray
Replace the drip tray.
Cleaning
Open drawer
Deploy the appliance and open the drawer (10).
Insert cleaning tablet! Close drawer!
Drop a cleaning tablet in the drawer and close the drawer again.
Press D/□
Press / (6). The cleaning programme will now run for about 7 minutes:
Cleaning
Empty drip tray
Empty the drip tray (18).
Replace drip tray
Replace the drip tray.
The appliance is ready for use again.
Calc'n'Cle a
Calc'nClean combines the separate functions of descending and cleaning. If the two programmes are both due to run soon, the fully automatic espresso machine suggests this service programme automatically.
If the prompt Service - Calc'n'Cle a n is displayed, press and hold down i (1) for at least three seconds. The display shows:
Calc'nClean Press D/□
or
To start without the prompt (see „Displaying Settings”) press and hold down i (1) for at least three seconds and select
Calc'nClean Press D/□
Press / (6). The display will guide you through the programme.
Empty drip tray
Empty the drip tray (18).
Replace drip tray
Replace the drip tray.

If the milk frother is not inserted, the following message is displayed:
Set up milk frother
Insert the milk frother (19).
Place container under milk frother
→0/□
Place a container with a capacity of at least one litre under the milk frother (19). Press / (6). The appliance rinses twice:
Cleaning
Open drawer
Deploy the appliance and open the drawer (10).
Insert cleaning tablet! Close drawer!
Drop a cleaning tablet in the drawer and close the drawer again.

If the water filter is activated, the following message is displayed:
Remove filter 0 /
Remove the water filter and press / (6).
Add 0.5 I water and descaler /
Pour lukewarm water into the empty water tank (8) up to the "0.5 l" mark and dissolve two descending tablets in it. Press / (6). The descaling programme now runs for about 20 minutes:
Dscaling

If there is not enough descending fluid in the water tank, the following message is displayed:
Not enough descending fluid
Refill fluid
Pour lukewarm water into the empty water tank (8) up to the "0.5 l" mark and dissolve two descending tablets in it. Press / (6).
The descending programme will continue.
Clean and refill water tank 0 / 0
Rinse the water tank and refill it with fresh water up to the "max" mark.
Press /口(6).
The descending programme will now run for about 1 minute:
Dscaling
The cleaning programme then runs for about 7 minutes and rinses the appliance:
Cleaning
Empty drip tray
Empty the drip tray (18).
Replace drip tray
Replace the drip tray.
Replace the filter if one is being used.
The appliance is ready for use again.
Accessories, storage, disposal, guarantee
Accessories
The following accessories are available from retailers or customer service:
| Accessories | Ordering number |
| Retail | Customer service |
| Cleaning
tablets | TZ60001 | 310575 |
| Descaling
tablets | TZ60002 | 310967 |
| Water filter | TZ70003 | 467873 |
| Grease (tube) | - | 311368 |
Storage
To avoid frost damage during transport and storage, the appliance must be completely emptied first.

Before emptying it as follows, the appliance must be ready for use and the water tank (8) filled.
- Place a large, narrow receptacle under the milk frother (19).
- Select the Milk froth setting on the display, press / (6) and release steam for about 15 seconds.
My coffee
Milk froth
Warm milk
- Switch the appliance off at the power switch O/I (7).
- Empty the water tank (8) and the drip tray (18).
Disposal

This appliance is labelled in accordance with the European Directive 2002/96/EG relating to waste electrical and electronic equipment - WEEE. The directive provides the framework for the EU-wide take-back and disposal of end-of-life appliances.
Please ask your specialist retailer about current disposal facilities.
Guarantee
The guarantee conditions for this appliance are as defined by our representative in the country in which it is sold. Details regarding these conditions can be obtained from the dealer from whom the appliance was purchased. The bill of sale or receipt must be produced when making any claim under the terms of this guarantee.
Right of modification reserved.
Simple troubleshooting
| Problem | Cause | Solution |
| Display shows
Refill bean container.
Although the bean con-
tainer is full, the appliance
does not grind the coffee
beans. | Beans are not falling into the
grinding unit (beans too oily). | Change the type of coffee
if necessary. Wipe out the empty bean container with a dry cloth. |
| No tea water dispensed. | The milk frother or its holder is
blocked. | Clean the milk frother or its
holder. |
| Milk froth insufficient or too
runny.
The milk frother does not
draw the milk in. | The milk frother or its holder is
blocked. | Clean the milk frother or its
holder. |
| Build-up of limescale in the
apppliance. | Descale the appliance. |
| Milk unsuitable for frothing. | Use low-fat milk (1.5% fat). |
| The milk frother (19) is not
correctly assembled. | Wet the milk frother parts and
press together firmly. |
| Coffee dispensing slows
to a trickle or stops
completely. | Coffee is ground too finely.
Pre-ground coffee is too fine. | Adjust the grinding unit to a
coarser setting. Use coarser
pre-ground coffee. |
| Build-up of limescale in the
apppliance. | Descale the appliance. |
| Coffee has no “crema”
(creamy foam). | Unsuitable type of coffee. | Use a type of coffee with a
higher proportion of robusta
beans. |
| The beans are no longer
fresh. | Use fresh beans. |
| The grinding setting is not suit-
able for the beans. | Adjust the grinding setting to
fine. |
| Coffee is too “acidic”. | The grinding setting is too
coarse or the pre-ground cof-
fee is too coarse. | Adjust the grinding unit to a
finer setting or use finer pre-
ground coffee. |
| Unsuitable type of coffee. | Use a darker roast. |
Simple troubleshooting
| Problem | Cause | Solution |
| Coffee is too "bitter". | The grinding setting is too fine or the pre-ground coffee is too fine. | Adjust the grinding unit to a coarser setting or use coarser pre-ground coffee. |
| Unsuitable type of coffee. | Change the type of coffee. |
| Display shows
Error
Please contact hotline. | The appliance has a fault. | Call the hotline (see rear cover). |
| The water filter does not stay in position in the water tank. | The water filter is not mounted correctly. | Firmly press the water filter straight down into the tank connection. |
| The coffee grounds are not compact and are too wet. | The grinding setting is too fine or too coarse, or not enough ground coffee has been used. | Adjust the grinding unit to a coarser or finer setting, or use 2 level measuring spoons of ground coffee. |
| Display shows
Clean brewing unit. | Brewing unit is soiled. | Clean brewing unit. |
| Too much pre-ground coffee in the brewing unit. | Clean brewing unit. (Pour in no more than 2 level measuring spoons of ground coffee). |
| The brewing unit's mechanism is stiff. | Remove the brewing unit and treat with a special grease intended for this purpose (Order No. 311368), see "Daily maintenance and cleaning". |
| Coffee or milk froth quality varies considerably. | Build-up of limescale in the appliance. | Descale the appliance with two descaling tablets as described in the instructions. |
| Water dripped onto the inner floor of the appliance when the drip tray was removed. | Drip tray removed too early. | Wait a few seconds after the last drink was dispensed before removing the drip tray. |
If you are unable to solve the problem, do not try to find the fault yourself or dismantle the appliance or repair it yourself. Call the hotline (see rear cover).
Technical data
| Power connection (voltage/frequency) | 220-240 V / 50-60 Hz |
| Heater wattage | 1700 W |
| Maximum static pump pressure | 19 bar |
| Maximum water tank capacity (without filter) | 2.5 liters |
| Maximum capacity of the coffee bean container | 1000 grams |
| Length of power cable | 150 cm |
| Dimensions (H x W x D) | 454 x 594 x 535 mm |
| Weight, empty | 25.9 kg |
| Type of grinding unit | Ceramic |
Toutes nos félicitations...
| My coffee |
| doux | normal | fort |
| Grande tasse | |