
5KSM7580XEMS - Stand mixer KITCHENAID - Free user manual and instructions
Find the device manual for free 5KSM7580XEMS KITCHENAID in PDF.
| Product Type | 6.9 Litre Bowl-Lift Stand Mixer |
| Bowl Capacity | 6.9 litres (stainless steel) |
| Motor Power | 500 watts, DC motor |
| Power Supply | 220-240 V, 50/60 Hz |
| Number of Speeds | 10 speeds with Soft Start |
| Included Accessories | Flat beater, stainless steel wire whip, PowerKnead spiral dough hook, pouring shield |
| Accessory Material | Dishwasher-safe stainless steel (model 5KSM7580) |
| Mixing System | Planetary action: rotates around bowl and on its axis |
| Lifting Mechanism | Bowl lift lever to position the bowl |
| Approximate Dimensions (W x D x H) | 41.4 x 30.5 x 38.6 cm |
| Approximate Net Weight | 13 kg |
| Care | Bowl and accessories dishwasher-safe; wipe mixer with a damp cloth |
| Safety | Must be grounded; unplug before cleaning; do not immerse |
| Warranty | 5 years for model 5KSM7580 (domestic use in Europe) |
| After-Sales Service | Authorized KitchenAid centers; France toll-free: 0800 600120 |
| Flour Capacity | 2 to 2.2 kg |
| Bread Capacity | 8 loaves of 450 g |
| Mashed Potato Capacity | 3.6 kg |
| Optional Accessories | Available via attachment hub (not included) |
Frequently Asked Questions - 5KSM7580XEMS KITCHENAID
User questions about 5KSM7580XEMS KITCHENAID
0 question about this device. Answer the ones you know or ask your own.
Ask a new question about this device
Download the instructions for your Stand mixer in PDF format for free! Find your manual 5KSM7580XEMS - KITCHENAID and take your electronic device back in hand. On this page are published all the documents necessary for the use of your device. 5KSM7580XEMS by KITCHENAID.
USER MANUAL 5KSM7580XEMS KITCHENAID
Important Safeguards 3
Electrical Requirements 4
Electrical Waste Disposal 4
PARTS AND FEATURES 5
SETTING UP YOUR STAND MIXER 6
Assembling your Bowl-Lift Stand Mixer. 6
Adjusting your Beater to Bowl Clearance. 7
CARE AND CLEANING. 9
TIPS FOR GREAT RESULTS
Planetary Mixing Action 10
Mixing Time 10
Mixer Use. 10
Mixing Tips. 10
Whipping Tips for Egg Whites.
Whipping Tips for Whipped Cream.
Bread Making Tips 12
SERVICE AND WARRANTY
When You Need Service 13
Household KitchenAid™ Bowl-Lift Stand Mixer Warranty 13
Service Centers. 14
Customer Service 14
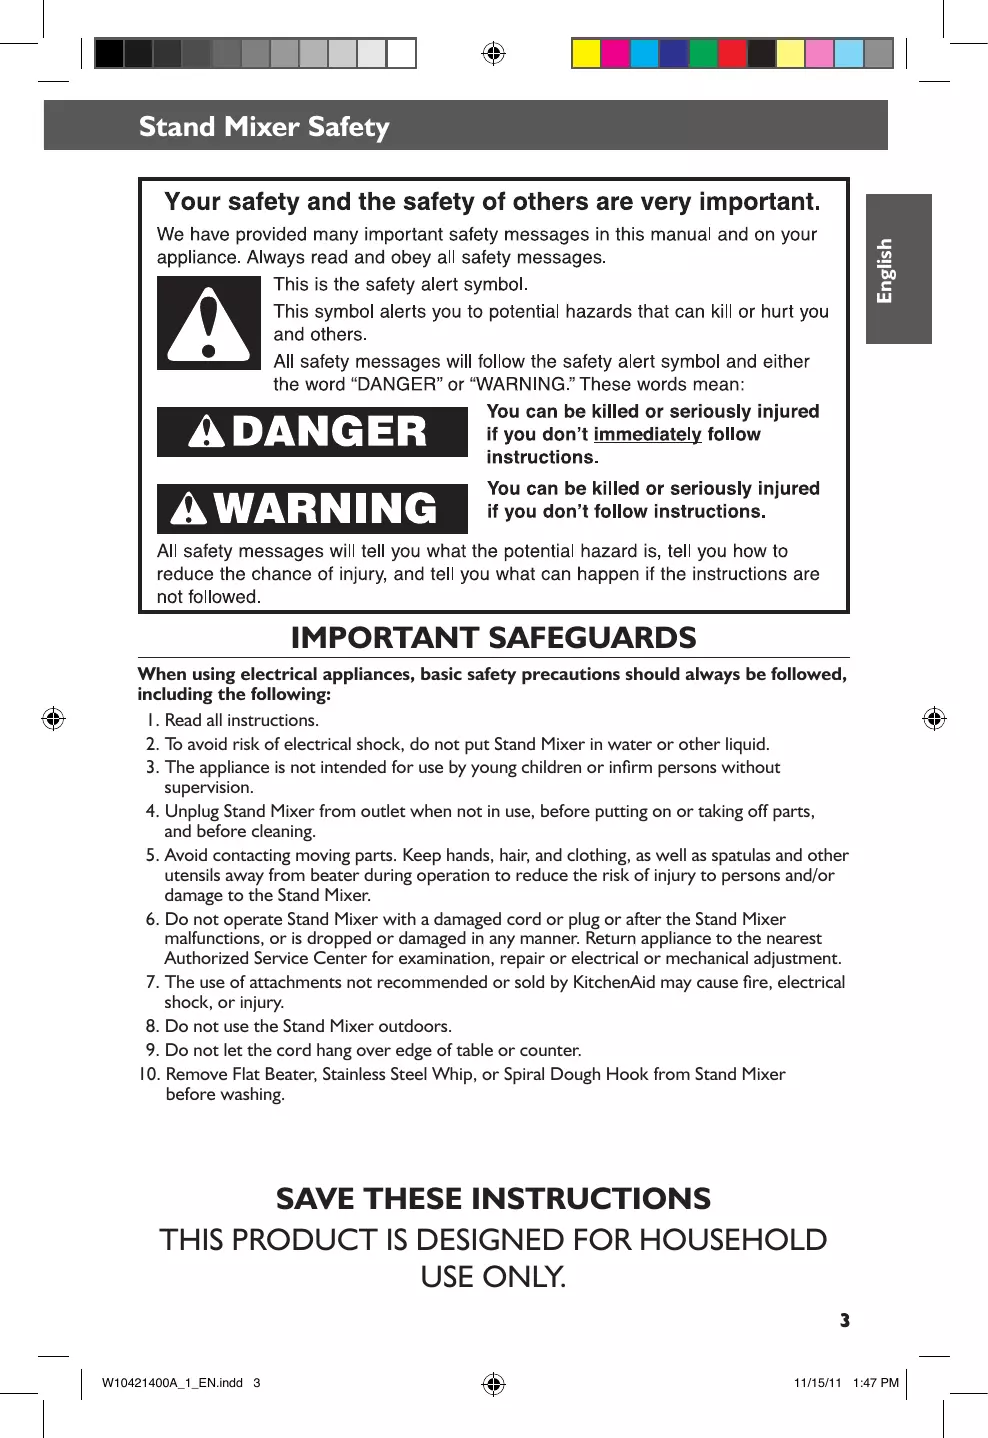
Stand Mixer Safety
Your safety and the safety of others are very important.
We have provided many important safety messages in this manual and on your appliance. Always read and obey all safety messages.

This is the safety alert symbol.
This symbol alerts you to potential hazards that can kill or hurt you and others.
All safety messages will follow the safety alert symbol and either the word "DANGER" or "WARNING." These words mean:
DANGER
You can be killed or seriously injured if you don't immediately follow instructions.
WARNING
You can be killed or seriously injured if you don't follow instructions.
All safety messages will tell you what the potential hazard is, tell you how to reduce the chance of injury, and tell you what can happen if the instructions are not followed.
IMPORTANT SAFEGUARDS
When using electrical appliances, basic safety precautions should always be followed, including the following:
I. Read all instructions.
2. To avoid risk of electrical shock, do not put Stand Mixer in water or other liquid.
3. The appliance is not intended for use by young children or infirm persons without supervision.
4. Unplug Stand Mixer from outlet when not in use, before putting on or taking off parts, and before cleaning.
5. Avoid contacting moving parts. Keep hands, hair, and clothing, as well as spatulas and other utensils away from beater during operation to reduce the risk of injury to persons and/or damage to the Stand Mixer.
6. Do not operate Stand Mixer with a damaged cord or plug or after the Stand Mixer malfunctions, or is dropped or damaged in any manner. Return appliance to the nearest Authorized Service Center for examination, repair or electrical or mechanical adjustment.
7. The use of attachments not recommended or sold by KitchenAid may cause fire, electrical shock, or injury.
8. Do not use the Stand Mixer outdoors.
9. Do not let the cord hang over edge of table or counter.
10. Remove Flat Beater, Stainless Steel Whip, or Spiral Dough Hook from Stand Mixer before washing.
SAVE THESE INSTRUCTIONS
THIS PRODUCT IS DESIGNED FOR HOUSEHOLD USE ONLY.
Stand Mixer Safety
English
Electrical Requirements
WARNING

Electrical Shock Hazard
Plug into a grounded outlet.
Do not remove ground prong.
Do not use an adapter.
Do not use an extension cord.
Failure to follow these instructions can result in death, fire, or electrical shock.
Volts: 220-240 A.C.
Hertz: 50/60 Hz
NOTE: The power rating for your Stand Mixer is printed on the serial plate, placed under your Stand Mixer.
Do not use an extension cord. If the power supply cord is too short, have a qualified electrician or serviceman install an outlet near the appliance.
The wattage rating is determined by using the attachment that draws the greatest load (power). Other recommended attachments may draw significantly less power.
Electrical Waste Disposal
This appliance is marked according to the European directive 2002/96/EC on Waste Electrical and Electronic Equipment (WEEE).
By ensuring this product is disposed of correctly, you will help avoid potential negative consequences for the environment and human health, which could otherwise be caused by inappropriate waste handling of this product.
The symbol on the product, or on the documents accompanying the product, indicates that this appliance may not be treated as household waste. Instead it shall be handed over to the applicable collection point for the recycling of electrical and electronic equipment.
Disposal must be carried out in accordance with local environmental regulations for waste disposal.
For more detailed information about treatment, recovery and recycling of this product, please contact your local city office, your household waste disposal service or the shop where you purchased the product.
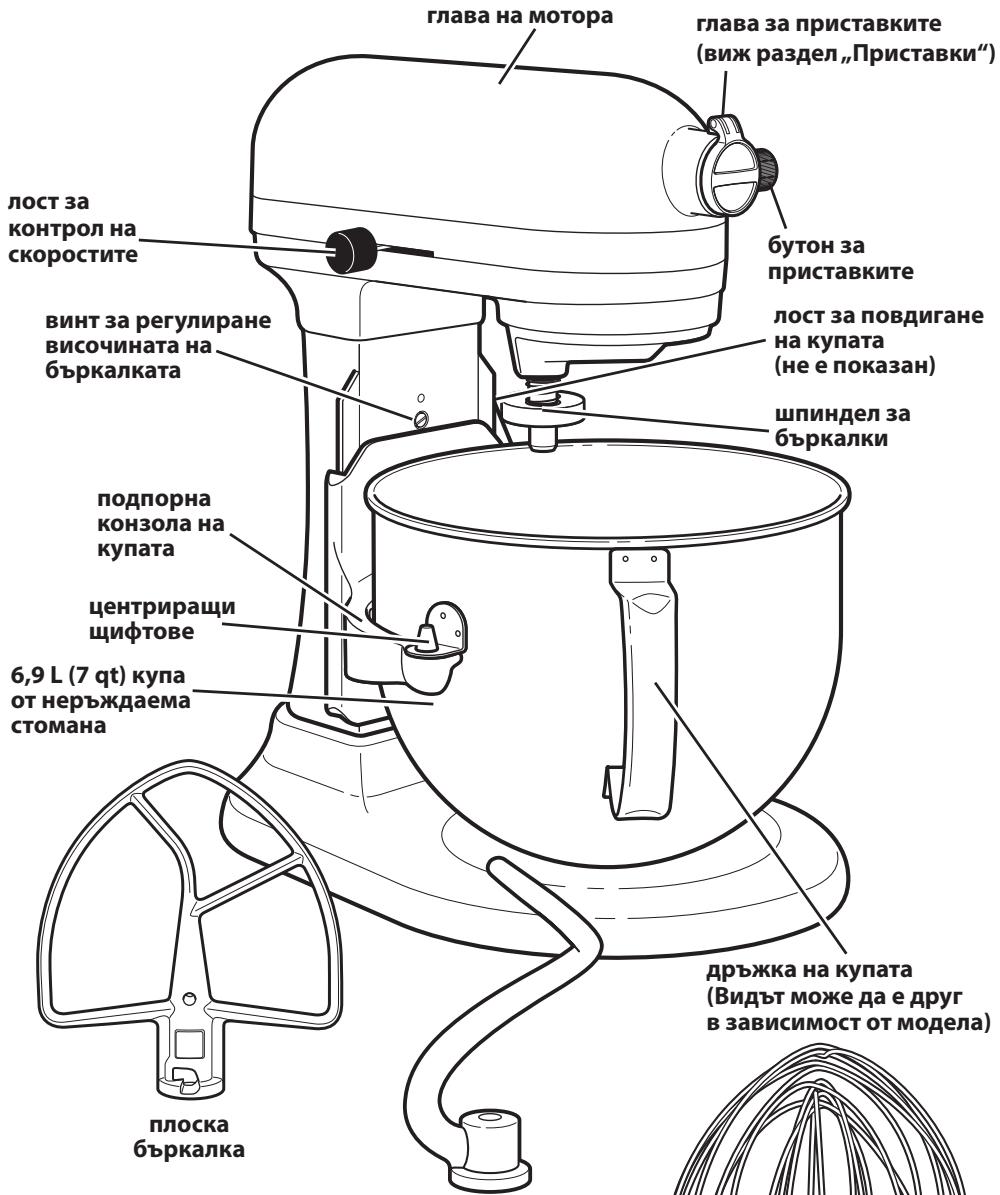
Parts and Features
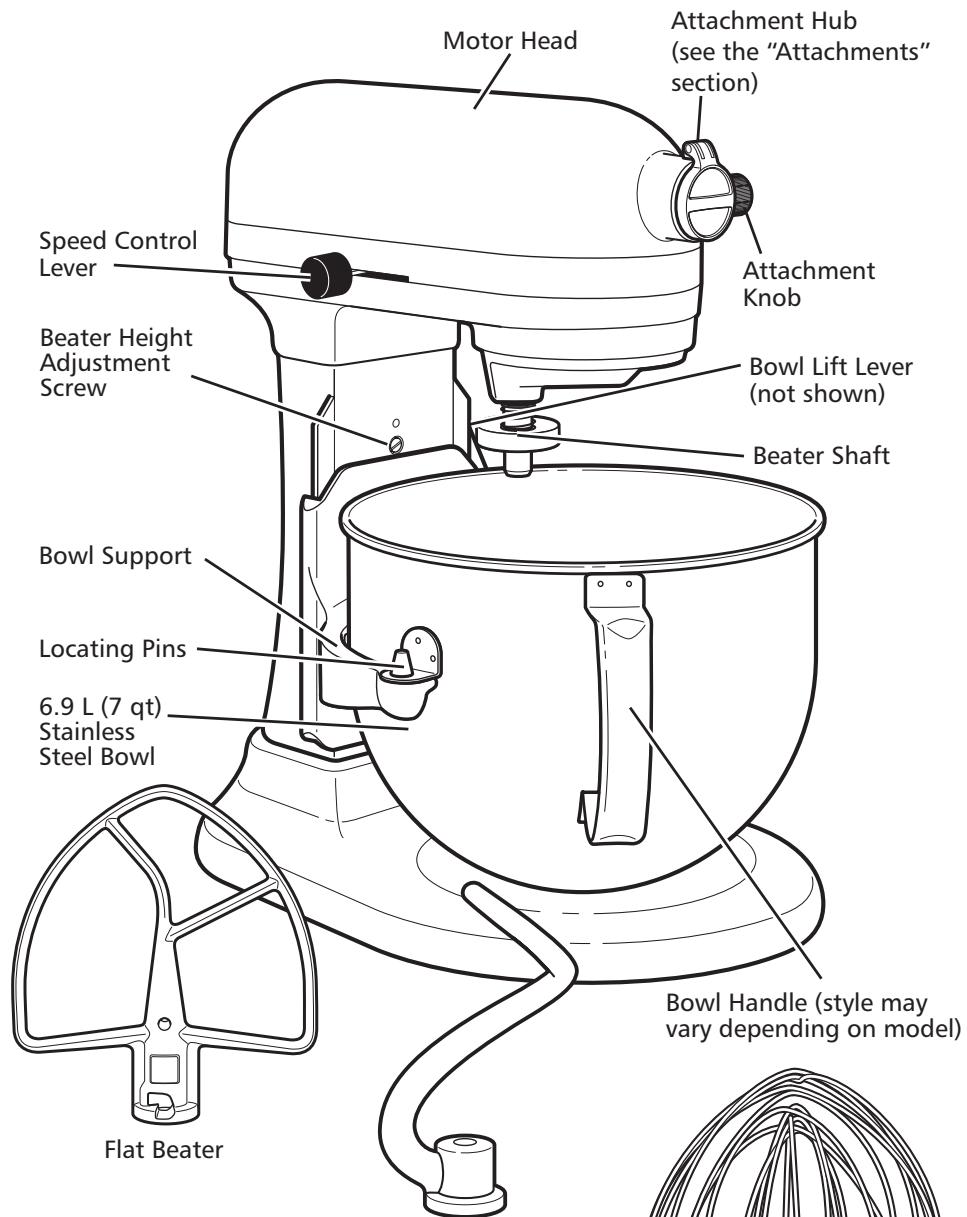
Spiral Dough Hook
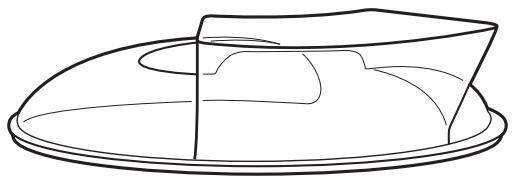
Pouring Shield
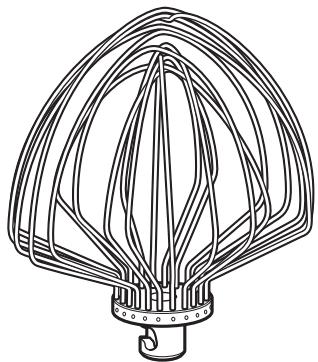
Stainless Steel Whip
Setting up your Stand Mixer
Assembling your Bowl-Lift Stand Mixer
To attach the Stainless Steel Bowl
Turn speed control to "0" (OFF). Unplug Stand Mixer or disconnect power. Place Bowl Lift Lever into down position. Fit Bowl Supports over Locating Pins and press down on back of the bowl until the Bowl Pin snaps into the Spring Latch. (Fig. 1)
IMPORTANT: If the bowl is not securely snapped into place, it will be unstable and wobble during use.
To raise the Stainless Steel Bowl to mixing position
Rotate Bowl Lift Lever counterclockwise to the straight up position. (Fig. 2)
The bowl must always be in the raised position when mixing.
To remove the Stainless Steel Bowl
Turn speed control to "0" (OFF). Unplug Stand Mixer or disconnect power: Place Bowl Lift Lever in down position. Grasp Bowl Handle and lift straight up and off Locating Pins.
WARNING
Injury Hazard
Unplug mixer before touching beaters.
Failure to do so can result in broken bones, cuts, or bruises.
To attach Flat Beater, Stainless Steel Whip, or Spiral Dough Hook.
Turn speed control to "0" (OFF). Unplug Stand Mixer or disconnect power. Lower bowl by rotating Bowl Lift Lever downward. Slip beater on Beater Shaft and press upward as far as possible. Turn beater to right, hooking it over the Pin on the Beater Shaft.
(Fig.3)
To remove Flat Beater, Stainless Steel Whip or Spiral Dough Hook
Turn speed control to "0" (OFF). Unplug Stand Mixer or disconnect power: Lower bowl by rotating Bowl Lift Lever downward. Press beater upward as far as possible and turn left. Pull beater from Beater Shaft.
To attach Pouring Shield
Turn speed control to "0" (OFF). Unplug Stand Mixer or disconnect power: Attach Flat Beater, Spiral Dough Hook, or Stainless Steel Whip and bowl. From the front of the mixer, slide the Pouring Shield over the bowl until the it is centered. The bottom rim of the Pouring Shield should fit within the bowl. (Fig. 4)
To use Pouring Shield
For best results, rotate the Pouring Shield so the Motor Head covers the U-shaped gap in the shield. The Pouring Chute will be just to the right of the Attachment Hub as you face the mixer. Pour the ingredients into the bowl through the Pouring Chute.
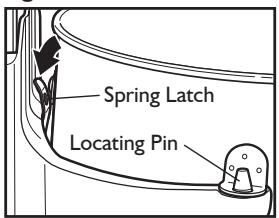
Fig.1
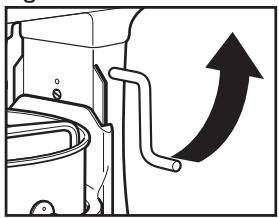
Fig. 2
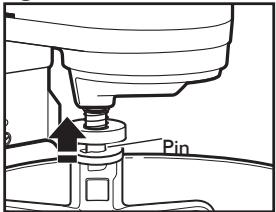
Fig. 3
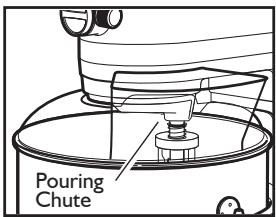
Fig. 4
Setting up your Stand Mixer
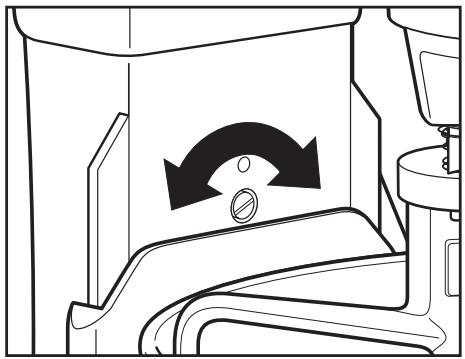
Adjusting your Beater to Bowl Clearance
Your Stand Mixer is adjusted at the factory so the Flat Beater just clears the bottom of the bowl. If, for any reason, the Flat Beater hits the bottom of the bowl or is too far away from the bowl, you can correct the clearance easily.
I. Turn speed control to "0" (OFF).
2. Unplug Stand Mixer or disconnect power.
3. Lower the bowl to the down position.
4. Turn Beater Height Adjustment Screw (A) slightly counter clockwise (left) to raise Flat Beater or clockwise (right) to lower Flat Beater.
5. Make adjustment with Flat Beater, so it just clears surface of the bowl. If you over adjust the screw, the Bowl Lift Lever may not lock into place.
NOTE: When properly adjusted, the Flat Beater will not strike on the bottom or side of the bowl. If the Flat Beater or the Stainless Steel Whip is so close that it strikes the bottom of the bowl, coating may wear off the Flat Beater (for coated beaters) or wires on Stainless Steel Whip may wear.
Scraping sides of bowl may be necessary under certain conditions regardless of beater adjustment. The Stand Mixer must be stopped to scrape bowl or damage to mixer may occur.
Using your Stand Mixer
Speed Control Guide - 10 Speed Stand Mixers
All speeds have the Soft Start feature that automatically starts the Stand Mixer at a lower speed to help avoid ingredient splashout and "flour puff" at start-up, then quickly increases to the selected speed for optimal performance.

| Speed | Used for | Accessories | Description |
| 1 | Stirring | For slow stirring, combining, mashng, starting all mixing procedures. Use to add flour and dry ingredients to batter, and add liquids to dry ingredients. Do not use Speed I to mix or knead yeast doughs. | |
| 2 | Slow Mixing, Kneading | For slow mixing, mashng, faster stirring. Use to mix and knead yeast doughs, heavy batters, and candies; start mashing potatoes or other vegetables; cut shortening into flour; mix thin or splashy batters. | |
| 4 | Mixing, Beating | For mixing semi-heavy batters, such as cookies. Use to combine sugar and shortening and to add sugar to egg whites for meringues. Medium speed for cake mixes. | |
| 6 | Beating, Creaming | For medium-fast beating (creaming) or whipping. Use to finish mixing cake, doughnut, and other batters. High speed for cake mixes. | |
| 8-10 | Fast Beating, Whipping, Fast Whipping | For whipping cream, egg whites, and boiled frostings. For whipping small amounts of cream, egg whites or for final whipping of mashed potatoes. |
NOTE: Use Speed 2 to mix or knead yeast doughs. Use of any other speed creates high potential for Stand Mixer failure. The PowerKnead Spiral Dough Hook efficiently kneads most yeast dough within 4 minutes.
Capacity Chart
| 6.9 L Bowl | |
| Flour | 2 to 2.2 kg |
| Bread | 8 breads of 450 g |
| Cookies / Biscuits | 160 pieces |
| Mashed Potatoes | 3.6 kg |
Attachments
General Information
KitchenAid™ optional Attachments are designed to assure long life. The Attachment Power Shaft and Attachment Hub Socket are of a square design, to eliminate any possibility of slipping during the transmission of power to the attachment. The hub and shaft housings are tapered to assure a snug fit, even after prolonged use and wear. KitchenAid™ Attachments require no extra power unit to operate them; the power unit is built-in.
Attachment Power Shaft
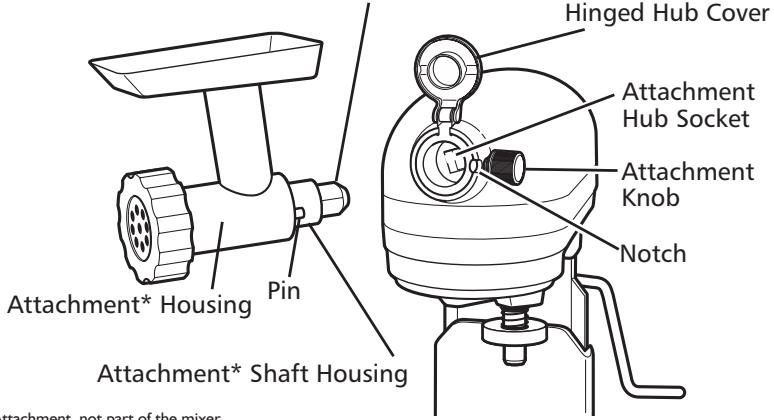
Optional Attachment, not part of the mixer.
Care and Cleaning
Stainless Steel Bowl, Flat Beater, Stainless Steel Whip, and Spiral Dough Hook may be washed in an automatic dishwasher. Or, clean them thoroughly in hot sudsy water and rinse completely before drying. Do not store beaters on shaft.
WARNING
ELECTRICAL SHOCK HAZARD ALWAYS BE SURE TO UNPLUG MIXER BEFORE CLEANING TO AVOID POSSIBLE ELECTRICAL SHOCK.
Wipe mixer with a damp cloth. DO NOT IMMERSE IN WATER. Wipe off beater shaft frequently, removing any residue that may accumulate.
| Accessories | Coated Metal | Stainless Steel |
| Silver coated metal beaters and dough hooks are dishwasher-safe. (Available on 5KSM759I model) | Stainless steel beaters and dough hooks are dishwasher-safe. (Available on 5KSM7580 model) | |
| Not applicable | 11-Wire Stainless Steel Elliptical Whips are dishwasher-safe. (Available on 5KSM7580 and 5KSM759I models) | |
| Not applicable | All metal bowls are stainless steel and dishwasher-safe. (Available on all Bowl-Lift models) |
Tips for Great Results
English
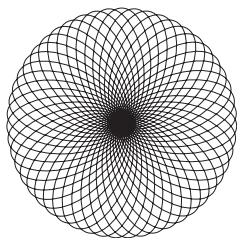
Planetary Mixing Action
During operation, the Flat Beater moves around the stationary bowl, at the same time turning in the opposite direction on its own axis.
The diagram shows the complete coverage of the bowl made by the path of the beater.
The 5KSM7580 and 5KSM7591 models are rated 500 Watts and use a Direct Current motor. It is a quiet and highly efficient motor, combined with a direct drive transmission system : this enables to drive I.3 Horse Power at peak power (output motor power), enabling fast and outstanding mixing result even with heavy dough.
Mixing Time
Your KitchenAid™ Mixer will mix faster and more thoroughly than most other electric mixers. Therefore, the mixing time in most recipes must be adjusted to avoid overbeating.
To help determine the ideal mixing time, observe the batter or dough and mix only until it has the desired appearance described in your recipe, such as "smooth and creamy." To select the best mixing speeds, use the "Speed Control Guide" section.
Mixer Use
WARNING
PERSONAL INJURY HAZARD
To avoid personal injury and damage to the beater, do not attempt to scrape bowl while mixer is operating; turn mixer off. Should scraper or other object drop into bowl, turn motor OFF before removing.
The bowl and beater are designed to provide thorough mixing without frequent scraping. Scraping the bowl once or twice during mixing is usually sufficient.
The Stand Mixer may become warm during use. Under heavy loads with extended mixing time periods, you may not be able to comfortably touch the top of the Stand Mixer. This is normal.
Mixing Tips
Adding Ingredients
Always add ingredients as close to side of bowl as possible, not directly into moving beater. The Pouring Shield can be used to simplify adding ingredients. Use Speed I until ingredients have been blended. Then gradually increase to desired speed.
Adding Nuts, Raisins, or Candied Fruits
Follow individual recipes for guidelines on including these ingredients. In general, solid materials should be folded in the last few seconds of mixing on Speed I. The batter should be thick enough to keep the fruit or nuts from sinking to the bottom of the pan during baking. Sticky fruits should be dusted with flour for better distribution in the batter.
Liquid Mixtures
Mixtures containing large amounts of liquid ingredients should be mixed at lower speeds to avoid splashing. Increase speed only after mixture has thickened.
NOTE: If ingredients in very bottom of bowl are not thoroughly mixed, then the beater is not far enough into the bowl. See the "Setting Up Your Stand Mixer" section.
Tips for Great Results
Whipping Tips for Egg Whites
Place room temperature egg whites in clean, dry bowl. Attach stainless steel bowl and wire whip. To avoid splashing, gradually turn to designated speed and whip to desired stage. See chart below.
AMOUNT
SPEED
I egg white...GRADUALLY to 10
2-4 egg whites.. GRADUALLY to 8
6 or more egg whites....GRADUALLY to 8
Whipping Stages
With your KitchenAid™ Stand Mixer, egg whites whip quickly. So watch to avoid over whipping. This list tells you what to expect.
Frothy
Large, uneven air bubbles.
Begins to Hold Shape
Air bubbles are fine and compact; product is white.
Soft Peak
Tips of peaks fall over when Stainless Steel Whip is removed.
Almost Stiff
Sharp peaks form when Stainless Steel Whip is removed, but whites are actually soft.
Stiff but not Dry
Sharp, stiff peaks form when Stainless Steel Whip is removed. Whites are uniform in colour and glisten.
Stiff and Dry
Sharp, stiff peaks form when Stainless Steel Whip is removed. Whites are speckled and dull in appearance.
Whipping Tips for Whipped Cream
Pour cold whipping cream into chilled bowl. Attach stainless steel bowl and wire whip. To avoid splashing, gradually turn to designated speed and whip to desired stage. See chart below.
AMOUNT
SPEED
50-200 mL............GRADUALLY to 10
More than 200 mL............GRADUALLY to 8
Whipping Stages
Watch cream closely during whipping. Because your KitchenAid™ Stand Mixer whips so quickly, there are just a few seconds between whipping stages. Look for these characteristics:
Begins to Thicken
Cream is thick and custard-like.
Holds its Shape
Cream forms soft peaks when Stainless Steel Whip is removed. Can be folded into other ingredients when making desserts and sauces.

Stiff
Cream stands in stiff, sharp peaks when Stainless Steel Whip is removed. Use for topping on cakes or desserts, or filling for cream puffs.
Tips for Great Results
Bread Making Tips
Making bread with a mixer is quite different from making bread by hand. Therefore, it will take some practice before you are completely comfortable with the new process. For your convenience, we offer these tips to help you become accustomed to bread-making the KitchenAid™ brand way.
- ALWAYS use the PowerKnead Spiral Dough Hook to mix and knead yeast doughs.
- Use Speed 2 to mix or knead yeast dough. Use of any other speed with heavy doughs may cause mixer to stop rotating to limit mixer damage. This is normal operation. If this occurs, turn the Speed Control Lever to off, and then turn back on to a lower speed.
- Use a candy or other kitchen thermometer to assure that liquids are at temperature specified in the recipe. Liquids at higher temperatures can kill yeast, while liquids at lower temperatures will retard yeast growth.
-
Warm all ingredients to room temperature to ensure proper rising of dough. If yeast is to be dissolved in bowl, always warm bowl first by rinsing with warm water to avoid cooling of liquids.
-
Allow bread to rise in a warm place, 26^ C to 29^ C , free from draft, unless otherwise specified in recipe.
- Recipe rising times may vary due to temperature and humidity in your kitchen. Dough has doubled in bulk when indentation remains after tips of fingers are pressed lightly and quickly into dough.
- Most bread recipes give a range for the amount of flour to be used. Enough flour has been added when the dough starts to clean sides of bowl. If dough is sticky or humidity is high, slowly add more flour, about 60g (1/2 cup) at a time but do not exceed recommended flour capacity. Knead after each addition until flour is completely worked into dough. If too much flour is added, a dry loaf will result.
- When done, yeast breads and rolls should be deep golden brown in colour. other tests for doneness of breads are: Bread pulls away from the sides of pan, and tapping on the top of the loaf produces a hollow sound. Turn loaves and rolls onto racks immediately after baking to avoid sogginness.
Service and Warranty
When You Need Service
WARNING

Electrical Shock Hazard Unplug before servicing. Failure to do so can result in death or electrical shock.
Please read the following before calling your service center.
-
The Stand Mixer may warm up during use. Under heavy loads with extended mixing time periods, you may not be able to comfortably touch the top of the unit. This is normal.
-
The Stand Mixer may emit a pungent odor, especially when new. This is common with electric motors.
- If the Flat Beater hits the Bowl, stop the Stand Mixer. See the "Setting Up Your Stand Mixer" section.
If your Stand Mixer should malfunction or fail to operate, please check the following:
- Is the Stand Mixer plugged in?
- Is the fuse in the circuit to the Stand Mixer in working order? If you have a circuit breaker box, be sure the circuit is closed.
- Turn off the Stand Mixer for 10-15 seconds, the turn it back on. If the mixer still does not start, allow it to cool for 30 minutes before turning it back on.
- If the problem is not due to one of the above items, see the "Service Centers" section.
Household KitchenAid™ Bowl-Lift Stand Mixer Warranty
| Length of Warranty: | KitchenAid Will Pay For: | KitchenAid Will Not Pay For: |
| Europe, Australia and New Zealand:For the ArtisanTM Mixer5KSM7580:Five years FullWarranty fromdate of purchase.For the HeavyDuty Mixer5KSM7591:One Year FullWarranty fromdate of purchase. | The replacement partsand repair labor costs to correct defects in materials or workmanship. Service must be provided by an Authorized KitchenAid Service Center. | A. Repairs when Stand Mixer is used for operations other than normal household food preparation.B. Damage resulting from accident, alterations, misuse, abuse, or installation/operation not in accordance with local electrical codes. |
KITCHENAID DOES NOT ASSUME ANY RESPONSIBILITY FOR INDIRECT DAMAGES.
Service and Warranty
English
Service Centers
All service should be handled locally by an Authorized KitchenAid Service Center. Contact the dealer from whom the unit was purchased to obtain the name of the nearest Authorized KitchenAid Service Center.
In the U.K.:
Call: 0845 6011 287
In Ireland:
M.X. ELECTRIC
Service Department
25 Alymer Crescent
Kilcock, Co. KILDARE
Call: 87 2581574
Fax:16284368
In Australia:
Call: 1800 990 990
In New Zealand:
Call: 0800 881 200
Customer Service
In U.K. & Ireland:
Tollfree number 0800 988 1266
(Calls from mobile phones are charged standard network rate)
Address:
KitchenAid Europa, Inc.
POBOX19
B-2018 ANTWERP 11
BELGIUM
For Southern Ireland:
Tollfree number +44 02086165148
www.KitchenAid.co.uk
www.KitchenAid.eu

Registered Trademark of KitchenAid, U.S.A.
TM Trademark of KitchenAid, U.S.A.
The shape of the Stand Mixer is a trademark of KitchenAid, U.S.A.
© 2011. All rights reserved.
Specifications subject to change without notice.
W10421400A
14
11/11
KitchenAid
6.9 L BOWL-LIFT STAND MIXER
Instructions
KitchenAid Service & Support, GroBhandel
ASSISTÊNCIA E GARANTIA
KoIomega, IaTp. IwaKei3
+30 210 7237656
o i k ,T_oi o n26,
+30 2310 220933,231388
www.KitchenAid.eu
TM Trademark of KitchenAid, U.S.A.
Juster vispen slick at den/DD berRer bollen
Kjokkenmaskinen er justert pa fabrikken sik at bakevispen gär akkurat klar av bunnen i bollen. Dersom flatvispen av en uller annen grunn skulle berore bunnen i bollen er for langt fra bunnen, er det enkelt a korrigere avstanden.
I. Drei hastighetsbryteren til "0" (AV)
2. Trekk ut kontakten aller slå av strømmen.
3. Senk bollen sik at den er trykket ned.
4. Vri skruen for justering av vispens hoyde (A) litt mot klokken (horyre) for a heve flatvispen, ell er med klokken (horyre) for a senke den.
5. Still inn flatvispen slick at den sá védt ici berörer skålens overflate. Hvis du justerer skruen for mye, er det ici sikkert bollens lasespake lases på plass.
john@servicecompaniet.no
Kundeservice
Norsk Importar:
HOWARD AS:
Hansteensgate 12
0253 OSLO
Tel: 23084130
www.KitchenAid.no
www.KitchenAid.eu
Malli 5KSM7580 Malli 5KSM7591
Sisallysluettelo
YLEISKONE JA TURVALLISUUS
HAETTA A LIKAMSTJONI
Til aô foroast likamstjón og skemmdirá hræraranum skal ekki reyna
aô skafa skálna á medan hrærivélin
er i gangi; slökktu á hrærivélinni.
Ef skafa eöa annar hlutur dettur ofan
í skálna skal SLOKKVA á motornum
áour en hann er fjarlægʊr.
MEPbI INPEIOCTOPOXHOCTN
Bo n36exhaHne pncka noxapa, nopaxeHn 3neKtpueckm TOKOM nIIOBpeXdHn Ipr nCpOlb30BaHn mIKcepa Heo6xoDmO co6JIoDaTb OCHOBhle Mepbl IpeOcSTOPOXHOCTN, BKJIoua CneDuOuNe:
1.Почтinte ВсинЧтукци.
2.Воизбекангпса поражени.TOKOM kateropи ueckn 3anpeueho norgykaTb MmKcepВ Bodу nINI npryuO xNdkocTeB.
3. Пибор Н пешдзнayен ДгЯ Испльь�аши Малеькими Deьми Илпестапьим Лцамп 6e3 писмотра.
4. OToCoeINHInTe MInKce OT pO3ETKN, KOrDa Bbl erO He NcPOnb3yeTe, nepeD yCTaHOBKOu INIIN CHaTnEM HacaDOK, a TAKKe nepeD uNCTKOJ.
5.ИЗбаятke KONTAKTc C DBNNUKUZIMUCNE DeTALAMn.Дla ПпepoonsТВрашени Трав m/N/нл NOВржdeHn MKNCEpa npi ero nCNoIb3OBAHm He dOnyUcKaTe COpniKOCHOBHeH NaCaIKn-B36NuBaKn C pykamn,BOLOcamn,ОdexkoDoy,a TakKe c Pnpi6opamn N DpyrIMN KxOHHbIMn PpHaJaNEXHoCTAmn.
6. He ncpoIb3yIte MInKcep c NOBpeJdeHbIM 5hUpom NITAHN IIN NOcne NaDEHn Pnp6op, INI KAKOROJIIO NOBpeJdeHn. OTHeCtNE YCTPOIcTBO B 6IIJXaIIN ABTOPi3OBaHHbI CEHTP O6ClyKINBaHn IIN OCMOtpA, peMOHTa INI OCUyIeCTBnEHn EJIeKTpUeCKNX INI MEXaHueCKNX HAcTpoEK.
7. Исторовские Нancesнaya Клипштейдддддддддддддддддддддддддддддддддддддддддддддддддддддддддддддддддддддддддддддддддддддддддддддддддддд徴ау, погоженю залковский TOKOM Или Травme.
8.He nCnoB3OBAbB BHe nOmeueHna.
9. He donyckaia Te CBscaHna shypa nitaHn C kpa cToIa nn dpyro pa6oey noBepxHocTn KoHTaKTA C ropaymni npedmetamn.
10. YdajIe TnlockyU B36uBaIky, BeHcIK n3 HepKaeIoSei Cstani nn KpIOK dIy 3aMeuBaHnra TeTa n3 MmKcepappepeD mbITbE.
COXPAHNTE DAHHOE PYKOBODCTBO
ДАHHOE YCTPOICTBO ПРЕДHA3HAUECHO TOJIbKO ДЯ ДOMAшHETo ИСПОЛьЗOBAHЯ.
ONACHOCTbIIOJUYEHINTPABMbI
Bo n36eKaHne nonyeHnraTpaBMbl
nOBpeKdEHHaBcB36BmBAnK,He nbTaaiTeCb
NCTNTb aHaY mIKcepa BO BpemraPabotbl
npi6Oba; BbIKIOUHTe MIKcep. Ecnn cKe6ok
nnk KaKoJ-N6O dpyro npedmet nonaet
B YAaM NMI KCEpa, BbIKIOUHTe DBrAteTb,
nepTe TEM KAK BbIHytb erO n3 Chaan.
UaHaN B36nBaJaKa pa3pa6oTaHbI dIa 0eCneueHHu TuaTeAHLBOr CMeuINBaHHa 6e3 aCTO uOcNtKb60KBbIX CTOpOH uaHi. ODoH uIN DByX OHCTOK Pn r CMeuINBaHHu OBtuHO 6bIbaET DoCTaTOHIO.
CtaioHapbI MmKcep MoKeT HarpeBaTcB npi pa6ote. PnB Bcokcx Haryp3kA nIITeJIbHOM CmeunBaHn PNKOCHOBEHe K BepXHe qACTM MmKcep MoKeT 6bTb HnepnTHbIM.3TO HopMaJIbHo.
Cobetbl no cmeunBaHnIO
I06abJeHne mHrpeJeHToB
Bcerda do6abIyIe INHrpeJeHntbI KaK MoJHo 6bnIke K 60koBoN IOBepXHOCTn qaIu, He CbIbTe IN HA BpauAoUIOyOra B36BBAKNy. YTo6bI ynpocnttB 3OT npocecc, NOpb3yIteCb 3aunTHbIM O6oDM IaN Do6abkN INHrpeJeHToB. UcNoB3yIte cKOPocTb 1 Do NOnHOrO pa3MeuINBaHIn INHrpeJeHNTOB. 3aTeM cKOpocTb CneDuY TocTepeHNO yBeJIuHTb Do Jxelaemoi.
Добavenhoe opexOB,ИЗюм ИиуkaTOB
Пи рдбавлени NTIXN INHр徴пentob собладатЕ ИндИИДУАЛьнгыpeцETbl. Тердьпн INHр徴пentbl, КпраВИLO, СлдуET ДовавлгвВСмсь на Завершоем STAne приг�OTOBlenIHCMcSiHaСКОРСТI.В3БИTOE TeTOДOLЖHO6bITbDOCTaTOUHO ГСТьM,ЧТБы Цкаты Или Ор Xen He OсEDaIIH NaДНФфОрМы при Випeчke.ClnnaIoUmecSФрКТыСлдуET NoCbIbIМуКOДЯн IX 6ОJIeepaВHOMePHorO pacnpdepehenHIB TteTe.
Kukne cmecn
Cmecn C 60nbMm CoepKaHnem JxndKnx
HnRpeNHeOB CJeUyET CMeuNbBat Ha 60Jee
Hn3KO KnCkOPOCTn, YTObI TeCTO He BblnEcknBaNoCb
N3 qaShu. YBEniYNaBt CkOpOCT CJeUyTeTbKO,
KOrDa Cmecb DoCTaToUHO 3aYcTeet.
IPMMEAHHE: Ecnn INHrpdeNHeTb Ha cAmOM Dne Chauin p3aMeShaHb HeNoCTatoHNO, 3TO O3NaHaet, YTO Bam CneJeYt DePkaT b36Bmanky 6bnKe KO nHy, m. Pa3den "HanaJaKa Bawaero ctaaNoHaPHoro MmKcepa".
Pone3HbIe coBebI dIydoCTnxKeHnHaHnyuushx pe3yNbTaTOB
B36nBaHne RnUhblx
6eIKOB BeHcNkOM
Помстinte яиньie 6eКи kOMHaTHOH TeMnepaTpyblBчntуO cyxuO uay.ПрсоeДиNTeЧауИЗноржавецчstлпи npOBoLoHbYBEHnK.ЧтбIи36keKaTb paCPIeCKBaHnA, NOCTeENHOyBENiYte SCOPocTbdoJXeJaEMOиВ3bSbAite DoHyxHOn KOHCnCTeHcN. CMOTpTe Ta6nUy Bn3y.
KOLINYECTBO
CKOPOCTb
1Ячныбелok.. IOCTENEHHOdo 10
2-4Ячныбжелka... IOCTENEHHO do 8
6 nnn 6oonee rnuhblx
6eKOB. IOCTENEH0 do 8
3TaBbB36nBaHn
B MInKcepe KitchenAidTM mHnBHe 6eKnB3bNBAHTcA OueHb 6bICTPO.5yIbTe BHNMaTEnBhbl, Tc0b6 I36KaTaB ype3MePHo NHeBbl. 3ToT cINcOK NOMOJET Bam pao3o6pTaC8, qTO MOXHO OxNJaTb.

Bo3HnkaeT neHa:
KpyHbIe, HepOBHbIe BO3yUHbIe ny3blpKn.
HaunhaetcoxpaHraTbcaΦopMa
Bo3nyhIbe ny3bIpBKn-MeJKNe N KOMnakTHbIe; 乙BET npOyKTA-6enbl.
Bepxuynmkarne
BepxuKn PnaBHO onaiaot
Pn BbHMaHn BeHuNka N3
HepkaeUoJe CtaJI.
IouTu TBepaKaOHcNCTeHnua
OcTpbIe BepxuIKN npn BbIHIMaHIM BEHUNKa I3 HepXaBeIOUeI CTaN, Ho HA CaMOM DeIe 6JIKN OCTAOITC MRAKIMN.
Bepyukn TBepdble, Ho He cyxne
EcnB Baw CstaioHapNbMnKcep BblIe N3 CTpo NN He pa6Otaet, npOBepbTe cLeedyUoee:
-Подсоевинен ЛМИКер к розтke?
- He cropeл лсетевои р dedoxpaHntelb?
Ecln в Карт pine установен АвтOMатуеский Вькlioчateл, OH должени Bkliouhen.
- BbIKIOHTe ctaIHOHaBbMnKcep Ha 10-15 cekyHd, zatem CHOBA BKIOHtE. EcII MmKcep BCE JHe HE BKnIOuHaTcA, daIte Emy OCTbITb B TeueHIn 30 MNHyT Do TORO KaK BKNIOHTb CHOBA.
- EcnnpnpuynhaBdpyrom,cm.pa3dJe"LcHTpb06cnykubAHNA".

TM ToproBar Mapka KitchenAid, CUSA
ΦopMa ctauHapHOro MmKcepa RbIaTc TOpROBoi MapKo KOMpaHn i KitchenAid, CJIJA
© 2011. Bce npaba 3aunuieHbI.
Cneuikauia MoKeT 6bIb n3MeHena 6e3 npedBaPnteHoro yBeOMnHeHa.
W10421400A
196
11/11

KitchenAid
6.9 L BOWL-LIFT STAND MIXER
Instructions
Model 5KSM7580 Model 5KSM7591

Obsah
BEZPECNOST KUCHYNSKEHO ROBOTU
50-200 ml.........POSTUPNE AZ NA 10
Vice než 200 ml. POSTUPNE AZ NA 8
Fáze šlehání
DÔLEŽITÉ BEZPECNOSTNÉ POKNY
TIETO POKNY SI USCHOVAJTE
TENTO VYROBOK JE URČENÍ IBA PRE DOMÁC PEUŽITIE.
50-200 ml.........POSTUPNE AZ NA 10
Viac než 200 ml.........POSTUPNE AZ NA 8
Fáza šlahania
Šlachačku behom šlāhania pozorne sledujte, kadže váš robot KitchenAid™ Šlāha tak rychlo, ze mate len niekolko sekünd medzi jednotlivými fazami šlāhania. Pri šlāhaní si všimajte nasledujúcích faz:
Zacina hustnut
Šlahačka je hustá a má konzistenci pudingu.
Drží tvar
BE30IACHOCT HA KYXHECHKNPOBOT
Baxnn npedna3n mepkn. 255
I3nckBaHnK bM eNeKtpnuecknte ypeu.. 256
I3XbPJIHe Ha eNeKtpUeCKn ypei 256
YACTN XAPAKTEPUCTUKI 257
IIOIROBKA 3A PABOTA HA KUYXHECKNPOBOT 258
Crlno6BaHe hKaKxHEnckn po6oT c noBduRaCa ce Kya. 258
Perynipate pa3ctoHneTo OT bpkakata do kynata 259
KAK DA N3NOL3BATE BAWHY KUYXHEHCKN POBOT
PbKOBOCTBO 3a KOHTPOJ Ha ckopoCTte - 10 cTepeH Ha ckopoCTte. 260
ПИСТАВКИ 261
TPIJKA I NIOUCTBAHE 261
CbBETI 3A OTJNUHPE3YJTATN
Pa6ota Ha pIaanetapnata 6bpkakka. 262
Bpeme 3a pa36bpkBaHe. 262
YnoTpe6a Ha MmKcepa. 262
CbbETn 3a 6bpkaHe. 262
CbBETn 3a pa36nbAne Ha 6eIbU. 263
CbBET3a pa36nBaHe Ha cMeTaHa. 263
CbBETn 3a npabeHe Ha xIa6. 264
PEMOHTI TAPAHLI
Korato Bn e Heo6xOaIM peMOHT 265
Tapaunza 3a Kxhenckn poobot c nobinda ca kyna 3a domauna ynoTp6a
Ha KitchenAidTM 265
CepBn3Hn ceHtpoBe. 266
OToIeN,ObcnyxBaHe Ha KJIneHTn" 266
БezonauchocT ha kyxhencknpo60T
Bawata 6e30nacHocT n 6e30nacHocTtHa npyRnte ca MHOrO BaxHH.
B ToBa pIbKOBODCTBO n Ha BaIInTe ypei n Ce hAmnpa MHO R BaxHn yka3AHn 3a 6e3ONaCHOCT. BuHaN cyTe n cna3BaIte BCuKn NcHTpyKu n 3a 6e3ONaCHOCT.

ToBa e 3NaK 3a npéDynpexJdHnE 3a 6e3oNaCHOCT.
To3n 3nak Bn npdeynpexkdaBa 3a Bb3MOxHn ONaCHOCTn, KOITo 6nxa MOrnn Da doBedaTdo CmBpt NnN Do HapaHraHn.
BcunK sbOeHn 3a 6eONacHOCT ce HAMipat cIeT O3N 3NaK nIn CneI dymata, ONACHOCT" nIn, INPEyINPEKDEHNE". Te3n DmN o3NaHaBaTa:
ONACHOCT
Ako He3a6abH0 He cna3nte Te3n HNcTpkyu,TOBa MoKe da doBeDe Do CmbpT UINTeKKn HapahraBaHn.
PPEdUnpeXkeHne
Ako He cna3BaTe Te3n HnctpyKuyn, TOBa MoKe Da IOBePe Do BaaTa CmbpT NnI Do cepNo3HO HapaHbAbe.
Bcnyk yka3aHnna 3a 6e3oNaCHOCT o8cHbAT nToEHzuaHnTa OAnCHOCT N Bn Ka3BaT KaK da HamaJIte OAnCHOCTTA OT HapaHraBaHe, KATO INΦOpMnPat 3a IocNeiTe npi HeCpA3BaHe Na IHCTpyKuNTe.
BAKHNI PEPDA3HIM MEPKN
Ipn ynpotpe6a Ha eJeKtpnueckn ypeu BNHaR na ce cna3BaT cneHnTe OCHOBn Mepkn 3a 6e3onacnoct:
1.Пюочete BCNUK INHCTpyKUIN.
2. 3aДаиЗбeRHeTe OnaCHOCT OT TOKOB yДap, He NOcTЯBЯITE KuxHecKnIpaObT BbB BOJa IINI dpyrN TeuHOCTN.
3. YpeIbT He e npEHa3Hauehen 3a ynoTepe6a OT MaKn IeCa IIN CTapu Xopa 6e Ha3Op.
4.ИЗвади Te ΣeCena OT KOHTaKta, KOraTo He I3NoJI3BaTe KuxHeHcKnIpo6Ot,IpeiI Da NOCTaBIne IJIN MaxHete YacTn I ppeN IOuNCTBaHe.
5.ИЗбягваite ДА пипат ДВИжшпсе ce част. Рьцete, КOCITE, ДрexнITE, KaKTOиШпатулптЕ Или Дугп Тпінандіжноctи He 6иBa Да ИмТ HИКаКБΚоТаКСьbpKaДКATAdokaTo pa6OTo KuxHHeHCKnЯ po6OT, 3a Да се HabamIn OnaCHOCTTa OT habaнявache 3aХopa n/NIIПоврEDA ha KuxHHeHCKnЯ po6OT.
6. He pa6oTeTe c kuxHeHcknpo60t, aKo shHpya nIin 9eIcena ca nobpeDeHn nIin ca Bb3HNKHan HEn3PpABHoCTn no KxHeHckn po60t - aKO e n3nyCaH nIin nobpeHn no KaKbBTO n da e NaunH. BbPheTe ypeDa Hna-6n3KnOToPiu3npaH cepBn3eh ZeHTbp 3a npOBepKa, nonpaBkAn nIin perynipane Ha eJeKtpnueCKnTe nIin MexaHUnn YacTn.
7. YnOTope6aTa Na npIcTaBKn, KOInTo He Ce npEneOpbUbAt nIn npOdaBaT ot KitchenAid MoKe Da DoBeDe Do NoKapu, TOKOB yIap nIIHapaHЯBaHЯ.
8.He n3noJI3BaIte KxHHeNcKnpo6OT Ha OTkpnto.
9. He octabraye Ka6ena Da BnCn Ha nd p6a Ha MaCata uIN Ha pa6othna nIOT.
10. Ппени миени, сваши плоскata 6ьрkanka, телта за разбивае на 6entbци плпьлката за разбивае на тetectо.
3APA3ETE3N INHCTPYKUN
TO3N ПОДУКТЕ ПРЕДHA3HAUECH CAMO 3A ДOMAшHA UNOTPEБА.
БezonauchocT ha kyxhenckma p060T
OnachoCT OT TOKOB yap
Bklioute shhypa B 3a3emeh KOHTAKT.
He n3BaXdaiTe 3a3emntHaTa cko6a.
He n3noJ3BaWte aanTep.
Heynotpe6aBaTe shnyp 3a ydbIkaBaHe.
HecnbaheToHa Te3n HNcTpyKuM MoKe Da IOBeDe Do CMBpt, NoXap NIn TOKOB yIap.
HansekeHne Ha MPexKaTa BbB BoNTObe: 220-240 A.C.
Yectota: 50/60 Hz
3A6ELEKKA: HomHaHaHaTa MoHocT Ha KxHHeNcKna po60e oTneuTaHa Bbpxy fOpMeHaTa Ta6eIka Ha DbHOTo Ha BaShnya ypei.
Да He ce n3pon3Ba ydbIgnteHa ka6ena. Ako mpekOBnT Ka6eI e npkeJaIeHO KbC, cneuaJIncT eJekTpOteXnK uIN cepBn3eH TEXnK Da nocTaBn KOHTaKT 6n3o Do KxHEncknpo60t.
KoHcymupaHaTa eHeprnaCe onpeJeIaYe3 n3nO3BaHe Ha npICTaBkata, KOToCe HxJdAe OT Ha-ToJAMOTo HAToBapBaHe (TOK). Bb3MOJHO eDpyrnpCTaBKn Da n3nO3BaT 3NaHTeJIHO NO-MaJIKO TOK.
3A6ELEKKA:To3n npOdyKT cBOpbJxeh CY-mpeXOB ka6eN.BcnyaJ,ue Ka6eJIbT 6bJe NOBpeH,TPra6Ba da 6bJe cMeHeH OT pON3BOUntela nIN OT HerOBOTO cepBn3HO npEcdTaBNTeJCTBO,3a da ce n36erHe onaCHOCT.
I3xBbprJaHe ha eJeKTpnuYeKn ypeiN
To3n ypeJ e MapKnupaN B cBoTbETCTBne C n3nCKBaHnraHa eBPOneiCkaTa DnpeKtNbA 2002/96/EO OTHOCHOOTnAbuOn OT eJeKtpnuecko n eJeKtpoHNo o6OpyDbaHe (WEEE).
KaTo HnnpaBnte TaKa, Ye Da n3XbPInTe npOyKta Cnopei N3NCKBaHnraTa, Ie n36erHeTe NotEnCuHaHn OTrpuCaTeHNn IOcIeDCTBn 3a OKoJHaTa CpeJa UOBeuKOTO 3dPaBe, KOnTO INhae 6NuXa Bb3NkHaJI ON THeNoDxOJa o6pa6OTKa Ipi N3XbPJIaNe Ha To3N IpOdyKT.
3HaKbT Bbypxy npodykTa nIi Ha npINOxKeHnte DOkymeHTN NOKa3Ba, ue To3n ypei He moxe da ce cHTa 3a 6ntOB OTNaBbK OT DOMAKINCTBOTO. IpedeAte To3v npOyKT B NyHKTa 3a Cb6ipaHe n peuNKInpaHe Ha OTnaDbuOT eNEkTpueceKO n eNEkTPoHNO o6OpyDbaHe.
N3XBpIaHeTO TpIbBa da Ce N3BpIuIN B CbOTBeTCTBne C MeCTHnTE eKOLOrTuHN pa3nope6n 3a n3XBpIaHe Ha OTNaIbCu.
Mol, 06bprHeTe Ce KbM CbOTBeTHnTe
O6uHcNc CnyK6n, KbM MeCTHnI NyHKT
3a peuKlnpaHe Ha 6ntOBu OTnaDbu INu
KbM TbpROBeua, OT KOROTO Cte 3aKynnn
ypea, 3a Da nOlyuHTe DoNbLnHtEnHa
InHΦOpMaζηa 3a peMOHT, NoppaKa I
peuKnlaPaHe Ha TO3n IpOdyKT.
Частихарakтерптукн
BUNka 3a pa36nBaHe Ha Tecto

3aunteh Kaapc OTbop 3a PblHe
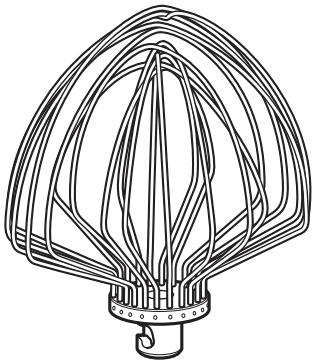
TeI 3a pa36mbahe OT HepbXkaema CTOMaHa
3anaeHa TbproBcKa Mapka Ha KitchenAid, CAU.
TM TbproBcKa Mapka Ha KitchenAid, CAU
ΦopMaTa Na KxHEnckn pyo60e 3ana3eHa Mapka Ha KitchenAid, CAU
© 2011. Bcnyckn npaba 3ana3eHn.
CneuΦkaunTe npIeXaT Ha npomraHa 6e3 npedn3BecTne.
W10421400A
266
11/11


W10421400A
11/11

- SETTING UP YOUR STAND MIXER 6
- CARE AND CLEANING. 9
- TIPS FOR GREAT RESULTS
- SERVICE AND WARRANTY
- Stand Mixer Safety
- Your safety and the safety of others are very important.
- DANGER
- WARNING
- IMPORTANT SAFEGUARDS
- SAVE THESE INSTRUCTIONS
- THIS PRODUCT IS DESIGNED FOR HOUSEHOLD USE ONLY.
- Electrical Requirements
- WARNING
- Electrical Waste Disposal
- Parts and Features
- Setting up your Stand Mixer
- Assembling your Bowl-Lift Stand Mixer
- To attach the Stainless Steel Bowl
- To raise the Stainless Steel Bowl to mixing position
- To remove the Stainless Steel Bowl
- To attach Flat Beater, Stainless Steel Whip, or Spiral Dough Hook.
- To remove Flat Beater, Stainless Steel Whip or Spiral Dough Hook
- To attach Pouring Shield
- To use Pouring Shield
- Adjusting your Beater to Bowl Clearance
- Using your Stand Mixer
- Speed Control Guide - 10 Speed Stand Mixers
- Attachments
- General Information
- Care and Cleaning
- English
- Planetary Mixing Action
- Mixing Time
- Mixer Use
- PERSONAL INJURY HAZARD
- Mixing Tips
- Adding Ingredients
- Adding Nuts, Raisins, or Candied Fruits
- Liquid Mixtures
- Whipping Tips for Egg Whites
- AMOUNT
- SPEED
- Whipping Stages
- Frothy
- Begins to Hold Shape
- Soft Peak
- Almost Stiff
- Stiff but not Dry
- Stiff and Dry
- Whipping Tips for Whipped Cream
- Begins to Thicken
- Holds its Shape
- Stiff
- Bread Making Tips
- When You Need Service
- Please read the following before calling your service center.
- If your Stand Mixer should malfunction or fail to operate, please check the following:
- Household KitchenAid™ Bowl-Lift Stand Mixer Warranty
- Service Centers
- Customer Service
- KitchenAid
- ASSISTÊNCIA E GARANTIA
- Juster vispen slick at den/DD berRer bollen
- Kundeservice
- Sisallysluettelo
- YLEISKONE JA TURVALLISUUS
- HAETTA A LIKAMSTJONI
- MEPbI INPEIOCTOPOXHOCTN
- Bo n36exhaHne pncka noxapa, nopaxeHn 3neKtpueckm TOKOM nIIOBpeXdHn Ipr nCpOlb30BaHn mIKcepa Heo6xoDmO co6JIoDaTb OCHOBhle Mepbl IpeOcSTOPOXHOCTN, BKJIoua CneDuOuNe:
- COXPAHNTE DAHHOE PYKOBODCTBO
- ДАHHOE YCTPOICTBO ПРЕДHA3HAUECHO TOJIbKO ДЯ ДOMAшHETo ИСПОЛьЗOBAHЯ.
- ONACHOCTbIIOJUYEHINTPABMbI
- Cobetbl no cmeunBaHnIO
- I06abJeHne mHrpeJeHToB
- Добavenhoe opexOB,ИЗюм ИиуkaTOB
- Kukne cmecn
- Pone3HbIe coBebI dIydoCTnxKeHnHaHnyuushx pe3yNbTaTOB
- B36nBaHne RnUhblx
- 6eIKOB BeHcNkOM
- KOLINYECTBO
- CKOPOCTb
- 3TaBbB36nBaHn
- Bo3HnkaeT neHa:
- HaunhaetcoxpaHraTbcaΦopMa
- Bepxuynmkarne
- IouTu TBepaKaOHcNCTeHnua
- Bepyukn TBepdble, Ho He cyxne
- EcnB Baw CstaioHapNbMnKcep BblIe N3 CTpo NN He pa6Otaet, npOBepbTe cLeedyUoee:
- Obsah
- BEZPECNOST KUCHYNSKEHO ROBOTU
- Fáze šlehání
- DÔLEŽITÉ BEZPECNOSTNÉ POKNY
- TIETO POKNY SI USCHOVAJTE
- TENTO VYROBOK JE URČENÍ IBA PRE DOMÁC PEUŽITIE.
- Fáza šlahania
- Zacina hustnut
- Drží tvar
- BE30IACHOCT HA KYXHECHKNPOBOT
- YACTN XAPAKTEPUCTUKI 257
- IIOIROBKA 3A PABOTA HA KUYXHECKNPOBOT 258
- KAK DA N3NOL3BATE BAWHY KUYXHEHCKN POBOT
- ПИСТАВКИ 261
- TPIJKA I NIOUCTBAHE 261
- CbBETI 3A OTJNUHPE3YJTATN
- PEMOHTI TAPAHLI
- БezonauchocT ha kyxhencknpo60T
- Bawata 6e30nacHocT n 6e30nacHocTtHa npyRnte ca MHOrO BaxHH.
- ONACHOCT
- PPEdUnpeXkeHne
- BAKHNI PEPDA3HIM MEPKN
- Ipn ynpotpe6a Ha eJeKtpnueckn ypeu BNHaR na ce cna3BaT cneHnTe OCHOBn Mepkn 3a 6e3onacnoct:
- 3APA3ETE3N INHCTPYKUN
- TO3N ПОДУКТЕ ПРЕДHA3HAUECH CAMO 3A ДOMAшHA UNOTPEБА.
- БezonauchocT ha kyxhenckma p060T
- I3xBbprJaHe ha eJeKTpnuYeKn ypeiN
- Частихарakтерптукн
Brand : KITCHENAID
Model : 5KSM7580XEMS
Category : Stand mixer