
FAB32RP1 - Combined refrigerator SMEG - Free user manual and instructions
Find the device manual for free FAB32RP1 SMEG in PDF.
| Product type | Combined refrigerator |
| Brand | SMEG |
| Model | FAB32RP1 |
| Dimensions (H x W x D) | 185 x 60 x 65 cm (estimation) |
| Weight | 72 kg (estimation) |
| Power supply | 220-240 V ~ 50 Hz |
| Climate class | SN (10°C to 32°C), N (16°C to 32°C), ST (18°C to 38°C), T (18°C to 43°C) |
| Refrigerator temperature range | +1°C to +9°C |
| Freezer temperature range | -16°C to -24°C |
| Super Cool function | Yes (rapid cooling) |
| Super Freeze function | Yes (rapid freezing) |
| Open door alarm | Yes |
| Interior light | Yes (replaceable bulb) |
| Fan | Yes (temperature distribution) |
| Defrost | Automatic for refrigerator, manual for freezer |
| Condenser cleaning | Recommended periodically |
| Safety | Control lock (child lock) |
| Included accessories | Adjustable shelves, door bins, vegetable crisper, ice cube tray, bottle holder |
| Manual | 22 pages, available in PDF |
Frequently Asked Questions - FAB32RP1 SMEG
User questions about FAB32RP1 SMEG
0 question about this device. Answer the ones you know or ask your own.
Ask a new question about this device
Download the instructions for your Combined refrigerator in PDF format for free! Find your manual FAB32RP1 - SMEG and take your electronic device back in hand. On this page are published all the documents necessary for the use of your device. FAB32RP1 by SMEG.
USER MANUAL FAB32RP1 SMEG
1.1 General safety instructions 26
1.2 Manufacturer liability 27
1.3 Appliance purpose 27
1.4 Disposal 27
1.5 Identification plate 28
1.6 This user manual 28
1.7 How to read the user manual 28
2 Description 29
2.1 General Description 29
2.2 Parts definition 29
2.3 Control panel 30
2.4 Available accessories 31
3 Use 33
3.1 Instructions 33
3.2 Preliminary operations 33
3.3 First use 33
3.4 Using the accessories 35
3.5 Using the refrigerator compartment 37
3.6 Using the freezer compartment 38
3.7 Noises during operation 39
3.8 Heated front surface 39
3.9 Turning the appliance off 39
3.10 Food storage advice 40
4 Cleaning and maintenance 41
4.1 Instructions 41
4.2 Cleaning the appliance 41
4.3 Defrosting 42
4.4 Replacing the lamp 43
4.5 What to do if... 43
5 Installation 45
5.1 Electrical connection 45
5.2 Positioning 45
1 Instructions
1.1 General safety instructions
Risk of personal injury
- Never touch the heating elements during use.
- Keep children under eight years of age at a safe distance if they are not constantly supervised.
- Children must never play with the appliance.
- Switch the appliance off immediately after use.
- Never try to put out a fire or flames with water: turn off the appliance and smother the flames with a fire blanket or other appropriate cover.
- The appliance must never be cleaned by unsupervised children.
- Have qualified personnel carry out installation and assistance interventions according to the standards in force.
- Do not modify this appliance.
-
Do not insert pointed metal objects (cutlery or utensils) into the slots in the appliance.
-
Do not try to repair the appliance yourself or without the intervention of a qualified technician.
- If the power supply cable is damaged, contact technical support immediately and they will replace it.
Risk of damaging the appliance
- Never rest sharp metallic objects such as knives, forks, spoons and lids on the appliance during use.
- Do not use abrasive or corrosive detergents on glass parts (e.g. powder products, stain removers and metallic sponges).
- Do not seat on the appliance.
- Do not use steam jets for cleaning the appliance.
- Do not obstruct ventilation openings and heat dispersal slots.
- Do not use the appliance to cool rooms for any reason.
Always disconnect the appliance from the power grid in the event of a breakdown, maintenance, when replacing the light bulb or during cleaning.
For this appliance
- Ensure that the appliance is switched off before replacing the bulb.
- Do not rest any weight or sit on the open door of the appliance.
Take care that no objects are stuck in the doors.
1.2 Manufacturer liability
The manufacturer declines all liability for damage to persons or property caused by:
- use of the appliance other than the one envisaged;
- non-observation of the user manual provisions;
- tampering with any part of the appliance;
- use of non-original spare parts.
1.3 Appliance purpose
- This appliance is for refrigeration and conservation of fresh and frozen foods in the home. Every other use is considered improper.
- This appliance may be used by children aged at least 8 and by people of reduced physical and mental capacity, or lacking in experience in the use of electrical appliances, as long they are supervised or instructed by adults who are responsible for their safety.
- The appliance is not designed to operate with external timers or with remote-control systems.
1.4 Disposal

This appliance must be disposed of separately from other waste (Directives 2002/95/EC, 2002/
96/EC, 2003/108/EC). The appliance does not contain substances in quantities sufficient to be considered hazardous to health and the environment, in accordance with current European directives.
To dispose of the appliance:
- Cut the power supply cable and remove it along with the plug.

Power voltage Danger of electrocution
- Disconnect the main power supply.
-
Disconnect the power cable from the electrical system.
-
Consign the appliance to the appropriate selective collection centres for electrical and electronic equipment waste, or deliver it back to the retailer when purchasing an equivalent product, on a one for one basis.
Instructions
Our appliances are packed in non-polluting and recyclable materials.
- Consign the packing materials to the appropriate selective collection centres.

Plastic packaging Danger of suffocation
- Do not leave the packaging or any part of it unattended.
- Do not let children play with the packaging plastic bags.
1.5 Identification plate
The identification plate bears the technical data, serial number and brand name of the appliance. Do not remove the identification plate for any reason.
1.6 This user manual
This user manual is an integral part of the appliance and must therefore be kept in its entirety and in an accessible place for the whole working life of the appliance.
Read this user manual carefully before using the appliance.
1.7 How to read the user manual
This user manual uses the following reading conventions:
Instructions

General information on this user manual, on safety and final disposal.
Description

Description of the appliance and its accessories.
Use

Information on the use of the appliance and its accessories, cooking advice.
Cleaning and maintenance

Information for proper cleaning and maintenance of the appliance.
Installation

Information for the qualified technician: installation, operation and inspection.

Safety instructions

Information

Advice
-
Use instruction sequence.
-
Single use instruction.
2 Description
2.1 General Description
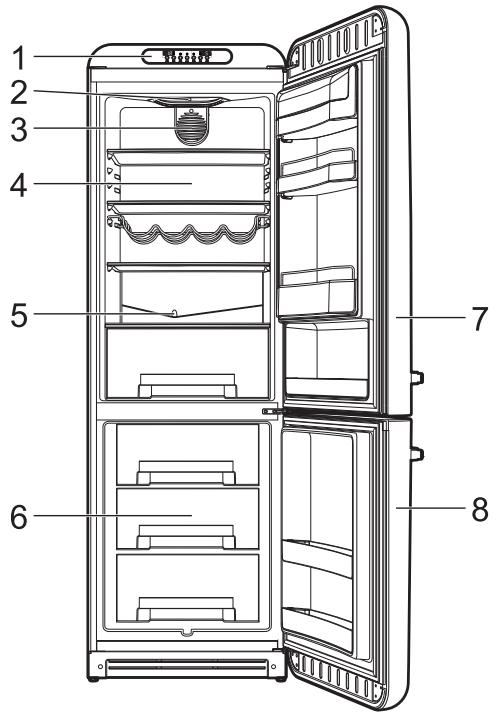
1 Control panel
2 Oven light
3 Fan
4 Refrigerator compartment
5 Defrost water outlet
6 Freezer compartment
7 Fridge door
8 Freezer door
2.2 Parts definition
Control panel
For setting the temperature inside the refrigerator and freezer compartments.
Refrigerator compartment
For storing fresh foods.
Interior lighting
The interior of the appliance is lit when the door is opened.
Fan
Distributes the temperature and reduces condensation on the shelves and other surfaces.

Electric energy consumption rises when the fan is operating.
Freezer compartment
For storing frozen foods, freezing fresh foods and producing ice cubes.
Defrost water outlet (static models only)
At the back of the fridge compartment, under the refrigeration plate, there is a groove and a hole for collecting the water from defrosting. Check periodically that this opening is not blocked and clean it with a piece of stiff wire, if necessary.
2.3 Control panel
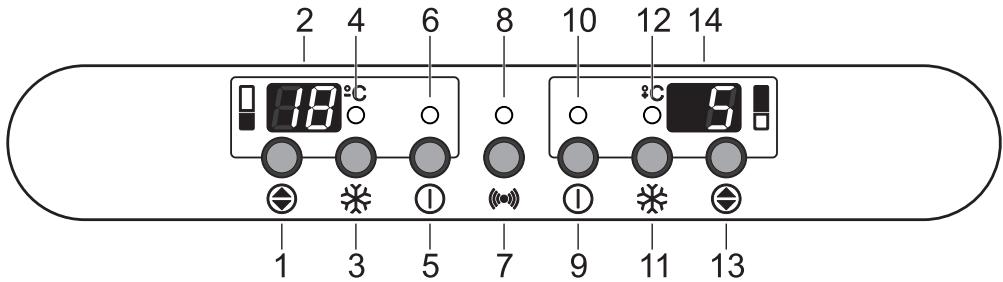
1 Freezer temperature button
2 Freezer temperature display
3 Freezer Super Freeze button
4 Freezer Super Freeze light
5 Freezer ON/OFF button
6 Freezer ON/OFF light
7 Alarm button
8 Alarm light
9 Fridge ON/OFF button
10 Fridge ON/OFF light
11 Fridge Super Cool button
12 Fridge Super Cool light
13 Fridge temperature button
14 Fridge temperature display
2.4 Available accessories

Some models are not provided with all accessories.
Shelves
For optimising fridge space and placing foodstuffs inside the refrigerator compartment.
Bottle rack

For storing bottles inside the refrigerator compartment.
Fruit and vegetable drawer
For storing fruit and vegetables, maintaining a constant humidity level.
Freezer drawers
For storing frozen foods and foods to be frozen.
Door balconies and shelves
For storing foodstuffs in small containers. The shelf in the lower part of the door is useful for storing bottles. In some models, the internal part of the freezer door is also fitted with balconies for frozen foods which are handled more frequently (e.g. ice cream, already opened bags etc.)
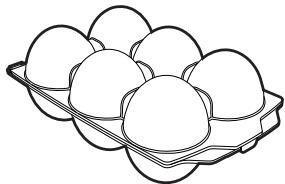
Egg holder
Useful for storing eggs, this can be positioned in various balconies and shelves in the freezer door, according to requirements.
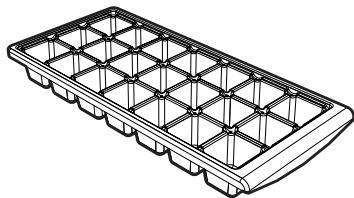
Ice tray
For producing ice cubes; to be placed in the freezer compartment.

The accessories intended to come into contact with food are made of materials that comply with the provisions of current legislation.

Original supplied and optional accessories can be requested to Authorised Assistance Centres. Use only original accessories supplied by the manufacturer.
3 Use
3.1 Instructions

Improper use Risk of damages to the appliance
- Do not use sharp objects when removing ice and frost in order not to damage the appliance's walls.
- Do not sit or lean on the door or any open drawers.
- Do not touch the heating elements on the outside of the appliance.
- Do not store inflammable, explosive or volatile substances.
- Organic compounds, acids and essential oils can corrode the seals and plastic surfaces if left in contact with them for extended periods.
- Bottles containing strong alcoholic drinks must be tightly closed and stored vertically.
3.2 Preliminary operations
- Remove any protective film from the outside or inside of the appliance, including accessories.
- Remove any labels (apart from the technical data plate) from the accessories and shelves.
- Remove and wash all the appliance accessories (see 4 Cleaning and maintenance).
3.3 First use

The fridge temperature can be set between +1^ and +9^ .
The freezer temperature can be set between -16^ and -24^ .
- Plug the appliance into a wall socket. The and symbols are displayed on the refrigerator and freezer temperature displays.
- Press the freezer compartment ON/OFF button (on the left) for 3 seconds to switch on the appliance. The respective green lights come on to indicate that the refrigerator compartment and the freezer compartment are on.
- The values for the refrigerator compartment and the freezer compartment appear on the displays. These values are displayed until the set temperatures are reached.

The appliance is set by default to +5^ C for the fridge and -18^ C for the freezer.
- Use the corresponding temperature buttons to set the temperatures of the fridge and freezer. The desired temperature will flash on the display.
- After approximately 5 seconds of button inactivity, the actual temperature of the compartment will be displayed.

The other buttons are disabled when setting.
Alarm
The alarm sounds to warn of the following: The fridge door has been open for more than a minute (continuous buzzer with relative red light on)
- Press the alarm button (or close the fridge door to deactivate the buzzer and switch off the red light.
The temperature inside the refrigerator or freezer compartment is too high (intermittent buzzer, flashing display and light on)
- Press the alarm button (to deactivate the buzzer.
-
The red light and the flashing temperature on the display turn off automatically when the refrigerator compartment or the freezer compartment reach the previously set temperature.
-
If the freezer compartment does not reach the required temperature within 24 hours of the alarm being turned off, it will sound again.

When the appliance is first turned on, the alarm will not sound for the first 24 hours to allow the appliance to reach the set temperatures.
Control lock

The control lock is a device that protects the appliance from accidental or inappropriate use.
- Press the alarm button (for 3 seconds to turn on the control lock. The and symbols flash for 3 seconds.
- Press the alarm button again for 3 seconds to turn it off.

When the control lock is active, only the alarm button ( ) is active. Pressing any other button makes the E and E symbols appear on the displays for 3 seconds.
3.4 Using the accessories
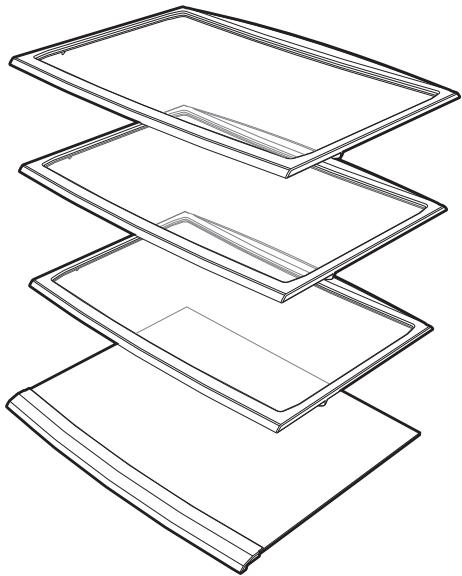
Shelves
These can be positioned at different heights on the guides according to requirements. Each shelf has a safety fitting to prevent it from being accidentally removed. To extract them fully, lift up the front part (1) and remove them (2).

Perishable foods should be placed on the rear part of the shelves where the temperature is lower.
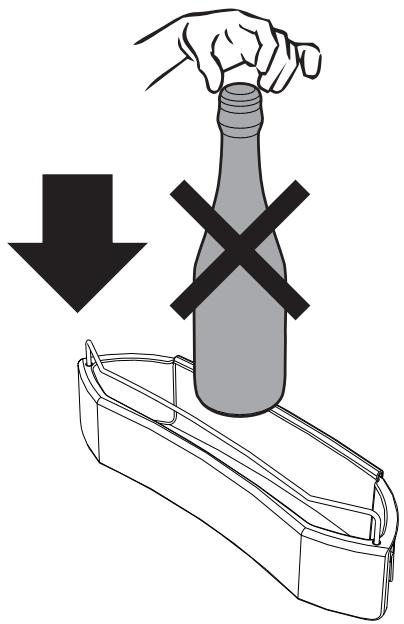
Bottle rack
May be positioned at different heights and installed with the front part raised so as to position the bottles at an angle. In order to store particularly long bottles, the bottle rack must be set at a height which will not prevent the door from being closed properly. To extract it fully, lift up the front part and remove it.
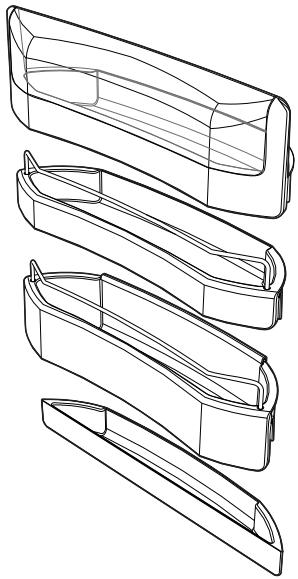
Door balconies and shelves
Suitable for storing eggs, butter, dairy products, conserves and other small food packages/containers. The lower part of the door has a shelf for bottles. Avoid placing excessively heavy bottles on the shelf and do not let them drop onto the bottom when inserting them.

In some models, the internal part of the freezer door is also fitted with balconies for frozen foods which are handled more frequently (e.g. ice cream, already opened bags etc.)
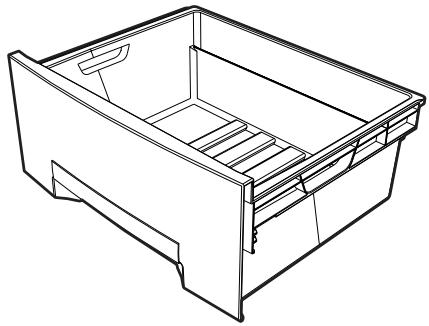
Fruit and vegetable drawer
Located at the bottom of the refrigerator compartment, which is fitted with a glass shelf to cover fresh foods that require constant humidity for optimum storage.
Ice tray
Fill the ice tray with cold water or other liquids. Place it horizontally in one of the freezer drawers. Close the freezer door and wait a few hours. When the water has fully frozen, remove the tray from the freezer compartment and remove the ice for use.
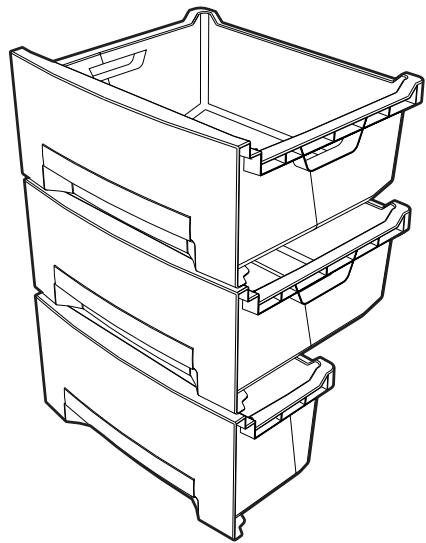
Freezer drawers
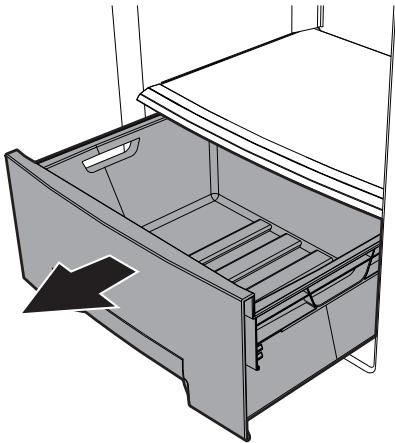
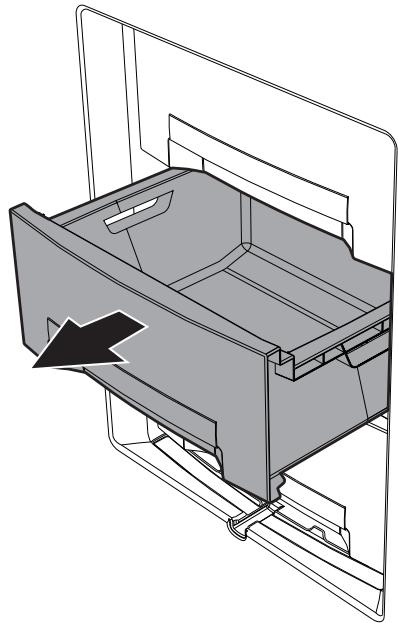
For storing frozen foods and foods to be frozen. To remove them, pull them towards you and lift the front part of each drawer.
3.5 Using the refrigerator compartment
Arranging foods
Arrange the foods on the various shelves, taking care that they have an airtight wrapping or cover. This precaution ensures that:
- the flavour, moisture and freshness of the foods is preserved;
- any contamination of foods with odours or tastes from other foods can be avoided;
- the humidity level inside the refrigerator is prevented from becoming too high as a result of the normal transpiration of food (especially fresh fruit and vegetables). In some operating conditions (rise in ambient temperature and humidity, more frequent opening of the door) this might cause condensation to form on the shelves.

Always allow hot foods and drinks to cool to room temperature before putting them in the fridge.
Super Cool Fridge Function

The Super Cool fridge function is used for quick cooling of large quantities of foodstuffs
- Press the fridge compartment Super Cool button. The corresponding orange indicator light comes on.
- After 6 hours the Super Cool function turns off automatically. The refrigerator compartment returns to its previous setting.
Storage life table
| Foodstuff | Time |
| Eggs, smoked meats, marinated foods, cheese | max 10 days |
| Root vegetables | max 8 days |
| Butter | max 7 days |
| Pastries, fruit, ready meals, fresh meat | max 2 days |
| Fish, minced meat, seafood | max 1 day |
3.6 Using the freezer compartment
Activate the Super Freeze freezer function 24 hours before freezing fresh foodstuffs.
Super Freeze Freezer Function

The Super Freeze freezer function is used for quick freezing of large quantities of foodstuffs
- Press the freezer compartment Super Freeze button. The corresponding orange indicator light comes on.
- When you wish to turn off the Super Freeze function, press the freezer compartment Super Freeze button again. The corresponding orange indicator light will turn off.
- If it is not turned off manually, the Super Freeze function will turn off automatically and the freezer compartment will return to its previous setting.

It is recommended the Super Freeze freezer function be used when first turning the appliance on and before cleaning the freezer.
- Place the fresh foodstuffs in the freezer drawers.
- Freeze the foodstuffs in the middle drawer in the No-Frost freezer. After 24 hours, the foodstuffs may be moved to other drawers for storage.
Frozen foods storage life table
| Foodstuff | Time |
| Fruit, beef | max 10-12 months |
| vegetables, veal, poultry | max 8-10 months |
| Game | max 6-8 months |
| Pork | max 4-6 months |
| Mince | max 4 months |
| Bread, desserts, cooked foods, lean fish | max 3 months |
| Offal | max 2 months |
| Sausages, oily fish | max 1 month |
Defrosted foods
Food must be consumed as soon as possible once defrosted. Freezing foods preserves them, but it does not destroy any micro-organisms, which are activated after thawing, damaging the foods.
Partial defrosting lowers the nutritional value of the foodstuffs, particularly of fruit, vegetables and ready meals.
3.7 Noises during operation
The refrigerator and freezer compartments are cooled by means of a compression system. In order to maintain the preset temperature inside the refrigerator and freezer compartments, the compressor comes into operation in response to the level of cooling required, and may operate continuously if necessary. When the compressor starts to function, it creates a buzzing noise which generally diminishes in intensity after a few minutes.
Another normal operating noise of the appliance is a gurgling due to the coolant flowing through the pipes in the circuit. This noise is normal and does not indicate an appliance malfunction. If it becomes too loud, this may mean that there are other causes. Checks must then be made to ensure that:
- The refrigerator is properly levelled on the floor and does not vibrate when the compressor is in operation: if this is not the case, adjust the appliance's feet until it is level;
- The drawers, shelves and trays on the door are correctly positioned in their holders: if they are not, put them in correctly;
- Bottles and containers on the various shelves are stable and not touching each other: otherwise, the vibration resulting from compressor operation could generate noise;
- Do not position the fridge in such a way that it is in contact with furniture or other household appliances.
3.8 Heated front surface
There is a front surface heating system inside the cabinet to limit the formation of condensation around the door seal.
3.9 Turning the appliance off
Whenever the appliance is to remain unused for long periods, it should be switched off.
- Press the freezer compartment ON/OFF button (on the left of the control panel) for 3 seconds. The respective green lights turn off to indicate that the refrigerator compartment and the freezer compartment are off.
- The and symbols are displayed on the refrigerator and freezer temperature displays.
- Unplug the appliance from the wall socket.
- Empty the compartments.
- Once the freezer has fully defrosted, dry any residual accumulated moisture with a tea towel.
Leave the door ajar to ensure that moisture and stagnant air do not cause unpleasant odours.

It is possible to turn off just the refrigerator if required. Press the fridge ON/OFF button (on the right) for 3 seconds
3.10 Food storage advice
Practical energy saving advice
- Correct use of the appliance, correct packaging of foodstuffs, a constant temperature and food hygiene have significant effects on the quality of storage.
- Reduce the number of times that the doors are opened and the length of time they remain open to prevent the compartments from heating up excessively.
- Clean the condenser (rear of the refrigerator) periodically to prevent the appliance from losing efficiency.
- Use the Super Freeze function only when strictly necessary.
- Defrost frozen food in the refrigerator compartment in order to make use of the cold stored in the frozen foods.
General advice
Always check the expiry date on the food packaging.
- The foodstuffs must be stored in closed or pre-packaged containers and must not be able to emit or absorb moisture and odours.
- Remove perishable products from the appliance if you are going away for a long period.
Refrigerator compartment door
- Keep eggs, butter, cheese etc. in the upper and central parts.
- Keep drinks, bottles, cans etc. in the lower part.
Refrigerator compartment
- Keep conserves, wine, biscuits etc. in the upper part.
- Keep dairy products, ready meals, pastries, fruit juices, beer etc. in the central part.
- Keep meats, cold cuts etc. in the lower part.
- Keep fresh and tropical fruit, vegetables, root vegetables etc. in the fruit and vegetable drawer.
Freezer compartment
- The type of food, quantity and date of freezing should be marked on the container/packaging.
- Use small containers, if possible already cold.
- The quantity of fresh foods which can be frozen at the same time is listed on the nameplate inside the refrigerator compartment.
- Use suitable freezer bags, tinfoil, cling-film for use with food, and freezer containers.
- Do not use paper bags, cellophane for non-food use, shopping bags or pre-used freezer bags.
- Avoid frozen food coming into contact with fresh food to be frozen.
Freezer compartment door (only static models)
- Keep bagged frozen vegetables, ice, ice cream etc.
4 Cleaning and maintenance
4.1 Instructions

Improper use Risk of damage to surfaces
- Do not use steam jets for cleaning the appliance.
- Do not use cleaning products containing chlorine, ammonia or bleach on steel parts or parts with metallic finishes on the surface (e.g. anodizing, nickel- or chromium-plating).
- Do not use abrasive or corrosive detergents on glass parts (e.g. powder products, stain removers and metallic sponges).
- Do not use rough or abrasive materials or sharp metal scrapers.

Power voltage Danger of electrocution
- Turn off the appliance and unplug it from the mains before cleaning.
- Do not pull the cable to remove the plug.
4.2 Cleaning the appliance
A special antibacterial protection on the appliance's interior walls prevents bacterial growth and keeps them clean. They must nevertheless be cleaned regularly in order to keep them in good condition.
Cleaning the outside of the appliance
- The appliance may be cleaned with water or alcohol-based liquid detergents (e.g. window cleaning products).
- Avoid aggressive detergents and rough sponges in order not to damage the surfaces.
- Use a soft brush to remove dust and fume deposits from the condenser on the rear of the appliance.
- Clean the tank above the compressor.
Cleaning the inside of the appliance
- Clean the interior with diluted liquid detergent or with warm water with a little vinegar added.
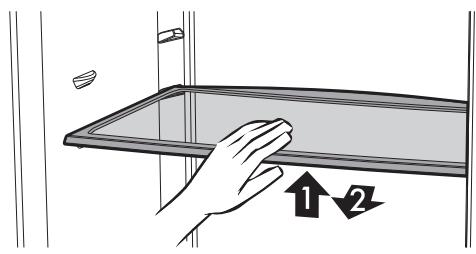
- The door balconies and containers can be removed: tap them upwards with your fist, first on one side and then on the other in the insertion zone.
- Remove any ice thicker than 3 - 5mm . Do not use sharp objects or spray products.
4.3 Defrosting

No-Frost models perform this procedure automatically.
Occasional presence of frost inside the freezer compartment is normal.
Defrosting the refrigerator compartment
The refrigerator compartment does not require defrosting, as any ice which forms on the refrigeration plate will melt when the compressor is idle.
If ice thicker than 3 - 5mm should form on the inside walls of the refrigerator compartment, turn off the appliance and defrost it manually.
The drainage channel opening for melted ice is located inside the refrigerator compartment under the refrigeration plate. Check regularly that it is not blocked by food scraps or anything else and clean it if necessary with a straw or stiff wire.
Defrosting the freezer compartment
The freezer compartment must be defrosted when the thickness of the ice inside reaches 3-5 mm.
- Place a container on the floor in front of the freezer compartment.
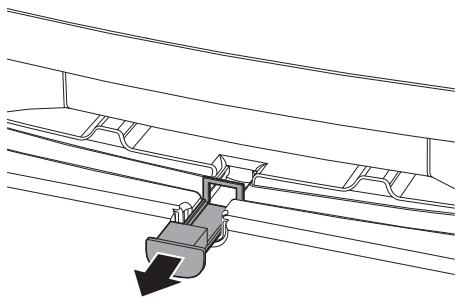
- Extract the drainage channel from the rear of the freezer to allow the water to flow out.
- Remove the freezer drawers.
- Do not use electrical devices (e.g. hair dryers) or sprays for defrosting, the plastic parts could be damaged.
- Clean and dry the inside of the freezer compartment.
- Replace the freezer drawers, plug the appliance back in and turn it on.

It is recommended you further lower the temperature of the foodstuffs 24 hours before defrosting using the Super Freeze function. After 24 hours, remove the frozen foods from the freezer and protect them from thawing.
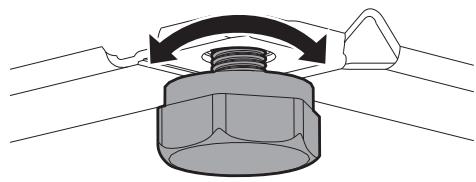
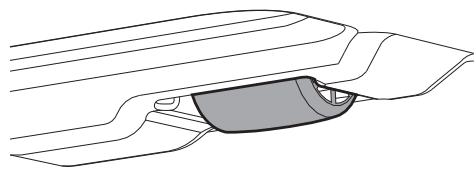
4.4 Replacing the lamp
- Remove the bulb cover using a tool (e.g. a screwdriver).
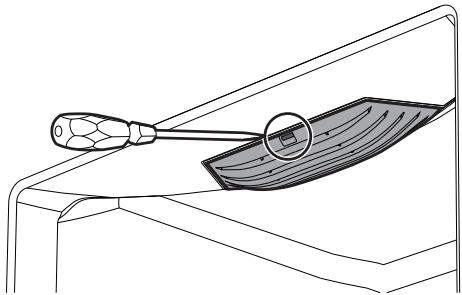
- Unscrew and remove the lamp.
- Replace the lamp with one of the same type.
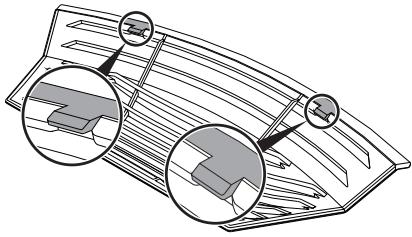
- Refit the cover: line up the teeth of the cover with the slots in the back of the lamp housing, then close the cover.
4.5 What to do if...
The appliance does not work:
- Make sure that the appliance is plugged in and that the main switch is turned on.
The compressor starts to function too often or functions continuously:
- The room temperature is too high.
- The door is being opened too often or for too long.
- The door is not closing/sealing properly.
- The freezer is loaded with too many fresh foods.
- Check that sufficient air can circulate around the sensor on the right-hand side of the refrigerator compartment.
- Check that the back of the freezer is properly ventilated and that the condenser is not too dirty.
Excessive ice or condensation has built up inside the refrigerator compartment:
- The door is being opened too often or for too long.
- Hot foods have been placed inside the refrigerator compartment.
- The foodstuffs or containers are in contact with the rear wall.
- The door seal is damaged or dirty. Clean or replace it.
Water is forming inside the refrigerator compartment:
- The drainage channel or opening is blocked.
The refrigerator compartment is not sufficiently cold:
- The thermostat is set at too high a temperature.
- The door is being opened too often or for too long.
- The door is not closing/sealing properly.
The room temperature is too high.
The temperature inside the refrigerator compartment is too cold and the foodstuffs are freezing.
- The thermostat is set at too low a temperature.
- Foodstuffs not contained in suitable containers or bags.
- Fruit and vegetables might be too wet.
- Foodstuffs placed against the rear wall of the refrigerator compartment.
Temperature inside freezer compartment not low enough to freeze foods properly:
- The thermostat is set at too high a temperature.
- The door is being opened too often or for too long.
- The door is not closing/sealing properly.
- The door seal is damaged or dirty. Clean or replace it.
- The food to be frozen contains large quantities of sugar.
Excessive ice has built up inside the freezer compartment:
- The thermostat is set at too low a temperature.
The room temperature is too high. - The door is being opened too often or for too long.
- The door is not closing/sealing properly.
- The door seal is damaged or dirty. Clean or replace it.
- Hot foods have been placed inside the freezer compartment.
Door hard to open just after closing:
- If you attempt to open the door again just after closing it (especially the freezer door), considerable strength is required. This is due to the vacuum created by the cooling of the warm air which has entered the freezer.
The doors are misaligned:
- Check that the appliance is level.
- Level the appliance using its feet.
The following EH appears on the display:
- Call Technical Support.
5 Installation
5.1 Electrical connection

Power voltage Danger of electrocution
- The appliance must be connected to earth in compliance with electrical system safety standards.
- Do not pull the cable to remove the plug.
General information
- Check the grid characteristics against the data indicated on the plate. The identification plate bearing the technical data, serial number and brand name is visibly positioned inside the appliance. Do not remove this plate for any reason.
- Make sure that the plug and socket are of the same type.
- Avoid using adapters and shunts as these could cause overheating and a risk of burns.
- The plug must always be accessible when the appliance is installed.
- Leave the refrigerator standing vertically for at least two hours before turning it on for the first time.
- If it is necessary to replace the power cable, this must be performed by an authorised technician from Technical Support Service.
5.2 Positioning

Heavy appliance Danger of crush injuries
- Position the appliance with the aid of a second person.

Pressure on the open door Risk of damages to the appliance
- Never use the open door to lever the appliance into place when fitting.
- Avoid exerting too much pressure on the oven door when open.
- The appliance must not be exposed to direct sunlight.
- The appliance must not be installed near heat sources. If this is not possible, suitable insulation must be used.
- Do not use the appliance outdoors.
Choice of location
Always install the refrigerator in a dry place with satisfactory ventilation. Depending on its climate class (stated on the nameplate inside the refrigerator compartment), the appliance can be used in different temperature conditions.
| Class | Room temperature |
| SN (Subnormal) | + 10°C to + 32°C |
| N (Normal) | + 16°C to + 32°C |
| ST (Subtropical) | + 18°C to + 38°C |
| T (Tropical) | + 18°C to + 43°C |
- Install the appliance at least 3~cm away from electrical or gas cookers and at least 30~cm away from combustion heaters or radiators.
- The appliance must not be installed near heat sources. If this is not possible, suitable insulation must be used.
- If installed underneath wall units, at least 5 cm clearance must be left.
- Ensure that the appliance is located with sufficient space for the door to open and for the internal drawers and shelves to be removed, if necessary.
- To allow proper cooling of the condenser, the refrigerator must not be placed too close to the wall. To prevent this, the appliance comes complete with two plastic spacers which must be fitted
to the top of the condenser.
Positioning
Place the appliance on a stable and level floor. If the floor is not perfectly level, use the two adjustable feet on the front part of the appliance.
The appliance has two small wheels on the back to allow it to be moved and positioned more easily.
In any case, we recommend moving the appliance very carefully in order to avoid damaging the floor (especially in the case of wooden floors).
- Description 29
- Use 33
- Cleaning and maintenance 41
- Installation 45
- Instructions
- General safety instructions
- Risk of personal injury
- Risk of damaging the appliance
- For this appliance
- Manufacturer liability
- Appliance purpose
- Disposal
- Power voltage Danger of electrocution
- Instructions
- Plastic packaging Danger of suffocation
- Identification plate
- This user manual
- How to read the user manual
- Description
- Use
- Cleaning and maintenance
- Installation
- Description
- General Description
- Parts definition
- Control panel
- Refrigerator compartment
- Interior lighting
- Fan
- Freezer compartment
- Defrost water outlet (static models only)
- Control panel
- Available accessories
- Shelves
- Bottle rack
- Fruit and vegetable drawer
- Freezer drawers
- Use
- Instructions
- Improper use Risk of damages to the appliance
- Preliminary operations
- First use
- Alarm
- Control lock
- Using the accessories
- Door balconies and shelves
- Ice tray
- Using the refrigerator compartment
- Arranging foods
- Super Cool Fridge Function
- Storage life table
- Using the freezer compartment
- Super Freeze Freezer Function
- Defrosted foods
- Noises during operation
- Heated front surface
- Turning the appliance off
- Food storage advice
- Practical energy saving advice
- General advice
- Refrigerator compartment door
- Freezer compartment door (only static models)
- Cleaning and maintenance
- Instructions
- Improper use Risk of damage to surfaces
- Cleaning the appliance
- Cleaning the outside of the appliance
- Cleaning the inside of the appliance
- Defrosting
- Defrosting the refrigerator compartment
- Defrosting the freezer compartment
- Replacing the lamp
- What to do if...
- Installation
- Electrical connection
- General information
- Positioning
- Heavy appliance Danger of crush injuries
- Pressure on the open door Risk of damages to the appliance
- Choice of location
- Positioning
Brand : SMEG
Model : FAB32RP1
Category : Combined refrigerator