
7288 - Digital TV Receiver TELEVES - Free user manual and instructions
Find the device manual for free 7288 TELEVES in PDF.
| Product Type | Digital Terrestrial TV Receiver (DTT) |
| Brand | TELEVES |
| Model | 7288 |
| Dimensions (W x H x D) | 260 mm x 45 mm x 165 mm |
| Weight | 1 kg |
| Power Supply | AC 90-240 V, 50 Hz, 19 W max |
| Video Standard | MPEG-2 MP@ML |
| Audio Standard | MPEG-1/2 Audio Layer 1, 2 |
| Connectors | 2 x SCART (TV, VCR), 2 x RCA audio (L/R), S/PDIF optical, RS-232 |
| Memory | Flash 2 MB, RAM 8 MB |
| Operating Temperature | 0°C to +45°C |
| Storage Temperature | -10°C to +50°C |
| Main Functions | EPG, teletext, parental control, event scheduler, 7 built-in games, automatic channel numbering (LCN) |
| Channel Search | Automatic (channels 2 to 69), manual by frequency, by operator, PID search |
| Care and Cleaning | Unplug before cleaning, use a soft cloth slightly damp with water (no detergent) |
| Safety | Do not open the case, risk of electric shock. Place in a ventilated area, away from humidity and heat sources |
| Warranty | 2 years (EU) from date of purchase, upon presentation of the invoice |
Frequently Asked Questions - 7288 TELEVES
User questions about 7288 TELEVES
0 question about this device. Answer the ones you know or ask your own.
Ask a new question about this device
Download the instructions for your Digital TV Receiver in PDF format for free! Find your manual 7288 - TELEVES and take your electronic device back in hand. On this page are published all the documents necessary for the use of your device. 7288 by TELEVES.
USER MANUAL 7288 TELEVES
Digital Terrestrial TV Receiver
CONNEXION AU TV OU VCR:
DVB: Digital Video Broadcasting.
3.- Description of panels and controls 28
3.1.-Remote control unit 29
4.- Installation of the DTR 7288 30
4.1.- Connecting the receiver.. 30
5.-Menu Information 31
6.-User Installation 32
6.1.- Channel Search 32
6.2.- System Setting 33
6.3.-Parental Lock 35
6.4.-Factory Default 35
7.- General Viewing Function 36
7.1.-Select Channel 36
7.2.- Previous Channel Recall 36
7.3.-TV&RadioMode 36
7.4.-TV&VCRMode 36
7.5.- Channel Information 37
7.6.-Volume & Audio Control 37
7.7.-Favourite List 37
8.- Channel Manager 38
8.1.- Channel Manager 38
8.2.-Favourite Channel 38
8.3.-Move Channel 39
8.4.- Lock Channel 39
8.5.-Rename Channel 40
8.6.-Delete Channel 40
8.7.-Sort Channel 40
9.- EPG (Electronic Program Guide) 41
10.-Timer 41
Connector PIN designations 43
Front Panel Display 44
Glossary of terms 44
Technical specifications 45
Menu Tree of DRT 7288 46
Guarantee 47
1.- Safety measures
The Receiver that you have just purchased has been manufactured to meet international safety standards. We recommend that you carefully read the safety instructions below.
POWERING:
90 - 240 V~ 50/60 Hz.
OVERLOAD:
Do not overload the mains sockets, extenders or adapters to avoid a fire hazard or electric shock.
LIQUIDS:
Do not wet or splash the receiver.
Do not place objects or containers with liquids on top of or beside the equipment.
SMALL OBJECTS:
Avoid placing small metallic objects close to the unit. These could accidentally enter through the ventilation slots of the Receiver and cause serious damage.
CLEANLINESS:
Unplug the Receiver from the mains before beginning to clean it.
Use a slightly damp, soft cloth (no detergent) to clean the outside of the unit.
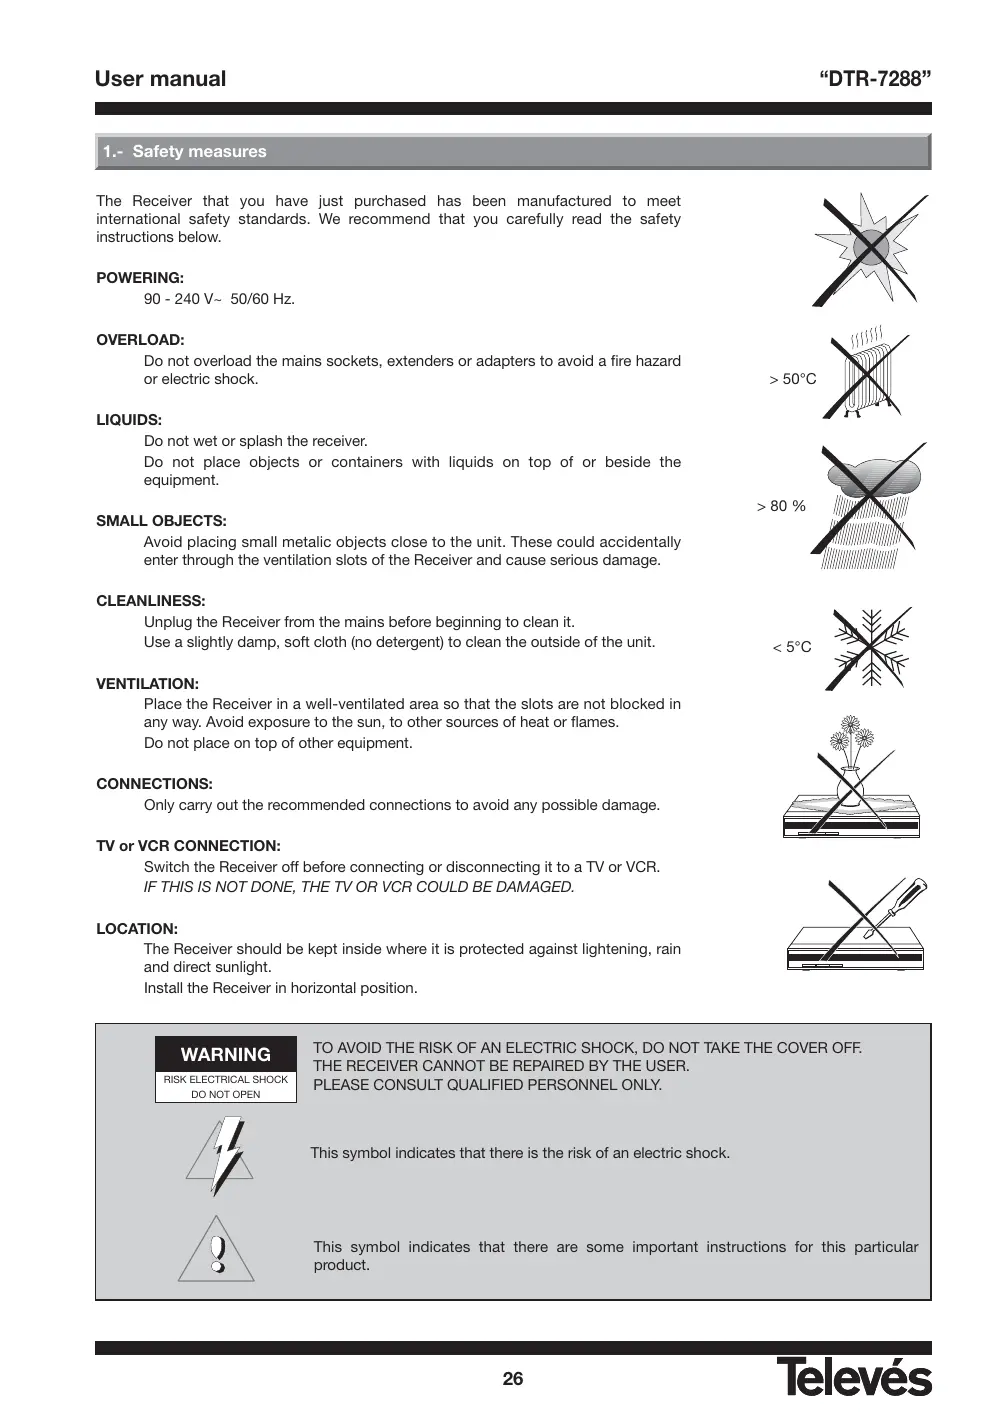
VENTILATION:
Place the Receiver in a well-ventilated area so that the slots are not blocked in any way. Avoid exposure to the sun, to other sources of heat or flames.
Do not place on top of other equipment.
CONNECTIONS:
Only carry out the recommended connections to avoid any possible damage.
TV or VCR CONNECTION:
Switch the Receiver off before connecting or disconnecting it to a TV or VCR.
IF THIS IS NOT DONE, THE TV OR VCR COULD BE DAMAGED.
LOCATION:
The Receiver should be kept inside where it is protected against lightening, rain and direct sunlight.
Install the Receiver in horizontal position.

>50^
80%

< 5^ C


WARNING
RISK ELECTRICAL SHOCK DO NOT OPEN


TO AVOID THE RISK OF AN ELECTRIC SHOCK, DO NOT TAKE THE COVER OFF.
THE RECEIVER CANNOT BE REPAIRED BY THE USER.
PLEASE CONSULT QUALIFIED PERSONNEL ONLY.
This symbol indicates that there is the risk of an electric shock.
This symbol indicates that there are some important instructions for this particular product.
2.- General Information
The DRT 7288 allows you to view a variety of terrestrial programs.
This user's guide covers the installation of the DTR 7288 and the necessary steps to operate various features.
It also explains special features available only in this DTR 7288 in detail, and will allow you to take full advantage of these features
2.1.- Main Features
Fully MPEG2, DVB compliant
Digital Audio with AC-3 support by SPDIF
■ User Friendly and easy-to-use Menu system
Various channel editing functions (favorite, moving, locking, renaming, deleting and sorting)
It supports the automatic ordering of channels - LCN (Logical Channel Number)
Stores up to 2000 programs
Easy and fast software upgrade through RS-232 port
Plug-and-play data transfer system (DSR to DSR)
Timer function, automatically turns On/Off by setting function (daily, weekly, monthly, one time)
It lets the user select the VHF bandwidth (7 or 8 MHz)
Automatic reserved channel moving system
Electronic Program Guide (EPG)
OSD Teletext (DVB ETS 300 706) and Subtitle function support
VBI Teletext support
Multi video output - CVBS, RGB
SCPC/MCPC receivable
256 color On-Screen-Display
Automatic PAL/NTSC conversion
Automatic last channel saving
7 different games are available
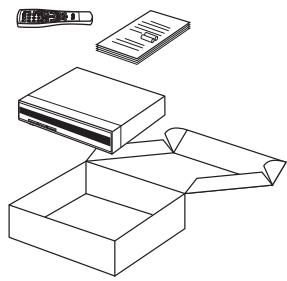
2.2.- Unpacking
Unpack the DTR 7288 and check to make sure that all of the following items are included in the packaging.
-1xRemoteControlUnit(RCU)
- User's manual
- 2 x AAA batteries
-1xDTR7288
2.3.- General Operation of the DTR 7288
Throughout this manual you will notice that the everyday operation of your DTR 7288 is based on a series of user friendly on screen display and menus. These menus will help you get the most from your DTR 7288, guiding you through installation, channel organizing, viewing and many other functions.
All functions can be carried out using the buttons on the RCU, and some of the functions can also be carried out using the buttons on the front panel.
If at any time when using the menus you want to return to the normal TV mode, press the TV/AV button.
Please be aware that new software may change the functionality of the DTR 7288.
Should you experience any difficulties with the operation of your DTR 7288, please consult the relevant section of this manual, or alternatively call your dealer or a customer service adviser.
3.- Description of panels and controls
Front panel

| Button | Function |
| ∅ | Switches between normal mode and standby. |
| ▲ /▼ | To step up and down through the channels. To select the different elements in the menus. |
| Display | In normal mode this displays the channel number; in standby it displays the time. |
Rear panel

| Name | Function |
| ANT IN | The input of the terrestrial antenna's signal. |
| TV OUT | Output of the RF signal to connect it to a TV or VCR. |
| VCR | To connect a VCR via a SCART connector. |
| TV | To connect a TV via a SCART connector. |
| AUDIO R | Audio output (right channel). |
| AUDIO L | Audio output (left channel). |
| S/PDIF | Digital audio optic output. |
| RS232 | Serial port connection. |
| MAINS | Connect to power |
| Button | Function |
| Turns powers ON/OFF of the DTR. | |
| × | When watching a channel mutes the sound. |
| 0 ... 9 | Enter number of the required Menu item or select a channel number to watch. |
| TV/RADIO | Switches between the TV and Radio channels. |
| FAV | Display the favourite channel list. |
| INFO | Shows information of the current channel. |
| Menú | Press this key one time to run Menú on screen and call command box. |
| / / | Moves up/down a page in the channel list. |
| OK | Executes the selected item in the Menu screen, or enters the desired value in any input mode. |
| PR+ / PR- | When watching a channel, change channels, or moves to the next higher or lower item in the Menu. |
| / + | When watching a channel, adjust the volume, or move to the left or right item in Menu. |
| EXIT | Returns to the previous Menú on the Menu screen or escape from the Menu. |
| AUDIO | When watching a channel, switches the audio languages. |
| EPG | Calls up the EPG. |
| R | Selects the different audio modes. |
| TV/AV | Switches between TV or AV mode. |
| Switches to teletext or subtitle mode. | |
| SCAN | Starts an automatic search. |
| +PR | Previous Channel Recall. |
| UHF | Non functional on this model |
| POSITION | Non functional when watching a channel |
Note: The buttons in red, green, yellow and blue color have secondary functions that are not described here and that can appear in various menus.
4.- Installation of DTR 7288
This section explains the installation of DTR 7288.
Refer to the manuals supplied with the equipment for the installation of outdoor equipment such as the antenna.
When adding new equipment, be sure to refer to the related parts of the manual for the installation.
4.1.- Connecting the receiver

Note: All of the cables used in the connections with the Receivers will be shielded.
DO NOT PLUG the Receiver into the mains until you have finished connecting it to all the other equipment.
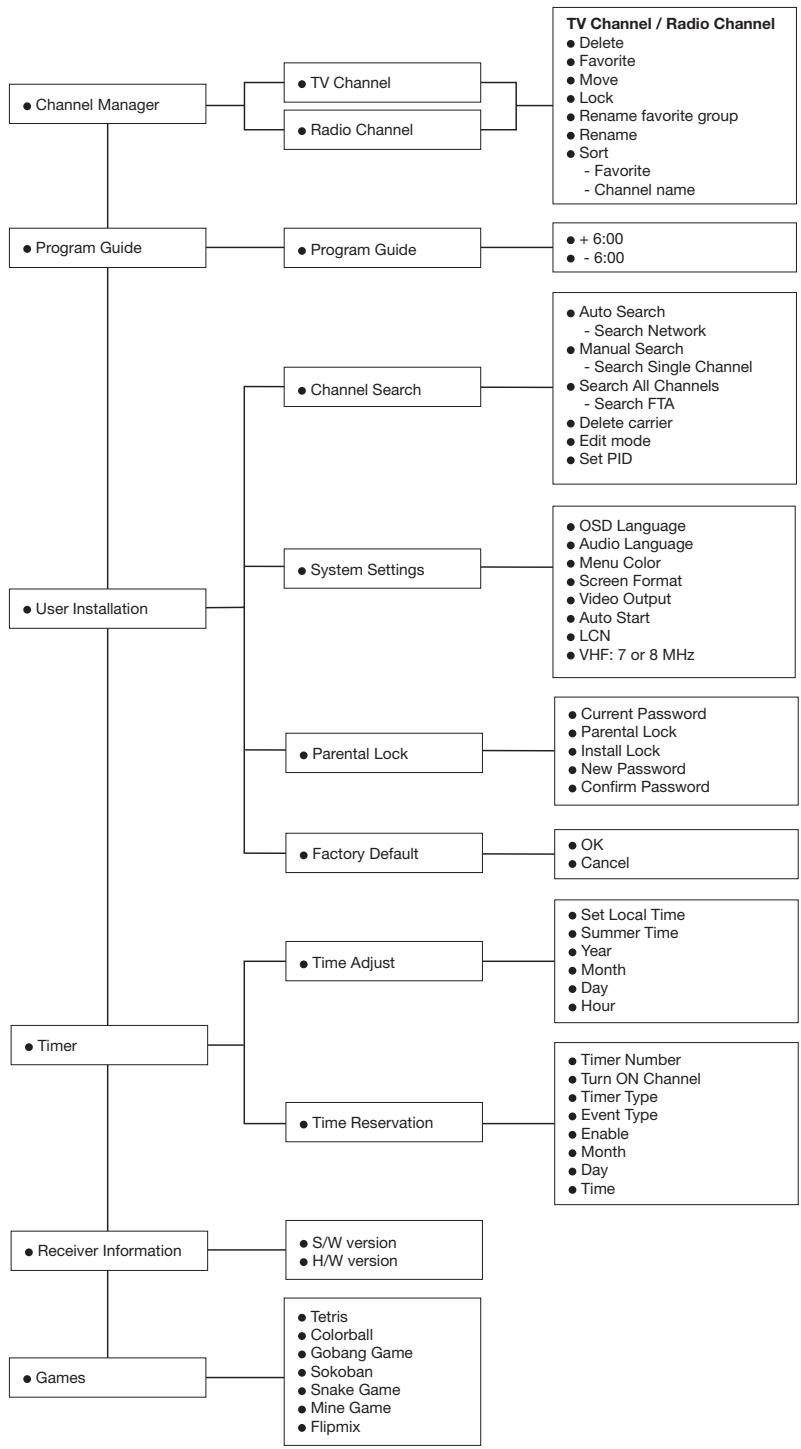
5.- Menu Information
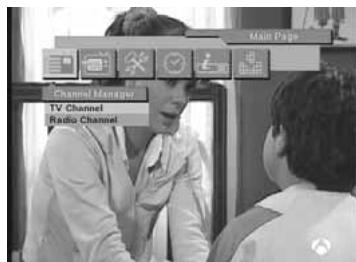
Once you have installed and connected the cables of the DTR 7288, the Menu will be displayed.
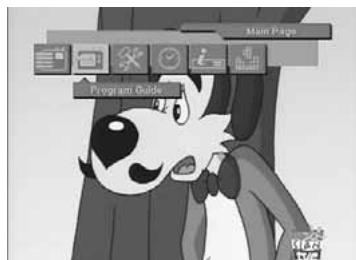
This Menu consists of 6 main menus as shown below.
- Channel Manager
- Program Guide
-User Installation - Timer
- Receiver Information
- Games
During the installation the OK key confirms a selection and 一 / 一 key shows the Drop Down List Box.
You can also use the numeric keys on the RCU to enter a numeric value.
Use the PR+ , PR- key to move up or down from one line to another line.
Use the 12 keys to move from main Menu to sub Menu and move from left side to right side or vice versa.
To escape the Menu system at anytime, press EXIT key on the RCU.

6.-User Installation
This Menu consists of 4 sub-menus as shown below.
- Channel Search
- System Setting
-Parental Lock
-Factory Default
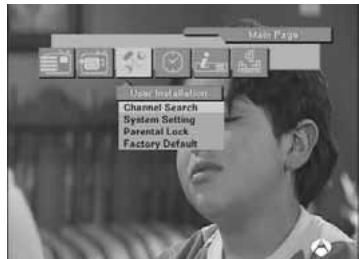
6.1.- Channel Search
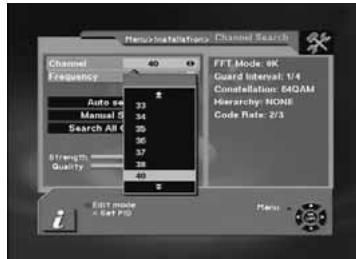
1.- Channel:
- Select desired Channel using - / + keys. Pressing the OK key will display a Down List Box which also lets you select the desired channel.
2.- Frequency:
- Edit the desired frequency. To access this option, it is necessary to press the red button on the remote control.
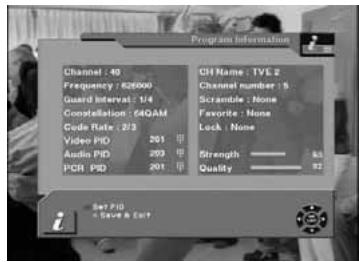
On the right-hand part of the screen, the information (Fft mode, guard, constellation, hierarchy and code rate) of the selected channel will appear once the signal has been received.
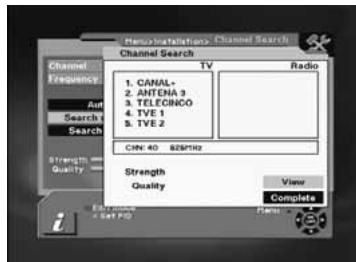
3.- Automatic Search:
- Carries out an automatic search, beginning with channel 2 and finishing with channel 69.
- Network Search: Carries out a search of the channels of the selected channel operator.
4.- Manual Search:
- Search a channel: Carries out a search of a specific channel, that has been previously selected in the channel list.
5.- Search all channels:
- Carries out a search of all the channels (scrambled and free).
- Search free channels: Carries out a search of the free channels.
DTR 7288 will automatically search channels for TV and Radio. During this procedure you can see a list of the previously searched channels in the Searched List Box on the screen.
On completion of searching channels, the cursor will be placed on COMPLETE automatically.
Now press OK button.
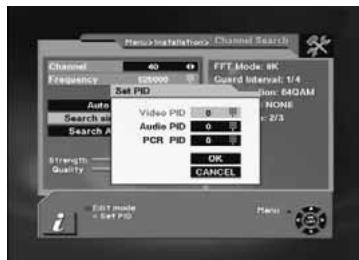
6.- Set PID:
- If you want to set PID (Packet Identifier) manually, select TP in the "Channel Search Page" and press MENU key on the RCU to display the command box.
- Then select SET PID command and press OK. The set PID Menu will be displayed. Enter the correct value and select OK.
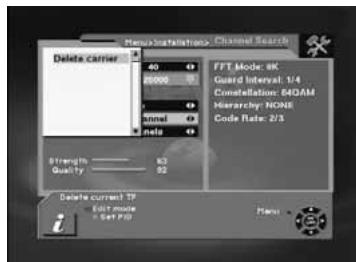
7.-Delete CH:
- If you want to delete a Channel, please select the Channel which you want to delete and then press MENU key on the RCU to display the command box. Then select Delete CH command. A confirm message box will be displayed.
Edit Mode: If you want to edit preprogrammed data such as Frequency, please press EDIT mode key (Red color key) on the RCU to display the command box. You can then move into those columns to change the value.
The System Setting Menu allows you to set items depending on your environment.
1.- OSD Language:
- Lets you select the desired language.
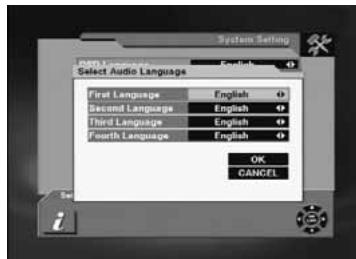
2.- Audio Language:
- Select the desired audio language to be in top priority under the condition that this language is supported by the channel.
3.- Menu color:
- This option allows you to personalize the color (grass, night, ocean, wine) of bottom of OSD Menu of its receiver.
4.- Screen Format:
- If your TV supports 16:9 screen format and selected channel provides 16:9 format program, select 16:9.
5.- Video output:
- If your SCART supports RGB control, select RGB. Otherwise select CVBS.
6.- Start On Channel:
- If you press OK key, then the channel list is displayed. You can select one channel from the list. The selected channel starts whenever you turn on DTR 7288.
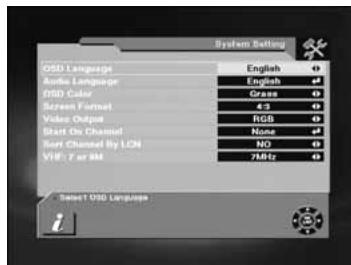
7. - Sort Channel by LCN:
- This option lets the user enable or disable the automatic ordering of channels as defined by the operator.
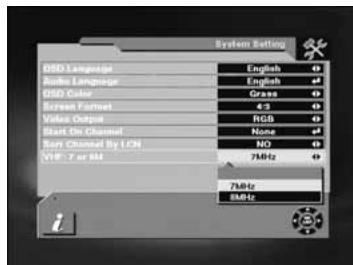
8. - VHF: 7 or 8 MHz
This option lets the user select the appropriate bandwidth (7 or 8 MHz) for the reception of VHF signals.
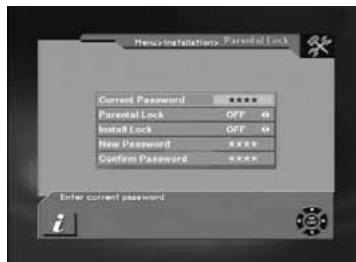
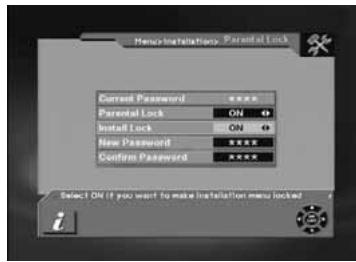
6.3.- Parental Lock
This function allows you to lock the channel with a password in order to prevent children from accessing the channel.
You can also protect your installed data and information using the Install Lock.
How to change the Password
1.- Enter the current password.
2.- Select ON of Parental Lock.
3.- Enter new password.
4.- Confirm your new password entering new password again.
Note: Default password is 0000.
Warning: Once you change the password, please keep it safely.
How to use Parent Lock
1.- To activate parent lock function, go to the TV channel Manager Page.
2.- Press Lock key (Blue color key) on the RCU.
3.- Select the channel which you want to Lock.
4.- Press OK then symbol is displayed.
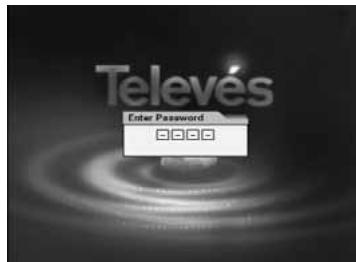
How to use Install Lock Enter the current password.
1.- Enter the current password
2.- Select ON of Install Lock
3.- Exit this Menu.
5.- Select any Menu and press OK on the RCU.
6.- Then the Enter Password box will be displayed.
7.- Unless you enter the correct password, you can not run any Menu.
Note: Default password is 0000
Warning: Do not forget your password
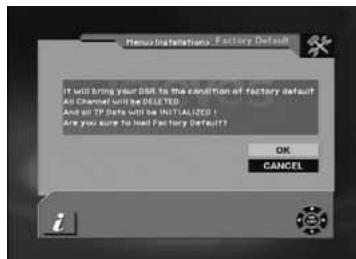
6.4.-Factory Default
If you want to bring DTR 7288 back to the factory default condition, select Factory Default and press the OK key.
Then a warning message will be displayed. To confirm, select OK.
Warning: On selecting factory default you will lose all of data and information, which was previously installed.
7.- General Viewing Function
The following describes the basic functions of your DTR 7288 while watching terrestrial TV or listening to terrestrial radio. While watching, the current channel information will be shown on the screen if you press the INFO button on the RCU.
7.1.- Select Channel
If you want to select channel, use key on the front panel or PR+, PR-key on the RCU or numeric keys.
In addition to the above normal function, DTR 7288 provides more convenient channel change function.
While watching, press OK key on the RCU. A channel list will be displayed on the right side of the screen. If you press EXIT key, the channel list will disappear.
To select a channel, go up or down this channel list and place the cursor on a desired channel. Then, press OK key to watch the selected channel.
If you press key on the RCU, the channel list will scroll page by page.

7.2.- Previous Channel Recall
Press PR key on the RCU to move to the previous channel you watched.
While viewing a TV channel, press the TV/RADIO key on the RCU to toggle between TV and Radio modes.
7.4.- TV & VCR Mode
The TV/AV key on the RCU lets you change the mode from terrestrial to TV or VCR.
- Press once to move to the TV mode.
- Press twice to move to VCR mode.
- Press three times to move back to terrestrial mode.
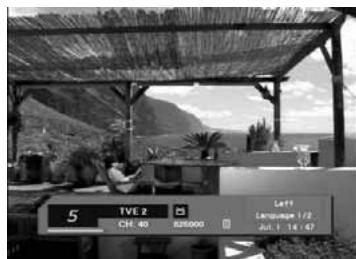
7.5.- Channel Information
Every time you change channels, you will receive program information for a few seconds.
While watching the channel you can see the current channel information at anytime by pressing the INFO key on the RCU.
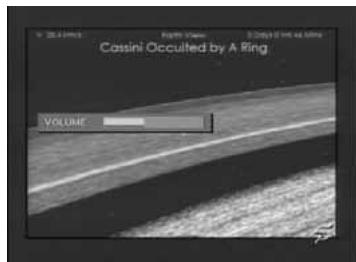
7.6.- Volume & Audio Control
1.- Volume Control
- To increase or decrease volume, use + Key on the RCU.
Note: DTR 7288 has 18 volume levels and this can be controlled from the volume level of your TV.
2.-Mute
- To mute the sound, press × button on the RCU. To bring back the normal sound, press this key once again.
3.- Audio Control
- Press the key repeatedly to select one of three possible Audio settings (Left, Right and Stereo)
- The current audio setting will be displayed in the channel information
4.- Language Selection
- Press the AUDIO key on the RCU repeatedly to select audio language. This is dependent on the transmission of audio signal.
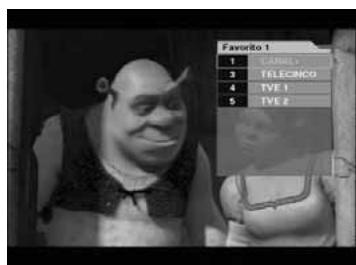
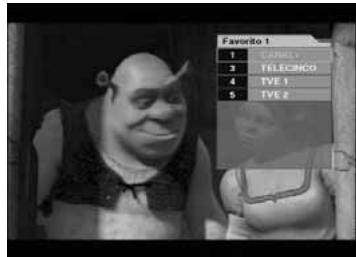
7.7.-Favourite List
To create a favorite group list press FAV key on the RCU.
You can access the next favorite group when you press FAV key again.
The method to group favorite channels is explained in the Favorite Channel (See paragraph 8.2.- Favorite channel).
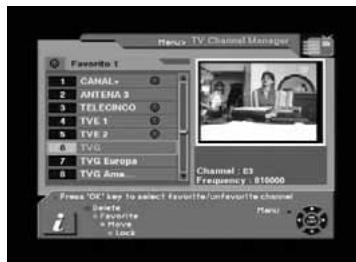
8.- Channel Manager
This function not only allows you to watch channels but also do a lot of interesting and useful things.
8.1.- Channel Manager
Channel manager consists of TV channel and Radio channel.
Warning: The functions "Move" and "Sort" are only available when the option "Logical Channel Number (LCN)" is disabled.
Note: Since the usage of Radio Channel is same as that of TV channel, in this manual only TV Channel manager is explained.
On the left side of the TV channel Menu, you can see the channel list.
On the right side, you can watch the current channel in small Picture in Graphic (PIG) mode (1/9 size of the normal mode).
You can also see channel information under the FIG screen.
When you move the cursor from one channel to another, the PIG will change accordingly.
You can use those color keys on the RCU as below.
1.-Delete mode (Red key)
2.- Favorite mode (Green key)
3.- Move mode (Yellow key)
4.- Lock mode (Blue key)
Pressing the Menu key on the RCU will display the command Menu.
TV channel manager has 3 commands as shown below;
1.- Rename Favorite group
2.- Rename
3.-Sort
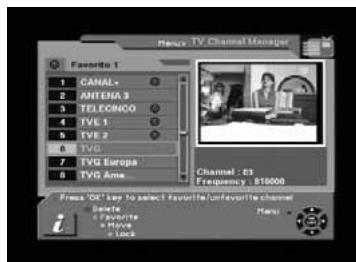
8.2.- Favorite Channel
When you select channel manager, default favorite list will be shown on screen as Favorite 1.
- Select your favorite channel and then press OK key. Then will be marked next to your selected channel name.
- If you want to remove the channel name from the favorite channel list, press
OK key once again, then the mark will disappear.
-
After the selection of favorite channels press EXIT key twice to save data and press FAV key repeatedly to see if each of the favorite groups are properly selected.
-
Represents scrambled channel
How to make a favorite group
1.- When you enter channel manager, the default favorite group will be shown once on the screen as Favorite 1.
2.- If you press FAV key (Green color key) on the RCU, a new favorite group will be created as Favorite 2.
How to edit the name of a Favorite group
1.- In the favorite mode, press MENU key on the RCU then the command box will be displayed on the screen.
2.- Select "Rename Favorite group" in the command box.
3.- You can edit the name by using the keypad.
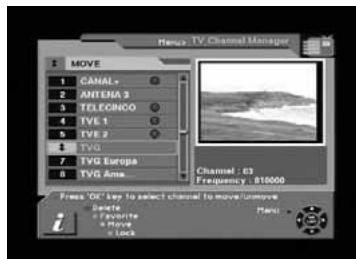
8.3.- Move Channel
Warning: This function is only available when the option "Logical Channel Number (LCN)" is disabled.
In the TV channel manager page, press Move key (Yellow color key) on the RCU.
Select a channel by pressing OK key and move the cursor to the location where you want to move the selected channel and press OK key. Then, you will find that the selected channel has moved to the desired location.
Check whether the channel number has changed on the channel list.
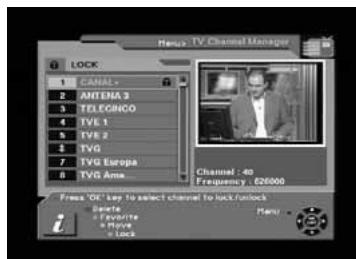
8.4.- Lock Channel
In the TV channel manager page, press Lock key (blue color key) on the RCU.
This Lock command allows you to lock the channel. First select the channel,
which you want to lock, and press OK key. Then this will be marked beside the selected channel name.
Note: To perform this function, you should set up the Parental Lock in advance.
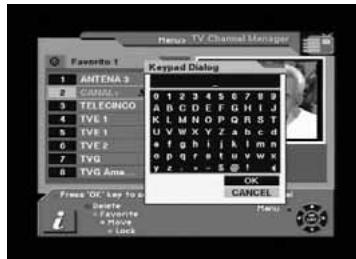
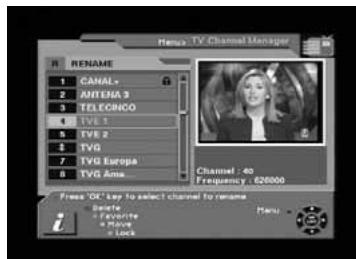
8.5.- Rename Channel
In the Main Page, press MENU key on the RCU, and then select Rename on the command Menu.
This Rename command allows you to rename the channel. First select the channel to be renamed and press OK key, then a Keypad dialog box will be displayed. Enter the desired name.
Check whether the channel name is changed on the channel list.
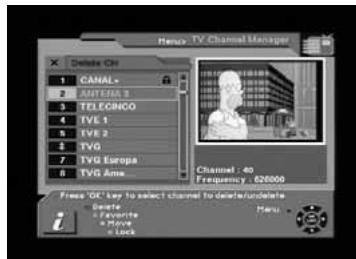
8.6.-Delete Channel
In the Channel manager, you can enter Delete mode, if you press Delete key (Red color key) on the RCU. Then, if you press Delete key (Red color key) repeatedly, the mode will cycle through Delete channel carrier -> Delete All -> Delete single CH.
This Delete command allows you to delete the channel permanently. First select the channels, which you want to delete; the selected channel number will be marked to "X". If you cancel the selection, press OK key again, then the marked number will be back.
If you decide to delete, press EXIT key and then press OK to delete.
Check whether the channel number is deleted on channel list.
Warning: The deleted channel cannot be recovered unless you search again.
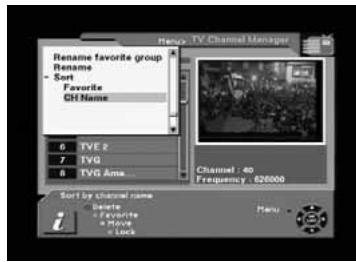
8.7.- Sort Channel
Warning: This function is only available when the option "Logical Channel Number (LCN)" is disabled.
In the Main Page, press MENU key on the RCU, and select Sort on the command Menu.
This Sort Menu has a sub command and it allows you to sort the channels, as you like.
You can sort the channels by Favorite and CH name. Place the cursor on the desired line, and then press OK key.
Check whether the channels are sorted properly on the channel list.
Note: Radio Channel Manager has the same operation as TV channel Manager.
9.- EPG (Electronic Program Guide)
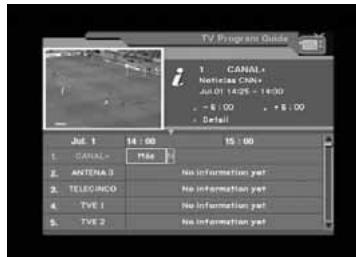
DTR 7288 provides EPG function for you to get access to the TV Guide (or Radio Guide if you are listening to radio channels) that will show the titles and other information of the current and next programs on different channels. The information is only available from the network to which the channel you are watching.
To see the EPG data, press EPG key on your RCU when watching a channel or select Program Guide in the Main Page.
The EPG box will be displayed.
You can see the channel in the FIG screen; channel list on the left side and Program schedule for selected channel will be displayed on the right side. The time related to the program schedule is also displayed.
Select one channel and placing the mark on the time of Program name which detail information you want to know. Then you can see blue button, if there is detail information of the channel. Press Detail (Blue color key) key on the RCU, for the detail information box to be displayed.
If you want to check the previous or next information of the channel, please press +6:00 key (Yellow color key) or -6:00 key (Green color key) on the RCU.
Note: A 'No information yet' message will be shown if the selected channel does not provide EPG data.
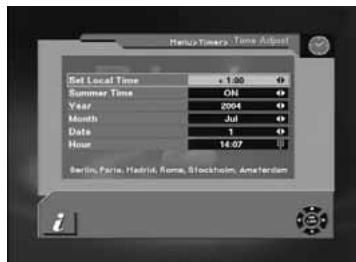
10.- Timer
You can adjust the real time as well as you can program the timer in various ways.
10.1.- Time Adjust
Usually you get the information real time from the satellite automatically but sometimes they transmit wrong information. In that case, you can adjust the real time using this function.
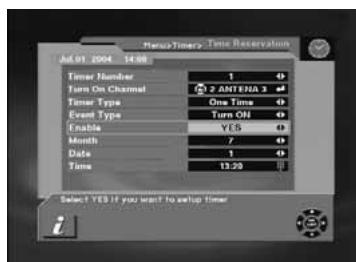
10.2.- Time Reservation
Timer can be activated by "Turn ON" and/or "Turn OFF" Option.
- Timer allows you to program the various timer functions.
- You can set the timer daily, weekly, monthly or once
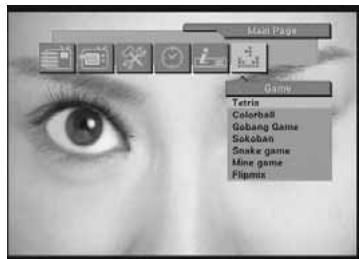
11.- Games
Through this menu you can choose any of the 7 games available.
-Tetris
-Colorball
- Gobang Game
-Sokoban
- Snake Game
-Mine Game
- Flipmix
Choose one of the games by pressing PR+ , PR- and then OK.
To play follow the instructions that appear on the screen.
To quit the game just press EXIT.
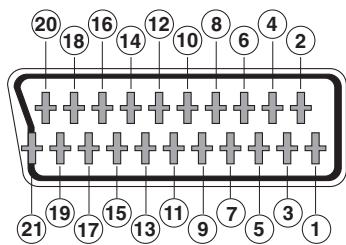
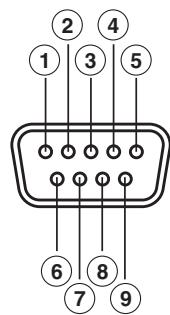
Connectors PIN designations
SCART connectors
PIN
TV
1 Audio Out Right
2 N/C
3 Audio Out Left
4 Audio ground
5 Blue Ground
6 N/C
7 Blue Out
8 Function Control Out
9 Green Ground
10 N/C
11 Green Out
12 N/C
13 Red Ground
14 Fast Blanking Ground
15 Red Out
16 Fast Blanking Out
17 CVBS ground
18 CVBS ground
19 CVBS Out
20 N/C
21 Ground
VCR
Audio Out Right
Audio In Right
Audio Out Left
Audio ground
Blue Ground
Audio In Left
Blue In
Function Control In
Green Ground
N/C
Green In
N/C
Red Ground
Fast Blanking Ground
Red In
Fast Blanking In
CVBS ground
CVBS ground
CVBS Out
CVBS In
Ground
RS 232
PIN
Description
1 N/C
2 RXD (Receive Data)
3 TXD (Transmit Data)
4 N/C
5 Ground
6 N/C
7 N/C
8 N/C
9 N/C
Front Panel Display
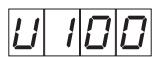
UP LOADPROCEDURE

VCR MODE

DOWN LOAD PROCEDURE
SYSTEM WAITTING

ERROR IN DATA TRANSMITTING

FLASH ROM ERROR

TV MODE

SYSTEM BOOTING
Glossary of terms
Here you can find a brief and simple explanation of some of the terms used in this User Manual.
DVB: Digital Video Broadcasting.
Consortium of different international organisms and companies with the common aim of creating global standards geared towards the development of digital television.
- EPG: Electronic Programme Guide.
Guide that provides the user with the list of programmes that will be shown in each channel, their times and some information on their subject matter.
-
Fast Blank : Signal sent by the SCART that controls the status of the TV's RGB.
-
FTA : (Free To Air) Free channels, in other words, not scrambled
-
Letter Box : One of the ways of displaying the programmes that are transmitted in 16:9 format on 4:3 television screens.
Two black bands appear on the top and bottom of the screen to create a window with the ratio that is needed.
-
MPEG 2: Family of digital audio/video compression standards used by the DVB.
-
OSD: OnScreen Display.
System that shows the onscreen menus.
- VCR : Video Cassette Recorder.
Technical specifications
1. Tuner & channel
Input Connector
1 x IEC (female)
Output Connector
1 x IEC (male)
Input frequency
47 to 68 MHz, 174 to 230 MHz and 470 to 860 MHz
Input/output frequency
47 to 860 MHz
Signal Level
-75 a -20 dBmV
Input Impedance
75 Ohm
Bandwidth (UHF)
8 MHz
Bandwidth (VHF)
7 or 8 MHz
Wave form
COFDM
Transmission mode
2K FFT, 8K FFT
Constellations
16QAM, 64QAM
Code rate
1/2, 2/3, 3/4, 5/6, 7/8
Guards intervals
Mono, Dual, Joint Stereo, Stereo for digital
Sampling rate
20 Hz ~ 20 KHz
32, 44.1, and 48 KHz
4. Memory
Flash memory
2 Mbytes
RAM memory
8 Mbytes
5. A/V & data in/out
SCART
TV×1, VCR×1
RGB video out
TV x 1 (SCART socket)
CVBS video out
2 x SCART socket (TV, VCR)
Analog audio out
RCA × 2 (L-CH × 1 , R-CH × 1 )
Digital audio out
2 x SCART socket (TV, VCR)
Data interface
S/PDIF x 1
RS232C, 9Pin SUB-D
6. Power supply
Input voltage
AC 90 - 240 V, 50 Hz
Type
Conmut.
Power consumption
19W Max.
7. Physical specification
Size (W× H× D)
260mm× 45mm× 165mm
Weight
about 1 Kg
8. Environment
Operating temperature
0^ +45^
Storage temperature
-10°C ... +50°C
Menu Tree of DRT 7288
Garantie
Televés S.A. offers a two year guarantee, beginning from the date of purchase for countries in the EU. For countries that are not part of the EU, the legal guarantee that is in force at the time of purchase is applied. Keep the purchase invoice to determine this date.
During the guarantee period, Televés S.A. complies with the guarantee by repairing or substituting the faulty equipment.
The harm produced by improper usage, wear and tear, manipulation by a third party, catastrophes or any other cause beyond the control of Televés S.A. is not included in the guarantee.
Televes
DECLARATION OF CONFORMITY
Declare under our own responsibility the conformity of the product
Referencia / Referencia / Reteore / Reference:
Descripción / Descripción / Description / Description
Marca / Marca / Marque / Mark
7288
Digital terrestrial receiver
Televés
With the Low Voltage Directive 73/123/EEC and the EMC Directive 89/1336/EEC as instants, the following requirements for the evaluation regarding this Directive, the following standards were applied:
EN 60065:1998
EN 55013:2001 + A1:2003
EN 55020:2002+A1:2003


Jose L. Fernandez Carnero
Technical director


Disposal of Old Electrical & Electronic Equipment
(Applicable in the European Union and other European countries with separate collection systems).
This symbol on the product or on its packaging indicates that this product shall not be treated as household waste. Instead it shall be handed over to the applicable collection point for the recycling of electrical and electronic equipment. By ensuring this product is disposed of correctly, you will help prevent potential negative consequences for the environment and human health, which could otherwise be caused by inappropriate waste handling of this product. The recycling of materials will help to conserve natural resources. For more detailed information about recycling of this product, please contact your local city office, your household waste disposal service or the shop where you purchased the product.
A CORUNCA P.15011
Gregorio Hernandez 8
Tfnos.: 981 27 47 31 /981 27 22 10
Fax: 981271611
coruna@televes.com
ALMERIA C.P.04008
Campogris 9
Tfno.: 950231443
Fax: 950231443
almeria@televes.com
BADAJOZ C.P.06010
C/Jacobo Rodriguez,
Pereira, n°11-Oficina
Tfno.: 924 20 74 83
Móvil: 670 70 21 93
Fax: 924 20 01 15
saherco@terra.es
BARCELONA C.P.08940
C/Sant Ferran,27
Cornellá - Barcelona
Tfnos.: 93 377 08 62 /93 474 29 50
Fax: 934745006
barcelona@televes.com
BILBAO C.P. 48150
Iberre kalea, modulo 16, pabellon 15-B
Sangroniz-Sondika
Tfnos.: 94 471 12 02 /94 471 24 78
Fax: 944711493
bilbao@televes.com
BURGOS C.P.09188
C/Real, s/n, San Adrián de Juarros
Tfno.: 947560458
Móvil: 670 73 75 86
emilianovarga@amena.com
GJON C.P.33210
C/Japon,14
Tfns.: 985 15 25 50 /985 15 29 67
Fax:985146389
gijon@televes.com
JAEN C.P.23007
Fax: (+39)-0255307363
televes.it@televes.com
TELEVES MIDDLE EAST FZE
P.O.Box 17199
JEBEL ALI FREE ZONE DUBAI,
UNITED ARAB EMIRATES
Tel.: 9714 88 343 44 Fax: 9714 88 346 44
televes.me@televes.com
TELEVES UNITED KINGDOM LTD
Unit 11 Hill Street, Industrial State
CWMBRAN, GWENT NP44 7PG.
(United Kingdom)
Tel.: 4401633875821
Fax:4401633866311
televes.uk@televes.com