
DD100 - Camera MINOX - Free user manual and instructions
Find the device manual for free DD100 MINOX in PDF.
| Product type | Compact digital camera |
| Brand | MINOX |
| Model | DD100 |
| Sensor | CMOS 10 megapixels |
| Optical zoom | 3x |
| Screen | LCD 2.7 inches |
| Video resolution | 720p HD |
| Internal memory | 16 MB |
| Storage media | SD/SDHC card up to 32 GB |
| Power source | Rechargeable lithium-ion battery 3.7 V 700 mAh |
| Battery life | Approximately 200 photos |
| Dimensions (W x H x D) | 95 x 62 x 25 mm |
| Weight | 130 g (with battery and card) |
| Connections | USB 2.0, AV output |
| Built-in flash | Yes, range up to 3 m |
| Shooting mode | Auto, Program, Scene, Video |
| Image stabilizer | Electronic |
| Maintenance and cleaning | Clean the lens with a dry microfiber cloth. Avoid moisture. |
| Safety | Do not expose to extreme temperatures. Use only the supplied charger. |
| Spare parts and repairability | Battery and charger available. Repair by authorized center. |
Frequently Asked Questions - DD100 MINOX
User questions about DD100 MINOX
0 question about this device. Answer the ones you know or ask your own.
Ask a new question about this device
Download the instructions for your Camera in PDF format for free! Find your manual DD100 - MINOX and take your electronic device back in hand. On this page are published all the documents necessary for the use of your device. DD100 by MINOX.
USER MANUAL DD100 MINOX
Get to know your camera Page 4
- Operating controls
- Symbols on the Display
General notes
- Notes on copyright
- Trademark information
The right power supply
- Inserting the batteries
- Important information on batteries
How to use SD cards
Selecting the camera settings Page 8
- Camera settings
- Functions and their respective explanations
Taking pictures
- Taking pictures without digital zoom
- Taking pictures with digital zoom
- Shooting with flash
- Shooting pictures with self-timer
- Selecting the image compression
- Adjusting the white balance
- Setting the exposure correction
- Movie function
Playing back and deleting images
-Playback of images using the camera
-Playback of images with digital zoom
- Overview of 4 images
- Overview of 9 images
-Playback of images as a slide show
-Playback of images without image information
- Deleting images
Web Cam
Installing the software Page 18
- Contents of CD-Rom for the DD100
- Computer system requirements
- Image processing/image viewing programs
- Connecting the DD100 to your PC
- DD100 Driver
- WebCam Driver
Image processing on your PC Page 21
- Downloading still pictures
- Image transfer using an image processing/ image viewing programm
- Loading video clips
Image processing on MacOS Page 22
- Downloading still pictures
Uninstalling software
- Uninstalling camera driver
- Uninstalling WebCam driver
Camera maintenance
-Places to avoid
- Safe keeping of the camera
- Cleaning your DD100
- Travelling by air
- Notes on possible electrical interference
Warning notes
Trouble shooting
Technical data
Customer service
Conditions of warranty
Page 22
Page 23
Page 25
Page 27
Page 28
Page 30
Page 31
Introduction
Dear MINOX Customer,
congratulations on the purchase of your new digital camera MINOX DD100. Like all other MINOX products this digital camera also boasts the traditional values fostered by the house of MINOX. Combining functionality in the smallest possible dimensions with maximum quality.
Simple and fast operation make the MINOX DD100 ideal for digital photography. It also guarantees unlimited photographic fun with its distinguished striking looks. The MINOX DD100 is ready to become your permanent companion and capture wonderful memories in a very modern way.
Enjoy your new camera.
MINOX DD 100
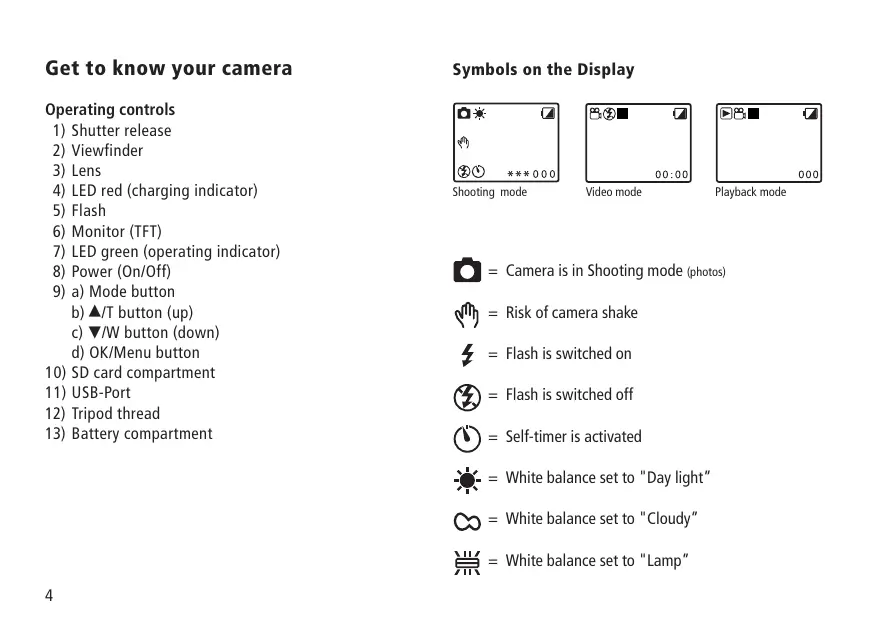
Get to know your camera
Operating controls
1) Shutter release
2) Viewfinder
3) Lens
4) LED red (charging indicator)
5) Flash
6) Monitor (TFT)
7) LED green (operating indicator)
8) Power (On/Off)
9) a) Mode button
b) /T button (up)
c) W button (down)
d) OK/Menu button
10) SD card compartment
11) USB-Port
12) Tripod thread
13) Battery compartment
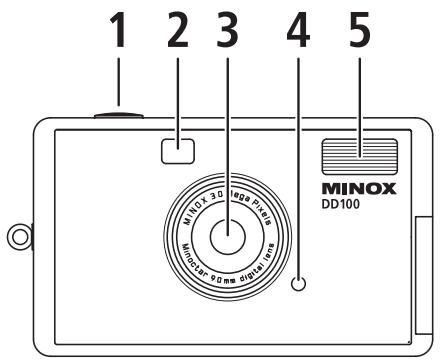
Symbols on the Display
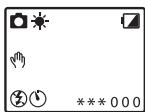
Shooting mode
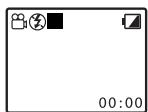
Video mode
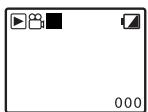
Playback mode
Camera is in Shooting mode (photos)
= Risk of camera shake
= Flash is switched on
= Flash is switched off
= Self-timer is activated
= White balance set to "Day light"
= White balance set to "Cloudy"
= White balance set to "Lamp"
= White balance set to "Tungsten"
D = White balance set to "Night"
*** = High quality / without compression
** = Normal quality / low compression
= Low quality / high compression
3M = Interpolated
000 = Image counter (indicates how many pictures still to be taken)
Camera is in Video mode (video clips)
Camera is in Playback mode (photo, video clips)
= Stop (ready to record / playback)
= Record video clips (red)
= Playback video clips (yellow)
= Battery very low
General notes
Notes on copyright
Images taken with your digital camera are not to be used in any way which may infringe upon copyright laws, apart from the use of a purely private nature.
Please observe that several restrictions concerning the photographic recording of stage performances, entertainment events and exhibitions even apply to private use. As user you are also requested to observe that the transfer of memory cards which contain images or data subject to copyright laws is only permitted within the framework of the respective restrictions of said laws.
Trademark information
The brand MINOX is a registered trademark of MINOX GmbH, Wetzlar. MS-DOS and Windows are registered trademarks of Microsoft Corporation in the U.S.A. and other countries. Windows is an abbreviated term which refers to the Microsoft Windows Operation System. Other company or product names are trademarks or registered trademarks of the respective corporate enterprise.
The right power supply
The DD100 requires 2 batteries of the size AAA/LR03. The capacity of the AAA batteries is sufficient for approx. 50 shots with flash and approx. 250 shots without flash. Intensive use of the TFT monitor for viewing the image may significantly reduce this capacity. We therefore recommend the use of rechargeable batteries. We recommend the use of rechargeable batteries. In this respect please make sure only to use NiMH type batteries. Other batteries could damage your camera and make warrantee claims null and void. NiMH batteries and appropriate charging devices are available from specialist stockists.
Please read the important notes and battery information given below prior to inserting batteries in the camera.
Inserting the batteries
- Open the battery compartment of your DD100 by sliding the cover in the direction indicated by the arrows.
- Take 2 new batteries of size AAA/LR03 and insert these in the battery compartment. Pay attention to the correct polarity (+/-) indicated on the side of the battery.
- Slide the cover back over the battery compartment.
Important information on batteries
- All images remain stored in your digital camera, also after removing the batteries from the camera.
- Upon actuation of the "Auto-off function" in the Setup mode the camera automatically switches back to Stand-by mode. All images taken are then saved in the integrated memory.
- Only replace batteries in switched off condition.
- Remove the batteries prior to storing the camera or if you do not intend using it for a prolonged period of time.
- When using rechargeable batteries, only use NiMH type batteries. Rechargeable batteries are not charged via the USB port in the camera!
How to use SD cards (Secure Digital Card)
To store your pictures you can use SD cards (up to 128 MB) as an external memory means, in addition to the internal memory (16 MB). SD cards are available from specialist stockists with varying storage capacity.
To insert a SD card in your camera follow the instructions given below:
- Open the SD compartment
- Hold the card at the edge and push it gently up to the stop in the SD card compartment. Always pay attention to the direction indications on the SD card compartment.
- Close the SD card compartment.
Caution:
Always observe that the SD card can be inserted in one direction only. Any incorrect insertion using force may damage the camera.
The SD card now has to be formatted by the camera, Please observe the following instructions for this purpose.
-
Switch on the DD100 using the Power On/Off button
2.Actuate the Mode button twice to access the setup mode. -
You can move around in the menu selection using the /T button (up) and /W button (down). Select the function "Format" and confirm with the OK/Menu button.
- Use the /T button (up) and the /W button (down) to select the function "Yes/Ja" and confirm with the OK/ Menu button, to format the SD card.
Note:
The playback mode may block if you do not format the card.
Selecting the camera settings
Camera settings
Switch on the DD100 using the Power On/Off button. Operate the "Mode button" twice to access the setup mode.
Setup
Web-Cam
Format
Auto off
Buzzer
Frequency
Settings
Language
You can move around the menu selection using the /T button (up) and the / -button (down). Select the desired Setup function with the OK/Menu button. There now follows a description of all functions.
Functions and their respective explanations
WebCam Change into the Webcam mode for
video conferences
Format Delete all images in the internal
memory or SD card:
-Yes
- No
Auto off Upon actuation of the "Auto-off function" in the Setup mode the camera automatically switches back to "Stand-by mode".
Optional modes available:
-30 sec.
-60sec.
- 120 sec.
-Off
Buzzer Beep signal selection:
- On
-Off
Frequency Please set the camera to the mains voltage used for artificial light in your country. The wrong frequency setting may lead to poor imaging quality or flickering video recording.
| - Off - 50 Hz (default setting) - 60 Hz (only for USA, Canada and parts of Japan) | |
| Setting | Save your changed settings or return to default setting with "Default". - Save Settings - Default - Exit |
| Language | Choice of languages: - English - French - Portuguese - Italian - German - Spanish - Chinese (T) - Chinese (S) - Japanese |
Important:
Don't forget to confirm any changed settings under "Setting".
Taking pictures
Taking pictures without digital zoom
Please follow the instructions given below to take pictures without digital zoom:
- Press the Power On/Off button to switch on the DD100. You are now in shooting mode.
- Frame your subject matter in the viewfinder.
- Hold the camera still and press the shutter release to take the picture.
- A beep signal confirms the correct recording of the image.
- When you let go of the shutter release you will see that the image counter indicates one image less.
Note:
The image counter counts down. After each image the camera calculates the remaining capacity of the memory for further images and indicates the respective number of pictures that are left. The remaining memory space always depends on the resolution and size of the previous shot.
Taking pictures with digital zoom
The DD100 has a digital zoom with which you can get up to 4 times magnification of the subject matter you have in view. Please follow the instructions given below to take pictures using the digital zoom:
- Press the Power On/Off button to switch on the DD100. You are now in shooting mode.
- Frame your subject matter in the viewfinder.
- You can zoom the subject matter in using the /T button (up) and zoom it out again with the /W button (down).
- Hold the camera still and press the shutter release to take the picture.
- A beep signal confirms the correct recording of the image.
- When you let go of the shutter release you will see that the image counter indicates one image less.
Main menu
Camera
Flash
Quality
Self-timer
WB
EV
Exit
Shooting with flash
Your DD100 has an integrated flash unit. Contrary to conventional cameras (with film), digital cameras are much more sensitive to light. You therefore only have to use the flash on digital cameras when the ambient light is very low. It is for this reason, and also to save the batteries, that the flash function of the DD100 is preset to "Off". In the "Auto" setting the flash switches on automatically when required. In difficult light situations or if you wish to obtain special effects, you can switch on the flash manually choosing "On." Please follow the instructions given below to select the desired flash function.
- Switch on the DD100 by pressing the Power On/Off button. You are now in shooting mode.
- Press the OK/Menu button to access the main menu.
- Using the /T button (up) and the /W button (down)" you can move around in the menu selection. Select the function "Flash" and confirm with the OK/ Menu button.
-
Select the desired flash function with the /T button (up) and /W button (down)
-
Auto
-On
-Off -
Confirm the desired flash function by pressing the OK/ Menu button. A beep signal confirms the change.
Note
If the batteries are weak the flash function is not available. To keep battery consumption to a minimum the DD100 always resets the flash function to the "Off" setting when switching off. Should you wish to change the flash function permanently to "Auto", please select "Auto" as specified above and then confirm this alteration in the camera settings under "Setting". Setting the camera to "Auto" may, however, reduce the capacity of the batteries by up to 20 percent.
Shooting pictures with the self-timer
You can also use the DD100 with a 10 second self-timer and put yourself in the picture. To operate the self-timer please follow the following instructions:
- Press the Power On/Off button to switch on the DD100. You are now in shooting mode.
- Press the OK/Menu button to access the main menu.
- Using the /T button (up) and the /W button (down) you can move around in the menu selection. Select the function "Selftimer" and confirm with the OK/Menu button.
-
Select the desired setting of the self-timer with the /T button (up) and /W button (down)
-
On
-Off -
Confirm the desired setting of the self-timer by pressing the "OK/Menu button". A beep signal confirms the change.
- Frame your subject matter in the viewfinder. Place the DD100 on a flat and firm surface.
- Press the shutter release once. You will hear short beeping signals which mean you now have ten seconds time to put yourself in the picture before the camera takes the shot. After each shot using the self-timer the camera automatically returns to the basic mode.
Selecting the image compression
Every picture taken is stored as a file in the memory of the DD100. In order to be able to store as many images as possible the DD100 automatically compresses each of these image files. The degree of automatic compression (compression rate) has an impact on the image quality. Always observe that the final size of the compressed image also depends on the contents of the subject matter. A white snow landscape, for example, is compressed much more than a colorful meadow of flowers rich in contrast. Always observe the instructions given below for selecting the right image compression:
- Press the Power On/Off button to switch on the DD100. You are now in shooting mode.
-
Press the OK/Menu button to access the main menu.
-
Using the /T button (up) and /W button (down) you can move around in the menu selection. Select the Setup function "Quality" and confirm with the OK/Menu button.
-
Select the desired quality
*** high = without compression
** normal = low compression
* low = high compression
3M interpolated
If you are using the internal memory the following imaging capacities are available:
*** without compression, 14 photos with a resolution of 1600× 1200 pixels ** low compression, 30 Photos with a resolution of 1600× 1200 pixels * high compression, 60 Photos with a resolution of 1600× 1200 pixels
3M interpolated, 20 Photos with a resolution of 2048 x 1536 pixels
- Confirm the desired quality/compression by pressing the OK/Menu button. A beep signal confirms the change.
- If you wish to change the quality/compression rate permanently, confirm your change in the setup mode under "Setting".
Adjusting the white balance
Your camera automatically sets the white balance to suit the ambient light of the subject matter in your picture. In difficult light conditions or to achieve special effects you can also set the white balance manually. For this purpose always observe the following instructions:
- Switch the DD100 on by pressing the Power On/Off button. You are now in shooting mode.
- Press the OK/Menu button to access the main menu.
- Using the /T button (up) and the /W button (down) you can move around in the menu selection. Select the function "WB" and confirm with the "OK/Menu button".
-
Select the desired white balance
-
Auto
- Day light
- Cloudy
- Lamp
-Tungsten -
Night
-
Confirm the desired white balance by pressing the "OK/ Menu button". A beep signal verifies the change.
- If you wish to change the white balance permanently you must confirm your change in the setup mode under "Setting".
Note:
We recommend leaving the default setting of the white balance on "Auto".
Setting the exposure correction (EV)
The exposure is automatically controlled by the camera. In difficult light situations or to achieve special effects you can correct the exposure manually. Observe the following instructions to set the exposure correction (EV).
- Switch on the DD100 by pressing the Power On/Off button. You are now in shooting mode.
- Press the OK/Menu button to access the main menu.
- Using the /T button (up) and the /W button (down) you can move around the menu selection. Select the function "EV" and confirm with the OK/Menu button.
- Increase the EV value with the /T button (up) or reduce the EV value with the /W button (down).
- Confirm the desired EV correction by pressing the OK/ Menu button. A beep signal confirms the change.
- Should you wish to change the EV correction permanently you must verify the change in the setup mode under "Setting".
Note:
We recommend leaving the exposure correction on "0".
Movie function
The DD100 can record a video clip of up to 60 seconds in length. Observe the instructions given below to use the movie function.
- Switch on the DD100 by pressing the Power On/Off button.
- Operate the Mode button once to access video mode. The white icon "■" (Stop) appears on the monitor (TFT).
- Frame your subject in the viewfinder.
- Press the shutter release to start the recording. As soon as recording starts you will see the red icon "●" (Record).
- Using the /T button (up) and the /W button (down) you can zoom the image in and out.
- Press the shutter release button again to end the recording.
Note:
The video mode has a resolution of 320 × 240 MP.
Playing back and deleting images
Playback of images using the camera
All recorded images and video clips can be viewed at any time on the monitor (TFT). For this purpose please observe the instructions given below:
- Switch on the DD100 by pressing the Power On/Off button.
- Actuate the Mode button 3 times to access the play-back mode.
- The stored images are displayed on the monitor (TFT). Using the / T button (up) and the / W button (down) you can view the previous image and subsequent image. To play a video clip you must press the shutter release. To stop the video clip press the shutter release once again.
Menu selection
Playback
Zoom
4 Thumbnail
9 Thumbnail
Slide Show
Delete one
Delete all
Display
Exit
Playback of images with digital zoom
With the zoom function you can zoom in on sections from the recorded images. To do this please observe the instructions given below.
- Switch on the DD100 by pressing the Power On/Off button.
- Actuate the Mode button 3 times to access playback mode.
- The stored images are displayed on the monitor (TFT). Using the / T button (up) and the / W button (down) you can view the previous and subsequent image.
- Press the OK/Menu button to access the menu selection.
- Using the /T button (up) and the /W button (down) you can move about the menu selection. Select the function "Zoom" and confirm with the OK/Menu button.
- Using the /T button (up) and the /W button (down) you can zoom in and zoom out the images. Press the OK/Menu button to confirm the degree of enlargement.
- Using the /T button (up) and the /W button (down) you can select the desired section of the image. Confirm again with the OK/Menu button to end the zoom function and return to the playback mode.
Overview of 4 images
Using the function "4 Thumbnail" you can simultaneously view four pictures on the monitor (TFT). To do this please observe the instructions given below.
- Switch the DD100 on by pressing the Power On/Off button.
- Actuate the "Mode button" three times to access playback mode. The stored images area displayed on the monitor (TFT).
- Press the OK/Menu button to access the menu selection.
- Using the /T button (up) and the /W button (down) you can move about in the menu selection. Select the function "4 Thumbnail" and confirm with the OK/Menu button.
- Four stored images are respectively displayed on the monitor (TFT) in an image overview.
- Using the /T button (up) and the /W button (down) you can select a picture from the image overview. Press the "OK/Menu button" and the picture you have selected is displayed in full size.
Overview of 9 images
Using the function "9 Thumbnail" you can simultaneously view nine pictures on the monitor (TFT). To do this please proceed as specified in the following instructions.
- Switch the DD100 on by pressing the Power On/Off button.
- Actuate the Mode button 3 times to access playback mode. The stored images are displayed on the monitor (TFT).
- Press the OK Menu button to access the menu selection.
- Using the /T button (up" and the /W button (down) you can move around in the menu selection. Select the function "9 Thumbnail" and confirm with the "OK/Menu button".
- On the monitor (TFT) nine stored images are respectively displayed in an image overview.
- Using the /T button (up) and the /W button (down) you can select an image from the image overview. Press the OK/Menu button and the selected image is displayed in full size.
Playback of images as a slide show
Using the "Slide Show" function you can playback all recorded images as a slide show in consecutive order on the monitor (TFT). To do this please follow the instructions given below.
- Switch on your DD100 by pressing the Power On/Off button.
- Actuate the "Mode button" three times to access the playback mode. The stored images are displayed on the monitor (TFT).
- Press the OK/Menu button to access the menu selection.
- Using the /T button (up) and the /W button (down) you can move around the menu selection. Select the function "Slide Show" and confirm with the OK/Menu button.
- All stored images are displayed on the Monitor (TFT) from the first to the last - consecutively.
- Press the "OK/Menu button" to return to the menu selection. Actuate the "OK/Menu button" once again to return to the playback mode.
Playback of images without image information
The recorded images can also be viewed without image information. To do so please observe the instructions given below.
- Press the Power On/Off button to switch on the DD100.
- Actuate the Mode button 3 times to access playback mode. The stored images are displayed on the monitor (TFT).
- Press the OK/Menu button to access the menu selection.
- Using the /T button (up) and the /W button (down) you can move around the menu selection. Select the function "Display" and confirm with the OK/Menu button.
-
Using the /T button (up) and the /W button (down) select the desired image information setting
-
On
-Off -
Press the OK/Menu button to return to the menu selection. Confirm with the OK/Menu button again to return to playback mode.
Deleting images
With the DD100 you can either delete a selected image or all stored images. Please follow the instructions given below to remove images from the memory.
Deleting a selected image
- Press the On/Off Power button to switch on the DD100.
- Actuate the Mode button 3 times to access playback mode. The stored images or the video clip are displayed on the monitor (TFT).
- Using the /T button (up) and the /W button (down) you can select the image you wish to delete.
- Press the OK/Menu button to access the menu selection.
- Use the /T button (up) and the /W button (down) to select the function "Delete One" and confirm with the OK/Menu button.
- You will now be requested to confirm that the picture is to be deleted. Use the /T button (up) and the /W button (down) to select "Yes" to finally delete the image.
Deleting all images
- Press the On/Off Power button to switch on the DD100.
- Actuate the Mode button 3 times to access playback mode. The stored images or video clip are displayed on the monitor (TFT).
- Press the OK/Menu button to access the menu selection.
- Use the /T button (up) and the /W button (down) to select the function "Delete All" and confirm with the OK/Menu button.
- You will now be requested to confirm that the pictures are to be deleted. Use the /T button (up) and the /W button (down) to finally delete all images.
WebCam
You can also use your DD100 as a WebCam for video confer ences. To do this please follow the instructions given below:
- Press the Power On/Off button to switch on the DD100.
- Actuate the Mode button 2 times to access the setup mode.
- Using the /T button (up) and the /W button (down) you can move around the menu selection. Select the function "Web Cam" and confirm with the OK/Menu button.
- Connect the camera to your computer using the USB cable.
- Start a program that supports the WebCam mode (e.g. Windows Net Meeting).
- Follow the instructions provided by your software.
Note:
The video conference mode is only possible under Windows and is not supported by MacOS. Before using the DD100 as WebCam for the first time you must first install the WebCam driver from the CD-ROM provided with the camera. To do this, please follow the instructions given in Chapter "Installing the Software".
Installing the Software
Contents of CD-ROM for the DD100
- DD100 Camera driver for
-Windows98SE - Mac OS 8.6 - 9.x
- WebCam driver for Windows 98SE/ME/2000/XP
- User manual as PDF
- Acrobat Reader
Computer system requirements
Prior to installing the software please check the computer requirements given below to ensure that your computer is compatible with the software provided.
| Operating system | Windows 98SE/ME/2000/XP Mac OS 8.6 - 9.x |
| CPU | Pentium Processor from 166 MHz or higher. Apple Macintosh from PowerMac G3, iMac, iBook. |
| RAM | 32 MB RAM or higher |
| Available hard disk space | 200 MB |
| USB interface | USB port |
| CD installation | CD-ROM drive |
| Monitor | 16-Bit Color VGA Display |
Important:
Due to possible incompatibility of USB hubs or USB interface cards, faults may arise during the connection or download of data to the PC. We therefore cannot guarantee satisfactory compatibility. Liability for damage or loss of data is excluded.
Note:
Due to packaging reasons the DD100 is delivered with a Mini CD-ROM. In computers with older CD-ROM drives difficulties may arise when reading this Mini CD-ROM. If this is the case please contact our Customer Service. We will then send you a standard size CD-ROM
Image processing/image viewing programs
You can use any commercially available image processing/ image viewing program to process/view your pictures.
Connecting the DD100 to your PC
When connecting the camera to the computer for the first time please make sure that the CD-ROM for the DD100 is in the CD-ROM drive. To connect the camera to your computer please observe the instructions given below.
- Plug the smaller USB connector into the USB port of your DD100 (on the left-hand side of the camera)
- Plug the larger USB connector into the USB port on your computer.
- The DD100 is "BUS-powered". This means that the USB port provides the DD100 with power as soon as it is connected to the computer and automatically switches it on.
- The computer/operating system recognizes the DD100 as a new unknown device. You are then requested to install the appropriate driver.
- Follow the instructions on the screen to complete the installation of the driver.
Note:
If you are working with Windows 98SE always make sure that the CD-ROM for the DD100 is in the CD-ROM drive before you connect the DD100 to your computer for the first time! Under the operating systems Windows ME/2000/XP or MacOS 9.x the installation of a camera driver is not usually necessary. In these cases your computer automatically recognizes the camera as removable data medium. Should your computer still ask you to install the camera driver, please follow the instructions given on the screen.
WebCam Driver (for all Windows versions from Windows 98SE)
Insert the DD100 CD-ROM in your CD-ROM drive and connect the DD100 to your computer using the provided USB cable.
- Switch on the DD100 with the Power On/Off button and actuate the Mode button 2 times to access the setup mode.
- Using the /T button (up) and the /W button (down) you can move around the menu selection. Select "Webcam" and confirm with the OK/Menu button. On the monitor (TFT) you will see the WebCam image.
- Insert the smaller USB connector into the USB port of your DD100 (on the left hand side of the camera)
- Insert the larger USB connector into the USB port on your computer.
- The DD100 is BUS-powered. This means the USB port provides the DD100 with power as soon as it is connected to the computer and switches it on automatically.
- The computer/operating system recognizes the DD100 as a new device. You are then requested to install the appropriate driver.
- Follow the instructions on the screen to complete the installation of the WebCam driver.
Note:
The WebCam driver runs under all Windows versions as from Windows 98SE. Always make sure that the CD-ROM for the
DD100 is in the CD-ROM drive before you connect the DD100 to your computer for the first time!
Important:
MacOS only transfers still pictures. The Web Cam mode is not supported by MacOS.
Important note for Windows XP
At the time of introduction of this product Microsoft urgently recommended all companies to send in their hardware solutions for certification. If a hardware device driver has not been certified through Microsoft, a warning sign appears. This message may possibly appear upon installation of this driver or its update. Should this occur, you can click on the button "continue anyway". Minox has tested this driver and its update on Windows XP and confirmed that it will not impair or destabilize your computer.
Image processing on your PC
Downloading still pictures
To download pictures you have taken with your digital camera onto your computer you must connect the DD100 to your computer using the USB cable. If you are working with Windows 98SE always make sure that the DD100 driver has been correctly installed and that the CD ROM for the DD100 is in the CD-ROM drive before you connect the DD100 to your computer for the first time! For this purpose please follow the instructions given in Chapter "Connecting the DD100 to your computer".
Image transfer using an image processing /image viewing program
You can use any commercially available image processing/ image viewing program to process/view your picture on a PC. Please follow the instructions given below to transfer images to your PC using the image processing/image viewing program.
-
Connect the DD100 to your PC using the provided USB cable as described above.
-
You will now see that a new drive "Removable Disc" has been created. Double click on the new drive to open it. Double click on the displayed subdirectories respectively to open them.
-
All image files (JPEG) stored in the camera are displayed on the screen of your computer.
- Follow the instructions of your image processing/image viewing program to process or view the images.
Loading video clips
You can use any commercially available image processing/video viewing program to process/view your recorded video clips (e.g. Windows Mediaplayer). Follow the instructions of your image processing/image viewing program for video clips.
- Connect the DD100 to your PC using the provided USB cable as described above.
- You will now see that a new drive "Removable Disc" has been created. Double click on the new drive to open it. Double click on the displayed subdirectories respectively to open them.
- All videos (AVI) stored in the camera are displayed on the screen of your computer.
- Follow the instructions of your image processing/image viewing program for video clips to process or play the video clips.
Image processing on MacOS
Downloading still pictures
Once you have correctly installed the DD100 driver you can download pictures from your digital camera onto your computer. To do this please follow the installation instructions given below.
- Press the "Power On/Off button to switch on the DD100.
- Connect the DD100 to your Mac using the USB cable.
- A new drive "Untitled" appears on your screen (Desktop). Double click this drive to open it.
- All stored images will appear in a window on your computer screen.
Note:
You can rename the drive "Untitled" at any time.
Uninstalling Software
You can uninstall the software in the "Add/Remove Program" in the control panel of your computer.
Note:
Only carry out this procedure when the installed software is no longer required or if the software installation was faulty. Carry out the following steps to uninstall your software.
Uninstalling camera driver (for Windows 98SE /ME)
Please follow the steps given below to uninstall your software:
- Switch on your computer.
- Press the Power On/Off button to switch on the DD100.
- Connect the DD100 to your PC using the provided USB cable.
- Start up Windows.
- Double click on "My Computer" on your Desktop.
- Double click on "Control Panel" and "System/Hardware".
- Open the "Device Manager" and select the "USB Controller".
- Select "Coach USB MSD" and press "Delete".
Uninstalling WebCam driver (for Windows 98SE/ME/2000/XP)
Please follow the instructions given below to uninstall your software:
- Switch on your PC.
- Press the Power On/Off button to switch on the DD100.
- Actuate the "Mode button" twice to access the setup mode.
- Using the /T button (up) and the /W button (down) you can move around the menu selection. Select the function "Webcam" and confirm with the "OK/ Menu button". The WebCam image appears on the monitor (TFT).
- Connect the DD100 to your PC using the provided USB cable.
- Start up Windows.
- Double click on "My Computer" on your Desktop.
- Double clock on "Control Panel" and "System/Hardware".
- Open the "Device Manager" and select "Image Device".
- Select "Coach Video Camera" and press "Delete".
- Select "Coach Digital Camera" and press "Delete".
Note:
Make sure that your DD100 is connected to the PC and is in "WebCam" mode.. Otherwise the "Device Manager" will not find any "Imaging Device".
Important:
You may be requested to restart your computer after uninstalling the software. Always save all files beforehand and close all active programs before restarting your PC.
Camera maintenance
Please read the following maintenance information to ensure you are using your DD100 correctly.
Places to avoid
Do not store or use the camera in the following places:
- Very damp, dirty or dusty places
- Places in direct sunshine or extreme temperatures, such as inside a locked car in summertime.
- Extremely cold places.
- Places exposed to severe vibrations.
- Places exposed to smoke or steam.
- Places exposed to strong magnetic fields (e.g. in close vicinity of electrically operated motors, transformers or magnets)
- Places in which aggressive chemicals such as pesticides, rubber or vinyl products are stored on a long-term basis.
- in wet rooms such as bathrooms, swimming pools etc..
Important:
Like any other electronic digital camera the DD100 is also particularly susceptible to sand and dust. Always make sure to keep the camera away from sand and dust to avoid damage that is beyond repair. Make sure that the camera is not exposed to sand in sandy places, particularly on beaches or in deserts where fine sand is blown about by wind.
Note:
If the camera is suddenly moved from a very cold to a very hot place, it may fog up on the inside (condensation)
Save keeping of the camera
If the DD100 is not used for a prolonged period of time please remove the batteries and preferably keep the camera in a dry place.
Cleaning your DD100
Remove the batteries and the USB cable. Use a small brush to carefully remove the dust from the lens and the surface of the monitor (TFT). Wipe the surface gently with a dry, soft, fluff-free cloth. Should there be any spots on the lens, apply a drop of liquid lens cleaning agent onto a piece of optical cloth and wipe over the lens surface gently. Never scratch any parts of the camera using hard objects. Do not use volatile substances such as solvents, benzene or insecticides as these could react with the camera body and lead to deformation or destroy the coating.
Travelling by air
Do not pack your camera with your standard luggage. The baggage handling at airports may cause damage inside the camera, even if no external damage is visible.
Notes on possible electrical interference:
Please observe that the switched on digital camera may cause an interference in the electronic systems of equipment e.g. in hospitals or aircraft. Please observe the applied regulations and warnings displayed in the respective areas.
Warning notes
TFT Display
Please be particularly careful with any discharging liquid crystals. Proceed as specified below should any of the following situations occur:
- If the liquid crystals come into contact with your skin first wipe the area with a cloth and then wash it thoroughly with running water and soap.
- Should liquid crystals enter the eyes flush the eyes for at least 15 minutes with clean water and consult a doctor.
-
Should you swallow any liquid crystals flush out your mouth thoroughly with water. Drink a large quantity of water and initiate vomiting. Then seek medical advice.
-
If the camera becomes very hot, if smoke or an unusual smell discharges from the camera, switch off the camera immediately and take out the batteries or remove the USB cable respectively. In situations such as these the continued use of the camera may cause a fire or electric shock.
-
Do not wrap the camera in anything. This can cause heat accumulation and result in a deformation of the camera body or the outbreak of fire.
-
Always proceed with caution with discharging batteries. Avoid contact with the eyes, skin or clothes as a contact with the discharging fluid can lead to injuries or to loss of eyesight. If contact does occur, wash the affected area with clear water immediately and contact a doctor.
-
Observe the following information on handling and storage of batteries in order to rule out discharging, igniting or bursting of the batteries:
-
Cover the poles of the batteries with insulating tape for storing.
- Never heat, modify or dismantle batteries.
- Do not expose batteries to impact or knocks.
- Never attempt to charge lithium or alkali batteries.
-
Never store the batteries together with metal products.
-
Always make sure to avoid the camera becoming wet. If water or other liquids enter the camera, switch it off immediately and remove the batteries and the USB cable. The further use of the camera may otherwise cause an electric shock.
-
Never attempt to modify the camera or dismantle it (never open the body!)
-
Always make sure to avoid any exposure of the camera to knocks or impact. For this reason never put the camera down on uneven surfaces. Do not put any heavy objects on the camera. Do not use the camera if it has just had a fall or if the body is damaged. The continued use of the camera may otherwise cause an electric shock.
- Never take pictures while walking, driving a car or other vehicle as you could have an accident.
- Never touch the metal parts of the camera in a thunderstorm. The lightning discharge may cause electric shocks. In the event of severe electric discharge in the air the camera may fail to operate correctly. If this is the case remove the batteries and start up the camera again.
Mistakes to be avoided when taking photographs
- Always make sure your finger, the camera strap or other objects are not covering the lens when you are shooting pictures.
Always make sure that the lens is clean. If it is soiled, follow the instructions for cleaning the lens given under "Camera maintenance". - Hold the camera steady during the shot until you hear the beep signal to avoid blurred images.
Troubleshooting
The guides given in the following are to help you cope with typical problems that may arise. Should the problem remain or if you require additional assistance with your DD100, please contact our technical customer service. Our specialists will be pleased to assist you. In the attachment you will find all the necessary addresses and further technical specifications.
| Problem | Symptom | Remedy |
| I can't load images onto my PC. | Faulty connection. | Check all connecting cables. Check that your camera is recognized by the device manager and the driver is correctly installed. |
| After downloading my pictures are out of focus. | This could be because of an instantaneous delay between the pressing of the shutter release and the recording of the image. | Hold the DD100 still until you hear the beep signal which confirms the completion of the shot. |
| My images are blurred. | Could be due to instantaneous delay between the pressing of the release and the shooting of the image. | Hold your DD1 steady until you hear the beep sound that indicates the shot has been taken. |
| The camera does not appear on the Desktop under Mac OS. | Mac OS X does not recognize the camera driver immediately. | Connect the DD100 to your Mac. Switch the camera on and restart the computer. |
Technical data
Image sensor
Image resolution
Image compression
Image memory capacity (16 MB internal memory)
Depth of color
Lens
Aperture
Focal length
Focusing range
Exposure
Exposure correction (EV)
3.0 mega pixels (2.1 MP Hardware resolution)
1600 × 1200 pixels
2048 x 1536 pixels (interpolated)
WebCam/Video: 320 × 240 pixels
without compression (^**)
low compression (^**)
high compression (^*)
interpolated (3M)
without compression (***): 14 photos in a resolution of 1600 × 1200 pixels
low compression (**): 30 photos in a resolution of 1600 × 1200 pixels
high compression (^*) : 60 photos in a resolution of 1600× 1200 pixels
interpolated (3M): 20 photos in a resolution of 2048 × 1536 pixels
24-bit RGB (8 bit x 3 colors)
5-element glass lens with integrated infrared filter
F 2.8
9.6 mm / in relation to 35 mm: approx. 48 mm
from 1.5m to infinity
automatic
aperture stops -1.8 to +1.8 (in stops of 0.3)
Shutter speed
Zoom
White balance
Monitor
Flash
Self-timer
File format
Storage media
Languages
System requirements
External ports
Power supply
Dimensions
Weight
Scope of delivery
automatic
4 x digital zoom in Shooting mode, additional zoom in Replay mode
Auto, Day light, Cloudy, Lamp, Tungsten, Night
1.6" TFT-Monitor
integrated
10 seconds delay
JPEG,AVI
Internal memory with 16 MB
External memory with SD card up to 128 MB
English, German, French, Italian, Spain, Portuguese, Chinese (Trad. + Simpl.)
Japanese
Windows 98SE/ME/2000/XP; MacOS 8.6 or later versions
USB-port, SD-Card Slot
2 batteries (size AAA/LR03) or rechargeable batteries
(only NiMH types!) or via USB connection
94× 56× 26mm / 3.7× 2.2× 1.0 inch (W× H× D)
approx. 100g / 3.5oz
Case, Wrist strap, USB cable, CD-ROM, brief instructions, 2 AAA batteries
Customer service
You can reach our Customer Service under the following address, where they will be pleased to help you:
MINOX GmbH
Walter-Zapp-StraBe 4
D-35578 Wetzlar, Germany
Tel.: +49 (0) 6441 / 917-0
Fax: +49 (0) 6441 / 917-612
info@minox.com
www.minox.com
For your notes
Conditions of warranty
With the purchase of this MINOX product you have acquired a product which has been manufactured and checked to special quality standards.
For this product the MINOX GmbH provides warranty of 2 years. The period commences on the date of purchase from an authorized dealer and the warranty is subject to the following conditions:
1) During the warranty period we shall deal with complaints based on faulty manufacture (free of charge) by repair, replacement of defective parts or replacement by an identical flawless product at our own discretion. Consequential claims, no matter what kind of what legal argument in connection with this warranty, cannot be accepted.
2) Claims under warranty are null and void, if the defect has been caused by improper handling – which also can include the use of non-MINOX accessories – if the MINOX product is serviced by unauthorized persons or workshops, or if the serial number has been obliterated.
3) Warranty claims can only be made by submission of the typewritten sales slip of an authorized dealer.
4) When submitting claims under warranty please return the MINOX product together with the typewritten sales slip and a description of the claim to the MINOX GmbH or MINOX agency.
5) Tourists may, if required, make use of the Agency of the country in which they are travelling (within the terms of the Warranty of the MINOX GmbH) by presenting the typewritten sales slip.
MINOX GmbH
Walter-Zapp-Str. 4
D-35578 Wetzlar
Tel.: +49 (0) 6441 / 917-0
Fax: +49 (0) 6441 / 917-612
eMail: info@minox.com
Internet: www.minox.com
MINOX GmbH
Walter-Zapp-Str. 4
D-35578 Wetzlar, Germany
Tel.: +49 (0) 6441 / 917-0
Fax: +49 (0) 6441 / 917-612
e-mail: info@minox.com
- Get to know your camera Page 4
- General notes
- The right power supply
- How to use SD cards
- Selecting the camera settings Page 8
- Taking pictures
- Playing back and deleting images
- Web Cam
- Installing the software Page 18
- Image processing on your PC Page 21
- Image processing on MacOS Page 22
- Uninstalling software
- Camera maintenance
- Warning notes
- Trouble shooting
- Technical data
- Customer service
- Conditions of warranty
- Page 25
- Page 27
- Page 28
- Page 30
- Page 31
- Introduction
- Get to know your camera
- Operating controls
- Symbols on the Display
- Notes on copyright
- Trademark information
- Inserting the batteries
- Important information on batteries
- How to use SD cards (Secure Digital Card)
- Caution:
- Note:
- Selecting the camera settings
- Camera settings
- Setup
- Functions and their respective explanations
- Important:
- Taking pictures without digital zoom
- Taking pictures with digital zoom
- Main menu
- Camera
- Shooting with flash
- Note
- Shooting pictures with the self-timer
- Selecting the image compression
- Adjusting the white balance
- Setting the exposure correction (EV)
- Movie function
- Playback of images using the camera
- Menu selection
- Playback
- Playback of images with digital zoom
- Overview of 4 images
- Overview of 9 images
- Playback of images as a slide show
- Playback of images without image information
- Deleting images
- Deleting a selected image
- Deleting all images
- WebCam
- Installing the Software
- Contents of CD-ROM for the DD100
- Computer system requirements
- Image processing/image viewing programs
- Connecting the DD100 to your PC
- WebCam Driver (for all Windows versions from Windows 98SE)
- Important note for Windows XP
- Image processing on your PC
- Downloading still pictures
- Image transfer using an image processing /image viewing program
- Loading video clips
- Image processing on MacOS
- Uninstalling camera driver (for Windows 98SE /ME)
- Uninstalling WebCam driver (for Windows 98SE/ME/2000/XP)
- Places to avoid
- Save keeping of the camera
- Cleaning your DD100
- Travelling by air
- Notes on possible electrical interference:
- TFT Display
- Mistakes to be avoided when taking photographs
- Troubleshooting
- MINOX GmbH
Brand : MINOX
Model : DD100
Category : Camera