ENERGY 5020 - Bluetooth Speakers ENERGY SISTEM - Free user manual and instructions
Find the device manual for free ENERGY 5020 ENERGY SISTEM in PDF.
Download the instructions for your Bluetooth Speakers in PDF format for free! Find your manual ENERGY 5020 - ENERGY SISTEM and take your electronic device back in hand. On this page are published all the documents necessary for the use of your device. ENERGY 5020 by ENERGY SISTEM.
USER MANUAL ENERGY 5020 ENERGY SISTEM
ENERGY SISTEM the heart of your music


INTRODUCCION
Energy Sistem thanks you for buying your new MP5 Energy™. We wish you enjoy using it.
This compact multimedia player, with TV-Out and HDP technology (2,8" TFT LCD display with 262.000 colours, built-in speaker and high fidelity processor) and Micro-SDHC memory expansion slot allows you to enjoy videos, music and pictures anytime anywhere. It also has an integrated FM radio tuner module.
We recommend that you fully read this user manual in order to enjoy the product in a safe way and with the best results.
CARE AND MAINTENANCE
Do not expose your MP5 Energy™ to shakes, dust, direct sun light, moisture or extreme temperatures.
Do not use abrasive or corrosive cleansers.
Keep the device clean and dust free with a soft and dry cloth.
Recharge the battery when the low battery icon appears on screen.
Do not disassemble the device. Any repairs must be performed by qualified Energy Sistem Soyntec's personnel.
MAIN FEATURES
Multimedia player with TV-Out.
HDP: 2,8" TFT display with 262.000 colours, built-in speaker and high fidelity processor.
MP5: Plays AVI videos (Divx/Xvid)/FLV/RM/RMVB) without transcoding. Includes transcoding software for special formats/codecs and Internet videos downloading software, compatible with Youtube, Google Video, Dailymotion and Metacafe.
Plays MP3/WMA/WAV music.
Displays JPG/BMP pictures.
Integrated FM Radio with 30 presets and direct recording.
Digital voice recording with built-in microphone.
Micro-SDHC expansion slot (up to 32GB).
High-fidelity in-ear earphones with neodymium magnets.
Li-Ion rechargeable battery.
Smart song browsing through categories and favorites.
Folder navigation.
Artists and lyrics on screen (Id3-Tag and LRC).
Upgradeable firmware.
No drivers needed (except for Windows 98).
8 equalization modes, including the new Microsoft™ MS PlayFX.
5 different playback modes, including sequential, random, repeat mode, and more.
PRODUCT CONTENT
Energy Sistem® MP5 Player Energy™ 5020/5021.
High-fidelity in-ear earphones.
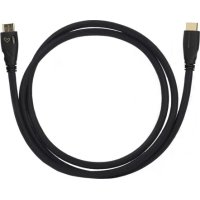
TV-Out cable (3 RCA connectors).
User manual.
Software and drivers CD.
USB 2.0 High-Speed cable for battery charging and data transfer.
Carrying case.
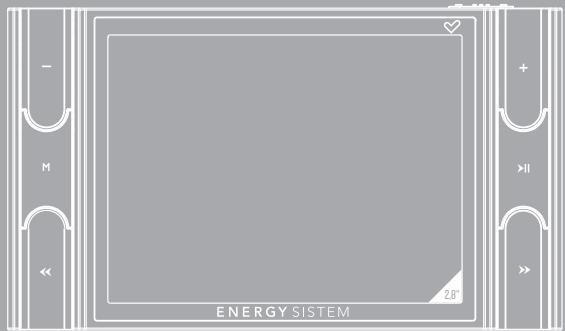
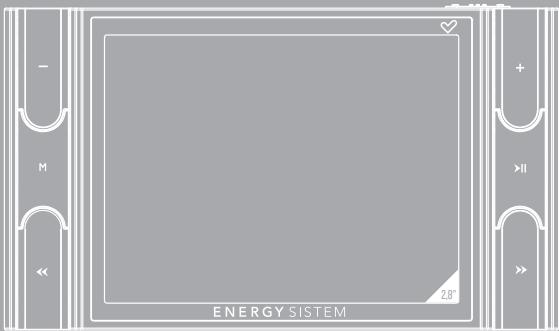
GENERAL OVERVIEW
TV-Out
2. Earphones output.
3. USB 2.0 Hi-Speed connector for battery charging and data transfer.
4. Micro-SDHC expansion slot.
5. Power on-off switch.
6. PREVIOUS: Previous element / Fast backwards.
7. MENU: Main menu / Previous menu / Show submenus.
8. NEXT: Next element / Fast forward.
9. VOLUME+: Rise volume / Delete / Add or delete favorites.
10. VOLUME: Lower Volume / Delete / Add or delete favorites.
II. PLAY: Playback / Select / Pause / Record / On-Off button.

BATTERY POWER
Your MP5 Energy™ has an integrated rechargeable Li-iron battery. It comes fully charged from factory, but it is recommended to perform a full recharge before the first use.
Recharge the battery connecting the player to a computer using the included USB 2.0 cable (using any USB type mini-B with 5-pins will also work).
Optionally, you can recharge the battery with an AC/DC power adaptor with an USB connector (USB type mini-B with 5-pins) (NOTE: the output of the AC/DC must be 500mA maximum).
Charging time is between 3-5 hours, depending if the player is powered off or working. To keep the battery in good conditions, we recommend not using the player while charging, with the power switch in "OFF" position and not leaving it charging for more than 8 hours.
Your MP5 Energy™ uses two systems for battery saving: It will power off the LCD display after 30 seconds of inactivity, and it will power off completely after another 10 minutes of inactivity. Both systems are configurable, respectively, browsing the menus SETTINGS -> Display Setting and SETTINGS -> AutoShut Time. In order to maximize the battery's lifespan, it is recommended not to disable completely these power saving features.
SWITCHING ON / OFF
To power on your MP5 Energy™, place the switch in the "ON" position and press PLAY for 2 seconds.
Note: When powering on, the device performs a memory check. The power on time depends on the amount of occupied memory.
Press PLAY for 3 seconds to power off the device. At that moment, the device will save your settings.
Note: If you power off the device directly with the switch button, your last changes in the settings will be lost, and it will not remember the last song played.
Your MP5 Energy™ allows you to enjoy MP3 / WMA / WAV codified music due to its high fidelity sound processor. To enter into the play mode for MP3/WMA/WAV files, press the PLAY button over the MUSIC option. Take a look to the different options available for you to easily select your music (press PLAY to start the selected file playback):
"Current Play": Shows the music player screen.
Note: To learn more about the player, take a look to the "Music player screen" section of the manual.
"All Music": With this option you will see, sorted alphabetically by file name, all the songs you have stored in your MP5 Energy™.
"Artist", "Album", "Title" and "Genre": They show listings of your favorite music sorted by artist, album, title or genre respectively.
Note: In order for the music files to be displayed in these listings, their artist, album, title and genre information must be stored into the file (information known as ID3-Tag). You can find freeware utilities to create or modify ID3-Tags like MP3Tag or ID3 Renamer.
" Favorites": With this option you can listen to your favorite music that you already marked as favorite. To add a song to your "Favorite" list, simply press the VOLUME+/- button while on top of a file or folder. Make a selection using PLAY. Inside the "Favorite" folder if you press VOLUME+/- a new menu will pop up allowing you to erase one or all the favorite marked songs. Again, make a selection using PLAY.
Note: Erasing an element from Favorites you only eliminate what marks it as favorite, the file will stay in memory.
"Recordings": Listen to the clips you have recorded using the microphone or the FM radio with this option. Choose the clip you want to listen to and press PLAY.
"Dir List": With this option you can explore the file tree in the memory of the MP5 Energy™ just as it would be displayed in your computer. Use this option to access the songs of your Micro-SDHC card.
"Medialib Update": Use this option whenever you store or delete songs so the artist, album and title listings are recreated accurately.
"Playback Resume": Use this option to resume the playback of the last songs you left unfinished.
Note: When the player is unplugged from the PC via the safe USB device removal, the MP5 Energy™ will run an automatic Update and enter battery charge mode.
You can pause the playback by pressing PLAY and to set the volume up/down, hold down the VOLUME + / VOLUME - button. Briefly press the PREVIOUS/NEXT button to skip to the previous/next track. You can fast forward or rewind the song by holding the PREVIOUS/NEXT button.
Access the submenu holding the MENU button on the music player interface and the available options will appear. With the "Display" option you can choose to show the song lyrics.
Note: The song lyrics are a text files named exactly after the music file with the. LRC extension. If some of your music files do not have the LRC file, the lyrics will not be shown, but you can listen to the music without problem.
To exit the current playback to the previous menu press MENU. Press MENU again if you want to go back to the main menu.
MUSIC PLAYER SETTINGS
You can choose the equalization mode that fits your preferences. To do so, on the music player interface hold MENU and choose EQ Select, and after that choose one of the 8 available modes: "Normal", "PlayFX", "Rock", "Pop", "Classic", "Bass", "Jazz" or "User EQ". With the "PlayFX" or the "User EQ Setup" you can personalize the "PlayFX" and "User EQ" equalization modes respectively.
The playing order of the tracks depends on the selected mode. By default, the mode is set to "Normal". You can change to a different mode holding MENU, selecting PLAY MODE and choosing "Normal" (sequential order) or "Shuffle" (random).
You can also set the repeat mode selecting REPEAT MODE at the submenu and choosing your preferred mode:
"Once" (plays the current file and stops), "Repeat I" (repeat current track), "Folder Once" (plays files inside the current folder and stops), "Folder Repeat" (repeats the files inside the current folder), "All Once" (plays all the files once), "All Repeat" (plays all the files continuously) and "Intro" (plays the first 10 seconds and skips to the next file).
To know the amount of free memory, browse to SETTINGS System Information.
BROWSER: FOLDER NAVIGATION
This handy function allows you to directly choose the music / video / image / e-Book folder or file that you want to play, previously sorted with your PC.
You can browse through folders while on MUSIC /VIDEO / PHOTO / E-BOOK mode. Keep in mind that while you browse the folders on one given section, only the files associated to that section will be displayed (music files in MUSIC, image files in PHOTO, etc...). If you want to see all files present in memory, choose BROWSER at the main menu.
With PREVIOUS/NEXT buttons you can select the previous/next folder or file. With the PLAY button you will enter the selected folder. You can go back to the previous folder pressing PLAY on the "... icon or pressing the MENU button.
Press PLAY over a file to start a playback. If you want to delete a file select it, press VOLUME + / - and then select "Delete file?" with the PLAY button. To cancel the deletion, simply select "Exit" instead.
FM RADIO
Your MP5 Energy™ has an integrated FM radio with 30 presets and direct recording. To listen to the radio, select the RADIO option in the main menu.
To display the FM settings menu, hold the MENU button:
Manual search:
- Being at the FM setting menu, select "Manual search" with the PLAY button
- Press PREVIOUS/NEXT to go back/forward along the frequency band.
- Once you have tuned a broadcast, hold MENU, select "Save channel" and choose the preset number with PREVIOUS/NEXT and finally press PLAY to store.
Automatic search: Being at the FM settings menu, select "Auto search" with the PLAY button to start the automatic search. The presets will be stored automatically as well.
To browse the stored presets, choose "Preset channels" at the FM settings menu and use the PREVIOUS/NEXT buttons to navigate through presets.
Note: At the center of the screen you can see the number of the preset you are hearing.
Record directly what you are listening on the FM radio. Enter the menu by holding the MENU button and choose "FM record" pressing PLAY. Press PLAY again to start recording. You can pause by pressing PLAY once more. To finish recording, press the MENU button. Press MENU again while not recording to get back to the RADIO mode.
Holding MENU on the record screen will give you access to the record options menu.
The sound files that you recorded are stored inside the "RECORD" folder. The files are WAV format. You can listen to these files while being at the MUSIC mode or BROWSER mode, selecting the "RECORD" folder while on the MUSIC section, or using the folder navigation function while on MUSIC/BROWSER section and pressing PLAY on the WAV file that you want to listen.
Exit the RADIO mode by pressing the MENU button.
E-BOOK
View and enjoy your electronic books (e-book in TXT format) anywhere with the high resolution TFT LCD screen of your MP5 Energy™. To view your e-books, select the E-BOOK option at the main menu. You will access directly to the files explorer (check the “BROWSER: FOLDER NAVIGATION” section) and choose the book that you want with PREVIOUS/NEXT button and press PLAY to start reading it.
Press the PREVIOUS/NEXT button to skip to the next/previous page. Hold MENU to access the options submenu. With "Browser Mode" option you activate/deactivate the automatic flip of pages, which time you can configure at "Flip Time". Use the different bookmarks submenus (Save, Load and Del) to manage your bookmarks. Press the PLAY button to confirm your selections.
- Your MP5 Energy™ is able to perform voice recording with its integrated microphone. To enter the voice record mode, select the RECORD option and press the PLAY button. Press PLAY to start recording. You can pause by pressing PLAY again. To finish recording, press the MENU button.
Holding MENU on the record screen will give you access to the record options menu.
The sound files that you recorded are stored inside the "RECORD" folder. The files are WAV format. You can listen to these files while being at the MUSIC mode or BROWSER mode, selecting the "RECORD" folder while on the MUSIC section, or using the folder navigation function while on MUSIC/BROWSER section and pressing PLAY on the WAV file that you want to listen.
Exit the RECORD mode by pressing the MENU button.
VIDEO PLAYER
You can enjoy your favourite videos and movies anytime anywhere, even on big screens on any TV set with its HQ TV-Out.
You can play AVI(Divx/Xvid)/FLV/RM/RMVB videos directly without conversion. On some exceptional occasions (like uncommon codecs or bitrates), to ensure a correct visualization and compatibility, you can play AVI/WMV/MPG/VOB/ASF videos previously converted to AVI format (XVID with MP2 audio) with Energy Movier software, included in the CD of your MP5. Check the user manual section "ENERGY MOVIER: CONVERTING AVI VIDEOS".
To play videos, select the VIDEO option from the main menu. You will access the files explorer (check the "BROWSER: FOLDER NAVIGATION" section). Choose the video that you want with the PREVIOUS/NEXT buttons and press PLAY to start playing it. Press PLAY to pause the playback. To get the volume up/down use the VOLUME+/- button.
Press PREVIOUS/NEXT button to skip to the previous/next video. You can fast forward or rewind the video by holding the PREVIOUS/NEXT button.
TV-Out: Hold the MENU button and select "Activate TV-Out" on the video options menu to activate the TV-Out connector.
Note: The TV-Out cable provided must previously be connected to your TV through the audio and video RCA connectors, and to your MP5 "TV OUT" and "Earphones" with the audio and video Jack connectors.
To access again the files explorer, press the MENU button.
To exit this mode and get back to the main menu, press again the MENU button.
ENERGY MOVIER: INSTALLATION
With Energy Movier software tool you can easily convert your AVI/WMV/MPG/ VOB/ASF videos to the AVI format (XVID with MP2 audio) so they occupy less memory and to ensure compatibility with the majority of formats/codecs.
For installing Energy Movier follow these steps:
- Insert the drivers CD in your CD/DVD reader unit of your PC.
Note: We save the latest available version of the software in the CD when the unit leaves the factory. However, if you have an internet connection, we recommend you to always download the latest version from our website www.energysystem.com. - Once you see the Energy Sistem menu, select "Install Energy Movier". If you have autorun disabled, you can run the installation file "setup.exe" from the folder "SOFTWARE/Energy Movier".
- On the installation screen, select "OK" and click on the icon to begin the installation. Follow the steps by pressing "Continue".
Note: Depending on the CODES you have installed in your computer, you might get a message of the program trying to overwrite some of them. In that case, we recommend that you keep your existing files by pressing "Yes".
- Once the installation is complete, you can run the application from Start -> "All programs" -> "Energy Sistem" -> "Energy Movier".
ENERGY MOVIER:CREATING AVI VIDEOS
For converting an AVI/WMV/MPG/VOB/ASF video follow these steps:
Note: If you want to convert special video formats like MPEG4 / DivX / XviD / etc. make sure that you have the appropriate "codecs" installed. You can install "codec" packages like "K-Lite Standard Pack". It is also recommended that the files to be converted are in the installation folder.
- Execute "Energy Movier" from the "Start" menu.
- If it's the first time you run the program, the options window will automatically pop up so you can select your MP5 Energy™ model. Optionally you can modify the quality and the image format you want for your videos.
- Choose a file to be converted with the "Select file" button.
- You can specify a name for the new file in the "Name of the converted video" section. If you don't write anything, the original file's name will be used.
- Optionally you can select the folder where your video is to be stored by clicking on the button "Select another folder". Note: If your Energy™ MP5 is connected to your computer, you can select a folder of the built-in memory so the new video stores directly into it, but make sure first that it has enough free memory
- Click on the "Add" button so the conversion job adds to the list of pending tasks. Note: You can add many conversion tasks so the videos batch convert without having you staring your computer. If you want to, you can erase a queued job by selecting the line with your mouse and pressing "Delete line".
- Repeat steps 3 to 6 for each one of the videos you would like to convert.
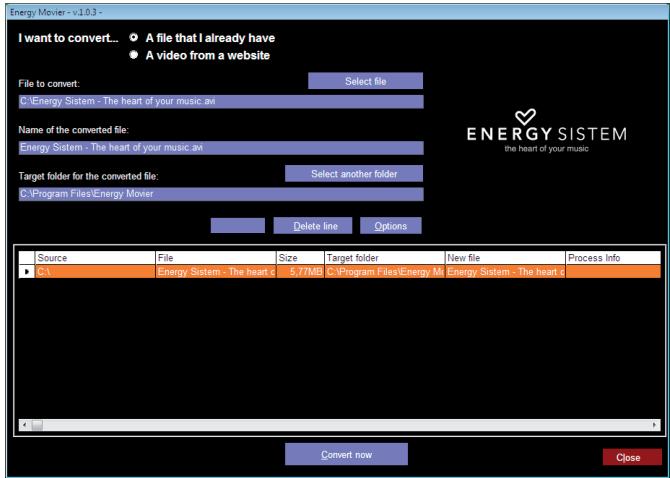
- Once you have queued all the videos you want to convert, press "Convert now" to begin the process.
- On the "Process Info" column you can check the current file conversion, along with its current size. When the process is finished, the "Process Info" column turns green colour. Wait for all the tasks to complete and click the "Close" button to exit the program. NOTE: We recommend not using the PC while Energy Movier is converting due to the high consumption of resources that could lead to other applications not responding.
- Connect your MP5 Energy™ to the computer (check out the "PC Connection" section) and copy the new AVI file(s) inside your desired folder, unless you selected your MP5 as the target folder destination for direct recording.
ENERGY MOVIER: INTERNET VIDEOS DOWNLOAD
On top of the possibility of converting videos you already have in your PC, you can also download and convert your favourite videos from the most popular Video Websites to enjoy them with your MP5 Energy™ anytime anywhere.
Note: On printing date of this manual, Energy Movier is compatible with Youtube, Google Video, Metacafe and Dailymotion; check the updated compatibility list at www.energysystem.com/videosweb http://www.energysystem.com/videosweb.
To download and convert the videos, follow these easy steps:
- Run "Energy Movier" from the "Start" menu.
- If this is the first run of the program, the options window will open automatically so you can select your MP5 Energy™ model. Optionally you can modify the quality and the aspect ratio you want for your videos.
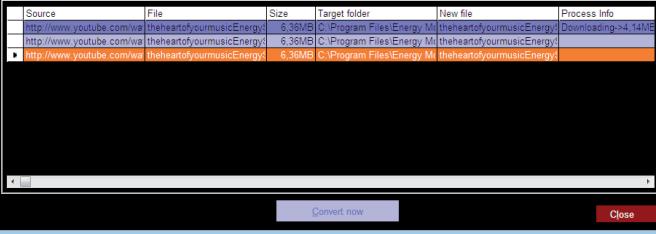
- Choose "A video from a website" in the "I want to convert...." section.
- Your next step is to provide the link to the video you want to download. Usually the right link is shown in the "Address" field of your web browser while you are seeing the video. Copy this address from your browser and paste it in the field "URL of the file to download" by pressing the button "Paste from clipboard" in Energy Movier.
-
In the field "Name of the converted file" you can specify a name for the new file. If you don't write anything, the original internet name will be used.
-
Optionally you can select the folder where the new video will be stored. To do so, click on the "Select another folder" button. Note: If you have your MP5 Energy™ connected to the PC, you can select a folder from it so the new video stores directly on the unit, but make sure there is enough free space.
- Click on the "Add" button to add the download and conversion job to the task list. If you receive an error message and your internet connection is fully functional, probably the link is from an unsupported page, or the video has some copyright or access restriction. (i.e. for mature only)
Note: You can add several download and conversion jobs so they batch process automatically without you staring at the computer. If you want to, you can delete a queued job selecting it with your mouse and pressing the "Delete line" button.
- Repeat steps 4 to 7 for each of the videos you want to download and convert.
- Once you have queued all the videos you want to download and convert, press "Convert now" to begin the process.
- On the "Process Info" column you can check the current file download and conversion, along with its current size. When the process is finished, the "Process Info" column turns green colour. Wait for all the tasks to complete and click the "Close" button to exit the program. NOTE: We recommend not using the PC while Energy Movier is converting due to the high consumption of resources that could lead to other applications not responding.
II. Connect your MP5 Energy™ to the computer (check out the "PC Connection" section) and copy the new AVI file(s) inside your desired folder, unless you selected your MP5 as the target folder destination for direct recording.
Energy Movier - v.1.0.3
Iwant to convert... A file that I already have
A video from a website
URL of the file to download:
Paste from clipboard
http://www.youtube.com/watch?v=2aMvNxT1G1
Name of the converted file:
Target folder for the converted file:
ete line
C:\Program Files\Energy Mover
te line
Options

ENERGY SISTEM
the heart of your music
VIEWING PICTURES
View and enjoy your JPG / BMP pictures and photos with the high resolution TFT LCD screen of your MP5 Energy™.
To view your images, select the PHOTO option from the main menu. You will access directly to the files explorer (check the “BROWSER: FOLDER NAVIGATION” section) and choose the picture that you want with the PREVIOUS/NEXT button and press PLAY to start viewing it. While viewing a picture, hold the MENU button to show the options submenu and use the different visualization options, including the slideshow presentation.
Press PREVIOUS/NEXT to browse to the previous/next image. To return to the explorer or the main menu, just single press MENU.
PC CONNECTION
In order to enjoy the multimedia capabilities of your MP5 Energy™, you have to first copy your favourite files from your PC to its internal memory, or use a Micro-SD memory expansion card.
Note: Turn off your MP5 Energy™ each time you insert/extract your Micro-SD card to avoid accidental data losses.
Connect your MP5 Energy™ to the computer using the USB 2.0 cable included. The device will be detected automatically without installing any driver (except Windows 98, in which case you have to install the W98 driver from the "SOFTWARE/Firmware" folder inside your MP5 built-in memory). Once detected, you can read/write to the device's memory just as if you were using a regular disk drive.
IMPORTANT: To avoid any data loss, always perform a safe USB device extraction before disconnecting the USB cable from the device of the PC. In Windows XP, for example, you can find the safe extraction icon in the task bar, next to the system clock.
FIRMWARE REINSTALLATION
- Your MP5 Energy™ has an installed operating system, usually called firmware, that sometimes needs to be reinstalled.
The process is easy, but has to be performed carefully, and only when it is really necessary. If you see that the player halts, reboots randomly, or you have problems to access the memory content from your computer, those are signs that the firmware might be damaged you should reinstall the latest version available.
IMPORTANT: First of all, make a backup of the files inside the your MP5 Energy™ that you want to keep and disconnect the device from your PC, since during the firmware reinstallation the memory will be formatted and erased. It is also is very important to make sure that your computer is virus-free and has no halt/lock problems.
Follow these steps to reinstall the firmware:
-
Insert the bundled Driver CD in a CD/DVD drive of your computer and the CD MENU will automatically appear. Select "Download Energy MP5 Firmware Utility" to access our website (you can access manually from a web browser from www. energysystem.com.
-
Select your model from the products section and download the last version of the firmware from the download zone. Note: Make sure the firmware you are downloading is specific for your model. Otherwise you will severely damage the unit. Uncompress the file in your computer.
- Open the "Readme" file and follow the instructions.
- Unplug the USB cable, turn on the unit and wait for the main menu (it may take up to a few minutes).
- Connect again the unit to the computer with the USB 2.0 cable.
- Go to "My PC" and double click on the drive that represents your MP5 internal memory.
- You can again transfer data to your MP5 Energy™ and enjoy it right away.
TROUBLESHOOTING
- Why can't I play some MP3 files?
The MP3 file has to be compressed along some standards like MPEGI/MPEG2/MPEG 2.5 layer 3. Otherwise, the file must be converted using a software application.
- My player doesn't power on and/or my computer doesn't detect it, what can I do? Probably there is a problem with the firmware. Check the user manual section "FIRMWARE REINSTALLATION".
- Why can't I play some WMA files?
Make sure that you are not coding the WMA files with DRM.
- Why can't I see the image, video or text files while using the music browser?
You will only see the files in memory associated to the browsing you are doing (music files for Music, image files for Photo, etc...) To view all the files in memory at once, choose the "Browser" option in the main menu.
- Why can't I display my.jpg files?
Many digital cameras and image edition software add hidden data to the .jpg files. This data can prevent your MP5 from loading the images. Try to eliminate them by saving the file with another name.
- When I switch off the MP5 with the ON/OFF button, the brightness or the song I was listening to is not stored. What gives?
For the MP5 to successfully store the state, you have to switch it off with the PLAY button.
- What's the video format of my MP5 EnergyTM?
It plays many video formats without recoding, and AVI files compressed with XVID, MP2 audio. Convert your videos using Energy Movier to ensure compatibility.
- I'm having trouble to detect my MP5 with Windows Vista.
There is a USB mass storage devices recognition issue with Windows Vista acknowledged by Microsoft. A solution is expected in the upcoming Service Pack I.
Have any other question? Check the product F.A.Q. section at www.energysystem.com.
Technical support email address: support@energysystem.co.uk
WARRANTY
Energy Sistem Soyntec S.A. warrants its products to be free from defects in materials and workmanship at the time of purchase.
The warranty period is 36 months from the date of purchase for MP3/MP4/MP5 Players.
WARRANTY PROCEDURE
- Visit the Support section at http://support.energysystem.com and select your product to view the FAQ (Frequently Asked Questions). The solution to your problem is very likely to have been already published there. You will also be able to download user manuals, user guides, drivers and updates.
- If you cannot find an appropriate solution in the Support section, you may send us your enquiry or warranty service request by email: support@energysystem.co.uk
- Alternatively, you may prefer to contact the distributor from which you purchased the product, presenting the purchase receipt or invoice."
Specifications are subject to change without notice.
© 2008 by Energy Sistem®. All rights reserved.
Trademarks.
All company, brand and product names are trademarks or registered trademarks of their respective companies.