MCE5500CA - Vacuum Cleaner DIRT DEVIL - Free user manual and instructions
Find the device manual for free MCE5500CA DIRT DEVIL in PDF.

| Product Type | Hard floor cleaner with dry and wet suction |
| Brand | DIRT DEVIL |
| Model | MCE5500CA |
| Power Supply | 120 V ~ 60 Hz, 120 V rated circuit |
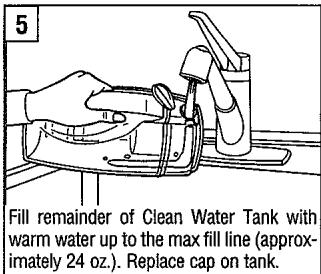
| Clean Water Tank Capacity | Approximately 24 oz (710 ml) |
| Dirty Water Tank Capacity | Up to the 'Max Debris' line |
| Brush Type | Brush roll |
| Main Functions | Dry vacuuming, wet cleaning, cleaning solution dispensing |
| Compatible Floor Types | Tile, linoleum, stone, vinyl, plastic laminate hardwood (except worn/bare surfaces/separate joints). Do not use on carpet. |
| Safety | Motor thermal protection, mandatory grounding (3-prong plug), child supervision required |
| Maintenance and Cleaning | Filter cleaning (washable with water), regular emptying of dirty water tank, brush roll cleaning |
| Spare Parts and Repairability | Permanent belt (repair at authorized center), replacement filter available (1-800-321-1134 or www.dirtdevil.com) |
| General Information | Household use only, limited warranty (see packaging), customer service 1-800-321-1134 |
Frequently Asked Questions - MCE5500CA DIRT DEVIL
User questions about MCE5500CA DIRT DEVIL
0 question about this device. Answer the ones you know or ask your own.
Ask a new question about this device
Download the instructions for your Vacuum Cleaner in PDF format for free! Find your manual MCE5500CA - DIRT DEVIL and take your electronic device back in hand. On this page are published all the documents necessary for the use of your device. MCE5500CA by DIRT DEVIL.
USER MANUAL MCE5500CA DIRT DEVIL
- Please read these instructions carefully before using your cleaner.
- Let us help you put your vacuum together or answer any questions, call:
1-800-321-1134
(USA & Canada)
www.dirtdevil.com
WARNING:
Cleaner assembly may include small parts.
Small parts can present a choking hazard.
For quick reference, please record your vacuum information below.
Model #:
Mfg. Code:
(Mfg. code located on the lower backside of cleaner)
THIS CLEANER IS INTENDED FOR HOUSEHOLD USE ONLY.
IMPORTANT SAFETY INSTRUCTIONS
When you use an appliance, basic precautions should be followed, including the following:
- READ ALL INSTRUCTIONS BEFORE USING THE APPLIANCE.
- ALWAYS FOLLOW THESE SAFETY INSTRUCTIONS.
- DO NOT LEAVE CLEANER UNATTENDED WHEN PLugged IN.
- OCCAsIONALLY CLEAN DEBRIS FROM BRUSH.
WARNING: FULLY ASSEMBLE CLEANER BEFORE OPERATING. - WARNING: THE CORDS, WIRES, AND/OR CABLES SUPPLIED WITH THIS PRODUCT CONTAINS CHEMICALS, INCLUDING LEAD OR LEAD COMPOUNDS, KNOWN TO THE STATE OF CALIFORNIA TO CAUSE CANCER AND BIRTH DEFECTS OR OTHER REPRODUCTIVE HARM. WASH HANDS AFTER USING.
READ ALL INSTRUCTIONS BEFORE USING THE APPLIANCE. WARNING: TO REDUCE THE RISK OF FIRE, ELECTRIC SHOCK OR INJURY:
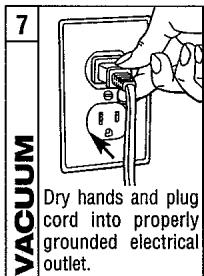
- Connect to a properly grounded outlet only. See Grounding Instructions.
- Do not leave appliance when plugged in. Unplug from outlet when not in use and before servicing.
- To reduce the risk of electric shock, use indoors only. Do not immerse. Use only on surface moistened by cleaning process or small spills. A small spill is considered to be less than one gallon and less than 1/8 inch deep.
- To reduce the risk of fire- Do not use a flammable or combustible liquid to clean floor.
- Do not allow to be used as a toy. Close attention is necessary when used by or near children.
- Use only as described in this manual.
- Do not use with damaged cord or plug. If appliance is not working as it should, has been dropped, damaged, left outdoors, or dropped into water, return it to a service center for inspection. Call 1-800-321-1134 or visit our website at www.dirtdevil.com to locate the nearest service center.
- Do not pull or carry by cord, use cord as handle, close a door on a cord, or pull cord around sharp edges or corners. Do not run appliance over cord. Keep cord away from heated surfaces.
- Do not unplug by pulling on cord. To unplug, grasp the plug, not the cord.
- Do not handle plug or appliance with wet hands.
- Do not put any objects into openings. Do not use with any opening blocked; keep free of dust, lint, hair, and anything that may reduce air flow.
- Keep hair, loose clothing, fingers, and all parts of body away from openings and moving parts.
- Do not pick up anything that is burning or smoking, such as cigarettes, matches, or hot ashes.
-
Do not use without dirty water reservoir and filter assembly in place.
-
Turn off all controls before unplugging.
- Do not use to pick up flammable or combustible liquids, such as gasoline, or use in areas where they may be present.
- Keep the Hard Floor Cleaner on the floor. Do not use on stairs.
- Do not use an extension cord with this Hard Floor Cleaner.
- Store the Hard Floor Cleaner indoors. Put the Hard Floor Cleaner away after use to prevent tripping accidents.
- Using improper voltage may result in damage to the motor and possible injury to the user. Proper voltage is listed on the cleaner plate.
- Use only with Dirt Devil® Floor Cleaner Concentrate or Dirt Devil® Hard Wood Floor Cleaner Concentrate.
- Always install float before any wet pick-up operation. NOTE: The float is part of the filter assembly inside the dirty water tank. See page 8 for installation instructions.
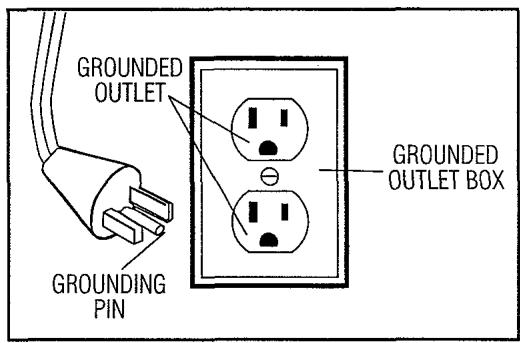
SAVE THESE INSTRUCTIONS GROUNDING INSTRUCTIONS
This appliance must be grounded. If it should malfunction or breakdown, grounding provides a path of least resistance for electric current to reduce the risk of electric shock. This appliance is equipped with a cord having an equipment-grounding conductor and grounding plug. The plug must be inserted into an appropriate outlet that is properly installed and grounded in accordance with all local codes and ordinances.
WARNING
Improper connection of the equipment-grounding conductor can result in a risk of electric shock. Check with a qualified electrician or service person if you are in doubt as to whether the outlet is properly grounded. Do not modify the plug provided with the appliance - if it will not fit the outlet, have a proper outlet installed by a qualified electrician.
This appliance is for use on a nominal 120-volt circuit and has a grounding attachment plug that looks like the plug illustrated in the sketch.
Make sure that the appliance is connected to an outlet having the same configuration as the plug. No adapter should be used with this appliance.
Your cleaner contains a thermal protective device to shut off the motor to aviod overheating. If this happens, turn the unit off and unplug the cleaner. Insept the nozzle inlet for blockage. Empty the Dirty Water Tank and clean filter. After approximately 30 minutes, the motor will have cooled and the vacuum will be ready to use. NOTE: the cleaner must remain unplugged during the 30 minute cooling period.
TABLE OF CONTENTS
Safety Instructions.. Page 2,3
Feature Descriptions.. Page 5
How to Assemble.. Page 6
How to Use.. Page 6
Operating Instructions.. Page 7
Emptying and Cleaning Dirty Water Tank...... Page 8
Cleaning the Filter.. Page 9
Transportation and Storage.. Page 10
Belt Removal and Replacement......Page 10
Troubleshooting Guide.. Page 11
LIMITED WARRANTY
To the consumer, Royal Appliance Mfg. Co. warrants this vacuum cleaner to be free of defects in material or workmanship commencing upon the date of the original purchase. Refer to your vacuum cleaner carton for the length of warranty and save your original sales receipt to validate start of warranty period.
If the vacuum cleaner should become defective within the warranty period, we will repair or replace any defective parts free of charge. The complete machine must be delivered prepaid to any ROYAL® Authorized Sales & Warranty Service Station. Please include complete description of the problem, day of purchase, copy of original sales receipt and your name, address and telephone number. If you are not near a Warranty Station, call the factory for assistance at USA & Canada: 1-800-321-1134. Use only genuine Royal® replacement parts.
The warranty does not include unusual wear, damage resulting from accident or unreasonable use of the vacuum cleaner. This warranty does not cover brushes, flat belts, filters and bulbs. This warranty does not cover unauthorized repairs. This warranty gives you specific legal rights and you may also have other rights (Other rights may vary from state to state in the USA).
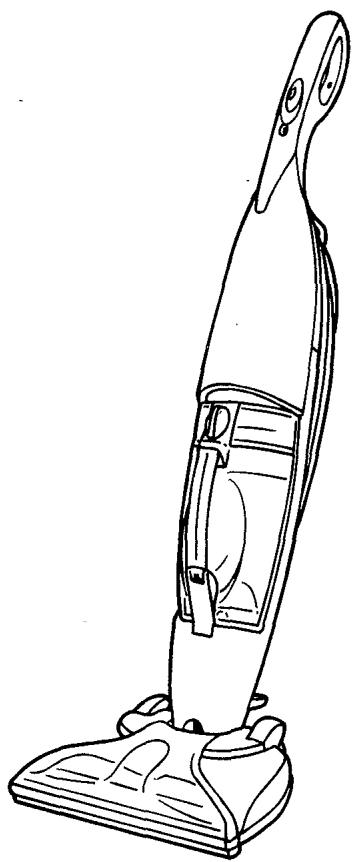
FEATURES
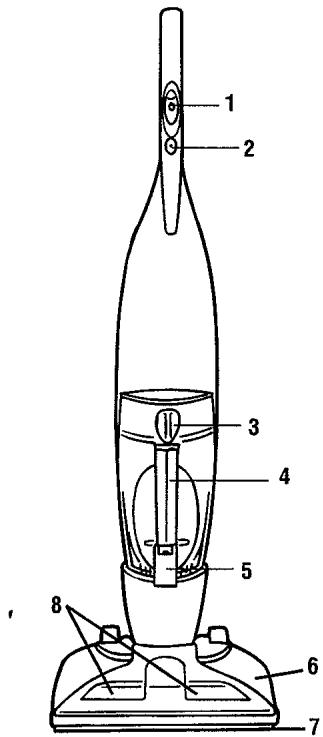
FRONT VIEW
FRONT VIEW
- Handle Switch
- Motor Reset Button
- Clean Water Tank Cap
- Clean/Dirty Water Tank
- Clean/Dirty Water Tank Latch
- Nozzle Base
- Squeegee
- Brushroll
BACK VIEW
- Comfort Grip
- Upper Cord Wrap
- Carry Handle
- Power Cord
- Nozzle Power Cord Clip
- Quick Cord Release
- Solution Pedal
- Nozzle Setting Pedal
- Non-Marring Wheels
- Handle Release Pedal
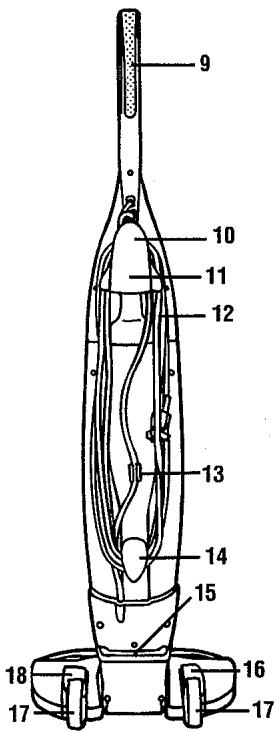
BACK VIEW
CLEANING SOLUTIONS
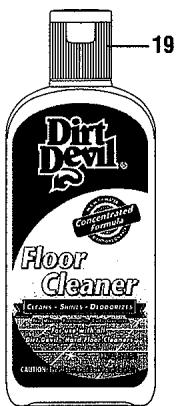
- Dirt Devil® Hard Floor Cleaner Concentrate (FOR USE ON VINYL, TILE, LINOLEUM, ETC.)
- Dirt Devil® Hardwood Floor Cleaner Concentrate

(CAUTION: TO PREVENT
DAMAGE TO WOOD
FLOORS, FOLLOW THE
MANUFACTURERS CLEAN
ING RECOMMENDATIONS.
BEFORE USING ON
SEATED WOOD FLOOR,
ENSURE THAT SURFACE IS
NOT WORN, BARE OR HAS
SEPARATED JOINTS. DO
NOT USE IF ANY OF THESE
CONDITIONS EXIST.
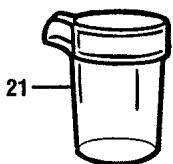
- Measuring Cup
HOW TO ASSEMBLE

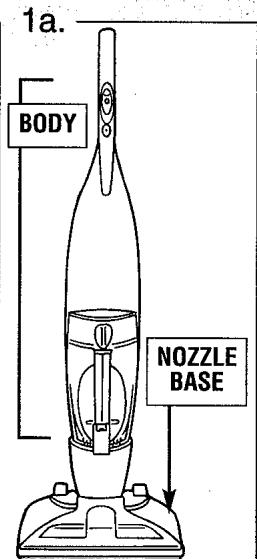

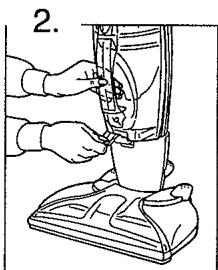
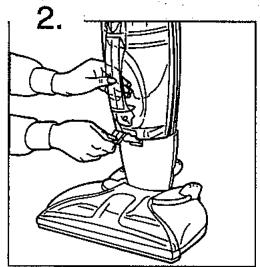
Stand nozzle base in upright and locked position. Align the notches of the inner tubing with the hole in the nozzle base. Press down firmly on body until it snaps into place (Diagram 1a). Push nozzle power cord into nozzle power cord clip on back of unit. NOTE: Make sure the excess power cord is tucked up and into carry handle (Diagram 2).
HOW TO USE
This product can be used to clean hard floor surfaces such as tile, linoleum, stone, vinyl, laminate, and sealed hard wood floors. It is not intended for use on carpets or rugs.
The recommended sequence of cleaning is as follows (Refer to page 7 for specific cleaning instructions):
| OPERATING SEQUENCE | Handle Switch | NOZZLE SETTING Pedal | SOLUTION ON/OFF Pedal |
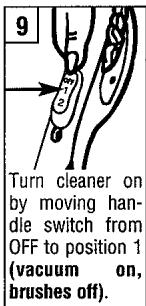
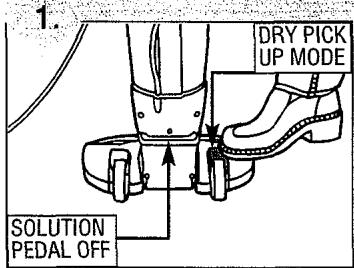
| DRY VACUUM | 1-DRY VAC | 1 - DRY VAC (nozzle raised) | OFF |
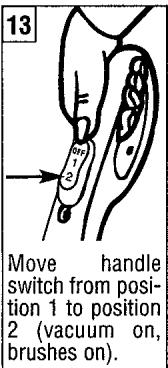
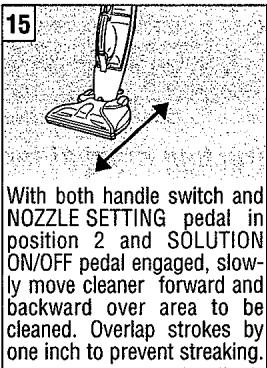
| WET CLEANING | 2-SCRUB & VAC | 2- WET SCRUB & VAC (nozzle lowered) | ON |
Please read instruction manual for more detailed operating instructions prior to first use.
OPERATING INSTRUCTIONS
The Hard Floor cleaner can be used to clean wood floors that have been sealed with a polyurethane coating and can be cleaned with water.
CAUTION: TO PREVENT DAMAGE TO WOOD FLOORS, FOLLOW THE MANUFACTURERS CLEANING RECOMMENDATIONS. BEFORE USING ON SEATED WOOD FLOOR, ENSURE THAT SURFACE IS NOT WORN, BARE OR HAS SEPARATED JOINS. DO NOT USE IN WET VAC/SCRUB MODE. DO NOT USE IF ANY OF THESE CONDITIONS EXIST.


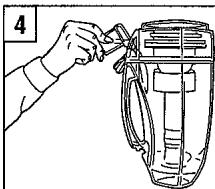
Pour Dirt Devil® Floor Cleaner or Hardwood Floor Cleaner Solution Concentrate into Clean Water Tank. DO NOT USE PINE, SOLVENT, OR WAX BASED CONCENTRATES IN CLEANER.


EMPTYING AND CLEANING DIRTY WATER TANK
WARNING: TO REDUCE THE RISK OF INJURY FROM MOVING PARTS - UNPLUG BEFORE SERVICING. Your cleaner is equipped with a shut off valve within your Dirty Water Tank. Empty the Dirty Water Tank when the wet and/or dry debris reaches the "Debris Max Fill" line on the outside of the Clean/Dirty Water Tank or the float rises, shutting off air flow through the nozzle. NOTE: You will hear a noticeable change in the pitch of the cleaner. This indicates a need to empty the Dirty Water Tank.
Tank-In-Tank": Your cleaner is designed with a unique Tank-In-Tank™ system. The outer tank (Clean Water Tank) contains the cleaning solution and water mix while the inner tank (Dirty Water Tank) collects dry and wet debris.
EMPTY DIRTY WATER TANK

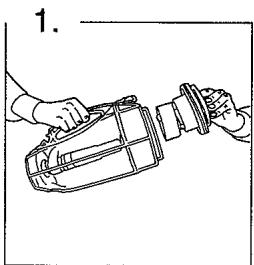
Disconnect cleaner from electrical outlet (Diagram 1). Place cleaner handle in upright and locked position (Diagram 1a).
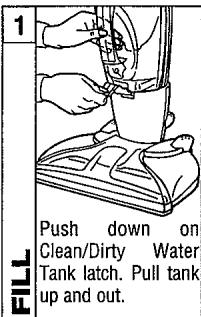
Push down on Clean/Dirty Water Tank latch while grabbing handle and pulling tank up and out from main body of cleaner.
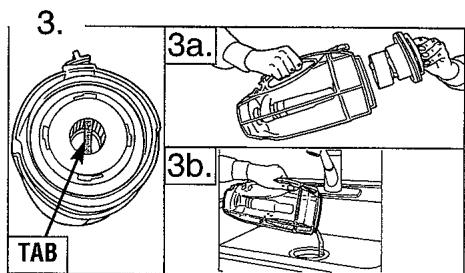
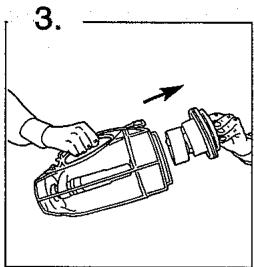
Grasp tab (Diagram 3) and pull up to remove filter assembly (Diagram 3a) out of tank. Empty contents into sink (Diagram 3b).
REPLACE DIRTY WATER TANK
Return filter assembly back into Clean/Dirty Water Tank (Diagram 1). To ensure a proper fit, make sure arrow on filter assembly is aligned with Clean Water Tank Cap (Diagram 1a.)


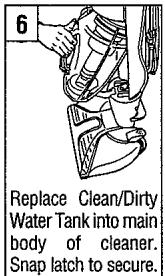
Replace Clean/Dirty Water Tank into main body of cleaner and snap Clean/Dirty Water Tank latch into place.

Replace cap on Clean Water Tank.
CLEANING THE FILTER
WARNING: TO REDUCE THE RISK OF INJURY FROM MOVING PARTS - UNPLUG BEFORE SERVICING.

Disconnect cleaner from electrical outlet (Diagram 1). Place cleaner handle in upright and locked position (Diagram 1a).
Remove Clean/Dirty Water Tank.
Pull filter assembly up and out of Clean/Dirty Water Tank.

Remove filter by grasping tab (inset) and turning counterclockwise. Lift filter up and out of filter assembly (Diagram 4).

Remove any loose debris from filter by tapping the filter against a garbage can. (Diagram 5). NOTE: For additional cleaning, the filter (a) and filter assembly (b) may be rinsed under water (Diagram 5a). Allow filter and filter assembly to air dry completely before use. For filter replacements, please call 1-800-321-1134 or visit www.dirtdevil.com to locate a dealer nearest you.
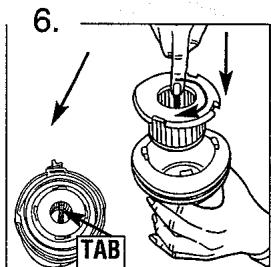
Replace filter by grasping tab (inset) and turning clockwise. Push filter down and into filter assembly (Diagram 6).

Return filter assembly back into Clean/Dirty Water Tank (Diagram 7). To ensure a proper fit, make sure arrow on filter assembly is aligned with Clean Water Tank Cap (Diagram 7a).


Replace Clean/Dirty water tank into main body of cleaner and snap clean/dirty water tank latch into place.
TRANSPORTATION AND STORAGE
TRANSPORTATION
With handle in full upright and locked position, tilt cleaner back on rear wheels and push forward.
STORAGE
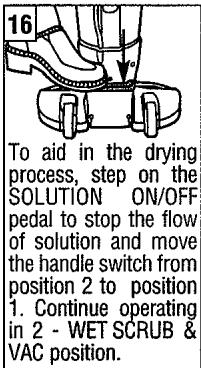
BEFORE STORING CLEANER: ensure that the NOZZLE SETTING pedal is in DRY VAC position. Run the cleaner for 30 seconds with the solution on/off pedal in the off position. Make sure that cleaning solution is not leaking from the unit.
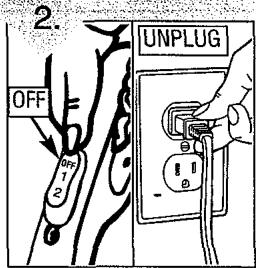
Move handle switch to OFF position and unplug from electrical outlet.
| ADDITIONAL NOTES | |
| MAKE SURE THAT NOTHING IS PRESSING ON THE NOZZLE SQUEEGEE. | |
| DO NOT STORE CLEANER ON A WOOD SURFACE. | |
BELT REMOVAL AND REPLACEMENT
This cleaner contains a permanent belt. If you experience problems with this unit, please call 1-800-321-1134 or visit or website at www.dirtdevil.com to locate the nearest Service Center.
TROUBLESHOOTING GUIDE
WARNING: TO REDUCE RISK OF PERSONAL INJURY - UNPLUG CLEANER BEFORE SERVICING
| PROBLEM | POSSIBLE REASON | POSSIBLE SOLUTION |
| Cleaner won't run | 1. Power cord not firmly plugged into outlet.2. Blown fuse or tripped breaker.3. Brush clogged.4. Needs service.5. Thermal Protector activated. | 1. Plug unit in firmly.2. Check fuse or breaker in home. Replace fuse/reset breaker.3. Remove debris from brushroll and push motor reset button4. Take to service center or call 1-800-321-1134.5. Unplug cleaner. Allow to cool for 30 minutes before use - Pg. 3. |
| Cleaner won't pick-up or low suction | 1. Clean/Dirty water tank not secured.2. Clean/Dirty water tank latch not secured properly.3. Dirty water tank is full.4. Dirty water passage clogged.5. Filter clogged or dirty. | 1. Secure tank - Pg. 8.2. Secure latch - Pg. 8.3. Empty dirty water tank - Pg. 8.4. Clean Dirty Water Tank - Pg. 8.5. Remove filter and clean - Pg. 9. |
| Water escaping from cleaner | 1. Dirty water tank is full.2. Dirty water tank not installed correctly.3. Solution On/Off pedal engaged. | 1. Empty Dirty water tank - Pg. 8.2. Insert Clean/Dirty Water Tank correctly - Pg. 9.3. Step on SOLUTION ON/OFF pedal to turn off solution dispense - Pg. 5 & 7. |
| Cleaner won't dispense solution | 1. Clean/Dirty water tank not installed properly.2. Clean water tank empty.3. Solution On/Off pedal not engaged. | 1. Install Clean/Dirty water tank - Pg. 7 & 8.2. Fill Clean Water Tank - Pg. 7.3. Step on SOLUTION ON/OFF pedal to turn on solution dispense - Pg. 9. |
| Brushroll not rotating | 1. Brushes clogged.2. Belt broken.3. Incorrect handle switch position. | 1. Unplug unit. Remove debris from brush-roll and push reset button on handle.2. Take to a service center or call 1-800-321-1134.3. Move handle switch to position 2 (vacuum on, brushes on) - Pg. 7. |
ANY OTHER SERVICING SHOULD BE DONE BY AN AUTHORIZED SERVICE REPRESENTATIVE
CUSTOMER SERVICE (1-800-321-1134)
In the event that further assistance is required, see your Yellow Pages for an authorized Royal® Dealer. Costs of any transportation to and from any place of repair are to be paid by the owner. The service parts used in this unit are easily replaced and readily available from an authorized Royal® Dealer or retailer. Always identify your cleaner by the model number and manufacturing code when requesting information or ordering replacement parts. (The model number appears on the bottom of the cleaner.)