ECO 3000T - Laptop MAXDATA - Free user manual and instructions
Find the device manual for free ECO 3000T MAXDATA in PDF.


User questions about ECO 3000T MAXDATA
0 question about this device. Answer the ones you know or ask your own.
Ask a new question about this device
Download the instructions for your Laptop in PDF format for free! Find your manual ECO 3000T - MAXDATA and take your electronic device back in hand. On this page are published all the documents necessary for the use of your device. ECO 3000T by MAXDATA.
USER MANUAL ECO 3000T MAXDATA
FAULT DIAGNOSIS AND TROUBLESHOOTING 72

NOTE
The company reserves the right to make unadvertised modifications to this document. Information contained in this document is intended solely for reference purposes and in no way constitutes a basis for asserting obligations on the part of the manufacturer or vendor. Neither the manufacturer nor the vendor accept liability for any errors or inaccuracies that this document may contain. Nor is liability accepted for damages or losses that arise from the incorrect application of this guide. No part of this document and the accompanying software may be copied, translated, or distributed without the prior permission of the dealer, manufacturer, or authors. Archive copies for private use are excepted from this rule. The use of this product's trademarks is subject to the conditions listed in the advanced service handbook on the device drivers and utilities CD-ROM. Brand or product names mentioned in this document may be names protected by copyright law or registered trademarks of other companies. These are mentioned only for identification purposes and have no recommendatory character in respect of the product or manufacturer.
© May 2002
Legal Notes
You can find additional legal notes and conditions in the advanced service handbook on the device drivers and utilities CD-ROM (Utility CD).
Acrobat and the Acrobat logo are trademarks of Adobe Systems Incorporated or its subsidiaries. In certain jurisdictions these trademarks may be registered.
Intel and Pentium are registered trademarks of Intel Corporation. MS-DOS, Windows, Windows 95, Windows 98, Windows Me, Windows 2000, Windows XP, and Windows NT are registered trademarks of Microsoft.
Application & References
This user guide offers an introduction and is intended to provide instructions for your first steps with your new computer. For more in-depth specialist information, please consult the advanced service handbook.
All references refer to the accompanying device drivers and utilities CD-ROM, which contains the advanced service handbook (in Adobe Acrobat format), drivers, and special utilities for your notebook. If you wish to use an operating system that is not mentioned in these documents, consult the README files on the CD-ROM for the relevant information. Please also consult your dealer to make sure that it is possible to run your chosen operating system on your notebook. The operating system is not contained on the device drivers and utilities CD-ROM.
Note: Some or all system configurations may have been made already. If this is not the case or if parts of the system need to be reconfigured, please consult the advanced service handbook on the device drivers and utilities CD-ROM for instructions on how to do this.
Declaration:
This device meets the EN 55022 product standard for interference emissions, the EN 50082-1 basic standard for interference, and the EN 60950 low voltage directive standard.
If any modification that has not been agreed with the manufacturer is made to the device, adherence to these standards can no longer be guaranteed.
To ensure electromagnetic compatibility (EMC), please observe the information given in the handbook.
Sound Power Level
The workplace-based sound power level is less than 55 dB A.
Federal Communications Commission (FCC) Note
This device has been tested and found to comply with the limits for a Class B digital device, pursuant to Part 15 of the FCC Rules.
Operator Note:
This device has been carefully RF suppressed and tested to avoid radio interference. However, please pay attention to the following concerning external data cables:
If it becomes necessary to replace a data cable specified by the manufacturer, then for correct radio interference suppression the operator must ensure that replacement cables match the original cable also as pertains to screening quality.
Use only screened cables and external devices that are identical with this product in safety level and EMC behavior.
In case of non-observance, compliance with the standards mentioned above is no longer guaranteed.
CD-ROM Drive:
The built-in CD-ROM drive is a Class 1 laser product. Do not open the device and do not look into the beam, not even with optical instruments.
Unless the drive is expressly designated for the simultaneous use of more than one CD, never insert more than one CD into the drive.

Returning the Device
We offer a return guarantee: We use materials that allow professional reprocessing or disposal. This means that your notebook is fully recyclable. The outside packaging and all inner parts of the box can be disposed of as waste paper.
IMPORTANT SAFETY INFORMATION
Although the notebook is highly robust, it is not indestructible. To prevent damage from occurring, please pay attention to the following:
- Avoid exposing the notebook to strong shocks or vibrations.
- Keep it away from intense heat (radiators, direct sunlight).
- Protect the notebook from electromagnetic interference.
This will also prevent data loss.
- Don't expose it to moisture. This is an electrical device!
- Be sure to use the correct power supply.

WARNING
Always use an approved power adapter.
The power adapter requires a fluctuation-free and uninterrupted power supply. If you have any questions, consult your local electricity supply company.
The power adapter must be fitted with a grounded (earthed) plug.
Never pull the cable to unplug the power supply – always pull the plug itself.
Disconnect the external power supply (power adapter or car adapter) before cleaning the computer.
Notes on Using Batteries
Only ever use batteries designed for use with this computer.
Recharge batteries via the notebook.
Do not attempt to repair faulty batteries yourself.

PLEASE NOTE
Entrust repairs to your dealer or qualified service personnel.
Keep damaged batteries away from children and dispose of them properly as soon as possible. Exercise caution in handling damaged batteries.
Batteries may explode if exposed to fire or improperly handled or disposed of.
The notebook is provided with a battery. The battery is recyclable. It is prohibited by law to dispose of the battery in ordinary household waste. If you have questions concerning proper disposal, consult your garbage collection service.
Note on system clock battery

WARNING
Caution: There is a risk of explosion if batteries are installed incorrectly. Replace the battery only with a battery recommended by the manufacturer or with a battery of the same type. Dispose of the battery according to the manufacturer's instructions.
Servicing
Do Not Service Your Computer Yourself! You could invalidate your warranty rights and expose yourself and the device to the risk of electrical shock. If servicing is required, consult qualified service personnel. Disconnect the computer from the power supply. If the following problems occur, consult qualified service personnel:


WARNING
- Power adapter or power cable is damaged or frayed.
- Liquid has entered the computer.
- Despite operating it correctly, the computer is not functioning properly.
- The computer has been dropped or damaged.
- Cleaning
Never apply cleaning agents directly to the computer. Use only a soft, lint-free cloth. Never use volatile (petroleum distillates) or scouring cleaning agents.
SHIPPING CONTENTS
Before you begin installing your notebook, make sure that all components are present.
If any item listed in the shipping contents is missing from your computer package, please contact your dealer immediately.
Notebook
- Battery
- Utility CD
- Power adapter
Power cable
- User guide
- CD or DVD-ROM drive (built in)
Modem cable
Please retain the original packaging in case you need to send the device in for repairs or upgrades.
PREPARATION
Before first using the computer, make sure you are familiar with the individual components of your system.
Slide the catch (1) to the right and open the display.
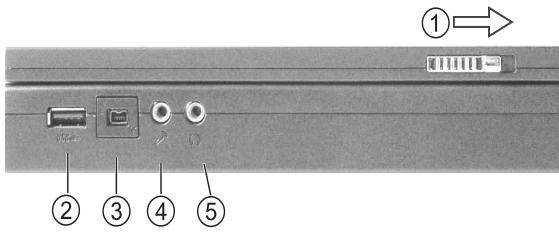
(1) Catch
(2) USB interface
(3) i.Link 1394 port
(4) Microphone input
(5) Loudspeake headphones
Fig. 1
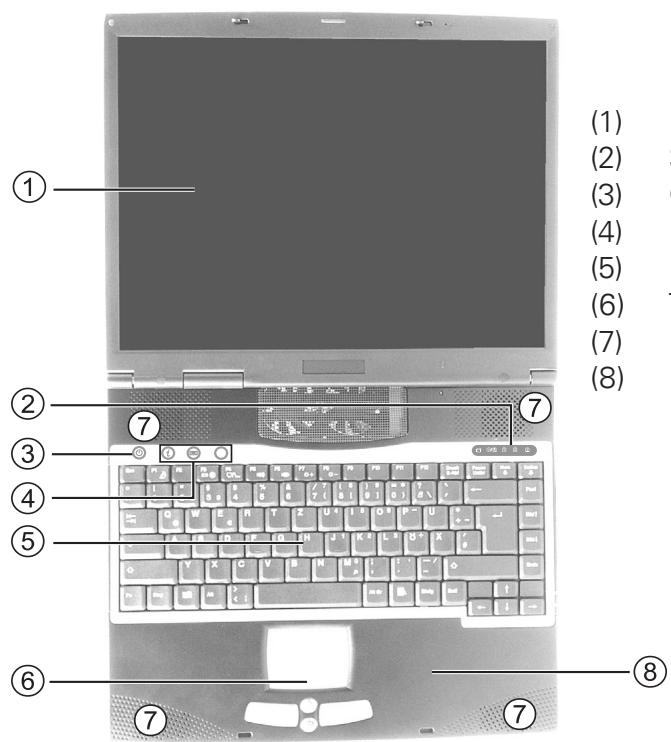
Fig. 2
(1) LCD display
(2) Status LEDs
(3) ON/OFF button
(4) Hot keys
(5) Keyboard
(6) TouchPad and buttons
(7) Loudspeaker input
(8) Hand rest
INSERTING THE BATTERY
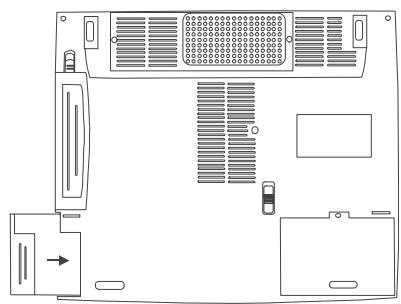
The battery is included in the notebook's shipping contents. This battery is only partially charged.
Take the new battery out of its packaging.
Now slide the battery into the battery slot in the direction of the arrow until it clicks into place.
The battery can now be charged up.

Fig. 3
PLEASE NOTE

Make sure that you allow the battery to charge for TWO hours if the computer is switched off, or for FIVE hours if the computer is switched on.
It is absolutely essential that the first time you charge the battery you fully charge it. Do not unplug the notebook from the power adapter until the battery is fully charged!
REMOVING THE BATTERY
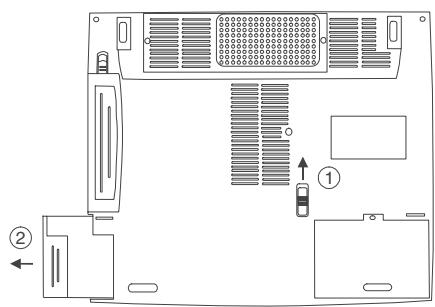
Fig. 4
Slide the catch (1) upwards. The battery is released.
Pull the battery out of the battery slot in the direction of the arrow (2).
You can now run the notebook with the power adapter alone.
POWER SUPPLY
You can choose to run the notebook via battery or power supply.
The first time you use the computer, you need to use the power adapter. Use only the supplied power adapter. Using the wrong power adapter can cause damage to the computer.

The power adapter contains no serviceable parts.
NEVER OPENTHE POWER ADAPTER!

DANGER OF DEATH!
The notebook is supplied with a power cable and a universal, self-adjusting power adapter. The power adapter can operate with any constant voltage between 100 and 240 volts.
To use the power adapter:
- Connect the power cable to the power adapter.
- Connect the power adapter to the DC IN socket on the computer.
- Connect the power cable to a power outlet.
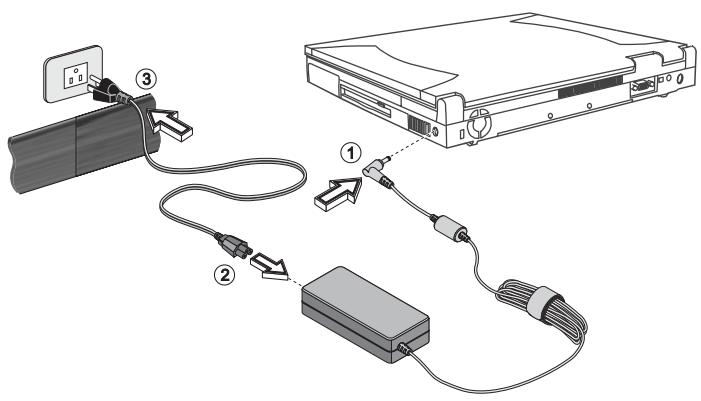
Fig. 5
SWITCHING THE COMPUTER ON
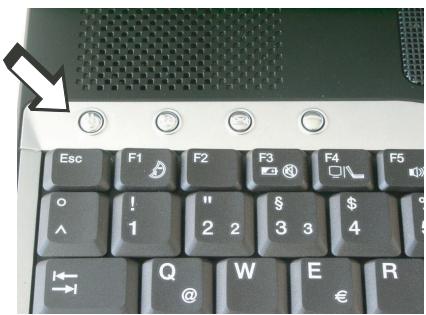
Fig. 6
You've completed the preparation. Now press and hold the on/off button for one second to switch on the notebook.
Once the computer is switched on, the on/off button can perform several functions depending on the energy settings.
In the standard settings, pressing it again will switch off the computer.
Note:
Please note that with the Windows operating systems you should always switch off the computer as follows: Click the Start button Select Shut Down Click OK
This avoids problems with the hard disk and operating system.
Tip:
If you experience a program or system crash, press the Ctrl + Alt + Del keys all at the same time. If you're lucky this will enable you to end only the task that has crashed and/or restart the computer
(warm start). If this does not work, hold down the on/off button for more than four seconds – this will switch off the computer. You can now start up the computer as normal (cold start).
The operating system is installed the first time you switch on the computer. Please follow the operating system's installation instructions here.
After installation and restarting, the computer is ready to use.
The basic graphics functions allow you to modify the resolution, color depth, and desktop appearance.
If you want to use the additional graphics functions such as TV Out, monitor port, multidisplay, etc., then you need to install the advanced VGA driver from the Utility CD.
You can find more detailed information on this from page 26 onwards in the installation instructions.
POWER MANAGEMENT
Your system is compatible with APM and the newer (and more efficient) ACPI energy saving system.
Note on PC Cards
Never unplug a PC card while the system is in save-to-disk mode. This would deactivate the slot and problems could occur with a modified system configuration the next time you start up the computer
HARDWARE (Battery Status &Warnings)
After completing the POST (power-on self-test), the battery status display shows the charge state of the battery. The symbol flashes when the battery charge is low. Save your data immediately and connect the power adapter.
Low charge level & SUSPEND
When the battery runs low (without the power adapter connected), one of these two protective functions is automatically activated:

PLEASE NOTE
Without Save-to-Disk
If there is no save-to-disk file or partition set up on your system, then current data will be stored in RAM and the system automatically switches into suspend mode.
With Save-to-Disk
Data is saved in the special file or partition on the hard disk reserved for this purpose. The computer then automatically switches off.
If there is no save-to-disk file or partition available, the system switches into suspend mode.
SYSTEM OVERVIEW
LEFT AND RIGHT SIDES
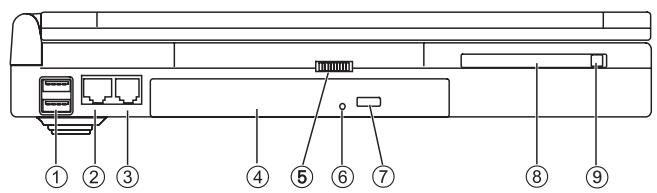
Fig. 7
(1) USB ports
(2) Network port
(3) Modem port
(4) CD or DVD-ROM drive *
(5) CD audio volume control
(6) Emergency opening mechanism *2
(7) CD eject button
(8) PC card slot
(9) PC card release catch
- depending on model
^*2 use a thin object (e.g. a straightened paperclip)
Only use if you need to open the CD-ROM drive without a power supply.
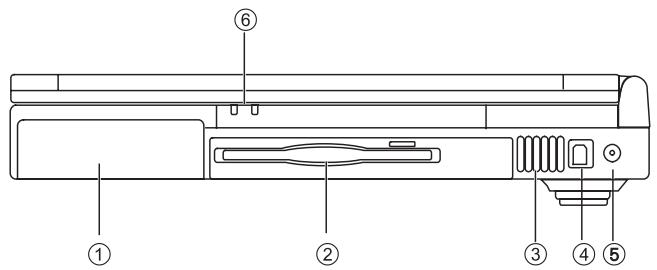
Fig. 8
(1) Battery
(2) Floppy disk drive with eject button
(3) Ventilation slots *
(4) S/PDIF (optical digital audio) output
(5) Power in socket
(6) Power and
- All air intake and ventilation openings must be kept free from obstructions at all times. If not, the device is liable to overheat.

PLEASE NOTE
REAR VIEW
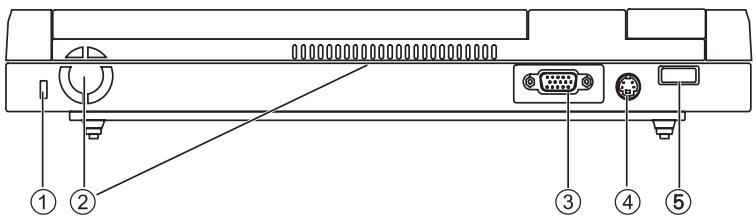
Fig. 9
(1) Kensington lock
(2) Ventilation slots *
(3) Connector for external monitor
(4) S-Video TV output
(5) Infrared interface
- All air intake and ventilation openings must be kept free from obstructions at all times. If not, the device is liable to overheat. PLEASE NOTE

UNDERSIDE
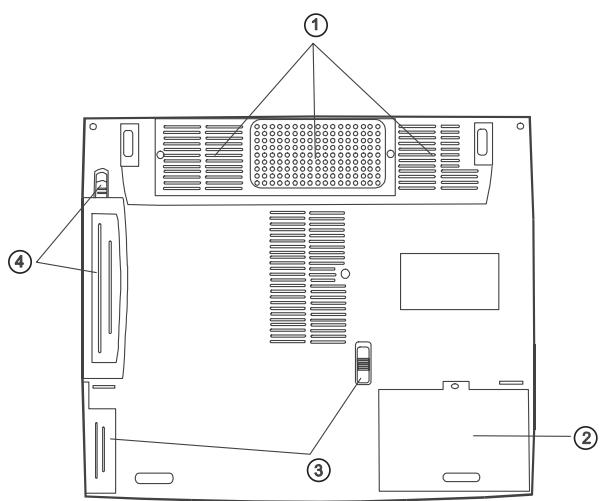
Fig. 10
(1) Ventilation slots *
(2) Hard disk slot
(3) Battery pack and release catch
(4) Removable disk drive with release catch The floppy disk drive can be removed after releasing the catch and replaced with an optionally available CDRW drive.
EXPLANATION OF LED DISPLAYS
Table 1
| Symbol | Meaning |
| Hard disk is being accessed. | |
| Floppy disk or CD-ROM drive is being accessed. | |
| Lights when Caps Lock is on. | |
| Lights when Num Lock is on. | |
| Lights when Scroll Lock is on. | |
| Flashing orange: battery charging Flashing green: battery charge is low | |
| Flashing green: the notebook is in suspend mode |
HOT KEYS
(Shortcut key combinations with special functions)
Table 2
| Symbol | Keys | Meaning |
| Fn +F1 | Starts the suspend mode | |
| Fn +F3 | Switches the battery warning on/off | |
| Fn +F4 | Switches between LCD / monitor / both | |
| Fn +F5 | Increases the volume | |
| Fn +F6 | Reduces the volume | |
| Fn +F7 | Increases LCD contrast | |
| Fn +F8 | Reduces LCD contrast | |
| Fn + Num Lock | Switches Num Lock off/on The numbers are printed in the upper right corner of each key. This facilitates numeric data entry. | |
| Scroll Lock | Switches Scroll Lock off/on |
THE QUICK LAUNCH KEYS

Fig. 11
There are three quick launch keys just above the keyboard. You can use these to launch frequently used applications.
(1) Starts the Internet browser
(2) This button launches the e-mail program
(3) User-customizable The driver for activating this function is provided on the Utility CD. The path is \Utility\QKey e.g.: D:\Utility\QKey\setup.exe
THE KEYBOARD
Typewriter -
Function keys -
Special keys -
Your notebook's keyboard has all the functions of a normal AT-compatible keyboard plus some extras: These keys correspond to a typewriter's keys.
In many operating systems (and applications), special functions are available via these keys. You can find more detailed information on this in the relevant handbooks.
These keys (and key combinations) are used for controlling various hardware functions.
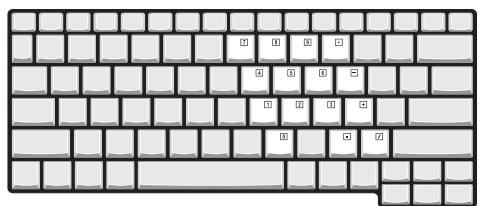
Fig. 12
Press Fn + Num Lock to activate this field

LED lights up
THE TOUCHPAD
The system automatically sets up the integrated TouchPad. Provided you are using Windows, you do not need to install any drivers for the basic functions.
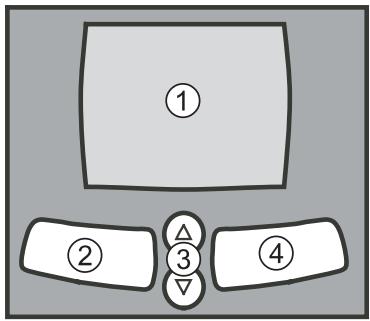
Fig. 13
(1) Sensor field
(2) Left "mouse" button
(3) Rocker keys - function like a mouse wheel
(4) Right "mouse" button
Note for left-handers: Most operating systems enable reversal of the mouse buttons.
THE FLOPPY DISK DRIVE
The computer comes with a built-in 1.44 MB 3.5" floppy disk drive. This drive is normally designated drive "A:"
To use a disk, insert it label-side upwards into the drive. The disk audibly locks into place. To eject the disk, press the eject button at the top right of the drive.
After releasing the catch, you can remove the floppy disk drive and replace it with an optionally available CDRW drive (see Fig. 10).
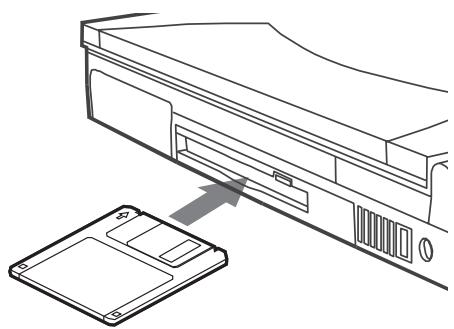
Fig. 14

PLEASE NOTE
Never eject a disk while the drive is accessing it. This can result in damage to the disk drive and data loss!
THE CD-ROM/DVD DRIVE
To insert a CD, press the eject button on the front side of the drive.
Place a CD onto the spindle with the label side facing up and push it gently down onto the spindle.
Push the CD tray back in until it locks into place. The CD is now ready to read.
Some CDs have an autostart function.
This means that installation programs or music CDs automatically run after you place them in the drive.
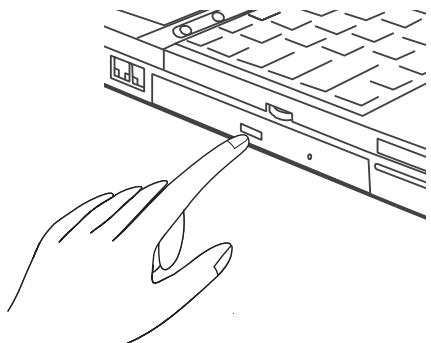
Fig. 15
THE PC CARD SLOT
The computer is provided with a PC card slot. This is a PCMCIA 3.3 V/5 V/12 V slot, Type II or I.
To insert a PC card, push it into the slot until it locks into place.
To remove it, push the eject button next to the slot.
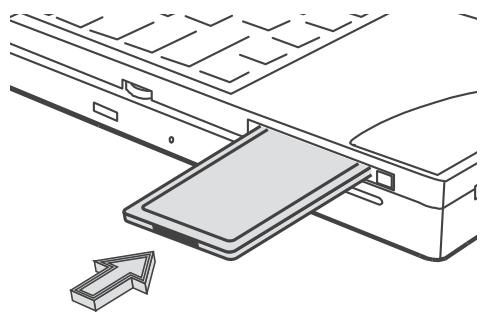
Fig. 16
THE DATA/FAX MODEM
The system automatically sets up the integrated analog modem. To use the modem functions, connect the modem socket to an analog telephone socket (not ISDN) using the telephone cable.
Proper Use:
The modem can be connected to all analog sockets (TBR 21) in Europe.
It is to be used solely for data communication purposes.

PLEASE NOTE
Do not attempt to connect the modem to an ISDN telephone socket!
This would result in serious damage to the device.
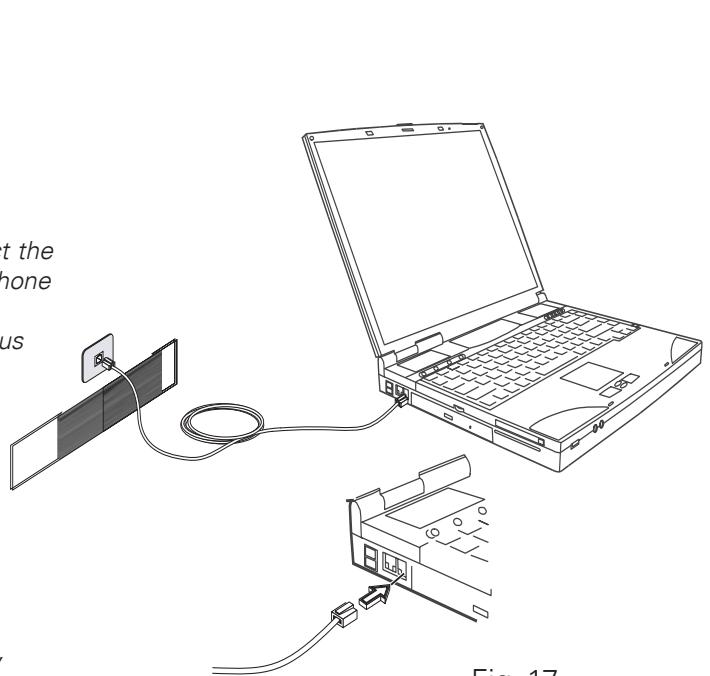
Fig. 17
If you use Windows 2000, please check the regional settings (the location). You can find more information on this in the Software section.
INSTALLATION ADVICE
RESTORING THE DRIVERS
Your system is supplied in a preloaded condition. This means that all the data and drivers that the system requires are already on the hard disk. In case you erase and/or format your hard disk drive, the system drivers are stored on the Utility CD supplied with the computer. After reinstalling the operating system (for example, with the Recovery CD), this allows you to restore your notebook to a usable condition.
WINDOWS XP
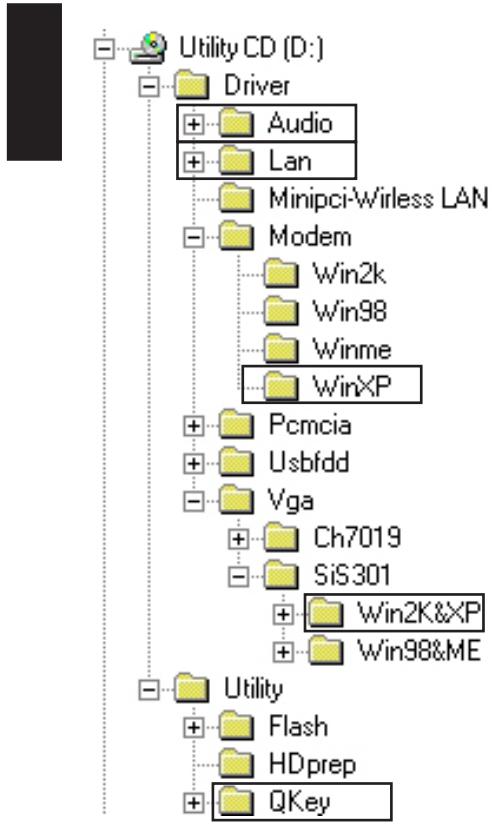
Run the "setup.exe" file in each of the directories indicated.
In principle, it doesn't matter what order the installation follows.
However, we recommend you install the graphics drivers (VGA) first of all. This will improve the appearance of the desktop environment.
SETTING THE RESOLUTION
After installing the graphics drivers, set the resolution to 1024 × 768 pixels.
You do this in the following way:
Right-click on any free area of the desktop
Select
In the Display Properties window, click the Settings tab.
Here you can set the slider to 1024 × 768 .
Click
FAST INFRARED SETTING
Your infrared interface has to be optimized manually. Please click in the following order:
Here, set the "Property: Infrared transceiver A" to the setting: "HP HSDL-2300/3600". Click
You can now close the device manager.
WINDOWS 2000
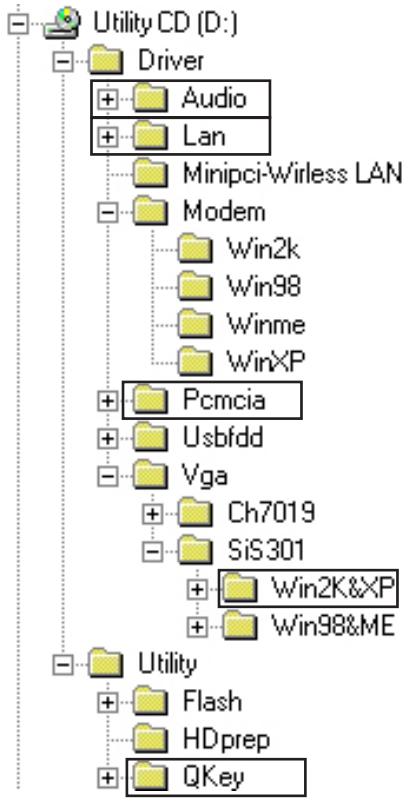
Run the "setup.exe" file in each of the directories indicated. In the PCMCIA directory, the file to run is called "O2update.exe". In principle, it doesn't matter what order the installation follows. However, we recommend you install the graphics drivers (VGA) first of all. This will improve the appearance of the desktop environment.
SETTING THE RESOLUTION
After installing the graphics drivers, set the resolution to 1024 × 768 pixels.
You do this in the following way:
Right-click on any free area of the desktop
Select
In the Display Properties window, click the Settings tab.
Here you can set the slider to 1024 × 768 .
Click
MODEM INSTALLATION
The drivers for your modem have to be installed manually. Please click in the following order:
This will start the device driver update assistant.
Select:
You can now close the device manager and the control panel.
REGIONAL SETTINGS
Depending on the version of the Windows 2000^TM driver for the modem, the basic settings for the location may be set to "United States of America".
To check/modify this, do the following:
Click with the left mouse button, in this order, on:
You can set the telephone and modem options here.
On the Dialing Rules tab, select New Location and click
Enter a location name (optional; for example, home, office, or similar), then under Country/Region select the country you are in and type in your local area code.
Click
Click < OK> to leave this menu.
You can now close the control panel.
WINDOWS 98

Run the "setup.exe" file in each of the directories indicated. In the PCMCIA directory, the file to run is called "O2update.exe". In principle, it doesn't matter what order the installation follows. However, we recommend you install the graphics drivers (VGA) first of all. This will improve the appearance of the desktop environment.
SETTING THE RESOLUTION
After installing the graphics drivers, set the resolution to 1024 × 768 pixels.
You do this in the following way:
Right-click on any free area of the desktop
Select
In the Display Properties window, click the Settings tab.
Here you can set the slider to 1024 × 768 .
Click
MODEM INSTALLATION
The drivers for your modem have to be installed manually. Please click in the following order:
This will start the device driver update assistant.
Select:
You can now close the device manager and the control panel.
FAST INFRARED SETTING
Your infrared interface has to be optimized manually. Please click in the following order:
Here, click "IrDA V3.0 Fast Infrared Port", then click
Here, set "Property: Infrared transceiver A" to the setting: "HP HSDL
2300". Click
You can now close the device manager.
To activate the new settings you need to restart your computer.
SPECIFICATIONS
Processor and Core Logic
Intel Pentium 4 processor, FCPGA2 - 478 package
20 KB L1 cache on die (12 KB for core instruction, 8 KB for data)
L2 cache on die cache (depending on CPU)
128 KB with Celeron CPU
256 KB with Willamete CPU
512 KB with Northwood CPU
SiS chipset with integrated graphics, audio and modem controller
400 MHz frontside bus, PCI / AGP
RAM
266 MHz DDR RAM, 2.5 V PC2100
Memory Expansion
Two 200-pin SO-DIMM slots for 128 MB or 256 MB
SDRAM modules in any combination up to 512 MB.
Display and Video
14.1 inch XGA active matrix TFT display or 15.0 inch XGA active matrix (TFT) display. Supported resolution 1024 × 768 with up to 16 million colors
SiS 650 with integrated AGP bus 2D/3D graphics accelerator
- UltraAGP Architecture Graphics Capability (similar to 4 x AGP). 3D graphics supported
Supports direct DVD MPEG-2 playback
Supports video compression and IDCT for DVD playback
Simultaneous LCD/external monitor
- Independent LCD and external monitor display
- UMA architecture with 16/32/64 MB RAM sharable as display memory
Fully DirectX compatible graphics engine
VESA DDC1, DDC2B & DDC 3.0
Storage Capacity
2.5 inch hard disk (height 9.5 mm) removable drive with 10 GB and more capacity
3.5 inch floppy disk drive exchange module for 720 KB and 1.44 MB
Audio
SiS 650 audio chipset with integrated audio controller
64-voice polyphony wavetable synthesizer
- DirectSound 3D accelerator for IID, IAD and Doppler effects Full-duplex independent sample rate converter
SoundBlaster Pro/16 compatible
AC'97 V2.1 interface supported
Full-duplex and independent sample rate converter for audio recording and playback
Modem
- Chipset Smart Link 56K Modem
- Transfer speed V.90/K56flex for downloading data at up to 56,000 bps
V.34, V.17, V.29 transmission protocol
LAN
SiS 900 PCI network adapter
- Fast Ethernet for 10Base-T and 100Base-TX network standards
- PnP functions, Windows 95/98 Plug and Play compatible
Automatic queue and auto-negotiation for flow control
- Auto-negotiation and parallel detection for automatic speed selection (IEEE 802.3u)
High performance 32-bit PCI bus master architecture with integrated DMA controller for low CPU and bus usage
Supports external device connection while running (subject to operating system)
Additional Hardware
5.25 inch CD-ROM (height 12.7 mm) fixed module with 24x speed
5.25 inch DVD-ROM (height 12.7 mm) fixed module (optional)
DVD/CDRW 5.25 inch combo drive (height 12.7mm ) fixed module (optional)
88-key keyboard, touch-type QWERTY keyboard with imbedded numeric keypad
- TouchPad pointer device with 4 buttons.
PC Card
O2Micro OZ 6912 PCMCIA controller
- Single slot for TYPE II cards with card bus 1.0 interface; supports hot swap; enables peripheral device connection for multimedia communication
Ports
VGA port 15-pin CRT connector
One stereo output socket and one microphone input socket
Infrared port
Three USB ports
One standard telephone socket (RJ-11)
One standard network port (RJ-45)
One DC IN socket
One S-Video port
One IEEE1394 i.Link port
Power Supply
- Main battery Li-Ion 12 cell, 11.1 V, 7800 mAh
100-240 V AC adapter, 50-60 Hz, 90 W - Recharge, system OFF: 3-4 hours (100%)
System ON: 8-10 hours (100%)
Battery power low warning - Suspend/restore capability
BIOS
AMI PnP function PnP BIOS
Self test, power-on self-test
DRAM autodetection, automatic size adjustment
L2 cache autodetection
Hard disk type autodetection
Energy management
- APM 1.2 (Advanced Power Management) & ACPI 1.0 (Advanced Configuration Power Interface)
- Two-level password protection
32-bit access, Ultra DMA5 mode support
Multiboot capability
Operating System
O/S Microsoft Windows 98/2000/XP
Other Data
Dimensions 278 (D) x 325 (W) x 44 (H) mm
Weight 3.8 ~kg (with CD-ROM and floppy disk drive)
- Operating temperature: 5 to 35^ C (41 to 95^ F )
- Operating humidity: 20 to 90% RH (5 to 35^ )
Storage temperature: -20 to 50^ (-4 to 122^ )
FAULT DIAGNOSIS AND TROUBLESHOOTING
If a problem occurs while working with your computer, first of all try using the following information to solve the problem. If the problem cannot be solved in this way, you can find additional information in the advanced service handbook (on the device drivers and utilities CD-ROM). If the problem persists, switch off the system for several minutes and then restart it. You will lose all unsaved data, but the system may work properly again. Subsequently contact your dealer or customer support agent.
Although I'm pressing the power switch the computer stays switched off
Possible cause of the problem: The battery is missing or is incorrectly installed
Note: The power on LED is not lit.
Troubleshooting:
o Make sure that the battery is in the battery compartment and is inserted properly.
Check that the battery terminals are making direct contact.
o Connect your notebook to the power adapter so that the battery (if present) can recharge.
Possible cause of the problem: battery level low
Note: The battery display LED flashes.
Troubleshooting:
Operate the computer using the power adapter. If the system does not immediately start up, switch off the computer and then restart it.
The screen is not working
Possible cause of the problem: The energy saving mode is activated.
Note: The suspend LED flashes.
Troubleshooting:
o Press the on/off button for approx. 1 second.
Possible cause of the problem: The screen settings are incorrect.
Troubleshooting:
o Press the Fn + F4 key combination, several times if necessary.
If an external monitor is connected, switch it on.
Possible cause of the problem: In the system settings, a different screen type to the existing one is set.
Troubleshooting:
o Press the Fn + F4 key combination.
If an external monitor is connected, connect this to a power source and switch it on. Also check the brightness and contrast settings (you can find additional information on this topic in the advanced service handbook).
The system stops working.
Possible cause of the problem: An energy saving function has been activated.
Note: The screen switches itself off.
Troubleshooting:
Press any key, or press the on/off button if none of the status LEDs are lit.
Possible cause of the problem: A software error has caused a system crash.
Troubleshooting:
The operating system handbook will provided further information.
If you cannot remedy the problem, then restart the system. You will lose any unsaved data! If this doesn't work either, briefly switch off the computer and then switch it back on again.
Warnings
Each time the system starts, it carries out a self-test (POST). If an error occurs, an error message appears, briefly describing the problem.
You can find information on what to do next in the advanced service handbook.