
XZZ6L - Electronic lock XENA - Free user manual and instructions
Find the device manual for free XZZ6L XENA in PDF.
Download the instructions for your Electronic lock in PDF format for free! Find your manual XZZ6L - XENA and take your electronic device back in hand. On this page are published all the documents necessary for the use of your device. XZZ6L by XENA.
USER MANUAL XZZ6L XENA
Replacement batteries and XENA accessories, please
visit: www.xenasecurity.com
Don't forget to register your XENA lock at
www.xenasecurity.com
Disclaimer:
XENA SECURITY ASSUMES NO RESPONSIBILITY OR LIABILITY FOR DAMAGES OR INJURIES RESULTING FROM THE USE OR MISUSE OF OUR PRODUCTS.
注意!ごらの製品は正規品はありませ人。
XENA XZZ6L series disc-lock alarm
Thank you for choosing a XENA Security product. By purchasing the world's strongest, smartest portable lock (with alarm inside), you've made life very difficult for a would-be thief. Please read these instructions carefully. If you have any questions or comments, don't hesitate to email us at info@xensecurity.com. For more information about this and other XENA products, accessories and product news, visit www.xensecurity.com.

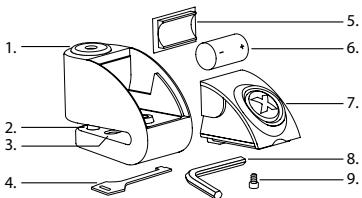
Parts of XZZ6L series alarmed disc-lock
-
Lock barrel
-
Flat coded key
-
Alarm module
-
Locking pin
-
Battery cover
-
Allen Key
-
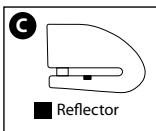
Reflector
-
Battery
-
Screw
Fitting XENA to your motorcycle's brake disc
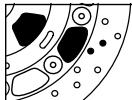

Area for locking pin
- Requires brake-disc thickness less than 7mm (1 / 4^ )
2.Locking-pin size:6mm (1 / 4^n) - Distance from locking-pin to back of disc-slot*: 42mm (15/8")
*Note that the locking pin can pass through ANY hole on the brake disc (see dark areas on diagram).
The locking system
- Insert the key in the lock and rotate clockwise. The lock barrel will spring open.
- Slide the unit on to your motorcycle's front or rear brake disc.
- Locate a hole in the brake disc that will allow the locking pin to pass through.
- Push the lock barrel down to insert the locking pin.
For more information on fitting XENA locks to your bike, go to www.xenasecurity.com/fags.
Your new XENA lock is shipped with the battery uninstalled. Please insert the CR2 battery supplied.
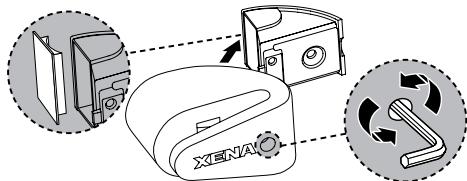
Battery installation (See fig.B)
- Using Allen key provided (8), undo screw (8) located underneath lock.
- Remove module and battery cover.
- Insert CR2 3v Lithium Battery (IMPORTANT: ensure that + and - line up properly).
- Replace battery cover and insert module back into lock body immediately
- Dispose of used battery promptly.
Warning: When the alarm module is separated from the lock body the alarm will activate. To avoid this please insert the module into the lock body immediately after inserting the battery
Battery life
- Under normal use, batteries should last at least 8 months. Frequent triggering or extreme temperatures can adversely affect battery life.
The alarm system
- There is no on-off switch. The unit automatically senses the presence of your brake disc. (IMPORTANT: Ensure that reflector is covered by brake-disc).
- Your XENA alarmed disc-lock is self-arming. The alarm sensors will become active 5 seconds after being locked on your brake-disc. The alarm will beep once to confirm that it is armed.
To remove module
*For more product details, please check with your local XENA dealer or visit www xenasecurity.com
- 10 seconds after the arming beep, shock & motion sensors work independently to determine if your bike is being tampered with.
Warning: Extremely loud alarm, avoid close proximity with ears.
Keys
- Each lock comes with three keys and a flat coded key with serial number (ie, X123456). Use this identification number to order keys for your lock. Make a note of serial number and keep it in a safe place. It is recommended to register your lock at www.xenasecurity.com
Caring for your lock
- Use a dry cloth to keep the LED reflector plate inside the disc-slot clean and free of dirt, dust, grease and grime. An obstructed reflector plate can adversely affect performance and may cause the lock to arm when not on the brake disc.
It is recommended to add a lock lubricant to the lock barrel every six months.
If alarm module becomes damaged
- The alarm module can be replaced with a new unit from your local authorised XENA dealer or email: info@xenasecurity.com
- Note: the lock will continue to function as an effective anti-theft device, with or without the alarm system.
Taking your XENA with you
- Ideally, carry your XENA underneath the seat of your bike.
- CAUTION: Do not carry your XENA in or attach it to your clothing, as this can cause serious personal injury in the event of an accident.
Troubleshooting
Alarm not arming: Check battery, Ensure the reflector (fig C) is obstructed by motorcycle disc, confirm sensors are active (see below).
Lock making constant clicking or beeping sound: replace batteries.
Alarm too sensitive: Place at 6 o'clock on disk.
Alarm not sensitive enough: Place at 12 o'clock to 3 o'clock on disc.
Alarm doesn't disarm: Clean sensor and reflector.
Important: How to "wake up" your XENA disc-lock alarm
- To avoid draining the battery when not in use, your XENA disc-lock alarm has a standby mode.
- Usually, the metal-on-metal contact from simply locking the lock onto your brake-disc is sufficient and the unit will arm normally.
- Sometimes it may be necessary to wake up the arming sensor by firmly locking and unlocking the key barrel once or twice.
How you'll know your XENA disc-lock alarm is Armed
- Once locked in place, the alarm will sound its arming beep approximately 5 seconds after "locked".
- 10 seconds after you hear the arming beep, the shock and motion sensors are active.
*For more detailed troubleshooting visit www xenasecurity.com
Bloque disques alarme XENA XZZ6L series
Area for locking pin