
ZONEPLAYER 120 - Wireless audio amplifier SONOS - Free user manual and instructions
Find the device manual for free ZONEPLAYER 120 SONOS in PDF.
| Product type | Multi-room wireless audio amplifier |
| Brand | Sonos |
| Model | ZonePlayer 120 |
| Dimensions (approx.) | Width: 30 cm, Height: 10 cm, Depth: 25 cm |
| Weight (approx.) | 3.5 kg |
| Power supply | AC mains 115/230 V (manual selection), 50/60 Hz |
| Main functions | Integrated amplifier, wireless multi-room streaming, analog audio input (RCA), subwoofer output, two Ethernet ports, compressed/uncompressed audio encoding |
| Output power | 75 W at 8 ohms, 150 W at 4 ohms per channel |
| Connectivity | SonosNet Wi-Fi, Ethernet 10/100 (2 ports), analog audio input (RCA), subwoofer output (RCA) |
| Supported audio formats | MP3, AAC, WMA, FLAC, Apple Lossless, WAV, AIFF (via network) |
| Care and cleaning | Clean with a dry, soft cloth. Do not use solvents or household cleaners. |
| Safety instructions | Do not expose to water, do not block ventilation openings, unplug during storms, have repairs carried out by an approved service center. |
| Spare parts and repairability | Repair exclusively by an authorized Sonos repair center. Contact customer service to find a nearby center. |
| Operating environment | Indoor, room temperature, avoid heat sources and humidity |
| Package contents | ZonePlayer 120, Ethernet cable, power cord, installation CD-ROM, installation guide |
| Regulatory information | Indoor use: band 2.454-2.4835 GHz (France). CE, FCC certifications. |
Frequently Asked Questions - ZONEPLAYER 120 SONOS
User questions about ZONEPLAYER 120 SONOS
0 question about this device. Answer the ones you know or ask your own.
Ask a new question about this device
Download the instructions for your Wireless audio amplifier in PDF format for free! Find your manual ZONEPLAYER 120 - SONOS and take your electronic device back in hand. On this page are published all the documents necessary for the use of your device. ZONEPLAYER 120 by SONOS.
USER MANUAL ZONEPLAYER 120 SONOS
Sonos® Multi-room Music System
ZonePlayer™ 120
Setup Guide • Installatiehandleiding • Installationshandbok • Guide d'Installation Guida all'instrumentation • Installationshandbuch • Guía de configuración
Sonos® ZonePlayer™ 120 Setup Guide. For use with the Sonos Multi-room Music System.
THIS DOCUMENT CONTAINS INFORMATION THAT IS SUBJECT TO CHANGE WITHOUT NOTICE.
No part of this publication may be reproduced or transmitted in any form or by any means, electronic or mechanical, including but not limited to photocopying, recording, information retrieval systems, or computer network without the written permission of Sonos, Inc.
Sonos® is a registered trademark of Sonos, Inc. in the United States, Canada, and Australia, and a trademark of Sonos, Inc. in other countries. Sonosnet™, ZonePlayer™, ZoneBridge™, and all Sonos logos are trademarks of Sonos, Inc. in the United States and/or other countries.
Macintosh and Mac OS are trademarks of Apple Computer, Inc., registered in the U.S. and other countries. Windows Vista™ and Windows XP are either registered trademarks or trademarks of Microsoft Corporation in the United States and/or other countries.
This product includes technology owned by Microsoft Corporation and under a license from Microsoft Licensing, GP. Use or distribution of such technology outside of this product is prohibited without a license from Microsoft Corporation and/or Microsoft Licensing, GP as applicable.
MPEG Layer-3 audio decoding technology licensed from Fraunhofer IIS and Thomson.
Sonos uses MSNTP software, which was developed by N.M. Maclaren at the University of Cambridge.
Copyright, N.M. Maclaren, 1996, 1997, 2000; © Copyright, University of Cambridge, 1996, 1997, 2000.
All other products and services mentioned may be trademarks or service marks of their respective owners.
© 2004-2008 by Sonos, Inc. All rights reserved.

For the latest product documentation, including the Sonos Multi-room Music System User Guide, go to www.sonos.com/support and click Documents.
ZonePlayer 120 Setup Guide
Version: 080501
Sonos® ZonePlayer 120
Setup Guide. 1
Installationshandbuch 19
Regulation Information
Europe
Sonos declares that this product complies with the requirements and other relevant provisions of the R&TTE Directive (1999/5/EC). A copy of the full Declaration of Conformance may be obtained at
http://eu.sonos.com.
This equipment has been tested and found to comply with the limits for a Class B digital device, pursuant to part 15 of the FCC Rules. These limits are designed to provide reasonable protection against harmful interference in a residential installation. This equipment generates, uses and can radiate radio frequency energy and, if not installed and used in accordance with the instructions, may cause harmful interference to radio communications. However, there is no guarantee that interference will not occur in a particular installation. If this equipment does cause harmful interference to radio or television reception, which can be determined by turning the equipment off and on, the user is encouraged to try to correct the interference by one or more of the following measures:
Reorient or relocate the receiving antenna.
- Increase the separation between the equipment and receiver.
- Connect the equipment into an outlet on a circuit different from that to which the receiver is connected.
- Consult the dealer or an experienced audio technician for help. Modifications not expressly approved by the manufacturer may void the user's authority to operate the equipment under FCC rules.
Canada
This Class B digital apparatus complies with Canadian ICES-003 and RSS-210. Operation is subject to the following two conditions: (1) this device may not cause interference, and (2) this device must accept any interference, including interference that may cause undesired operation of the device.
Industry Canada
The installer of this radio equipment must ensure that the antenna is located or pointed such that it does not emit RF field in excess of Health Canada limits for the general population; consult Safety Code 6, obtainable from Health Canada's Web site www.hc- sc.gc.ca/rpb.
RF Exposure Requirements
To comply with FCC and EU exposure essential requirements, a minimum separation distance of 20cm (8 inches) is required between the equipment and the body of the user or nearby persons.
Recycling Information
This symbol on the product or on its packaging indicates that this product shall not be treated as household waste. Instead please deliver it to the applicable collection point for the recycling of electrical and electronic equipment. By recycling this product correctly, you will help conserve natural resources and prevent potential negative environmental consequences. For more detailed information about recycling of this product, please contact your local city office, your household waste disposal service or the shop where you purchased the product.
Setup Guide
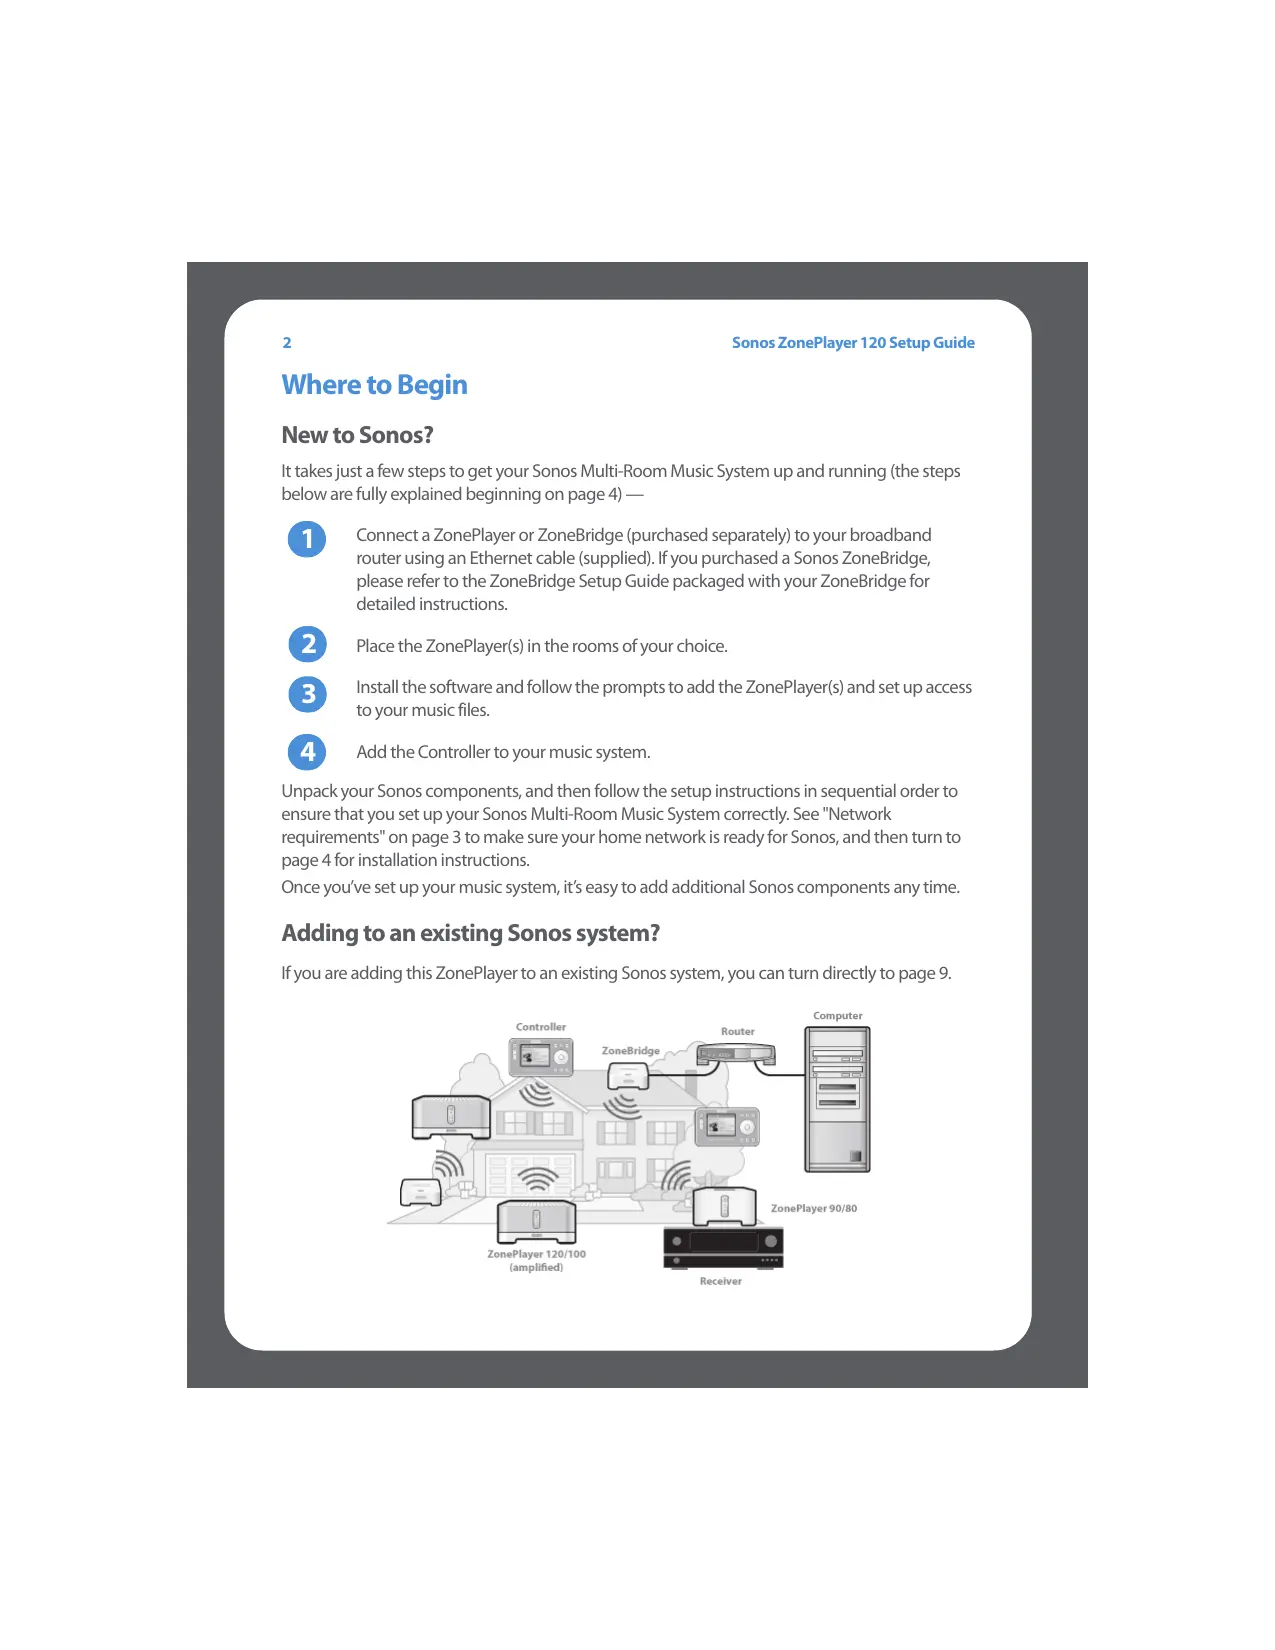
Where to Begin
New to Sonos?
It takes just a few steps to get your Sonos Multi-Room Music System up and running (the steps below are fully explained beginning on page 4) —

Connect a ZonePlayer or ZoneBridge (purchased separately) to your broadband router using an Ethernet cable (supplied). If you purchased a Sonos ZoneBridge, please refer to the ZoneBridge Setup Guide packaged with your ZoneBridge for detailed instructions.

Place the ZonePlayer(s) in the rooms of your choice.

Install the software and follow the prompts to add the ZonePlayer(s) and set up access to your music files.

Add the Controller to your music system.
Unpack your Sonos components, and then follow the setup instructions in sequential order to ensure that you set up your Sonos Multi-Room Music System correctly. See "Network requirements" on page 3 to make sure your home network is ready for Sonos, and then turn to page 4 for installation instructions.
Once you've set up your music system, it's easy to add additional Sonos components any time.
Adding to an existing Sonos system?
If you are adding this ZonePlayer to an existing Sonos system, you can turn directly to page 9.
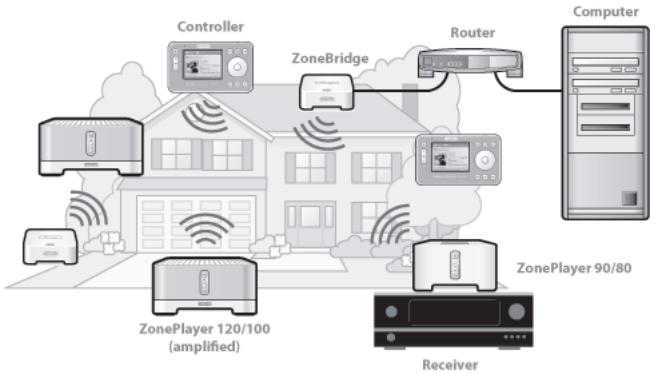
About the ZonePlayer 120
- The ZonePlayer 120 has a high-performance, built-in amplifier that can power large or small speakers, allowing you to enjoy superior audio quality in every room.
- The ZonePlayer 120 has a multi-port Ethernet switch to enable multiple direct connections to routers, computers, or other ZonePlayers.
- The ZonePlayer 120 has analog audio inputs with digital encoding so that music from an external audio source (such as a CD player or portable MP3 player) can be connected to one ZonePlayer, and played by all the other ZonePlayers in the system.
Your Computer Network

Note: Your network must have a high-speed Internet connection, as the Sonos Multi-Room Music System is designed to provide you with online software updates. Your Sonos system must be registered in order to receive updates, so be sure to register during the setup process. We do not share your e-mail address with other companies.
To play the digital music files stored on your computer, your computer network must meet the following requirements:
Network requirements
- DSL/cable modem, or LAN-based, high-speed Internet connection.
- If you currently have a cable or DSL modem connected directly to your computer, you should install a router between your modem and your computer to enhance your computer's security, and to share the Internet connection with the Sonos Multi-Room Music System and other devices. If you do not have a router, you should purchase and install one before proceeding.
Compatible operating systems
- Windows Vista™
- Windows® XP, including Windows® XP Media Center
Macintosh OS X
Please visit our Web site at http://faq.sonos.com/specs for the latest system requirements.
Setting Up New Sonos System

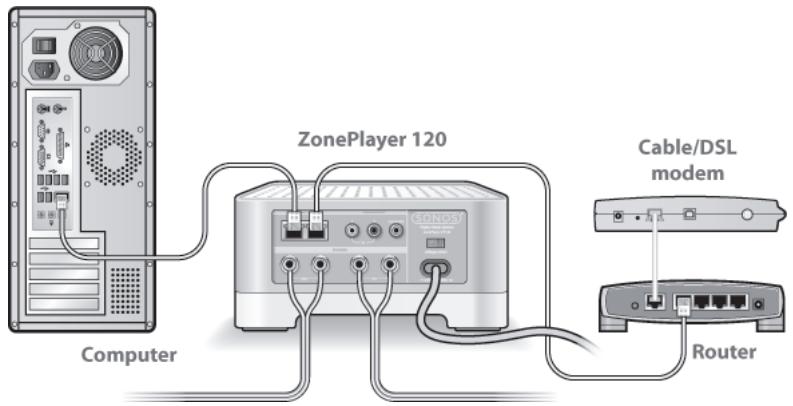
Connect to your broadband router

Note: One Sonos component must connect to your broadband router using a standard Ethernet cable (supplied). Follow the steps below to connect a ZonePlayer 120. If you plan to connect to an external amplifier or to powered speakers, you can connect a ZonePlayer 90 or 80 instead (purchased separately). If you do not wish to play music in this room, you can connect a Sonos ZoneBridge (purchased separately.)
Connect an Ethernet cable (supplied) from any of the Ethernet switch connectors on the back of your ZonePlayer (or ZoneBridge if purchased separately) to an open port on your router.
- Do not connect the ZonePlayer directly to your cable or DSL modem unless your modem has a built-in router.
- If you don't have a router, go to http://faq.sonos.com/norouter for instructions.
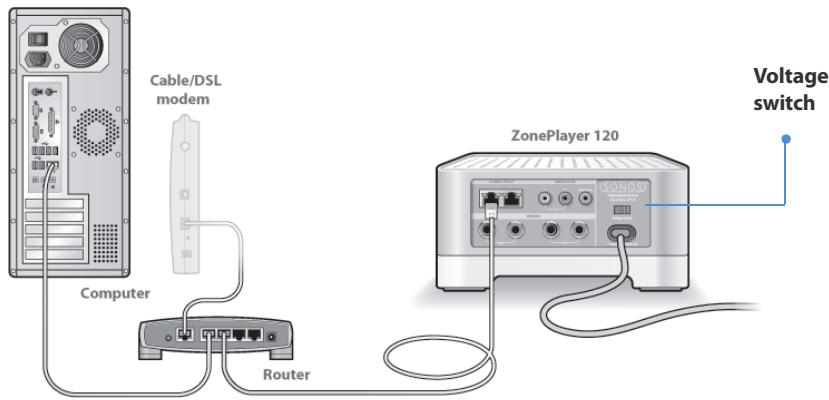
Make sure the voltage switch is set to the proper position for your household before applying power to the ZonePlayer 120.

Place ZonePlayer in the room of your choice

Note: Be sure to connect the red (+) and black (-) terminals from each speaker to the corresponding terminals on the ZonePlayer. Mismatching of polarities will result in weak central sound, and a distorted sense of sound direction.
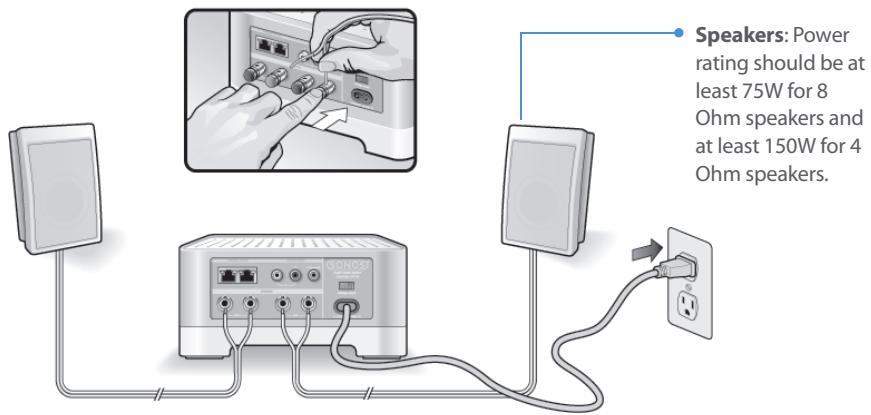
- If you are using speaker wire, use your finger to firmly push the spring-loaded speaker posts inward to reveal the connection hole. Insert the stripped end of the speaker wire into the hole, then release. Repeat for the other speaker connections.
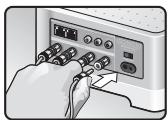
- If your speakers have banana connectors, you can insert the plugs directly into the banana jacks on the back of the ZonePlayer (available in North America only). Repeat for the other speaker connections.

Caution: Make sure the voltage switch is set to the proper position for your household before plugging in your ZonePlayer 120.
- Attach the power cable and plug in your ZonePlayer.

Install the software
Insert the Sonos System Setup CD-ROM, and follow the prompts to connect your ZonePlayer(s) and set up access to your music files. (If you purchased multiple Sonos components, you may have more than one System Setup CD-ROM—use the one that accompanied your ZonePlayer and you can put the others away.)

Note: During the setup process, you will be prompted to check for software updates. Select Yes to ensure that you set up your music system using the latest software release. (If you add additional Sonos components, you may be prompted to update your music system again during the setup process.)
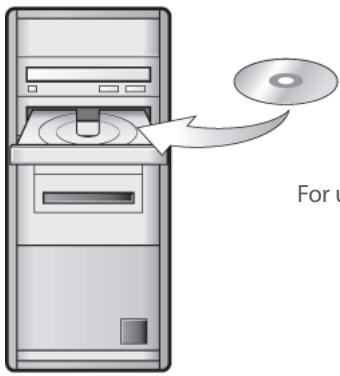
For use with:
Windows Vista
- Windows XP, including Windows XP Media Center
Mac OS X
- If you don't use Windows® or Macintosh OS X® operating systems, you can put the Sonos System Setup CD away in a safe place and use the Sonos Controller to set up your music system. Simply plug in the power adapter (see page 7) and follow the Controller's on-screen prompts. For additional information, please go to http://faq.sonos.com/nodcr.
- If you have music stored on a computer or Network-Attached Storage (NAS) device, the Sonos Multi-Room Music System will recognize most standard shared folders. For additional information on shared folders, please visit our Web site at http://faq.sonos.com/sharing.

Note: Firewall software such as Norton Internet Security™, McAfee® Personal Firewall, Windows Firewall, or Mac OS X Firewall, can block the operation of your Sonos Desktop Controller software. During installation, you may see prompts from your firewall software indicating that the Sonos application is attempting to perform certain operations. You should always allow full access to the Sonos application. You may also need to change the settings of your firewall software to ensure that Windows file sharing is not blocked. Please go to our Web site at http://faq.sonos.com/firewall for detailed instructions.

Add the Sonos Controller
- After at least one ZonePlayer has been set up, you can pick up your Controller and follow the prompts on the Controller's screen to add it to your music system.
- You should charge your Sonos Controller when you remove it from the packaging. The Controller battery will be fully charged in about two (2) hours. You can use your Controller while it is charging.
- The power connector cover is part of your Controller's splash-resistant design, so keep the cover down when the Controller is not charging.
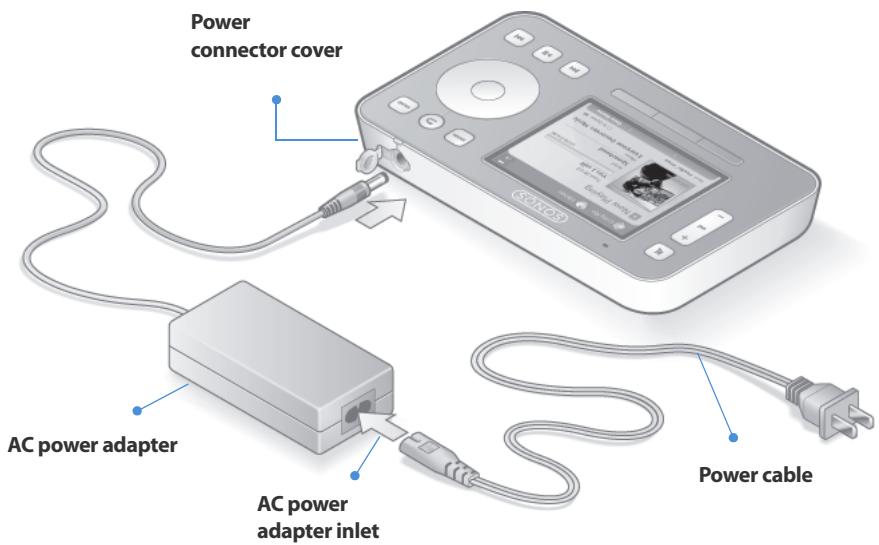

Caution: Use only the supplied power adapter to charge the Controller's battery. Using another adapter will damage your Controller and void your product warranty.
Now you're ready to play some music! If you need help getting started, see the steps below.
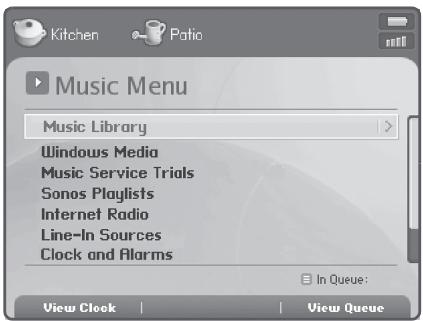
Music menu
Press the Music button on your Sonos Controller to display the Music menu.
To read more about the features and functions of your new Sonos system, please download the user guide from our Web site at: www.sonos.com/support/documents or start your Desktop Controller software and select Sonos System Help from the Help menu.
- To activate a free music service trial, select Music Service Trials. (Your music system must be registered to activate a trial, so if you have not yet registered, you can do it now by selecting System Settings Advanced Settings System Registration.)
To select an Internet radio station, select Internet Radio. - To add music folders located on a computer in your home network, open your Desktop Controller software and select Set Up Music Library→Add a Share from the Music menu.
- You can use the Sonos Controller to add music folders by selecting System Settings Music Library Management Music Library Setup Add New, but it's easier to use the Desktop Controller for this one-time task.
Adding To Existing Sonos System
Once you've set up your Sonos Multi-Room Music System, you can easily add more Sonos components any time (up to 32 zones).
If your house has structured (built-in) wiring, you can make a wired connection to the additional ZonePlayers or ZoneBridges. If you don't have structured wiring, our built-in wireless technology is ideal for you.

Note: Thick walls, 2.4 GHz cordless telephones, and the presence of other wireless devices can interfere with the wireless network signals from your Sonos Multi-Room Music System. If you are experiencing difficulty, it is advisable to relocate the ZonePlayer, change the wireless channel your music system is operating on, or make a wired connection (Ethernet cable) either from your router to the ZonePlayer, or from one ZonePlayer to another (see page 15.) If you are having trouble placing your units within wireless range of each other, you can go to our Web site at http://faq.sonos.com/range for more information.
Add a ZonePlayer or ZoneBridge

Note: If you are replacing the ZonePlayer that is currently attached to your router, first add the new Sonos component to your music system (steps below.) You can then unplug the wired Sonos component from your router, replace it with the new one, and move the original component to a new location.
- Choose one of the following options:
If you are adding an amplified ZonePlayer, attach desired speakers.
- If you are adding a ZonePlayer 90 or 80, connect it to an external amplified device.
If you are adding a ZoneBridge, attach the power adapter.
(For help with this step, refer to the Setup Guide packaged with your Sonos component, or start your Desktop Controller software and select Sonos System Help from the Help menu.)
- If you are making a wired connection, connect an Ethernet cable from your router, another ZonePlayer or ZoneBridge, or a live network wall plate (if you have built-in wiring) to one of the Ethernet switch connections on the back of the new Sonos component. If you are making a wireless connection, skip this step.
-
Attach the power cord and plug in the ZonePlayer or ZoneBridge.
-
Choose one of the following options:
-
Using the Sonos Controller, select System Settings Add a ZonePlayer or ZoneBridge from the Music menu and follow the prompts to add this component to your Sonos Multi-Room Music System.
- Using the Desktop Controller software, select Zones Add a ZonePlayer or ZoneBridge and follow the prompts to add this component to your Sonos Digital Music System.
Add a Controller
You should charge your new Sonos Controller when you remove it from the packaging. Plug it into the power adapter, and then follow the Controller's on-screen prompts to add it to your music system (you can use the Controller while it is charging.)
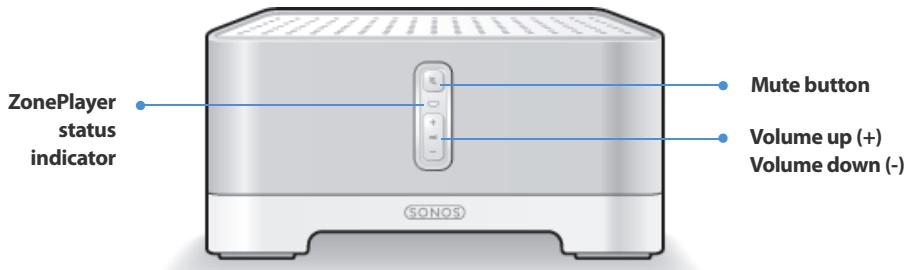
ZonePlayer 120 Front
On/Off
Using the Sonos Controller, select Pause All from the Zone menu.
Using the Desktop Controller software, select Pause All from the Play menu.
ZonePlayer status indicator
- Flashes white when powering up or connecting to your Sonos Multi-Room Music System.
Solid white when powered up and connected to your Sonos Multi-Room Music System (normal operation). - Flashes amber when a fault condition is detected.
Mute button
- Lights solid green when sound is muted.
- Flashes green rapidly when household mute or unmute is about to take place.
- Flashes green slowly when ZonePlayer is connecting to your music system.
Volume up (+)
Volume down (-)
Your Sonos Multi-Room Music System is designed to be always on; the system uses minimal electricity whenever it is not playing music. To stop streaming music in all zones, you can use the Pause All feature.
Indicates the current status of the ZonePlayer. When the ZonePlayer is in normal operation, you can turn the white status indicator light on and off. For detailed instructions, you can open the Desktop Controller software and select Sonos System Help from the Help menu.
For a complete list of status indications, please go to http://faq.sonos.com/led.
To mute/unmute this ZonePlayer: Press the Mute button to mute or unmute this ZonePlayer.
To mute/unmute all ZonePlayers: Press and hold the Mute button for 3 seconds to mute all ZonePlayers in your household. Press and hold for 3 seconds to unmute all ZonePlayers.
Press these buttons to adjust the volume up and down.
ZonePlayer 120 Rear Panel
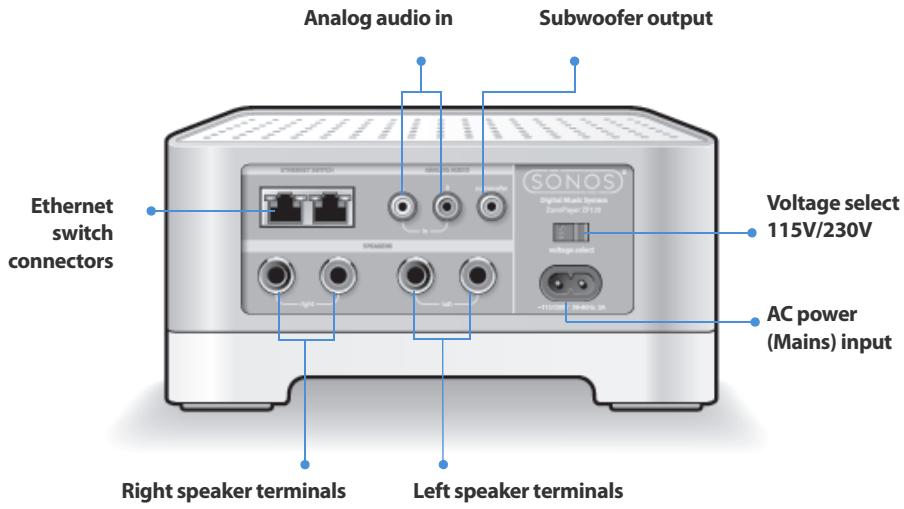
Important Note: Power rating should be at least 75W for 8 Ohm speakers and at least 150W for 4 Ohm speakers
| Ethernet switch connectors (2) | Use Category 5 Ethernet cable to connect to a router, computer, or additional network device such as a network-attached storage (NAS) device. |
| LED indicators: | |
| • Green (link connection) | |
| • Flashing Yellow (network activity) | |
| Right speaker terminals | Use high-quality speaker wire to connect the right speaker to the ZonePlayer. |
| Left speaker terminals | Use high-quality speaker wire to connect the left speaker to the ZonePlayer. |
| Voltage select | 115V/230VSelect the appropriate voltage setting for your country. |
| AC power (mains) input | Use the supplied power cord to connect to power outlet. |
| Analog audio in | You may use a standard RCA audio cable to connect the ZonePlayer's analog audio inputs to the audio outputs from a separate audio component, such as a CD player or a portable music player. |
| Subwoofer output Note: If you disconnect your subwoofer, make sure to also disconnect the subwoofer's cable from the ZonePlayer output. | You may connect a powered subwoofer to this output using a standard RCA cable. The system will detect when a cable is connected to the subwoofer output and adjust the crossover frequency automatically. |
Using Line-In
You can connect an external source such as a CD player, portable music player, or television to your Sonos Multi-Room Music System. The device will be automatically detected as soon as you plug it in.
-
Use a standard RCA cable to plug an external source like a CD player into the analog Audio In connections on the back of your ZonePlayer 120.
-
If you are connecting a portable player to the ZonePlayer 120, you will need a 1/8 inch mini-stereo to RCA audio cable instead. Plug the mini-stereo end into the portable device and the RCA end into the Audio In connection on the ZonePlayer.
-
Choose one of the following options:
-
Using the Sonos Controller, select Line-In Sources from the Music menu. Select Edit Name to select a source name for this device. Once setup is complete, simply select Line-In Sources from the Music menu, and touch Play any time you want to play music from this device.
- Using the Desktop Controller software, select the Line-In tab from the Music Library. Click Set Up and then select the Line-In tab to choose a source name and line-in level for this device. Once setup is complete, simply select Line-In Sources from the Music Library, and press Play Now any time you want to play music from this device.
A default (typical) line-in level is automatically assigned when you select a source name. If the volume sounds too low, you can select a higher line level for this device. You may experience clipping at higher volume levels if you set the level too high.
Line-in encoding settings
When you have line-in music sources attached to a ZonePlayer, line-in encoding determines how the Sonos Multi-Room Music System will encode the data coming in from these sources. For Multi-Room audio, we recommend using the Compressed setting. For the highest quality sound, you can select Uncompressed encoding, but this selection requires more network bandwidth than compressed audio. For TV or DVD audio, we recommend using the Uncompressed setting.
To change the line-in encoding setting, select one of the following options:
- Using the Sonos Controller, select System Settings Advanced Settings Line-In Encoding.
- Using the Desktop Controller for Windows, select File Preferences and then click the Advanced tab.
- Using the Desktop Controller for Macintosh, select Sonos→Preferences and then click the Advanced tab.
For additional information on connecting audio devices, you can go to our Web site at http://faq.sonos.com/cables. For additional guidance on the use of this feature, please go to the online help system included with your Desktop Controller software.
Basic Troubleshooting

Warning: Under no circumstances should the product be repaired by anyone other than an authorized Sonos repair center, as this will invalidate the warranty. Please contact the Sonos Customer Service Center to locate an authorized repair center in your area. Do not open the system as there is a risk of electric shock.
If a problem occurs, you can try the troubleshooting suggestions listed below. If one of these doesn't remedy the problem, or you are not sure how to proceed, please contact the Sonos Customer Service Center and we'll be happy to help.
Web site
Visit our Web site at www.sonos.com/support. There you can visit our Forums, browse our Frequently Asked Questions (FAQ) pages, or request assistance.
Telephone
US/Canada: +1.800.680.2345 toll-free
United Kingdom: 0808 2346596
If your country is not listed here, please visit our Web site at www.sonos.com/support and click Phone Support to find the correct telephone number for your country.
ZonePlayer not detected during setup
A network or a firewall issue may be preventing the ZonePlayer from joining your Sonos system. If this is a wireless ZonePlayer, try moving the ZonePlayers closer together, or wire the ZonePlayer temporarily to see if the problem is related to wireless interference.
If you encounter this message when installing the first wired Sonos component, you can try the steps below to resolve this issue. If you are still experiencing problems, please contact the Sonos Customer Service Center.
1. Check the firewall
Firewall software installed on the computer may be blocking the ports that Sonos uses to operate. First, disable all your firewalls and try to connect again. If this resolves the problem, then you should configure your firewall to work with the Sonos Desktop Controller. Please visit our Web site at http://faq.sonos.com/firewall for additional information. If this does not resolve the problem, you can try step 2 below.
2. Check the router
You can bypass your router's switch to determine whether there are any router configuration issues by connecting Sonos as follows (note that the ZonePlayer and the computer still have Internet access in this configuration):
- Be sure that your cable/DSL modem is connected to the router's WAN (Internet) port.
- Temporarily remove any other components that are wired to your network.
- Connect an Ethernet cable from the computer directly to the back of the ZonePlayer, and then connect another Ethernet cable from the ZonePlayer directly to one of the LAN ports on your router.
- When you make a change to your network configuration, you may need to power cycle the ZonePlayer by unplugging the power cord, and then plugging it back in.
If you are not using a router, visit our Web site at http://faq.sonos.com/norouter for more information.
3. Check the wiring
Check the link/activity lights on both the router and the ZonePlayer. They should be green, and there should be blinking activity lights.
- If the green link lights are not lit, try connecting to a different port.
If the link lights still do not light, try connecting a different Ethernet cable.
When adding the handheld Sonos Controller, it fails to detect the ZonePlayer(s)
Wireless interference or a network problem may be preventing the Controller from joining your Sonos Multi-Room Music System.
1. Verify that this is not a DHCP or network problem.
- Disconnect the Ethernet cable from the back of the ZonePlayer so that it is not connected to your network.
- Unplug the ZonePlayer's power cord and then plug it back in.
- When the status indicator light on the front of the ZonePlayer stops blinking white, try adding your Controller again.
If it works, your router's DHCP server may have run out of available IP addresses to assign to the Controller. In most cases you can log into your router by typing http://192.168.1.1 into your browser's address line (the IP address of your router may be different). Check the DHCP settings and increase the number of IP addresses available in the DHCP scope.
If your Controller still does not recognize the ZonePlayer after completing this step, you can try step 2 below.
2. Turn off any 2.4GHz cordless phones.
Some 2.4GHz cordless telephones can cause wireless interference. If turning off your 2.4GHz cordless phone resolves the problem, you should consider switching to a 5.8Ghz or 900Mhz phone (or change the wireless channel your Sonos system is operating on - see step 4 below.)
3. Put 108 Mbps wireless routers into 54 Mbps mode.
Sonos cannot function properly when a router is operating in turbo mode. In order to double the speed from 54 Mbps to 108 Mbps, the router goes into a wide bandwidth mode which utilizes most of the 2.4 GHz spectrum that the FCC has set aside for 802.11b/g devices. This means that interference (RF noise) will occur with any other 2.4 GHz device that is not operating on the same channel as the 108 Mbps device (usually channel 6). While it is possible to put all of your wireless devices on channel 6, it is unwise. The devices will have to compete for available bandwidth, and your entire wireless network will become sluggish and bogged down.
4. Change the wireless channel your Sonos system is operating on.
- Using the Desktop Controller for Windows: From the File menu, select Preferences. Click the Advanced tab, and select another wireless channel from the Wireless Channel list.
- Using the Desktop Controller for Macintosh: From the Sonos menu, select Preferences. Click the Advanced tab, and select another wireless channel from the Wireless Channel list.
It may take several seconds for the switch to take effect. If you have music playing, a short music dropout will occur during the wireless channel change.
Important Safety Information
- Read these instructions.
- Keep these instructions.
- Heed all warnings.
- Follow all instructions.
5.Do not use this apparatus near water. - Clean only with dry soft cloth.
- Do not block any ventilation openings. Install in accordance with the manufacturer's instructions.
- Do not install near any heat sources such as radiators, heat registers, stoves, or other apparatus that produce heat.
- Protect the power cable from being walked on or pinched, particularly at plugs, convenience receptacles, and the point where they exit from the apparatus.
- Only use attachments/accessories specified by the manufacturer.
- Unplug this apparatus during lightning storms or when unused for long periods of time.
- Refer all servicing to qualified service personnel. Servicing is required when the apparatus has been damaged in any way, such as power-supply cable or plug is damaged, liquid has been spilled or objects have fallen into the apparatus, the apparatus has been exposed to rain or moisture, does not operate normally, or has been dropped.
- The Mains plug should be readily available to disconnect the equipment.

-
Warning: To reduce the risk of fire or electric shock, do not expose this apparatus to rain or moisture.
-
Do not expose apparatus to dripping or splashing and do not place objects filled with liquids, such as vases, on the apparatus.

Note: Household cleaners or solvents can damage the finish on your ZonePlayers or Controllers. Clean only with a dry soft cloth.
Installationshandbuch

- Sonos® Multi-room Music System
- ZonePlayer™ 120
- THIS DOCUMENT CONTAINS INFORMATION THAT IS SUBJECT TO CHANGE WITHOUT NOTICE.
- Sonos® ZonePlayer 120
- Regulation Information
- Europe
- Canada
- Industry Canada
- RF Exposure Requirements
- Recycling Information
- Setup Guide
- Where to Begin
- New to Sonos?
- Adding to an existing Sonos system?
- About the ZonePlayer 120
- Your Computer Network
- Network requirements
- Compatible operating systems
- Setting Up New Sonos System
- Connect to your broadband router
- Place ZonePlayer in the room of your choice
- Install the software
- For use with:
- Add the Sonos Controller
- Music menu
- Adding To Existing Sonos System
- Add a ZonePlayer or ZoneBridge
- Add a Controller
- ZonePlayer 120 Front
- On/Off
- ZonePlayer status indicator
- Mute button
- ZonePlayer 120 Rear Panel
- Using Line-In
- Line-in encoding settings
- Basic Troubleshooting
- Web site
- Telephone
- ZonePlayer not detected during setup
- Check the firewall
- Check the router
- Check the wiring
- When adding the handheld Sonos Controller, it fails to detect the ZonePlayer(s)
- Verify that this is not a DHCP or network problem.
- Turn off any 2.4GHz cordless phones.
- Put 108 Mbps wireless routers into 54 Mbps mode.
- Change the wireless channel your Sonos system is operating on.
- Important Safety Information
- Installationshandbuch
Brand : SONOS
Model : ZONEPLAYER 120
Category : Wireless audio amplifier